Many people mistake fundamentals for basics. They are not the same. Understanding how computers represent your digital image data is essential to your career. Being a “tech head” will not make you a better designer/photographer/videographer, but it will make you faster and more confident. Although there are a lot of (boring) books on the science of computer graphics, I promise to keep it light and only cover the absolute “must knows” that working pros are expected to understand.
When it comes to digital cameras, most consumers (and sales-people) seem obsessed with megapixels. Because “everybody knows” that having more pixels means better images (it doesn’t by the way). What’s lacking in all this hoopla is a clear understanding of what pixels are and just how many you need. The more pixels you have (whether they are captured with your digital camera or acquired with a scanner), the more RAM you need to buy and extra hard drive space to store them all. So it behooves you to understand some of the technology behind the images you want to capture, manipulate, output, and store.
Essentially, computers and video devices use pixels to express image information. Each pixel is a small square of light. The pixel is the smallest portion of an image that a computer is capable of displaying or printing. Too few pixels and an image appears “blocky” because there is not enough detail to work with. Too many pixels and the computer or output device slows down dramatically because it has to process so much information.
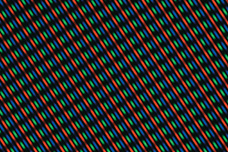
A close-up of TV picture elements, or pixels.
But where did the term pixel come from? Pixel is an abbreviation for picture element. The word was coined to describe the photographic elements of a television image. In 1969, writers for Variety magazine took pix (a 1932 abbreviation of pictures) and combined it with element to describe how TV signals came together. There are even earlier reports of Fred C. Billingsley coining the word at NASA’s Jet Propulsion Laboratory in 1965. Although the exact origins of the word may be disputed, its meaning is not. The word pixel quickly caught on, first in the scientific communities in the 1970s and then in the computer-art industry in the mid 1980s.
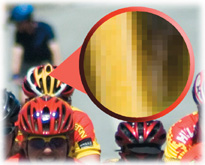
The red circle shows an enlargement of the image. Notice how you can see actual pixels when you increase the magnification of an image. These squares of light are the building blocks of all digital photos.
When you shop for a digital camera, you are bombarded with talk of megapixels. Consumers are often misled about what megapixels are and how many are needed. A megapixel is simply a unit of storage, whether internal or on a removable card. A megapixel is one million pixels and is a term commonly used to describe how much data a digital camera can capture. As with your car, just because your tank can hold more gallons of gas doesn’t mean it’s more fuel efficient or better than your coworker’s car.
For example, if a camera can capture pictures at 2048 × 1536 pixels, it is referred to as having 3.1 megapixels (2048 × 1536 = 3,145,728). If you were to print that picture on paper at 300 pixels per inch (ppi), it would roughly be a 7″ × 5″ print. Professional photographers need more pixels than this, but a consumer may not. It all depends on how the pixels are meant to be displayed.
Digital cameras use card-based storage, like this compact flash card, to hold the captured pixels.
The more pixels you capture, the larger the image is (both in disk space and potential print size). Consumer usage such as email or inkjet prints is less demanding than professional usage such as billboards or magazines. Professionals need more megapixels than consumers; hence, high-end cameras cost more because they are targeted at people who make money by taking photos.
OK, prepare to be confused (but not for long). A lot of terms are used to describe image resolution. The problem is that many people (and companies) use the wrong terms, which understandably leads to a great deal of confusion. Let’s take a quick look at the most common terms and their accurate meanings.
Tip: Don’t Believe the Megapixel Myth
More megapixels does not guarantee a better picture. Instead of picking a camera solely on how many pixels it will capture, investigate cameras with better lenses or options that are important to you. If you are shooting for large-format output, you’ll need a larger megapixel-count camera, but if you’re shooting for personal use, consider how you output most of your pictures.
The most common term used to describe image resolution is dots per inch (dpi). Although you’ll hear it used for digital cameras and scanners, it is really only appropriate for printers. As a measurement of resolution, dpi is fairly straightforward.
To determine dpi, it is necessary to count the number of dots that can fit in a 1 inch × 1 inch area. A higher dpi can mean smoother photographs or line art; for example, newspapers tend to use approximately 150 dpi, whereas magazines can use up to 600 dpi. Consumer printers easily print at 600 dpi or even higher, which can produce extremely good results (when using the right paper). An increase in dpi can produce even better-looking images. You’ll see (and hear) dpi used a lot, but it solely refers to print and physical output.
Tip: A Fix for Those with Less Than Perfect Eyesight
Are you working with a high-resolution monitor and having a hard time seeing your menus in Photoshop? You can change the size of the display text. Press Command/Ctrl+K to open the Interface Preferences window. From the UI Font Size menu choose Medium or Large to give your eyes a break.
It’s only in evaluating printers that the term dots per inch (dpi) makes sense.

In a commercial printing environment, very high-resolution images are required.
When you view your images on a computer monitor, you are seeing pixels displayed on your screen. Computer monitors use the concept of logical inches. The Mac OS used 72 pixels per inch (ppi) to match the concept of the printing idea of 72 points per real inch on paper. The Windows OS has traditionally used 96 ppi.
As computer monitors have evolved, they’ve advanced to support variable resolution settings. As such, the actual ppi for a screen can vary greatly depending on the physical size of the screen and the resolution being used by the computer’s graphics card. Worry less about the ration of pixels on your screen and simply accept that the standard measurement of resolution in Photoshop (and most computer programs) is ppi.
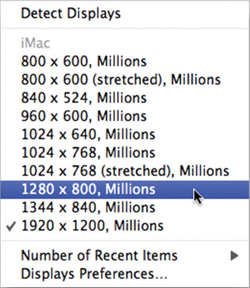
Modern computer monitors support various screen resolutions. Changing the monitor resolution results in a different amount of pixels per inch displayed on your monitor. Do not run Photoshop at a screen resolution of less than 1024 x 768, or it will cause user interface problems.
What about scanners, you might ask? Manufacturers often tout the dpi capabilities of their scanner. This is inaccurate. Scanners don’t use dots, they use samples. A sample is when a scanner captures part of an image. Samples per inch (spi) is a measurement of how many samples are captured in the space of one inch. In general, an increase in sampling leads to a file that is truer to its analog original. However, there is a threshold: Once a certain amount of information is surpassed, human senses (or electronic output devices) cannot tell the difference.
Consumer-level scanners can capture optical resolution ranging between 300 to 4800 spi. Professional devices can capture significantly higher optical resolution. Capturing a large number of samples is crucial if you need to enlarge an image. More samples per inch translates into more information available as pixels, which can then be harnessed in output when they are converted to dots in the printer. So if your scanner’s software says dpi, it really means spi, but you can see how the two are closely related.
Tip: Scanner Advice
The most important issue with scanners is optical resolution versus interpolated resolution. A scanner captures optical resolution through hardware. Interpolated resolution is what happens after the captured data is enlarged via software. Most manufacturers claim very high numbers of spi (or dpi). However, these interpolated results use software to enlarge the image, which is undesirable. You should only care about the optical resolution when choosing a scanner.
In professional printing environments, you’ll often hear the term lines per inch (lpi). This is from the traditional process where images with gradiated tones (such as photographs) are screened for printing to create a halftone. This was originally performed by laying film with dots printed on it over the film before exposure. In the digital age, this process and these terms are used less often, but it is still good for you to have a basic understanding.

This image has been converted to a halftone, as is evident by the visible dot pattern.
These days, the work of converting an image to lines is performed by an imagesetter. The dots are arranged in lines, and the lpi measurement refers to the number of lines per inch. An increase in lpi results in smoother images. Table 1.1 shows the most common lpi settings for different output formats.
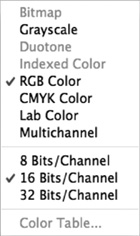
Within Photoshop, you need to choose from one of eight image modes when working with a document. The mode you pick will depend on what you need to do with the image and how you intend to output it. The three most common modes are RGB, grayscale, and CMYK, but it’s worth taking a quick look at all eight.
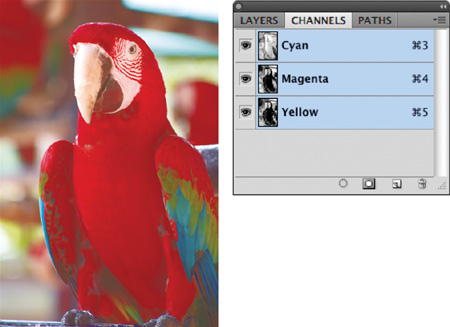
The most common mode for graphics in Photoshop is RGB Color mode. The RGB Color mode uses additive color theory to represent color (a 100% value of red, green, and blue light creates white light). Different intensity values of red (R), green (G), and blue (B) combine to form accurate colors. By mixing intensity values, virtually every color can be accurately represented.
When working in Photoshop, most designers choose RGB Color mode for its wide range of available color (also known as gamut) and extensive support for filters and adjustments. Additionally, computer monitors use RGB mode to display color, and this is the native color space for onscreen display. Because you’ll most often be processing images on a computer, it is easiest to work in the same color space as your monitor.

Professional printing uses a four-color process to simulate color. The four inks are cyan (C), magenta (M), yellow (Y), and black (K for key). The CMYK Color mode uses the subtractive color model to re-create color. Subtractive color explains the theory of how ink or dye absorbs specific wavelengths of light and reflects others. The object’s color is based on which part of the light spectrum is not absorbed. Although print designers use CMYK Color mode for professional printing, they will work in RGB Color mode throughout the design stage. CMYK Color mode has a smaller color gamut, so CMYK conversion is not done until the last stage of image preparation.

A grayscale image uses different shades of gray to represent image details. For example, an 8-bit image is represented by 256 levels of gray (see “Bit Depth” later in this chapter). Likewise, a 16-bit image would show 65,536 levels of gray (a substantial improvement, but it requires an output device that can utilize the data). Grayscale mode can be significantly affected by printer conditions, because the amount of ink coverage can vary, which in turn can impact how dark the image will print. For example, many newspaper images look washed out in Photoshop, but they look fine when the ink prints on the highly absorbent newsprint. When creating grayscale images, it is important to perform test prints with the output device and paper to see how contrast is maintained.

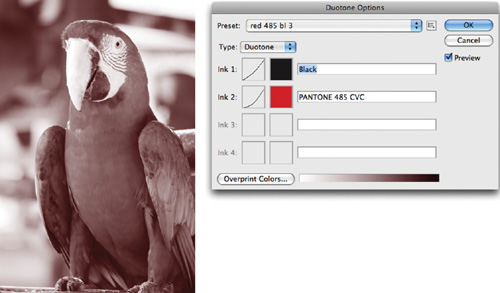
A duotone image can actually be monotone, duotone, tritone, or quadtone. Grayscale images that use a single-colored ink are called monotones. Duotones, tritones, or quadtones are grayscale images printed with two, three, or four inks, respectively. Using both black and gray ink to represent the tonal values, duotones create better quality-printed grayscales.
The most popular form of duotone is a sepia-tone image (often seen in historical prints). In modern times, a designer may use a duotone for style purposes or to save money by using fewer inks.
A bitmap image uses only one of two color values—black or white (no gray)—to represent the pixel data. These 1-bit images have a very small file size. To create a bitmap, you first must convert the image to an 8-bit grayscale formula, and then convert to the Bitmap mode.
Do not confuse Bitmap mode with a bitmap image, which is another name for raster (or pixel-based) images. Additionally, avoid confusion with the BMP file format, which is a standard Windows file format that dates back to the earliest version of Windows. An image in the Bitmap mode simply uses only black and white to represent image data.

Indexed Color mode severely limits the number of colors used to represent the image. In Indexed Color mode, 256 colors are available. To reduce file sizes (and download times), some Web designers use fewer colors in their graphics. They will turn to specialized formats like GIF and PNG-8. Although this mode reduces file size, it also visibly lowers the quality of the image. Indexed Color mode works well for illustrations or logos but not so well for photos on the Internet. Instead of converting the image to Indexed Color mode via the Image menu, you can access this mode by using the Save for Web command (File > Save for Web). This will convert the file to a GIF or PNG-8 (which both use the Indexed Color mode), but leaves the original image at the higher-quality, RGB Color mode.

L*a*b* Color is the most complete color mode used to describe the colors visible to the human eye. The three parameters of color are L for luminance of the color, a represents the color’s position between red and green, and b represents its position between yellow and blue.
The Lab Color mode was created to serve as a device-independent, absolute model to be used for a reference. Lab Color mode is most commonly used in Photoshop to work with Photo CD images. Lab attempts to simulate the full gamut of color; however, it is a three-dimensional model and can’t be represented properly within Photoshop. Hence, the * after the L, a, and b is used to signify that it is a derivative model. Lab images can only be printed on PostScript Level 2 and Level 3 printers: For all other professional printers, Lab images must first be converted to CMYK mode. The Lab Color mode is generally only used by imaging professionals seeking the truest color fidelity, because it supports all the colors in both the RGB and CMYK Color modes.

Multichannel mode is a highly specialized mode used for complex separations for professional printing. You may never need to use it. Photoshop automatically converts to Multichannel mode when you delete a channel from an RGB or CMYK image. The color onscreen is no longer accurate because Photoshop cannot describe it. This is sometimes done for an effect or as part of the image repair process if one channel did not capture properly (such as from a malfunctioning digital camera). Most likely, you’ll never want to work in Multichannel mode.
Besides resolution (the number of pixels) and color mode (the way colors are processed) there is one other variable that affects image quality. Bit depth measures how much color is available for display or printing of each pixel. A greater bit depth means each pixel contains more information for describing the color. A pixel with a bit depth of one can display the pixel as either black or white. The most common bit depth is 8-bit mode, which has a possible value of 256 intensity levels per color channel. However, depending on the version of Photoshop you are working with, you can access 8, 16, or 32 bits per channel. It’s important to note that a large bit depth can limit image adjustment commands.
There’s a lot more ground to cover, but you’ll explore the topics discussed here and others in greater depth in each chapter. You’ll feel a bit more comfortable with the language used to describe images and color as you read on. With the knowledge you’ve gained so far, you can jump into using Photoshop and start to navigate around its interface.