Photoshop’s interface can be pretty intimidating. Among all those windows, tools, and menu commands it’s easy to get lost. However, it’s worth it to master these components. Adobe Photoshop is by far the most-used image editor and knowing how to harness its power unlocks a world of design opportunities. Working professionals use it for a variety of tasks, from enhancing magazine photos to designing Web animations and from creating television graphics to performing medical imaging.
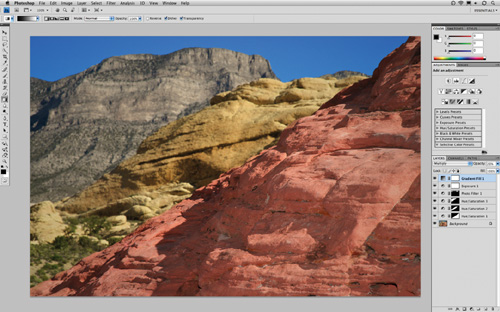
Open the file Ch02_Red_Rock. psd from the Chapter 2 folder on the CD included with this book. Many of the windows in Photoshop require an image to be open before they display any detail.
Most important is to learn the essential features you need right away, and then gradually learn the rest as needed. I frequently tell students of all levels that often there are three or more ways to perform the same task in Photoshop. Adobe’s software designers have tried their best to make the program intuitive (and everyone certainly doesn’t think the same way). Additionally, new features are often unveiled with product updates, yet the old features remain for those who resist change or prefer the older method.
Learning Photoshop is a very doable task, especially if you take a balanced and measured approach, balancing learning new features with practical application. At this point in my career, I have seen older professionals as well as young students become proficient Photoshop users. In fact, learning Photoshop is the best way to learn other Adobe programs, such as Illustrator and After Effects, as well as learn how to complete diverse tasks like color correction for video or Web page design.
So let’s start with a quick tour of the Photoshop interface. Adobe offers two versions of the application: Photoshop and Photoshop Extended. The standard version of Photoshop is suited for all users, whereas Photoshop Extended offers specialized features for medical researchers, architects, engineers, and video professionals. This book will show the Photoshop Extended interface, because many users have access to that version of the software. But the book only covers in-depth those features that are common to both versions of the application.
If you have not done so already, launch Photoshop. Since many of Photoshop’s panels will be new to you, we’ll tackle them in the order in which you’ll likely encounter them. The goal here is to get the “lay of the land” and just figure out what each panel is used for. Throughout the rest of the book you’ll dig much deeper into how (and when) to use these specific panels and tools. During the learning process, you’ll need to use features before you’ve had a chance to learn about them in depth, so a basic knowledge right away is very important.
To ensure that the application is in its default state, choose Window > Workspace > Essentials (Default).
Tip: A Great Frame-Up
Photoshop CS4 keeps all of your documents and panels in an application frame to keep the interface cleaner. You can toggle the frame off or on by choosing Window > Application Frame. Experiment to see which look you prefer.
The Photoshop CS4 interface is contained within an Application Frame. This makes it easy to keep the many windows and interface elements neatly organized. Across the top of the frame is the Application bar, which consolidates several commands into one strip. Photoshop CS4 has been reorganized to emphasize task-based workflows, which attempt to guide you to the right tools.

Main menu. On Windows, the main menu bar is in the Application bar. For the Macintosh, the main menu remains at the top of the main monitor.
View Extras. Shows Guides, Grids, and Rulers as well as lets you change image magnification levels.
Screen Mode Switcher. Lets you access Photoshop’s three screen modes, which affect how the user interface is displayed on your monitor.
Layout Control. Allows you to display a number of open documents in a tiled view or as tabs.
Zoom Level. Controls the magnification of the open document.
Workspace switcher. Allows you to switch between different arrangements of windows designed for specific tasks like color correction, typography, video, and Web. For the remainder of this chapter, you’ll be using the Essentials workspace.
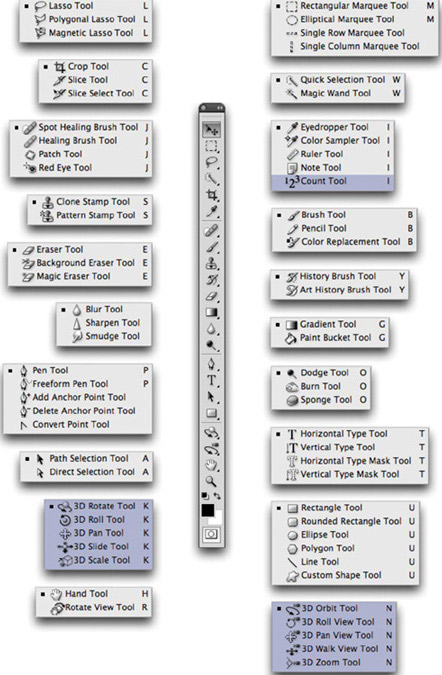
All the hands-on tools are contained in the Photoshop Tools panel. Photoshop groups similar tools together. You can access these hidden tools by clicking and holding on a particular tool. Whenever you see a triangle in Photoshop, click it to open additional options.
The first keyboard shortcuts you should master are those for the Tools panel. Frequently, the first letter of the tool is the keyboard shortcut. If you can’t remember the shortcut, click the tool while holding down the Option/Alt key to cycle through the available tools.
An alternative method is to press the keyboard shortcut multiple times while holding the Shift key (for example, Shift+M cycles between the Rectangular and Elliptical Marquee tools). If you’d like to simplify the shortcuts even more, press Command/Ctrl+K to call up the Preferences dialog box.
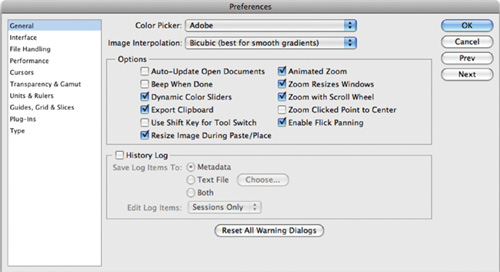
Deselect the Use Shift Key for Tool Switch option. You can then press a shortcut key (such as G for Gradient tool) and cycle through the tools contained in that tool’s drawer. This speeds up your ability to switch tools.
Select the Zoom with Scroll Wheel option if you have a three-button mouse. This makes it easier to zoom in or out of your working document.
In the Interface category:
Make sure the Show Tool Tips feature is selected to assist in learning common keyboard shortcuts. Tool Tips teach you the proper name as well as keyboard shortcut for each tool. Just hover over a user interface element to learn more about it.
Set the UI Font Size to Medium or Large if you’d like to increase the size of screen elements so they are easier to read on high-resolution monitors.
Many tools are available and each has multiple purposes (as well as strengths and weaknesses). Throughout this book, you’ll learn how to effectively use these tools. With patience, you’ll get the most from Photoshop’s powerful feature set.
The Options bar is essential, because it contains the majority of controls for the currently active tool. It consolidates the most used (and useful) options for the active tool and moves them to the forefront for easy access. The Options bar is visible by default. It runs the length of your monitor and is docked directly below your Application bar. Be sure to keep the Options bar open, because you’ll always need it. If you accidentally close it, you can bring it back by choosing Window > Options.
In Photoshop, a layer can contain artwork and transparency information. This allows you to combine (or composite) multiple images into a new piece (such as a postcard or advertisement). Originally, Photoshop did not have layers. You could open a picture to process it, but that was about it. However, over time the demands placed on Photoshop by its users led to its evolution. As Photoshop moved beyond a mere touchup tool, the flexibility of layers emerged to meet the demand. By isolating discrete elements to their own layers, designers can make several changes and freely experiment with their design.
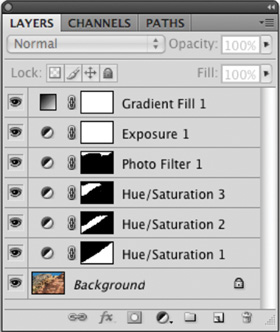
Without sounding like a zealot, layers in Photoshop mean everything to a designer. You will spend much of this book (and your early career using Photoshop) getting comfortable with layers. With that said, always leave your Layers panel open while you work (press F7 to open it); this is where most of the action takes place. The Layers panel is like the steering wheel of a car. You’ll dig much deeper into layers in Chapter 7, “Layer Masking,” and Chapter 8, “Compositing with Layers.”
In the previous chapter, different image modes that a computer graphic could occupy were discussed. In the Channels panel you can view the individual components of color. The brighter the area in the individual channel, the more presence there is for that color. Let’s look at a simple example of an RGB graphic.
Choose File > Open and navigate to the Chapter 2 folder on the book’s accompanying CD.
Open the image called Ch02_RGB_Overlap.psd. You should see red, green, and blue circles overlapping one another. The overlap has also created new colors: red + green = yellow; blue + green = cyan; red + blue = magenta; and red + green + blue = white.
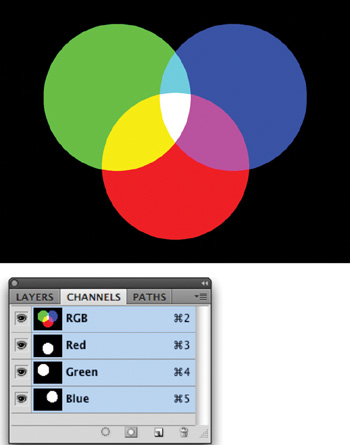
Activate the Channels panel. By default it is docked with the Layers panel (just click on its name and the window will switch to display Channels). If you don’t see it, choose Window > Channels.
Look at the individual channels; you’ll see a definitive area for each color. Notice how the full circles are visible (and white) where there is 100% value of each channel.
Close the document by choosing File > Close.
Fully understanding Channels unlocks a wealth of image-processing power. Harnessing color’s individual components is difficult at first but well worth the effort. You’ll delve much deeper into Channels in Chapter 10, “Color Correction and Enhancement.”
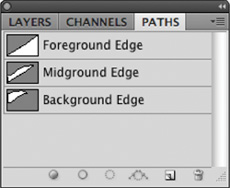
While Photoshop is known as a raster-editing tool (because of its several pixel-based functions), it does contain several vector tools as well. Vectors use lines that are defined by math equations; as such, they can be scaled indefinitely and always remain crisp. Several of Photoshop’s vector tools can create paths, which are useful for complex selections. You can create a path with the Pen tool. By clicking around an image, anchor points are created, and then Photoshop connects the dots with vector lines. Paths can also be created using the vector shape tools. Use the Paths panel to select the path you want to update. For more on complex selections, see Chapter 5, “Selection Tools and Techniques.”
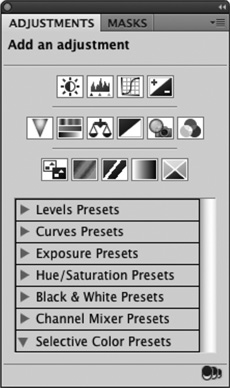
One of the most common tasks in Photoshop is making adjustments to images to fix tone and color. Photoshop CS4 adds a new Adjustments panel to provide easy access to the most common commands. The adjustments are grouped into three categories:
Tonal controls. Use these controls to adjust Brightness/Contrast, Levels, Curves, and Exposure in a nondestructive fashion.
Color controls. Use these controls to adjust Hue/Saturation, Color Balance, Black & White conversion, Photo Filter, and Channel Mixer properties.
Creative/Advanced controls. These controls are special purpose adjustments and include Invert, Posterize, Threshold, Gradient Map, and Selective Color.
You’ll also find a useful list of presets for quick access to common adjustments as well as custom settings you create. You’ll explore these adjustments more in later chapters.
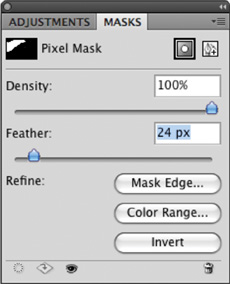
Photoshop uses masks to obscure parts of an associated item. In fact, you can apply a mask to a layer, a vector, or a filter. Photoshop CS4 offers precise control over masks including the ability to adjust their density and edges. Masks are a useful way to erase parts of a layer nondestructively, which allows for future changes. They can also be used to isolate an adjustment to only parts of an image. You’ll see multiple masks in use in the sample document to isolate the effects of color correction. You’ll explore masks in depth in Chapter 7, “Layer Masking.”
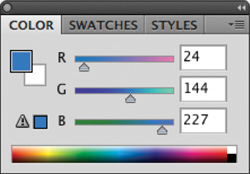
Don’t confuse the Color panel with the color mode of the document. The Color panel allows you to modify and select colors using six different color models. You can choose colors using RGB sliders or the more intuitive Hue Saturation and Brightness (HSB) model. To adjust color, move the sliders for the corresponding value. Sliding the Red slider to the right increases the amount of red in the new color. Choosing colors is independent of image mode in that you can use a CMYK model for an RGB image. However, picking a color to use in a grayscale document will not introduce color into that image.
Spend some time exploring the Color panel and find a method that works best for you. Clicking on a color swatch opens the powerful Color Picker, which unlocks a larger visual interface for exploring color and enhances the use of the Eyedropper tool to sample color from a source image. You’ll use color in several of the chapters in this book, and the Color panel and Color Picker are fairly easy to understand.
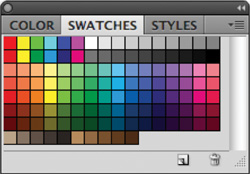
The Swatches panel is like a painter’s palette in that it holds several colors ready to use. Several colors are loaded by default, which are useful when painting or using filters that utilize those colors. If you click the panel’s submenu, you’ll discover many more swatch books to load for specialty purposes like Web browser colors, spot color printing, or thematic color swatches (such as a blue saturated range).
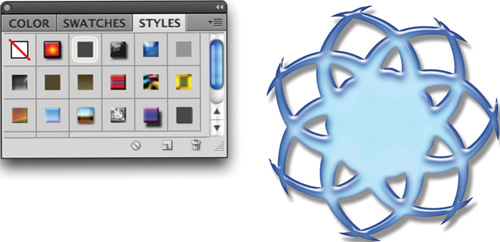
The Styles panel is where you can visually access Layer Styles. These are the combination of layer effects (which can be applied singularly to create effects such as beveled edges, drop shadows, or glows). Effects are most useful in combination, and advanced photorealistic effects can be achieved. Photoshop ships with several built-in styles, and many more are available for download from Adobe’s Web site (www.adobe.com/exchange) as well as many other Photoshop sites. Layer Styles are frequently used for text and image effects but can also be harnessed for Web rollover effects for buttons. For more on Layer Styles, be sure to read Chapter 13, “Layer Styles.”
While working with photos, you’ll often need to zoom in to touch up an image. It may sound cliché, but it’s easy to lose your perspective when working in Photoshop. When you zoom in to a pixel level for image touchup, you often won’t be able to see the entire image onscreen. This is where the Navigator comes in handy:
Open the photo Ch02_Butterfly.jpg from the Chapter 2 folder on the CD.
Select the Zoom tool from the toolbox or press Z (the tool looks like a magnifying glass). Click multiple times near the butterfly’s head to zoom in.
Call up the Navigator panel by choosing Window > Navigator.
You can now navigate within your photo:
Drag the red view box around the thumbnail to pan within the image.
Resize the Navigator panel for a larger image preview.
Move the Zoom slider to zoom in or out on the image.
Click the Zoom Out or Zoom In buttons to jump a uniform magnification.
While color correcting or adjusting exposure, the histogram can be a great help. This graph illustrates how the pixels in the image are distributed across brightness levels. To read a histogram, start at the left edge, which shows the shadow regions. The middle shows the midtones (where most adjustments to an image are made), and to the right are the highlights. Image touchup and enhancement are covered in Chapter 10. You may want to leave the Histogram panel open as you work, because it is an easy way to learn to read the graphical details of a digital image.
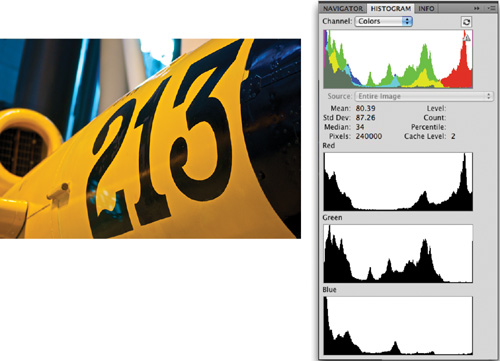
The Histogram panel has been set to Show All Channels view. You can choose this interface by clicking the triangle in the upper-right corner and choosing All Channels view. The top histogram is a composite histogram for the red, green, and blue channels combined; the next three show them individually.
The Info panel is a useful place to find a plethora of image information, even when using the default options. You can get information about color values as well as precise details about the active tool. However, by customizing the panel you can make it truly useful:
Select the Info panel by choosing Window > Info or by pressing F8.
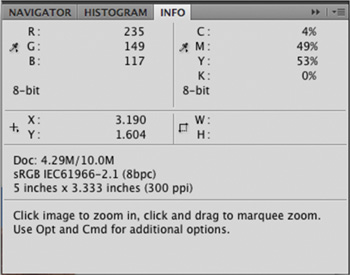
From the Info panel submenu (the triangle in the upper-right corner) choose Panel Options.
The resulting dialog box has several options; I recommend the following choices for a new user:
Leave Mode set to Actual Color.
Set Second Color Readout to CMYK if you’re doing print work, or set it to RGB color if you are preparing images to use on the Internet or in video exclusively.
Set Mouse Coordinates to Pixels.
Enable the following choices under Status Information: Document Sizes, Document Profile, and Document Dimensions.
The last option, Show Tool Hints, provides a detailed explanation for each tool you select from the toolbox.
Click OK.
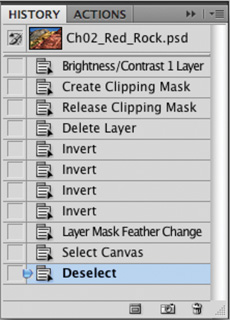
The History panel will quickly become your best friend. It’s here that Photoshop keeps a list of what you have done to the image since you opened it. By default Photoshop keeps track of the last 20 steps performed on an image, but you can modify this number. A higher number means more levels to undo.
Press Command/Ctrl+K to call up the Photoshop Preferences dialog box.
In the Performance section, change History States to a higher number, such as 100. Note that more levels of undo requires more RAM, so you may need to balance this number if your system is under-equipped.
Click OK.
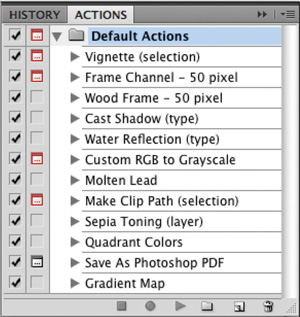
Actions are among the least-used features of Photoshop but are the most powerful. Actions allow for visual scripting, which means you can record commands or adjustments that you need on one image and play them back on other images. For example, you could record an action that adjusts the size of an image, runs an adjustment to lighten the image, and then converts it to a TIFF file for commercial printing. You could then play that series of commands back on another image or even batch process an entire folder of images (which can eliminate boring, repetitive work). Actions can be very useful for both design and production tasks.
You’ll explore Actions fully in Chapter 15, “Actions and Automation.”
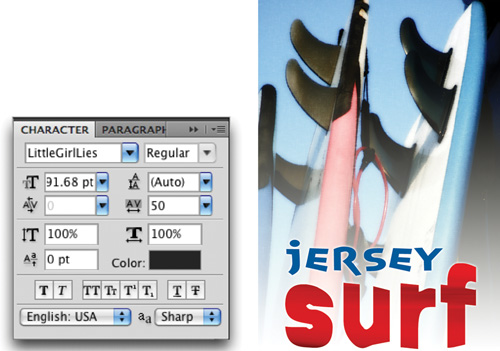
While Photoshop began its life as an image editor (essentially a digital darkroom), it has greatly evolved over the years to also include a powerful text tool. Many people start and finish their entire designs inside Photoshop. These designs include advertisements, posters, packaging, and DVD menus.
A close look at the Character panel reveals complex control over the size, style, and positioning of individual characters within a word. The Type tool is explained in significant depth in Chapter 12, “Using the Type Tool.”
The Paragraph panel contains controls that impact paragraph text. When using the Type tool, you can click and type, which creates point type. Or, for more control, you can click and drag to create a text block and then access paragraph type. This causes the text to have boundaries and wrap when it hits a margin. Within a text block, you have a significant level of control on how your type is aligned and justified. For much more on text, see Chapter 12.
Tip: Docking Panels
To save space, any floating panel can be collapsed to an icon. Simply drag a panel to any edge and a blue line will appear (which indicates where the panel will dock). The most common place to dock panels is on the right edge of the screen, but they can be docked on the left or bottom edges as well.