
Okay, this title is actually taken from a movie starring California Governor Arnold Schwarzenegger called Raw Deal. I found the movie poster for it online, and I must admit it was the movie’s tag line that sold me on using it as my chapter title. The tag line was: “The system gave him a Raw Deal. Nobody gives him a Raw Deal.” The word “Nobody” was underlined. Like this: Nobody. So here’s the weird thing: shouldn’t it have been, “Nobody gives him a Raw Deal!” with the “him” either italicized or underlined? But the “Nobody” was underlined instead. Makes you stop and think, doesn’t it? Anyway, on the movie poster itself, Arnold is holding a really large automatic weapon (I know—how unusual) while wearing a small white under-shirt, so his arms and chest look really huge. Ya know, if I had arms and a chest the size of Arnold’s, I’m not sure I’d even own a shirt. I’d go shirtless everywhere, and I don’t think anyone would give me even an ounce of heat about it. I think restaurants and grocery stores would quickly ease their “no shirt—no service” policy and welcome me right in. Especially if I was carrying that large automatic weapon like he is. Why, I’ll bet people get right out of his way. Now, this movie was released in 1986 (I think I was about 6 months old then), and at that time there was no shooting in RAW, so this was years before the RAW wars broke out. (Everybody thought one day we’d have a huge war over oil reserves in the Middle East. But no one had anticipated that long before that, the entire world would be embroiled in a bitter RAW vs. JPEG war that would threaten to take neighboring TIFF and PSD right into the conflict with it. I can’t believe you’re still reading this. You’re my kind of people—ya know, for just one person.)
Although Adobe Camera Raw was originally created to process photos taken in your camera’s RAW format, you can also use it to process your JPEG and TIFF photos. A big advantage of using Camera Raw that many people don’t realize is that it’s just plain easier and faster to make your images look good using Camera Raw than with any other method. Camera Raw’s controls are simple, they’re instantaneous, and they’re totally undoable, which makes it hard to beat. But first, you’ve got to get your images into Camera Raw for processing.
Opening RAW Images:
Since Camera Raw was designed to open RAW images, if you double-click on a RAW image (whether in Bridge or just in a folder on your computer), it will launch Photoshop and open that RAW image in Camera Raw (its full official name is Adobe Camera Raw, and it’s often referred to as ACR, but here in the book, I’ll just be calling it “Camera Raw” for short, because...well...that’s what I call it). Note: If you double-click on what you know is a RAW image and it doesn’t open in Camera Raw, make sure you have the latest version of Camera Raw—images from newly released cameras need the latest versions of Camera Raw to recognize their RAW files.
SCOTT KELBY
Opening JPEG & TIFF Images from Bridge:
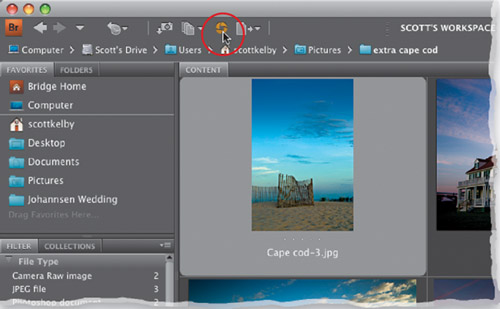
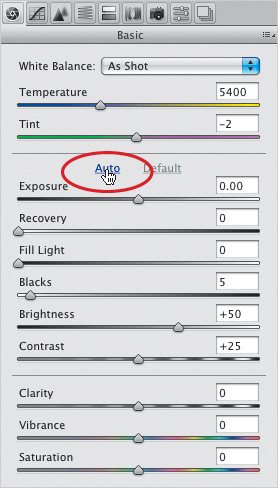
If you want to open a JPEG or TIFF image from Bridge, it’s easy—click on it and then press the Open in Camera Raw icon at the top-left side of the Bridge window (that icon is shown circled here in red), or use the keyboard shortcut Command-R (PC: Ctrl-R).
SCOTT KELBY
Opening JPEG & TIFF Images from Your Computer:
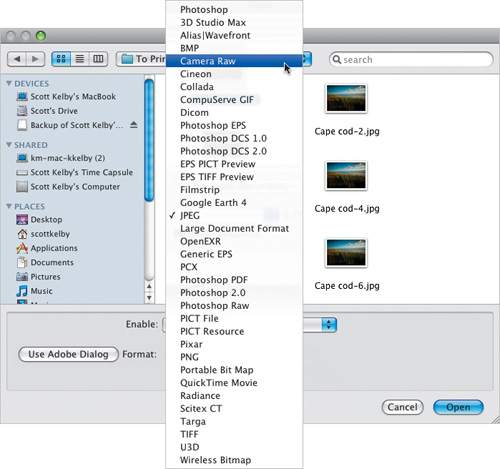
If you want to open a JPEG or TIFF image from your computer, then here’s what you do: On a Mac, go under Photoshop’s File menu and choose Open. When the Open dialog appears, click on your JPEG (or TIFF, but we’ll use a JPEG as our example) image, and in the Format pop-up menu, it will say JPEG. You need to click-and-hold on that Format pop-up menu, and from that menu choose Camera Raw, as shown here. Then click the Open button, and your JPEG image will open in Camera Raw. In Windows, just go under Photoshop’s File menu and choose Open As, then navigate your way to that JPEG or TIFF image, change the Open As pop-up menu to Camera Raw, and click Open.
SCOTT KELBY
Opening Multiple Images:
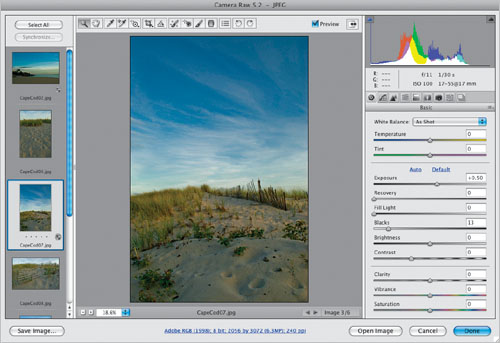
You can open multiple RAW photos in Camera Raw by selecting them first (either in Bridge or in a folder on your computer), then just double-clicking on any one of them, and they’ll all open in Camera Raw and appear in a filmstrip along the left side of the Camera Raw window (as seen here). If the photos are JPEGs or TIFFs, in Bridge, select ’em first, then press Command-R (PC: Ctrl-R). If they’re in a folder on your computer, then you’ll need to use Bridge to open them, as well (just use the Folders panel in Bridge to navigate to where those images are located, then select them, and press Command-R).
SCOTT KELBY
Step One:
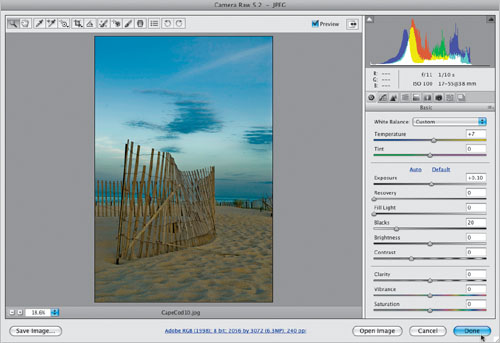
One thing about editing JPEGs and TIFFs in Camera Raw: When you make adjustments to a JPEG or TIFF photo and you click the Open Image button, it opens your image in Photoshop (as you’d expect). However, if you just want to save the changes you made in Camera Raw without opening the photo in Photoshop, then click the Done button instead (as shown here), and your changes will be saved to your JPEG or TIFF image. But there is a big distinction between editing JPEG or TIFF images and editing a RAW image. If you click the Done button, you’re actually affecting the real pixels of the original JPEG or TIFF photo, whereas, if this were a RAW image, you wouldn’t be (which is another big advantage of shooting in RAW). If you click the Open Image button, and open your JPEG or TIFF photo in Photoshop, you’re opening and editing the real image, as well. Just so you know.
SCOTT KELBY
Step Two:
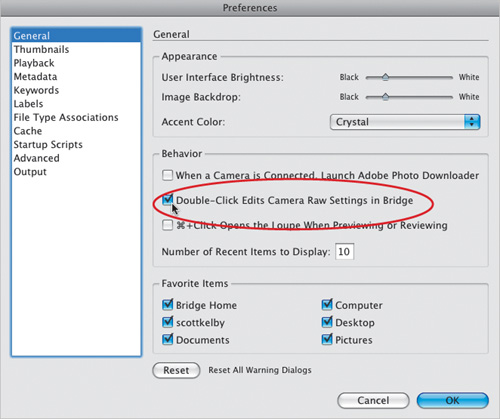
Here’s another thing you’ll need to know: there are actually two Camera Raws—one in Photoshop, and a separate one in Bridge. The advantage of having two Camera Raws comes into play when you’re processing (or saving) a lot of RAW photos—you can have them processing in Bridge’s version of Camera Raw, while you’re working on something else in Photoshop. If you find yourself using Bridge’s Camera Raw most often, then you’ll probably want to press Command-K (PC: Ctrl-K) to bring up Bridge’s Preferences, and then turn on the checkbox for Double-Click Edits Camera Raw Settings in Bridge (as shown here). Now, double-clicking on a photo opens RAW photos in Bridge’s Camera Raw, rather than Photoshop’s.
If you’ve ever taken a photo indoors, chances are the photo came out with kind of a yellowish tint. Unless you took the shot in an office, and then it probably had a green tint. If you just took a shot of somebody in a shadow, the photo probably had a blue tint. Those are white balance problems, and if you’ve properly set your white balance in the camera, you won’t see these distracting tints (the photos will just look normal), but most people shoot with their cameras set to Auto White Balance, which we can fix really easily in Camera Raw.
Step One:
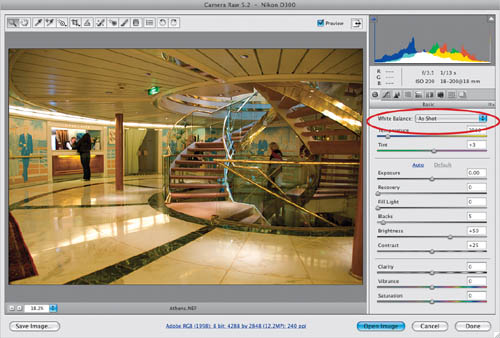
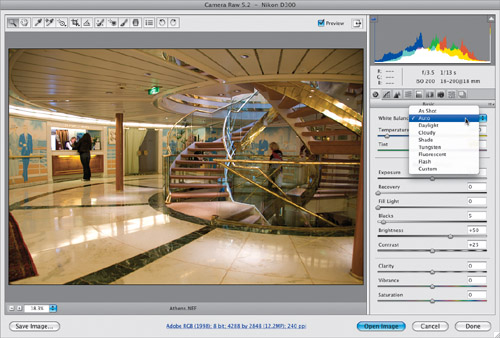
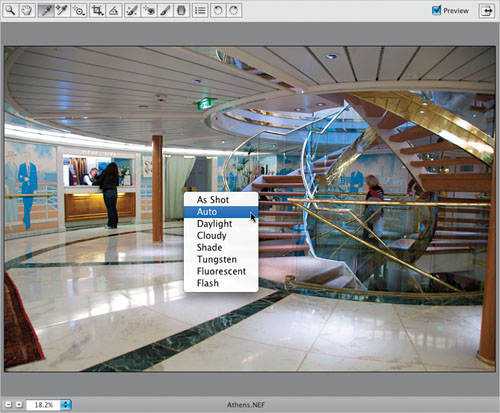
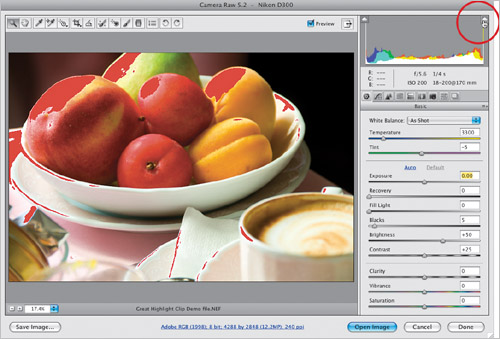
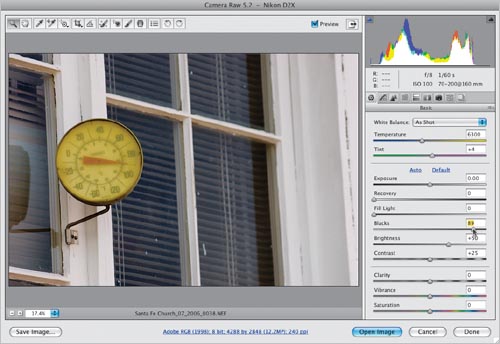
I put adjusting the white balance first for two reasons: (1) it’s the very first thing I adjust in my own Camera Raw workflow, and (2) it fixes one of the biggest problems you’re likely to encounter with digital images—the color is off. Getting the white balance right will eliminate 95% of your color problems, so we might as well fix that first thing. At the top of the Basic panel (on the right side of the Camera Raw window), are the White Balance controls. If you look to the right of the words “White Balance,” you’ll see a pop-up menu (shown circled here in red), and if this is the first time you’re opening this particular image, it will be set to As Shot (that is telling you that the white balance you’re seeing in Camera Raw is the white balance you had set in your camera when you took the shot). If you look at the photo shown here, you can see that this shot came out with a yellowish tint, but we can fix that with a quick white balance adjustment.
SCOTT KELBY
Step Two:
There are three ways to change the white balance in your photo, and the first is to simply choose one of the built-in White Balance presets. Fairly often, that’s all you need to do to color correct your image. Just click-and-hold on the White Balance pop-up menu, and you’ll see a list of white balance settings you could have chosen in the camera. Just choose the preset that most closely matches what the lighting situation was when you originally took the photo (for example, if you took the shot in the shade of a tree, you’d choose the Shade preset). Here I tried each preset and Auto seemed to look best. It removed some of the yellowish tint, and seemed to add a little red. I also tried Tungsten, which seemed to add a bit of green. That’s why it doesn’t hurt to try each preset and simply choose the one that looks best to you. Note: This is the one main area where the processing of RAW and JPEG or TIFF images differs. You’ll only get this full list of white balance presets with RAW images. With JPEGs or TIFFs, your only choice is As Shot or Auto white balance.
Step Three:
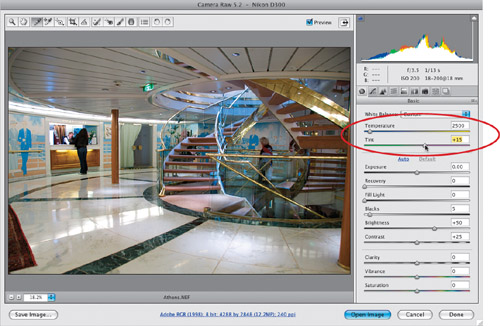
The second method is to use the Temperature and Tint sliders (found right below the White Balance preset menu). The bars behind the sliders are color coded so you can see which way to drag to get which kind of color tint. What I like to do is use the built-in presets to get close (as a starting point), and then if my color is just a little too blue or too yellow, I just drag in the opposite direction. So, in this example, the Auto preset was close, but still a little too greenish, so I dragged the Temperature slider a little bit toward blue and the Tint slider toward magenta (as shown here)
Step Four:
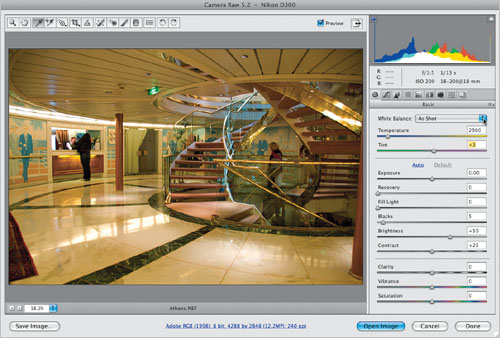
Just a couple of other quick things about manually setting your white balance using the Temperature and Tint sliders: First, when you move either the Temperature or Tint sliders, the white balance chosen in the preset pop-up menu changes to Custom, because now you’re creating your own custom white balance from scratch. Also, if you move a slider and decide you didn’t want to move it after all, just double-click directly on the little slider “nub” itself, and it will reset to its previous location. By the way, I generally just adjust the Temperature slider, and rarely have to touch the Tint slider. Lastly, to reset the white balance to where it was when you opened the image, just choose As Shot from the White Balance pop-up menu.
Step Five:
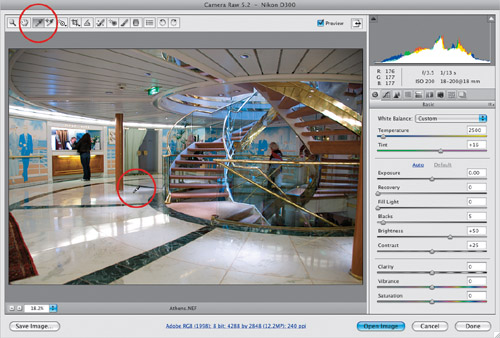
The third method is my personal favorite, and the method I use the most often, and that is setting the white balance using the White Balance tool (I). This is perhaps the most accurate because it takes a white balance reading from the photo itself. You just click on the White Balance tool in the toolbar at the top left (it’s circled in red here), and then click it on something in your photo that’s supposed to be a light gray (that’s right—you properly set the white balance by clicking on something that’s light gray). So, take the tool and click it once on a light shadow area to the left of the staircase (as shown here) and it sets the white balance for you. If you don’t like how it looks, then just click on a different light gray area.
TIP: Quick White Balance Reset
To quickly reset your white balance to the As Shot setting, just double-click on the White Balance tool up in the toolbar.
Step Six:
Now, here’s the thing: although this can give you a perfectly accurate white balance, it doesn’t mean that it will look good. White balance is a creative decision, and the most important thing is that your photo looks good to you. So don’t get caught up in that “I don’t like the way the white balance looks, but I know it’s accurate” thing that sucks some people in—set your white balance so it looks right to you. You are the bottom line. You’re the photographer. It’s your photo, so make it look its best. Accurate is not another word for good.
Step Seven:
Here’s a before/after so you can see what a difference setting a proper white balance makes (by the way, you can see a quick before/after of your white balance edit by pressing the letter P on your keyboard to toggle the Preview on/off).
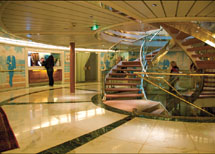
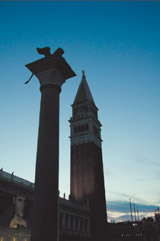
Before: The As Shot white balance has a yellowish tint
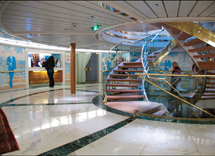
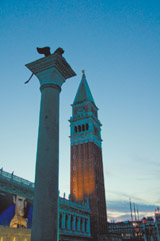
After: With one click of the White Balance tool, everything comes together
TIP: Using the Swatch Card
To help you find that neutral light gray color in your images, I’ve included a swatch card in the back of this book (it’s perforated, so you can tear it out), and it has a special Camera Raw white balance light gray swatch area. Once your lighting is set, just have your subject hold it while you take one shot. Then, open that image in Camera Raw, and click the White Balance tool on the swatch card to instantly set your white balance. Now apply that same white balance to all the other shots taken under that same light (more on how to do that coming up in the next chapter).
The next thing I fix (after adjusting the white balance) is the photo’s exposure. Now, some might argue that this is the most essential adjustment of them all, but if your photo looks way too blue, nobody will notice if the photo’s underexposed by a third of a stop, so I fix the white balance first, then I worry about exposure. In general, I think of exposure as three things: highlights, shadows, and midtones. So in this tutorial, I’ll address those three, which in Camera Raw are the exposure (highlights), blacks (shadows), and brightness (midtones).
Step One:
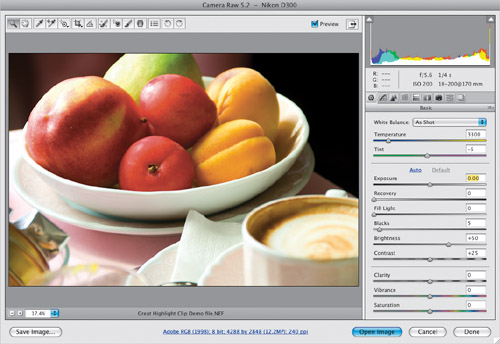
The Exposure slider affects the overall exposure of the photo (dragging to the right makes your overall exposure lighter; dragging to the left makes it darker). But don’t just start dragging the Exposure slider yet, because there’s something we need to really watch out for, and that’s clipping the highlights (where areas of the photo get so bright that they lose all detail). Luckily, Camera Raw has built-in clipping warnings, so you don’t lose highlight detail. First, look at this photo’s histogram at the top right of the window. See the solid white triangle in the top-right corner? That’s warning you that some parts of this photo are already clipping.
SCOTT KELBY
Step Two:
If you want to see exactly which areas are clipping (so you can see if they are even areas we need to worry about), just move your cursor over that highlight warning triangle, click on it, and any areas that are clipping will show up in red (as shown here). That see-your-clipping-areas-in-red warning will now stay on while you’re making your adjustments. Click on the little highlight triangle again (or press the letter O on your keyboard) to toggle this feature off/on.
Step Three:
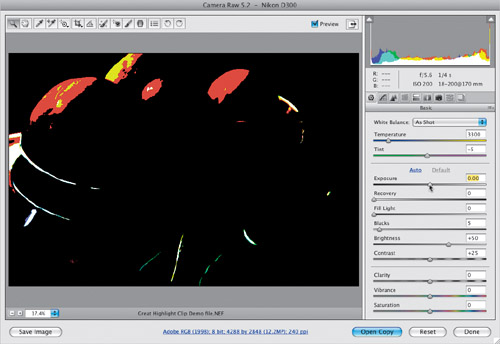
If you don’t like the red clipping warning, or if you have a photo with a lot of red in it, and the red warnings aren’t easily seen, there is another warning you can use. Just press-and-hold the Option (PC: Alt) key and then click-and-hold the Exposure slider. This turns your preview area black, and any clipped areas will appear in their color, as seen here (so if the Blue channel is clipping, you’ll see blue; if parts of the Green channel are clipping, you’ll see areas of green; but of course, the worst is to see areas in solid white, which means all the colors are clipping). By the way, this warning will stay on as you drag the Exposure slider, as long as you have the Option key held down. Also, some things will always clip, like a photo with the sun visible in it, or a specular highlight on the chrome bumper of a car, but that’s okay—they don’t have any detail. We’re only concerned about recovering areas that actually have important detail.
Step Four:
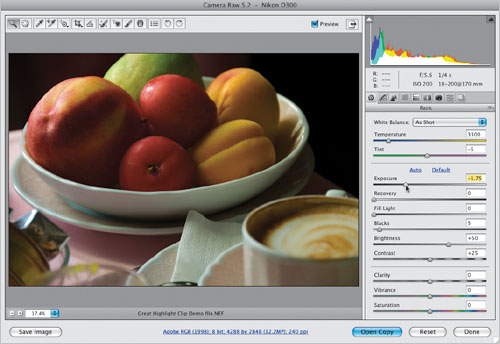
So, now that we know how to find out when we have a clipping problem, how do we make the problem go away? Well, since this problem happens when things get too bright, you could always drag the Exposure slider to the left until the clipping warnings go away. For example, here I lowered the exposure (by dragging the Exposure slider to the left) until the clipping warning finally went away, but that’s a really bad tradeoff. We fixed one problem (clipped highlights), but now we have another problem that may be worse (a really underexposed photo). Luckily, there’s something simple we can do that lets us keep the overall exposure where we need it, and avoid clipping the highlights at the same time.
Step Five:
Start by dragging the Exposure slider until the exposure looks right to you (here the exposure looked good to me, but some of the important highlight areas were clipping, as shown in Step Three). Now, drag the Recovery slider (located right below the Exposure slider) to the right, and as you do, just the very brightest highlights are pulled back (recovered) from clipping. Keep dragging until the white highlight clipping warning turns solid black (like the one shown here), and you’re done! By the way, you can use that same press-and-hold-the-Option (PC: Alt)-key trick while you’re dragging the Recovery slider, and the screen will turn black, revealing just the clipped areas. As you drag to the right, you’ll actually see the clipped areas go away. Now you’ve got your overall exposure where you want it, and you have detail in all your highlights at the same time. How sweet is that?

Step Six:
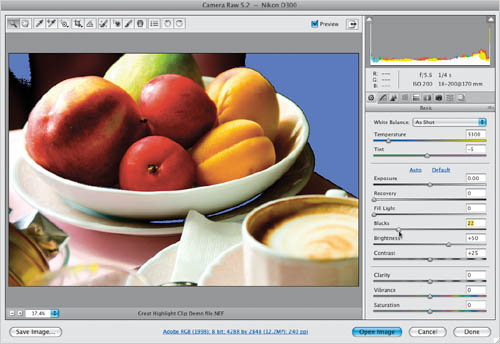
Next, I adjust the shadow areas using the Blacks slider. Dragging to the right increases the amount of black in the darkest shadow areas of your photo. Dragging to the left opens up (lightens) the shadow areas. I switched photos here to show you a better example of how the Blacks slider works.
SCOTT KELBY
Step Seven:
Increasing the blacks will usually saturate the colors in your photo, as well, so if you have a really washed out photo (as shown in the previous step), just drag the Blacks slider to the right until the color and depth come back (as they have here). Compare this with the original shown in the previous step, and you can see what a dramatic difference increasing the blacks can make for a washed out photo. Okay, let’s switch back to the breakfast photo, and pick up there.
Step Eight:
While my biggest concern is clipping the highlights, there’s also a shadow clipping warning to let you know when areas have gotten so dark that they lose all shadow detail. That warning is the triangle on the top left of the histogram. If you move your cursor over it and click, any areas that are solid black will appear in bright blue (as seen here). If there’s shadow clipping, the only fix is to drag the Blacks slider to the left to reduce the amount of blacks in the shadows, but I generally don’t do that, because to me that usually makes a photo look flat and too low contrast. So, I avoid lowering the Blacks amount below the default setting of 5 unless absolutely necessary (here the clipped areas are just shadows, not important detail, so I ignore them). But hey, that’s just me. You can also use the press-and-hold-the-Option (PC: Alt)-key trick with the Blacks slider. As you might expect, this works in the opposite way the highlight warning works; instead, the preview area turns solid white, and any areas that are solid black have lost detail and actually have turned to solid black.
Step Nine:
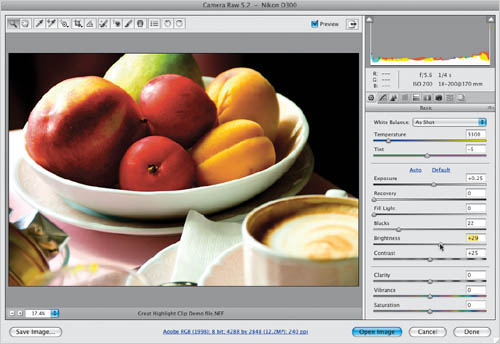
The next slider down is Brightness. Since you’ve already adjusted the highlights (Exposure slider) and the shadows (Blacks slider), the Brightness slider adjusts everything else (I relate this slider to the midtones slider in Photoshop’s Levels adjustment, so that might help in understanding how this slider differs from the Exposure or Blacks sliders). Of the three main adjustments (Exposure, Blacks, and Brightness), this one I personally use the least—if I do use it, I usually just drag it a very short amount to the right to open up some of the midtone detail. But in this case, I dragged it a little to the left to keep the photo from looking too bright. There are no warnings for midtones, but if you push it far enough to the right, you could see some highlight clipping.
Step 10:
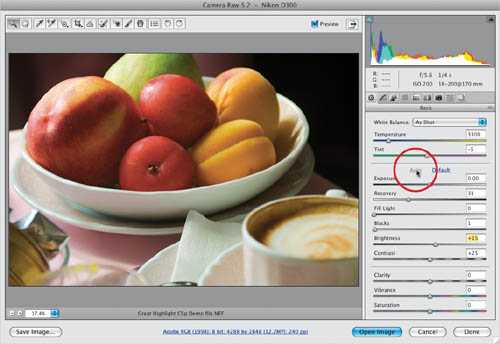
If you don’t feel comfortable making these adjustments yourself, you can always give Camera Raw a crack at it, by clicking the Auto button (it’s the underlined word Auto, shown circled here in red). Back in the CS3 version of Camera Raw, I called this the Overexpose My Photo button, but in CS4, they’ve greatly improved how Auto works, and now it often does a pretty decent job. When you click on Auto, your photo will either look better, or not. If it’s not, just press Command-Z (PC: Ctrl-Z) to undo the Auto adjustment, and then try the correction yourself using the Exposure, Blacks, and Brightness sliders. Here, I clicked the Default button (to the right of the Auto button) to reset Camera Raw to its defaults, and then I clicked the Auto button. In this case, it looks kinda flat to me, and that’s why it’s important to learn to be able to make these corrections yourself.
If you’re not quite comfortable with manually adjusting each image, like I mentioned at the end of the last tutorial, Camera Raw does come with a one-click Auto function, which takes a stab at correcting the overall exposure of your image (including shadows, fill light, contrast, and recovery). If you like the results, you can set up Camera Raw’s preferences so every photo, upon opening in Camera Raw, will be auto-adjusted using that same feature. Ahhh, if only that Auto function worked better.
Step One:
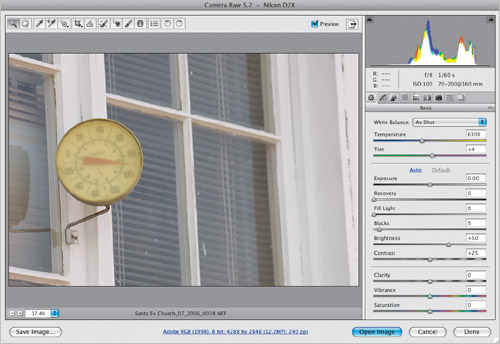
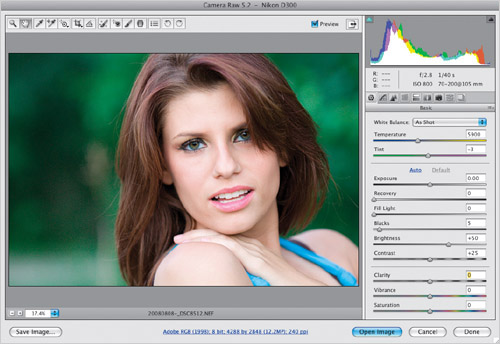
Once you have an image open in Camera Raw, you can have Camera Raw take a stab at setting the overall exposure (using the controls in the Basic panel) for you by clicking on the Auto button (shown circled in red here). Although I used the four individual Auto checkboxes in earlier versions of Camera Raw, I dunno...maybe it’s my camera, maybe it’s me, but so far this Auto button (added in CS3) hasn’t met a photo it didn’t want to overexpose at least a little. But if you’ve tried it and you like the results (hey, it could happen), then you might want to make Camera Raw auto-process every image you open in it.
Step Two:
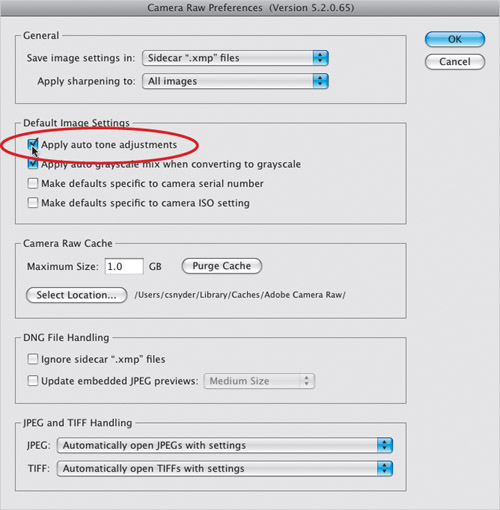
To do that, click on the Preferences icon up in Camera Raw’s toolbar (it’s the third from the right), and when the Camera Raw Preferences dialog appears, turn on the checkbox for Apply Auto Tone Adjustments (shown circled in red here), then click OK. Now, Camera Raw will evaluate each image and try to correct it. If you don’t like its tonal corrections, then you can just click on the Default button, which appears to the right of the Auto button (the Auto button will be grayed out because it’s already been applied).
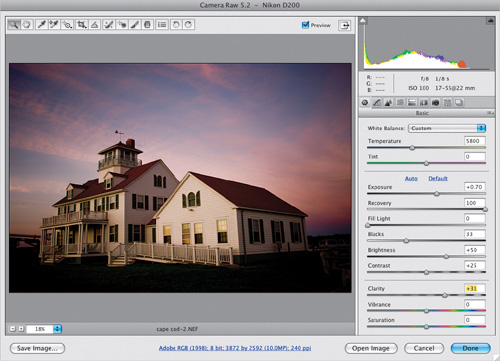
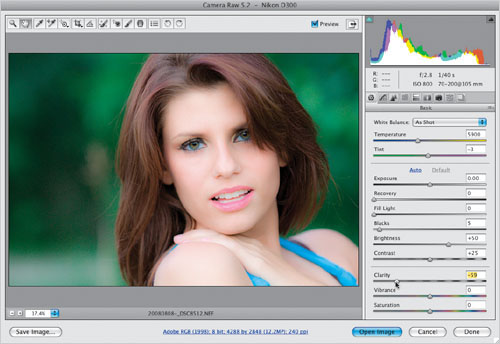
This is one of my favorite features in Camera Raw, and whenever I show it in a class, it never fails to get “Oooohs” and “Ahhhhs.” I think it’s because it’s just one simple slider, yet it does so much to add “snap” to your image. The Clarity slider (which is well-named) basically increases the midtone contrast in a way that gives your photo more punch and impact, without actually sharpening the image (much like certain Curves adjustments in Photoshop can add snap and punch to your photos).
Step One:
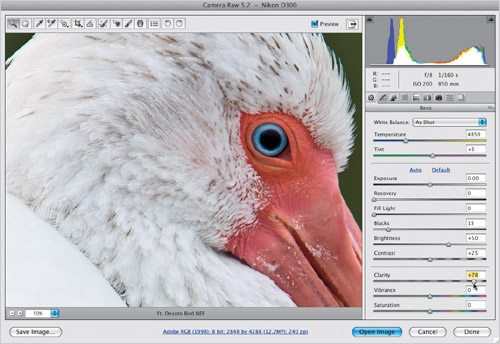
The Clarity slider is found in the bottom section of the Basic panel in Camera Raw, right above the Vibrance and Saturation sliders. (Although its official name is Clarity, I heard that at one point Adobe engineers considered naming it “Punch” instead, as they felt using it added punch to the image.) To clearly see the effects of Clarity, first zoom in to a 100% view by double-clicking on the Zoom tool up in the toolbar (it looks like a magnifying glass). In the example shown here, I only zoomed to 50% so you could see more of the image (plus, when that eye got to 100%, it really looked creepy).

SCOTT KELBY
Step Two:
Using the Clarity control couldn’t be easier—drag the slider to the right to increase the amount of snap (midtone contrast) in your image (compare the top and bottom images shown here). Almost every image I process gets between +25 and +50 Clarity. If the image has lots of detail, like a cityscape, or a sweeping landscape shot, or something with lots of little details like a motorcycle (or the feathers of a bird), then I’ll go as high as +75 to +80, as seen here. If the subject is of a softer nature, like a portrait of a child, then in that case, I don’t generally apply any Clarity at all.
Step Three:
The CS4 version of Camera Raw was the first version to offer negative Clarity, meaning you can apply less than 0 (zero) to reduce the midtone contrast for softening effects. For example, here’s an original image without any negative Clarity applied.
SCOTT KELBY
Step Four:
Now drag the Clarity slider to the left (which gives you a negative amount of Clarity), and take a look at how much softer our subject’s skin looks. Everything else in the image looks softer too, so it’s an overall softening, but in the chapter on the Adjustment Brush (Chapter 4), you’ll learn how to apply softening just to your subject’s skin (or anything else you need softened), while leaving the rest of the image sharp.
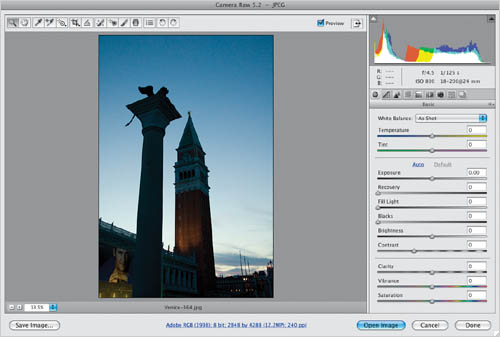
If you have to deal with a backlit subject (and we all do at one time or another, either intentionally or by accident), then you’re going to love the Fill Light slider. Unlike the Shadow/Highlight adjustment in Photoshop (which requires you to jump through a few hoops and tweak a number of sliders, so it doesn’t look fake and “milky”), the Fill Light slider not only looks more natural, but because of that, it lets you apply more Fill Light and still have your image look good. However, there is one little tweak you’ll need to know, but it couldn’t be easier.
Step One:
Here’s a pretty typical image where the subject, shot near sunset, is backlit with the setting sun, and while you can see some detail, the detail areas of the subject are mostly in the shadows.
SCOTT KELBY
Step Two:
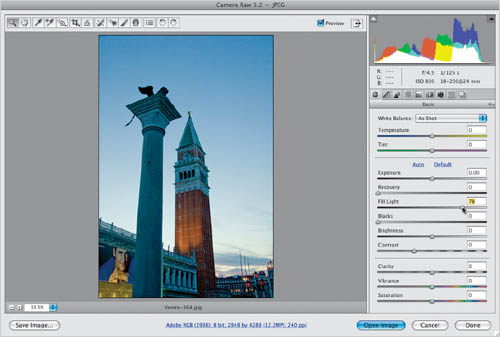
Dragging the Fill Light slider to the right opens up those lower mid-shadow areas, and lets detail that was once hidden in the shadows be revealed (as seen here).
Step Three:
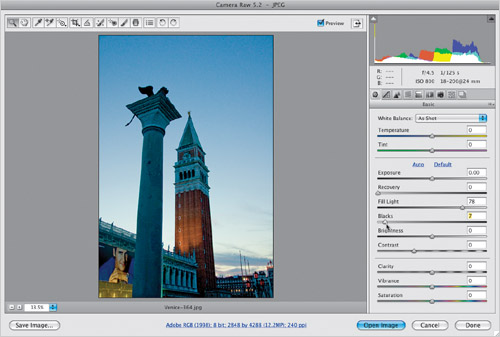
If you have to drag the Fill Light slider quite a bit to the right (as I did here), you’re going to run into a little problem in that your deeper shadows might start to look a bit washed out. So when I have to push things as far as I did here, I generally drag the Blacks slider over to the right just a little (as shown here) to bring back some of the richness and color saturation in the deep shadow areas. Now, there is a difference if you’re working with RAW or JPEG/TIFF images. With RAW images, the default setting for the Blacks will be 5, and generally all you’ll need to do is move them over to 7 or 8. However, on JPEG or TIFF images, your default is 0, and I tend to drag them a little farther (in the example shown here, I started at 0 and dragged up to 7 to get to where it looked right to me). Of course, every image is different, but either way, you shouldn’t have to move the Blacks slider too far (just remember—the farther you move your Fill Light slider to the right, the more you’ll have to compensate by adding more Blacks).
Step Four:
Here’s a before/after with only two edits applied to this photo: (1) I dragged the Fill Light slider over to 78, and (2) I dragged the Blacks slider to 7.
Before: The subject is in the shadows
After: Using Fill Light and adding Blacks
When it comes to adding contrast to a photo, I pretty much avoid the Contrast slider in Camera Raw’s Basic panel as much as possible, because it’s too broad and too lame (much like the Contrast slider in Photoshop’s Brightness/Contrast dialog was before it was improved back in CS3, which was too broad and too lame. I just had a dejá vu). Anyway, when it comes to creating contrast, try the Tone Curve instead, and you’ll never go back to that one broad and lame slider that is too broad and too lame. (I know. I did it again. I’m mean, “Oops, I did it again.”)
Step One:
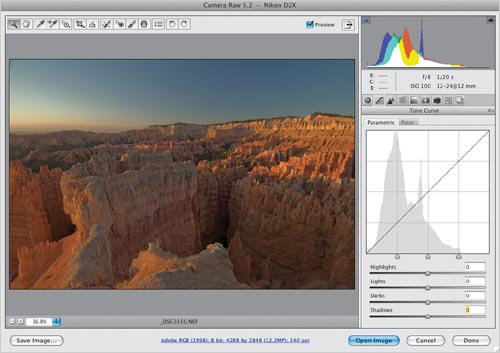
After you’ve done all your exposure and tone adjustments in the Basic panel, and you want to add contrast, skip the Contrast slider and click on the Tone Curve icon (it’s the second icon from the left at the top of the Panel area). There are two different types of curves available in Camera Raw: the Point curve, and the Parametric curve. We’ll start with the Point curve, so click on the Point tab at the top of the Tone Curve panel. Here’s what the photo shown here looks like with no added contrast in the Point curve (notice that the pop-up menu above the curve is set to Linear, which is a flat, unadjusted curve).
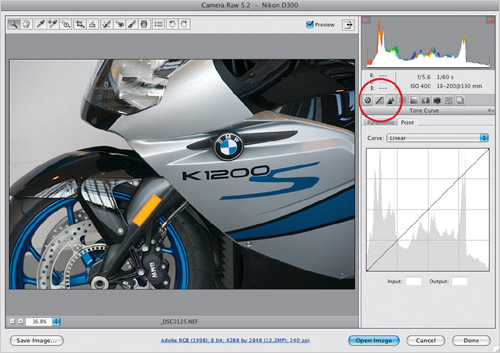
SCOTT KELBY
Step Two:
The normal default setting for this curve is Medium Contrast. If you want to create much more dramatic contrast, choose Strong Contrast from the Curve pop-up menu (as shown here), and you can see how much more contrast this photo now has, compared with how it looked in Step One. The difference is the Strong Contrast settings create a much steeper curve, and the steeper the curve, the more contrast it creates.

Step Three:
If you’re familiar with Photoshop’s Curves and want to create your own custom curve, start by choosing any one of the preset curves, then either click-and-drag the adjustment points on the curve or use the Arrow keys to move them (I think it’s easier to click on a point, then use the Up and Down Arrow keys on your keyboard to move that part of the curve up or down). If you’d prefer to start from scratch, choose Linear from the Curve pop-up menu, which gives you a flat curve. To add adjustment points, just click along the curve. To remove a point, just click-and-drag it right off the curve (drag it off quickly, like you’re pulling off a Band-Aid).

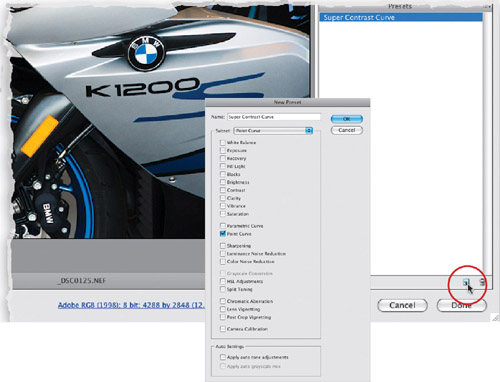
Step Four:
If you create a curve that you’d like to be able to apply again to other photos, you can save this curve as a preset. To do that, click on the last icon in the row of icons at the top of the Panel area to bring up the Presets panel. Next, click on the New Preset icon (which looks just like Photoshop’s Create a New Layer icon) at the bottom of the Presets panel. This brings up the New Preset dialog (shown here). If you just want to save this curve setting, from the Subset pop-up menu near the top, choose Point Curve, and it turns off the checkboxes for all the other settings available as presets, and leaves only the Point Curve checkbox turned on (as shown here). Give your preset a name (I named mine “Super Contrast Curve”) and click OK.
Step Five:
If you’re not comfortable with adjusting the Point curve, try the Parametric curve, which lets you craft your curve using sliders rather than adjusting points. This is popular with photographers because it’s so easy to use and, unlike Photoshop’s curves, it keeps you from creating a curve that would pretty much trash the photo. When you click on the Tone Curve icon, it’s the Parametric tab that appears first. There are four sliders, which control the four different areas of the curve, but before you start “sliding,” know that the adjustments you make here are added on top of the default Point curve setting of Medium Contrast. If you’d like to start from scratch, then click on the Point curve tab, choose Linear from the Curve pop-up menu, and then click back on the Parametric curve tab.
SCOTT KELBY
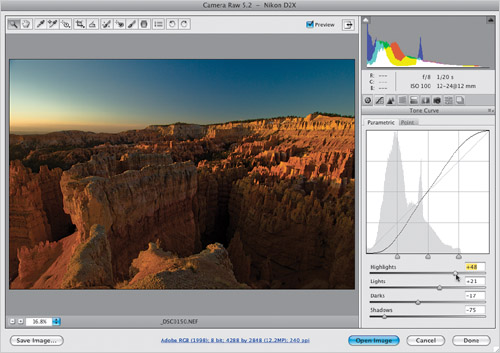
Step Six:
The Highlights slider controls the highlights area of the curve (the top of the curve), and dragging it to the right arcs the curve upward, making the highlights brighter. Right below that is the Lights slider, which covers the next lower range of tones (the area between the midtones and the highlights). Dragging this slider to the right makes this part of the curve steeper, and increases the upper midtones. The Darks and Shadows sliders do pretty much the same thing for the lower midtones and deep shadow areas. But remember, dragging to the right opens up those areas, so to create contrast, you’d drag both of those to the left instead. Here, to create some real punchy contrast, I dragged both the Highlights and Lights sliders to the right, and the Darks and Shadows sliders to the left.
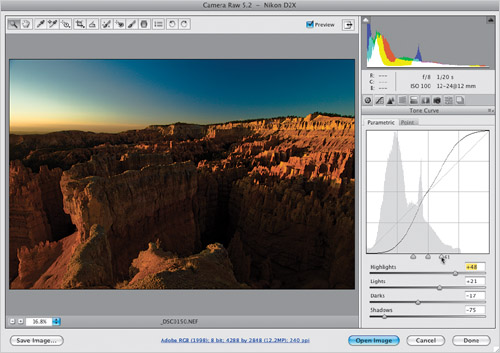
Step Seven:
One advantage of the Parametric curve is that you can use the region divider controls (under the curve) to choose how wide a range each of the four sliders covers. So, if you move the far-right region divider to the right (shown here), it expands the area controlled by the Lights slider. Now the Highlights slider has less impact, flattening the upper part of the curve, so the contrast is decreased. If I drag that same region divider control back to the left instead, it expands the Highlights slider’s area, which steepens the curve and increases contrast. Note: Shortly after CS4 shipped, Adobe released a Camera Raw update that added the Targeted Adjustment Tool (TAT) to the toolbar for use on the Parametric Curve, the HSL panel, and in Grayscale Mix (see page 214 for how the TAT works). You may find it easier than dragging the sliders. They also snuck in another enhancement: the ability to take a snapshot of your current image (like snapshots in Photoshop’s History panel). So, if you make some adjustments you really like, you can save a snapshot of what your image looked like at that point, and return to it anytime if you mess up.
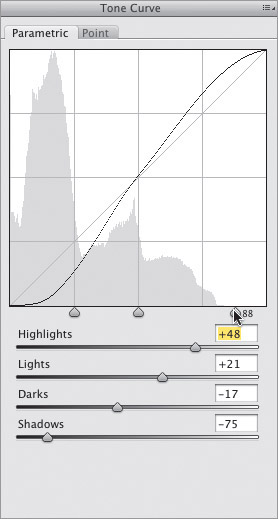
Step Eight:
If your goal is extraordinary contrast (like a black-and-white photo with that super-contrasty look), then you want the steepest curve you can get away with (without damaging the photo). Besides dragging the Highlights and Lights sliders to the right, and the Darks and Shadows sliders to the left, you can compress the tones so the Shadows and Highlights sliders affect larger areas. You do this by dragging the two outside region divider controls toward the center (as shown here), which adds even more steepness to the curve.
There’s a distinct advantage to cropping your photo here in Camera Raw, rather than in Photoshop CS4 itself, and that is you can return to Camera Raw later and bring back the uncropped version of the image. This even holds true for JPEG and TIFF photos, as long as you haven’t overwritten the original JPEG or TIFF file. To avoid overwriting, when you save the JPEG or TIFF in Photoshop, just change the filename (that way the original stays intact). With RAW images, you don’t have to worry about that, because it doesn’t let you overwrite the original.
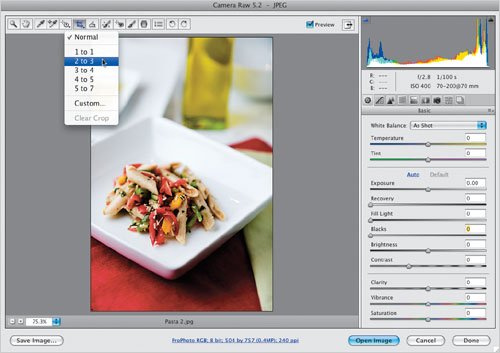
Step One:
The Crop tool (C) is the sixth tool from the left in Camera Raw’s toolbar. By default, it pretty much works like the Crop tool in Photoshop (you click-and-drag it out around the area you want to keep), but it does offer some features that Photoshop doesn’t—like access to a list of preset cropping ratios. To get them, click-and-hold on the Crop tool and a pop-up menu will appear (as shown here). The Normal setting gives you the standard drag-it-where-you-want-it cropping. However, if you choose one of the cropping presets, then your cropping is constrained to a specific ratio. For example, choose the 2 to 3 ratio, click-and-drag it out, and you’ll see that it keeps the same aspect ratio as your original uncropped photo.
SCOTT KELBY
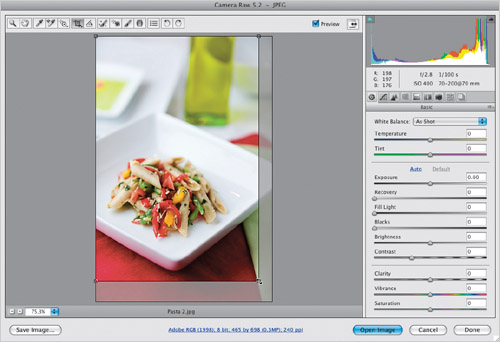
Step Two:
Here’s the 2-to-3-ratio cropping border dragged out over my image. The area that will be cropped away appears dimmed, and the clear area inside the cropping border is how your final cropped photo will appear. If you want to see the cropped version before you leave Camera Raw (a first in CS4), just switch to another tool in the toolbar.
Step Three:
If you reopen your cropped photo again in Camera Raw, you’ll see the cropped version. To bring back the cropping border, just click on the Crop tool. To remove the cropping altogether, press the Esc or Delete (PC: Backspace) key on your keyboard (or choose Clear Crop from the Crop tool’s pop-up menu). If you want your photo cropped to an exact size (like 8×10″, 13×19″, etc.), choose Custom from the Crop tool’s pop-up menu to bring up the dialog you see here. You can choose to crop by inches, pixels, or centimeters.
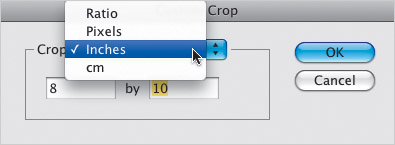
Step Four:
Here, we’re going to create a custom crop so our photo winds up being exactly 8×10″, so choose Inches from the Crop pop-up menu, then type in your custom size. Click OK, click-and-drag out the cropping border, and the area inside it will be exactly 8×10″. Click on any other tool in the toolbar, and you’ll see the final cropped 8×10″ image (as seen here). If you click the Open Image button, the image is cropped to your specs and opened in Photoshop. If, instead, you click the Done button, Camera Raw closes and your photo is untouched, but it keeps your cropping border in place for the future.
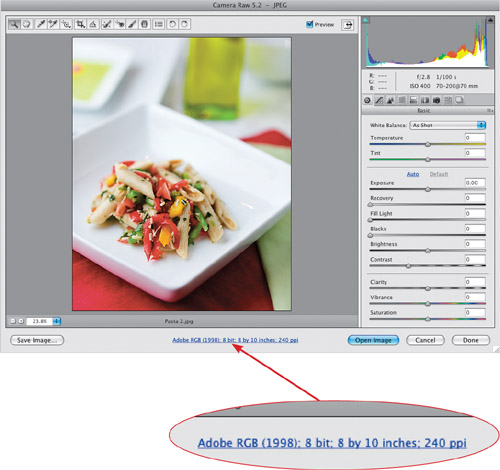
TIP: Seeing Image Size
The size of your photo (and other information) is displayed under the preview area of Camera Raw (in blue underlined text that looks like a Web link). When you drag out a cropping border, the size info for the photo automatically updates to display the dimensions of the currently selected crop area.
Step Five:
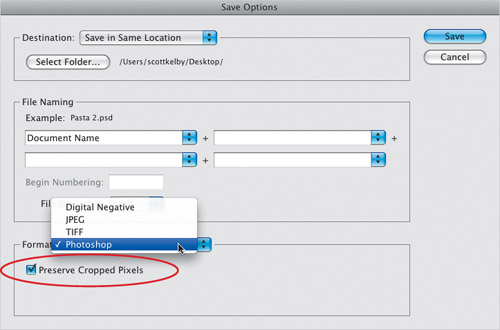
If you save a cropped JPEG or TIFF photo out of Camera Raw (by clicking the Done button), the only way to bring back those cropped areas is to reopen the photo in Camera Raw. However, if you click the Save Options button and you choose Photoshop from the File Extension pop-up menu (as shown), a new option will appear called Preserve Cropped Pixels. If you turn on that checkbox before you click Save, when you open this cropped photo in Photoshop, it will appear to be cropped, but the photo will be on a separate layer (not flattened on the Background layer). So the cropped area is still there—it just extends off the visible image area. You can bring that cropped area back by clicking-and-dragging your photo within the image area (try it—use the Move tool [V] to click-and-drag your photo to the right or left and you’ll see what I mean).
Step Six:
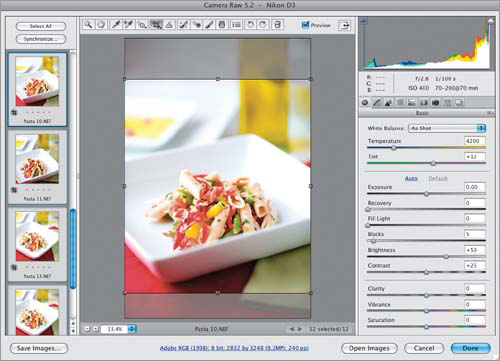
If you have a number of similar photos you need to crop the same way, you’re going to love this: First, select all the photos you want to crop in Camera Raw (either in Bridge or on your computer), then open them all in Camera Raw. When you open multiple photos, they appear in a vertical filmstrip along the left side of Camera Raw (as shown here). Click on the Select All button (it’s above the filmstrip) and then crop the currently selected photo as you’d like. As you apply your cropping, look at the filmstrip and you’ll see all the thumbnails update with their new cropping instructions. A tiny Crop icon will also appear in the bottom-left corner of each thumbnail, letting you know that these photos have been cropped in Camera Raw.
SCOTT KELBY
Step Seven:
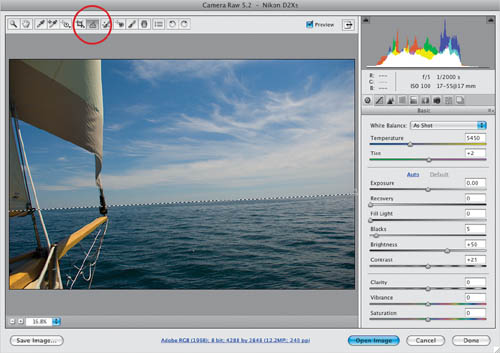
Another form of cropping is actually straightening your photos using the Straighten tool. It’s a close cousin of the Crop tool because what it does is essentially rotates your cropping border, so when you open the photo it’s straight. In the Camera Raw toolbar, choose the Straighten tool (it’s immediately to the right of the Crop tool, and shown circled here in red). Now, click-and-drag it along the horizon line in your photo (as shown here). When you release the mouse button, a cropping border appears and that border is automatically rotated to the exact amount needed to straighten the photo (as shown in Step Eight).
SCOTT KELBY
Step Eight:
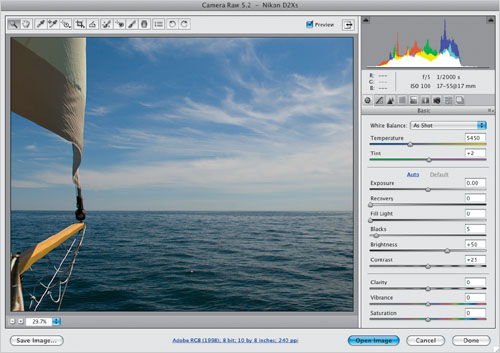
You won’t actually see the straightened photo until you switch tools or open the photo in Photoshop (which means, if you click Save Image or Done, Camera Raw closes, and the straightening information is saved along with the file. So if you open this file again in Camera Raw, you’ll see the straightened version, and you won’t really know it was ever crooked). If you click Open Image instead, the straightened photo opens in Photoshop. Again, if this is a RAW photo (or if it’s a JPEG or TIFF and you clicked the Done button), you can always return to Camera Raw and remove this cropping border to get the original uncropped photo back.
TIP: Canceling Your Straightening
If you want to cancel your straightening, just press the Esc key on your keyboard, and the straightening border will go away.
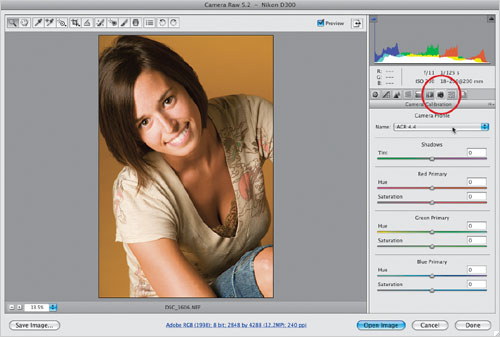
If you’ve ever looked at a JPEG photo on the LCD screen on the back of your digital camera, and then wondered why your RAW image doesn’t look as good, it’s because your camera adds color correction, sharpening, contrast, etc., to your JPEG images while they’re still in the camera. But when you choose to shoot in RAW, you’re telling the camera, “Don’t do all that processing—just leave it raw and untouched, and I’ll process it myself.” But, if you’d like that JPEG-processed look as a starting place for your RAW photo editing, you can use CS4’s new Camera Profiles to get you close.
Step One:
As I mentioned above, when you shoot in RAW, you’re telling the camera to pretty much leave the photo alone, and you’ll do all the processing yourself using Camera Raw. Each camera has its own brand of RAW and so Adobe Camera Raw applies a Camera Profile based on the camera that took the shot (it reads the embedded EXIF data, so it knows which camera you used). Anyway, if you click on the Camera Calibration icon (the third icon from the right above the Panel area), you’ll see the built-in default Camera Profile used to interpret your RAW photo. In all previous versions of Camera Raw, there were no other choices—there was a pop-up menu, but with only this one ACR profile as a choice.
SCOTT KELBY
Step Two:
If you click-and-hold on the Name pop-up menu at the top (click on ACR 4.4), a menu pops up with a list of profiles for the camera you took the shot with (as seen here, for images taken with a Nikon digital camera). Adobe recommends that you start by choosing the Camera Standard Beta 1 (as shown here), to see how that looks to you.
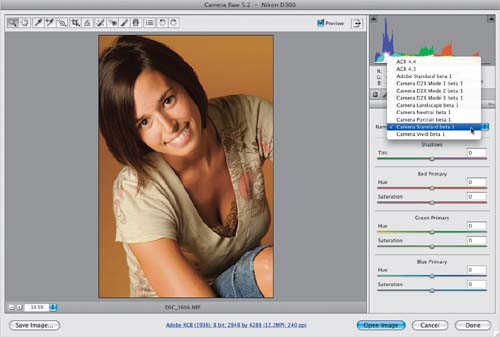
Step Three:
If you have a Nikon or Canon dSLR camera, Adobe also included camera-matching profiles, which are designed to replicate the different color shooting modes that are available in your camera (Camera Raw knows which camera you took the shot with by reading the EXIF metadata). There are five camera-matching profiles for Canon dSLRs, and eight for Nikon dSLRs. (Note: If you don’t shoot Canon or Nikon, then you’ll only have Adobe Standard Beta 1 to choose from, but you can create your own custom profiles using Adobe’s free DNG Profile Editor utility, available from Adobe at http://labs.adobe.com.)
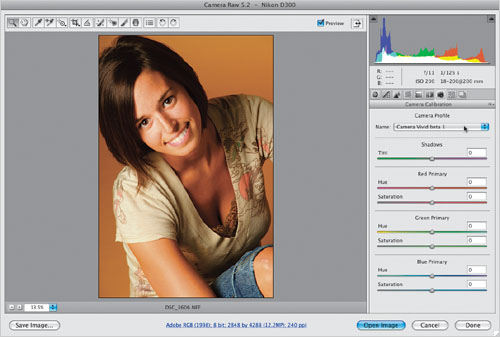
Step Four:
Here’s a before/after with only one thing done to this photo: I chose Camera Vivid Beta 1 (as shown in the pop-up menu in Step Three). Again, this is designed to replicate color looks you could have chosen in the camera, so if you want to have Camera Raw give you a similar look as a starting point, this is how it’s done. Personally, I use this when I want my starting point to be closer to the JPEG image I saw on the back of my camera.

Before: Using the default ACR 4.4 profile

After: Using the Camera Vivid Beta 1 profile