
This is the second time this chapter has appeared in any version of this book, and the only reason it’s here is because I promised my assistant Kathy that I would find a way to include a Huey Lewis song as one of my chapter titles, but by the time the last book was done, I didn’t have one, and there was no way she was going to let that book go to press without one. (She has an unnatural obsession with ’80s singer Huey Lewis. She’s seen the movie Duets [where he plays a karaoke singer] 316 times as of the writing of this book. By the time it comes off press, she will have seen it 321 times, based on past experience. It’s sad to see her destroying her life like this, so I’ve been trying to focus her attention on something more positive, like drinking or shoplifting, and she’s making some progress there. Sadly though, one day she got pretty hammered, went into Walmart, shoved a copy of Back to the Future into her purse, ran out to the parking lot, jumped into her DeLorean, and nearly sideswiped a kid on a skateboard wearing a red sleeveless hunting vest.) Anyway, this chapter, an homage to the song “Working for a Livin’” by Huey Lewis & the News, is where I bring the whole process together, from importing the photos into Bridge, to correcting the images, sharpening, and printing—the whole thing, in the same workflow order I use everyday in my own work. So, this is the mini-chapter where it all comes together. It’s where the rubber meets the road. Where the brick meets the pavement. Where the goose gets the gander. Where Bartles meets Jaymes. Where the roaster grinds the coffee (where the roaster grinds the coffee?), etc.
I’ve been asked many times, “What is your Photoshop digital photography workflow?” (What should I do first? What comes next? Etc.) So, I thought I would add this chapter here in the back to bring it all together. This chapter isn’t about learning new techniques (you’ve already learned all the things you’ll need for your workflow), it’s about seeing the whole process, from start to finish, in order. (Every photographer has a different workflow that works for them, and I hope that sharing mine helps you build a workflow that works for you and your style of work.)
Step One:
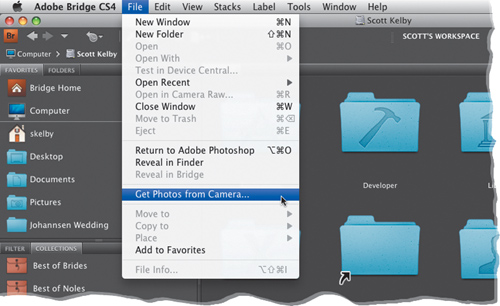
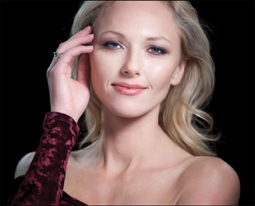
Our first step is to get the photos from our memory card onto our computer, so we can start to work with them. Start by connecting your memory card reader to your computer, then go under Bridge CS4’s File menu and choose Get Photos from Camera (as shown here). In our example, we’re going to import some shots I took of a professional model named Angelina, from a live lighting demo I did at a tradeshow booth for the F.J. Westcott company (www.fjwestcott.com), showing off their daylight balanced continuous lights, the Spiderlite TD5s (those lights totally rock, by the way).
Step Two:
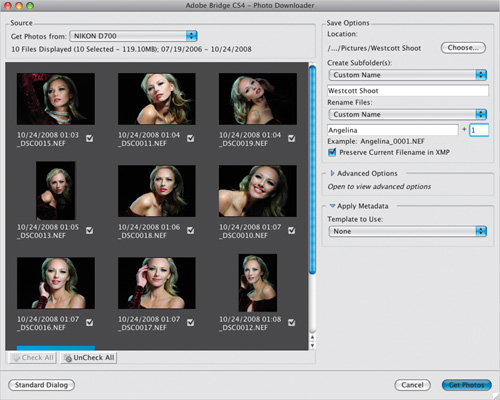
When the Photo Downloader appears, in the Save Options section, choose the location where you want your photos saved to on your computer, and I recommend choosing the option to rename your files as you import them (choose a descriptive name). You can find out more about this importing process back on page 2.
SCOTT KELBY
Step Three:
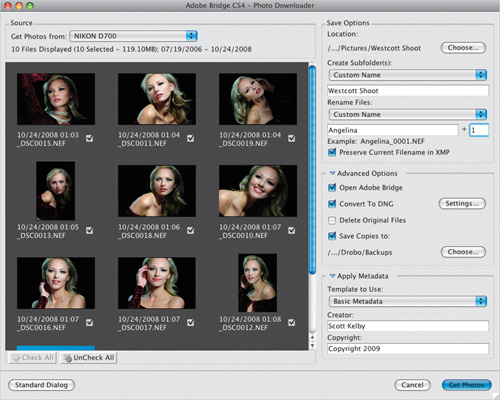
In the Advanced Options section of the dialog, turn on the checkbox to Open Adobe Bridge, and most importantly, turn on the Save Copies To checkbox and choose an external hard drive where a copy of your imported photos will be automatically backed up. That way, one copy of the photos on your memory card gets saved to your computer (these you can edit all you want, delete, and basically do whatever you want with as these are your working copies), and the second set of copies (the ones backed up to your external hard drive) act as your originals—your untouched negatives. In the Apply Metadata section, choose your copyright template to have your copyright and contact info embedded directly into your imported photos (see page 58 for how to create a Metadata template), then click Get Photos.
Step Four:
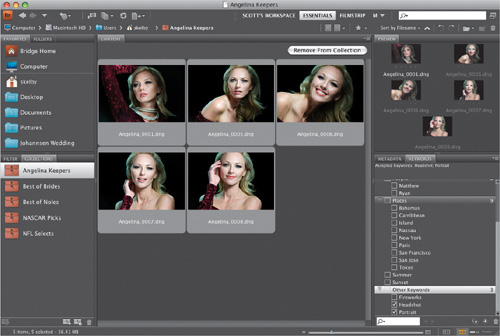
As the photos are imported, they appear in Bridge in the default workspace. The problem with the default workspace is that the Preview panel where you see your photos is way too small, which is why I always switch to a custom workspace that gives the largest possible preview, regardless of whether your photo is in landscape or portrait orientation (to learn how to set up this same workspace, jump back to page 9). Since I created this workspace earlier in the book, I just click on Scott’s Workspace up at the top center of the window, which gives me the layout you see here. You can see, even at this early stage, the photo needs some serious editing (it’s too green), and needs some retouching, sharpening, and some finishing effects.
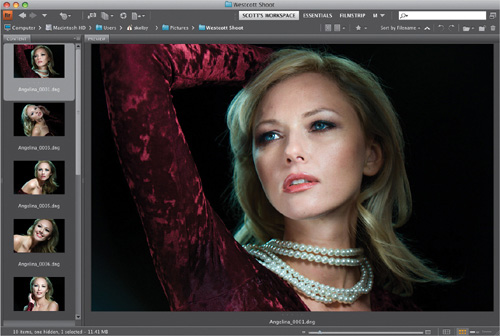
Step Five:
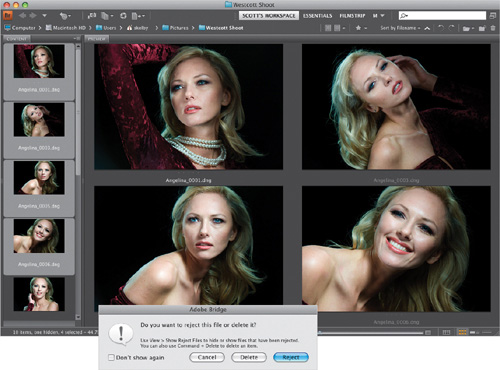
In my workflow, I’m only concerned about finding two types of photos: (1) the very best ones from the shoot—the ones I might show the client—and (2) the photos that are so bad (way out of focus, taken by mistake, left the lens cap on, flash didn’t fire, etc.) I just want them off my computer, because they’re wasting space. To compare one or more photos at the same time, just click on the first photo, then press-and-hold the Command (PC: Ctrl) key, and click on any photos you want to compare (here I’ve clicked on four photos in the Content panel, and now all four photos appear in the Preview panel, as seen here). If a photo is so bad you want it off your computer, just click on it (in the Content panel) and press the Delete (PC: Backspace) key on your keyboard. This brings up a dialog asking if you want to mark it as a Reject (for deleting later) or move it to your computer’s Trash (PC: Recycle Bin) right now (the choice is yours).
Step Six:
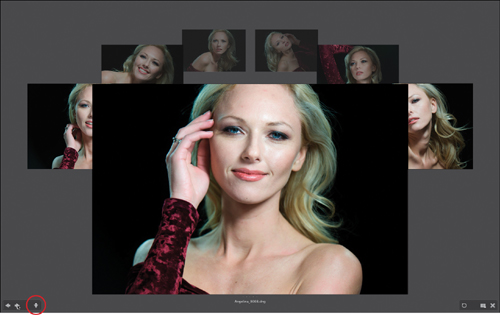
Now that the bad ones have been deleted, I want to quickly find “the keepers.” I start by pressing Command-A (PC: Ctrl-A) to select all the photos, then I press Command-B (PC: Ctrl-B) to enter the full-screen Review mode. Here your images just rotate around, and each time you click the Left/Right Arrow buttons (in the bottom-left corner), it brings another image to the front (as seen here). If I come across an image that’s not going to make it into the final batch I show the client, I just click on the Down Arrow button (shown circled here in red), and it removes it from this rotating carousel of photos. The idea is simple: keep dropping photos like this until all that’s left in the carousel are the keepers.
Step Seven:
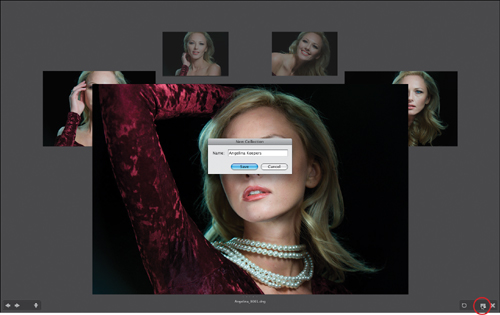
When there’s nothing left in rotation but your keepers, click on the New Collection button in the bottom-right corner of the Review mode screen (it’s shown circled here in red) to place all the remaining photos in their own separate collection (that way, all your best photos from this shoot are always just one click away). When you click this button, a little naming dialog will appear for you to name your new collection, then click the Save button. If ever you need to get back to this collection, just go to the Collections panel and you’ll see it listed there. Click on it, and those keepers appear.
Step Eight:
Okay, now I can return to the Essentials workspace (click on Essentials up top), and once that workspace appears, I go and add keywords to these photos in the Keywords panel (see page 48 for how to keyword). Next, I’m ready to start editing my photos (what’s nice is that, in this case, I’m down to just five photos, which keeps my editing and retouching manageable, because I’m only editing and retouching the photos the client will actually see). So, once I’ve added my keywords, it’s time to start editing these images.
Step Nine:
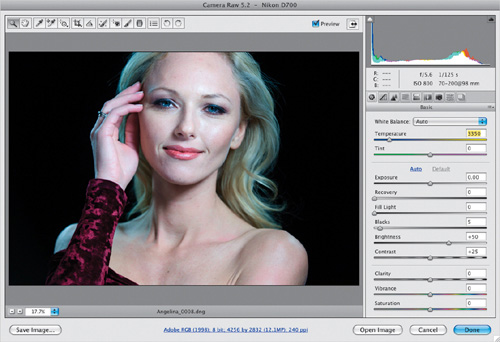
To edit one of the images, just click on it in Bridge, and then press Command-R (PC: Ctrl-R), which opens your photo in Bridge’s Camera Raw, as seen here (just to clarify, it’s not opening in Photoshop—Bridge has its own Camera Raw). Also, although I’m opening the image at this point from the regular thumbnail view, if you’re in that fullscreen Review mode and you want to open an image to tweak it in Camera Raw, you can use the same keyboard shortcut as above, and when you’re done, just click the Done button and it returns you to the full-screen Review mode. Now, back in Camera Raw, if you look up in the histogram, you can see that the exposure really isn’t too bad (it’s not clipping the highlights), but the white balance is way off (which is why her hair looks green), so since I always start off by fixing the white balance first, let’s do it.
Step 10:
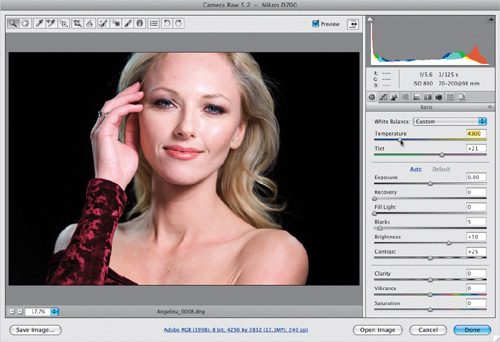
I took these shots with two of those Spiderlite TD-5s, which as I mentioned are continuous lights (rather than a flash), but they use very bright fluorescent bulbs, so as a starting point, I chose Fluorescent from the White Balance pop-up menu. When I did this, most of the green went away, but it still looked a little bit cold, so I just dragged the Temperature slider to the right a little bit (toward yellow) to warm it up, and that made a huge difference in the overall color of the photo (as seen here). (For more on making adjustments in Camera Raw, see Chapters 2 and 3.)
Step 11:
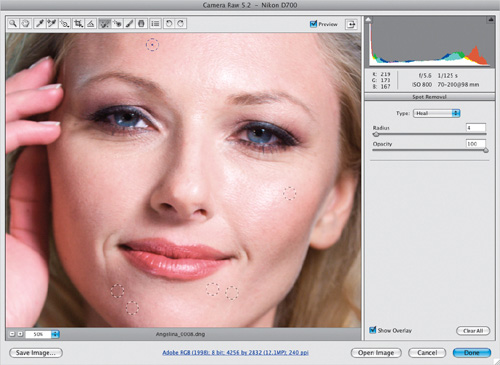
Now for a little retouching: Let’s start by removing some of the blemishes on her face. Zoom in to at least 50%, then get the Spot Removal tool from up in the toolbar. Make your brush size (Radius) a little larger than the blemish you want to remove and just click. Don’t paint—just click. Here, I found a few little blemishes, and I just moved my cursor over them and clicked once. This tool is ideal for little blemishes like this, but if it’s much more than this simple type of one-click stuff, you’re better off jumping over to Photoshop.
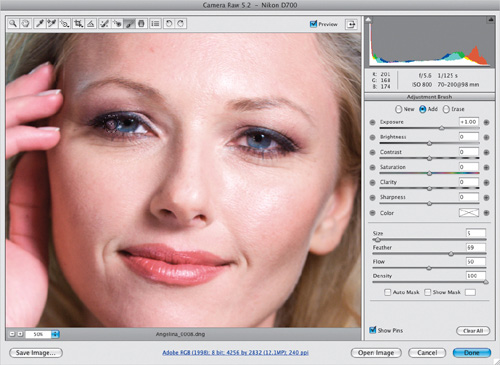
Step 12:
Now let’s brighten her eyes a bit using the Adjustment Brush. First, click on it up in the toolbar, then click on the + (plus sign) button at the right end of the Exposure slider twice, which resets the tool, and increases the exposure a bit (of course, we can control the exposure amount after the fact, so just think of this as our starting place. For a how-to on this brush, jump back to page 155). Take the brush, shrink the brush size so it’s nice and small, and then start painting over the whites of her eyes. A green pin will appear over the point where you started, which lets you know that you’ve adjusted that area. Once you’ve laid down a pin, you can control how bright the whites of her eyes are by dragging the Exposure slider.
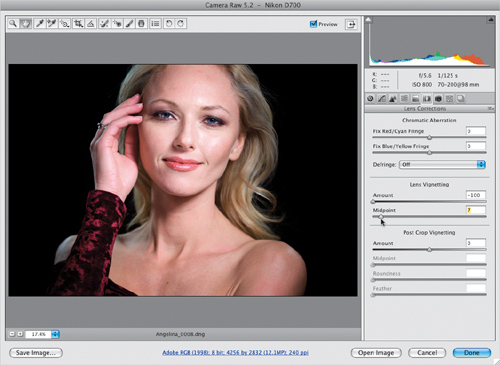
Step 13:
Let’s do one more thing here in Camera Raw before we head to Photoshop (I try to do as much as I can in Camera Raw, because it’s much easier and faster to do the adjustments here than it would be to do them in Photoshop itself). Let’s finish up here by adding an intentional vignette effect, which gives the feeling of a soft spotlight by darkening the edges all the way around the image. Click on the Lens Correction icon, and in the Lens Vignetting section, drag the Amount slider all the way to the left to really darken the corners, then drag the Midpoint slider almost all the way to the left, as well, so that darkening extends farther into the photo than just the corners, which gives you this nice soft spotlight effect.
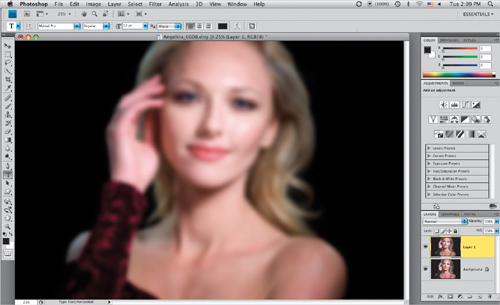
Step 14:
Now, click the Open Image button to open the photo in Photoshop, so we can do a little skin softening and sharpening (for more on these finishing techniques, see page 330). Press Command-J (PC: Ctrl-J) to duplicate the Background layer. Then, go under the Filter menu, under Blur, and choose Gaussian Blur. When the Gaussian Blur dialog appears, enter 25 pixels, then click OK to totally blur the photo (as shown here).
Step 15:
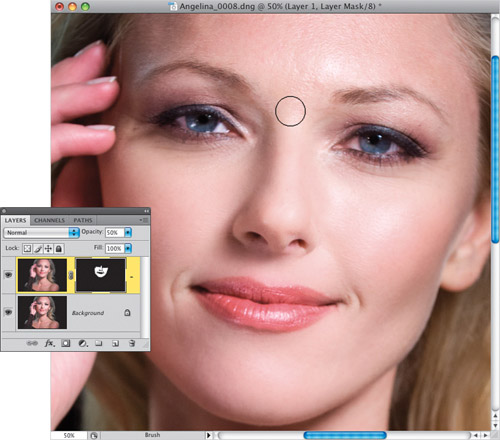
Now lower the Opacity setting of this layer to 50%, so you can clearly see the softening (this is more softening than you’ll usually wind up using, but by starting at 50%, it’s easier to see the softening as you apply it). We’re actually going to hide this 50% blurry layer behind a mask, and then paint in the softening in just the spots where we really want it. Start by pressing-and-holding the Option (PC: Alt) key and clicking on the Add Layer Mask icon at the bottom of the Layers panel (shown circled here in red).
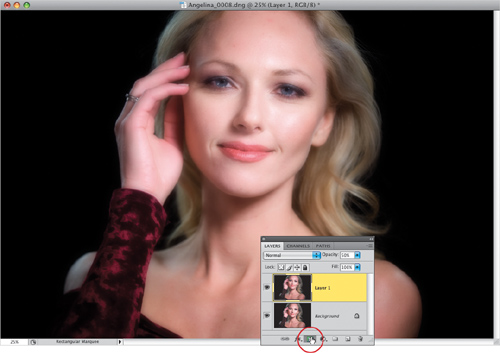
Step 16:
This will hide that blurry layer behind a black layer mask (as seen here). Now switch to the Brush tool (B), choose a medium-sized, soft-edged brush (from the Brush Picker up in the Options Bar), and paint in white over just the areas you want to soften, being careful to avoid any areas that should remain nice and sharp, like the eyes, eyebrows, nostrils, lips, hair, etc., as shown here. If you take a look in the Layers panel, you can see the black layer mask, and the skin areas we’ve painted over appear in white on the mask’s thumbnail.
Step 17:
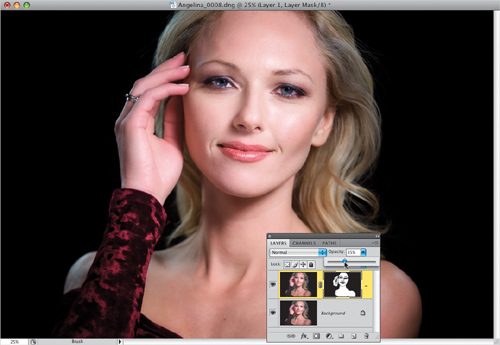
At this point, I generally lower the Opacity of this layer to 35% (as shown here), and I do this so you see some of the original skin texture, which keeps the softening from looking artificial. It’s one of those “less is more” things.
Step 18:
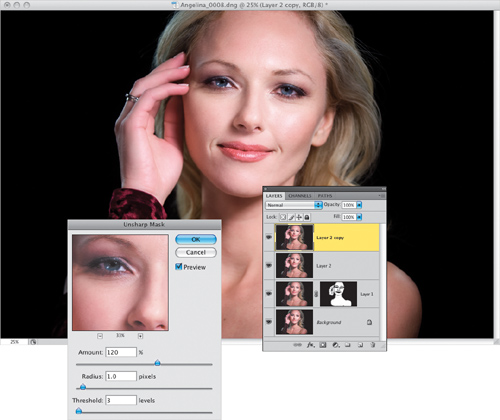
Now let’s finish up by applying some sharpening. We’re going to use a similar technique to the one we just used for skin sharpening, but instead we’ll be painting sharpening, rather than softening. Press Command-Option-Shift-E (PC: Ctrl-Alt-Shift-E) to create a new layer that is a flattened version of your image (this leaves your two original layers intact under this layer—should you ever need to get to them). Now press Command-J (PC: Ctrl-J) to duplicate the layer, then go under the Filter menu, under Sharpen, and choose Unsharp Mask. When the Unsharp Mask dialog appears, for Amount, enter 120%, for Radius, enter 1.0, and for Threshold, enter 3, then click OK to apply this sharpening to the duplicate layer.
Step 19:
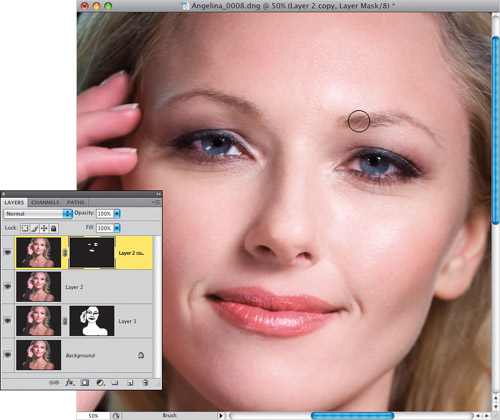
Press-and-hold the Option (PC: Alt) key and click on the Add Layer Mask icon at the bottom of the Layers panel to hide the sharpened layer behind a black layer mask. Get the Brush tool (use the same soft-edged brush), and paint over just the detail areas, like the eyes, eyebrows (as shown here), lips, nostrils, hair, and basically anything you want sharpened in the photo.
Step 20:
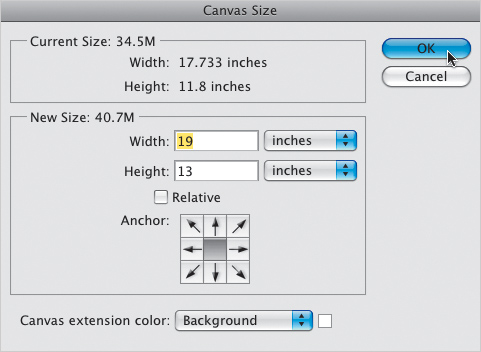
At this point, the editing is basically done, so I would start to set up the photo for printing. I want to print this on 13×19″ paper, so I’m going to add a little bit of white canvas space around my photo (the original photo size is 17.73″ wide by 11.8″ high). Go under the Image menu and choose Canvas Size. When the Canvas Size dialog appears, turn off the Relative checkbox, then type in the final size you want for your print in the Width and Height fields (as shown here), and click OK. Now we’re ready to start printing.
Step 21:
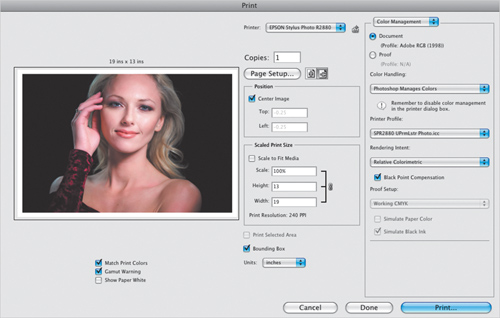
Now it’s time to print the photo, so go under the File menu and chose Print. When the Print dialog appears, choose your printer from the pop-up menu at the top of the center column. If you need to change your page size, click on the Page Setup button below that. On the right side of the Print dialog, set the Color Handling pop-up menu to Photoshop Manages Colors, then from the Printer Profile pop-up menu, choose the paper profile for the exact paper and printer you’re printing to (more on this, starting on page 389). In our case, we’re printing on Epson Ultra Premium Photo Paper Luster (which used to be called just Epson Premium Luster) to an Epson Stylus Photo R2880 printer. For Rendering Intent, choose Relative Colorimetric, and leave the Black Point Compensation checkbox turned on, then click the Print button.
Step 22:
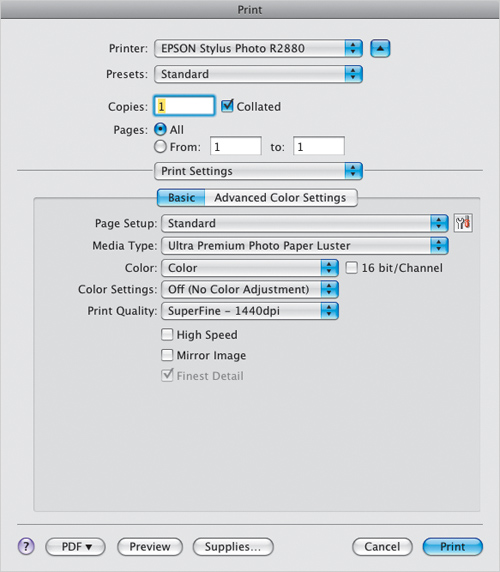
Clicking Print brings up your printer’s Print dialog (seen here). In the previous dialog (Photoshop’s Print dialog), you chose Photoshop Manages Colors (which is the right choice, by the way), but since Photoshop is going to manage the color, you don’t also want your printer trying to manage the color, too (the results aren’t pretty). So, go to the Print Settings section and turn your printer’s color management feature off (as shown here). On a PC, click the Preferences button, change the Mode to Custom, then choose Off (No Color Adjustment) from the pop-up menu. Don’t click the Print button yet—you’ve got one more step.

Step 23:
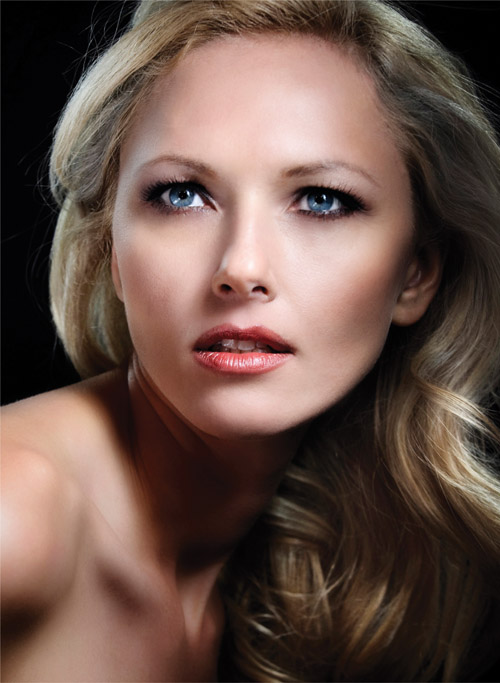
Now, also in the Print Settings section (the Printer Preferences dialog on a PC), choose the exact type of paper you’ll be printing to in the Media Type pop-up menu, choose your Print Quality, and if the High Speed checkbox is on, turn that off. Okay, that’s it. Now you can click Print. The final results are shown below. So that’s it—from import, to finding the photos you want to keep, to applying some edits in Camera Raw, another round of edits in Photoshop, and then printing the final image (which is what it’s all about, right?).
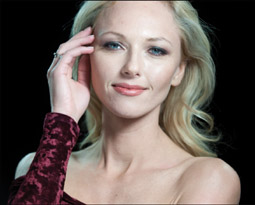
Before
After