1. Motion Basics
Motion 4 allows you to create simple text graphics or complex animations for your visual projects (documentaries, features, news, digital signage, and so on). With an easy-to-learn interface and rich tool set, Motion is your in-house special effects solution.
The incredible compositing power of Motion is organized into two main windows: the Canvas and Utility windows. Each of these windows is composed of multiple panes in which your project creation and modification is performed. Motion also has a built-in dashboard window, the Heads-Up Display (HUD), that provides quick access to often modified parameters.
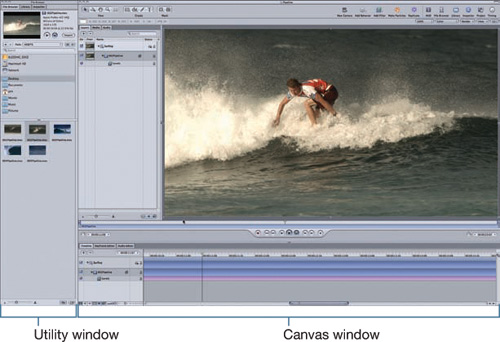
Utility Window
The Utility window has three main tabs: the File Browser, Library, and Inspector. In these tabs—which can be detached to create additional instances of the Utility window—you can import custom objects, add preset objects to your project, and transform those objects.
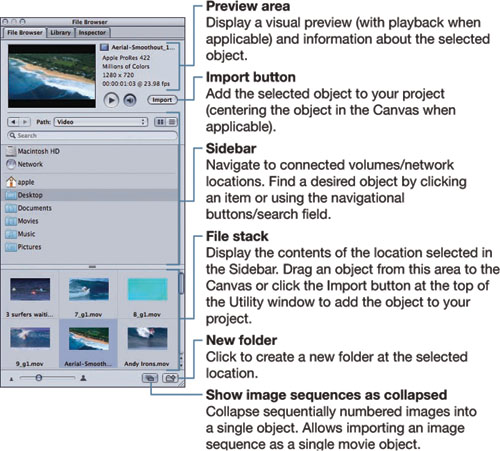
File Browser (Command-1)
Motion’s File Browser allows you to import objects into projects. It is directly linked to your system’s Finder.
Tip
The Sidebar and Stack perform like a Finder window. You can create a new folder and reorganize, rename, or delete files.
Note
When importing an object, Motion does not copy/collect the object’s file; it simply references the file at its current location.
Library (Command-2)
The Library provides access to all of the royalty-free content, behaviors, filters, generators, particle emitters, and replicators installed with Motion. It also contains shapes, shape styles, gradients, and text styles; and offers quick access to your iTunes and iPhoto libraries.

Tip
When you install Motion, the default location for the Library content is Users/Username/Library/Application Support/Motion. The Library content is available to use in any Motion project.
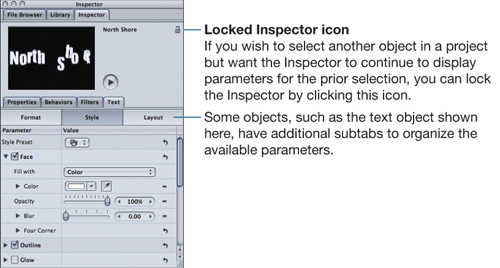
Inspector (Command-3)
The Inspector tab includes every control to transform an object (which becomes a layer when placed inside your project), group, effect, camera, or light. The Inspector comprises four subtabs: Properties, Behaviors, Filters, and Object.
Note
The fourth tab, Object, is a utility tab that changes its name based on the selected object type (Shape, Image, and so on).
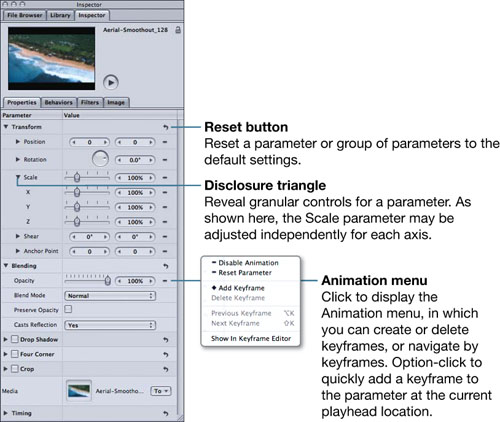
Properties (F1)
The Properties tab in the Inspector contains all of the core property parameters of a selected object. In this tab, you can transform a selection, change its blend mode, and tweak parameters related to lighting, shadows, and timing. You can also apply keyframes and parameter behaviors to most settings.
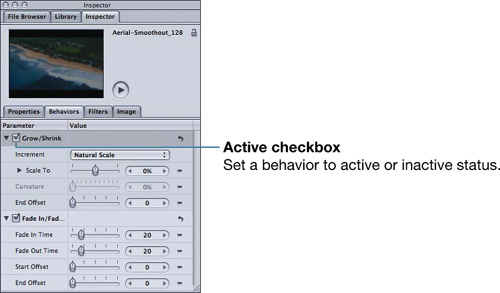
Behaviors (F2)
Behaviors are Motion’s tool for animating objects without setting keyframes. When you add behaviors to selected objects in your project, they are listed in the Behaviors tab.
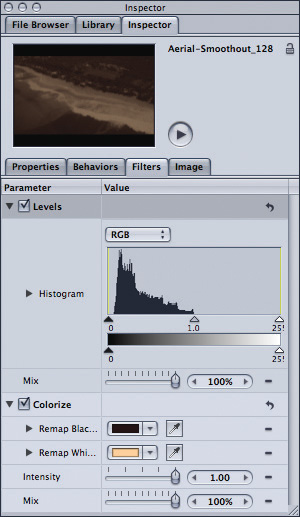
Filters (F3)
Filters allow you to achieve distinctive looks. As you add filters to selected objects, their parameters are listed in the Filters tab.
Tip
Filter order can affect the visual results of your project. Drag a filter name to a higher or lower position in the list to change the order in which filters are applied.
Object (F4)
The Object tab label changes depending on the currently selected object type. For example, if you select an image object, the tab will be labeled Image; if you select a text object, the tab will be labeled Text. The tab’s properties also reflect your selection.
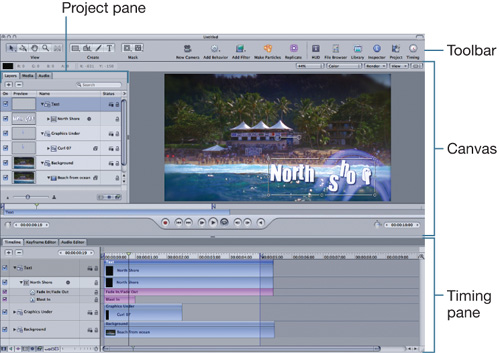
Canvas Window
The Canvas window is your main workspace. Here you build your project and create your composition. This composing process is done by direct manipulation of the Canvas workspace and in conjunction with the Inspector tab and the HUD. Two panes in the Canvas window are not visible when your start a new project: Project and Timing.
Canvas
The Canvas is the most prominent area of the Canvas window and acts as your composition area. You can transform objects, aim lights, and draw shapes in addition to performing many other tasks. The look and performance of the Canvas is dependent on the other areas of the Canvas window.
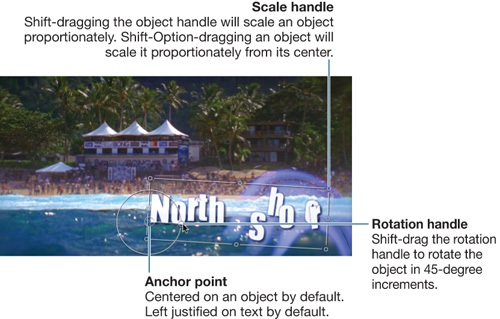
With an object selected in the Canvas, you can use a number of tools to directly manipulate that object. You can also Control-click (or right-click) an object to access the Object shortcut menu to access even more options.
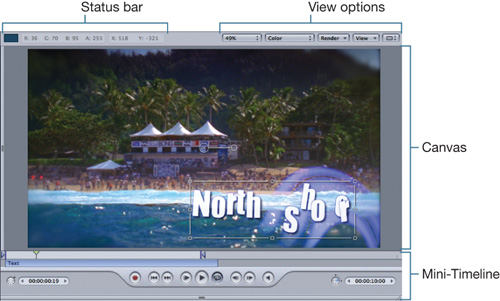
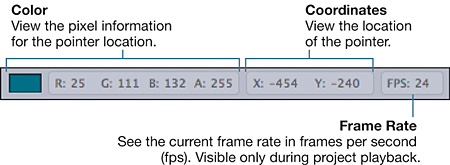
Status Bar
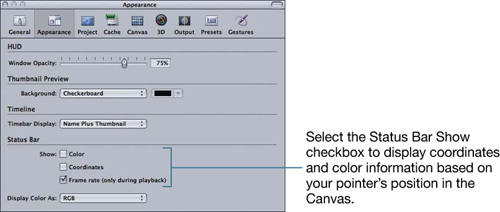
The Status Bar displays information about your project. You can choose which of three options are displayed in the Appearance pane of Motion > Preferences (refer to “Setting Project Properties and Preferences” in this chapter).
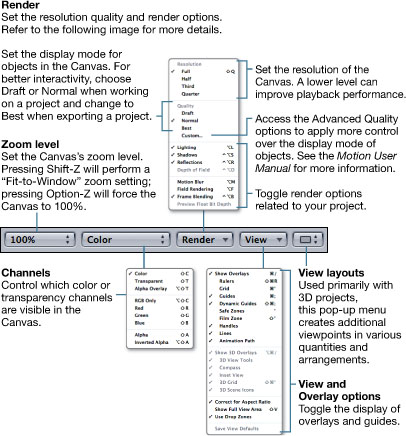
View Options
Here you can customize the Canvas’s appearance. These controls not only affect the project’s onscreen display, but they also influence the project output format during export.
Note
You can override these settings in the Output tab of the Export window or by using Share commands.
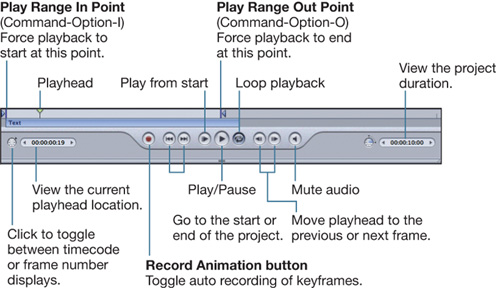
Mini-Timeline
The mini-Timeline provides simple control over project timing and playback. You can trim the duration or adjust the timing of a selected object, which is designated as a clip. More comprehensive timing adjustments are made in the Timing pane (discussed later in this chapter.)
Toolbar
In the Motion Toolbar, you can create and edit project objects, add cameras and effects, and show or hide interface elements. You can also customize the Toolbar to provide quick access to favorite tools and often-used parts of the user interface.
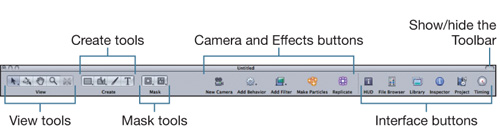
View Tools
This section of the Toolbar contains tools to manipulate and adjust objects in the Canvas.
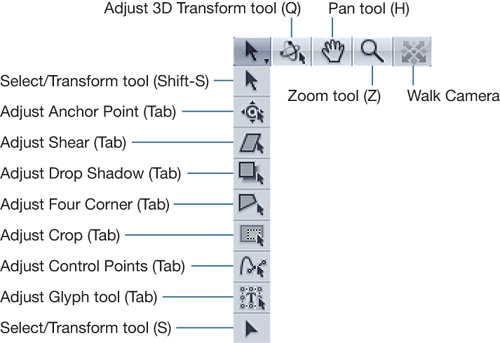
Note
In addition to using the keyboard-specific shortcuts shown, you can repeatedly press Tab to cycle through the tools under the Select/Transform tool and the Adjust 3D Transform tool, depending on the selected object type.
Create Tools
The Create tools include shape, paint, and text tools. See Chapter 3, “Shapes, Masks, and Paint,” for more information on the shape tools. See Chapter 2 for more information on creating text using the Text tool.
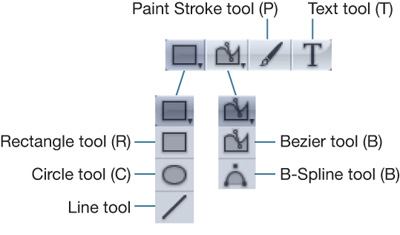
Mask Tools
Motion includes a variety of Mask tools, including Bezier and B-Spline. See Chapter 3 for more information on Mask tools.

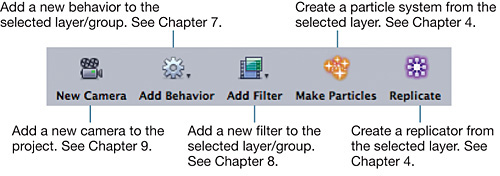
Camera and Effects Buttons
These buttons allow you to add cameras, behaviors, and filters to your project. You can also create particle systems or replicators from a selected object.
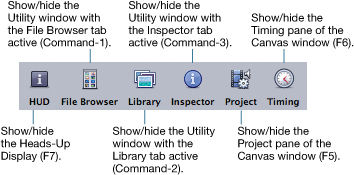
Interface Buttons
These buttons give you fast access to most of the user interface.
Project Pane (F5)
The Project pane is your project organization hub. It contains three tabs: Layers, Media, and Audio.
Layers Tab (Command-4)
Here you can access all of the objects in your project. Every object is represented as a layer. Layers can be consolidated into groups. Those layers and groups can be renamed in the Layers tab.
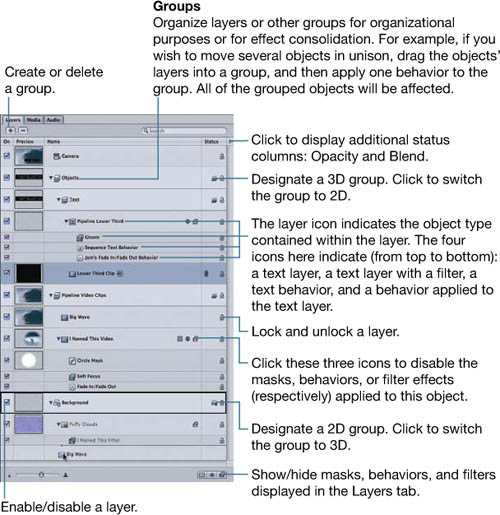
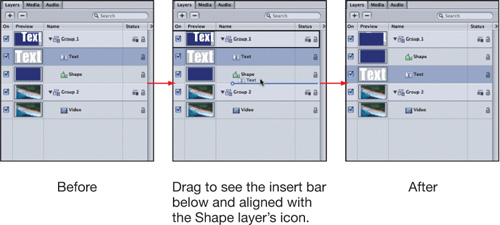
When working with a 2D object, a layer’s vertical position within the Layers tab determines the associated object’s compositing order in the Canvas. Higher layers are placed in the foreground; lower layers are placed in the background. You can drag the layers to reorganize them or to change their compositing order. An insert bar indicates where an object will appear in the Layers list and the group in which the object will reside.
In this example, the text object will be composited behind the shape but will remain in Group 1.
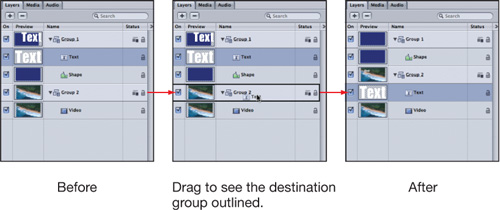
In this example, the text object will be composited behind the Shape but will reside in Group 2.
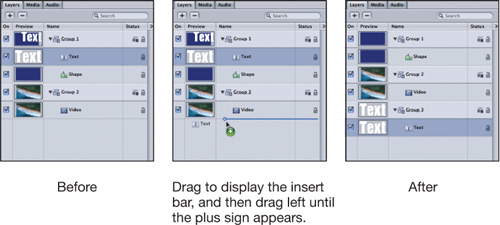
In this example, the text object will be composited behind the shape and the video while a new group is created to contain the text.
Tip
You can make duplicate layers by selecting a layer and then Option-dragging the layer within the Layers tab or within the Canvas. Alternatively, you can select a layer and press Command-D.
Note
If you have applied a filter or mask to a layer, you may wish to create a Clone layer rather than simply duplicating the layer. Select the layer and then press K to create a clone. Changes made to the filters or masks applied to the original layer will propagate to the same filters and masks present in the clone.
![]()
Media Tab (Command-5)
The Media tab tracks all outside assets that you have added to your project. These objects—such as QuickTime movies, still images, and audio—are listed along with their media properties such as resolution, pixel aspect ratio, and duration.

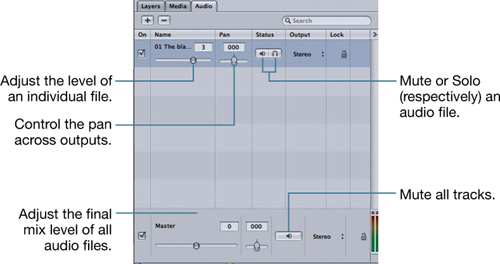
Audio Tab (Command-6)
The Audio tab allows you to access the audio files in your project.
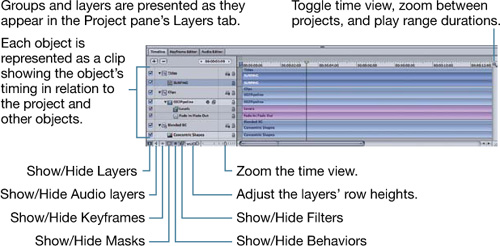
Timing Pane (F6)
The Timing pane represents your project within time. It includes three tabs: the Timeline, Keyframe Editor, and Audio Editor.
Timeline Tab (Command-7)
While in an application such as After Effects you perform most tasks in the Timeline; in Motion the Timeline is used primarily to make global changes and perform simple project edits.
Keyframe Editor Tab (Command-8)
The Keyframe Editor allows you to work with keyframes in a graph-based environment. Using keyframes, you can animate parameters of filters, behaviors, and objects over time.

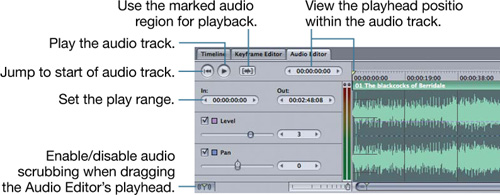
Audio Editor Tab (Command-9)
The Audio Editor tab provides access to the currently selected audio file. It shows you the entire audio file and allows you to choose which portion of audio to use in your project. You can also keyframe level and pan in this editor.
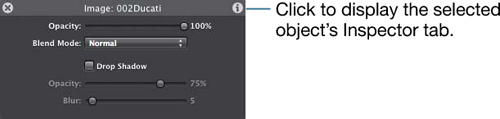
Heads-Up Display (F7)
The Heads-Up Display (HUD) is a floating window that functions like a mini-Inspector. It provides access to the most commonly used parameters. A HUD’s appearance changes based on the type of object currently selected.
Tip
You can cycle through HUDs that are attached to an object by pressing D. These HUDs could include filters or behaviors that you applied to a layer as well as properties of the object itself.
Setting Project Properties and Preferences
Beyond the basic interface configuration, Motion allows for customization. Some of these customizations are project-based; others are applied to the application itself.
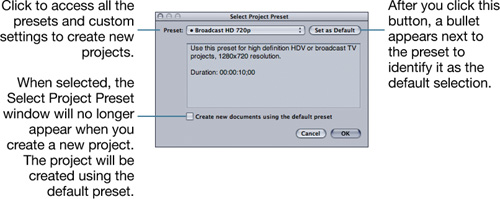
Project Presets
When starting a new project, you should choose a preset that reflects the frame size and frame rate of your intended output file. The available presets aid you in your choice by featuring the most commonly used codecs. However, these codecs do not determine the output codec. For QuickTime movie output, the default codec is Apple ProRes 4444 (although you can choose another codec if desired).
Project Properties
If necessary, you can alter almost all of your current project’s settings by choosing Edit > Project Properties.

Motion Preferences
Application-wide settings can be accessed by choosing Motion > Preferences. Only a couple of the nine preference panes are shown in the following images.
Appearance
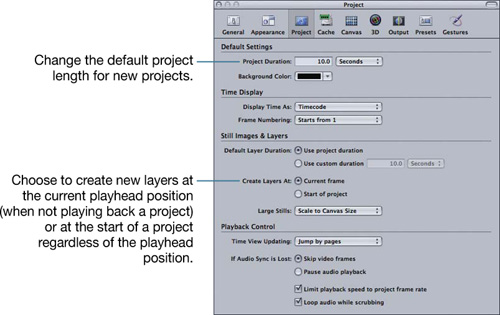
Project
Keyboard Shortcuts
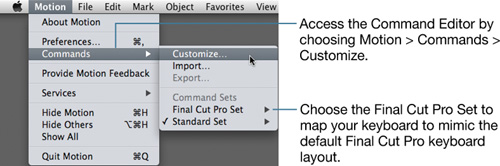
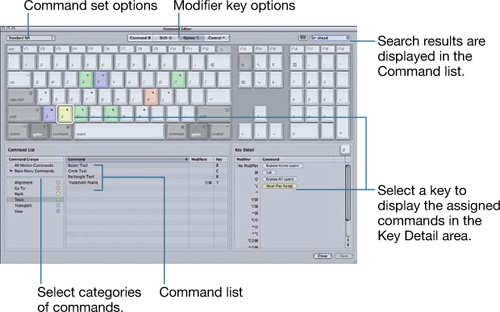
Motion’s Command Editor lets you customize the keyboard layout to your liking and save your customized command sets. It is also a great resource for learning Motion keyboard shortcuts.
Whether you want to modify an existing command set or create your own command set from scratch (perhaps to mimic another application such as After Effects), you can customize the keyboard to work the way you want.