
Database connectivity is essential in almost every application you create, regardless of whether it's a Windows-based program or a web site or service. When Visual Studio .NET was first introduced, it provided developers with a great set of options to navigate to the database files on their file systems and local servers, with a Server Explorer, data controls, and data-bound components. The underlying .NET Framework included ADO.NET, a retooled database engine that is more suited to the way applications are built today.
Visual Studio 2010 took those features and smoothed out the kinks, adding tools and functionality to the IDE to give you more direct access to the data in your application. This chapter looks at how you can create, manage, and consume data using the various tool windows provided in Visual Studio 2010. These can be collectively referred to as the Visual Database Tools.
A number of windows specifically deal with databases and their components. From the Data Sources window that shows project-related data files and the Data Connections node in the Server Explorer, to the Database Diagram Editor and the visual designer for database schemas, you'll find most of what you need directly within the IDE. In fact, it's unlikely that you'll need to venture outside of Visual Studio to work with your data.
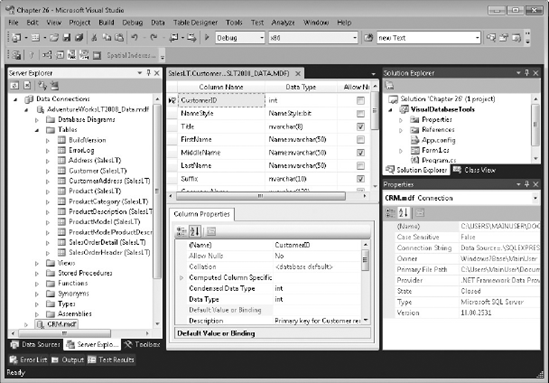
Figure 26-1 shows the Visual Studio 2010 IDE with a current database-editing session. Notice how the windows, toolbars, and menus all update to match the particular context of editing a database table. In the main area is the list of columns belonging to the table, a Table Designer menu has been added, and there is a Column Properties editing region below. The normal Properties tool window contains the properties for the current table. The next few pages take a look at each of these windows and describe their purposes so you can use them effectively.
In Chapter 12, you saw how the Server Explorer can be used to navigate the components that make up your system (or indeed the components of any server to which you can connect). One component of this tool window that was omitted from that discussion is the Data Connections node. Through this node, Visual Studio 2010 provides a significant subset of the functionality that is available through other products, such as SQL Server Management Studio, for creating and modifying databases.
Figure 26-1 shows the Server Explorer window with an active database connection (AdventureWorksLT2009_Data.mdf) and another database that Visual Studio is not currently connected to (CRM.mdf). The database icon displays whether or not you are actively connected to the database, and contains a number of child nodes dealing with the typical components of a modern database, such as Tables, Views, and Stored Procedures. Expanding these nodes lists the specific database components along with their details. For example, the Tables node contains a node for the Customer table, which in turn has nodes for each of the columns, such as CustomerID, FirstName, and LastName. Clicking these nodes enables you to quickly view the properties within the Properties tool window. This is the default database view; you can switch to either Object Type or Schema view by selecting Change View, followed by the view to change to, from the right-click context menu off the database node. Each of these views simply groups the information about the database in a different hierarchy.
To add a new database connection to the Server Explorer window, click the Connect to Database button at the top of the Server Explorer (third icon in from the left), or right-click the Data Connections root node and select the Add Connection command from the context menu.
If this is the first time you have added a connection, Visual Studio asks you what type of data source you are connecting to. Visual Studio 2010 comes packaged with a number of Data Source connectors, including Access, SQL Server, and Oracle, as well as a generic ODBC driver. It also includes a data source connector for Microsoft SQL Server Database File and Microsoft SQL Server Compact databases.
The Database File option was introduced in SQL Server 2005 and borrows from the easy deployment model of its lesser cousins, Microsoft Access and MSDE. With SQL Server Database File, you can create a flat file for an individual database. This means you don't need to attach it to a SQL Server instance, and it's highly portable — you simply deliver the .mdf file containing the database along with your application. Alternatively, using a SQL Server Compact (SSC) database can significantly reduce the system requirements for your application. Instead of requiring an instance of SQL Server to be installed, the SSC runtime can be deployed alongside your application.
Once you've chosen the data source type to use, the Add Connection dialog appears. Figure 26-2 shows this dialog for a SQL Server Database File connection, with the settings that are appropriate to that data source type. You are taken directly to this dialog if you already have data connections defined in Visual Studio.

The Change button takes you to the Data Sources page, enabling you to add different types of database connections to your Visual Studio session. Note how easy it is to create a SQL Server Database File. Just type or browse to the location where you want the file and specify the database name for a new database. If you want to connect to an existing database, use the Browse button to locate it on the file system.
Generally, the only other task you need to perform is to specify whether your SQL Server configuration is using Windows or SQL Server Authentication. The default installation of Visual Studio 2010 includes an installation of SQL Server 2005 Express, which uses Windows Authentication as its base authentication model.
Note
The Test Connection button displays an error message if you try to connect to a new database. This is because it doesn't exist until you click OK, so there's nothing to connect to!
When you click OK, Visual Studio attempts to connect to the database. If successful, it adds it to the Data Connections node, including the children nodes for the main data types in the database, as discussed earlier. Alternatively, if the database doesn't exist, Visual Studio prompts you asking if it should go ahead and create it. You can also create a new database by selecting the Create New SQL Server Database item from the right-click menu off the Data Connections node in the Server Explorer.
The easiest way to edit a table in the database is to double-click its entry in the Server Explorer. An editing window is then displayed in the main workspace, consisting of two components. The top section is where you specify each field name, data type, and key information such as length for text fields, and whether the field is nullable.
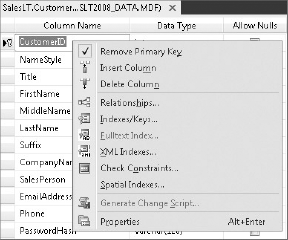
Right-clicking a field gives you access to a set of commands that you can perform against that field, as shown in Figure 26-3. This context menu contains the same items as the Table Designer menu that is displayed while you're editing a table, but it is usually easier to use the context menu because you can clearly see which field you're modifying.
The lower half of the table editing workspace contains the Column Properties window for the currently selected column. Unlike the grid area that simply lists the Column Name, Data Type, and whether the column allows nulls, the column properties area allows you to specify all of the available properties for the particular Data Source type.
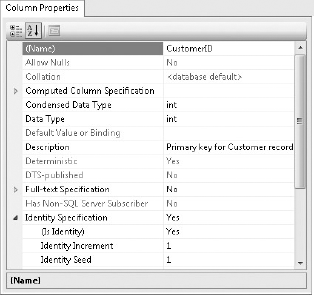
Figure 26-4 shows a sample Column Properties window for a field, CustomerID, that has been defined with an identity clause that is automatically incremented by 1 for each new record added to the table.
Most databases that are likely to be used by your .NET solutions are relational in nature, which means you connect tables together by defining relationships. To create a relationship, open one of the tables that will be part of the relationship and click the Relationships button on the toolbar, or use the Table Designer
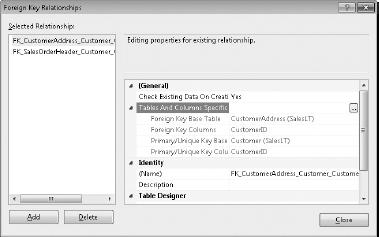
Click the Add button to create a new relationship, or select one of the existing relationships to edit. Locate the Tables and Columns Specification entry in the property grid and click its associated ellipsis to set the tables and columns that should connect to each other. In the Tables and Columns dialog, shown in Figure 26-6, first choose which table contains the primary key to which the table you selected will connect. Note that for new relationships the Foreign key table field is populated with the current table name and cannot be changed.

Once you have the Primary key table, you then connect the fields in each table that should bind to each other. You can add multiple fields to the relationship by clicking the blank row that is added as you add the previous field. When you are satisfied with the relationship settings, click OK to save it and return to the Foreign Key Relationships dialog.
Views are predefined queries that can appear like tables to your application and can be made up of multiple tables. Use the Data
The first task is to choose which tables, other views, functions, and synonyms will be included in the current view. When you've chosen which components will be added, the View editor window is displayed (see Figure 26-7). This editor should be familiar to anyone who has worked with a visual database designer such as Access. The tables and other components are visible in the top area, where you can select the fields you want included. The top area also shows connections between any functions and tables. The View in Figure 26-7 connects three tables by linking all rows in the Customer table with the CustomerAddress and Address tables. Figure 26-7 also shows that by right-clicking the connector between tables you can change the type of join used. If you need to add additional tables, right-click the design surface and select Add Table.
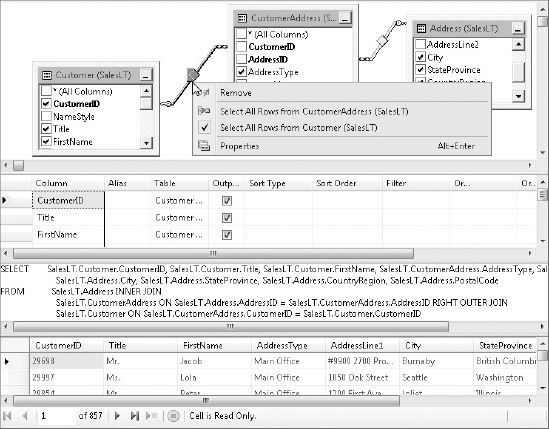
The middle area shows a tabular representation of your current selection, and adds columns for sorting and filtering properties, and the area directly beneath the tabular representation shows the SQL that is used to achieve the view you've specified. Changes can be made in any of these three panes with the other panes being dynamically updated with the changes.
The bottom part of the view designer can be used to execute the view SQL and preview the results. To execute this view, select Execute SQL from the right-click context menu on any of the panes, or click the button with the same name from the View Designer toolbar.
To create and modify stored procedures and functions, Visual Studio 2010 uses a text editor such as the one shown in Figure 26-8. Since there is no IntelliSense to help you create your procedure and function definitions, Visual Studio doesn't allow you to save your code if it detects an error.
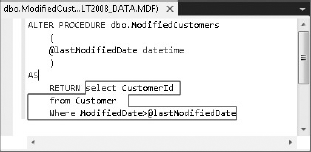
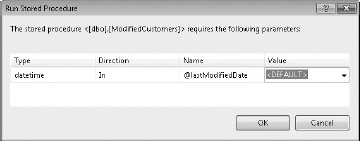
To help you write and debug your stored procedures and functions, there are shortcuts to Insert SQL, Run Selection, and Execute from the right-click context menu for the text editor. Inserting SQL displays the Query Builder shown earlier in Figure 26-7 as a modal dialog. Run Selection attempts to execute any selected SQL statements, displaying the results in the Output window. Finally, the Execute shortcut runs the entire stored procedure or function. If they accept input parameters, a dialog similar to Figure 26-9 is displayed, in which you can specify appropriate test values. Again, the results are displayed in the Output window.
You can also create a visual representation of your database tables via database diagrams. To create a diagram, use the Data
When you create your first diagram in a database, Visual Studio may prompt you to allow it to automatically add necessary system tables and data to the database. If you disallow this action, you won't be able to create diagrams at all; so it's just a notification, rather than an optional action to take.
The initial process of creating a diagram enables you to choose which tables you want in the diagram, but you can add tables later through the Database Diagram menu that is added to the IDE. You can use this menu to affect the appearance of your diagram within the editor too, with zoom and page break preview functionality as well as being able to toggle relationship names on and off.
Because database diagrams can be quite large, the IDE has an easy way of navigating around the diagram. In the lower-right corner of the Database Diagram editor in the workspace is an icon displaying a four-way arrow. Click this icon and a thumbnail view of the diagram appears, as shown in Figure 26-10.

Just click and drag the mouse pointer around the thumbnail until you position the components you need to view and work with in the viewable area of the IDE.
The Data Sources window, which typically appears in the same tool window area as the Solution Explorer, contains any active data sources known to the project, such as datasets (as opposed to the Data Connections in the Server Explorer, which are known to Visual Studio overall). To display the Data Sources tool window, use the Data
The Data Sources window has two main views, depending on the active document in the workspace area of the IDE. When you are editing code, the Data Sources window displays tables and fields with icons representing their types. This aids you as you write code because you can quickly reference the type without having to look at the table definition. This view is shown on the right image of Figure 26-11.
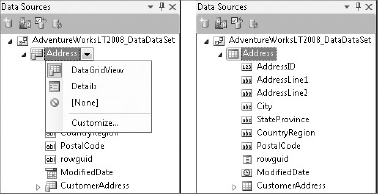
When you're editing a form in Design view, however, the Data Sources view changes to display the tables and fields with icons representing their current default control types (initially set in the Data UI Customization page of Options). The left image of Figure 26-11 shows that the text fields use TextBox controls, whereas the ModifiedDate field uses a DateTimePicker control. The icons for the tables indicate that all tables will be inserted as DataGridView components by default as shown in the drop-down list.
In the next chapter you learn how to add and modify data sources, as well as use the Data Sources window to bind your data to controls on a form. Data classes or fields can simply be dragged from the Data Sources window onto a form in order to wire up the user interface.
Visual Studio 2010 also has the capability to view and edit the data contained in your database tables. To edit the information, use the Data
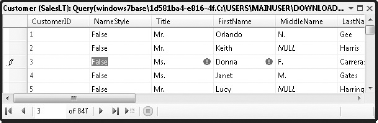
You can also show the diagram, criteria, and SQL panes associated with the table data you're editing by right-clicking anywhere in the table and choosing the appropriate command from the Pane submenu. This can be useful for customizing the SQL statement that is being used to retrieve the data — for example, to filter the table for specific values, or just to retrieve the first 50 rows.
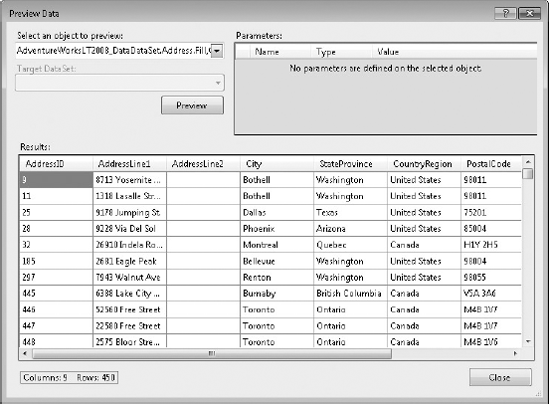
You can also preview data for different data sources to ensure that the associated query will return the information you expect. In the database schema designer, right-click the query you want to test and choose Preview Data from the context menu. Alternatively, select Preview Data from the right-click context menu off any data source in the Data Sources tool window.
The Preview Data dialog is displayed with the object list defaulted to the query you want to test. Click the Preview button to view the sample data, shown in Figure 26-13. A small status bar provides information about the total number of data rows that were returned from the query, as well as how many columns of data were included.
If you want to change to a different query, you can do so with the Select an object to preview drop-down list. This list contains other queries in the same data source, other data sources, and elsewhere in your solution. If the query you're previewing requires parameters, you can set their values in the Parameters list in the top-right pane of the dialog. Clicking the Preview button submits the query to the appropriate data source and displays the subsequent results in the Results area of the Preview Data dialog box.
With the variety of tools and windows available to you in Visual Studio 2010, you can easily create and maintain databases without having to leave the IDE. You can manipulate data as well as define database schemas visually using the Properties tool window in conjunction with the Schema Designer view.
Once you have your data where you want it, Visual Studio keeps helping you by providing a set of drag-and-drop components that can be bound to a data source. These can be as simple as a checkbox or textbox, or as feature-rich as a DataGridView component with complete table views. In the next chapter you learn how being able to drag whole tables or individual fields from the Data Sources window onto a form and have Visual Studio automatically create the appropriate controls for you is a major advantage for rapid application development.