
Now that you've learned just about everything you need to know about making your photos look good, it's time to think about how you'll output them. Photoshop Elements 8 gives you a wide variety of options for outputting finished photos — ranging from print and e-mail, to amazing slideshows. In this chapter I introduce you to many of these features so that you know what your options are when it's time to share your work with the world.
Before you get to some of the more recent sharing options, take a moment to learn about the most traditional form of sharing — printing. In Photoshop Elements (PSE) you can print from the Editor or the Organizer, making it easy to create a variety of print layouts.
To print a photo from the Editor, open the file and choose File
Note
Keep in mind that any printing options that are Organizer specific are not available in the Mac version of PSE 8. Also note that some features in the Organizer don't appear if you don't have Elements Premier installed.
When the Print dialog opens, all photos currently in the Editor are displayed in the vertical strip on the left. Be aware that each of these photos will be printed when you click the Print button. If you want to remove a particular photo from the list, select the photo and click the Remove button at the bottom of the list.
To add a photo that isn't open in the Editor, click the Add button. When the Add Photos dialog opens, you'll have the opportunity to choose photos from the Organizer's Media Browser, an album, or the entire catalog. You can also add photos based on a specific keyword.
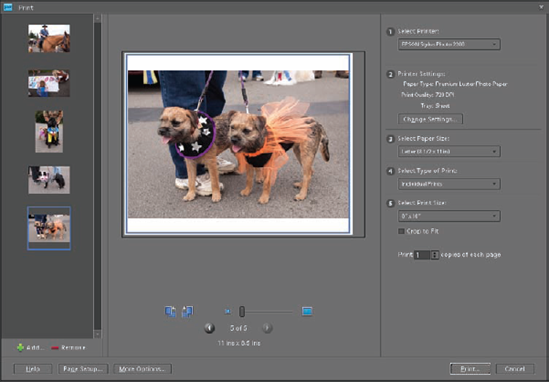
The Print dialog is designed to step you through the process and provides numbered menus on the right.
The Select Printer drop-down menu lists all the printers installed on your system. When a printer is selected, it affects some of the settings below it. That's why this is the first step.
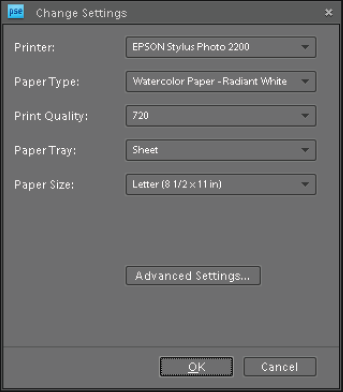
The Printer Settings are affected by the printer selection in Step 1. To change them, click the Change Settings button. The dialog shown in Figure 14.2 opens.
Tip
If multiple photos appear in the Print dialog, any changes you make to the settings on the right affect all of them.
Use the Paper Type drop-down menu to choose the type of paper you're using. Select the resolution you want to use from the Print Quality drop-down menu. Then click the Advanced Settings button to open your printer's driver dialog so that you can match these paper and resolution settings to those in your printer's software.
You want both programs to use the same information so that the colors in the file are accurately interpreted into the color gamut of the printer. Failing to match these settings causes unpredictable results.
Use the Select Paper Size drop-down menu to choose the paper size you're using. Be sure to select only paper sizes that work with the printer you're using.
The options on the Select Type of Print drop-down menu are Individual Prints, Picture Package, and Contact Sheet. If you choose either Picture Package or Contact Sheet, you'll be asked to switch to the Organizer's Print dialog, which I cover in a moment. When printing from the Editor, you need to choose Individual Prints.
The Select Print Size drop-down menu has a short list of standard print sizes, from wallet size to 8 × 10 inches. There are two additional options: Actual Size and Custom. Custom enables you to create a special print size.
If you choose a size that's different than the actual print size, you lose some control over the quality of your photo because the image is resampled and any final sharpening may be compromised. With that said, when you're making small prints, this loss is somewhat negligible, so you may find the results acceptable. However, when increasing the size (for example, resizing a photo that measures 3.5 × 5 inches to 8 × 10 inches), you will notice degradation to the image.
Note
You can also use the Size slider below the main image display to change the photo's size. This adjustment affects only the selected photo.
Selecting Crop to Fit fills the frame with the selected image. Just be aware that this can cause parts of the image to be cropped unless it's exactly the same aspect ratio as the selected print size.
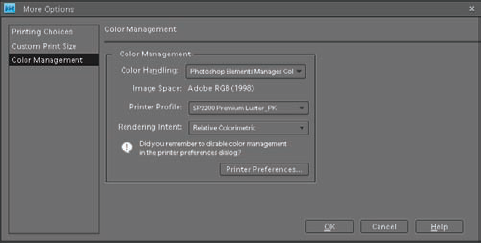
Clicking the More Options button on the lower left of the dialog enables you to set up a few other printing options. The first two options, Printing Choices and Custom Print Size, are handy, while the third, Color Management, is important.
Figure 14.3 shows the More Options dialog. The options appear in the pane on the left and are as follows:
Printing Choices. Use these settings to add a date, caption, or filename above or below the printed area. You can also add a border around the image by selecting Thickness in the Border settings. Then click the color swatch to the right to change the color of the border.
Custom Print Size. Use this group of settings to specify a custom print size, similar to using Custom in the Select Print Size menu.
Color Management. Use these settings to manage how color is converted between PSE and your printer. The Color Handling menu enables you to choose to allow the printer to manage color or to let PSE manage the color. Most modern printers are pretty good at handling color, so try using that setting on a few test prints. If you aren't satisfied with the results, let PSE manage the color.
Just be aware that if you choose to do so, you need to choose the same paper you're printing on from the Printer Profile menu and need to turn off all color management in your printer's driver. This varies with different printer models. Look for a setting in the printer's driver that says something like No Color Adjustment.
To access your printer's driver software from this dialog, click the Printer Preferences button.
After you get the Print dialog set up the way you want it, click the Print button to begin printing.
When you're printing from the Editor, only one photo can be printed per page. If you want to print more than one photo on a single sheet of paper, you need to select the photos in the Organizer and then use the Organizer's Prints dialog to print them.
Open the Organizer Prints dialog, shown in Figure 14.4, by choosing File
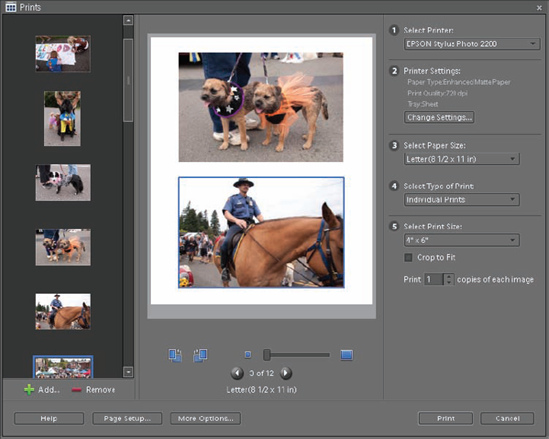
Notice that because 4 × 6 is chosen in the Select Print Size menu, two photos appear in the main display area, which are laid out on a single 8.5 × 11 sheet of paper.
If one of these photos were vertical, it would automatically rotate to fit the layout. If a smaller print size were chosen, even more photos would be grouped onto the page.
Tip
Use the arrow buttons below the main display area to cycle through the different pages, rather than individual photos.
Back in the days of film photography, photographers would lay strips of film on a sheet of photographic paper to make a contact print of the strips of film. This enabled them to fit several small proofs onto a single sheet of paper.
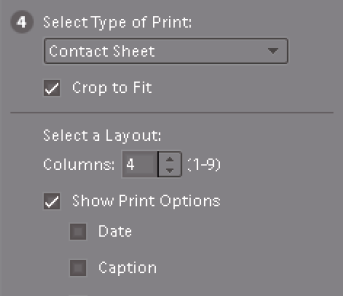
When Contact Sheet is selected from the Select Type of Print drop-down menu, a set of options appears below it. If the option Show Print Options is selected, additional options are displayed below the contact sheet options, as shown in Figure 14.5. Use the Columns setting to control the number of columns of photos that are laid out on the page.
Selecting Date, Caption, or Filename uses metadata information for each photo to display its information next to it. Keep in mind that if you have not added caption information to the photo using the Organizer's Properties panel, nothing appears next to the photo when that option is selected.
Contact sheets are useful when you want to group a lot of photos onto a single sheet. However, a more common way to print multiple photos on a single sheet is to use Picture Package.
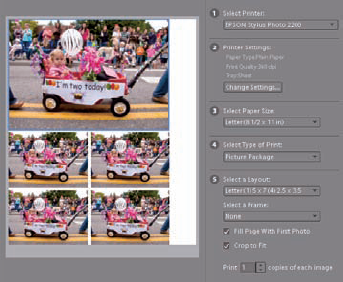
The Picture Package setting enables you to group different sizes of photos onto a sheet of paper. It may remind you of the picture packages school photographers sometimes offer. When Picture Package is selected in the Select Type of Print drop-down menu, the Select Print Size menu (5) changes to Select a Layout. Use this menu to choose the sizes of prints to be added to each page.
Typically, when you're printing a picture package, it's because you want different sizes of the same photo. By default, the Picture Package setting adds photos to the layout in the same sequence they appear in the Organizer.
However, if you want to create a picture package of a single photo, select Fill Page With First Photo. Figure 14.6 shows a picture package that consists of one 5 × 7 and four 2.5 × 3.5 wallets on a single letter size sheet of paper — perfect for Grandma.
Use the Select a Frame drop-down menu to add a fun, graphical frame around each photo on the sheet. Just be aware that these frames sit on top of the outer edges of the photos, reducing the total image area of each photo.
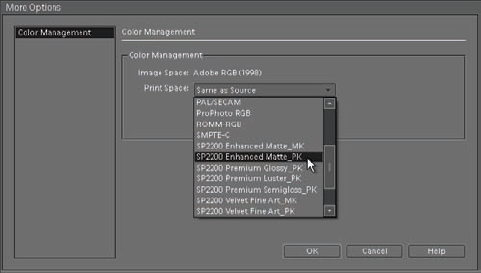
Color management works a bit differently in the Organizer's Prints dialog than in the Editor's Print dialog. The More Options dialog, shown in Figure 14.7, does not have an option to allow the printer to manage color as it does in the Editor's Print dialog.
By default, the printer color space is set to the same color space as the file's color space. For best results, select the same paper you're using from the Print Space drop-down menu so that the printer can do the best job of converting the colors.
Inkjet printing is convenient, and it can be fun — especially when everything works the way it's supposed to. But when it doesn't, it can be frustrating and a waste of money in the form of ink and paper. That's why it's often a good idea to have a photolab handle your printing needs.
There are a lot of online printing solutions, but I recommend finding a lab in your area. Many of these people are experts in color correcting so you can depend on them to fine-tune the color of your prints so that they look exactly the way you want them to look.
When you begin working with a lab, it behooves you to ask a few questions, such as:
What file types do they prefer?
What color space is the best for their equipment?
What's the best way to deliver files for printing?
Does the lab automatically color correct photos, or is it something you need to request?
I can tell you from my own experience that I enjoy inkjet printing when I'm working on a special project, but when I simply need a few quick photos, it's much simpler and cheaper to leave the printing to professionals.
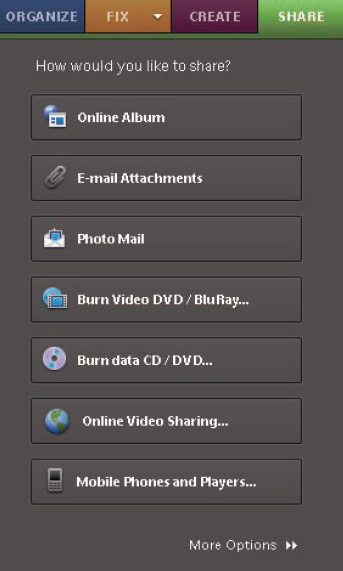
Digital technology has opened the door to a myriad of photo sharing options. The quickest way to get to the PSE sharing features is to click the Share tab on the right side of the Organizer, or the Editor, which opens the Share panel shown in Figure 14.8. Then click the button for the specific type of sharing method you want to use.
In Chapter 3 you learned how to collect groups of photos into albums in the Organizer using the Albums pane. You also learned to upload albums and to burn them to disc to share them with friends and family. The Share panel offers a more refined way of accomplishing these tasks.
Note
Some of these features use the Organizer, so if you choose them from the Editor's Share panel, the Organizer automatically opens. Because of this, it's sometimes easier to use these sharing features from within the Organizer.
Figure 14.9 shows the pane that opens when you choose Online Album from the Share panel. The two options at the top of the panel enable you to share an existing album by selecting it, or to create a new album from photos selected in the Organizer.
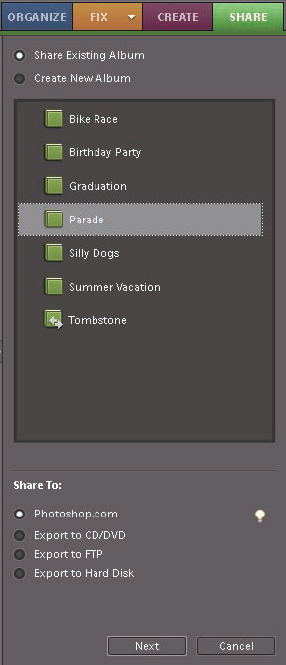
When you choose to create a new album, a window similar to the New Album pane under the Organize tab is displayed. When an existing album is chosen from the list in the main pane, its photos are displayed in the Organizer's browser, enabling you to make last minute adjustments to the sequencing, or to remove any photos you decide to not share.
The Share To area at the bottom of the panel enables you to choose how to share the selected album. Here's what these options are used for:
Photoshop.com. This enables you to upload the album to Photoshop.com in a slideshow-style format. It also gives you options to send e-mail announcements to your contacts to let them know about the album. You can also choose to allow your contacts to easily download photos and order prints online.
Export to CD/DVD. This option is similar to uploading an album, but the entire album is burned to disc instead of uploaded.
Export to FTP. If you already have a Web site, you can use this option to upload an album to your site using File Transfer Protocol (FTP) software. In order to do this, you'll need to know the login information for your Web site hosting service.
Export to Hard Disk. This option is just like the Export to CD/DVD option, except that the album is written to a hard disk instead of a plastic disc.
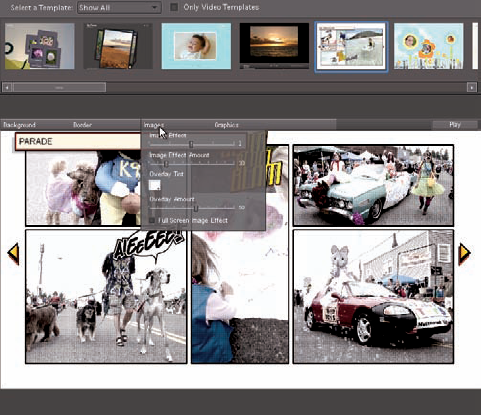
When you select any of these album sharing options and click the Next button, the Photo Browser area is replaced with a preview of the album. The Filmstrip at the top displays a series of templates. Click the Select a Template menu to open a drop-down menu with different design sets to choose from.
Double-click one of the albums in the Filmstrip to change your album to that template. Many of these templates have different sets of controls.
Note
The options Burn Video DVD/BluRay, Online Video Sharing, and Mobile Phones and Players are functional only if Adobe Premiere Elements is installed on your system. This video-editing software is not covered in this book.
In Figure 14.10 the Comic Book template is selected and the cursor is hovering over the Image controls for this template.
One of the most common methods for sharing photos in today's digital age is to attach photos to an e-mail message. However, some photos may be too large to go through e-mail or too large for proper viewing by the person you send them to. Fortunately, PSE makes it easy to prepare photo attachments.
Note
Albums are saved to discs or hard discs in a Web-style format, similar to slideshows discussed in Chapter 4. To view a slideshow, open the folder that it was saved into and double-click the file named index.html.
The first time you click the E-mail Attachments button in the Share panel, a window opens asking you which e-mail program you're using.
By default Microsoft Outlook or Outlook Express is selected, but you can change this by selecting your e-mail program from the drop-down menu.
If you don't see yours listed, you can use the Adobe e-mail service by setting up an account. To do so, you need to choose Edit
Note
Use the Sharing preferences any time you need to change your e-mail client.
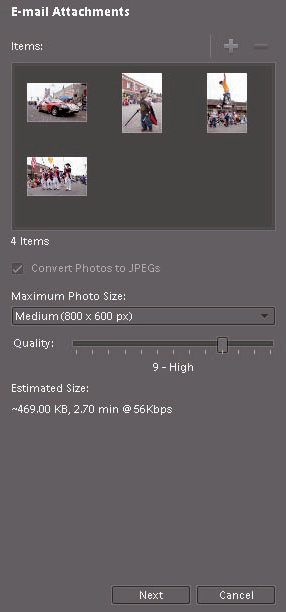
To create and send an e-mail attachment, select the photo(s) you wish to send and then click the E-mail Attachments button in the Share panel. When you do, the E-mail Attachments pane, shown in Figure 14.11, opens.
Each option is used as follows:
Convert Photos to JPEGs. If the selected photo(s) aren't already in the JPEG file format, you select this to automatically convert them. I strongly recommend this because the JPEG file format is universal, and JPEGs can be compressed to make them smaller, which facilitates their transfer through e-mail. Remember that because the converted file is saved as a JPEG, it won't overwrite the original file.
Maximum Photo Size. This drop-down menu is used to choose the pixel dimensions of the photos. I recommend using the Medium setting unless you know what kind of viewing environment the recipient is using. For example, if you're sending a photo to Grandma and you know she has a small display on her computer, you may want to choose a smaller size. Just be aware that the larger the dimensions are, the larger the overall file size is.
Quality. This slider controls the amount of JPEG compression. The lower the quality, the more compressed the file, as seen by monitoring the Estimated Size readout. As you reduce the Quality value, the size is also reduced.
Just be aware that there is a point of diminishing returns where low-quality values compromise the quality of the file — especially when you're using a larger Maximum Photo Size setting. I recommend not going below a value of 3.
Estimated Size. This readout gives you some valuable information about file size, as mentioned previously. It also tells you how large a group of photo attachments is and how fast they will travel through the online process. Keep in mind that these values are based on slower 56K modems. If you and the recipient have faster connections, such as DSL or cable, transfer times will be a fraction of the time shown here.
When you click the Next button, the pane changes, giving you the opportunity to edit the e-mail's message and to select recipients from your Elements Contact Book.
If you don't have recipients in the contact book, click the icon that looks like a person to open the Contact Book dialog. Then you can choose to add new contacts or import all the contacts from your Outlook Express contacts.
After you've added a message and selected recipients, click the Next button to launch your e-mail software and send an e-mail with the photo(s) attached. Preparing and sending photos through e-mail doesn't get much easier than this.
Photo Mail is a different way of sending a photo through e-mail. Instead of attaching the photo to the e-mail, it's embedded inside the e-mail message. Because of that, you don't have all the sizing and quality options you see when using the E-mail Attachments pane. However, you do get to choose a graphical stationary and customize the layout of the e-mail.
Be aware, though, that sometimes your recipient's e-mail program may not support this kind of embedded e-mail.
Though this seems cool, I recommend that you keep things simple when e-mailing photos so that you not only know that the recipients can see it, but that you also know that they'll see it at its best.
The Burn data CD/DVD feature enables you to easily burn selected photo files to a CD or DVD. This is a great way to create backup discs or to send a disc of photos to someone else. When you select it, the Burn data CD/DVD dialog opens, enabling you to choose which of your drives to use for the burning process.
You can also name the disc so that later on when it's put into a drive, the name shows in Windows Explorer/Mac Finder.
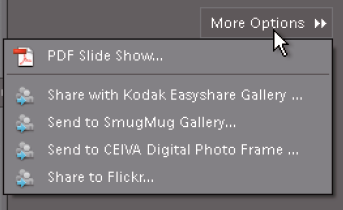
When you choose More Options from the bottom of the Share panel, the list shown in Figure 14.12 is displayed. The first option enables you to create a PDF slideshow that you can e-mail to someone. (If you're using the Editor's version of the Share panel, the PDF Slideshow option is another button.)
Unfortunately, you can't include music or transitions in this type of slideshow, so I don't bother covering it here. The other options enable you to upload photos to a variety of photo-sharing sites that you may be using.
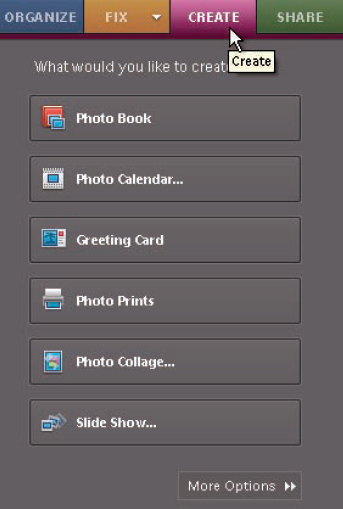
The final area to explore in PSE 8 is the Organizer's Create panel, shown in Figure 14.13. As you can see in this figure, there are a lot of options when it comes to creative ways of sharing your photos.
The Create panel works much like the Share panel. You choose a creation by clicking its associated button and then follow the contextual instructions. The following sections take a brief look at how each of the Create panel options are used.
When Photo Book is selected, the Photo Book pane displays options for creating a book to be printed on an inkjet printer, as well as three other options used for designing and printing a book using Shutterfly or Kodak Gallery. When one of these online services is selected, you're prompted to upload your files to the company's Web site for designing and ordering prints using its specific software.
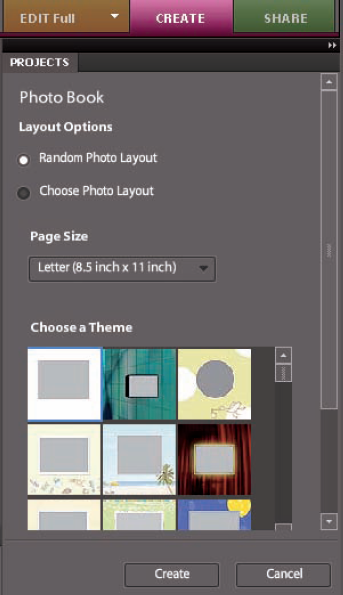
When the Print with Local Printer option is selected in the Create panel, the Editor opens with the selected photos loaded into the Project Bin, and the Projects pane displays the Photo Book options shown in Figure 14.14.
Choose a theme from the list, or select Choose Photo Layout to pick the layout you want to use. If you select Choose Photo Layout, click Next to move to the Choose a Theme pane. When you like your layout, click Create and let the Editor go to work building your book layout.
When you click Photo Calendar, your only options are to use the Shutterfly or Kodak Gallery online services. To use either of these services, you need to have an account with them. After logging into your account, you'll be guided through the design process using that particular service.
The Greeting Card option is much like the Photo Book option. The choices are to use an inkjet printer or one of the two featured online services. When you choose Print with Local Printer, you're guided through a process similar to Photo Book.
Clicking Photo Collage opens the Photo Collage pane in the Editor. It works much like the Greeting Card creation options.
When Photo Prints is selected, the Photo Prints pane is displayed in the Create panel, as shown in Figure 14.15.
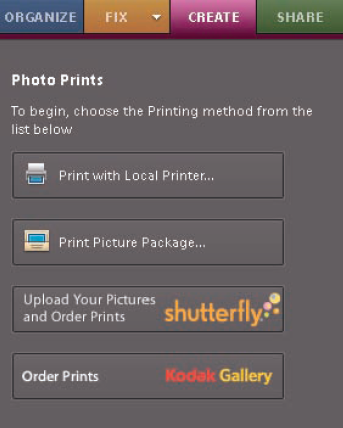
Choosing Print with Local Printer opens the Editor's Print dialog or the Organizer's Prints dialog, depending on whether the Share panel is being used in the Editor or Organizer. Choosing Print Picture Package opens the Organizer's Prints dialog, no matter where it's selected.
I covered both the Print and Prints dialogs earlier in this chapter. The two other options take you to the respective online services for print ordering.
The Slide Show option is one of the best features of the Create panel because it enables you to create an amazing slideshow. You can customize it with movie clips, narration, animation, and more.
After the slideshow is completed, it can be output as a movie file, burned to a video CD (VCD) for playback on a TV, and more. When you click Slide Show from the Create panel, the Slide Show Preferences dialog, shown in Figure 14.16, opens in the Editor.
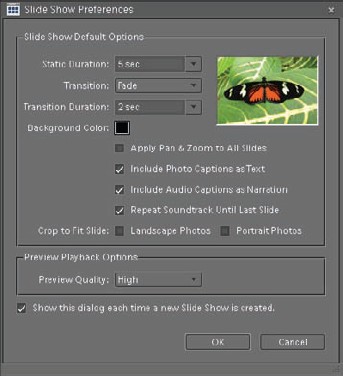
You can set up some basic slideshow preferences in the Slide Show Preferences dialog before getting into the main design dialog.
Though these settings affect the slideshow globally, you still have some flexibility in the Slide Show Editor that opens next. If you find that you tend to use the same Slide Show Preferences for all your slideshows, deselect Show this dialog each time a new Slide Show is created so that you don't need to click through the dialog every time you create a new slideshow.
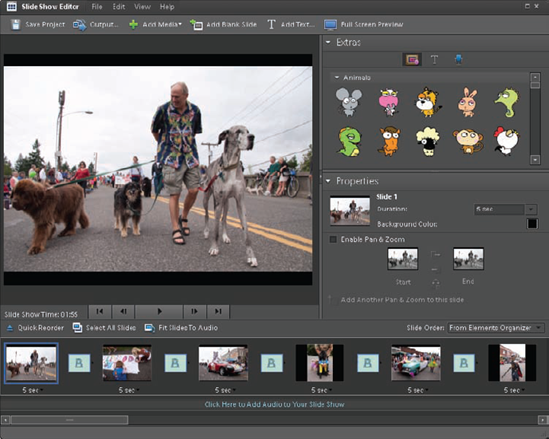
When you click OK in the Slide Show Preferences dialog, the Slide Show Editor dialog appears, shown in Figure 14.17.
It would be easy to write an entire chapter on this single feature because there are so many options. My goal here is to point out the highlights to help guide you on your exploration.
Click one of the three icons at the top of the Extras pane to populate the main Extras area with content. Left to right, these buttons are used to load graphics, formatted text, or a recorder that's used to record narration. In order to use the recorder, you need to have a microphone attached to your computer. Choose the slides you want to make the additions to by selecting them from the Filmstrip at the bottom of the dialog. Each of these changes affects only the selected slide.
Tip
To change the order of the slides, use the Slide Order menu or click and drag the slides in the Filmstrip to relocate them.
Though you can set all slide durations and transitions using the Slide Show Properties dialog, you can also adjust these settings on an individual basis. To change a slide's duration time, select a slide and use the Duration drop-down menu on the Properties pane and adjust the time value.
You can also change a slide's duration time by clicking the time displayed below it in the filmstrip and choosing a value from the pop-up menu.
To change a slide's transition theme, click the transition button to the right of the slide in the filmstrip to load transitions into the Properties panel. Use the Transition drop-down menu to choose a transition, and then use the Time menu to change the duration of that transition. You can also click the small arrow beside the transition icon to quickly open a pop-up menu of all transitions.
Tip
Use the Slideshow controls underneath the main image area to play and pause the slideshow so you can preview any changes. You can also play and pause a slideshow by pressing the Spacebar.
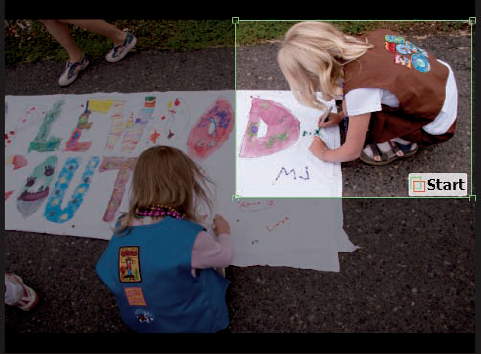
In 1990, director Ken Burns produced an acclaimed documentary, The Civil War, which was first shown on PBS. Burns developed a technique of panning and zooming photos to make their presentation more dynamic for television. The effect became very popular and is often referred to as the Ken Burns Effect. You can use it to add some pizzazz to your slideshows.
To add panning and zooming to one of your slides, select the slide. Then click the Properties menu and choose Enable Pan & Zoom. A green box appears on the image in the main viewing area.
Click and drag the corners of the box to indicate where the effect is to begin, as shown in Figure 14.18. Then choose the End thumbnail in the Properties panel. A red box displays on the main preview. Crop and position it to indicate where the effect is to end. Notice that both of these boxes are displayed on the slide's thumbnail on the Filmstrip.
To add a video clip or audio clip to your slideshow, click the Add Media button at the top of the dialog. A drop-down menu opens with options for selecting media in the Organizer or from a different location on your computer system.
You can add a music soundtrack by clicking the Click Here to Add Audio to Your Slide Show link at the bottom of the dialog. When you do, a pop-up dialog box opens with your system's My Music folder displayed. Choose the song you want to add and click Open.
If you want to make the slideshow's total duration fit the length of the music, click the Fit Slides to Audio button, which is just below the slideshow play/pause controls.
After you've done a lot of work on a slideshow, save it, even if you're not through working on it. To save a slideshow, click the Save Project button at the top-right of the dialog. The slideshow is then saved and displayed in the Organizer.
Be aware that when a project is saved, all related files and sub-folders are grouped together as a project. To maintain the link between these project files, sub-folders, and page files, avoid moving them using Windows Explorer. Instead use the Move command in PSE.
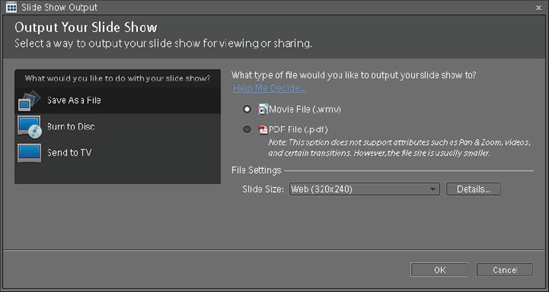
To output a slideshow, click the Output button at the top of the dialog, to the left of the Save Project button. When you do, the dialog box shown in Figure 14.19 appears. Choose an output option from the left side and then use any additional options on the right to complete the process.
These tips should help to get you started on creating some really fun slideshows. I want to offer you one final piece of advice: Try to avoid the temptation to use every option available.
If you throw in everything including the proverbial kitchen sink, your slideshow viewers may find their heads spinning by the end of your presentation!
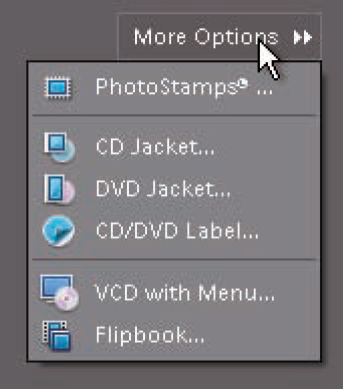
The last area to look at in the Create panel is the More Options menu at the bottom of the panel. This button opens a menu with options that enable you to create some other projects that aren't listed in the main Create pane. Figure 14.20 shows these options.
Here's what each of these options enable you to create:
PhotoStamps. Used to order custom postage stamps online that are printed with your own photos.
CD Jacket. Guides you through a design process similar to Greeting Cards to create a custom CD Jacket.
DVD Jacket. Guides you through a design process similar to Greeting Cards to create a custom DVD Jacket.
CD/DVD Label. Guides you through a design process similar to Greeting Cards to create a custom CD/DVD Label.
VCD with Menu. Enables you to create a video CD of a slideshow so that it can be displayed on a TV using a DVD player.
Flipbook. Guides you through a design process for creating an animated flipbook of selected photos. When completed, the flipbook is saved as a WMV (Windows Media Video) movie file that can be played on a TV, e-mailed, or uploaded to a Web site.
As you can see, PSE 8 provides you with myriad options when it comes to sharing your photos. If you take the time to learn to use a few of them, you'll be able to share the joy photography brings into your life with the people you care about.