At first blush, Photoshop Elements 8 can seem overwhelming to the new user. That's because its powerful set of tools provides so many possibilities when working with photos. However, after you get a basic understanding of how Photoshop Elements (PSE) is intended to be used, and how it compares and contrasts with other products in the Adobe Photoshop family, you'll have a better understanding of the intended purpose of PSE and how it will best serve you and your photo editing needs.
The first thing to understand about PSE is that it's really two programs in one. The first program is the Organizer, used to import and organize photos. The second program is the Editor. The Editor is used for lots of things, such as developing photos, inkjet printing, and sharing your photos with others through books, online albums, and calendars.
Note
Unfortunately, the Organizer isn't part of the Mac version of PSE. A scaled-down version of Adobe Bridge, which is Photoshop's file browser, is included instead. Due to space limitations, Adobe Bridge is not covered in this book.
You can open the two programs separately. For example, you can import some photos using the Organizer without opening the Editor, and fix a photo using the Editor without opening the Organizer. However, the two programs are generally used simultaneously. When the Organizer and the Editor are combined, they create a complete photo workflow that enables you to do just about anything you can imagine with your photos.
The term workflow, in the world of photography, refers to each of the steps taken to download, organize, edit, and output photos. If you process your photographs in a specific order, all necessary steps are carried out on each image in the most efficient manner and at the right time.
Note
For examples of other types of workflows think of companies such as McDonald's and Starbucks. These companies are successful because they have developed a standard workflow that guarantees consistency no matter where you purchase their products.
This book is written with the workflow concept in mind. Each chapter presents information in the sequential order it is generally carried out during the workflow. This allows you to experience the workflow as you learn.
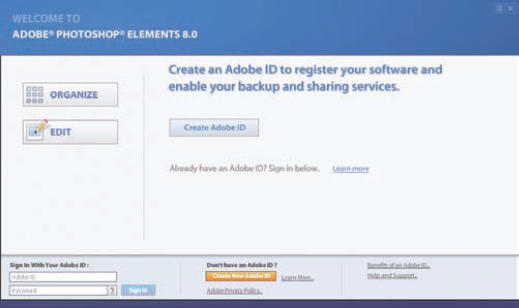
Figure 1.1 shows the Welcome screen that opens when you launch PSE. If you click Organize, the Organizer opens without opening the Editor. If you click Edit, the PSE editor opens without opening the Organizer. After one of these programs is open, you can open the other from within it.
After opening the Organizer, you're presented with a set of panel option tabs at the top right of the screen with the headings shown in Figure 1.2. These same tabs are also in the Editor. The four different workflow segments — Organize, Fix, Create, and Share — give you a clue as to how PSE is designed to help you manage your workflow. When one of these tabs is clicked, a contextual panel opens below it allowing you to use the features associated with that tab.
By dividing the workflow into useful segments, the Organizer enables you to work more intuitively. These workflow segments are arranged in the same order that they are typically carried out in the workflow. The following sections give you a quick look at each of these workflow segments to give you a bird's-eye view of the PSE workflow.
You use the Organizer to download and import photos so that PSE is aware of them, and it is generally the first thing you do with your photos. You can also use it to quickly view photos so you can choose which ones to keep and which ones to delete.
Some other things you can do in the Organizer include:
Add ratings to photos so that you know which ones are important
Add keyword tags that identify specific elements within each image so that you can locate them later
Sort photos by date and time
Move, rename, and delete specific files or groups of files
Create photo albums of special photos for showing and sharing
Access special information about photos that gives you some behind-the-scenes info on them
Back up and archive your photos so that you know they're protected
The Organizer is one of the most powerful features of PSE. It gives you complete control over your photographic digital assets, enabling you to find any photo you need when you need it. This is a huge advantage in an age when many people have several thousand photos in their photo library.
Editing photos is what Photoshop and PSE are famous for. That's because you can do just about anything — from removing a blemish in someone's face to completely swapping his head for one with a better expression. Though most photos may not require this kind of dramatic editing, almost all photos benefit from a trip through the Editor.
Here's a short list of some of the common tasks carried out in the Editor during the editing phase of a workflow:
Basic tonal and color adjustment
Localized tonal and color adjustment that affects only specific areas of a photo
Cropping and sizing
Using special filters for tasks such as blurring or sharpening
Compositing several photos into a panorama
Correcting problems in photos using a variety of retouching tools
The Editor enables you to edit photos so that they look exactly the way you want them to look. After you learn to use the tools and techniques in this book, you'll be limited in Editor only by your imagination.
Once you have your photos looking the way you want them, you move into the project creation portion of the workflow. This is where you get to focus on telling stories with your photos. Some of the options here, such as printing, are as old as photography. However, newer options are now available that enable you to share your work in a wide range of ways.
Here are some examples of projects you can create in PSE:
Create photo books and flipbooks
Create custom photo calendars and greeting cards
Order prints from online labs
Create really cool slideshows
Most of these projects in PSE are easy to create, and you can easily share them. But that's just the beginning of the photo-sharing capabilities in PSE.
One of the coolest things about digital photography is it enables you to easily share photos with loved ones, or with the rest of the world. PSE helps you do that by offering a range of sharing options, including:
Creating online albums to display at Photoshop.com or on your own Web site
Attaching appropriately sized photos to an e-mail so that they display correctly when you send them to someone
Burning a CD or DVD of photo files
Sending photos to online photo sharing sites such as Kodak, SmugMug, or Flickr
As you can see, PSE can handle just about anything you can think of when it comes to your photos.
When it comes to digital photography, there are three products in the Photoshop family: Photoshop, Lightroom, and PSE. Each program is used to organize and edit digital photos, and each has its own strengths and weaknesses, depending on the user's needs and skill level.
Note
Adobe Premier Elements, used for editing digital video, is available with certain packages of PSE. The focus of this book is on still photography so Premier is not discussed.
When I first began my Photoshop journey many years ago, I started with a free version of PSE that came with my first digital camera. It introduced me to digital image editing and the Photoshop way of doing things. This knowledge allowed me to grow into Photoshop when my needs outgrew that early version of PSE.
As you can imagine from their names, Photoshop and Photoshop Elements are quite similar. Each has a separate organizational program for browsing and organizing images, as well as a separate program for editing digital images.
The organizational program in Photoshop is named Adobe Bridge. Bridge shares several functions with the PSE Organizer, though there are some big differences. The primary difference is that Photoshop's Bridge is a true file browser. This means that when you direct it to a folder of images, it shows you every photo in the folder. The PSE Organizer is different in that it functions more as a catalog. It only displays the photo files that you tell it about. For example, if you have a folder with some photos that were imported into the Organizer and some other photos that were not imported, only the imported photos are displayed in the Organizer.
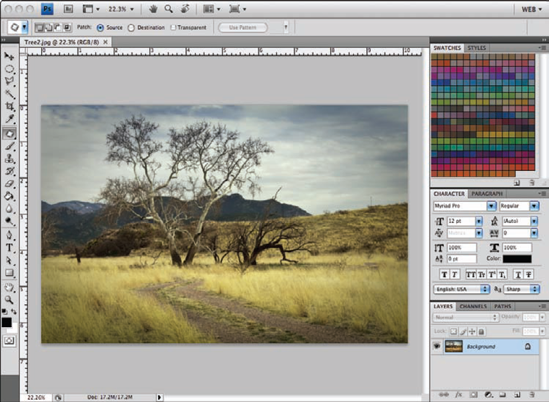
The editor in Photoshop is Photoshop itself. Figure 1.3 shows one of the many Photoshop CS4 workspaces.
Over the last fifteen years it has become the industry standard for editing digital images. Photoshop is packed with a huge array of image-editing tools that are used by all sorts of image users, ranging from graphic artists, Web designers, and 3-D modelers to engineers, architects, and medical researchers.
Photoshop is like going to the hardware store and ordering one of every tool in the store. The average person won't need most of these image-editing tools, but she'll have them anyway. This huge array of tools creates a high level of complexity that can make it difficult for the average user to understand just how to proceed, especially if she doesn't really need many of the sophisticated tools.
Because Photoshop is used in so many different ways and by so many different kinds of users, it's impossible to always have the tools arranged in an intuitive manner. PSE is a kinder and simpler version of Photoshop. It's intended primarily for people who want to organize and edit photographs. Because of this focus, the workflow in PSE is more clearly defined and easier to understand, making it easier to learn and use. This enables you to spend more time creatively exploring your photos instead of learning complex software.
Adobe's new kid on the block is Lightroom. It's officially named Adobe Photoshop Lightroom, so it really is part of the Photoshop and PSE family.
However, Lightroom isn't designed to be a replacement for Photoshop or PSE. Instead, it's intended to work hand-in-hand with these programs. Lightroom is used for the front end of the workflow, where speed and efficiency are needed for working with large quantities of files. Users can select specific files and move them into Photoshop or PSE for more advanced editing, but if you aren't shooting raw, or if you aren't shooting lots of photos, you probably don't have a need for Lightroom.
Lightroom, like PSE, is designed with specific workflow needs in mind as they relate to photography. Like PSE, the Lightroom workspace is laid out in a modular fashion with related tasks grouped together.
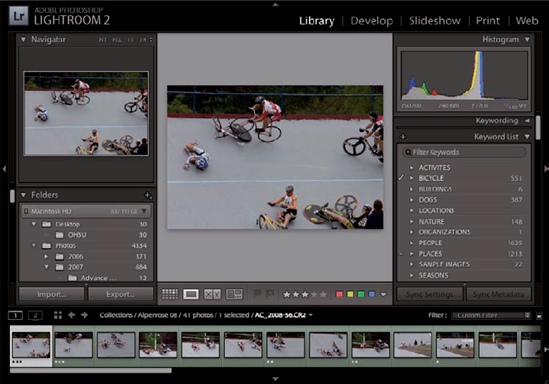
The organizational section, shown in Figure 1.4, is called the Library module. The Library is part of the software package and cannot be opened and closed independently. It functions as a catalog, similar to the Organizer in PSE rather than Photoshop's Adobe Bridge file browser. However, there are some differences.
The catalog is at the heart of Lightroom. A file must exist in this catalog in order for it to move through the other editing and output modules. This isn't the case with PSE. Though the Organizer works closely with the rest of the program, an image file can be opened directly into the PSE Editor without being part of the Organizer's catalog.
Another distinction about Lightroom is that it's primarily intended to work with raw format files. This is a powerful feature for the raw shooter, but it restricts some of the things you can do to a photo. For example, the retouching capabilities in Lightroom are very limited when compared to Photoshop and PSE, and image compositing capabilities are nonexistent.
Note
see also
Raw files can also be processed in Photoshop and PSE. They are discussed in detail in Chapter 8.
When you first launch PSE, you are prompted to join Photoshop.com, a Web site created by Adobe. You don't need to join in order to use PSE, but you may want to consider it. That's because Photoshop.com is primarily intended for PSE users. It was rolled out in the summer of 2008 and has had significant updates since then.
Note
Photoshop.com is available only in the United States. If you're using a European version of PSE, the option won't be available.
Photoshop.com is free to join and includes the following benefits:
You get free online storage for up to 2GB of photos. This enables you to store important photos away from your home or office. It also enables you to view and share your photos from anywhere an Internet connection is available.
Tip
If you want more than the 2GB of free storage, you can upgrade to Photoshop.com Plus for $49.99 per year. This gives you 20GB of storage and other features, such as seasonal art themes and extra tutorials.
You can use drag-and-drop uploading to easily upload files to online galleries.
You can create online albums that are open to the public or invitation only. These albums enable you to share photos with friends and family, or with the world. Automatic online backups of selected photo albums occur whenever photos are changed.
Integration with other online photo sites, such as Flickr, Photobucket, Picasa, and even Facebook, is available.
You can create a list of online friends who use Photoshop.com so that you can follow their photo galleries.
You have access to PSE-related news, design templates, and tutorials.
You can access your online photos from anywhere and synchronize your photos on all your computers.
There are other Web sites that offer features similar to these, but they aren't as tightly integrated with PSE as Photoshop.com. It's worth taking a look at Photoshop.com to see if it fits your needs.
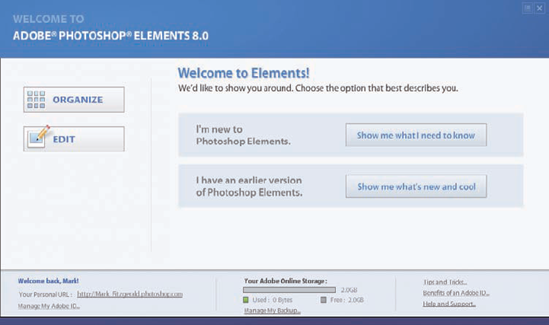
Though you don't need to have PSE to be a member of Photoshop.com, the program makes it quite easy to join. When you launch PSE and the Welcome screen opens, click the Create Adobe ID button to create your Photoshop.com account. After your account is created and you're logged in, the Welcome screen changes to include two new buttons, as shown in Figure 1.5. You can also create an account or log into your account from within the Organizer or the Editor.
Some things you can do with the Welcome screen include:
If you're a new user, click the Show me what I need to know button to learn some of the basics of using PSE.
If you've been using a previous version of PSE, click the Show me what's new and cool button to see many of the new features that have been added to PSE 8.
If you want to learn some new tips and tricks, click the Tips and Tricks hyperlink in the lower right of the dialog box.
If you're stuck on a problem, click the Help and Support link to quickly access Adobe's online support.
If you have a Photoshop.com account, click the Manage My Backup link at the bottom center to set up and manage your automatic backups.
Now that you've got the big picture of PSE, it's time to get down to business so that you can begin using it to organize your photos and make them look great.