CHAPTER 5
Understanding Exposure
For some of you, this chapter contains concepts you are familiar with. However, for others of you, dSLRs or photography in general might be new territory. And even if you're an advanced user, you may benefit from the information on evaluating your exposure using histograms and adjusting your exposure using the Nikon D7000's exposure compensation and bracketing features. This chapter covers exposure, how aperture affects depth of field, how the shutter speed is used to create different effects, and how ISO can affect both your aperture and shutter speed settings.
Understanding exposure is essential to controlling the outcome of your images. Exposure: ISO 100, f/10, 1/60 second using a Nikon 70-200mm f/2.8 VR lens at 155mm.
Exposure Overview
Exposure is the most important aspect of photography. If you don't understand how exposure is calculated, you'll have difficulty understanding how your camera chooses the settings for semiautomatic modes such as Shutter Priority or Aperture Priority. This can hinder your ability to achieve a specific effect in your image.
By definition, exposure as it relates to digital photography is the total amount of light collected by the camera's sensor during a single shutter cycle. A shutter cycle occurs when the Shutter Release button is pressed, the shutter opens, closes, and resets. One shutter cycle occurs for each image (with the exception of multiple exposures, of course). An exposure is made of three elements that are all interrelated. Each depends on the others to create a proper exposure. If one of the elements changes, the others must increase or decrease proportionally or you will no longer have an equivalent exposure. Following are the elements you need to consider:
- Shutter speed. The shutter speed determines the length of time the sensor is exposed to light.
- ISO sensitivity. The ISO setting you choose influences your camera's sensitivity to light.
- Aperture/f-stop. How much light reaches the sensor of your camera is controlled by the aperture, or f-stop. Each camera has an adjustable opening on the lens. As you change the aperture (the opening), you allow more or less light to reach the sensor.
Shutter speed
Shutter speed is the amount of time light entering from the lens is allowed to expose the image sensor. Obviously, if the shutter is open longer, more light can reach the sensor. The shutter speed can also affect the sharpness of your images. When you're handholding the camera and using a longer focal-length lens, a faster shutter speed is often required to counteract against camera shake from hand movement, which can cause blur (this is the effect Vibration Reduction lenses combat). When taking photographs in low light, a slow shutter speed is often required, which causes blur from camera shake and/or fast-moving subjects.
The shutter speed can also be used to effectively show motion in photography. Panning, or moving the camera horizontally with a moving subject while using a slower shutter speed, can cause the background to blur while keeping the subject in focus. This is an effective way to portray motion in a still image. On the opposite end, using a fast shutter speed can freeze action, such as the water that sprays from a wave as a surfer rides it, which can also give the illusion of motion in a still photograph.
Shutter speeds are indicated in fractions of a second. Common shutter speeds in full-stops (from slow to fast in seconds) include 1, 1/2, 1/4, 1/8, 1/15, 1/30, 1/60, 1/125, 1/500, 1/1000, and so on. Increasing or decreasing shutter speed by one setting doubles or halves the exposure, respectively. The D7000 also allows you to adjust the shutter speed in 1/3-stops. For example, if you take a picture with a 1/2-second shutter speed and it turns out too dark, logically, you'll want to keep the shutter open longer to let in more light. To do this, you need to adjust the shutter speed to 1 second, which is the next full stop, letting in twice as much light.
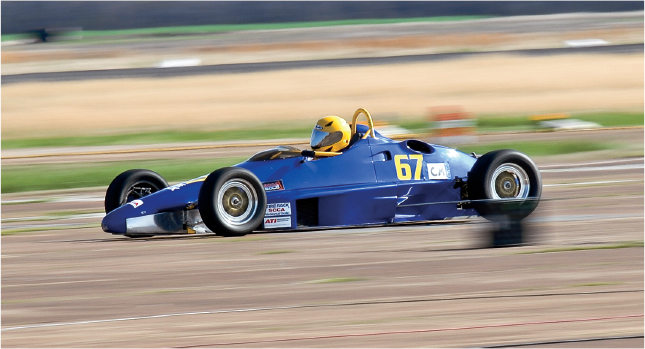
5.1 For this image, I used a slow shutter speed and panning to blur the background, providing an element of movement to the photo. Exposure: ISO 100, f/11, 1/80 second using a Nikon 70-200mm f/2.8G VR at 200mm.
ISO
ISO used to commonly be referred to as film speed in photography. Generally, these days ISO is referred to as sensitivity. The term ISO is derived from the International Organization for Standardization, which is a governing body in the international manufacturing markets. The International Organization for Standardization ensures consumers can buy similar products from different manufacturers that will perform in the same manner. For example, the settings used on 100-speed Kodak film will be the same settings used in equivalent light with 100-speed Fuji film or any other manufacturer's film.
In addition, the ISO sensitivity number indicates how sensitive the medium is to light — in your case, the medium is the CMOS (Complementary Metal Oxide Semi-conductor) sensor. The higher the ISO number, the more sensitive it is and the less light you need to take a photograph. For example, you might choose an ISO setting of 100 on a bright, sunny day when you are photographing outside because you have plenty of light. However, on a cloudy day, you may want to consider an ISO of 400 or higher to make sure your camera captures all the available light. This allows you to use a faster shutter speed should it be appropriate to the subject you are photographing.
It is helpful to know that each ISO setting is twice as sensitive to light as the previous setting. For example, at ISO 400, your camera is twice as sensitive to light as it is at ISO 200. This means it needs only half the light at ISO 400 that it needs at ISO 200 to achieve the same exposure.
As with shutter speeds, the D7000 allows you to adjust the ISO in 1/3-stop increments (100, 125, 160, 200, and so on), which enables you to fine-tune your ISO to reduce the noise inherent with higher ISO settings.
While at a glance using a higher ISO setting may seem like a panacea to correct any problems you might have when shooting in low light, there is a tradeoff — noise. Noise, simply put, is randomly colored dots that appear in your image. Noise is caused by extraneous electrons that are produced when your image is being recorded. When light strikes the image sensor in your D7000, electrons are produced. These electrons create an analog signal that is converted into a digital image by the analog-to-digital (A/D) converter in your camera (yes, digital cameras start with an analog signal).
There are two specific causes of noise. The first is heat-generated, or thermal, noise. While the shutter is open and your camera is recording an image, the sensor starts to generate a small amount of heat. This heat can free electrons from the sensor, which in turn contaminate the electrons that have been created as a result of the light striking the photocells on your sensor. This contamination shows up as noise.
The second cause of digital noise is known as high ISO noise. Background electrical noise exists in any type of electronic device. For the most part, it's miniscule and you never notice it. Cranking up the ISO amplifies the signals (photons of light) your sensor is receiving. Unfortunately, as these signals are amplified so is the background electrical noise. The higher your ISO, the more the background noise is amplified until it shows up as randomly colored specks.
Digital noise is composed of two elements — chrominance and luminance. Chrominance refers to the colored specks and luminance refers mainly to the size and shape of the noise.
Fortunately with every new camera released, the technology gets better and better, and the D7000 is no exception. The D7000 has one of the highest signal-to-noise ratios of any camera on the market; thus you can shoot at ISO 1600 and have almost no noticeable noise at all. In some previous cameras, shooting at ISO 1600 produced very noisy images that were not suitable for even medium-sized prints, such as an 8 × 10.
5.2 This image shows digital noise resulting from using a high ISO (6400). Notice that the noise is more prevalent in the darker areas of the image.
Although it's very low, noise does exist. Noise starts appearing in images taken with the D7000 when you shoot above ISO 1600 or use exposure times of 4 seconds or more. For this reason, most camera manufacturers have built-in noise reduction (NR) features. The D7000 has two types of NR: Long exposure NR and High ISO NR. Each one approaches the noise differently to help reduce it.
Aperture
Aperture is the size of the opening in the lens that determines the amount of light that reaches the image sensor. The aperture is controlled by a metal diaphragm that operates in a similar fashion to the iris of your eye. Aperture is expressed as f-stop numbers, such as f/2.8, f/5.6, and f/8. Here are a couple of important things to know about aperture:
- Smaller f-numbers equal wider apertures. A small f-stop such as f/2.8 opens the lens so more light reaches the sensor. If you have a wide aperture (opening), the amount of time the shutter needs to stay open to let light into the camera decreases.
- Larger f-numbers equal narrower apertures. A large f-stop such as f/11 closes the lens so less light reaches the sensor. If you have a narrow aperture (opening), the amount of time the shutter needs to stay open to let light into the camera increases.
I am often asked why the numbers of the aperture seem counterintuitive. The answer is relatively simple: The numbers are actually derived from ratios, which translate into fractions. The f-number is defined by the focal length of the lens divided by the actual diameter of the aperture opening. The simplest way to look at it is to put a 1 on top of the f-number as the numerator. For the easiest example, take a 50mm f/2 lens (okay, Nikon doesn't actually make a 50mm f/2, but pretend for a minute). Take the aperture number, f/2. If you add the 1 as the numerator, you get 1/2. This indicates that the aperture opening is half the diameter of the focal length, which equals 25mm. So at f/4, the effective diameter of the aperture is 12.5mm. It's a pretty simple concept once you break it down.
![]() The terms aperture and f-stop are interchangeable.
The terms aperture and f-stop are interchangeable.
As with ISO and shutter speed, there are standard settings for aperture, each of which has a 1-stop difference from the next one. The standard f-numbers are f/1.4, f/2, f/2.8, f/4, f/5.6, f/8, f/11, f/16, and f/22. Initially these may appear to be a random assortment of numbers, but they aren't. Upon closer inspection you will notice that every other number is a multiple of 2. Broken down even further, you will find that each stop is a multiple of 1.4. This is where the standard f-stop numbers are derived from. If you start out with f/1 and multiply by 1.4, you get f/1.4; multiply this by 1.4 again and you get 2 (rounded up from 1.96), multiply 2 by 1.4 you get 2.8, and so on.

5.3 This figure illustrates the relative difference in aperture sizes.
As it does with the ISO and shutter speed settings, the Nikon D7000 allows you to set the aperture in 1/3-stop increments.
![]() In photographic vernacular, opening up refers to going from a smaller to a larger aperture and stopping down refers to going from a larger to smaller aperture.
In photographic vernacular, opening up refers to going from a smaller to a larger aperture and stopping down refers to going from a larger to smaller aperture.
Now that you know a little more about apertures, you can begin to look at why different aperture settings are used and the effect that they have on your images. The most common reason why a certain aperture is selected is to control the depth of field or how much of the image is in focus. Quite simply, using a wider aperture (f/1.4−4) gives you a shallow depth of field that allows you to exercise selective focus, focusing on a certain subject in the image while allowing the rest to fall out of focus. Conversely, using a small aperture (f/11−32) maximizes your depth of field, allowing you to get more of the scene in focus. Using a wider aperture is generally preferable when shooting portraits because it blurs out the background and draws attention to the subject; a smaller aperture is generally used when photographing landscapes to ensure that a larger range of the scene is in focus.
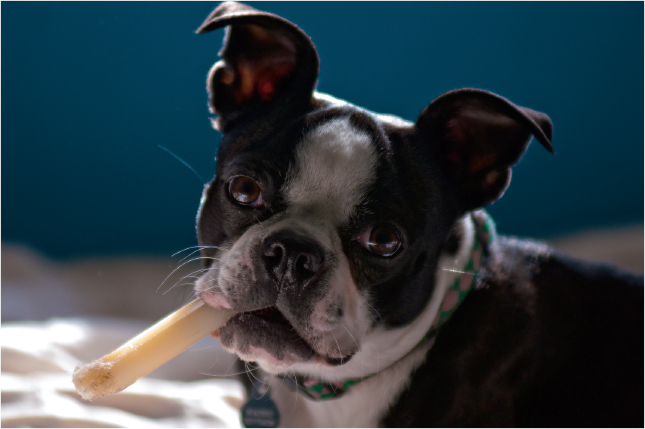
5.4 This shot of Maddie, my Boston terrier, was made with a wide aperture of f/2.8 to achieve a shallow depth of field. Exposure: ISO 640 (Auto), f/2.8, 1/250 second using an 80-200mm f/2.8 lens at 200mm.
Another way that the aperture setting is used, oddly enough, is to control the shutter speed. You can use a wide aperture to allow a lot of light in so that you can use a faster shutter speed to freeze action. On the opposite end of the spectrum, you can use a smaller aperture if you want to be sure that your shutter speed is slower.
Fine-tuning Your Exposure
Your camera's meter may not always be completely accurate. There are a lot of variables in most scenes, and large bright or dark areas can trick the meter into thinking a scene is brighter or darker than it really is, causing the image to be overor underexposed. One example of this is in a really bright situation such as the beach on a sunny day or a similar, albeit opposite weatherwise, snowy scene. The camera's meter generally sees all the brightness in the scene and underexposes to try to preserve detail in the highlights, which makes the main subject and most of the image dark and lacking in contrast. In snowy scenes, this is a special problem because it causes the snow to appear gray and dingy. The general rule of thumb in this situation is to add 1 to 2 stops of exposure compensation.
Exposure compensation
Exposure compensation is a D7000 feature that allows you to fine-tune the amount of exposure to a setting other than what the camera's exposure meter sets automatically. Although you can usually adjust the exposure of the image in your image-editing software (especially if you shoot RAW), it's best to get the exposure right in the camera to be sure that you have the highest image quality. If, after taking the photograph, you review it and it's too dark or too light, you can adjust the exposure compensation and retake the picture to get a better exposure. Exposure compensation is adjusted in EV (Exposure Value); 1 EV is equal to 1 stop of light. You adjust exposure compensation by pressing the Exposure Compensation button, next to the Shutter Release button, and rotating the Main Command dial to the left for more exposure (+EV) or to the right for less exposure (−EV). Depending on your settings, the exposure compensation is adjusted in 1/3, or 1/2, stops of light. You can change this setting in the Custom Settings menus (CSM b2).
You can adjust the exposure compensation up to +5 EV and down to −5 EV, which is a pretty large range of 10 stops. To remind you that exposure compensation has been set, the Exposure Compensation indicator is displayed on the top LCD control panel and the viewfinder display. It also appears on the rear LCD screen when the Shooting info is being displayed.
![]() Be sure to reset the exposure compensation to 0 after you finish to avoid unwanted overor underexposure.
Be sure to reset the exposure compensation to 0 after you finish to avoid unwanted overor underexposure.
There are a few ways to get the exact exposure that you want. You can use the histogram to determine whether you need to add or subtract from your exposure. You can also use bracketing to take a number of exposures and choose the one that you think is best, or you can combine the bracketed images with different exposures to create one high dynamic range (HDR) image using post-processing software.
Histograms
The easiest way to determine if you need to adjust the exposure compensation is to preview your image. If it looks too dark, add some exposure compensation; if it's too bright, adjust the exposure compensation down. This, however, is not the most accurate method of determining how much exposure compensation to use. To accurately determine how much exposure compensation to add or subtract, look at the histogram. A histogram is a visual representation of the tonal values in your image. Think of it as a bar graph that charts the lights, darks, and midtones in your picture.
The histogram charts a tonal range of about 5 stops, which is about the limit of what the D7000's sensor can record. This range is broken down into 256 brightness levels from 0 (absolute black) to 255 (absolute white), with 128 coming in at middle, or 18 percent, gray. The more pixels at any given brightness value, the higher the bar. If there are no bars, then the image has no pixels in that brightness range.
![]() The histogram displayed on the LCD is based on an 8-bit image. When you're working with 12- or 14-bit files using editing software, the histogram may be displayed with 4096 brightness levels for 12-bit or 16384 brightness levels for 14-bit.
The histogram displayed on the LCD is based on an 8-bit image. When you're working with 12- or 14-bit files using editing software, the histogram may be displayed with 4096 brightness levels for 12-bit or 16384 brightness levels for 14-bit.
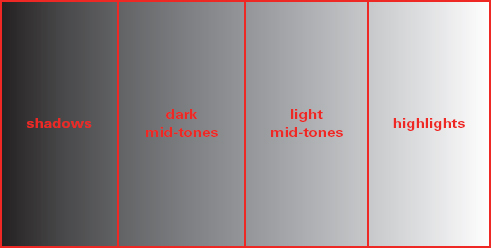
5.5 A representation of the tonal range of a histogram
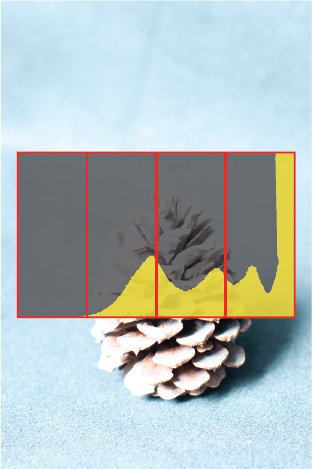
5.6 An example of a histogram from an overexposed image (no highlight detail). Notice that the histogram information is spiking and completely touching the far right of the graph.
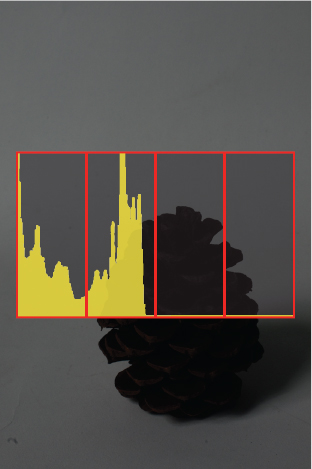
5.7 An example of a histogram from an underexposed image (no shadow detail). Notice the spikes at the far left of the graph.
The D7000 offers four histogram views: the luminance histogram, which shows the brightness levels of the entire image, and separate histograms for each color channel (Red, Green, and Blue).
The most useful histogram for determining if your exposure needs adjusting is the luminance histogram. To display the luminance histogram without the color channel histograms, simply press the Multi-selector up while viewing the image on the LCD. This displays a thumbnail of the current image, the shooting information, and a small luminance histogram.
Theoretically, you want to expose your subject so that it falls right about in the middle of the tonal range, which is why your camera's meter exposes for 18 percent gray. If your histogram graph has most of the information on the left side, then your image is probably underexposed; if it's mostly on the right side, then your image is probably overexposed. Ideally, with most average subjects that aren't bright white or extremely dark, you want to try to get your histogram to resemble a bell curve, with most of the tones in the middle range, tapering off as they get to the dark and light ends of the graph. But this is only for most average types of images that would be not too light and not too dark with little contrast. As with almost everything in photography, there are exceptions to the rule. If you take a photo of a dark subject on a dark background (a low-key image), then naturally your histogram will have most of the tones on the left side of the graph. Conversely, when you take a photograph of a light subject on a light background (a high-key image), the histogram will have most of the tones leading to the right.
The most important thing to remember is that there is no such thing as a perfect histogram. A histogram is just a factual representation of the tones in the image. The other important thing to remember is that although it's okay for the graph to be near one side or the other, you usually don't want your histogram to have spikes bumping up against the edge of the graph; this indicates your image has blown-out highlights (completely white, with no detail) or blocked-up shadow areas (completely black, with no detail).

5.8 An example of a histogram from a properly exposed image shot on a neutral gray background. Notice that the graph does not spike against the left or right edge, but tapers off.
Now that you know a little bit about histograms, you can use them to adjust exposure compensation. Here is a good set of steps to follow when using the histogram as a tool to evaluate your photos:
- After taking your picture, review its histogram on the LCD. To view the histogram in the image preview, press the Playback button to view the image. Press the Multi-selector up, and the histogram appears directly to the right of the image preview.
- Look at the histogram. An example of an ideal histogram can be seen in Figure 5.8.
- Adjust the exposure compensation. To move the tones to the right to capture more highlight detail, add a little exposure compensation by pressing the Exposure Compensation button and rotating the Main Command dial to the left. To move the tones to the left, press the Exposure Compensation button and rotate the Main Command dial to the left.
- Retake the photograph if necessary. After taking another picture, review the histogram again. If needed, adjust the exposure compensation more until you achieve the desired exposure.
When you're photographing brightly colored subjects, it may sometimes be necessary to refer to the RGB histograms. Sometimes it's possible to overexpose an image only in one color channel, even though the rest of the image looks like it is properly exposed. To view the separate RGB histograms, you need to set the display mode in the Playback menu.
To view RGB histograms, follow these steps:
- Press the Menu button.
- Use the Multi-selector to select the Playback menu.
- Use the Multi-selector to highlight Display mode. Press OK or press the Multi-selector to the right to view the menu options.
- Use the Multi-selector to scroll down to the menu option Detailed photo info RGB histogram. Pressing the Multi-selector right sets the option to On. This is confirmed by a small check mark in a box next to the option.
- When the option is set, use the Multi-selector to scroll up to the Done option. If you fail to select Done, the setting will not be saved.
It's possible for any one of the color channels to become overexposed, or blown out, as some photographers call it, although the most commonly blown-out channel is the Red channel. Digital camera sensors seem to be more prone to overexposing the Red channel because these sensors are generally more sensitive to red colors. When one of these color channels is overexposed, the histogram looks similar to the luminance histogram of a typical overexposed image.
Typically, the best way to deal with an image that has an overexposed color channel is to reduce exposure by using exposure compensation. Although this a quick fix, reducing the exposure can also introduce blocked-up shadows; you can deal with this by shooting RAW or, to a lesser extent, by using Active D-Lighting. Ideally, adding a bit of fill light to the shadow areas with a reflector or flash is the way to go.
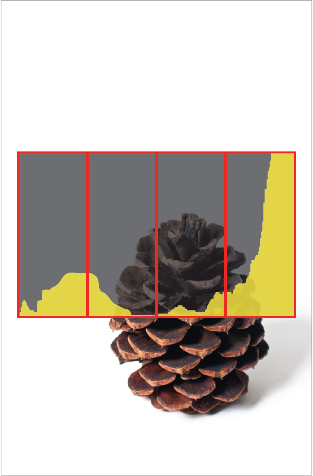
5.9 An example of a histogram from a high-key image. Although most of the tones are to the right the histogram tapers off down to the shadow side, indicating that there is detail in the shadow area.
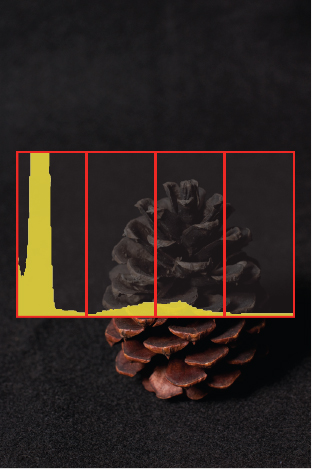
5.10 An example of a histogram from a low-key image. Notice that although most of the tones are to the left the histogram tapers off down to the highlight side, indicating that there is detail in the highlight area.
Exposure bracketing
Another way to ensure that you get the proper exposure is to bracket your exposures. Bracketing is a photographic technique in which you vary the exposure of your subject over three or more frames. By doing this, you are able to get the proper exposure in difficult lighting situations where your camera's meter can be fooled. Bracketing is usually done with at least 1 exposure under and 1 exposure over the metered exposure.
![]() Technically, bracketing is done with 3 or more frames. The +2 and −2 options in the D7000 auto-bracketing feature aren't a true bracket, but simply one metered and one underor overexposure.
Technically, bracketing is done with 3 or more frames. The +2 and −2 options in the D7000 auto-bracketing feature aren't a true bracket, but simply one metered and one underor overexposure.
You can bracket your images manually or you can choose to use the D7000 Auto-bracketing function. The D7000 has a button that allows you to activate the bracketing function quickly by pressing the BKT button and rotating the Command dial. To set up the D7000 for exposure bracketing
- Press the Menu button.
- Use the Multi-selector to enter the CSM. Scroll down to CSM e Bracketing/flash. Press the Multi-selector right.
- Scroll down to CSM e5, Auto bracketing set. Press the Multi-selector right to choose the options.
- Use the Multi-selector button to choose AE only. Press the Multi-selector right.
- Press the OK button. The BKT button is now assigned to be used for auto-exposure bracketing.
The D7000 also offers a few other different types of bracketing:
- Auto-exposure and flash. This bracketing option varies both the exposure compensation and the flash output.
- Auto-exposure only. This bracketing option varies the exposure compensation.
- Flash only. This bracketing option adjusts the flash output.
- White Balance bracketing. White Balance bracketing takes an image and saves multiple copies of the same image with small adjustments to the white balance (WB). This ensures that you get the proper WB. This option cannot be used when shooting RAW files.
- ADL. This allows you to bracket shots with one shot taken as is and the subsequent shot(s) with Active D-Lighting applied. You can choose from two or three frames. Selecting three frames gives you three shots: one with AD-L off, one with AD-L Normal, and one with AD-L set to High. When selecting two frames, you get one shot with AD-L off and one with AD-L on. The amount of AD-L is set in the AD-L menu (you can set this on the Info display). If the AD-L is set to off then Auto AD-L is applied to the image.
For auto-exposure bracketing you can choose the number of frames and the exposure increments between frames.
- Choose 3, +2, or −2. This option allows you to get one overexposure, one metered exposure, and one underexposure; one metered exposure and one overexposure; or one metered exposure and one underexposure.
- Vary the exposure increments from 0.3, 0.7, and 1.0 stops. Choosing a higher exposure increment gives you a wider variation than choosing a lower increment. For example, choosing a 3-frame bracket at 0.3 EV gives you a series of exposures where your images range only ± 1/3 stop over and under the original exposure. The series of exposure compensation will range as follows: −0.3, 0, +0.3. Choosing a 3-frame bracket at 1.0 EV provides a much wider series of exposures. This gives you a full 3-stop range: 1 stop over, 1 stop under, plus the original exposure.
Now that you understand all your options, the steps for activating auto-bracketing are as follows:
- Press and hold the BKT button. Look at the LCD control panel on the top of the camera. If Auto-bracketing is off, the LCD displays 0F, meaning you are not bracketing any frames.
- While still holding the BKT button, rotate the Main Command dial to the right to choose the number of frames to bracket. Choose from 3, +2, or −2. If you're using ADL bracketing, you choose from 2F or 3F.
- With the BKT button still pressed, rotate the Sub-command dial to choose the exposure compensation increments. Choose from 0.3, 0.7, or 1.0 EV.
Once you have selected your settings, release the BKT button and shoot the photos. Shoot the specified number of images for your bracket set. You can choose to shoot them one at a time using Single shooting mode, or you can press and hold the shutter until the bracket set is completed using Continuous shooting mode.
![]() You must go back into the Auto-bracketing menu and change the setting to 0F to disable Auto-bracketing; otherwise the camera will continue to bracket all your images.
You must go back into the Auto-bracketing menu and change the setting to 0F to disable Auto-bracketing; otherwise the camera will continue to bracket all your images.
In CSM e6 you can change the order in which the bracketed images are taken. At the default setting, the camera first takes the metered exposure, then follows with the underexposed image, and then finishes up with the overexposed image. You can also choose to have the camera begin with the underexposure, then take the metered exposure, and finish up with the overexposure. This gives you a series of images that run from darkest to lightest. This is how I prefer to shoot my bracketed images.
![]() Of course, you don't have to use the Auto-bracketing function to bracket your exposures. You can just as easily bracket manually. Set the exposure mode to Manual, use the analog exposure meter to set the exposure, and then adjust the exposure up and/or down manually.
Of course, you don't have to use the Auto-bracketing function to bracket your exposures. You can just as easily bracket manually. Set the exposure mode to Manual, use the analog exposure meter to set the exposure, and then adjust the exposure up and/or down manually.
Bracketing has additional uses aside from helping ensure that you get the correct exposure. You can also use different elements from the bracketed exposures and combine them using image-editing software to get a final image that has a wider tonal range than is possible for your image sensor to capture. This technique is known as HDR, or High Dynamic Range. You can use a few different programs to create an HDR image. Adobe Photoshop version CS2 and later have a tool called Merge to HDR. Select two or more images (using three to five images is recommended) and this tool automatically merges the separate images for you. Using Photoshop, you can also layer the bracketed images and use layer masks to reveal or hide different areas of the images. Although HDR is a very good tool for getting more tonal range in your images, be careful not to overuse it. In recent years, quite a few photographers have had the tendency to take this technology too far, creating unrealistic, overly processed-looking images.
Figures 5.11 through 5.13 are a sequence of bracketed images. The auto-bracketing was set to AE only, 3 frames; and the EV increment was set to 1EV to show the broad range of exposures you can get with bracketing. Figure 5.14 is an HDR image that is a composite of all three images.
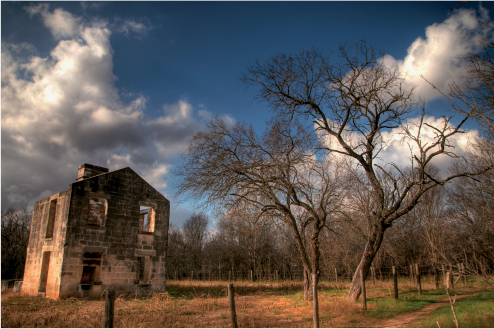
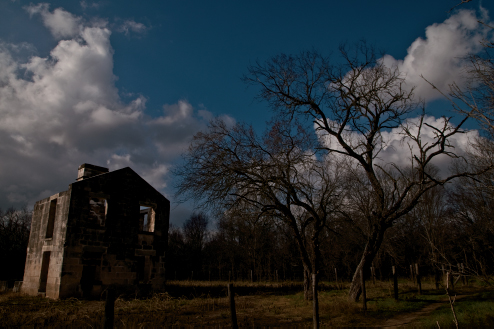
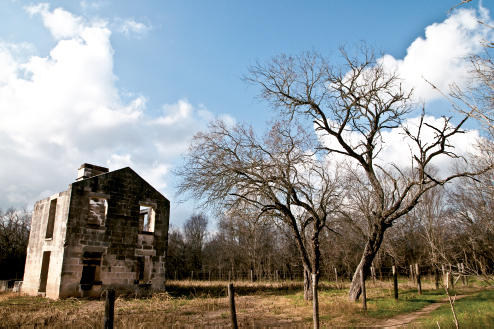
5.11 Bracketed image underexposed by 1 stop. Exposure: ISO 200, f/11, 1/800 second using a Tamron 17-50mm f/2.8 lens at 17mm.
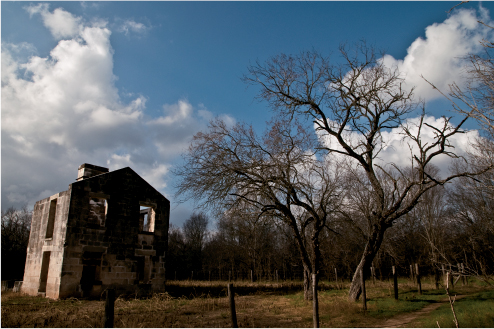
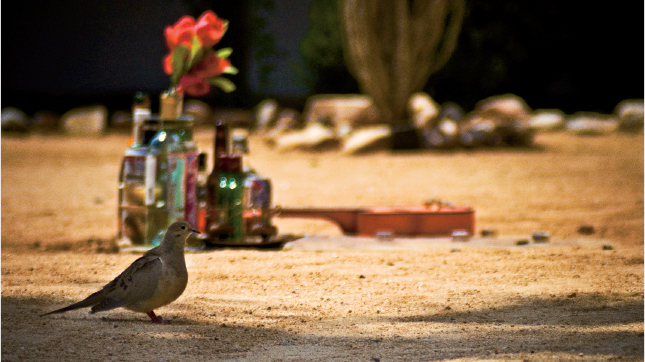
5.12 Bracketed image shot as metered. Exposure: ISO 200, f/11 for 1/400 using a Tamron 17-50mm f/2.8 lens at 17mm.
5.13 Bracketed image overexposed by 1 stop. Exposure: ISO 200, f/11, 1/200 second using a Tamron 17-50mm f/2.8 at 17mm.