Chapter 4. Understanding JavaScript
The World Wide Web (WWW) began as a text-only medium—the first browsers didn’t even support images within web pages. The Web has come a long way since those early days, as today’s websites include a wealth of visual and interactive features in addition to useful content: graphics, sounds, animation, and video. Web scripting languages, such as JavaScript, are one of the easiest ways to spice up a web page and to interact with users in new ways.
The first part of this chapter introduces the concept of Web scripting and the JavaScript language. As the chapter moves ahead, you’ll learn how to include JavaScript commands directly in your HTML documents and how your scripts will be executed when the page is viewed in a browser. You will work with a simple script, edit it, and test it in your browser, all the while learning the basic tasks involved in creating and using JavaScript scripts.
Learning Web Scripting Basics
In the world of science fiction movies (and many other movies that have no excuse), computers are often seen obeying commands in English. Although this might indeed happen in the near future, computers currently find it easier to understand languages such as BASIC, C, and Java.
You already know how to use one type of computer language: HTML. You use HTML tags to describe how you want your document formatted, and the browser obeys your commands and shows the formatted document to the user. But because HTML is a simple text markup language, it can’t respond to the user, make decisions, or automate repetitive tasks. Interactive tasks such as these require a more sophisticated language: a programming language, or a scripting language.
Although many programming languages are complex, scripting languages are generally simple. They have a simple syntax, can perform tasks with a minimum of commands, and are easy to learn. Web scripting languages enable you to combine scripting with HTML to create interactive web pages.
Scripts and Programs
A movie or a play follows a script—a list of actions (or lines) for the actors to perform. A web script provides the same type of instructions for the web browser. A script in JavaScript can range from a single line to a full-scale application. (In either case, JavaScript scripts usually run within a browser.)
Note
Is JavaScript a scripting language or a programming language? It depends on who you ask. We’ll refer to scripting throughout this book, but feel free to include JavaScript programming on your résumé after you’ve finished this book.
Some programming languages must be compiled, or translated, into machine code before they can be executed. JavaScript, on the other hand, is an interpreted language: The browser executes each line of script as it comes to it.
There is one main advantage to interpreted languages: Writing or changing a script is very simple. Changing a JavaScript script is as easy as changing a typical HTML document, and the change is enacted as soon as you reload the document in the browser.
Note
Interpreted languages have their disadvantages—they can’t execute quickly, so they’re not ideally suited for complicated work, such as graphics. Also, they require the interpreter (in JavaScript’s case, usually a browser) to work.
Introducing JavaScript
JavaScript was developed by Netscape Communications Corporation, the maker of the Netscape web browser. JavaScript was the first web scripting language to be supported by browsers, and it is still by far the most popular.
JavaScript is almost as easy to learn as HTML, and it can be included directly in HTML documents. Here are a few of the things you can do with JavaScript:
• Display messages to the user as part of a web page, in the browser’s status line, or in alert boxes
Note
A bit of history: JavaScript was originally called LiveScript and was first introduced in Netscape Navigator 2.0 in 1995. It was soon renamed JavaScript to indicate a marketing relationship with Sun’s Java language—although there is no other relationship, structurally or otherwise, between Java and JavaScript.
• Validate the contents of a form and make calculations (for example, an order form can automatically display a running total as you enter item quantities)
• Animate images or create images that change when you move the mouse over them
• Create ad banners that interact with the user, rather than simply displaying a graphic
• Detect the browser in use or its features and perform advanced functions only on browsers that support them
• Detect installed plug-ins and notify the user if a plug-in is required
• Modify all or part of a web page without requiring the user to reload it
• Display or interact with data retrieved from a remote server
You can do all this and more with JavaScript, including creating entire applications. We’ll explore the uses of JavaScript throughout this book.
How JavaScript Fits into a Web Page
Using the <script> tag, you can add a short script (in this case, just one line) to a web document, as shown in Listing 4.1. The <script> tag tells the browser to start treating the text as a script, and the closing </script> tag tells the browser to return to HTML mode. In most cases, you can’t use JavaScript statements in an HTML document except within <script> tags. The exception is event handlers, described later in this chapter.
Listing 4.1 A Simple HTML Document with a Simple Script
<?xml version="1.0" encoding="UTF-8"?>
<!DOCTYPE html PUBLIC "-//W3C//DTD XHTML 1.1//EN"
"http://www.w3.org/TR/xhtml11/DTD/xhtml11.dtd">
<html xmlns="http://www.w3.org/1999/xhtml" xml:lang="en">
<head>
<title>The American Eggplant Society</title>
</head>
<body>
<h1>The American Eggplant Society</h1>
<p>Welcome to our site. Unfortunately, it is still
under construction.</p>
<p>We last worked on it on this date:
<script type="text/javascript">
<!-- Hide the script from old browsers
document.write(document.lastModified);
// Stop hiding the script -->
</script>
</p>
</body>
</html>
JavaScript’s document.write statement, which you’ll learn more about later, sends output as part of the web document. In this case, it displays the modification date of the document, as shown in Figure 4.1.
Figure 4.1 Using document.write to display a last-modified date.

In this example, we placed the script within the body of the HTML document. There are actually four different places where you might use scripts:
• In the body of the page—In this case, the script’s output is displayed as part of the HTML document when the browser loads the page.
• In the header of the page between the <head> tags—Scripts in the header can’t create output within the HTML document, but can be referred to by other scripts. The header is often used for functions—groups of JavaScript statements that can be used as a single unit. You will learn more about functions in Chapter 14, “Getting Started with JavaScript Programming.”
• Within an HTML tag, such as <body> or <form>—This is called an event handler and enables the script to work with HTML elements. When using JavaScript in event handlers, you don’t need to use the <script> tag. You’ll learn more about event handlers in Chapter 14.
• In a separate file entirely—JavaScript supports the use of files with the .js extension containing scripts; these can be included by specifying a file in the <script> tag.
Using Separate JavaScript Files
When you create more complicated scripts, you’ll quickly find your HTML documents become large and confusing. To avoid this, you can use one or more external JavaScript files. These are files with the .js extension that contain JavaScript statements.
External scripts are supported by all modern browsers. To use an external script, you specify its filename in the <script> tag:
<script type="text/javascript" src="filename.js"></script>
Because you’ll be placing the JavaScript statements in a separate file, you don’t need anything between the opening and closing <script> tags—in fact, anything between them will be ignored by the browser.
Tip
External JavaScript files have a distinct advantage: You can link to the same .js file from two or more HTML documents. Because the browser stores this file in its cache, this can reduce the time it takes for your web pages to display.
You can create the .js file using a text editor. It should contain one or more JavaScript commands and only JavaScript—don’t include <script> tags, other HTML tags, or HTML comments. Save the .js file in the same directory as the HTML documents that refer to it.
Understanding JavaScript Events
Many of the useful things you can do with JavaScript involve interacting with the user and that means responding to events—for example, a link or a button being clicked. You can define event handlers within HTML tags to tell the browser how to respond to an event. For example, Listing 4.2 defines a button that displays a message when clicked.
Listing 4.2 A Simple Event Handler
<?xml version="1.0" encoding="UTF-8"?>
<!DOCTYPE html PUBLIC "-//W3C//DTD XHTML 1.1//EN"
"http://www.w3.org/TR/xhtml11/DTD/xhtml11.dtd">
<html xmlns="http://www.w3.org/1999/xhtml" xml:lang="en">
<head>
<title>Event Test</title>
</head>
<body>
<h1>Event Test</h1>
<button type="button"
onclick="alert('You clicked the button.')">
Click Me!</button>
</body>
</html>
In various places throughout this book, you’ll learn more about JavaScript’s event model and how to create simple and complex event handlers.
Exploring JavaScript’s Capabilities
If you’ve spent any time browsing the Web, you’ve undoubtedly seen lots of examples of JavaScript in action. Here are some brief descriptions of typical applications for JavaScript, all of which you’ll explore further, later in this book.
Improving Navigation
Some of the most common uses of JavaScript are in navigation systems for websites. You can use JavaScript to create a navigation tool—for example, a drop-down menu to select the next page to read or a submenu that pops up when you hover over a navigation link.
When it’s done right, this kind of JavaScript interactivity can make a site easier to use, while remaining usable for browsers that don’t support JavaScript.
Validating Forms
Form validation is another common use of JavaScript. A simple script can read values the user types into a form and can make sure they’re in the right format, such as with ZIP Codes or phone numbers. This allows users to notice common errors and fix them without waiting for a response from the web server. You’ll learn how to work with form data in Chapter 26, “Working with Web-Based Forms.”
Special Effects
One of the earliest and most annoying uses of JavaScript was to create attention-getting special effects—for example, scrolling a message in the browser’s status line or flashing the background color of a page.
These techniques have fortunately fallen out of style, but thanks to the W3C DOM and the latest browsers, some more impressive effects are possible with JavaScript—for example, creating objects that can be dragged and dropped on a page or creating fading transitions between images in a slideshow.
Remote Scripting (AJAX)
For a long time, the biggest limitation of JavaScript was that there was no way for it to communicate with a web server. For example, you could use it to verify that a phone number had the right number of digits, but not to look up the user’s location in a database based on the number.
Now that some of JavaScript’s advanced features are supported by most browsers, this is no longer the case. Your scripts can get data from a server without loading a page or send data back to be saved. These features are collectively known as AJAX (Asynchronous JavaScript And XML), or remote scripting. You’ll learn how to develop AJAX scripts in Chapter 24, “AJAX: Remote Scripting.”
You’ve seen AJAX in action if you’ve used Google’s Gmail mail application or recent versions of Yahoo! Mail or Microsoft Hotmail. All of these use remote scripting to present you with a responsive user interface that works with a server in the background.
Displaying Time with JavaScript
One common and easy use for JavaScript is to display dates and times. Because JavaScript runs on the browser, the times it displays will be in the user’s current time zone. However, you can also use JavaScript to calculate “universal” (UTC) time.
Note
UTC stands for Universal Time Coordinated, and is the atomic time standard based on the old GMT (Greenwich Mean Time) standard. This is the time at the Prime Meridian, which runs through Greenwich, London, England.
As a basic introduction to JavaScript, you will now create a simple script that displays the current time and the UTC time within a web page, starting with the next section.
Beginning the Script
Your script, like most JavaScript programs, begins with the HTML <script> tag. As you learned earlier in this chapter, you use the <script> and </script> tags to enclose a script within the HTML document.
Caution
Remember to include only valid JavaScript statements between the starting and ending <script> tags. If the browser finds anything but valid JavaScript statements within the <script> tags, it will display a JavaScript error message.
To begin creating the script, open your favorite text editor and type the beginning and ending <script> tags as shown.
<script type="text/javascript"></script>
Adding JavaScript Statements
Your script now needs to determine the local and UTC times, and then display them to the browser. Fortunately, all the hard parts, such as converting between date formats, are built in to the JavaScript interpreter.
Storing Data in Variables
To begin the script, you will use a variable to store the current date. You will learn more about variables in Chapter 16, “Using JavaScript Variables, Strings, and Arrays.” A variable is a container that can hold a value—a number, some text, or in this case, a date.
To start writing the script, add the following line after the first <script> tag. Be sure to use the same combination of capital and lowercase letters in your version because JavaScript commands and variable names are case sensitive.
now = new Date();
This statement creates a variable called now and stores the current date and time in it. This statement and the others you will use in this script use JavaScript’s built-in Date object, which enables you to conveniently handle dates and times. You’ll learn more about working with dates in Chapter 17, “Using JavaScript Functions and Objects.”
Note
Notice the semicolon at the end of the previous statement. This tells the browser that it has reached the end of a statement. Semicolons are optional, but using them helps you avoid some common errors. We’ll use them throughout this book for clarity.
Calculating the Results
Internally, JavaScript stores dates as the number of milliseconds since January 1, 1970. Fortunately, JavaScript includes a number of functions to convert dates and times in various ways, so you don’t have to figure out how to convert milliseconds to day, date, and time.
To continue your script, add the following two statements before the final </script> tag:
localtime = now.toString();
utctime = now.toGMTString();
Note
The localtime and utctime variables store a piece of text, such as January 1, 2001 12:00 PM. In programming parlance, a piece of text is called a string.
These statements create two new variables: localtime, containing the current time and date in a nice readable format, and utctime, containing the UTC equivalent.
Creating Output
You now have two variables—localtime and utctime—which contain the results we want from our script. Of course, these variables don’t do us much good unless we can see them. JavaScript includes a number of ways to display information, and one of the simplest is the document.write statement.
The document.write statement displays a text string, a number, or anything else you throw at it. Because your JavaScript program will be used within a web page, the output will be displayed as part of the page. To display the result, add these statements before the final </script> tag:
document.write("<strong>Local time:</strong> " + localtime + "<br/>");
document.write("<strong>UTC time:</strong> " + utctime);
These statements tell the browser to add some text to the web page containing your script. The output will include some brief strings introducing the results and the contents of the localtime and utctime variables.
Notice the HTML tags, such as <strong>, within the quotation marks—because JavaScript’s output appears within a web page, it needs to be formatted using HTML. The <br/> tag in the first line ensures that the two times will be displayed on separate lines.
Note
Notice the plus signs (+) used between the text and variables in Listing 4.3. In this case, it tells the browser to combine the values into one string of text. If you use the plus sign between two numbers, they are added together.
Adding the Script to a Web Page
You should now have a complete script that calculates a result and displays it. Your listing should match Listing 4.3.
Listing 4.3 The Complete Date and Time Script
<script type="text/javascript">
now = new Date();
localtime = now.toString();
utctime = now.toGMTString();
document.write("<strong>Local time:</strong> " + localtime + "<br/>");
document.write("<strong>UTC time:</strong> " + utctime);
</script>
To use your script, you’ll need to add it to an HTML document. If you use the general template you’ve seen in the chapters so far, you should end up with something like Listing 4.4.
Listing 4.4 The Date and Time Script in an HTML Document
<?xml version="1.0" encoding="UTF-8"?>
<!DOCTYPE html PUBLIC "-//W3C//DTD XHTML 1.1//EN"
"http://www.w3.org/TR/xhtml11/DTD/xhtml11.dtd">
<html xmlns="http://www.w3.org/1999/xhtml" xml:lang="en">
<head>
<title>Displaying Times and Dates</title>
</head>
<body>
<h1>Current Date and Time</h1>
<script type="text/javascript">
now = new Date();
localtime = now.toString();
utctime = now.toGMTString();
document.write("<strong>Local time:</strong> "
+ localtime + "<br/>");
document.write("<strong>UTC time:</strong> " + utctime);
</script>
</body>
</html>
Note
Notepad and other Windows text editors might try to be helpful and add the .txt extension to your script. Be sure your saved file has the correct extension.
Now that you have a complete HTML document, save it with the .htm or .html extension.
Testing the Script
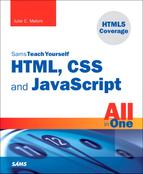
To test your script, you simply need to load the HTML document you created in a web browser. If you typed the script correctly, your browser should display the result of the script, as shown in Figure 4.2. (Of course, your result won’t be the same as mine, but it should be the same as the setting of your computer’s clock.)
Figure 4.2 Firefox displays the results of the Date and Time script.

A note about Internet Explorer 6.0 and above: Depending on your security settings, the script might not execute, and a yellow highlighted bar on the top of the browser might display a security warning. In this case, click the yellow bar and select Allow Blocked Content to allow your script to run. (This happens because the default security settings allow JavaScript in online documents, but not in local files.)
Modifying the Script
Although the current script does indeed display the current date and time, its display isn’t nearly as attractive as the clock on your wall or desk. To remedy that, you can use some additional JavaScript features and a bit of HTML to display a large clock.
To display a large clock, we need the hours, minutes, and seconds in separate variables. Once again, JavaScript has built-in functions to do most of the work:
hours = now.getHours();
mins = now.getMinutes();
secs = now.getSeconds();
These statements load the hours, mins, and secs variables with the components of the time using JavaScript’s built-in date functions.
After the hours, minutes, and seconds are in separate variables, you can create document.write statements to display them:
document.write("<h1>");
document.write(hours + ":" + mins + ":" + secs);
document.write("</h1>");
The first statement displays an HTML <h1> header tag to display the clock in a large typeface. The second statement displays the hours, mins, and secs variables, separated by colons, and the third adds the closing </h1> tag.
You can add the preceding statements to the original date and time script to add the large clock display. Listing 4.5 shows the complete modified version of the script.
Listing 4.5 The Date and Time Script with Large Clock Display
<?xml version="1.0" encoding="UTF-8"?>
<!DOCTYPE html PUBLIC "-//W3C//DTD XHTML 1.1//EN"
"http://www.w3.org/TR/xhtml11/DTD/xhtml11.dtd">
<html xmlns="http://www.w3.org/1999/xhtml" xml:lang="en">
<head>
<title>Displaying Times and Dates</title>
</head>
<body>
<h1>Current Date and Time</h1>
<script type="text/javascript">
now = new Date();
localtime = now.toString();
utctime = now.toGMTString();
document.write("<strong>Local time:</strong> "
+ localtime + "<br/>");
document.write("<strong>UTC time:</strong> " + utctime);
hours = now.getHours();
mins = now.getMinutes();
secs = now.getSeconds();
document.write("<h1>");
document.write(hours + ":" + mins + ":" + secs);
document.write("</h1>");
</script>
</body>
</html>
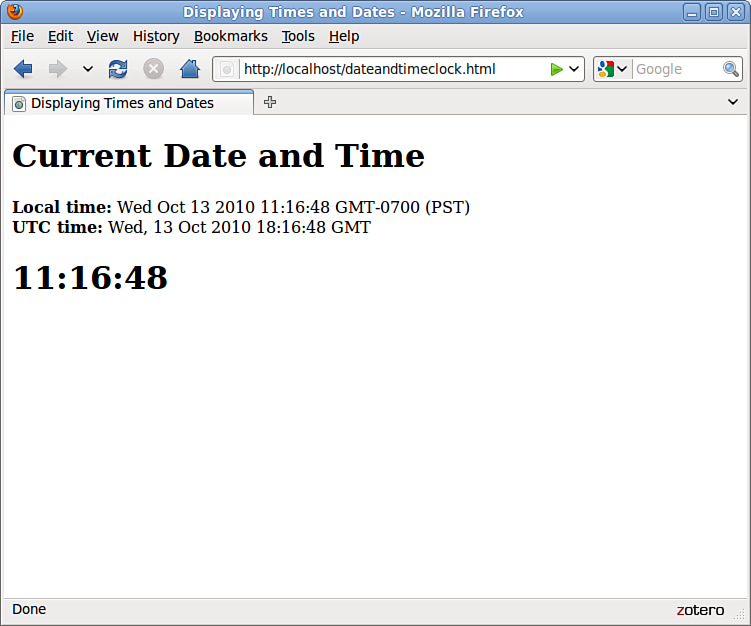
Now that you have modified the script, save the HTML file and open the modified file in your browser. If you left the browser running, you can simply use the Reload button to load the new version of the script. Try it and verify that the same time is displayed in both the upper portion of the window and the new large clock. Figure 4.3 shows the results.
Figure 4.3 Firefox displays the modified Date and Time script.
Dealing with JavaScript Errors
As you develop more complex JavaScript applications, you’re going to run into errors from time to time. JavaScript errors are usually caused by mistyped JavaScript statements.
To see an example of a JavaScript error message, modify the statement you added in the previous section. We’ll use a common error: omitting one of the parentheses. Change the last document.write statement in Listing 4.5 to read:
document.write("</h1>";
The time formatting produced by this script isn’t perfect; hours after noon are in 24-hour time, and there are no leading zeroes, so 12:04 is displayed as 12:4. See Chapter 17 for solutions to these issues.
Save your HTML document again and load the document into the browser. Depending on the browser version you’re using, one of two things will happen: Either an error message will be displayed, or the script will simply fail to execute.
If an error message is displayed, you’re halfway to fixing the problem by adding the missing parenthesis. If no error was displayed, you should configure your browser to display error messages so that you can diagnose future problems:
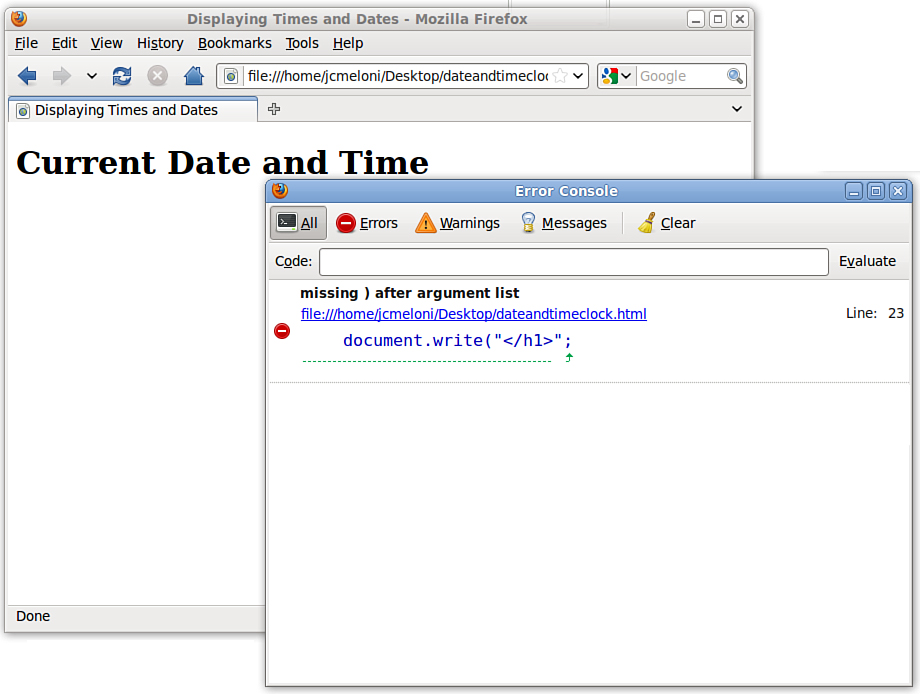
• In Firefox, you can also select Tools, JavaScript Console from the menu. The console is shown in Figure 4.4, displaying the error message you created in this example.
Figure 4.4 Firefox’s JavaScript Console displays an error message.
• In Chrome, select Tools, JavaScript Console from the Customizations (Options) menu. A console will display in the bottom of the browser window.
• In Internet Explorer, select Tools, Internet Options. On the Advanced page, uncheck the Disable Script Debugging box and check the Display a Notification About Every Script Error box. (If this is disabled, a yellow icon in the status bar will still notify you of errors.)
The error we get in this case is missing ) after argument list (Firefox) or Expected ')' (Internet Explorer), which turns out to be exactly the problem. Be warned, however, that error messages aren’t always this enlightening.
Although Internet Explorer displays error dialog boxes for each error, Firefox’s JavaScript Console displays a single list of errors and enables you to test commands. For this reason, you might find it useful to install Firefox for debugging and testing JavaScript, even if Internet Explorer is your primary browser.
Summary
During this chapter, you’ve learned what web scripting is and what JavaScript is. You’ve also learned how to insert a script into an HTML document or refer to an external JavaScript file, what sorts of things JavaScript can do, and how JavaScript differs from other web languages. You also wrote a simple JavaScript program and tested it using a web browser. You discovered how to modify and test scripts and what happens when a JavaScript program runs into an error.
In the process of writing this script, you have used some of JavaScript’s basic features: variables, the document.write statement, and functions for working with dates and times.
Now that you’ve learned a bit of JavaScript syntax, you’re ready to continue on to learn all manner and sorts of things about web development before settling in to write interactive websites using client-side scripting.
Q&A
Q. Do I need to test my JavaScript on more than one browser?
A. In an ideal world, any script you write that follows the standards for JavaScript will work in all browsers, and 93% of the time (give or take) that’s true in the real world. But browsers do have their quirks, and you should test your scripts on Internet Explorer and Firefox at a minimum.
Q. If I plan to learn PHP or some other server-side programming language anyway, will I have any use for JavaScript?
A. Certainly. JavaScript is the ideal language for many parts of a web-based application, such as form validation. Although PHP and other server-side languages have their uses, they can’t interact directly with the user on the client-side.
Q. When I try to run my script, the browser displays the actual script in the browser window instead of executing it. What did I do wrong?
A. This is most likely caused by one of three errors. First, you might be missing the beginning or ending <script> tags. Check them, and verify that the first reads <script type="text/javascript">. Second, your file might have been saved with a .txt extension, causing the browser to treat it as a text file. Rename it to .htm or .html to fix the problem. Third, make sure your browser supports JavaScript and that it is not disabled in the Preferences dialog.
Q. Why are the <strong> and <br /> tags allowed in the statements to print the time? I thought HTML tags weren’t allowed within the <script> tags.
A. Because this particular tag is inside quotation marks, it’s considered a valid part of the script. The script’s output, including any HTML tags, is interpreted and displayed by the browser. You can use other HTML tags within quotation marks to add formatting, such as the <h1> tags we added for the large clock display.
Workshop
The workshop contains quiz questions and exercises to help you solidify your understanding of the material covered. Try to answer all questions before looking at the “Answers” section that follows.
Quiz
1. When a user views a page containing a JavaScript program, which machine actually executes the script?
a. The user’s machine running a web browser
b. The web server
c. A central machine deep within Netscape’s corporate offices
2. What software do you use to create and edit JavaScript programs?
a. A browser
b. A text editor
c. A pencil and a piece of paper
3. What are variables used for in JavaScript programs?
a. Storing numbers, dates, or other values
b. Varying randomly
c. Causing high school algebra flashbacks
4. What should appear at the very end of a JavaScript script embedded in an HTML file?
a. The <script type="text/javascript"> tag
b. The </script> tag
c. The END statement
Answers
1. a. JavaScript programs execute on the web browser. (There is actually a server-side version of JavaScript, but that’s another story.)
2. b. Any text editor can be used to create scripts. You can also use a word processor if you’re careful to save the document as a text file with the .html or .htm extension.
3. a. Variables are used to store numbers, dates, or other values.
4. b. Your script should end with the </script> tag.
Exercises
• Add a millisecond field to the large clock. You can use the getMilliseconds function, which works just like getSeconds but returns milliseconds.
• Modify the script to display the time, including milliseconds, twice. Notice whether any time passes between the two time displays when you load the page.