Chapter 2. Understanding HTML and XHTML Connections
The first chapter gave you a basic idea of the process behind creating web content and viewing it online (or locally, if you do not yet have a web hosting provider). In this chapter, we’ll get down to the business of explaining the various elements that must appear in an HTML file so that it is displayed appropriately in your web browser.
By the end of the chapter, you’ll learn how HTML differs from XHTML and why there are two different languages designed to do the same thing—create web content. In general, this chapter provides a quick summary of HTML and XHTML basics and gives some practical tips to make the most of your time as a web page author and publisher. It’s not all theory, however; you do get to see a real web page and the HTML code behind it.
Getting Prepared
Here’s a review of what you need to do before you’re ready to use the rest of this book:
1. Get a computer. I used a computer running Ubuntu (Linux) to test the sample web content and capture the figures in this book, but you can use any Windows, Macintosh, or Linux/UNIX machine to create and view your web content.
2. Get a connection to the Internet. Whether you have a dial-up, wireless, or broadband connection doesn’t matter for the creation and viewing of your web content, but the faster the connection, the better for the overall experience. The Internet service provider (ISP), school, or business that provides your Internet connection can help you with the details of setting it up properly. Additionally, many public spaces such as coffee shops, bookstores, and libraries offer free wireless Internet service that you can use if you have a laptop computer with Wi-Fi network support.
3. Get web browser software. This is the software your computer needs to retrieve and display web content. As you learned in the first chapter, the most popular browser software (in alphabetical order) is Apple Safari, Google Chrome, Microsoft Internet Explorer, Mozilla Firefox, and Opera. It’s a good idea to install several of these browsers so that you can experiment and make sure that your content looks consistent across them all; you can’t make assumptions about the browsers other people are using.
Note
Not sure how to find an ISP? The best way is to comparison-shop online (using a friend’s computer or a public computer that’s already connected to the Internet). You’ll find a comprehensive list of national and regional ISPs at http://www.thelist.com/.
4. Explore! Use a web browser to look around the Internet for websites that are similar in content or appearance to those you’d like to create. Note what frustrates you about some pages, what attracts you and keeps you reading others, and what makes you come back to some pages over and over again. If there is a particular topic that interests you, consider searching for it using a popular search engine such as Google (http://www.google.com/) or Bing (http://www.bing.com/).
Caution
Although all web browsers process and handle information in the same general way, there are some specific differences among them that result in things not always looking the same in different browsers. Be sure to check your web pages in multiple browsers to make sure that they look reasonably consistent.
Getting Started with a Simple Web Page
In the first chapter, you learned that a web page is just a text file that is marked up by (or surrounded by) HTML codes that tell the browser how to display the text. To create these text files, use a text editor such as Notepad (on Windows) or TextEdit (on a Mac)—do not use WordPad, Microsoft Word, or other full-featured word-processing software because those create different sorts of files than the plain-text files we use for web content.
Note
As discussed in the first chapter, if you plan to put your web content on the Internet (as opposed to publishing it on CD-ROM or a local intranet), you’ll need to transfer it to a computer that is connected to the Internet 24 hours a day. The same company or school that provides you with Internet access might also provide web space; if not, you might need to pay a hosting provider for the service.
Before you begin working, you should start with some text that you want to put on a web page:
1. Find (or write) a few paragraphs of text about yourself, your family, your company, your softball team, or some other subject in which you’re interested.
2. Save this text as plain, standard ASCII text. Notepad and most simple text editors always save files as plain text, but if you’re using another program, you might need to choose this file type as an option (after selecting File, Save As).
As you go through this chapter, you will add HTML markup (called tags) to the text file, thus making it into web content.
When you save files containing HTML tags, always give them a name ending in .html. This is important: If you forget to type the .html at the end of the filename when you save the file, most text editors will give it some other extension (such as .txt). If that happens, you might not be able to find the file when you try to look at it with a web browser; if you find it, it certainly won’t display properly. In other words, web browsers expect a web page file to have a file extension of .html.
Caution
To reiterate, because it is very important both to the outcome and the learning process itself: Do not create your first HTML file with Microsoft Word or any other HTML-compatible word processor; most of these programs attempt to rewrite your HTML for you in strange ways, potentially leaving you totally confused. Additionally, I recommend that you do not use a graphical, what-you-see-is-what-you-get (WYSIWYG) editor, such as Microsoft FrontPage or Adobe Dreamweaver. You’ll likely find it easier and more educational to start out with a simple text editor while you’re just learning HTML. You can move to visual tools (such as FrontPage and Dreamweaver) after you have a better understanding of what’s going on under the hood.
When visiting websites, you might also encounter pages with a file extension of .htm, which is also an acceptable file extension to use. You might find other file extensions used on the Web, such as .jsp (Java Server Pages), .asp (Microsoft Active Server Pages), or .php (PHP: Hypertext Preprocessor), but these file types use server-side technologies that are beyond the scope of HTML and the chapters throughout this book. However, these files also contain HTML in addition to the programming language; although the programming code in those files is compiled on the server side and all you would see on the client side is the HTML output, if you were to look at the source files, you would likely see some intricate weaving of programming and markup codes.
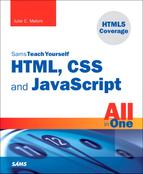
Listing 2.1 shows an example of text you can type and save to create a simple HTML page. If you opened this file with Firefox, you would see the page shown in Figure 2.1. Every web page you create must include the <html></html>, <head></head>, <title></title>, and <body></body> tag pairs.
Figure 2.1 When you save the text in Listing 2.1 as an HTML file and view it with a web browser, only the actual title and body text are displayed.
Note
If you’re using TextEdit on a Macintosh computer, the steps for creating an HTML file are a little different than for using Notepad on a Windows computer. Both are popular text editors, but with the latter, you must first click on the Format menu, select Make Plain Text, and then change the preferences under the Saving header by unchecking the box for Append ‘.txt’ Extension to Plain Text Files. Also, the default preferences are set to show .html documents as they would appear in a browser, which won’t allow you to edit them. To fix this, check Ignore Rich Text Commands in HTML Files under the Rich Text Processing header.
Listing 2.1 The <html>, <head>, <title>, and <body> Tags
<?xml version="1.0" encoding="UTF-8"?>
<!DOCTYPE html PUBLIC "-//W3C//DTD XHTML 1.1//EN"
"http://www.w3.org/TR/xhtml11/DTD/xhtml11.dtd">
<html xmlns="http://www.w3.org/1999/xhtml" xml:lang="en">
<head>
<title>The First Web Page</title>
</head>
<body>
<p>
In the beginning, Tim created the HyperText Markup Language. The Internet
was without form and void, and text was upon the face of the monitor and
the Hands of Tim were moving over the face of the keyboard. And Tim said,
Let there be links; and there were links. And Tim saw that the links were
good; and Tim separated the links from the text. Tim called the links
Anchors, and the text He called Other Stuff. And the whole thing together
was the first Web Page.
</p>
</body>
</html>
In Listing 2.1, as in every HTML page, the words starting with < and ending with > are actually coded commands. These coded commands are called HTML tags because they “tag” pieces of text and tell the web browser what kind of text it is. This allows the web browser to display the text appropriately.
Note
Technically speaking, HTML5 will be the next web standard but it’s not quite at the point of full adoption. Current estimates put the full adoption of HTML sometime in 2011. However, as you learn about important features of HTML and XHTML in this book, I will include notes about how HTML5 features might differ.
The first few lines of code in the web page serve as standard boilerplate code that you will include in all of your pages. This code actually identifies the page as a valid XHTML 1.1 document, which means that, technically, the web page is an XHTML page. All the pages developed throughout the book are XHTML 1.1 pages. Because XHTML is a more structured version of HTML, it’s still okay to generally refer to all the pages in the book as HTML pages. By targeting XHTML 1.1 with your code, you are developing web pages that adhere to the very latest web standards. This is a good thing!
If you have obtained a web hosting account, you could use FTP at this point to transfer the firstpage.html file to the web server. In fact, from this chapter forward, the instructions will assume you have a hosting provider and are comfortable sending files back and forth via FTP; if that is not the case, please review the first chapter before moving on. Or, if you are consciously choosing to work with files locally (without a web host), be prepared to adjust the instructions to suit your particular needs (such as ignoring the commands “transfer the files” and “type in the URL”).
Note
You don’t need to be connected to the Internet to view a web page stored on your own computer. By default, your web browser tries to connect to the Internet every time you start it, which makes sense most of the time. However, this can be a hassle if you’re developing pages locally on your hard drive (offline) and you keep getting errors about a page not being found. If you have a full-time web connection via a LAN, cable modem, or DSL, this is a moot point because the browser will never complain about being offline. Otherwise, the appropriate disciplinary action will depend on your breed of browser; check the options under your browser’s Tools menu.
HTML Tags Every XHTML Web Page Must Have
The time has come for the secret language of HTML tags to be revealed to you. When you understand this language, you will have creative powers far beyond those of other humans. Don’t tell the other humans, but it’s really pretty easy.
Before you get into the HTML tags, let’s first address the messy-looking code at the top of Listing 2.1. The first line indicates that the HTML document is, in fact, an XML document:
<?xml version="1.0" encoding="UTF-8"?>
Note
It isn’t terribly important that you understand concepts such as character encoding at this point. What is important is that you include the appropriate boilerplate code in your pages so that they adhere to the latest web standards. As of this writing, XHTML 1.1 is a web standard. HTML5 is not yet a web standard, but if you were creating an HTML5 document, these lines at the beginning of your HTML file would not be necessary.
The version of XML is set to 1.0, which is fairly standard, as is the type of character encoding (UTF-8).
The second and third lines of code in Listing 2.1 are even more complicated looking:
<!DOCTYPE html PUBLIC "-//W3C//DTD XHTML 1.1//EN"
"http://www.w3.org/TR/xhtml11/DTD/xhtml11.dtd">
Again, the specifics of this code aren’t terribly important as long as you remember to include the code at the start of your pages. This code identifies the document as being XHTML 1.1, which then allows web browsers to make sure the code meets all the requirements of XHTML 1.1.
Most HTML tags have two parts: an opening tag, which indicates where a piece of text begins, and a closing tag, which indicates where the piece of text ends. Closing tags start with a / (forward slash) just after the < symbol.
Note
The XML/XHTML boilerplate code isn’t strictly required for you to create web pages. You can delete the opening lines of code in the example so that the page starts with the <html> tag and it will still open fine in a web browser. The extra code is included to ensure your pages are up to date with the current web standards. Additionally, the extra code enables you to validate your web pages for accuracy, which you’ll learn how to do a bit later in this chapter.
Another type of tag is the empty tag, which is unique in that it doesn’t include a pair of matching opening and closing tags. Instead, an empty tag consists of a single tag that starts with a < and ends with a / just before the > symbol.
Following is a quick summary of these three tags just to make sure you understand the role each plays:
• An opening tag is an HTML tag that indicates the start of an HTML command; the text affected by the command appears after the opening tag. Opening tags always begin with < and end with >, as in <html>.
• A closing tag is an HTML tag that indicates the end of an HTML command; the text affected by the command appears before the closing tag. Closing tags always begin with </ and end with >, as in </html>.
• An empty tag is an HTML tag that issues an HTML command without enclosing any text in the page. Empty tags always begin with < and end with />, as in <br /> and <img />.
For example, the <body> tag in Listing 2.1 tells the web browser where the actual body text of the page begins, and </body> indicates where it ends. Everything between the <body> and </body> tags will appear in the main display area of the web browser window, as shown in Figure 2.1.
Note
You no doubt noticed in Listing 2.1 that there is some extra code associated with the <html> tag. This code consists of two attributes (xmlns and xml:lang), which are used to specify additional information related to the tag. These two attributes are standard requirements of all XHTML web pages; the former defines the XML namespace, whereas the latter defines the language of the content. Throughout this book, a standard namespace is defined, and the English language is used. If you are writing in a different language, replace the "en" (for English) with the language identifier relevant to you.
The very top of the browser window (refer to Figure 2.1) shows title text, which is any text that is located between <title> and </title>. The title text is also used to identify the page on the browser’s Bookmarks or Favorites menu, depending on which browser you use. It’s important to provide titles for your pages so that visitors to the page can properly bookmark them for future reference.
You will use the <body> and <title> tag pairs in every HTML page you create because every web page needs a title and body text. You will also use the <html> and <head> tag pairs, which are the other two tags shown in Listing 2.1. Putting <html> at the very beginning of a document simply indicates that the document is a web page. The </html> at the end indicates that the web page is over.
Within a page, there is a head section and a body section. Each section is identified by <head> and <body> tags. The idea is that information in the head of the page somehow describes the page but isn’t actually displayed by a web browser. Information placed in the body, however, is displayed by a web browser. The <head> tag always appears near the beginning of the HTML code for a page, just after the opening <html> tag.
The <title> tag pair used to identify the title of a page appears within the head of the page, which means it is placed after the opening <head> tag and before the closing </head> tag. In upcoming chapters, you’ll learn about some other advanced header information that can go between <head> and </head>, such as style sheet rules that are used to format the page, as well as the JavaScript you’ll learn to write and embed.
Tip
You might find it convenient to create and save a bare-bones page (also known as a skeleton page, or template) with just the opening and closing <html>, <head>, <title>, and <body> tags, similar to the document used in Listing 2.1. You can then open that document as a starting point whenever you want to make a new web page and save yourself the trouble of typing all those obligatory tags every time.
The <p> tag used in Listing 2.1 encloses a paragraph of text. You should enclose your chunks of text in the appropriate container tags whenever possible.
Organizing a Page with Paragraphs and Line Breaks
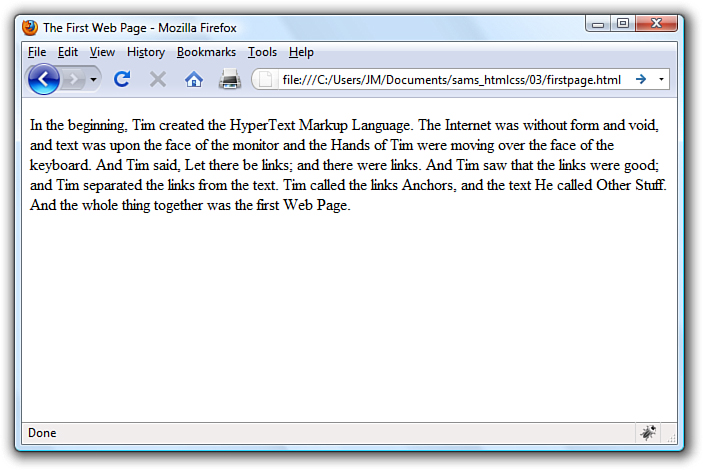
When a web browser displays HTML pages, it pays no attention to line endings or the number of spaces between words. For example, the top version of the poem shown in Figure 2.2 appears with a single space between all words, even though that’s not how it’s entered in Listing 2.2. This is because extra whitespace in HTML code is automatically reduced to a single space. Additionally, when the text reaches the edge of the browser window, it automatically wraps to the next line, no matter where the line breaks were in the original HTML file.
Figure 2.2 When the HTML in Listing 2.2 is viewed as a web page, line and paragraph breaks only appear where there are <br /> and <p> tags.
Listing 2.2 HTML Containing Paragraph and Line Breaks
<?xml version="1.0" encoding="UTF-8"?>
<!DOCTYPE html PUBLIC "-//W3C//DTD XHTML 1.1//EN"
"http://www.w3.org/TR/xhtml11/DTD/xhtml11.dtd">
<html xmlns="http://www.w3.org/1999/xhtml" xml:lang="en">
<head>
<title>The Advertising Agency Song</title>
</head>
<body>
<p>
When your client's hopping mad,
put his picture in the ad.
If he still should prove refractory,
add a picture of his factory.
</p>
<hr />
<p>
When your client's hopping mad,<br />
put his picture in the ad.
</p>
<p>
If he still should prove refractory,<br />
add a picture of his factory.
</p>
</body>
</html>
You must use HTML tags if you want to control where line and paragraph breaks actually appear. When text is enclosed within the <p></p> container tags, a line break will be assumed after the closing tag. In later chapters, you will learn to control the height of the line break using CSS. The <br /> tag forces a line break within a paragraph. Unlike the other tags you’ve seen so far, <br /> doesn’t require a closing </br> tag—this is one of those empty tags discussed earlier. Although HTML 4 does not require the / in empty tags, XHTML does and future standards will, so it’s important for you to stick to the latest standards and create web pages that are coded properly. Always code empty tags so that they end with />.
Caution
You might come across a lot of web content that includes <br> instead of <br />. Or you might see other content that does not include the closing </p> tag. Just remember there is a lot of antiquated web content floating around the Internet, and just because you see it in use doesn’t mean it’s correct. Save yourself a lot of future work and frustration by adhering to the standards you learn in this book. Developing clean HTML coding habits is a very important part of becoming a successful web designer.
The poem in Listing 2.2 and Figure 2.2 shows the <br /> and <p> tags being used to separate the lines and verses of an advertising agency song. You might have also noticed the <hr /> tag in the listing, which causes a horizontal rule line to appear on the page (see Figure 2.2). Inserting a horizontal rule with the <hr /> tag also causes a line break, even if you don’t include a <br /> tag along with it. Like <br />, the <hr /> horizontal rule tag is an empty tag and therefore never gets a closing </hr> tag.
Organizing Your Content with Headings
When you browse through web pages on the Internet, you’ll notice that many of them have a heading at the top that appears larger and bolder than the rest of the text. Listing 2.3 is sample code and text for a simple web page containing an example of a heading as compared to normal paragraph text. Any text between <h1> and </h1> tags will appear as a large heading. Additionally, <h2> and <h3> make progressively smaller headings, and so on as far down as <h6>.
<?xml version="1.0" encoding="UTF-8"?>
<!DOCTYPE html PUBLIC "-//W3C//DTD XHTML 1.1//EN"
"http://www.w3.org/TR/xhtml11/DTD/xhtml11.dtd">
<html xmlns="http://www.w3.org/1999/xhtml" xml:lang="en">
<head>
<title>My Widgets</title>
</head>
<body>
<h1>My Widgets</h1>
<p>My widgets are the best in the land. Continue reading to
learn more about my widgets.</p>
<h2>Widget Features</h2>
<p>If I had any features to discuss, you can bet I'd do
it here.</p>
<h3>Pricing</h3>
<p>Here, I would talk about my widget pricing.</p>
<h3>Comparisons</h3>
<p>Here, I would talk about how my widgets compare to my
competitor's widgets.</p>
</body>
</html>
Note
By now you’ve probably caught on to the fact that HTML code is often indented by its author to reveal the relationship between different parts of the HTML document. This indentation is entirely voluntary—you could just as easily run all the tags together with no spaces or line breaks and they would still look fine when viewed in a browser. The indentations are for you so that you can quickly look at a page full of code and understand how it fits together. Indenting your code is a very good web design habit and ultimately makes your pages easier to maintain.
As you can see in Figure 2.3, the HTML that creates headings couldn’t be simpler. In this example, the phrase “My Widgets” is prominently displayed using the <h1> tag. To create the biggest (level 1) heading, just put an <h1> tag at the beginning and a </h1> tag at the end of the text you want to use as a heading. For a slightly smaller (level 2) heading—for information that is of lesser importance than the title—use the <h2> and </h2> tags around your text. For content that should appear even less prominently than a level 2 heading, use the <h3> and </h3> tags around your text.
Figure 2.3 The use of three levels of headings shows the hierarchy of content on this sample product page.

However, bear in mind that your headings should follow a content hierarchy; use only one level 1 heading, have one (or more) level 2 headings after the level 1 heading, use level 3 headings directly after level 2 headings, and so on. Do not fall into the trap of assigning headings to content just to make that content display a certain way. Instead, ensure that you are categorizing your content appropriately (as a main heading, a secondary heading, and so on), while using display styles to make that text render a particular way in a web browser.
Theoretically, you can also use <h4>, <h5>, and <h6> tags to make progressively less important headings, but these aren’t used very often. Web browsers seldom show a noticeable difference between these headings and the <h3> headings anyway, and content usually isn’t displayed in such a manner as to need six levels of headings to show the content hierarchy.
Note
On many web pages nowadays, graphical images of ornately rendered letters and logos are often used in place of the ordinary text headings discussed in this chapter. However, using text headings is one of many search engine optimization (SEO) tips that you will learn about in Chapter 28, “Helping People Find Your Web Pages.” Search engines look at heading tags to see how you organize your content; they give higher preference to content that you have indicated is more important (for example, a level 1 heading) versus content that you indicate is of lesser importance (lower-level headings).
It’s important to remember the difference between a title and a heading. These two words are often interchangeable in day-to-day English, but when you’re talking HTML, <title> gives the entire page an identifying name that isn’t displayed on the page itself; it’s displayed only on the browser window’s title bar. The heading tags, on the other hand, cause some text on the page to be displayed with visual emphasis. There can be only one <title> per page and it must appear within the <head> and </head> tags, whereas you can have as many <h1>, <h2>, and <h3> headings as you want, in any order that suits your fancy. However, as I mentioned before, you should use the heading tags to keep tight control over content hierarchy; do not use headings as a way to achieve a particular look because that’s what CSS is for.
You’ll learn to take complete control over the appearance of text on your web pages in Parts II and III of this book. Short of taking exacting control of the size, family, and color of fonts, headings provide the easiest and most popular way to draw extra attention to important text.
Caution
Don’t forget that anything placed in the head of a web page is not intended to be viewed on the page, whereas everything in the body of the page is intended for viewing.
Validating Your Web Content
In the first chapter, I discussed ways to test your pages; one very important way to test your pages is to validate them. Think of it this way: It’s one thing to design and draw a beautiful set of house plans, but it’s quite another for an architect to stamp it as a safe structure suitable for construction. Validating your web pages is a similar process; in this case, however, the architect is an application—not a person.
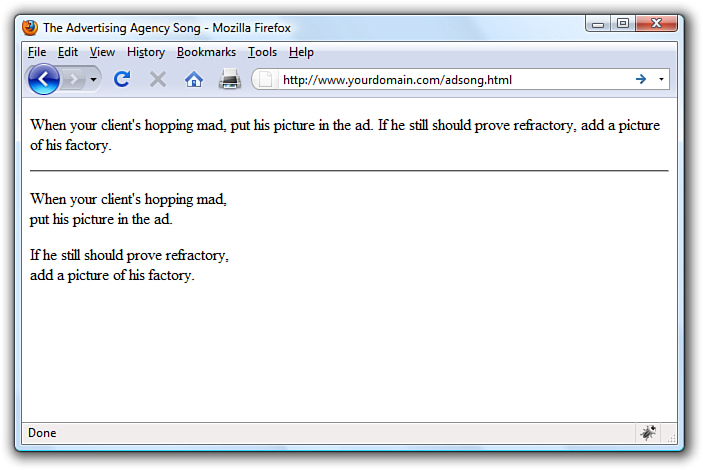
In brief, validation is the process of testing your pages with a special application that searches for errors and makes sure your pages follow the strict XHTML standard. Validation is simple. In fact, the standards body responsible for developing web standards—the World Wide Web Consortium (W3C)—offers an online validation tool you can use. To validate a page, follow this URL: http://validator.w3.org/. The W3C Markup Validation Service is shown in Figure 2.4.
Figure 2.4 The W3C Markup Validation Service enables you to validate an HTML (XHTML) document to ensure it has been coded accurately.
If you’ve already published a page online, you can use the Validate by URI tab. Use the Validate by File Upload tab to validate files stored on your local computer file system. The Validate by Direct Input tab enables you to paste the contents of a file from your text editor. If all goes well, your page will get a passing report (see Figure 2.5).
Figure 2.5 If a page passes the W3C Markup Validation Service, you know it is ready for prime time.

If the W3C Markup Validation Service encounters an error in your web page, it will provide specific details (including the line numbers of the offending code). This is a great way to hunt down problems and rid your pages of buggy code. Validation not only informs you whether your pages are constructed properly, it also assists you in finding and fixing problems before you post pages for the world to see.
Tip
Some web development tools include built-in validation features you can use in lieu of the W3C Markup Validation Service. Some examples include browser extensions such as Firebug (http://getfirebug.com/) and HTML Validator (http://users.skynet.be/mgueury/mozilla/), but many other programs offer similar functionality; check your user documentation.
The Scoop on HTML, XML, XHTML, and HTML5
In its early days, HTML was great because it allowed scientists to share information over the Internet in an efficient and relatively structured manner. It wasn’t until later that graphical web browsers were created and HTML started being used to code more than scientific papers. HTML quickly went from a tidy little markup language for researchers to an online publishing language. After it was established that HTML could be jazzed up for graphical browsing, the creators of web browsers went crazy by adding lots of nifty features to the language. Although these new features were neat at first, they compromised the original design of HTML and introduced inconsistencies when it came to how browsers displayed web pages; new features worked on only one browser or another, and you were out of luck if you happened to be running the wrong browser. HTML started to resemble a bad remodeling job of a house—a job done by too many contractors and without proper planning. As it turns out, some of the browser-specific features created during this time have now been adopted as standards whereas others have been dropped completely.
As with most revolutions, the birth of the Web was very chaotic, and the modifications to HTML reflected that chaos. Over the years, a significant effort has been made to reel in the inconsistencies of HTML and restore some order to the language. The problem with disorder in HTML is that it results in web browsers having to guess at how a page is to be displayed, which is not a good thing. Ideally, a web page designer should be able to define exactly how a page is to look and have it look the same regardless of what kind of browser or operating system someone is using. Better still, a designer should be able to define exactly what a page means and have that page look consistent across different browsers and platforms. This utopia is still off in the future somewhere, but a markup language called XML (Extensible Markup Language) began to play a significant role in leading us toward it.
XML is a general language used to create specific languages, such as HTML. It might sound a little strange, but it really just means that XML provides a basic structure and set of rules to which any markup language must adhere. Using XML, you can create a unique markup language to describe just about any kind of information, including web pages. Knowing that XML is a language for creating other markup languages, you could create your own version of HTML using XML. You could even create a markup language called BCCML (Bottle Cap Collection Markup Language), for example, which you could use to create and manage your extensive collection of rare bottle caps. The point is that XML lays the ground rules for organizing information in a consistent manner, and that information can be anything from web pages to bottle caps.
You might be thinking that bottle caps don’t have anything to do with the Web, so why mention them? The reason is that XML is not entirely about web pages. XML is actually broader than the Web in that it can be used to represent any kind of information on any kind of computer. If you can visualize all the information whizzing around the globe among computers, mobile phones, handheld computers, televisions, and radios, you can start to understand why XML has much broader applications than just cleaning up web pages. However, one of the first applications of XML is to restore some order to the Web, which is why XML is relevant to learning HTML.
If XML describes data better than HTML, does it mean that XML is set to upstage HTML as the markup language of choice for the Web? No. XML is not a replacement for HTML; it’s not even a competitor of HTML. XML’s impact on HTML has to do with cleaning up HTML. HTML is a relatively unstructured language that benefits from the rules of XML. The natural merger of the two technologies resulted in HTML’s adherence to the rules and structure of XML. To accomplish this merger, a new version of HTML was formulated that follows the stricter rules of XML. The new XML-compliant version of HTML is known as XHTML. Fortunately for you, you’ll actually be learning XHTML throughout this book because it is really just a cleaner version of HTML.
You might have heard about HTML5, which is touted as the next web standard. It will be, but not quite yet. When it does become a web standard, it will not render XHTML useless—HTML5 is not a replacement for XHTML, but instead is a major revision of HTML 4. In other words, XHTML and HTML5 can coexist on the Web, and web browsers that currently support XHTML will also (one day) support HTML5 as well.
The goal of this book is to guide you through the basics of web publishing, using XHTML and CSS as the core languages of those pages. However, whenever possible, I will note elements of the languages that are not present in HTML5, should you want to design your content for even further sustainability. If you gain a solid understanding of web publishing and the ways in which CSS works with the overall markup language of the page (be it XHTML or HTML5), you will be in a good position if you decide you want to move from XHTML to HTML5.
Summary
This chapter introduced the basics of what web pages are and how they work, including the history and differences between HTML and XHTML. You learned that coded HTML commands are included in a text file, and that typing HTML text yourself is better than using a graphical editor to create HTML commands for you—especially when you’re learning HTML.
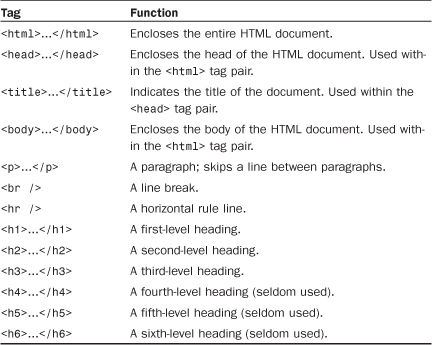
You were introduced to the most basic and important HTML tags. By adding these coded commands to any plain-text document, you can quickly transform it into a bona fide web page. You learned that the first step in creating a web page is to put a few obligatory HTML tags at the beginning and end, including a title for the page. You then mark where paragraphs and lines end and add horizontal rules and headings if you want them. Table 2.1 summarizes all the tags introduced in this chapter.
Table 2.1 HTML Tags Covered in Chapter 2
Finally, you learned about XML and XHTML, how they relate to HTML, and what HTML5 means in relation to what it is you’re learning here.
Q&A
Q. I’ve created a web page, but when I open the file in my web browser, I see all the text including the HTML tags. Sometimes I even see weird gobbledygook characters at the top of the page! What did I do wrong?
A. You didn’t save the file as plain text. Try saving the file again, being careful to save it as Text Only or ASCII Text. If you can’t quite figure out how to get your word processor to do that, don’t stress. Just type your HTML files in Notepad or TextEdit instead and everything should work just fine. (Also, always make sure that the filename of your web page ends in .html or .htm.)
Q. I’ve seen web pages on the Internet that don’t have <html> tags at the beginning. You said pages always have to start with <html>. What’s the deal?
A. Many web browsers will forgive you if you forget to include the <html> tag and will display the page correctly anyway. However, it’s a very good idea to include it because some software does need it to identify the page as valid HTML. Besides, you want your pages to be bona fide XHTML pages so that they conform to the latest web standards.
Workshop
The workshop contains quiz questions and exercises to help you solidify your understanding of the material covered. Try to answer all questions before looking at the “Answers” section that follows.
Quiz
1. What four tags are required in every HTML page?
2. What HTML tags and text would you use to produce the following web content:
• A small heading with the words We are Proud to Present
• A horizontal rule across the page
• A large heading with the one word Orbit
• A medium-sized heading with the words The Geometric Juggler
• Another horizontal rule
3. What code would you use to create a complete HTML web page with the title Foo Bar, a heading at the top that reads Happy Hour at the Foo Bar, followed by the words Come on down! in regular type?
Answers
1. <html>, <head>, <title>, and <body> (along with their closing tags, </html>, </head>, </title>, and </body>).
2. Your code would look like this:
<h3>We are Proud to Present</h3>
<hr />
<h1>Orbit</h1>
<h2>The Geometric Juggler</h2>
<hr />
3. Your code would look like this:
<?xml version="1.0" encoding="UTF-8"?>
<!DOCTYPE html PUBLIC "-//W3C//DTD XHTML 1.1//EN"
"http://www.w3.org/TR/xhtml11/DTD/xhtml11.dtd">
<html xmlns="http://www.w3.org/1999/xhtml" xml:lang="en">
<head>
<title>Foo Bar</title>
</head>
<body>
<h1>Happy Hour at the Foo Bar</h1>
<p>Come on Down!</p>
</body>
</html>
Exercises
• Even if your main goal in reading this book is to create web content for your business, you might want to make a personal web page just for practice. Type a few paragraphs to introduce yourself to the world and use the HTML tags you’ve learned in this chapter to make them into a web page.
• Throughout the book, you’ll be following along with the code examples and making pages of your own. Take a moment now to set up a basic document template containing the XML declaration, doctype declaration, and tags for the core HTML document structure. That way, you can be ready to copy and paste that information whenever you need it.