Chapter 24. AJAX: Remote Scripting
Remote scripting, also known as AJAX (Asynchronous JavaScript and XML), is a browser feature that enables JavaScript to escape its client-side boundaries and work with files on a web server or with server-side programs. In this chapter, you’ll learn how AJAX works and create two working examples.
Introducing AJAX
Traditionally, one of the major limitations of JavaScript is that it couldn’t communicate with a web server because it is a client-side technology—it stays within the browser. For example, you could create a game in JavaScript, but keeping a list of high scores stored on a server would require submitting a page to a server-side form, which JavaScript could not do (because it wasn’t meant to do that).
Speaking purely about user interactions, one of the limitations of web pages in general was that getting data from the user to the server, or from the server to the user, generally required a new page to be loaded and displayed. But in 2011, you likely run across websites every day that enable you to interact with content without loading a new page every time you click or submit a button.
AJAX is the answer to both of these problems. AJAX refers to JavaScript’s capability to use a built-in object, XMLHttpRequest, to communicate with a web server without submitting a form or loading a page. This object is supported by Internet Explorer, Firefox, Chrome, and all other modern browsers.
Although the term AJAX was coined in 2005, XMLHttpRequest has been supported by browsers for years—it was developed by Microsoft and first appeared in Internet Explorer 5. Nonetheless, it has only recently become a popular way of developing applications because browsers that support it have become more common. Another name for this technique is remote scripting.
Note
The term AJAX first appeared in an online article by Jesse James Garrett of Adaptive Path on February 18, 2005. It still appears here: http://www.adaptivepath.com/ideas/ajax-new-approach-web-applications.
The JavaScript Client (Front End)
JavaScript traditionally only has one way of communicating with a server—submitting a form. Remote scripting allows for much more versatile communication with the server. The A in AJAX stands for asynchronous, which means that the browser (and the user) isn’t left hanging while waiting for the server to respond. Here’s how a typical AJAX request works:
1. The script creates an XMLHttpRequest object and sends it to the web server. The script can continue after sending the request.
2. The server responds by sending the contents of a file or the output of a server-side program.
3. When the response arrives from the server, a JavaScript function is triggered to act on the data.
4. Because the goal is a more responsive user interface, the script usually displays the data from the server using the DOM, eliminating the need for a page refresh.
In practice, this happens quickly, but even with a slow server, it can still work. Also, because the requests are asynchronous, more than one can be in progress at a time.
The Server-Side Script (Back End)
The part of an application that resides on the web server is known as the back end. The simplest back end is a static file on the server—JavaScript can request the file with XMLHttpRequest, and then read and act on its contents. More commonly, the back end is a server-side program running in a language such as PHP, Perl, or Ruby.
JavaScript can send data to a server-side program using GET or POST methods, the same two ways an HTML form works. In a GET request, the data is encoded in the URL that loads the program. In a POST request, it is sent separately and can contain more data.
XML
The X in AJAX stands for XML (Extensible Markup Language), the universal markup language upon which the latest versions of HTML are built. A server-side file or program can send data in XML format, and JavaScript can act on the data using its methods for working with XML. These are similar to the DOM methods you’ve already used—for example, you can use the getElementsByTagName() method to find elements with a particular tag in the data.
Note
JSON (JavaScript Object Notation) takes the idea of encoding data in JavaScript and formalizes it. See http://www.json.org/ for details and code examples in many languages.
Keep in mind that XML is just one way to send data, and not always the easiest. The server could just as easily send plain text, which the script could display, or HTML, which the script could insert into the page using the innerHTML property. Some programmers have even used server-side scripts to return data in JavaScript format, which can be easily executed using the eval function.
Popular Examples of AJAX
Although typical HTML and JavaScript is used to build web pages and sites, AJAX techniques often result in web applications—web-based services that perform work for the user. Here are a few well-known examples of AJAX:
• Google’s Gmail mail client (http://mail.google.com/) uses AJAX to make a fast-responding email application. You can delete messages and perform other tasks without waiting for a new page to load.
• Amazon.com uses AJAX for some functions. For example, if you click on one of the Yes/No voting buttons for a product comment, it sends your vote to the server and a message appears next to the button thanking you, all without loading a page.
• Digg (http://www.digg.com) is a site where users can submit news stories and vote to determine which ones are displayed on the front page. The voting happens inside the page next to each story.
These are just a few examples. Subtle bits of remote scripting are appearing all over the Web, and you might not even notice them—you’ll just be annoyed a little bit less often at waiting for a page to load.
AJAX Frameworks and Libraries
Because remote scripting can be complicated, especially considering the browser differences you’ll learn about later this chapter, several frameworks and libraries have been developed to simplify AJAX programming.
Note
See Chapter 22, “Using Third-Party Libraries,” for information about using third-party libraries with JavaScript.
For starters, three of the libraries described earlier in this book, JQuery, Prototype, and Script.aculo.us, include functions to simplify remote scripting. There are also some dedicated libraries for languages such as PHP, Python, and Ruby.
Some libraries are designed to add server-side functions to JavaScript, whereas others are designed to add JavaScript interactivity to a language like PHP. You’ll build a simple library later this chapter that will be used to handle the remote scripting functions for this chapter’s examples.
Limitations of AJAX
Remote scripting is a relatively new technology, so there are some things it can’t do, and some things to watch out for. Here are some of the limitations and potential problems of AJAX:
• The script and the XML data or server-side program it requests data from must be on the same domain.
• Some older browsers and some less common browsers (such as mobile browsers) don’t support XMLHttpRequest, so you can’t count on its availability for all users.
• Requiring AJAX might compromise the accessibility of a site for disabled users.
• Users may still be accustomed to seeing a new page load each time they change something, so there might be a learning curve for them to understand an AJAX application.
As with other advanced uses of JavaScript, the best approach is to be unobtrusive—make sure there’s still a way to use the site without AJAX support if possible, and use feature sensing to prevent errors on browsers that don’t support it. See Chapter 21, “Using Unobtrusive JavaScript,” for more details.
Using XMLHttpRequest
You will now look at how to use XMLHttpRequest to communicate with a server. This might seem a bit complex, but the process is the same for any request. Later, you will create a reusable code library to simplify this process.
Creating a Request
The first step is to create an XMLHttpRequest object. To do this, you use the new keyword, as with other JavaScript objects. The following statement creates a request object in some browsers:
ajaxreq = new XMLHttpRequest();
The previous example works with Firefox, Chrome, Internet Explorer 7 and 8, and other modern browsers, but not with Internet Explorer 5 or 6. It is up to you whether you want to support these browsers or not because their percentages of use are very low. However, some institutions might be stuck with a lot of IE6 browsers installed at workstations, so your mileage may vary.
From this point forward, the sample code will only support IE7 and beyond (modern browsers), but if you want to support these old browsers, you have to use ActiveX syntax:
ajaxreq = new ActiveXObject("Microsoft.XMLHTTP");
The library section later this chapter demonstrates how to use the correct method depending on the browser in use. In either case, the variable you use (ajaxreq in the example) stores the XMLHttpRequest object. You’ll use the methods of this object to open and send a request, as explained in the following sections.
Opening a URL
The open() method of the XMLHttpRequest object specifies the filename as well as the method in which data will be sent to the server: GET or POST. These are the same methods supported by web forms.
ajaxreq.open("GET","filename");
For the GET method, the data you send is included in the URL. For example, this command opens the search.php program and sends the value “John” for the query parameter:
ajaxreq.open("GET","search.php?query=John");
Sending the Request
You use the send() method of the XMLHttpRequest object to send the request to the server. If you are using the POST method, the data to send is the argument for send(). For a GET request, you can use the null value instead:
ajaxreq.send(null);
Awaiting a Response
After the request is sent, your script will continue without waiting for a result. Because the result could come at any time, you can detect it with an event handler. The XMLHttpRequest object has an onreadystatechange event handler for this purpose. You can create a function to deal with the response and set it as the handler for this event:
ajaxreq.onreadystatechange = MyFunc;
Caution
As usual with event handlers, be sure to specify the function name without parentheses. With parentheses, you’re referring to the result of the function; without them, you’re referring to the function itself.
The request object has a property, readyState, that indicates its status, and this event is triggered whenever the readyState property changes. The values of readyState range from 0 for a new request to 4 for a complete request, so your event-handling function usually needs to watch for a value of 4.
Although the request is complete, it might not have been successful. The status property is set to 200 if the request succeeded or an error code if it failed. The statusText property stores a text explanation of the error or “OK” for success.
Interpreting the Response Data
When the readyState property reaches 4 and the request is complete, the data returned from the server is available to your script in two properties: responseText is the response in raw text form, and responseXML is the response as an XML object. If the data was not in XML format, only the text property will be available.
JavaScript’s DOM methods are meant to work on XML, so you can use them with the responseXML property. Later this chapter, you’ll use the getElementsByTagName() method to extract data from XML.
Creating a Simple AJAX Library
You should be aware by now that AJAX requests can be a bit complex. To make things easier, you can create an AJAX library. This is a JavaScript file that provides functions that handle making a request and receiving the result, which you can reuse any time you need AJAX functions.
This library will be used in the two examples later this chapter. Listing 24.1 shows the complete AJAX library, including the special case for older browsers.
// global variables to keep track of the request
// and the function to call when done
var ajaxreq=false, ajaxCallback;
// ajaxRequest: Sets up a request
function ajaxRequest(filename) {
try {
// Firefox / IE7 / Others
ajaxreq= new XMLHttpRequest();
} catch (error) {
try {
// IE 5 / IE 6
ajaxreq = new ActiveXObject("Microsoft.XMLHTTP");
} catch (error) {
return false;
}
}
ajaxreq.open("GET", filename);
ajaxreq.onreadystatechange = ajaxResponse;
ajaxreq.send(null);
}
// ajaxResponse: Waits for response and calls a function
function ajaxResponse() {
if (ajaxreq.readyState !=4) return;
if (ajaxreq.status==200) {
// if the request succeeded...
if (ajaxCallback) ajaxCallback();
} else alert("Request failed: " + ajaxreq.statusText);
return true;
}
The following sections explain how this library works and how to use it.
The ajaxRequest Function
The ajaxRequest function handles all the steps necessary to create and send an XMLHttpRequest. First, it creates the XMLHttpRequest object. As noted before, this requires a different command for older browsers and will cause an error if the wrong one executes, so try and catch are used to create the request. First the standard method is used, and if it causes an error, the ActiveX method is tried. If that also causes an error, the ajaxreq variable is set to false to indicate that AJAX is unsupported.
The ajaxResponse Function
The ajaxResponse function is used as the onreadystatechange event handler. This function first checks the readyState property for a value of 4. If it has a different value, the function returns without doing anything.
Next, it checks the status property for a value of 200, which indicates the request was successful. If so, it runs the function stored in the ajaxCallback variable. If not, it displays the error message in an alert box.
Using the Library
To use this library, follow these steps:
1. Save the library file as ajax.js in the same folder as your HTML documents and scripts.
2. Include the script in your document with a <script src> tag. It should be included before any other scripts that use its features.
3. In your script, create a function to be called when the request is complete and set the ajaxCallback variable to the function.
4. Call the ajaxRequest() function. Its parameter is the filename of the server-side program or file. (This library supports GET requests only, so you don’t need to specify the method.)
5. Your function specified in ajaxCallback will be called when the request completes successfully, and the global variable ajaxreq will store the data in its responseXML and responseText properties.
The two remaining examples in this chapter make use of this library to create AJAX applications.
Creating an AJAX Quiz Using the Library
Now that you have a reusable AJAX library, you can use it to create JavaScript applications that take advantage of remote scripting. This first example displays quiz questions on a page and prompts you for the answers.
Caution
Unlike most of the scripts in this book, this example requires a web server. It will not work on a local machine due to browsers’ security restrictions on remote scripting.
Rather than including the questions in the script, this example reads the quiz questions and answers from an XML file on the server as a demonstration of AJAX.
The HTML File
The HTML for this example is straightforward. It defines a simple form with an Answer field and a Submit button, along with some hooks for the script. The HTML for this example is shown in Listing 24.2.
Listing 24.2 The HTML File for the Quiz Example
<?xml version="1.0" encoding="UTF-8"?>
<!DOCTYPE html PUBLIC "-//W3C//DTD XHTML 1.1//EN"
"http://www.w3.org/TR/xhtml11/DTD/xhtml11.dtd">
<html xmlns="http://www.w3.org/1999/xhtml" xml:lang="en">
<head>
<title>Ajax Quiz Test</title>
<script type="text/javascript" src="ajax.js"></script>
</head>
<body>
<h1>Ajax Quiz Example</h1>
<form method="post" action="">
<p><input type="button" value="Start the Quiz" id="startq" /></p>
<p><strong>Question:</strong>
<span id="question">[Press Button to Start Quiz]</span></p>
<p><strong>Answer:</strong>
<input type="text" name="answer" id="answer" /></p>
<p><input type="button" value="Submit Answer" id="submit" /></p>
</form>
<script type="text/javascript" src="quiz.js"></script>
</body>
</html>
This HTML file includes the following elements:
• The <script> tag in the <head> section includes the AJAX library you created in the previous section from the ajax.js file.
• The <script> tag in the <body> section includes the quiz.js file, which will contain the quiz script.
• The <span id="question"> tag sets up a place for the question to be inserted by the script.
• The text field with the id value "answer" is where the user will answer the question.
• The button with the id value "submit" will submit an answer.
• The button with the id value "startq" will start the quiz.
You can test the HTML document at this time by placing the file on your web server and accessing it via the URL, but the buttons won’t work until you add the XML and JavaScript files, as you’ll learn about in the next two sections.
The XML File
The XML file for the quiz is shown in Listing 24.3. I’ve filled it with a few JavaScript questions, but it could easily be adapted for another purpose.
Listing 24.3 The XML File Containing the Quiz Questions and Answers
<?xml version="1.0" ?>
<questions>
<q>What DOM object contains URL information for the window?</q>
<a>location</a>
<q>Which method of the document object finds the
object for an element?</q>
<a>getElementById</a>
<q>If you declare a variable outside a function,
is it global or local?</q>
<a>global</a>
<q>What is the formal standard for the JavaScript language
called?</q>
<a>ECMAScript</a>
</questions>
The <questions> tag encloses the entire file and each question and answer are enclosed in <q> and <a> tags. Remember, this is XML, not HTML—these are not standard HTML tags, but tags that were created for this example. Because this file will be used only by your script, it does not need to follow a standard format.
To use this file, save it as questions.xml in the same folder as the HTML document. It will be loaded by the script you create in the next section.
Of course, with a quiz this small, you could have made things easier by storing the questions and answers in a JavaScript array. But imagine a much larger quiz, with thousands of questions, or a server-side program that pulls questions from a database, or even a hundred different files with different quizzes to choose from, and you can see the benefit of using a separate XML file.
The JavaScript File
Because you have a separate library to handle the complexities of making an AJAX request and receiving the response, the script for this example only needs to deal with the action for the quiz itself. Listing 24.4 shows the JavaScript file for this example.
Listing 24.4 The JavaScript File for the Quiz Example
// global variable qn is the current question number
var qn=0;
// load the questions from the XML file
function getQuestions() {
obj=document.getElementById("question");
obj.firstChild.nodeValue="(please wait)";
ajaxCallback = nextQuestion;
ajaxRequest("questions.xml");
}
// display the next question
function nextQuestion() {
questions = ajaxreq.responseXML.getElementsByTagName("q");
obj=document.getElementById("question");
if (qn < questions.length) {
q = questions[qn].firstChild.nodeValue;
obj.firstChild.nodeValue=q;
} else {
obj.firstChild.nodeValue="(no more questions)";
}
}
// check the user's answer
function checkAnswer() {
answers = ajaxreq.responseXML.getElementsByTagName("a");
a = answers[qn].firstChild.nodeValue;
answerfield = document.getElementById("answer");
if (a == answerfield.value) {
alert("Correct!");
}
else {
alert("Incorrect. The correct answer is: " + a);
}
qn = qn + 1;
answerfield.value="";
nextQuestion();
}
// Set up the event handlers for the buttons
obj=document.getElementById("startq");
obj.onclick=getQuestions;
ans=document.getElementById("submit");
ans.onclick=checkAnswer;
This script consists of the following:
• The first var statement defines a global variable, qn, which will keep track of which question is currently displayed. It is initially set to zero for the first question.
• The getQuestions() function is called when the user clicks the Start Quiz button. This function uses the AJAX library to request the contents of the questions.xml file. It sets the ajaxCallback variable to the nextQuestion() function.
• The nextQuestion() function is called when the AJAX request is complete. This function uses the getElementsByTagName() method on the responseXML property to find all the questions (<q> tags) and store them in the questions array.
• The checkAnswer() function is called when the user submits an answer. It uses getElementsByTagName() to store the answers (<a> tags) in the answers array, and then compares the answer for the current question with the user’s answer and displays an alert indicating whether they were right or wrong.
• The script commands after this function set up two event handlers. One attaches the getQuestions() function to the Start Quiz button to set up the quiz; the other attaches the checkAnswer() function to the Submit button.
Testing the Quiz
To try this example, you’ll need all four files in the same folder: ajax.js (the AJAX library), quiz.js (the quiz functions), questions.xml (the questions), and the HTML document. All but the HTML document need to have the correct filenames so they will work correctly. Also, remember that because it uses AJAX, this example requires a web server.
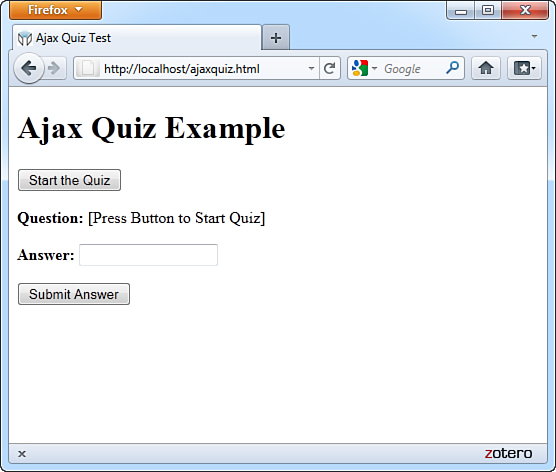
Figure 24.1 shows the quiz in action. The second question has just been answered.
Figure 24.1 The quiz example loaded in a web browser.
Debugging AJAX Applications
Dealing with remote scripting means working with several languages at once—JavaScript, server-side languages such as PHP, XML, and of course HTML. Thus, when you find an error, it can be difficult to track down. Here are some tips for debugging AJAX applications:
• Be sure all filenames are correct and that all files for your application are in the same folder on the server.
• If you are using a server-side language, test it without the script: Load it in the browser and make sure it works; try passing variables to it in the URL and checking the results.
• Check the statusText property for the results of your request—an alert message is helpful here. It is often a clear message such as “File not found” that might explain the problem.
• If you’re using a third-party AJAX library, check its documentation—many libraries have built-in debugging features you can enable to examine what’s going on.
Caution
Once again, because it uses AJAX, this example requires a web server. You’ll also need PHP to be installed, which it is by default by the vast majority of hosting services.
Listing 24.5 The HTML File for the Live Search Example
<?xml version="1.0" encoding="UTF-8"?>
<!DOCTYPE html PUBLIC "-//W3C//DTD XHTML 1.1//EN"
"http://www.w3.org/TR/xhtml11/DTD/xhtml11.dtd">
<html xmlns="http://www.w3.org/1999/xhtml" xml:lang="en">
<head>
<title>Ajax Live Search Example</title>
<script type="text/javascript" src="ajax.js"></script>
</head>
<body>
<h1>Ajax Live Search Example</h1>
<form method="get" action="">
<p><strong>Search for:</strong>
<input type="text" size="40" id="searchlive" /></p>
<div id="results">
<ul id="list">
<li>[Search results will display here.]</li>
</ul>
</div>
</form>
<script type="text/javascript" src="search.js"></script>
</body>
</html>
• The <script> tag in the <head> section includes the AJAX library, ajax.js.
• The <script> tag in the <body> section includes the search.js script, which you’ll create next.
• The <input> element with the id value "searchlive" is where you’ll type your search query.
• The <div> element with the id value "results" will act as a container for the dynamically fetched results. A bulleted list is created with a <ul> tag; this will be replaced with a list of results when you start typing.
<names>
<name>John Smith</name>
<name>Jane Smith</name>
</names>
Listing 24.6 The PHP Code for the Live Search Example
<?php
header("Content-type: text/xml");
$names = array (
"John Smith", "John Jones", "Jane Smith", "Jane Tillman",
"Abraham Lincoln", "Sally Johnson", "Kilgore Trout",
"Bob Atkinson", "Joe Cool", "Dorothy Barnes",
"Elizabeth Carlson", "Frank Dixon", "Gertrude East",
"Harvey Frank", "Inigo Montoya", "Jeff Austin",
"Lynn Arlington", "Michael Washington", "Nancy West" );
if (!$query) {
$query=$_GET['query'];
}
echo "<?xml version="1.0" ?>
";
echo "<names>
";
while (list($k,$v)=each($names)) {
if (stristr($v,$query)) {
echo "<name>$v</name>
";
}
}
echo "</names>
";
?>
• The header statement sends a header indicating that the output is in XML format. This is required for XMLHttpRequest to correctly use the responseXML property.
• The $names array stores the list of names. You can use a much longer list of names without changing the rest of the code.
• The program looks for a GET variable called query and uses a loop to output all the names that match the query.
• Because PHP can be embedded in an HTML file, the <?php and ?> tags indicate that the code between them should be interpreted as PHP.
Note
If you want to learn more about PHP, try Sams Teach Yourself PHP, MySQL and Apache All-in-One (ISBN: 067232976X).
Listing 24.7 The JavaScript File for the Live Search Example
// global variable to manage the timeout
var t;
// Start a timeout with each keypress
function StartSearch() {
if (t) window.clearTimeout(t);
t = window.setTimeout("LiveSearch()",200);
}
// Perform the search
function LiveSearch() {
// assemble the PHP filename
query = document.getElementById("searchlive").value;
filename = "search.php?query=" + query;
// DisplayResults will handle the Ajax response
ajaxCallback = DisplayResults;
// Send the Ajax request
ajaxRequest(filename);
}
// Display search results
function DisplayResults() {
// remove old list
ul = document.getElementById("list");
div = document.getElementById("results");
div.removeChild(ul);
// make a new list
ul = document.createElement("ul");
ul.id="list";
names = ajaxreq.responseXML.getElementsByTagName("name");
for (i = 0; i < names.length; i++) {
li = document.createElement("li");
name = names[i].firstChild.nodeValue;
text = document.createTextNode(name);
li.appendChild(text);
ul.appendChild(li);
}
if (names.length==0) {
li = document.createElement("li");
li.appendChild(document.createTextNode("No results"));
ul.appendChild(li);
}
// display the new list
div.appendChild(ul);
}
// set up event handler
obj=document.getElementById("searchlive");
obj.onkeydown = StartSearch;
• A global variable, t, is defined. This will store a pointer to the timeout used later in the script.
• The StartSearch() function is called when the user presses a key. This function uses setTimeout() to call the LiveSearch() function after a 200-millisecond delay. The delay is necessary so that the key the user types has time to appear in the search field.
• The LiveSearch() function assembles a filename that combines search.php with the query in the search field and launches an AJAX request using the library’s ajaxRequest() function.
• The DisplayResults() function is called when the AJAX request is complete. It deletes the bulleted list from the <div id="results"> section, and then assembles a new list using the W3C DOM and the AJAX results. If there were no results, it displays a “No results” message in the list.
• The final lines of the script set the StartSearch() function up as an event handler for the onkeydown event of the search field.
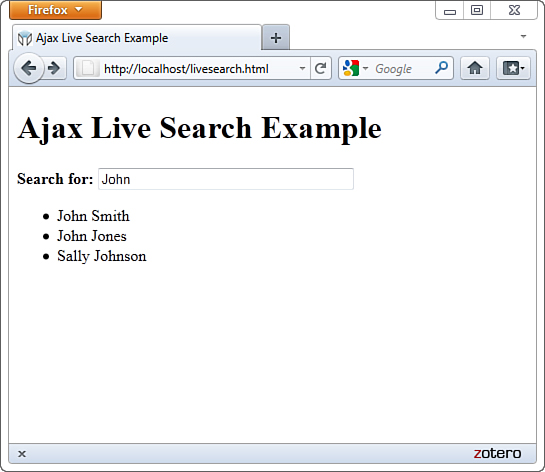
Figure 24.2 The live search example as displayed in the browser.
Summary
In this chapter, you’ve learned how AJAX, or remote scripting, allows JavaScript to communicate with a web server. You created a reusable AJAX library that can be used to create any number of AJAX applications, and you created an example using an XML file. Finally, you created a live search form using AJAX and PHP.
Q&A
Q. What happens if the server is slow, or never responds to the request?
A. This is another reason you should use AJAX as an optional feature—whether caused by the server or by the user’s connection, there will be times when a request is slow to respond or never responds. In this case, the callback function will be called late or not at all. This can cause trouble with overlapping requests; for example, in the live search example, an erratic server might cause the responses for the first few characters typed to come in a few seconds apart, confusing the user. You can remedy this by checking the readyState property to make sure a request is not already in progress before you start another one.
Q. In the live search example, why is the onkeydown event handler necessary? Wouldn’t the onchange event be easier to use?
A. Although onchange tells you when a form field has changed, it is not triggered until the user moves on to a different field—it doesn’t work for “live” search, so you have to watch for key presses instead. The onkeypress handler would work, but in some browsers it doesn’t detect the Backspace key, and it’s nice to have the search update when you backspace to shorten the query.
Workshop
The workshop contains quiz questions and exercises to help you solidify your understanding of the material covered. Try to answer all questions before looking at the “Answers” section that follows.
Quiz
1. Which of the following is the A in AJAX?
a. Advanced
b. Asynchronous
c. Application
2. Which property of an XMLHttpRequest object indicates whether the request was successful?
a. status
b. readyState
c. success
3. True or False: To support old versions of Internet Explorer, you must create an ActiveX object rather than an XMLHttpRequest object when using AJAX.
Answers
1. b. AJAX stands for Asynchronous JavaScript and XML.
2. a. The status property indicates whether the request was successful; readyState indicates whether the request is complete, but does not indicate success.
3. True. Internet Explorer 5 and 6 require ActiveX, whereas versions of Internet Explorer after version 7 support the XMLHttpRequest object natively.
Exercises
• Build your own XML file of questions and answers on your favorite topic and try it with the quiz example.
• Use the AJAX library to add an AJAX feature to your site or create a simple example of your own.