Chapter 17. Using JavaScript Functions and Objects
In this chapter, you’ll learn about two more key JavaScript concepts that you’ll use throughout the rest of this book. First, you’ll learn the details of using functions, which enable you to group any number of statements into a block. This is useful for repeating sections of code, and you can also create functions that accept parameters and return values for later use.
Whereas functions enable you to group sections of code, objects enable you to group data—you can use them to combine related data items and functions for working with the data. You’ll learn how to define and use objects and their methods and will work specifically with two useful built-in objects, Math and Date.
Using Functions
The scripts you’ve seen so far are simple lists of instructions. The browser begins with the first statement after the <script> tag and follows each instruction in order until it reaches the closing </script> tag (or encounters an error).
Although this is a straightforward approach for short scripts, it can be confusing to read a longer script written in this fashion. To make it easier for you to organize your scripts, JavaScript supports functions, which you learned about in Chapter 14, “Getting Started with JavaScript Programming.” In this section, you will learn how to define and use functions.
Defining a Function
Functions are groups of JavaScript statements that can be treated as a single unit. To use a function, you must first define it. Here is a simple example of a function definition:
function Greet() {
alert("Greetings.");
}
This snippet defines a function that displays an alert message to the user. This begins with the function keyword. The function’s name is Greet. Notice the parentheses after the function’s name. As you’ll learn next, the space between them is not always empty.
The first and last lines of the function definition include braces ({ and }). You use these to enclose all of the statements in the function. The browser uses the braces to determine where the function begins and ends.
Between the braces, this particular function contains a single line. This uses the built-in alert function, which displays an alert message. The message will contain the text “Greetings.”
Caution
Function names are case sensitive. If you define a function such as Greet with a capital letter, be sure you use the identical name when you call the function. That is to say, if you define the function with the name Greet but you attempt to call the function using greet, it will not work.
Now, about those parentheses. The current Greet function always does the same thing: Each time you use it, it displays the same message. Although this avoids a bit of typing, it doesn’t really provide much of an advantage.
To make your function more flexible, you can add parameters, also known as arguments. These are variables that are received by the function each time it is called. For example, you can add a parameter called who that tells the function the name of the person to greet. Here is the modified Greet function:
function Greet(who) {
alert("Greetings, " + who);
}
Of course, to use this function, you should include it in an HTML document. Traditionally, the best place for a function definition is within the <head> section of the document. Because the statements in the <head> section are executed first, this ensures that the function is defined before it is used.
Listing 17.1 shows the Greet function embedded in the header section of an HTML document.
Listing 17.1 The Greet Function in an HTML Document
<?xml version="1.0" encoding="UTF-8"?>
<!DOCTYPE html PUBLIC "-//W3C//DTD XHTML 1.1//EN"
"http://www.w3.org/TR/xhtml11/DTD/xhtml11.dtd">
<html xmlns="http://www.w3.org/1999/xhtml" xml:lang="en">
<head>
<title>Functions</title>
<script type="text/javascript">
function Greet(who) {
alert("Greetings, " + who);
}
</script>
</head>
<body>
<p>This is the body of the page.</p>
</body>
</html>
Calling the Function
You have now defined a function and placed it in an HTML document. However, if you load Listing 17.1 into a browser, you’ll notice that it does absolutely nothing. This is because the function is defined—ready to be used—but we haven’t used it yet.
Making use of a function is referred to as calling the function. To call a function, use the function’s name as a statement in a script. You will need to include the parentheses and the values for the function’s parameters. For example, here’s a statement that calls the Greet function:
Greet("Fred");
This tells the JavaScript interpreter to transfer control to the first statement in the Greet function. It also passes the parameter "Fred" to the function. This value will be assigned to the who variable inside the function.
Tip
Functions can have more than one parameter. To define a function with multiple parameters, list a variable name for each parameter, separated by commas. To call the function, specify values for each parameter separated by commas.
Listing 17.2 shows a complete HTML document that includes the function definition and a second script in the body of the page that actually calls the function. To demonstrate the usefulness of functions, we’ll call it twice to greet two different people.
Listing 17.2 The Complete Function Example
<?xml version="1.0" encoding="UTF-8"?>
<!DOCTYPE html PUBLIC "-//W3C//DTD XHTML 1.1//EN"
"http://www.w3.org/TR/xhtml11/DTD/xhtml11.dtd">
<html xmlns="http://www.w3.org/1999/xhtml" xml:lang="en">
<head>
<title>Functions</title>
<script type="text/javascript">
function Greet(who) {
alert("Greetings, " + who);
}
</script>
</head>
<body>
<h1>Function Example</h1>
<p>Prepare to be greeted twice.</p>
<script type="text/javascript">
Greet("Fred");
Greet("Ethel");
</script>
</body>
</html>
This listing includes a second set of <script> tags in the body of the page. The second script includes two function calls to the Greet function, each with a different name.
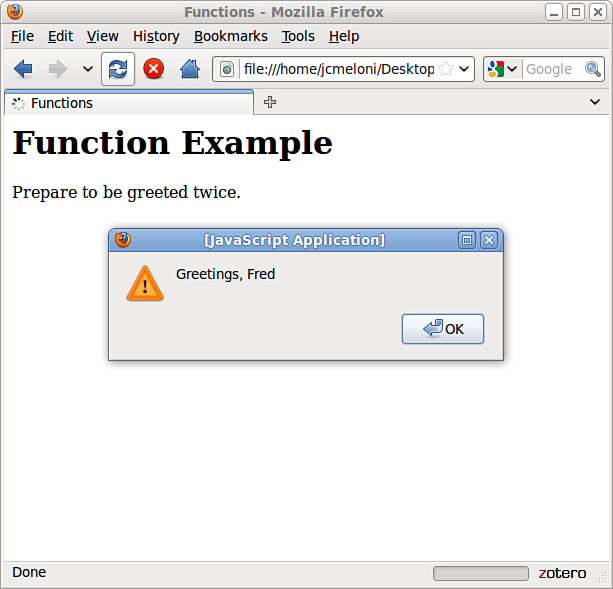
Now that you have a script that actually does something, try loading it into a browser. You should see something like Figure 17.1, which shows the Greeting script when it is initially loaded in a browser.
Figure 17.1 The output of the Greeting example.
Note
Notice that the second alert message isn’t displayed until you press the OK button on the first alert. This is because JavaScript processing is halted while alerts are displayed.
Returning a Value
The function you just created displays a message to the user, but functions can also return a value to the script that called them. This enables you to use functions to calculate values. As an example, you can create a function that averages four numbers.
Note
I’ve also included the opening brace ({) on the first line of the function. This is a common style, but you can also place the brace on the next line or on a line by itself.
Your function should begin with the function keyword, the function’s name, and the parameters it accepts. We will use the variable names a, b, c, and d for the four numbers to average. Here is the first line of the function:
function Average(a,b,c,d) {
Next, the function needs to calculate the average of the four parameters. You can calculate this by adding them, and then dividing by the number of parameters (in this case, 4). Thus, here is the next line of the function:
result = (a + b + c + d) / 4;
This statement creates a variable called result and calculates the result by adding the four numbers, and then dividing by 4. (The parentheses are necessary to tell JavaScript to perform the addition before the division.)
To send this result back to the script that called the function, you use the return keyword. Here is the last part of the function:
return result;
}
Listing 17.3 shows the complete Average function in an HTML document. This HTML document also includes a small script in the <body> section that calls the Average function and displays the result.
Listing 17.3 The Average Function in an HTML Document
<?xml version="1.0" encoding="UTF-8"?>
<!DOCTYPE html PUBLIC "-//W3C//DTD XHTML 1.1//EN"
"http://www.w3.org/TR/xhtml11/DTD/xhtml11.dtd">
<html xmlns="http://www.w3.org/1999/xhtml" xml:lang="en">
<head>
<title>Function Example: Average</title>
<script type="text/javascript">
function Average(a,b,c,d) {
result = (a + b + c + d) / 4;
return result;
}
</script>
</head>
<body>
<h1>Function Example: Average</h1>
<p>The following is the result of the function call.</p>
<script type="text/javascript">
score = Average(3,4,5,6);
document.write("The average is: " + score);
</script>
</body>
</html>
You can use a variable with the function call, as shown in this listing. This statement averages the numbers 3, 4, 5, and 6 and stores the result in a variable called score:
score = Average(3,4,5,6);
Tip
You can also use the function call directly in an expression. For example, you could use the alert statement to display the result of the function alert(Average(1,2,3,4))
Introducing Objects
In the previous chapter, you learned how to use variables to represent different kinds of data in JavaScript. JavaScript also supports objects, a more complex kind of variable that can store multiple data items and functions.
Although a variable can have only one value at a time, an object can contain multiple values, as well as functions for working with the values. This enables you to group related data items and the functions that deal with them into a single object.
In this chapter, you’ll learn how to define and use your own objects. You’ve already worked with some of them, including
• DOM objects—Allow your scripts to interact with web pages. You learned about these in Chapter 15, “Working with the Document Object Model (DOM).”
• Built-in objects—Include strings and arrays, which you learned about in Chapter 16, “Using JavaScript Variables, Strings, and Arrays.”
The syntax for working with all three types of objects—DOM objects, built-in objects, and custom objects—is the same, so even if you don’t end up creating your own objects, you should have a good understanding of JavaScript’s object terminology and syntax.
Creating Objects
When you created an array in the previous chapter, you used the following JavaScript statement:
scores = new Array(4);
The new keyword tells the JavaScript interpreter to use a function—in this case, the built-in Array function—to create an object. You’ll create a function for a custom object later in this chapter.
Object Properties and Values
Each object has one or more properties—essentially, variables that will be stored within the object. For example, in Chapter 15, you learned that the location.href property gives you the URL of the current document. The href property is one of the properties of the location object in the DOM.
You’ve also used the length property of String objects, as in the following example from the previous chapter:
test = "This is a test.";
document.write(test.length);
Like variables, each object property has a value. To read a property’s value, you simply include the object name and property name, separated by a period, in any expression, as in test.length previously. You can change a property’s value using the = operator, just like a variable. The following example sends the browser to a new URL by changing the location.href property:
location.href="http://www.google.com/";
Note
An object can also be a property of another object. This is referred to as a child object.
Understanding Methods
Along with properties, each object can have one or more methods. These are functions that work with the object’s data. For example, the following JavaScript statement reloads the current document, as you learned in Chapter 15:
location.reload();
When you use reload(), you’re using a method of the location object. Like normal functions, methods can accept arguments in parentheses and can return values.
Using Objects to Simplify Scripting
Although JavaScript’s variables and arrays are versatile ways to store data, sometimes you need a more complicated structure. For example, suppose you are creating a script to work with a business card database that contains names, addresses, and phone numbers for a variety of people.
If you were using regular variables, you would need several separate variables for each person in the database: a name variable, an address variable, and so on. This would be very confusing.
Arrays would improve things slightly. You could have a names array, an addresses array, and a phone number array. Each person in the database would have an entry in each array. This would be more convenient, but still not perfect.
With objects, you can make the variables that store the database as logical as business cards. Each person is represented by a Card object, which has properties for name, address, and phone number. You can even add methods to the object to display or work with the information.
In the following sections, you’ll use JavaScript to actually create the Card object and its properties and methods. Later in this chapter, you’ll use the Card object in a script to display information for several members of the database.
Defining an Object
The first step in creating an object is to name it and its properties. We’ve already decided to call the object a Card object. Each object will have the following properties:
• name
• address
• workphone
• homephone
The first step in using this object in a JavaScript program is to create a function to make new Card objects. This function is called the constructor for an object. Here is the constructor function for the Card object:
function Card(name,address,work,home) {
this.name = name;
this.address = address;
this.workphone = work;
this.homephone = home;
}
The constructor is a simple function that accepts parameters to initialize a new object and assigns them to the corresponding properties. This function accepts several parameters from the statement that calls the function, and then assigns them as properties of an object. Because the function is called Card, the object is the Card object.
Notice the this keyword. You’ll use it any time you create an object definition. Use this to refer to the current object—the one that is being created by the function.
Defining an Object Method
Next, you will create a method to work with the Card object. Because all Card objects will have the same properties, it might be handy to have a function that prints out the properties in a neat format. Let’s call this function PrintCard.
Your PrintCard function will be used as a method for Card objects, so you don’t need to ask for parameters. Instead, you can use the this keyword again to refer to the current object’s properties. Here is a function definition for the PrintCard() function:
function PrintCard() {
line1 = "Name: " + this.name + "<br/>
";
line2 = "Address: " + this.address + "<br/>
";
line3 = "Work Phone: " + this.workphone + "<br/>
";
line4 = "Home Phone: " + this.homephone + "<hr/>
";
document.write(line1, line2, line3, line4);
}
This function simply reads the properties from the current object (this), prints each one with a caption, and skips to a new line.
You now have a function that prints a card, but it isn’t officially a method of the Card object. The last thing you need to do is make PrintCard part of the function definition for Card objects. Here is the modified function definition:
function Card(name,address,work,home) {
this.name = name;
this.address = address;
this.workphone = work;
this.homephone = home;
this.PrintCard = PrintCard;
}
The added statement looks just like another property definition, but it refers to the PrintCard function. This will work so long as the PrintCard function is defined with its own function definition. Methods are essentially properties that define a function rather than a simple value.
Tip
The previous example uses lowercase names such as workphone for properties, and an uppercase name (PrintCard) for the method. You can use any case for property and method names, but this is one way to make it clear that PrintCard is a method rather than an ordinary property.
Creating an Object Instance
Now let’s use the object definition and method you just created. To use an object definition, you create a new object. This is done with the new keyword. This is the same keyword you’ve already used to create Date and Array objects.
The following statement creates a new Card object called tom:
tom = new Card("Tom Jones", "123 Elm Street", "555-1234", "555-9876");
As you can see, creating an object is easy. All you do is call the Card() function (the object definition) and give it the required attributes, in the same order as the definition.
After this statement executes, a new object is created to hold Tom’s information. This is called an instance of the Card object. Just as there can be several string variables in a program, there can be several instances of an object you define.
Rather than specify all the information for a card with the new keyword, you can assign them after the fact. For example, the following script creates an empty Card object called holmes, and then assigns its properties:
holmes = new Card();
holmes.name = "Sherlock Holmes";
holmes.address = "221B Baker Street";
holmes.workphone = "555-2345";
holmes.homephone = "555-3456";
After you’ve created an instance of the Card object using either of these methods, you can use the PrintCard() method to display its information. For example, this statement displays the properties of the tom card:
tom.PrintCard();
Extending Built-in Objects
JavaScript includes a feature that enables you to extend the definitions of built-in objects. For example, if you think the String object doesn’t quite fit your needs, you can extend it, adding a new property or method. This might be very useful if you were creating a large script that used many strings.
You can add both properties and methods to an existing object by using the prototype keyword. (A prototype is another name for an object’s definition, or constructor function.) The prototype keyword enables you to change the definition of an object outside its constructor function.
As an example, let’s add a method to the String object definition. You will create a method called heading, which converts a string into an HTML heading. The following statement defines a string called title:
title = "Fred's Home Page";
This statement would output the contents of the title string as an HTML level 1 header:
document.write(title.heading(1));
Listing 17.4 adds a heading method to the String object definition that will display the string as a heading, and then displays three headings using the method.
Listing 17.4 Adding a Method to the String Object
<?xml version="1.0" encoding="UTF-8"?>
<!DOCTYPE html PUBLIC "-//W3C//DTD XHTML 1.1//EN"
"http://www.w3.org/TR/xhtml11/DTD/xhtml11.dtd">
<html xmlns="http://www.w3.org/1999/xhtml" xml:lang="en">
<head>
<title>Test of Heading Method</title>
</head>
<body>
<script type="text/javascript">
function addhead (level) {
html = "h" + level;
text = this.toString();
start = "<" + html + ">";
stop = "</" + html + ">";
return start + text + stop;
}
String.prototype.heading = addhead;
document.write ("This is a heading 1".heading(1));
document.write ("This is a heading 2".heading(2));
document.write ("This is a heading 3".heading(3));
</script>
</body>
</html>
First, you define the addhead() function, which will serve as the new string method. It accepts a number to specify the heading level. The start and stop variables are used to store the HTML “begin header” and “end header” tags, such as <h1> and </h1>.
After the function is defined, use the prototype keyword to add it as a method of the String object. You can then use this method on any String object or, in fact, any JavaScript string. This is demonstrated by the last three statements, which display quoted text strings as level 1, 2, and 3 headers.
Listing 17.5 A Sample Script That Uses the Card Object
// define the functions
function PrintCard() {
line1 = "<strong>Name: </strong>" + this.name + "<br/>
";
line2 = "<strong>Address: </strong>" + this.address + "<br/>
";
line3 = "<strong>Work Phone: </strong>" + this.workphone + "<br/>
";
line4 = "<strong>Home Phone: </strong>" + this.homephone + "<hr/>
";
document.write(line1, line2, line3, line4);
}
function Card(name,address,work,home) {
this.name = name;
this.address = address;
this.workphone = work;
this.homephone = home;
this.PrintCard = PrintCard;
}
// Create the objects
sue = new Card("Sue Suthers", "123 Elm Street", "555-1234", "555-9876");
phred = new Card("Phred Madsen", "233 Oak Lane", "555-2222", "555-4444");
henry = new Card("Henry Tillman", "233 Walnut Circle", "555-1299",
"555-1344");
// And print them
sue.PrintCard();
phred.PrintCard();
henry.PrintCard();
Listing 17.6 The HTML File for the Card Object Example
<?xml version="1.0" encoding="UTF-8"?>
<!DOCTYPE html PUBLIC "-//W3C//DTD XHTML 1.1//EN"
"http://www.w3.org/TR/xhtml11/DTD/xhtml11.dtd">
<html xmlns="http://www.w3.org/1999/xhtml" xml:lang="en">
<head>
<title>JavaScript Business Cards</title>
</head>
<body>
<h1>JavaScript Business Cards</h1>
<p>Script begins here.</p>
<hr/>
<script type="text/javascript" src="cardtest.js" > </script>
<p>End of script.</p>
</body>
</html>
Figure 17.2 Displaying the output of the business card example.

Note
This example isn’t a very sophisticated database because you have to include the data for each person in the HTML document. However, an object like this could be used to store a database record retrieved from a database server with thousands of records.
Using the Math Object
The Math object is a built-in JavaScript object that includes math constants and functions. You don’t need to create a Math object; it exists automatically in any JavaScript program. The Math object’s properties represent mathematical constants, and its methods are mathematical functions.
Rounding and Truncating
Three of the most useful methods of the Math object enable you to round decimal values up and down:
• Math.ceil() rounds a number up to the next integer.
• Math.floor() rounds a number down to the next integer.
• Math.round() rounds a number to the nearest integer.
All of these take the number to be rounded as their single parameter. You might notice one thing missing: the capability to round to a decimal place, such as for dollar amounts. Fortunately, you can easily simulate this. Here is a simple function that rounds numbers to two decimal places:
function round(num) {
return Math.round(num * 100) / 100;
}
This function multiplies the value by 100 to move the decimal, and then rounds the number to the nearest integer. Finally, the value is divided by 100 to restore the decimal to its original position.
Generating Random Numbers
One of the most commonly used methods of the Math object is the Math.random() method, which generates a random number. This method doesn’t require any parameters. The number it returns is a random decimal number between zero and one.
You’ll usually want a random number between one and a value. You can do this with a general-purpose random number function. The following is a function that generates random numbers between one and the parameter you send it:
function rand(num) {
return Math.floor(Math.random() * num) + 1;
}
This function multiplies a random number by the value specified in the num parameter, and then converts it to an integer between one and the number by using the Math.floor() method.
Other Math Functions
The Math object includes many functions beyond those you’ve looked at here. For example, Math.sin() and Math.cos() calculate sines and cosines. The Math object also includes properties for various mathematical constants, such as Math.PI.
Working with Math Functions
The Math.random method generates a random number between 0 and 1. However, it’s difficult for a computer to generate a truly random number. (It’s also hard for a human being to do so—that’s why dice were invented.)
Today’s computers do reasonably well at generating random numbers, but just how good is JavaScript’s Math.random function? One way to test it is to generate many random numbers and calculate the average of all of them.
In theory, the average should be somewhere near .5, halfway between 0 and 1. The more random values you generate, the closer the average should get to this middle ground.
As an example of the use of the Math object’s methods, you can create a script that tests JavaScript’s random number function. To do this, you’ll generate 5,000 random numbers and calculate their average.
This example will use a look, which you’ll learn more about in the next chapter. But this is a simple enough example that you should be able to follow along. In this case, the loop will generate the random numbers. You’ll be surprised how fast JavaScript can do this.
To begin your script, you will initialize a variable called total. This variable will store a running total of all of the random values, so it’s important that it starts at 0:
total = 0;
Next, begin a loop that will execute 5,000 times. Use a for loop because you want it to execute a fixed number of times:
for (i=1; i<=5000; i++) {
Within the loop, you will need to create a random number and add its value to total. Here are the statements that do this and continue with the next iteration of the loop:
num = Math.random();
total += num;
}
Note
The % symbol in the previous code is the modulo operator, which gives you the remainder after dividing one number by another. Here it is used to find even multiples of 1,000.
Depending on the speed of your computer, it might take a few seconds to generate those 5,000 random numbers. Just to be sure something is happening, the script will display a status message after each 1,000 numbers:
if (i % 1000 == 0)
document.write("Generated " + i + " numbers...<br/>");
The final part of your script will calculate the average by dividing total by 5,000. Your script can also round the average to three decimal places:
average = total / 5000;
average = Math.round(average * 1000) / 1000;
document.write("<h2>Average of 5000 numbers: " + average + "</h2>");
To test this script and see just how random those numbers are, combine the complete script with an HTML document and <script> tags. Listing 17.7 shows the complete random number testing script.
Listing 17.7 A Script to Test JavaScript’s Random Number Function
<?xml version="1.0" encoding="UTF-8"?>
<!DOCTYPE html PUBLIC "-//W3C//DTD XHTML 1.1//EN"
"http://www.w3.org/TR/xhtml11/DTD/xhtml11.dtd">
<html xmlns="http://www.w3.org/1999/xhtml" xml:lang="en">
<head>
<title>Math Example</title>
</head>
<body>
<h1>Math Example</h1>
<p>How random are JavaScript's random numbers?
Let's generate 5000 of them and find out.</p>
<script type="text/javascript">
total = 0;
for (i=1; i<=5000; i++) {
num = Math.random();
total += num;
if (i % 1000 == 0) {
document.write("Generated " + i + " numbers...<br/>");
}
}
average = total / 5000;
average = Math.round(average * 1000) / 1000;
document.write("<h2>Average of 5000 numbers: " + average + "</h2>");
</script>
</body>
</html>
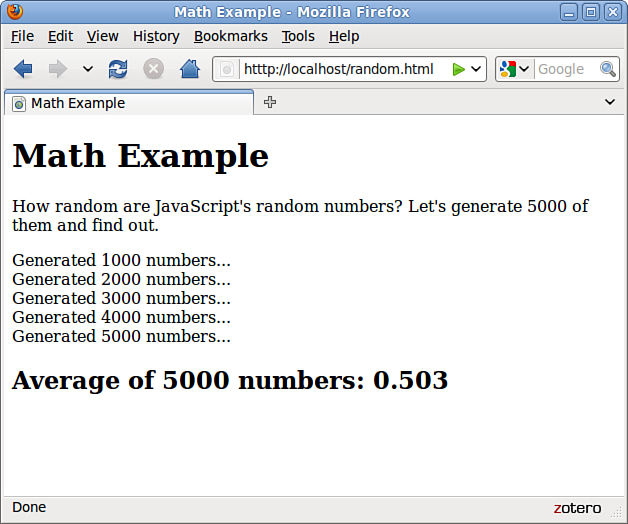
To test the script, load the HTML document into a browser. After a short delay, you should see a result. If it’s close to .5, the numbers are reasonably random. My result was .503, as shown in Figure 17.3.
Figure 17.3 The random number testing script in action.
Note
The average you’ve used here is called an arithmetic mean. This type of average isn’t a perfect way to test randomness. Actually, all it tests is the distribution of the numbers above and below .5. For example, if the numbers turned out to be 2,500 .4s and 2,500 .6s, the average would be a perfect .5—but they wouldn’t be very random numbers. (Thankfully, JavaScript’s random numbers don’t have this problem.)
Using the with Keyword
The with keyword is one you haven’t seen before. You can use it to make JavaScript programming easier—or at least easier to type.
The with keyword specifies an object, and it is followed by a block of statements enclosed in braces. For each statement in the block, any properties you mention without specifying an object are assumed to be for that object.
As an example, suppose you have a string called lastname. You can use with to perform string operations on it without specifying the name of the string every time:
with (lastname) {
window.alert("length of last name: " + length);
capname = toUpperCase();
}
In this example, the length property and the toUpperCase method refer to the lastname string, although it is only specified once with the with keyword.
Obviously, the with keyword only saves a bit of typing in situations like this. However, you might find it more useful when you’re dealing with a DOM object throughout a large procedure, or when you are repeatedly using a built-in object, such as the Math object.
Working with Dates
The Date object is a built-in JavaScript object that enables you to conveniently work with dates and times. You can create a Date object anytime you need to store a date and use the Date object’s methods to work with the date.
Note
JavaScript dates are stored as the number of milliseconds since midnight, January 1, 1970. This date is called the epoch. Dates before 1970 weren’t allowed in early versions, but are now represented by negative numbers.
You encountered one example of a Date object in Chapter 4, “Understanding JavaScript,” with the time/date script. The Date object has no properties. To set or obtain values from a Date object, you must use the methods described in the next section.
Creating a Date Object
You can create a Date object using the new keyword. You can also optionally specify the date to store in the object when you create it. You can use any of the following formats:
birthday = new Date();
birthday = new Date("November 1, 2010 08:00:00");
birthday = new Date(11,1, 2010);
birthday = new Date(11,1,2010, 8, 0, 0);
You can choose any of these formats, depending on which values you want to set. If you use no parameters, as in the first example, the current date is stored in the object. You can then set the values using the set methods, described in the next section.
Setting Date Values
A variety of set methods enable you to set components of a Date object to values:
• setDate() sets the day of the month.
• setMonth() sets the month. JavaScript numbers the months from 0 to 11, starting with January (0).
• setFullYear() sets the year.
• setTime() sets the time (and the date) by specifying the number of milliseconds since January 1, 1970.
• setHours(), setMinutes(), and setSeconds() set the time.
As an example, the following statement sets the year of a Date object called holiday to 2010:
holiday.setFullYear(2010);
Reading Date Values
You can use the get methods to get values from a Date object. This is the only way to obtain these values because they are not available as properties. Here are the available get methods for dates:
• getDate() gets the day of the month.
• getMonth() gets the month.
• getFullYear() gets the year.
• getTime() gets the time (and the date) as the number of milliseconds since January 1, 1970.
• getHours(), getMinutes(), getSeconds(), and getMilliseconds() get the components of the time.
Note
Along with setFullYear and getFullYear, which require four-digit years, JavaScript includes setYear and getYear methods, which use two-digit year values. You should always use the four-digit version to avoid Year 2000 issues.
Working with Time Zones
Finally, a few functions are available to help your Date objects work with local time values and time zones:
• getTimeZoneOffset() function gives you the local time zone’s offset from UTC (Coordinated Universal Time, based on the old Greenwich Mean Time standard). In this case, local refers to the location of the browser. (Of course, this only works if the user has set his system clock accurately.)
• toUTCString() function converts the date object’s time value to text, using UTC. This method was introduced in JavaScript 1.2 to replace the toGMTString method, which still works but should be avoided.
• toLocalString() function converts the date object’s time value to text, using local time.
Along with these basic functions, JavaScript 1.2 and later include UTC versions of several of the functions described previously. These are identical to the regular commands, but work with UTC instead of local time:
• getUTCDate() function gets the day of the month in UTC time.
• getUTCDay() function gets the day of the week in UTC time.
• getUTCFullYear() function gets the four-digit year in UTC time.
• getUTCMonth() function returns the month of the year in UTC time.
• getUTCHours(), getUTCMinutes(), getUTCSeconds(), and getUTCMilliseconds() return the components of the time in UTC.
• setUTCDate(), setUTCFullYear(), setUTCMonth(), setUTCHours(), setUTCMinutes(), setUTCSeconds(), and setUTCMilliseconds() set the time in UTC.
Converting Between Date Formats
Two special methods of the Date object enable you to convert between date formats. Instead of using these methods with a Date object you created, you use them with the built-in object Date itself. These include the following:
• Date.parse() method converts a date string, such as November 1, 2010, to a Date object (number of milliseconds since 1/1/1970).
• Date.UTC() method does the opposite. It converts a Date object value (number of milliseconds) to a UTC (GMT) time.
Summary
In this chapter, you learned several important features of JavaScript. First, you learned how to use functions to group JavaScript statements and how to call functions and use the values they return. Next, you learned about JavaScript’s object-oriented features—defining objects with constructor functions, creating object instances, and working with properties, property values, and methods.
As an example of these object-oriented features, you looked closer at the Math and Date objects built into JavaScript and learned more than you ever wanted to know about random numbers.
Q&A
Q. Many objects in JavaScript, such as DOM objects, include parent and child objects. Can I include child objects in my custom object definitions?
A. Yes. Just create a constructor function for the child object, and then add a property to the parent object that corresponds to it. For example, if you created a Nicknames object to store several nicknames for a person in the card file example, you could add it as a child object in the Card object’s constructor: this.nick = new Nicknames();.
Q. Can I create an array of custom objects?
A. Yes. First, create the object definition as usual and define an array with the required number of elements. Then assign a new object to each array element (for example, cardarray[1] = new Card();). You can use a loop, described in the next chapter, to assign objects to an entire array at once.
Q. Can I modify all properties of objects?
A. With custom objects, yes—but this varies with built-in objects and DOM objects. For example, you can use the length property to find the length of a string, but it is a read-only property and cannot be modified.
Q. The random numbers are generated so quickly I can’t be sure it’s happening at all. Is there a way to slow this process down?
A. Yes. If you add one or more form fields to the example and use them to display the data as it is generated, you’ll see a much slower result. It will still be done within a couple of seconds on a fast computer, though.
Workshop
The workshop contains quiz questions and activities to help you solidify your understanding of the material covered. Try to answer all questions before looking at the “Answers” section that follows.
Quiz
1. What JavaScript keyword is used to create an instance of an object?
a. object
b. new
c. instance
2. What is the meaning of the this keyword in JavaScript?
a. The current object.
b. The current script.
c. It has no meaning.
3. Which of the following objects cannot be used with the new keyword?
a. Date
b. Math
c. String
4. How does JavaScript store dates in a Date object?
a. The number of milliseconds since January 1, 1970
b. The number of days since January 1, 1900
c. The number of seconds since Netscape’s public stock offering
5. What is the range of random numbers generated by the Math.random function?
a. Between 1 and 100
b. Between 1 and the number of milliseconds since January 1, 1970
c. Between 0 and 1
Answers
1. b. The new keyword creates an object instance.
2. a. The this keyword refers to the current object.
3. b. The Math object is static; you can’t create a Math object.
4. a. Dates are stored as the number of milliseconds since January 1, 1970.
5. c. JavaScript’s random numbers are between 0 and 1.
Exercises
• Modify the Greet function to accept two parameters, who1 and who2, and to include both names in a single greeting dialog. Modify Listing 17.2 to use a single function call to the new function.
• Modify the definition of the Card object to include a property called email for the person’s email address. Modify the PrintCard function in Listing 17.5 to include this property.
• Modify the random number script in Listing 17.7 to run three times, calculating a total of 15,000 random numbers, and display separate totals for each set of 5,000. (You’ll need to use another for loop that encloses most of the script.)