
Chapter at a Glance
In this chapter, you will learn to:
In later chapters of this book, we show you ways to add fancy effects to electronic slide shows to really grab the attention of your audience. But no amount of animation, jazzy colors, and supporting pictures will convey your message if the words on the slides are inadequate to the task. For most of your presentations, text is the foundation on which you build everything else, so this chapter shows you various ways to work with text to ensure that the words on your slides are accurate, consistent, and appropriately formatted.
In this chapter, you will learn how to enter and edit text on slides, on the Outline tab, and in text boxes. You will see how the AutoCorrect feature can help you avoid typographical errors, and how the spell-checking feature can help you correct misspellings after the fact. For those times when a word or phrase is correct but you want to substitute a different word or phrase, you will learn how to replace one word with another throughout a presentation by using the Find And Replace feature, which you also use to ensure the consistent use of fonts. Finally, you will vary the size, alignment, spacing, and look of words and phrases on individual slides.
Note
See Also Do you need only a quick refresher on the topics in this chapter? See the Quick Reference section at the beginning of this book.
Warning
Important Before you can use the practice files in this chapter, you need to install them from the book’s companion CD to their default location. See Using the Book’s CD at the beginning of this book for more information.
Note
Troubleshooting Graphics and operating system–related instructions in this book reflect the Windows Vista user interface. If your computer is running Windows XP and you experience trouble following the instructions as written, please refer to the Information for Readers Running Windows XP section at the beginning of this book.
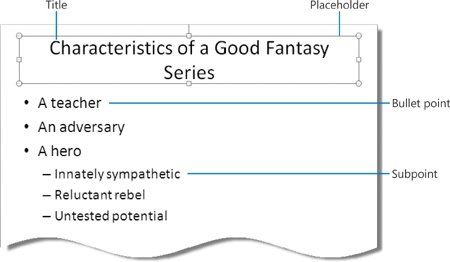
When you add a new slide to a presentation, the layout you select indicates the type and position of the objects on the slide with placeholders. For example, a Title And Content slide has placeholders for a title and either a bulleted list with one or more levels of bullet points (and subordinate levels called subpoints) or an illustration such as a table, chart, graphic, or movie clip. You can enter text directly into a placeholder on a slide in the Slide pane, or you can enter text on the Outline tab of the Overview pane, where the entire presentation is displayed in outline form.
Tip
If you want to add text to a slide that has no text placeholder—for example, if you want to add an annotation to a graphic—you can create an independent text box and enter the text there. For information about creating text boxes, see Adding and Manipulating Text Boxes later in this chapter.
When you point to a placeholder on a slide or to text on the Outline tab, the pointer changes to an I-beam. When you click the placeholder or text, a blinking insertion point appears where you clicked to indicate where characters will appear when you type. As you type, the text appears both on the slide and on the Outline tab.
In this exercise, you will enter slide titles, bullet points, and subpoints, both directly in slides and on the Outline tab. There are no practice files for this exercise.
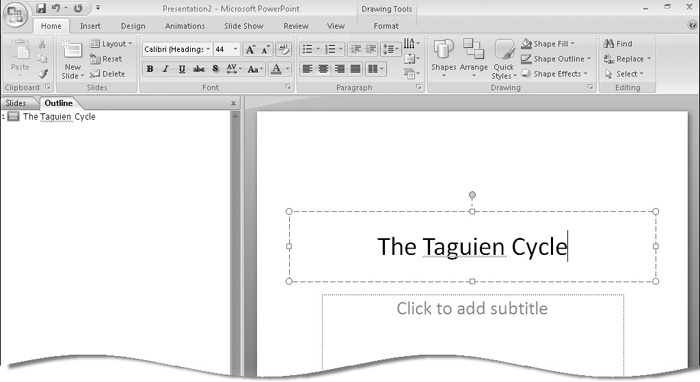
In the Slide pane, click the slide’s Click to add title placeholder.
A selection box surrounds the placeholder, and a blinking insertion point appears in the center of the box, indicating that the text you type will be centered in the placeholder.
Type The Taguien Cycle.
Do not type the period. By tradition, slide titles have no periods. PowerPoint’s spell-checking feature indicates with a red wavy underline that Taguien is a possible spelling error. This word is a proper name and is correct.
Tip
If you make a typing error while working through this exercise, press Backspace to delete the mistake, and then type the correct text. For information about checking and correcting spelling, see Checking Spelling and Choosing the Best Words later in this chapter.
In the Overview pane, click the Outline tab, and notice that the text you typed also appears there.
In the Slide pane, click the Click to add subtitle placeholder.
The title placeholder is deselected, and the subtitle placeholder is selected.
Type A New Series for Young Adults, and then press
 to move the insertion point to a new line in the same placeholder.
Type Judy Lew, Project Editor.
As you enter titles and bullet points throughout the exercises, don’t type any ending punctuation marks.
On the Quick Access Toolbar, click the Save button, and save the presentation in the Working folder with the name My Proposal.
We won’t tell you to save your work again in this exercise. Suffice it to say that you should save often.
Add a new slide with the Title and Content layout.
Note
See Also For information about adding slides, see Creating a Presentation Based on a Ready-Made Design in Chapter 2.
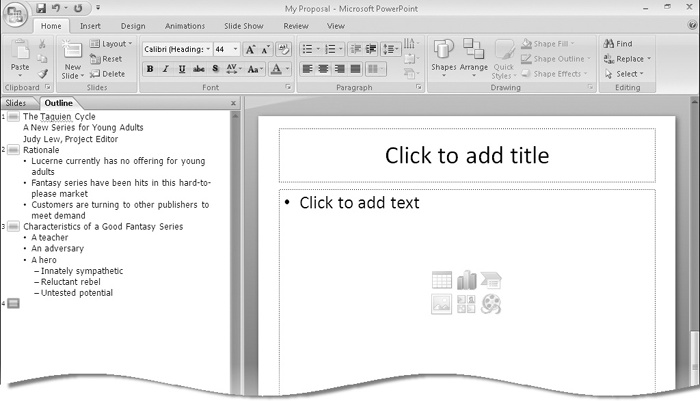
PowerPoint creates a new slide with placeholders for a title and a bulleted list. The Outline tab now displays an icon for a second slide, and the status bar displays Slide 2 of 2.
Without clicking anywhere, type Rationale.
If you start typing on an empty slide without first selecting a placeholder, PowerPoint enters the text into the title placeholder. The title appears on both the slide and the Outline tab.
On the Outline tab, click to the right of Rationale, and then press
.PowerPoint adds a new slide to the presentation, and an icon for Slide 3 appears in the Outline pane.
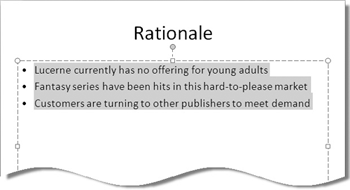
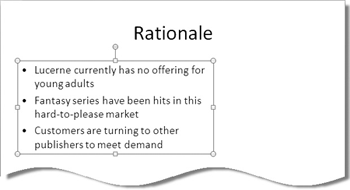
The Slide 3 icon changes to a bullet on Slide 2. The bullet is gray until you enter text for the bullet point.
Type Lucerne currently has no offering for young adults, and then press
.PowerPoint adds a new bullet at the same level.
Type Fantasy series have been hits in this hard-to-please market, and then press
.Type Customers are turning to other publishers to meet demand, and then press
.On the Outline tab, the bullet changes into an icon for Slide 3. The new slide is displayed in the Slide pane.
Type Characteristics of a Good Fantasy Series, press
, and then press  .
.This slide title is too long to fit in the title placeholder at its default font size, so PowerPoint decreases the size to make it fit.
Note
See Also For more information about the AutoFit feature, see Correcting and Sizing Text While Typing later in this chapter.
Type A teacher, press
, type An adversary, press
, type A hero, and then press .On the Home tab, in the Paragraph group, click the Increase List Level button.
PowerPoint creates a subpoint.
Tip
You can use the Increase List Level button to change slide titles to bullet points and bullet points to subpoints both on the slide and on the Outline tab. You can also use the Decrease List Level button to change subpoints to bullet points and bullet points to slide titles in both places. However, when you are entering text on the Outline tab, it is quicker to use keys—Tab and Shift+Tab—to perform these functions than it is to take your hands off the keyboard to use your mouse.
Type Innately sympathetic, press
, type Reluctant rebel, press , and then type Untested potential.Instead of creating another bullet, PowerPoint creates a new slide.
Save your work.


After you enter text, you can change it at any time. You can insert new text by clicking where you want to make the insertion and simply typing. Before you can change existing text, you have to select it by using the following techniques:
Select an individual word by double-clicking it. The word and the space following it are selected. Punctuation following a word is not selected.
Select adjacent words, lines, or paragraphs by dragging through them.
Alternatively, position the insertion point at the beginning of the text you want to select, hold down the Shift key, and either press an arrow key to select characters one at a time or click at the end of the text you want to select.
Select an entire slide title by clicking its slide icon on the Outline tab.
Select an entire bullet point or subpoint by clicking its bullet on either the Outline tab or the slide.
Select all the text in a placeholder by clicking inside the placeholder and then clicking Select and then Select All in the Editing group on the Home tab.
Note
See Also For more information about the Select feature, see Finding and Replacing Text and Fonts later in this chapter.
Selected text appears highlighted in the location where you made the selection—that is, on either the slide or the Outline tab. To replace a selection, you type the new text. To delete the selection, you press either the Delete key or the Backspace key.
To move a selection to a new location, you can simply drag it. You can also move and copy text by using the Cut or Copy and Paste buttons in the Clipboard group on the Home tab. You can work on the slide itself when moving or copying text within a slide, but it is more efficient to work on the Outline tab when moving or copying text between slides.
If you change your mind about a change you have made, you can reverse it by clicking the Undo button on the Quick Access Toolbar. If you undo an action in error, you can click the Redo button on the Quick Access Toolbar to reverse the change.
To undo multiple actions at the same time, you can click the earliest action you want to undo in the Undo list. You can undo actions only in the order in which you performed them—that is, you cannot reverse your fourth previous action without first reversing the three actions that followed it.
Tip
The number of actions you can undo is set to 20, but you can change that number by clicking the Microsoft Office Button, clicking PowerPoint Options, clicking Advanced, and then in the Editing Options area, changing the Maximum Number Of Undos setting.
In this exercise, you will delete and replace words, as well as move bullet points and subpoints around on slides and on the Outline tab.
Note
USE the Editing presentation. This practice file is located in the DocumentsMicrosoft PressPowerPoint2007SBSWorking folder.
OPEN the Editing presentation.
On the Outline tab, in the Slide 1 subtitle, double-click the word New.
When you select text on either the Outline tab or the slide, a small toolbar (called the Mini toolbar) containing options for formatting the text appears. If you ignore the Mini toolbar, it fades from view.
Note
See Also For information about using the Mini toolbar, see Changing the Size, Alignment, Spacing, and Look of Text later in this chapter.
In the Slide 3 title, double-click Good, and then type Hit followed by a space.
What you type replaces the selection. Notice that the text also changes in the Slide pane.
Press
 , and then press
  seven times to delete the word Series.
On the slide, click the bullet to the left of Reluctant rebel.
The entire subpoint is selected, including the invisible paragraph mark at the end.
Note
Troubleshooting When you want to work with a bullet point or subpoint as a whole, you need to ensure that the invisible paragraph mark at its end is included in the selection. If you drag across the text, you might miss the paragraph mark. As a precaution, hold down the Shift key and press End to be sure that the paragraph mark is part of the selection.
On the Home tab, in the Clipboard group, click the Cut button.
Click to the left of the word Innately, and then click the Paste button.
The first two subpoints have effectively switched places.
On the Outline tab, click the bullet point to the left of A hero to select the bullet point and its subpoints.
Drag the selection up and to the left of A teacher.
On the Quick Access Toolbar, click the Undo button to reverse your last editing action.
The Redo button appears on the Quick Access Toolbar, to the right of Undo. When you point to the Undo or Redo button, the name in the ScreenTip reflects your last editing action—for example, Redo Drag And Drop.
On the Quick Access Toolbar, click the Redo button to restore the editing action.

The size and position of the placeholders on a slide are dictated by the slide’s design. Every slide you create with a particular design has the same placeholders in the same locations, and the text you type in them has the same format.
When you want additional text to appear on the slide, such as annotations or minor points that do not belong in a bulleted list, you can create a text box by using the Text Box button in the Text group on the Insert tab. You can create a text box in two ways:
You can click the Text Box button, click the slide where you want the text to appear, and then type. The text box grows to fit what you type on one line, even expanding beyond the border of the slide if necessary.
You can click the Text Box button, drag a box where you want the text to appear on the slide, and then type. When the text reaches the right boundary of the box, the height of the box expands by one line so that the text can wrap. As you continue typing, the width of the box stays the same, but the height grows as necessary to accommodate all the text.
When you click in a text box, an insertion point appears, and the box is surrounded by a dashed border. You can then edit the text—for example, you can add, delete, or correct words and punctuation. Clicking the dashed border changes it to a solid border. You can then manipulate the text box as a unit—for example, you can size, move, or copy it as a whole.

You can drag the handles around the border of the box to change its size and shape. By default, PowerPoint adjusts the box to fit the text within it. If you want to create a text box of a specific size or shape, you can right-click the box’s border, click Format Shape, click Text Box in the Format Shape dialog box, and then change the settings. In this dialog box, you can also specify whether PowerPoint should shrink the text to fit the box if it won’t all fit at the default size (18 points), and whether the text should wrap within the box.
Tip
If you want to change the size, shape, or behavior of a placeholder on an individual slide, you can use the same techniques as those you use with text boxes. If you want to make changes to the same placeholder on every slide, you should make the adjustments on the presentation’s master slide.”
Sometimes you will want the text in a text box to be oriented differently than the rest of the text on the slide. When a text box is selected, a green rotating handle is attached to its upper-middle handle. You can drag this handle to change the angle of the text.
Tip
You can also change the direction of text on the Text Box page of the Format Shape dialog box. In the Text Direction list, click one of the Rotate options. Or you can click Stacked to keep the individual characters horizontal but make them run from top to bottom in the box instead of from left to right.
When a text box is surrounded by a solid border, you can move or copy the text box anywhere on the slide. Dragging its border is the most efficient way to move a text box within one slide, and you can copy it just as easily by holding down the Ctrl key while you drag it.
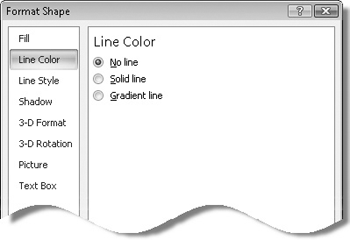
To deselect the text box, you click a blank area of the slide. The border then disappears.If you want a text box to have a border when it is not selected, you can display the Format Shape dialog box, and on the Line Color page, select either Solid Line or Gradient Line. You can then fine-tune the border’s color or gradient to achieve the effect you want.
In this exercise, you will select and deselect a placeholder to see the effect on its border. You will create one text box whose height stays constant while its width increases and another whose width stays constant while its height increases. You will manipulate these text boxes by rotating and moving one of them and sizing the other. You will also make a text box border a solid line that is visible when the text box is not selected.
Note
USE the TextBoxes presentation.This practice file is located in the DocumentsMicrosoft PressPowerPoint2007SBSWorking folder.
OPEN the TextBoxes presentation.
Move to Slide 2, and then on the slide, click the slide title.
The blinking insertion point and dashed border indicate that the placeholder is selected for editing.
Point to the border of the placeholder, and when the pointer changes to a four-headed arrow, click the mouse button once.
The placeholder is selected as a unit, as indicated by the solid border. Although you won’t usually want to change the size or location of a text placeholder, while the placeholder has a solid border, you can size and move it just like any other text box. Your changes will affect only the placeholder on the current slide, not corresponding placeholders on other slides.
To deselect the placeholder, click outside it in a blank area of the slide.
Move to Slide 5, and then click the bulleted list placeholder.
On the Insert tab, in the Text group, click the Text Box button, and then point immediately below the lower-left handle of the placeholder for the bulleted list.
The pointer changes shape to an upside-down T.
Click the slide to create a text box.
A small, empty text box appears with a blinking insertion point inside it.
Type Contrast with Adversary on Slide 6.
The width of the text box increases to accommodate the text as you type it.
To rotate the text so that it reads vertically instead of horizontally, drag the green rotating handle that is attached to the upper-middle handle 90 degrees clockwise.
Point to the border of the box (not to a handle), and then drag the box to the right edge of the slide.
Right-click the border of the box, and then click Format Shape.
In the Format Shape dialog box, click Line Color.
Click Solid line, click the Color arrow, and in the top row of the Theme Colors palette, click the orange box (Orange, Accent 6). Then click Close.
Click a blank area of the slide to deselect the text box, and then move to Slide 2.
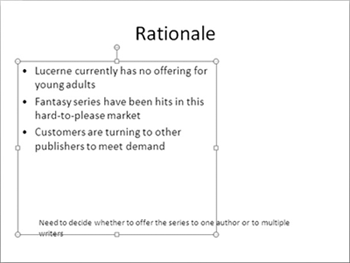
On the Insert tab, in the Text group, click the Text Box button. Point to the center of the area below the bulleted list, and drag approximately 2 inches to the right and 1/2 inch down.
No matter what height you make the box, it snaps to a standard height when you release the mouse button.
Type Need to decide whether to offer the series to one author or to multiple writers.
The width of the box does not change, but the height of the box increases to accommodate the complete entry.
Click the border of the text box to select it as a unit, point to the solid border, and drag the box to the lower-left corner of the slide, so that its left border aligns with the text of the bullet points.
Point to the handle in the lower-right corner of the box, and drag up and to the right until the box is two lines high and the same width as the bullet points.


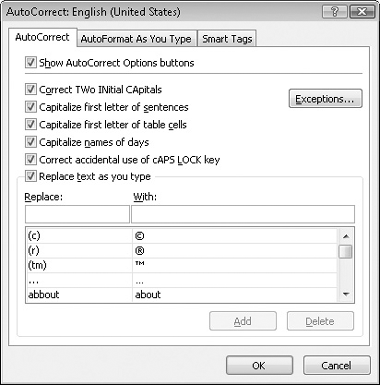
We all make mistakes while typing test in a presentation.To help you ensure that these mistakes don’t go uncorrected, PowerPoint uses the AutoCorrect feature to catch and automatically correct common capitalization and spelling errors. For example, if you type teh instead of the or WHen instead of When, AutoCorrect corrects the entry.
You can customize AutoCorrect to recognize misspellings you routinely type or to ignore text you do not want AutoCorrect to change. You can also create your own AutoCorrect entries to automate the typing of frequently used text. For example, you might customize AutoCorrect to enter the name of your organization when you type only an abbreviation.
In addition to using AutoCorrect to correct misspellings as you type, PowerPoint uses the AutoFit feature to size text to fit its placeholder. For example, if you type more text than will fit in a title placeholder, AutoFit shrinks the font size so that it all fits. The first time AutoFit changes the font size, it displays the AutoFit Options button to the left of the placeholder. Clicking this button displays a menu that gives you control over automatic sizing. For example, you can stop sizing text for the current placeholder while retaining your global AutoFit settings. You can also display the AutoCorrect dialog box, where you can change the AutoFit settings.
In this exercise, you will add an AutoCorrect entry and use AutoCorrect to fix a misspelled word. Then you will use AutoFit to size text so that it fits within its placeholder and to make a long bulleted list fit on one slide by converting its placeholder to a two-column layout.
Note
USE the Correcting presentation. This practice file is located in the DocumentsMicrosoft PressPowerPoint2007SBSWorking folder.
OPEN the Correcting presentation.
Click the Microsoft Office Button, click PowerPoint Options, and then in the left pane of the PowerPoint Options window, click Proofing.
In the AutoCorrect options area, click AutoCorrect Options.
The AutoCorrect dialog box opens.
In the lower part of the dialog box, scroll through the huge table of misspellings.
When you type one of the entries in the first column, PowerPoint automatically substitutes the correct spelling from the second column.
In the Replace box above the table, type travil, and then press
.In the With box, type travel, and then click Add.
Now if you type travil in any presentation, PowerPoint will replace it with travel.
Click OK to close the AutoCorrect dialog box, and then click OK again to close the PowerPoint Options window.
Move to Slide 4, click to the left of the word advisories, type travil, and then press
 .
.PowerPoint corrects the word travil to travel.
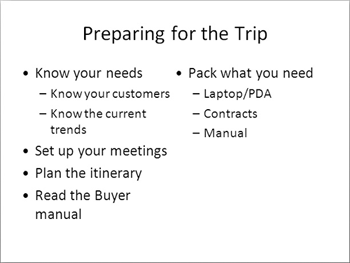
Move to Slide 3, click to the right of the word need in the last bullet point, and then press
.Press
to convert the new bullet point to a subpoint, type Laptop/PDA, and then press .Add Contracts and Manual as two additional subpoints, pressing
after each one.PowerPoint makes the text of the bulleted list smaller so that all the bullet points and subpoints fit in the placeholder. The AutoFit Options button appears in the lower-left corner of the slide.
Click the AutoFit Options button to display a list of options.
The placeholder is instantly formatted to accommodate a two-column bulleted list, with the last bullet point and its subpoints at the top of the second column. All the bullet points in both columns increase in size.
Click a blank area of the slide to deselect the placeholder.


The AutoCorrect feature is very useful if you frequently type the same misspelling. However, most misspellings are the result of erratic finger-positioning errors or memory lapses. You can use two different methods to ensure that the words in your presentations are spelled correctly in spite of these random occurrences:
By default, PowerPoint’s spelling checker checks the spelling of the entire presentation—all slides, outlines, notes pages, and handout pages—against its built-in dictionary. To draw attention to words that are not in its dictionary and that might be misspelled, PowerPoint underlines them with a red wavy underline.You can right-click a word with a red wavy underline to display a menu with a list of possible spellings. You can choose the correct spelling from the menu or tell PowerPoint to ignore the word. To turn off this feature, you can click the Microsoft Office Button, click PowerPoint Options, click Proofing, and then clear the Check Spelling As You Type check box.
Instead of dealing with potential misspellings while you are creating a presentation, you can check the entire presentation in one session by clicking the Spelling button in the Proofing group on the Review tab. PowerPoint then works its way through the presentation, and if it encounters a word that is not in its dictionary, it displays the Spelling dialog box. After you indicate how PowerPoint should deal with the word, it moves on and displays the next word that is not in its dictionary, and so on.
The English-language version of the 2007 Office release includes English, French, and Spanish dictionaries. If you use a word or phrase from a different language, you can mark it so that PowerPoint doesn’t flag it as a misspelling.
You cannot make changes to PowerPoint’s main dictionary, but you can add correctly spelled words that are flagged as misspellings to PowerPoint’s supplemental dictionary (called CUSTOM.DIC). You can also create and use custom dictionaries and use dictionaries from other Microsoft programs.
PowerPoint can check your spelling, but it can’t alert you if you are not using the best word. Language is often contextual—the language you use in a presentation to club members is different from the language you use in a business presentation.To make sure you are using words that best convey your meaning in any given context, you can use the Thesaurus to look up alternative words, or synonyms, for a selected word.
In this exercise, you will correct a misspelled word, mark a non-English word, and check the spelling of an entire presentation. You will then use the Thesaurus to replace a word on a slide with a more appropriate one.
Note
USE the Spelling presentation. This practice file is located in the DocumentsMicrosoft PressPowerPoint2007SBSWorking folder.
OPEN the Spelling presentation.
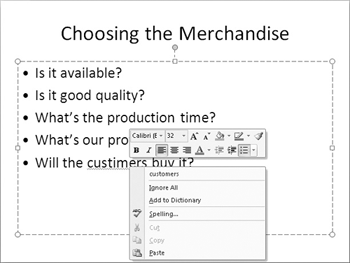
Move to Slide 6, add a fifth bullet point, and then type Will the custimers buy it?
PowerPoint flags the word custimers as a possible error with a red wavy underline.
Right-click custimers.
PowerPoint doesn’t know whether you want to format the word or correct its spelling, so it displays both a Mini toolbar and a menu.
On the menu, click customers to replace the misspelled word.
Move to Slide 5.
The Filipino word Kumusta has been flagged as a possible error.
Right-click Kumusta.
The spelling checker suggests Kumquats as the correct spelling.
With the insertion point still in Kumusta, on the Review tab, in the Proofing group, click the Language button.
Scroll down the list of languages, click Filipino, and then click OK.
Behind the scenes, PowerPoint marks Kumusta as a Filipino word, and the word no longer has a red wavy underline.
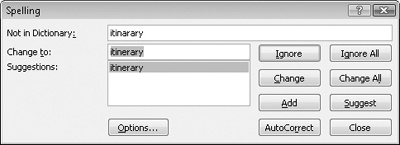
Move to Slide 1, and then on the Review tab, in the Proofing group, click the Spelling button.
PowerPoint begins checking the spelling in the presentation. The spelling checker stops on the word itinarary and displays the Spelling dialog box.
In the Spelling dialog box, click Change.
PowerPoint replaces itinaray with the suggested itinerary and then stops on the word advizories, suggesting advisories as the correct spelling.
Click Change.
Next the spelling checker stops on Dyck. This term does not appear in the dictionary, but it is a proper name that is spelled correctly.
Click Add.
The term Dyck is added to the CUSTOM.DIC dictionary. A message box tells you that PowerPoint has finished the spelling check.
Click OK.
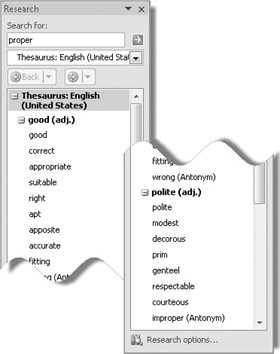
On Slide 5, select the word proper (but not the space following the word).
On the Review tab, in the Proofing group, click the Thesaurus button.
The Research task pane opens, displaying a list of synonyms with equivalent meanings.
In the Research task pane, click the minus sign to the left of polite to bring more of the synonym list into view.
Below good, decide which word you want to substitute for the selection, point to the word until an arrow appears, click the arrow, and then click Insert.
If you don’t see an obvious substitute for the selected word, you can click a word that is close in the Thesaurus list and synonyms for that word will be displayed.
Close the Research task pane.


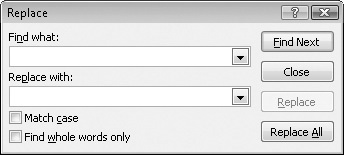
You can locate and change specific text in a presentation by using the buttons in the Editing group on the Home tab to do the following:
Click Find to locate each occurrence of a word, part of a word, or a phrase. In the Find dialog box, you enter the text, and then click Find Next. You can specify whether PowerPoint should locate matches with the exact capitalization or case—that is, if you specify person, PowerPoint will not locate Person—and whether it should locate matches for the entire text—that is, if you specify person, PowerPoint will not locate personal.
Click Replace to locate each occurrence of a word, part of a word, or a phrase and replace it with something else. In the Replace dialog box, you enter the text you want to find and what you want to replace it with, click Find Next, and then click Replace to replace the found occurrence or Replace All to replace all occurrences. Again, you can specify whether to match capitalization and whole words.
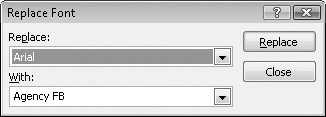
In the Replace list, you can click Replace Fonts to find and replace a font in a presentation. In the Replace Font dialog box, you can specify the font you want to change and the font you want PowerPoint to replace it with.
Click a text placeholder on a slide, click Select in the Editing group, and then click Select All to select all the text in that placeholder. If you select the placeholder itself, clicking Select and then Select All adds all the other objects on that slide to the selection. You can then work with all the objects as a unit.Clicking Select and then Selection Pane displays the Selection And Visibility task pane, where you can specify whether particular objects should be displayed or hidden.
Tip
You might want to hide an object if you are using the slide in similar presentations for two different audiences, one of which needs more detail than the other.
In this exercise, you will use the Replace feature to find and replace a word, and then you’ll use Replace Fonts to find and replace a font. You will also display the Selection And Visibility task pane and hide an object on a slide.
Note
USE the Finding presentation. This practice file is located in the DocumentsMicrosoft PressPowerPoint2007SBSWorking folder.
OPEN the Finding presentation.
On the Home tab, in the Editing group, click the Replace button.
In the Replace with box, type Verdigris.
Select the Match case check box to locate text that exactly matches the capitalization you specified and replace it with the capitalization you specified.
Click Find Next.
PowerPoint finds and selects the word verdigris on Slide 3.
Click Replace.
PowerPoint replaces verdigris with Verdigris, and then locates the next match.
Click Replace All.
An alert box tells you that PowerPoint has finished searching the presentation and that the Replace All operation changed two occurrences of the text.
Click OK, and then in the Replace dialog box, click Close.
Click a blank area of the current slide to release the selection.
In the Editing group, click the Replace arrow, and then in the list, click Replace Fonts.
With Arial selected in the Replace list, click the With arrow, and then in the list, click Calibri.
Click Replace.
All the Arial text in the presentation changes to Calibri.
Click Close to close the Replace Font dialog box.
Move to Slide 6, and in the Editing group, click the Select button, and then click Selection Pane.
The Selection And Visibility task pane opens. The task pane indicates that there are four objects on this slide, but a quick count reveals that only three of them are visible.
Below Shapes on this Slide in the task pane, click the box to the right of Rectangle 4.
An eye appears in the box to the right of Rectangle 4, and that object—a text box—is now displayed at the bottom of the slide.
In the task pane, click the box to the right of Rectangle 4 again.
Close the Selection and Visibility task pane.

Earlier in this chapter we discussed the AutoFit feature, which shrinks the size of text that overflows a placeholder so that it fits in the allocated space. If you want to keep the size of the text in a presentation consistent, you can turn off this automatic text shrinking.You then have two ways to adjust the size of placeholders to fit their text:
Note
See Also For more information about AutoFit, see Correcting and Sizing Text While Typing earlier in this chapter.
Of course, you can also manually control the size of text by using options in the Font group on the Home tab. You can either click the Increase Font Size or Decrease Font Size button or set a precise size in the Font Size box.
To control the way text is aligned within a placeholder, you can click the text and then click one of the following alignment buttons in the Paragraph group on the Home tab:
The Align Text Left button aligns text against the placeholder’s left edge. It is the usual choice for paragraphs.
The Center button aligns text in the middle of the placeholder. It is often used for titles and headings.
The Align Text Right button aligns text against the placeholder’s right edge. It is not used much for titles and paragraphs, but you might want to use it in text boxes.
The Justify button aligns text against both the left and right edges, adding space between words to fill the line.
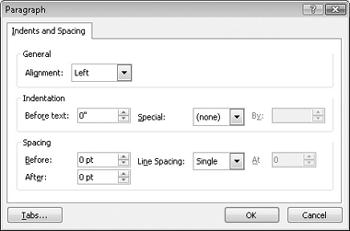
You can adjust the vertical spacing between all the lines of text in the placeholder by clicking the Line Spacing button in the Paragraph group and making a selection.If you want to adjust the space before or after a paragraph, you need to display the Paragraph dialog box, either by clicking the Line Spacing button and then clicking More at the bottom of the menu or by clicking the Paragraph dialog box launcher.You can then adjust the Before and After settings for the paragraph as a unit.
In addition to changing the look of paragraphs, you can also manipulate the look of individual words.After selecting the characters you want to format, you can make changes by using buttons in the Font group on the Home tab, as follows:
You can change the font.
You can apply attributes, including bold, italic, underlining, and shadow and strikethrough effects.
You can increase or decrease the space between the letters in a selection.
You can change the capitalization of the words—for example, you can change small letters to capital letters.
You can change the color of the characters.
In this exercise, you will change the size of the text in a placeholder and then adjust the size of the placeholder both automatically and manually. You will experiment with text alignment, decrease line spacing, and increase paragraph spacing. Then you will use buttons in the Font group to format words so that they stand out and look attractive.
Note
USE the Changing presentation. This practice file is located in the DocumentsMicrosoft PressPowerPoint2007SBSWorking folder.
OPEN the Changing presentation.
Move to Slide 2, and in the Slide pane, click anywhere in the bulleted list.
On the Home tab, in the Editing group, click the Select button, and then click Select All.
The note at the bottom of the slide is not selected because it was entered in a separate text box, not in the placeholder.
On the Home tab, in the Font group, click the Decrease Font Size button twice.
Click the Font Size arrow, and point to various sizes in the list to see a live preview of the effect. Then click 24.
Now suppose you want to make room for a graphic to the right of the bulleted list.
Point to the placeholder’s right-middle handle, and when the pointer changes to a two-headed arrow, drag to the left until the right border of the placeholder is aligned with the right end of the slide title.
Right-click the placeholder’s border, and then click Format Shape.
Click Text Box, click Resize shape to fit text, and then click Close.
The placeholder shrinks in size so that it is just big enough to hold its text.
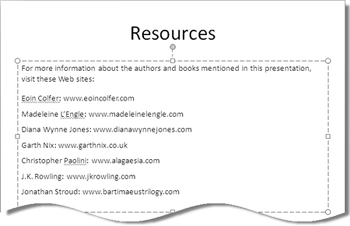
Move to Slide 7, and then click the text box containing the Web addresses.
If this text box contained only one paragraph, you could simply click the text box and then click a button in the Paragraph group to apply the paragraph formatting you want. However, the text box contains multiple paragraphs, and you first need to select them all.
On the Home tab, in the Editing group, click the Select button, and then click Select All.
In the Paragraph group, click the Align Text Left button.
The text is now left-aligned and easier to read.
In the Paragraph group, click the Line Spacing button, and then click 1.5.
Click the first paragraph, and then click the Paragraph dialog box launcher.
In the Spacing area, change the After setting to 12, and then click OK.
Move to Slide 5, and then select all the text in the text box at the right side of the slide.
In the Font group, click the Change Case arrow, and then in the list, click UPPERCASE.
The terms lowercase and uppercase come from typesetting. Individual letters were manually assembled into words, sentences, and paragraphs for printing. The small versions of letters were kept in alphabetical order in the lower case, where they were easier for the typesetter to reach, and the capital versions were kept in the upper case.
With the text still selected, in the Font group, click the Italic button.
Click the Font Color arrow, and then in the palette, point to each of the colors in the top Theme Colors row in turn.
As you point, the selected text changes color to give you a live preview of the effect.
At the right end of the top Theme Colors row, click the orange box (Orange, Accent 6).
Click a blank area of the slide to see the effect of your changes.
You can enter and edit text both on the Outline tab or directly on a slide, depending on which is most efficient at any particular time.
Text in placeholders provides consistency across an entire presentation. But you are not limited to using placeholders. You can place text wherever you want it on a slide by using text boxes.
PowerPoint provides assistance by correcting common spelling errors and adjusting the size of text so that it fits optimally on a slide.
You can take advantage of the Find and Replace features to ensure consistent use of terms and fonts throughout a presentation.
Although PowerPoint provides the structure for a presentation so that you can focus on your message, you can manually change the formatting, location, and size of text at any time.