
Chapter at a Glance

In other chapters of this book, you have worked with predefined color schemes and font sets, applied ready-made slide layouts, and based a new presentation on a design template that comes with Microsoft Office PowerPoint 2007. In addition to using these built-in elements, you can create your own color schemes, font sets, layouts, and templates.
Why would you want to create your own elements rather than using those that come with PowerPoint? If your organization has established a corporate or brand image through the use of a logo, a color scheme, or other visual cues, you might be required to incorporate that branding into presentations that will be seen outside the organization. Even if branding is not an issue, you might want to establish a unique look for all your presentations to identify your work.
In this chapter, you will create a new color scheme and font set and then save the color/font combination as a new theme. You will view and edit the slide masters for a presentation; changing the layout, text formatting, and bullet formatting, and adding a picture to the background. You will then create a new master layout, save a presentation as a design template, and create a new presentation based on the template.
Note
See Also Do you need only a quick refresher on the topics in this chapter? See the Quick Reference section at the beginning of this book.
Warning
Important Before you can use the practice files in this chapter, you need to install them from the book’s companion CD to their default location. See Using the Book’s CD at the beginning of this book for more information.
Note
Troubleshooting Graphics and operating system–related instructions in this book reflect the Windows Vista user interface. If your computer is running Windows XP and you experience trouble following the instructions as written, please refer to the Information for Readers Running Windows XP section at the beginning of this book.
As we discussed in Chapter 4, you can apply a theme to a presentation to make its colors, fonts, formatting, graphics, and other elements consistent from slide to slide. You can then switch to a different pre-defined color scheme and font set without otherwise affecting the overall look of the theme.
If none of the ready-made color schemes or font sets meets your needs, you can create your own and use it with any theme. If you want to be able to use your custom theme/color scheme/font set combination with other presentations, you can save the combination as a new theme that you can then apply to another presentation with a few clicks of the mouse button.
Tip
You can make a custom theme, or any theme, the default for all new presentations by right-clicking the theme’s thumbnail in the Themes gallery and then clicking Set As Default Theme.
The simplest way to create a new color scheme or font set is by altering an existing one. After you add the new scheme to the Theme Colors gallery or font set to the Theme Fonts gallery, you can apply it to an entire presentation by clicking it in the Custom section of the gallery. You can apply it to the current slide only by right-clicking it and then clicking Apply To Selected Slide.
Tip
You don’t have to create a custom color scheme or font set to be able to apply the particular combination of colors or fonts used on one slide to another slide. You can display the slide with the formatting you want to reuse, click the Format Painter button in the Clipboard group, and then click the slide to which you want to copy the formatting.
In this exercise, you will create a new color scheme and font set, and make them available for reuse. Then you will save the color/font combination as a new theme that you can apply to any presentation.
Note
USE the CustomTheme presentation. This practice file is located in the DocumentsMicrosoft PressPowerPoint2007SBSCreating folder.
BE SURE TO start PowerPoint before beginning this exercise.
OPEN the CustomTheme presentation.
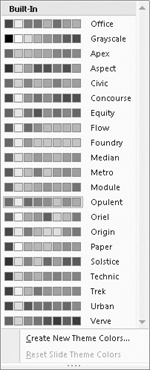
Display Slide 8, and then on the Design tab, in the Themes group, click the Colors button.
The available color schemes appear in the Theme Colors gallery. The Opulent color scheme is currently applied to the presentation.
In the gallery, click the Flow color scheme.
This scheme has some interesting colors, but its background is too dark.
In the Themes group, click the Colors button, and then at the bottom of the gallery, click Create New Theme Colors.
Click the Text/Background - Dark 2 box to display a color palette.
Under Theme Colors, click the fourth box down in the seventh column (Turquoise, Accent 3, Darker 25%).
The Sample pane changes to show the new color combination.
Click the Hyperlink box, and under Standard Colors, click the Orange box.
Click the Accent 4 box, and at the bottom of the palette, click More Colors.
In the Colors dialog box, click the Standard tab.
In the color wheel, click an orange color, and then click OK.
In the Name box at the bottom of the dialog box, change the name of the new theme to My Custom Colors, and then click Save.
PowerPoint applies the change to all the slides and adds a theme with the new color scheme to the left end of the Themes gallery.
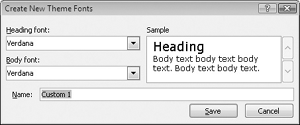
In the Themes group, click the Fonts button, and then in the Theme Fonts gallery, click Aspect as a starting point for a new font set.
Click the Fonts button again, and then at the bottom of the gallery, click Create New Theme Fonts.
Click the Heading font arrow, and then in the list, click Arial Rounded MT Bold.
The Sample pane shows the new combination.
In the Name box at the bottom of the dialog box, change the name of the new font set to My Custom Fonts, and then click Save.
In the Themes group, click first the Colors button and then the Fonts button, and notice that your combinations are listed under Custom in the respective galleries.
In the Themes group, click the More button, and then at the bottom of the gallery, click Save Current Theme.
The Save Current Theme dialog box opens, displaying the contents of your Document Themes folder. Saving custom themes in this folder ensures that they are available in the gallery for use in other presentations.
In the File name box at the bottom of the dialog box, change the name of the new theme to My Theme, and then click Save.
Close the CustomTheme presentation without saving your changes.
Open a new, blank presentation. Then on the Design tab, in the Themes group, point to the second thumbnail in the gallery.
PowerPoint displays the ScreenTip My Theme below the thumbnail.
Click the My Theme thumbnail to apply the custom theme to the new presentation.


When you create a presentation, the slides take on the characteristics of the template on which it is based. PowerPoint templates use masters to determine their basic design. By default, PowerPoint presentations have three masters:
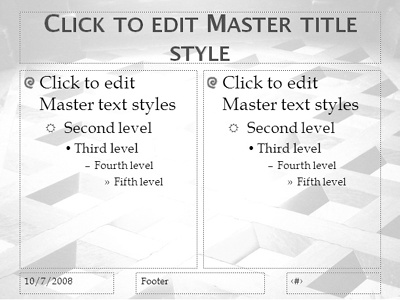
Slide master. This set of masters controls the look of all the slides in a presentation—the theme, text placement, background graphics, and so on. The set contains a master design for most of the layouts you are likely to want to use.
Handout master. This master controls the look of student handouts.
Notes master. This master controls the look of speaker notes.
Note
See Also For information about the masters for notes and handouts, see Preparing Speaker Notes and Handouts in Chapter 10.
When you create a new presentation, its slides assume the design of its corresponding set of masters. The masters contain placeholders for a title, bullet points, or other content, depending on the particular layout. Most masters also contain placeholders for the date and time, footer information, and slide number. The placeholders control the position of the elements on the slide. Text placeholders also control the formatting of their text.
On an individual slide, you can make changes to the design elements provided by the master, but you can change the basic design only on the master. When you change a design element on the master, all the slides reflect the change.
Tip
To override the master design for a particular slide, you use commands on the Home and Design tabs. For example, you can remove a background graphic from a slide by clicking the Hide Background Graphics button in the Background group on the Design tab.
To make changes to a presentation’s masters, you need to switch to Slide Master view by clicking the Slide Master button in the Presentation Views group on the View tab. PowerPoint then displays all the master layouts in the Overview pane on the left and the selected master layout in the Slide pane on the right. It also adds a Slide Master tab to the Ribbon and hides the tabs that aren’t needed in this view.

By clicking buttons on the Slide Master tab, you can make the following adjustments:
Make another set of masters available to the presentation and preserve that set so that it remains available even if it is not currently used in the presentation.
Add a new layout with the same background, title, and footer style to which you can add your own placeholders.
Delete a selected layout.
Change the ScreenTip that appears when you point to a layout in the Layout gallery.
Specify which placeholders will be included on the selected layout.
Select and fine-tune the theme applied to the master set.
Control the background color, texture, and graphics.
Set the default page setup for the presentation.
Clicking the Close Master View button in the Close group on the Slide Master tab returns you to the view you were in before Slide Master view. You can also click any view button on the View toolbar at the right end of the status bar to close Slide Master view.
While you are working in Slide Master view, you can use the buttons on the other tabs in the following ways:
Format a text placeholder on a master by selecting it and then clicking buttons in the Font and Paragraph groups on the Home tab.
Add objects such as graphics and WordArt text to a master by clicking buttons on the Insert tab.
Animate parts of a slide and add transitions by clicking buttons on the Animations tab.
In addition to formatting the text, you can format bulleted lists by specifying the bullet’s size, shape, and color. You can also control the indenting of various bullet levels and the distance between the bullet and its text by displaying the rulers and moving markers, as follows:
First Line Indent. The upper triangle controls the first line of the paragraph.
Hanging Indent. The lower triangle controls the left edge of the remaining lines of the paragraph.
Left Indent. The small square controls how far the entire paragraph sits from the edge of the text object.
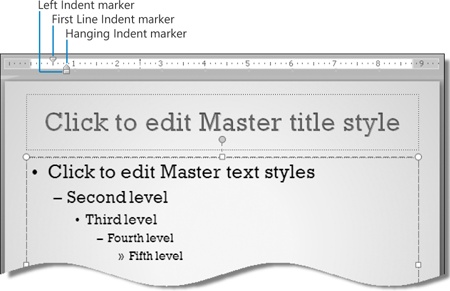
To adjust the relationship between the first and remaining lines of a bullet point, you drag the First Line Indent and Hanging Indent markers to the left or right on the ruler. To adjust the distance of the bullet point from the edge of the text object, you drag the Left Indent marker.
In this exercise, you will view a presentation’s masters in Slide Master view, remove the footer placeholders from the title layout, and add a picture to the background. You will change the font set used in the master and adjust the formatting of the title placeholder. Then you will change bullet characters and adjust bullet spacing.
Note
USE the Masters presentation and the Background graphic. These practice files are located in the DocumentsMicrosoft PressPowerPoint2007SBSCreating folder.
OPEN the Masters presentation.
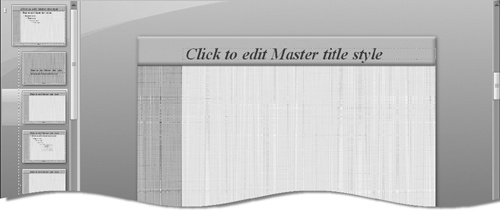
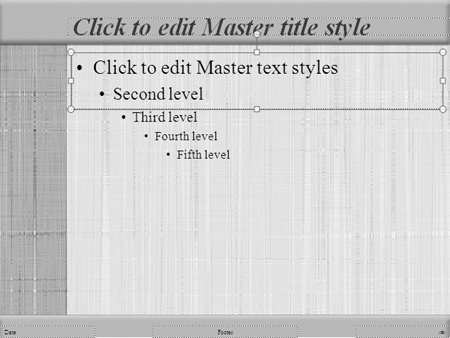
With Slide 1 displayed in Normal view, on the View tab, in the Presentation Views group, click Slide Master.
You are now in Slide Master view. The Overview pane on the left shows thumbnails of the primary master and the other layouts in this set, with the first layout—the title slide—selected. The selected layout appears in the Slide pane to the right.
With the title master displayed, on the Slide Master tab, in the Master Layout group, clear the Footers check box.
The date, footer information, and slide number placeholders are removed from the title master, but they remain in place on all the other masters. You cannot remove the footer placeholders from the primary master, and you must remove them from the other layouts one by one.
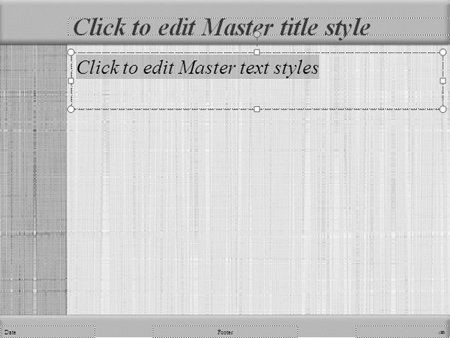
In the Overview pane, click the primary master.
The primary master is displayed in the Slide pane. Changes made to this master will be reflected in all the other layouts in the master set.
On the Insert tab, in the Illustrations group, click the Picture button.
In the Insert Picture dialog box, navigate to your DocumentsMicrosoft PressPowerPoint2007SBSCreating folder, and double-click the Background graphic.
PowerPoint expands the graphic to fill the primary master and adds the Format contextual tab to the Ribbon. Because the primary master controls the basic characteristics of all the layouts, the graphic fills their backgrounds as well.
On the Format tab, in the Arrange group, click the Send to Back button.
PowerPoint moves the graphic behind the other elements on the primary master.
On the Slide Master tab, in the Edit Theme group, click the Fonts button, and then in the Theme Fonts gallery, click the Apex font set.
In the title placeholder, select all the text, and then on the Home tab, click the Font dialog box launcher.
On the Font tab of the dialog box, set the Font style to Bold, the Font color to Purple, and under Effects, select the Small Caps check box. Then click OK.
The titles of all the layouts take on the attributes assigned to the primary master.
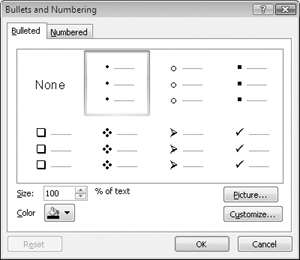
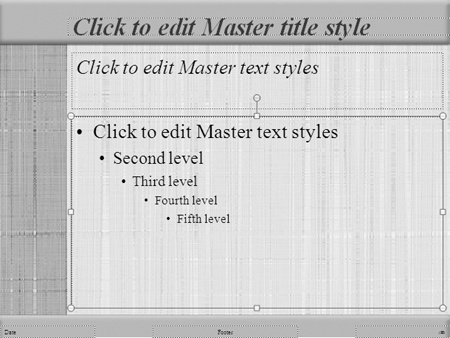
In the bulleted list placeholder, click anywhere in the phrase Click to edit Master text styles. Then in the Paragraph group, click the Bullets arrow, and click Bullets and Numbering at the bottom of the gallery.
The Bullets And Numbering dialog box opens.
You can change the bullet’s color, adjust its size in relation to the text of the bullet point, change the symbol, or switch to numbers.
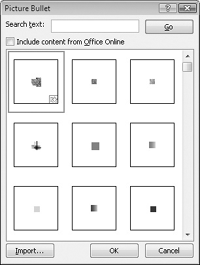
Click Picture.
Scroll two-thirds of the way down the gallery of images, click the red spiral, and then click OK.
Click anywhere in the phrase Second level, display the Bullets and Numbering dialog box, and click Customize.
At the top of the dialog box, click the Font arrow, and at the bottom of the list, click Wingdings.
Scroll through the gallery of symbols available in the Wingdings font, and double-click one that is compatible with the red swirl you selected for the first level bullet.
Back in the Bullets and Numbering dialog box, set the Color of the new bullet to Dark Red and its Size to 90, and then click OK.
On the View tab, in the Show/Hide group, select the Ruler check box.
Horizontal and vertical rulers appear along the top and left edges of the Slide pane. On the horizontal ruler are the indent markers that control how second level-bullet points are indented. You want to increase the amount of space between the second-level bullet and its text.
On the horizontal ruler, drag the Hanging Indent marker to the right to the 1-inch mark.
The First Line Indent marker remains where it is, but the Left Indent marker moves with the Hanging Indent marker, increasing the distance between the bullet and the text and aligning the second and subsequent lines in the bullet point at the 1-inch mark.
In the Overview pane, click the fourth layout, and then click the fifth layout.
Because you changed the bullets and the indenting of the second-level bullet points on the primary master, these changes are reflected in all bulleted-list layouts.
On the View tab, in the Show/Hide group, clear the Ruler check box to turn off the rulers. Then in the Presentation Views group, click the Normal button.
You return to Slide 1 in Normal view.
Display Slide 2.
Reflecting the changes you made to the master, the graphic fills the background of the slide, the title is purple and displayed in small capital letters, and the bullets are red swirls.


PowerPoint 2007 comes with many standard layouts—enough to suit most presentations. However, you might want a completely different look, either for your entire presentation or for just some of the slides in it. To get the look you want, you can create a new layout.
The easiest way to create a new layout is in Slide Master view. Clicking the Insert Layout button in the Edit Master group on the Slide Master tab adds a new layout to the master set, with a title but no other content. You can then insert placeholders and arrange and format them the way you want them.
In this exercise, you will create a new master layout for a slide with a title, introductory text, and a bulleted list.
Note
USE the CustomLayout presentation. This practice file is located in the DocumentsMicrosoft PressPowerPoint2007SBSCreating folder.
OPEN the CustomLayout presentation.
With Slide 1 displayed in Normal view, on the View tab, in the Presentation Views group, click Slide Master.
You switch to Slide Master view.
With the title master displayed, on the Slide Master tab, in the Edit Master group, click the Insert Layout button.
PowerPoint adds a new layout after the title master.
On the Slide Master tab, in the Master Layout group, click the Insert Placeholder arrow.
In the Placeholder gallery, click Text.
The pointer changes to a cross.
Move the cross pointer to the upper-left corner of the pale tan area of the master, and drag down and to the right to draw a text placeholder the width of the area and about an inch high.
The five default bullet levels overflow the boundaries of the placeholder.
In the placeholder, click the bullet to the left of Fifth level to select the bullet point, and then press
 .
.Repeat step 6 for Fourth level, Third level, and Second level.
With the insertion point at the end of the first-level bullet point, on the Home tab, in the Paragraph group, click the Bullets arrow, and then in the gallery, click None.
With the placeholder still selected, select the text, and then in the Font group, click the Italic button.
The text placeholder is now formatted to display an italic paragraph, instead of a bullet point.
On the Slide Master tab, in the Master Layout group, click the Insert Placeholder arrow, click Text in the gallery, and then draw a second text placeholder below the first.
Click the new text placeholder, and use the handles around its perimeter to size it so that it takes up the remaining pale tan area of the layout.
This layout now accommodates an introductory statement followed by five levels of bullet points.
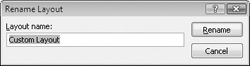
On the Slide Master tab, in the Edit Master group, click the Rename button.
In the Layout name box, type My Custom Layout, and then click Rename.
In the Close group, click the Close Master View button.
PowerPoint returns to Normal view.
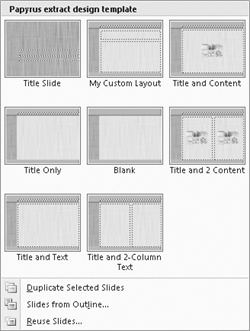
With Slide 1 selected in Normal view, on the Home tab, in the Slides group, click the New Slide arrow.
In the gallery, click the My Custom Layout thumbnail to add a slide with your custom layout to the presentation.


Suppose you have spent a lot of time customizing the masters of a particular presentation and you think you might want to use the new design for future presentations. Or suppose your company wants to require that all official presentations use a customized set of masters that include a logo, contact information, a specific background, and bullets and text in colors that reflect the company’s branding. In cases like these, you can save a customized presentation as a design template. You can then use it as the basis for new presentations by selecting it from the My Templates folder that is available in the New Presentation window.
In this exercise, you will save a presentation as a design template and then create a new presentation based on the template.
Note
USE the CustomTemplate presentation. This practice file is located in the DocumentsMicrosoft PressPowerPoint2007SBSCreating folder.
OPEN the CustomTemplate presentation.
In the File name box, type My Template.
Click the Save as type arrow, and then in the list, click PowerPoint Template.
PowerPoint displays your default Templates folder.
Warning
Important For a template to be available directly in the New Presentation window, it must be stored in the default Templates folder. If you store a template in a different folder, you can browse to that folder and double-click the template file to start PowerPoint and open a new presentation based on the template.
Click Save.
PowerPoint saves the template in the specified folder. You can now edit the template and save it as you would any other presentation.
On the Slides tab in the Overview pane, click Slide 2. Then scroll the pane until you can see the last slide in the presentation, hold down the
 key, and click Slide 16.
Slides 2 through 16 are selected.
The template now contains only the title slide.
In the Slide pane, select the title and delete it. Then select the text in the subtitle placeholder, delete it, and click away from the placeholder.
The title slide now contains two placeholders that are empty except for placeholder instructions.
On the Quick Access Toolbar, click the Save button, and then close the template.
Click the Microsoft Office Button, and then click New.
On the My Templates tab, double-click My Template.
PowerPoint opens a new presentation based on your custom template.
On the Home tab, in the Slides group, click the New Slide arrow, and then in the Slide gallery, click any slide layout.
Continue adding slides of different layouts to the presentation to see their effects.

If the themes, color schemes, and font sets that come with PowerPoint 2007 don’t meet your needs, you can create your own and then make any combination available to all your presentations as a custom theme.
Masters control the basic design of all slides in a presentation. You can make global changes by editing text and objects on the masters.
To create your own layouts, you can manipulate existing objects on the slide masters. Or you can add an entirely new master and build the layout from scratch.
After setting up a presentation to look the way you want, you can save it as a design template for use as the basis for other presentations.