
Chapter at a Glance
The goal of all the effort involved in creating a presentation is to be able to effectively deliver it to a specific audience. With Microsoft Office PowerPoint 2007, you can easily deliver a presentation from your computer as an electronic slide show. In Slide Show view, instead of the slide appearing in a presentation window within the PowerPoint program window, the slide occupies the entire screen.
Before you can deliver a presentation, you need to perform several tasks to ensure its success. You can hide individual slides to adapt the presentation for a specific audience, or if you know that you will be giving variations of the same presentation to different audiences, you can save a set of slides as a separate presentation that you will show only if appropriate. You can tailor the speed at which slides appear, to appropriately fit your presentation to the allotted time. To support your delivery of the presentation, you can prepare speaker notes, and to help your audience retain your message, you can prepare handouts. Finally, if you are delivering the presentation at a remote location, you will want to use the Package For CD feature to ensure that you take all the necessary files with you.
When you deliver a slide show from your computer, you navigate through slides by clicking the mouse button or by pressing the arrow keys. You can move forward and backward one slide at a time, and you can jump to specific slides as the needs of your audience dictate. During the slide show, you can mark up slides with an on-screen pen or highlighter to emphasize a point.
In this chapter, you will adapt a presentation for two audiences, first by creating a custom slide show, and then by hiding a slide. You will apply slide timings to a presentation, rehearse it, and have PowerPoint set the timings for you. You will enter speaker notes in both the Notes pane and in Notes Page view, customize the Notes master, and print speaker notes and handouts. Then you will save a presentation package on a CD and run it from the CD by using the presentation viewer that comes with PowerPoint. Finally, you will deliver a presentation and mark up slides while showing them.
Note
See Also Do you need only a quick refresher on the topics in this chapter? See the Quick Reference section at the beginning of this book.
Warning
Important Before you can use the practice files in this chapter, you need to install them from the book’s companion CD to their default location. See Using the Book’s CD at the beginning of this book for more information.
Note
Troubleshooting Graphics and operating system–related instructions in this book reflect the Windows Vista user interface. If your computer is running Windows XP and you experience trouble following the instructions as written, please refer to the Information for Readers Running Windows XP section at the beginning of this book.
If you plan to deliver variations of the same presentation to different audiences, you should prepare one presentation containing all the slides you are likely to need for all the audiences. Then you can select slides from the presentation that are appropriate for a particular audience and group them as a custom slide show. When you need to deliver the presentation for that audience, you open the main presentation and show the subset of slides by choosing the custom slide show from a list.
For example, suppose you need to pitch an idea for a new product or service to both a team of project managers and a company’s executive team. Many of the slides would be the same for both groups, but the presentation to the executive team would include more in-depth competitive and financial analysis. You would develop the executive team’s presentation first and then create a custom slide show for the project managers by using a subset of the slides in the executive presentation.
Sometimes you might want to be able to make an on-the-spot decision during a presentation about whether to display a particular slide. You can give yourself this flexibility by hiding the slide so that you can skip over it if its information doesn’t seem useful to a particular audience. If you decide to include the slide’s information in the presentation, you can display it by pressing the letter H or by using the Go To Slide command.
In this exercise, you will select slides from an existing presentation to create a custom slide show for a different audience. You will also hide a slide and then see how to display it when necessary.
Note
USE the Adapting presentation. This practice file is located in the DocumentsMicrosoft PressPowerPoint2007SBSDelivering folder.
BE SURE TO start PowerPoint before beginning this exercise.
OPEN the Adapting presentation.
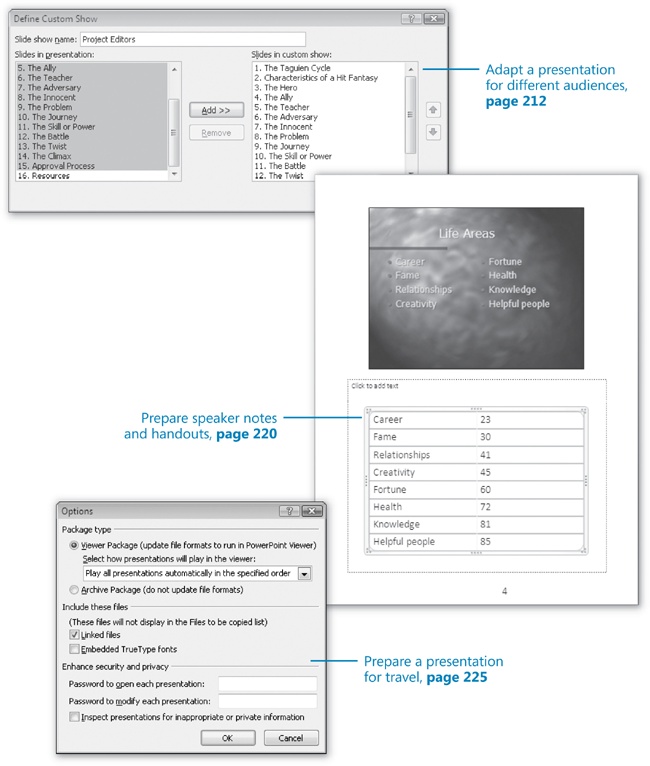
On the Slide Show tab, in the Start Slide Show group, click the Custom Slide Show button, and then click Custom Shows.
Click New.
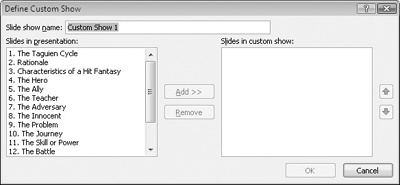
The Define Custom Show dialog box opens. The default custom show name is selected in the Slide Show Name box.
In the Slide show name box, type Project Editors.
In the Slides in presentation list, click 1. The Taguien Cycle, and then click Add.
Slide 1 appears as Slide 1 in the Slides In Custom Show box on the right.
In the Slides in presentation list, click 3. Characteristics of a Hit Fantasy, scroll the list, hold down the
 key, and click 15. Approval Process. Then click Add.
The slides appear in sequential order in the Slides In Custom Show box on the right.
Click OK.
In the Custom Shows dialog box, click Show to start the custom slide show.
Click the mouse button to advance through all the slides, including the blank one at the end of the show.
In Normal view, on the Slide Show tab, in the Start Slide Show group, click the Custom Slide Show button.
Project Editors has been added to the list. Clicking this option will run the custom slide show.
In the Custom Shows dialog box, verify that Project Editors is selected, and then click Edit.
At the bottom of the Slides in custom show box, click 14. Approval Process, and then click Remove.
PowerPoint removes the slide from the custom slide show, but not from the main presentation.
Click OK to close the Define Custom Show dialog box, and then click Close to close the Custom Shows dialog box.
In the Overview pane, scroll to the bottom of the Slides tab, right-click Slide 12, and then click Hide Slide.
On the Slides tab, PowerPoint puts a box with a diagonal line around the number 12, and dims the slide contents to indicate that it is hidden.
Display Slide 11, and on the View toolbar, click the Slide Show button. Then press
 to move to the next slide.
Because Slide 12 is hidden, PowerPoint skips from Slide 11 to Slide 13.
Right-click anywhere on the screen, point to Go to Slide, and then click (12) The Battle.
The number is in parentheses because the slide is hidden. When you click it, the hidden slide appears in Slide Show view.


When delivering a slide show, you can move from slide to slide in the following ways:
The length of time a slide appears on the screen is controlled by its slide timing. By default, slide timings are divided equally among the animations for each slide. So if a slide has a title and four bullet points that are all animated and you assign a timing of 1 minute to the slide, the five elements will appear at 12-second intervals.
To apply a timing to one slide, to a group of slides, or to an entire presentation, you first select the slides, and then in the Advance Slide area of the Transition To This Slide group on the Animations tab, select the Automatically After check box and enter the number of minutes and/or seconds you want each slide to remain on the screen.
Tip
If you are delivering the presentation in Slide Show view and want to prevent PowerPoint from advancing to the slide according to a slide timing, press the letter S on your keyboard, or right-click the current slide and click Pause. To continue the presentation, press the letter S again, or right-click the slide and click Resume.
If you don’t know how much time to allow for the slide timings of a presentation, you can rehearse the slide show while PowerPoint automatically tracks and sets the timings for you, reflecting the amount of time you spend on each slide during the rehearsal. During the slide show, PowerPoint displays each slide for the length of time you indicated during the rehearsal. In this way, you can synchronize an automatic slide show with a live narration or demonstration.
In this exercise, you will set the timing for one slide and then apply it to an entire presentation. Then you will rehearse the presentation and have PowerPoint set slide timings according to the amount of time you display each slide during the rehearsal.
Note
USE the Rehearsing presentation. This practice file is located in the DocumentsMicrosoft PressPowerPoint2007SBSDelivering folder.
On the Animations tab, in the Transition to This Slide group, in the Advance Slide area, select the Automatically After check box, and then type or select 00:03.
Because both check boxes in the Advance Slide area are selected, the slide will advance either after three seconds or when you click the mouse button.
On the View toolbar, click the Slide Show button.
Slide 1 is displayed for three seconds, and then PowerPoint moves to Slide 2.
Press
 to end the show, and then on the View toolbar, click the Slide Sorter button.
Below the lower-left corner of Slide 1 is the slide timing you just applied.
Click Slide 1, and then on the Animations tab, in the Transition to This Slide group, click the Apply To All button.
The slide timing you applied to Slide 1 is now applied to all the slides.
Warning
Important When you click Apply To All, all the transition effects applied to the current slide are transferred to the other slides. If you have applied different transitions to different slides, those individually specified transitions are overwritten. So it’s a good idea to apply all the effects that you want the slides to have in common first. Then you can select individual slides and customize their effects.
Switch to Slide Show view, watch as the slides advance, and then click the mouse button when the black screen is displayed.
In the Advance Slide area of the Transition to This Slide group, clear the Automatically After check box, and then click Apply To All.
The slide timings disappear from below the slides.
With Slide 1 selected, on the Slide Show tab, in the Set Up group, click the Rehearse Timings button.
The screen switches to Slide Show view, starts the show, and displays the Rehearsal toolbar in the upper-left corner of the screen. A Slide Time counter is timing the length of time Slide 1 remains on the screen.
Wait about 10 seconds, and then on the Rehearsal toolbar, click the Next button.
Work your way slowly through the slide show, clicking Next to move to the next slide.
If you want to repeat the rehearsal for a particular slide, on the Rehearsal toolbar, click the Repeat button to reset the slide time for that slide to 0:00:00.
Tip
If you want to start the entire rehearsal over again, click the Rehearsal tool-bar’s Close button, and when a message asks whether you want to keep the existing timings, click No.
When you reach the end of the slide show, a message box displays the elapsed time for the presentation and asks whether you want to apply the recorded slide timings.
Click Yes.
The screen switches back to Slide Sorter view, where the recorded timings have been added below each slide.
Click the Animations tab.
The timing for the active slide, Slide 1, appears in the Automatically After box in the Advance Slide area of the Transition To This Slide group.
If the Automatically After setting is not a whole second, click the Up button to the right of the box to adjust the time up to the next whole second.
You can manually adjust the timing of any slide by selecting it and changing the setting in this box.
On the View toolbar, click the Slide Show button.

Creating a Self-Running Presentation
When slide timings have been applied to a PowerPoint presentation, the presentation can be set up to run automatically, either once or continuously. For example, you might want to set up a self-running presentation for a product demonstration in a store.
To set up a self-running presentation:
Open the presentation, and then on the Slide Show tab, in the Set Up group, click the Set Up Slide Show button.
In the Show type area, click Browsed at a kiosk (full screen).
When you click this option, the Loop Continuously Until ‘Esc’ check box in the Show Options area becomes unavailable so that you cannot clear it. Any narration or animation attached to the presentation will play with the presentation unless you select the Show Without Narration or Show Without Animation check box.
Click OK.
To test the show, display Slide 1, and on the View toolbar, click the Slide Show button.
The presentation runs continuously, using its transitions, animations, and slide timings.
Press
to stop the slide show, and then save the presentation with a different name.
When you are ready to run the presentation, you can navigate to the folder where it is stored, and double-click it. The slide show opens in the view in which it was saved. Switch to Slide Show view to start the presentation. You can press Esc to stop the slide show at any time.
If you will be delivering your presentation before a live audience, you will probably need some speaker notes to guide you. Each slide in a PowerPoint presentation has a corresponding notes page. As you create each slide, you can enter notes that relate to the slide’s content by simply clicking the Notes pane and typing. If you want to include something other than text in your speaker notes, you must switch to Notes Page view by clicking the Notes Page button in the Presentation Views group on the View tab. When your notes are complete, you can print them so that they are readily available to guide the presentation.
As a courtesy for your audience, you might want to supply handouts showing the presentation’s slides so that people can take notes. You don’t need to do anything special to create handouts. Printing them requires a few simple decisions, such as how many slides you want to appear on each page.
Notes and handouts have their own masters, and you can customize them by using the same techniques you use to customize slide masters. Usually, you will find that the default masters are more than adequate, but if you want to make changes, you click Notes Master or Handout Master in the Presentation Views group on the View tab to display the respective masters.
Note
See Also For information about customizing masters, see Viewing and Changing a Presentation’s Master Slides in Chapter 9.
In this exercise, you will enter speaker notes for a couple of slides in the Notes pane. You will then switch to Notes Page view, insert a graphic in one note and a table in another, customize the Notes master, and then print speaker notes and handouts.
Note
USE the NotesHandouts presentation and the YinYang graphic. These practice files are located in the DocumentsMicrosoft PressPowerPoint2007SBSDelivering folder.
OPEN the NotesHandouts presentation.
With Slide 1 selected, in the Notes pane, click the Click to add notes placeholder, type Welcome and introductions, and then press
 .
.Type Logistics, press
, and then type Establish knowledge level.Display Slide 2, and in the Notes pane, type Talk about the main concepts.
Display Slide 3, and in the Notes pane, type Complementary energies, and then press
twice.On the View tab, in the Presentation Views group, click the Notes Page button.
Slide 3 is displayed in Notes Page view, with the view percentage set so that the entire page will fit in the window.
On the Insert tab, in the Illustrations group, click the Picture button.
In the Insert Picture dialog box, navigate to your DocumentsMicrosoft PressPowerPoint2007SBSDelivering folder, and then double-click the YinYang graphic.
Drag the image down below the note you typed in step 4.
At the bottom of the scroll bar, click the Next Slide button to move to Slide 4.
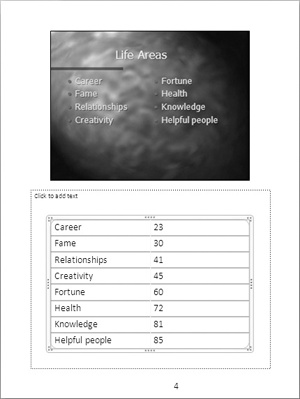
On the Insert tab, in the Tables group, click the Table button, and then drag to create a table that is two columns wide and eight rows high.
Drag the table by its border down into the notes placeholder, and then on the Design contextual tab in the Table Style Options group, clear the Header Row and Banded Rows check boxes.
Enter the following information, pressing
 to move from cell to cell and from row to row:
Career
23
Fame
30
Relationships
41
Creativity
45
Fortune
60
Health
72
Knowledge
81
Helpful people
85
The speaker notes now include the page numbers in a reference work where you can find additional information if required during the presentation.
On the View tab, in the Presentation Views group, click the Normal button, and then drag the splitter bar above the Notes pane up to expand it.
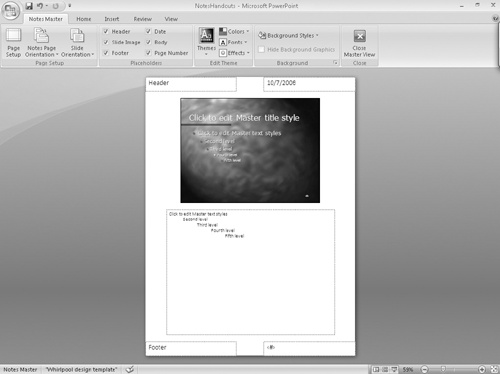
Drag the splitter bar down again. Then on the View tab, in the Presentation Views group, click the Notes Master button.
The Notes Master appears, and the Notes Master tab is added to the Ribbon.
In the upper-left corner of the page, click the header placeholder, and then type Feng Shui.
In the lower-left corner of the page, click the footer placeholder, and then type Beginners’ Class.
On the View toolbar, click the Normal button to return to Normal view.
Click the Print what arrow, click Notes Pages in the list, and then click OK.
You now have a copy of the speaker notes to refer to during the presentation.
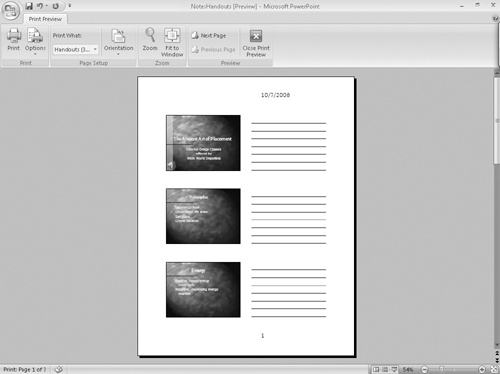
Display the Print dialog box again, and then change the Print what setting to Handouts.
You can print audience handouts in six formats: one, two, three, four, six, or nine slides per page. The default, six, is set on the Handout master, but you can change it in the Print dialog box.
In the Handouts area, click the Slides per page arrow, and in the list, click 3.
When you print three slides per page, PowerPoint adds lines for notes to the right of each slide, as shown in the diagram on the right side of the dialog box.
In the lower-left corner of the dialog box, click Preview.
The first page of the handouts appears in Print Preview.
On the Print Preview tab, in the Print group, click the Print button, and then click OK.
Return to Normal view.

When you develop a presentation on the computer from which you will be delivering it, you will have all the fonts, linked objects, and other components of the presentation available when the lights go down and you launch your first slide. However, if you will deliver your presentation from a different computer, you need to make sure the fonts, linked objects, and any other necessary items are available.
With PowerPoint 2007, you can use the Package for CD feature to help you gather all the presentation components and save them to a CD or other type of removable media so that they can be transported to a different computer. Linked files are included in the presentation package by default. TrueType fonts are stored with the presentation if you click Embedded TrueType Fonts while creating the package. (When you include embedded fonts, the file size increases significantly.)
Tip
You can embed fonts when you package a presentation, or you can do it when you first save the presentation. In the Save As dialog box, click Tools, click Save Options, and on the Save page, select the Embed Fonts In The File check box. Then click Embed Only The Characters Used In The Presentation to embed only the characters in the font set that are actually used, or click Embed All Characters to embed the entire font set.
When you use Package For CD, by default the presentation will be set up to run automatically in the Microsoft Office PowerPoint Viewer. You can then send the CD containing the presentation package to people who do not have PowerPoint installed on their computers, and they will be able to view the presentation in the PowerPoint Viewer.
In this exercise, you will use Package For CD to create a presentation package on a CD. You will then run the presentation using the PowerPoint Viewer.
Note
USE the Travel presentation. This practice file is located in the DocumentsMicrosoft PressPowerPoint2007SBSDelivering folder.
BE SURE TO have a blank CD available. If your computer does not have a CD burner, you can follow along with the exercise but you will not be able to complete steps 8 through 16.
OPEN the Travel presentation.
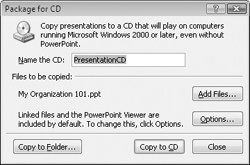
Click the Microsoft Office Button, click Save As, and then save the current presentation in the Delivering folder, with the name My Organization 101.
Click the Microsoft Office Button, point to Publish, and then click Package for CD.
A message box tells you that your file will be converted to the PowerPoint 97-2003 format so that it is compatible with the PowerPoint Viewer.
Click OK.
In the Name the CD box, type Organization.
The open presentation, its linked files, and the PowerPoint Viewer will be included in the presentation package by default, but you need to specifically include embedded fonts.
In the Package type area, leave Viewer Package selected, but click the Select how presentations will play in the viewer arrow, and then in the list, click Let the user select which presentation to view.
Clicking Viewer Package includes the PowerPoint Viewer. If you click Archive Package, the package contains only the presentation.
In the Include these files area, select the Embedded TrueType fonts check box, and then click OK.
Warning
Important Be sure to select the Embedded TrueType Fonts check box if a presentation includes fonts that don’t come with the version of Windows running on the presentation computer or the 2007 Microsoft Office system programs. Then the presentation will look the same on a computer on which the fonts aren’t installed as it does on your computer.
Insert a blank CD in your CD burner, and then click Copy to CD.
If your computer does not have a CD burner, click Copy To Folder instead, and then select the folder in which you want to store the package.
When PowerPoint asks you to verify that you want to include linked content, click Yes.
When you see a message that the copy operation was successful, click No to indicate that you don’t want to copy the same package to another CD.
At the right end of the title bar, click the Close button to close the presentation and exit PowerPoint.
Remove the CD from your CD burner, and then re-insert it.
Note
Troubleshooting If you are running the package from your computer, navigate to the folder where the package is stored, and double-click the Organization folder (the name you assigned in step 4). Then double-click PPTVIEW to start the Presentation Viewer.
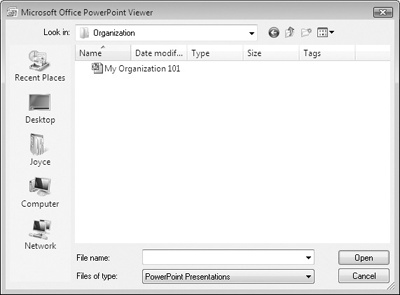
After a few seconds, the PowerPoint Viewer starts. The first time you run this program, you need to click Accept to accept the terms of the program’s license agreement. Then a dialog box opens in which you can select the presentation you want to run.
In the list of file and folder names, double-click My Organization 101.
The PowerPoint Viewer displays the presentation’s title slide.
Click the mouse button to advance through the slides in the PowerPoint Viewer, and then press the
key to end the presentation.The PowerPoint Viewer closes.
Close the Microsoft Office PowerPoint Viewer dialog box.

To start a slide show from Normal or Slide Sorter view, you click the Slide Show button to display the current slide full screen. Then the simplest way to move linearly from one slide to the next is to click the mouse button without moving the mouse. But you can also move around by using the keyboard in the following ways:
To move to the next slide, press the Spacebar, the Down Arrow key, or the Right Arrow key.
To move to the previous slide, press the Page Up key or the Left Arrow key.
To end the presentation, press the Esc key.
If you need to move to a slide other than the next one or the previous one, you can move the mouse pointer to display an inconspicuous toolbar in the lower-left corner of the slide. You can use this toolbar in the following ways:
To move to the previous slide, click the Previous button.
To jump to a slide out of sequence (even if it is hidden), click the Navigation button, click Go To Slide, and then click the slide.
To display the slides in a custom slide show, click the Navigation button, click Custom Show, and then click the show.
To display a list of keyboard shortcuts for carrying out slide show tasks click the Navigation button, and then click Help. For example, you can press the H key to show the next hidden slide, press the E key to erase pen annotations, or press the A key to show the pointer arrow.
To end the presentation, click the Navigation button, and then click End Show.
During a presentation, you can reinforce your message by drawing on the slides with an electronic “pen” or changing the background behind text with a highlighter. You simply click the Pen button on the toolbar that appears when you move the mouse, click the tool you want, and then begin drawing or highlighting. You can change the pen or highlighter color to make it stand out on the slide by clicking the Pen button, clicking Ink Color, and then selecting the color you want.
In this exercise, you will move around in various ways while delivering a presentation. You’ll also use a pen tool to mark up one slide, change the color, and mark up another.
Note
USE the Showing presentation. This practice file is located in the DocumentsMicrosoft PressPowerPoint2007SBSDelivering folder.
OPEN the Showing presentation.
With Slide 1 selected in Normal view, on the View toolbar, click the Slide Show button.
The background of the first slide is displayed.
Click anywhere on the screen, and then click again.
First the title moves onto the slide from the top, and then the subtitle moves onto the slide from the bottom.
Click the mouse button to advance to Slide 2.
The slide contents move in from the right.
Press the
 key to display the previous slide, and then press the
  key to display the next slide.
Move the mouse.
The pointer appears on the screen, and the shadow toolbar appears in the lower-left corner.
On the toolbar, click the Next button (the button at the right end of the shadow toolbar) to display Slide 3.
Right-click anywhere on the screen, and then click Previous to redisplay Slide 2.
Right-click anywhere on the screen, point to Go to Slide, and then in the list of slide names, click 7 Pulling It All Together.
Display the toolbar, click the Navigation button, and then click Next to display Slide 8.
Use various navigation methods to move around the slide show until you are comfortable moving around.
Right-click anywhere on the screen, and then click End Show.
Slide 8 appears in Normal view.
Tip
If you click all the way through to the end of the presentation, PowerPoint displays a black screen to indicate that the next click will return you to the previous view. If you do not want the black screen to appear at the end of a presentation, click the Microsoft Office Button, click PowerPoint Options, and click Advanced. Then in the Slide Show area, clear the End With Black Slide check box, and click OK. Then clicking while the last slide is displayed will return you to the previous view.
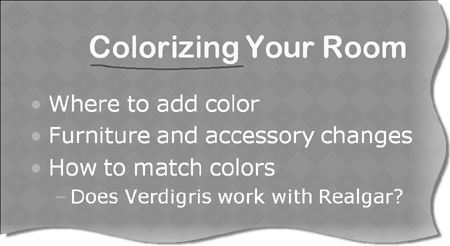
Display Slide 5, and switch to Slide Show view.
Right-click anywhere on the screen, point to Pointer Options, and click Felt Tip Pen.
The pointer changes to resemble the tip of a felt tip pen.
Draw a line below the word Colorizing in the title.
Right-click the screen, point to Pointer Options, and then click Erase All Ink on Slide.
The line is erased.
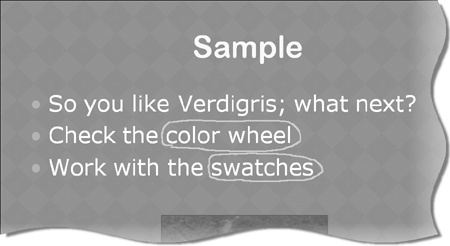
Display the toolbar, click the Pen button, point to Ink Color, and then in the palette, click a light purple color.
Draw circles around color wheel and swatches.
Right-click anywhere on the screen, point to Pointer Options, and then click Arrow.
The pen tool changes back to the regular pointer, and you can now click the mouse button to advance to the next slide.
A message asks whether you want to keep your ink annotations.
Click Discard.
Slide 6 appears in Normal view.
When you don’t want to include all the slides in a presentation for a particular audience, you can use a subset of the slides to create a custom slide show. You can also hide slides and then display them only if appropriate.
You can assign timings to slides manually, or you can rehearse the presentation and record the slide timings from the rehearsal. The presentation automatically advances from one slide to the next have the specified time has elapsed.
You can easily create speaker notes to ensure a smooth delivery or print handouts to ensure that your audience can easily follow along with your presentation.
To run the presentation on a computer other than the one you developed the presentation on, you can create a presentation package. Including the PowerPoint Viewer in the package enables the presentation can run on a computer on which PowerPoint is not installed.
Knowing how to use all the toolbar buttons, commands, and keyboard shortcuts to navigate in Slide Show view will ensure a smoother presentation delivery.
To emphasize a point, you can mark up slides during a slide show by using different pen tools and different colors. You can save or discard these annotations.