The bulk of your content recovery will probably be at the list or item level. But there are times when you must restore a lower-level component, such as a content database, to restore this content. Additionally, you need to know the best practices for recovering content at many levels in the farm, including the following:
This section will give you an overview of restoring failed, corrupted, or deleted content and some best practices for doing so.
Honestly, we rarely see entire Web applications fail. Usually, it is a component of a Web application, such as a content database or IIS Web application, that fails. But understanding how to restore a Web application from content databases is necessary because most medium and larger organizations will rely on SQL Server backups for their SharePoint Server 2007 content. But it is important to understand some of the best practices when you use the native tools, so they will be covered also.
First, Web applications primarily consist of content databases. The configuration of the content database is stored in the configuration database, but the user data is stored in one or more content databases. In a worst-case scenario, you can rebuild a Web application with nothing but a good set of content database backups. Remember, you cannot restore what you do not back up. The following directions will assist you in a plain Web application restore using only the content databases:
Restore the content databases associated with the Web application in question
Create a new Web application using exactly the previous settings. Be sure to use the same URLs, add zones, and re-create policies if necessary. A better way would be scripting the addition of these extra items. A scripted farm install is covered at the end of this chapter.
When creating a new Web application, you must create a new default content database; you cannot select an existing database. Therefore, delete the newly created content database after creation. We know this sounds backward, but it works.
Next, add a new content database. Instead of actually creating a new database, enter the name of your restored content database. This will associate your restored content databases with the new Web application.
The preceding steps might be much more complex, depending on your installation, but should serve as the basics for restoring a Web application. When you created the new Web application in Central Administration, it forced the creation of new IIS Web applications, even if you used the same name. Therefore, you lost any direct customizations to IIS. In this case, you must reconfigure IIS customizations such as multiple host headers, Web.config changes, and SSL certificates. If you lost the WFE servers as well, be sure to restore any 12 hive customizations from your server backups.
Restoring a Web application via Central Administration is common when the native tools for backups are used. Be sure to use host headers when building Web applications when you use the native tools for restores. Doing so ensures a painless restore process. Not doing so may cause a situation where multiple Web applications are trying to be instantiated in IIS to the same IP address, which can cause your Web application restores to fail.
More Info
For detailed information on backing up and restoring farm components, browse to http://technet.microsoft.com/en-us/library/cc263053.aspx.
Remember that you cannot restore what is not backed up. We consider it a best practice to back up IIS individually, even though it is included in the operating system backups. This gives us the ability to do a lightweight IIS restore and removes the need to restore the entire system state when we only need IIS. If you are using SSL certificates, it is a good idea to back them up in the same location as your farm or IIS backups—and don’t forget to back them up with the private key! Otherwise, your SSL certificates cannot be reinstalled in a disaster.
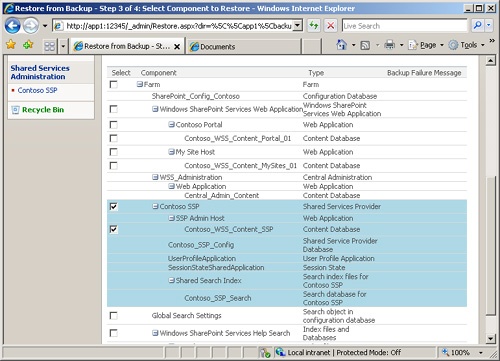
Whether you are using SQL Server tools or SharePoint Server 2007 tools to back up your content databases, you should use SharePoint Server 2007 tools for SSPs backups. The primary reason we use the native backup tool is to provide a reliable way to back up and restore the index files and search database. Much like the configuration database and Central Administration content database, these are intrinsically linked and should never be backed up or restored separately. Figure 21-6 shows the restoration screen and an example of how you must restore the hosting SSP to restore the index files and search database.
There are other reasons to use the native tools, such as preservation of audiences, Excel Services settings, search scopes, managed properties, My Site settings, Business Data Catalog settings, and personalization features. Complete documentation for choosing backup and restore tools can be found at http://technet.microsoft.com/en-us/library/cc263427.aspx. This link is frequently updated and may supersede information found in this chapter.
Note
If you are using only the native tools to back up your SSPs, you might consider a local hard disk on the index server for your backup point. Doing so allows your SSP backups to be moved to your permanent operating system backup media. Be sure you have enough disk space to hold your Shared Services backups, and remove unneeded backups to preserve space. We recommend that this backup point not be the system (boot) disk or index files disk. Alternatively, you could back up to a shared drive that is then independently backed up to media.
It is important to remember how SharePoint Server 2007 is architected. A single site collection is stored in a single content database. Multiple site collections can be contained in a single content database, but site collections cannot span content databases. The discussion about site collection backup and restore should begin with how you designed your database structure. If you randomly create site collections in content databases, you won’t have granular control over site collection backup and restore. In fact, some administrators have difficulty determining which content database hosts a specific site collection. The Site Collection List option in Central Administration will show you the site-collection-to-content-database association, as shown in Figure 21-7
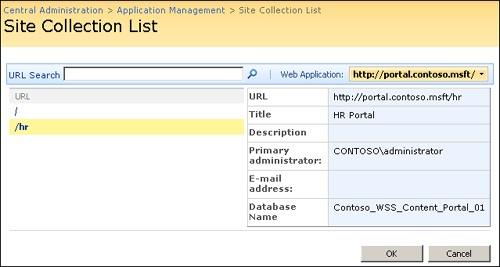
Figure 21-7. Use the Site Collection List menu in Central Administration to determine the hosting content database.
If, however, you grouped site collections by their criticality in corresponding content databases, you can then use SQL Server tools to manage them to different support levels. Figure 21-8 shows a possible database design for hosting three different SLA levels within a single farm.
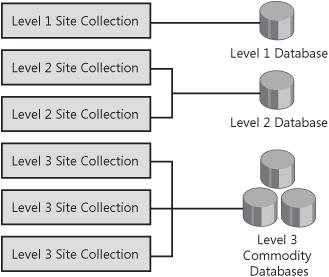
If you group site collections similar to what is shown in Figure 21-8, then you can manage them accordingly. Level 1 site collections could have frequent SQL level backups and be mirrored to another SQL instance. Level 2 site collections might be transaction log shipped, and Level 3 site collections might be in simple recovery mode and backed up only once a day. Additionally, every level of content database could be on a different SQL Server instance, and on different disk subsystems. Note that Figure 21-8 depicts a one-to-one relationship between a Level 1 site collection and a Level 1 content database. While this provides robust recovery and performance options, it does not scale well. This option should be reserved for the most critical site collections in your server farm.
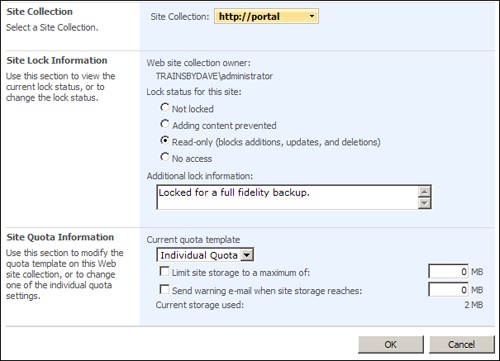
So how can you manage recovery of content via the native tools? The only tool specifically scoped to site collections is stsadm.exe –o backup –url. This command set allows for the backup and restore of site collections, but not sites. There is no native tool for site-level backup and restore. While you could use stsadm.exe –o import | export for some content, it is a content migration tool and is not full fidelity. In fact, using stsadm.exe isn’t full fidelity either unless you have locked the site collection in Central Administration or via stsadm.exe. There is always the possibility of an open object during the backup. Figure 21-9 shows how to lock a site collection in Central Administration for full-fidelity backups via stsadm.exe.
If you require site collection backup and restore, you should consider dedicated databases for those site collections or research third-party backup and restore solutions. One advantage to using the native tools over third-party tools is that they are directly supported by Microsoft. Be sure to verify that your backups are actually working. In our conversations with Microsoft support, we were surprised to hear that many customers thought their backups were working but, after a farm failure, found out they weren’t. Don’t let this happen to you. While we recommend the use of native backup and restore tools, there are definitely implementations that will require third-party tools for immediate item-level restores that the native tools will not do. If you decide to use a third-party tool, be sure to thoroughly test your solution.
So, how will you protect the content at the list and item level? While we have mainly focused on larger components of your design, content recovery can be delegated to provide shorter SLAs and even remove the responsibility from you altogether. You could simply state that you will not retrieve single items that are deleted from lists or deleted lists themselves. It is more common now than you might think for organizations to not restore entire databases to retrieve a single item in SharePoint Server 2007. Why? Because we have a two-stage Recycle Bin. Much has been written about the Recycle Bin on TechNet and in Microsoft Press books, so please refer to them for technical questions. What we want to discuss here are the best practices for configuring the Recycle Bin and how to include its use in your SLAs.
As you write your SLAs, remember the impact that the Recycle Bin can have on your design. The second stage of the Recycle Bin doesn’t count against site quota and therefore adds to your planned content database size. If the Recycle Bin is frequently used by your users, you could find yourself in a position to support 50-percent larger content databases than you had planned. Your SLA should define the size of the second-stage Recycle Bin, and the default 50 percent seems a bit much. But only you can define the second-stage size, and that size should be based on business requirements. If your requirements were that all deleted data should be kept for 90 days, you would need to disable the second stage completely, as seen in Figure 21-10. Be sure to educate your users when you turn off the second stage, as this will not remove the second stage management interface for site collections contained within the Web application. Objects emptied from the first stage are simply expunged.
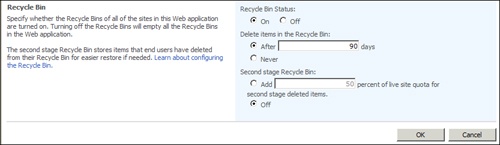
Figure 21-10. You can manipulate time-based expiration and second-stage limits in Web application general settings.
Take care when configuring the Recycle Bin because the process isn’t as straightforward as it appears. First, turning off the Recycle Bin on an active Web application will empty both the first and second stages on all Recycle Bins, and that action is not easily reversed. Second, the time-based expiration setting is a global setting. Therefore, items do not expire from the first stage to the second stage. When the time-based limit is reached, the item is expunged. Think of it this way: If the time-based setting was 90 days and a user emptied her Recycle Bin 60 days after initially deleting an item, the item will remain in the second stage for 30 days. Third, if you turn off time-based expiration and do not use site quotas, the second stage will have no limit. Because the second stage is based on the site quota, site collections without a quota will essentially have no second-stage storage limit.
As you can see, the Recycle Bin should be carefully thought out, and it should be part of the RTO and RPO requirements. If you haven’t noticed, the Recycle Bin roughly maps to the RTO and the RPO. The time-based deletion setting defines how long you will keep the data (RTO), and the second stage defines how long you will keep the data online (RPO).
Note
While versioning can provide some protection for corrupted and deleted data, it isn’t robust enough to include in most SLAs for content protection. You could create a custom list definition that always has at least one major version enabled. This would add a layer of fault tolerance should a file become corrupted. Be aware that the list administrator could simply turn this definition off. For this last reason, it has been left out of this section.