Chapter 6. More About Classes and Objects
After completing this chapter, you will be able to:
Organize classes into header files and source files.
Create objects.
Define constructors to initialize an object.
Define class-wide members by using the static keyword.
Define relationships between objects in an application.
Chapter 2, discusses how C++ is an object-oriented programming language. Recall from that chapter that you define classes to represent the important types of entities in your application, and you create objects as instances of these classes. For example, a Human Resources application might define classes such as Employee and Contract. When the application is running, it might create a new Employee object every time a new employee joins the company and a new Contract object to describe the employee’s terms of employment.
This chapter builds on the introduction to classes and objects in Chapter 2. In this chapter, you’ll see how to organize classes into header files and source files, which makes it possible for you to keep a clean separation between a class definition and its implementation. You’ll also learn how to provide constructors to initialize new objects when they’re created.
Most of the data members and member functions in a class are instance members because they belong to specific instances of the class. It’s also possible to define class members, which belong to the class as a whole. You’ll see how to define class members in this chapter by using the static keyword.
Finally, you’ll see how to create object relationships in C++. This concept is important in object-oriented programming because it facilitates objects communicating with one another in a running application.
Organizing classes into header files and source files
Chapter 2 shows you how to define a simple class and implement all its member functions inline. Let’s refresh your memory by considering the following class, which represents a credit card account:
ref class CreditCardAccount
{
public:
    void PrintStatement()
    {
        Console::Write("Credit card balance: ");
        Console::WriteLine(currentBalance);
    }
private:
    double currentBalance;
};
The CreditCardAccount class contains a single member function named PrintStatement. This function has been declared public, so it can be accessed by other parts of the application. The class also contains a single data member named currentBalance, which has been declared private to preserve encapsulation.
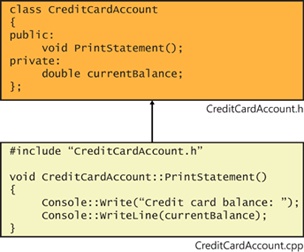
Notice that the class definition contains the full body of the PrintStatement function not just its prototype. This is known as an inline function. Inline functions are fine for small functions but can carry an overhead if used too much, and they can also make the class definition hard to understand. Imagine a class containing 100 functions, all of which are declared inline. The class definition would be very long, and it might be difficult to understand the structure of the code. A common solution in C++ is to divide the class definition into two parts: a header file and a source file, as shown in the following figure.
Note
You can use any file names you like for the header file and source file. Most developers use the same name as the class, with the standard file extensions .h (for the header file) and .cpp (for the source file.)
The header file, CreditCardAccount.h, contains the class declaration. Notice that the class declaration now contains function prototypes rather than function bodies. These prototypes make the header file easier to read because the function signatures are more prominent.
The source file, CreditCardAccount.cpp, contains the class definition, which consists of all the function bodies for the class. Each function must be prefixed by the name of the class to which it belongs, followed by two colons, as follows:
void CreditCardAccount::PrintStatement()
{
     ... function body ...
}
The double-colon syntax (::) is the C++ scope resolution operator. In this example, the scope resolution operator tells us that the PrintStatement function belongs to the CreditCardAccount class.
The reason for this should be clear: How is the compiler to know that this is the PrintStatement function that is part of CreditCardAccount as opposed to some other PrintStatement function?
Note
You must provide an #include statement at the start of the source file to include the header file for the class. For example, CreditCardAccount.cpp has an #include statement to include CreditCardAccount.h. The compiler needs the information in this header file to compile the function bodies in the source file, for example, to check that the spelling and number of arguments in PrintStatement matches the declaration.
Declaring a class in a header file
In this exercise, you will create a new application and define a CreditCardAccount class in a header file. (You will implement the class in the exercise that follows.)
Start Visual Studio 2012 and create a new CLR Console Application project named CreditOrganizer.
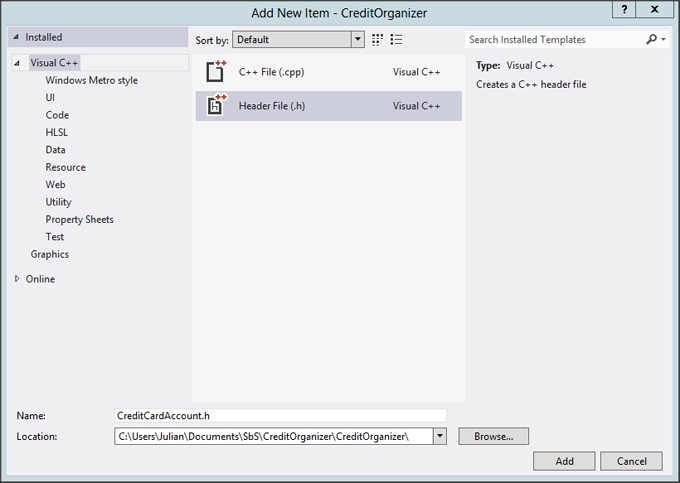
On the Project menu, click Add New Item.
In the Add New Item dialog box, in the pane on the left, select Visual C++ and then, in the center pane, click Header File (.h).
Toward the bottom of the dialog box, in the Name box, type CreditCardAccount.h, and then click Add.
Visual Studio creates an empty header file.
Type the following code in the header file to define the CreditCardAccount class:
ref class CreditCardAccount
{
public:
    void SetCreditLimit(double amount);
    bool MakePurchase(double amount);
    void MakeRepayment(double amount);
    void PrintStatement();
    long GetAccountNumber();

private:
    long accountNumber;
    double currentBalance;
    double creditLimit;
};
Every credit card account has a unique account number, a current balance, and a credit limit. The SetCreditLimit member function will be used to initialize the credit limit for the account. You can use the MakePurchase member function to make a purchase on the credit card. This function returns true if the purchase is allowed, or false if the purchase would cause the credit limit to be exceeded. The MakeRepayment member function repays some or all of the outstanding balance. The PrintStatement member function displays a statement for the account. And finally, the GetAccountNumber member function returns the number for the account.
Build the application and fix any compiler errors.
Implementing a class in a source file
In this exercise, you will implement the CreditCardAccount class in a source file.
Continue using the project from the previous exercise.
On the Project menu, click Add New Item.
In the Add New Item dialog box, in the pane on the left, select Visual C++ and then, in the center pane, click C++ File (.cpp).
Toward the bottom of the dialog box, in the Name box, type CreditCardAccount.cpp, and then click Add.
Visual Studio creates an empty source file.
Add two #include statements at the beginning of the file, as follows:
#include "stdafx.h"
#include "CreditCardAccount.h"
The file stdafx.h is a header file that can include other standard header files; you include stdafx.h at the start of every source file in your project.
CreditCardAccount.h contains the class definition for CreditCardAccount. You include this header file here so that the compiler can check your implementation of the CreditCardAccount class.
Add the following code so that you can use classes and data types defined in the System namespace:
#using <mscorlib.dll>
using namespace System;
The #using <mscorlib.dll> preprocessor directive imports the Microsoft Intermediate Language (MSIL) file mscorlib.dll so that you can use managed data and managed constructs defined in this library file.
The using namespace System statement helps you to use classes and data types defined in the System namespace. Specifically, you will use the Console class to display messages on the console.
Implement the CreditCardAccount::SetCreditLimit member function, as shown here:
void CreditCardAccount::SetCreditLimit(double amount)
{
  creditLimit = amount;
}
Implement the CreditCardAccount::MakePurchase member function as follows:
bool CreditCardAccount::MakePurchase(double amount)
{
    if (currentBalance + amount > creditLimit)
    {
        return false;
    }
    else
    {
        currentBalance += amount;
        return true;
    }
}
This function is called when the card owner attempts to make a purchase by using the credit card. The amount parameter indicates the amount of the purchase. The function tests whether the purchase would exceed the creditLimit data member, returning false if it would. Otherwise, the function adds the amount to the currentBalance data member and returns true.
Implement the CreditCardAccount::MakeRepayment member function as follows:
void CreditCardAccount::MakeRepayment(double amount)
{
    currentBalance -= amount;
}
This function gives the user the opportunity to pay off some or all of the outstanding balance.
Implement the CreditCardAccount::PrintStatement member function as follows:
void CreditCardAccount::PrintStatement()
{
    Console::Write("Current balance: ");
    Console::WriteLine(currentBalance);
}
This function displays information about the current state of the account.
Implement the GetAccountNumber member function as follows:
long CreditCardAccount::GetAccountNumber()
{
    return accountNumber;
}
Build the application and fix any compiler errors.
Creating objects
After you have defined and implemented a class, you are ready to begin creating objects.
The following code shows how to create an object and call its public member functions:
CreditCardAccount ^myAccount;         // Declare a handle
myAccount = gcnew CreditCardAccount;  // Create a new
                                      // CreditCardAccount object
myAccount->MakePurchase(100);         // Use the -> operator to invoke
                                      // member functions
myAccount->MakeRepayment(70);
myAccount->PrintStatement();
...
The gcnew operator creates a new object of the CreditCardAccount class and returns a handle to this new object. The handle is used with the -> operator to invoke member functions on the new object.
Note
If you forget to delete an object of a managed class, the garbage collector is responsible for disposing of it. In Chapter 7, you can see how this works as well as how you can work with the garbage collector to ensure that your objects are tidied up correctly at the end of their lives.
In this exercise, you will create a new CreditCardAccount object, invoke its member functions, and delete the object when it is no longer required.
Continue using the project from the previous exercise.
If the file CreditOrganizer.cpp is not visible in the editor window, find the file in the Solution Explorer, and then double-click the name to display it in the editor.
Just after the #include “stdafx.h” line, add another #include directive as follows:
#include "CreditCardAccount.h"
This line makes it possible for you to create and use CreditCardAccount objects in this source file.
Replace the body of the main function with the following code:
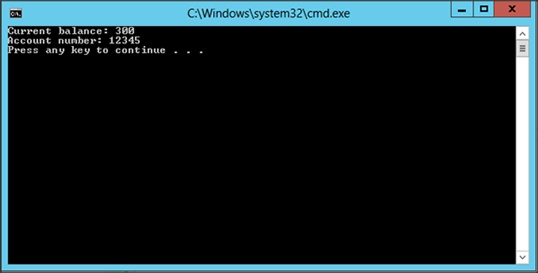
CreditCardAccount ^myAccount;         // Declare a handle
myAccount = gcnew CreditCardAccount;  // Create a new CreditCardAccount object
myAccount->SetCreditLimit(1000);
myAccount->MakePurchase(1000);        // Use the -> operator to invoke member functi
ons
myAccount->MakeRepayment(700);
myAccount->PrintStatement();
long num = myAccount->GetAccountNumber();
Console::Write("Account number: ");
Console::WriteLine(num);
Build the application and fix any compiler errors.
Run the application by pressing Ctrl+F5.
The application creates a CreditCardAccount object, makes a purchase and a repayment, and prints a statement. However, the account number displays as zero, as illustrated in the following screen shot:
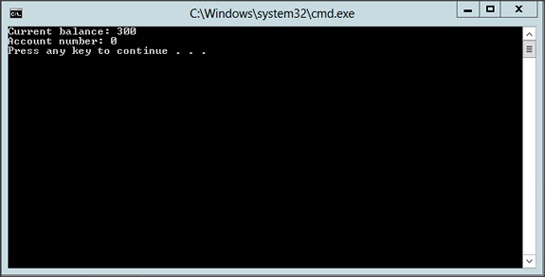
The reason for this is because the members of the CreditCardAccount object are initialized to zero when it’s created. However, it doesn’t really make sense to have an account without a number, so we’d like to ensure that every account is created with an account number.
You do this by defining a constructor in the CreditCardAccount class. The constructor is a member function that initializes new objects when they’re created. Chapter 7 shows you how to tidy up objects just before they are destroyed.
Initializing objects by using constructors
In this section, you will see how to define constructor functions for a class.
Defining constructors
A constructor is a special member function that is called automatically when an object is created. The purpose of the constructor is to initialize the object to bring it into an operational state. You declare the prototype for the constructor in the class definition. The following example declares a simple constructor for the CreditCardAccount class:
ref class CreditCardAccount
{
public:
    CreditCardAccount();
    // ... Other members, as before
};
There are several important points to notice here. First, a constructor must have the same name as the class; this is how the compiler recognizes it as a constructor. Also, a constructor cannot specify a return type—not even void. If you do specify a return type for a constructor, you will get a compiler error.
You can implement the constructor in the source file as follows:
CreditCardAccount::CreditCardAccount()
{
    accountNumber = 1234;
    currentBalance = 0;
    creditLimit = 3000;
}
Note
Although this example has set all three fields, the compiler will arrange for fields to be set to a default value. This is zero for numeric types, false for Booleans, and a “null” value for handles.
This simple constructor initializes every new CreditCardAccount object with the same values. A more realistic approach is to define a constructor that takes parameters so that each object can be initialized with different values.
Note
You can provide any number of constructors in a class, as long as each constructor has a distinct parameter list. This is an example of function overloading.
In this exercise, you will add a constructor to the CreditCardAccount class. The constructor takes two parameters specifying the account number and credit limit for the new account. The current balance is always initialized to 0 for each new account, so there is no need to supply a parameter for this data member.
Continue using the project from the previous exercise.
Open CreditCardAccount.h and declare a public constructor as follows:
ref class CreditCardAccount { public: CreditCardAccount(long number, double limit); // ... Other members, as before };Open CreditCardAccount.cpp and implement the constructor as follows:
CreditCardAccount::CreditCardAccount(long number, double limit)
{
    accountNumber = number;
    creditLimit = limit;
    currentBalance = 0.0;
}
Open CreditOrganizer.cpp and modify the statement that creates the CreditCardAccount object as follows:
myAccount = gcnew CreditCardAccount(12345, 2500);
This statement creates a new CreditCardAccount object and passes the values 12345 and 2500 into the CreditCardAccount constructor. The constructor uses these parameter values to initialize the accountNumber and creditLimit data members, respectively.
Build the application, fix any compiler errors, and then run the application.
The application now displays meaningful information for the account number, as demonstrated in the following screen shot:
Member initialization lists
There’s an alternative syntax for initializing data members in a constructor using a member initialization list, as follows:
CreditCardAccount::CreditCardAccount(long number, double limit)
     : accountNumber(number), creditLimit (limit), currentBalance(0.0)
{
}
The colon on the second line is followed by a comma-separated list of data members. For each data member, an initial value is provided in parentheses. Observe that the body of the constructor is now empty because we have nothing else to do—this is quite normal.
It is considered better practice to use a member initialization list rather than initializing members in the constructor body. There are also some situations in which you must use a member initialization list. You’ll see such an example in Chapter 8, when you delve into that subject.
Defining class-wide members
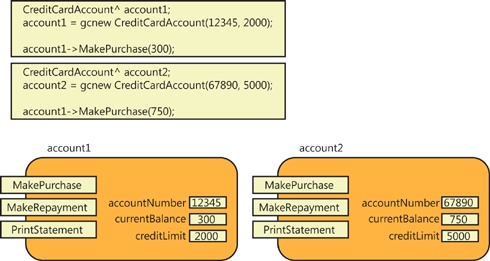
The data members and member functions currently defined in the CreditCardAccount class are instance members. Each CreditCardAccount instance has its own accountNumber, currentBalance, and creditLimit. Likewise, when you invoke member functions such as MakePurchase, MakeRepayment, and PrintStatement, you must specify which CreditCardAccount instance you’re using, as shown in the following figure.
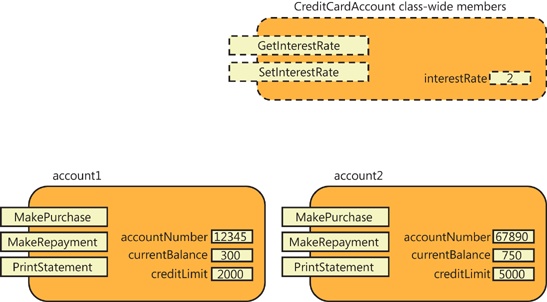
With C++, you can also define class-wide members that logically belong to the entire class rather than to a specific instance. For example, you can define a class-wide data member named interestRate that holds the interest rate for all accounts. Similarly, you can provide class-wide member functions called SetInterestRate and GetInterestRate to work with the interest rate, as shown in the following figure.
Let’s see how to define class-wide data members and member functions.
Defining class-wide data members
To define a class-wide data member, use the static keyword, as demonstrated in the following code:
ref class CreditCardAccount
{
private:
    static int numberOfAccounts = 0;           // Declare class-wide data member
    // ... Other members, as before
};
This declaration informs the compiler that there is a class-wide data member named numberOfAccounts and initializes it to zero.
Note
Like any other member of a class, if you do not initialize numberOfAccounts explicitly, the default initial value will be 0.
In this exercise, you will add a static numberOfAccounts data member to the CreditCardAccount class. You will increment this data member every time a new CreditCardAccount object is created.
Continue using the project from the previous exercise.
Open CreditCardAccount.h and declare the static numberOfAccounts data member as follows:
class CreditCardAccount
{
private:
    static int numberOfAccounts = 0;
    // ... Other members, as before
};
Open CreditCardAccount.cpp and modify the CreditCardAccount constructor so that it increments numberOfAccounts every time a new CreditCardAccount object is created.
CreditCardAccount::CreditCardAccount(long number, double limit)
{
    accountNumber = number;
    creditLimit = limit;
    currentBalance = 0.0;
    numberOfAccounts++;
    Console::Write("This is account number ");
    Console::WriteLine(numberOfAccounts);
}
Open CreditOrganizer.cpp and modify the main function so that it creates and uses several CreditCardAccount objects.
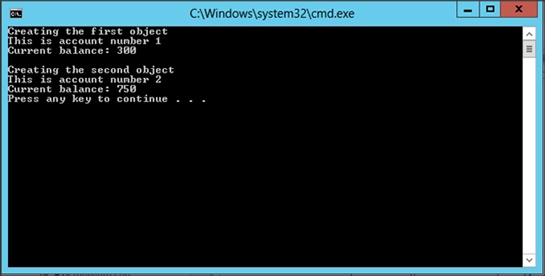
Console::WriteLine("Creating first object");
CreditCardAccount ^account1;
account1 = gcnew CreditCardAccount(12345, 2000);
account1->MakePurchase(300);
account1->PrintStatement();
Console::WriteLine("
Creating second object");
CreditCardAccount ^account2;
account2 = gcnew CreditCardAccount(67890, 5000);
account2->MakePurchase(750);
account2->PrintStatement();
Build the application, fix any compiler errors, and then run the application.
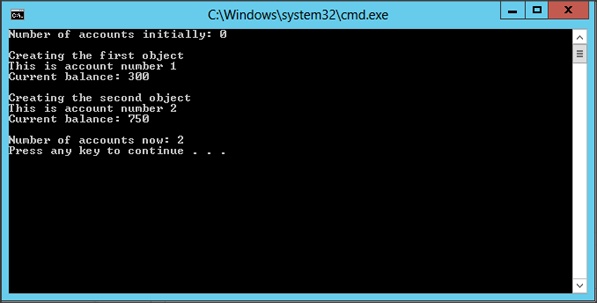
Every time a new CreditCardAccount object is created, the application increments numberOfAccounts and displays its latest value.
Defining class-wide member functions
It can be dangerous to make data members public; preferably, you want to give users access through member functions. To give access to a static data member, you can define a static member function. To define a class-wide member function, use the static keyword in the function declaration like this:
ref class CreditCardAccount
{
public:
    static int GetNumberOfAccounts();
    // ... Other members, as before
};
Implement the function in the source file to match the code snippet that follows. Keep in mind that you don’t use the static keyword on the implementation, but only on the declaration inside the class definition.
int CreditCardAccount::GetNumberOfAccounts()
{
    return numberOfAccounts;
}
Note
Because it is not associated with an instance but with the class as a whole, a static member function can only access static class members. For example, GetNumberOfAccounts can access numberOfAccounts, but it cannot access accountNumber, currentBalance, or creditLimit, because they are part of an instance.
To call a static member function, use the class name rather than a particular instance, as shown in this example:
int n = CreditCardAccount::GetNumberOfAccounts();
The use of the class name emphasizes the fact that GetNumberOfAccounts is a class-wide member function rather than an instance member function.
Note
You have seen the syntax ClassName::FunctionName before. Every time you display a message on the console, you use a statement such as Console::WriteLine(“Hello world”). This statement calls the static member function WriteLine on the Console class.
In this exercise, you will define a static GetNumberOfAccounts member function in the Credit CardAccount class. You will then call this function several times in main.
Continue using the project from the previous exercise.
Open CreditCardAccount.h and declare the GetNumberOfAccounts function as follows:
ref class CreditCardAccount
{
public:
    static int GetNumberOfAccounts();
    // ... Other members, as before
};
Open CreditCardAccount.cpp and implement the GetNumberOfAccounts function as follows:
int CreditCardAccount::GetNumberOfAccounts()
{
    return numberOfAccounts;
}
Open CreditOrganizer.cpp and modify the main function so that it calls GetNumberOfAccounts at various stages during execution.
int n = CreditCardAccount::GetNumberOfAccounts();
Console::Write("Number of accounts initially: ");
Console::WriteLine(n);
Console::WriteLine("
Creating first object");
CreditCardAccount ^account1;
account1 = gcnew CreditCardAccount(12345, 2000);
account1->MakePurchase(300);
account1->PrintStatement();
Console::WriteLine("
Creating second object");
CreditCardAccount ^account2;
account2 = gcnew CreditCardAccount(67890, 5000);
account2->MakePurchase(750);
account2->PrintStatement();
n = CreditCardAccount::GetNumberOfAccounts();
Console::Write("
Number of accounts now: ");
Console::WriteLine(n);
Build the application, fix any compiler errors, and then run the application.
The application displays the messages depicted in the following screen shot:
Class constructors
Suppose that you have a class-wide member but you cannot give it a value until run time. For example, you want to set the interest rate for the CreditCardAccount class to the current rate at the time the application starts.
Unlike standard C++, C++/CLI embodies the concept of a static constructor. An ordinary constructor is used to initialize instance members when an object is created; a static constructor is used to do once-only initialization for a class. You use them to do any setup that is needed before your class is used, and it is guaranteed to run before the class is used. This means that it is called before any objects of that type are created or before any static members of the class are used. It is as if the compiler makes sure that the static constructor is called the first time it meets a mention of the name CreditCardAccount.
A static constructor is like a normal constructor: it has the same name as the class, and no return type. In addition, static constructors have the static modifier and do not take any arguments:
ref class MyClass
{
public:
    static MyClass() { ... }
    ...
};
You can easily rewrite the CreditCardAccount class so that is uses a static constructor to initialize an interestRate member.
Continue using the project from the previous exercise.
Open CreditCardAccount.h and add a declaration for a private member called interestRate.
static double interestRate;
Add the declaration for a static constructor in the public section of the class declaration.
static CreditCardAccount();
Open CreditCardAccount.cpp and add the implementation of the static constructor. The call to WriteLine will help you see when the constructor is called.
static CreditCardAccount::CreditCardAccount()
{
    interestRate = 4.5;
    Console::WriteLine("Static constructor called");
}
Be aware that you need the static keyword here. You don’t normally use static outside the class declaration, but in this case it is needed so that the compiler can determine that this is the static constructor.
Build and run the application. Here is the code that you should have at the top of main:
int n = CreditCardAccount::GetNumberOfAccounts();
Console::Write("Number of account initially:");
Console::WriteLine(n);
Console::WriteLine("
Creating first object");
CreditCardAccount ^account1;
account1 = gcnew CreditCardAccount(12345, 2000);
The output from running the application appears as follows:
Static constructor called
Number of accounts initially: 0
You can see from this that the static constructor is called immediately before the first object is created.
Using constants in classes
You will often find that you need to represent constant values in your classes, members whose value cannot change as execution proceeds. These constants might be of two types:
Those which are constant and common to every object in the class. For example, a Car class might have a numberOfWheels member that is common to every Car instance and which has a fixed value of 4.
Those that are constant, but might be different for each object. For example, a BankAccount object has an account number; this is individual to each instance but cannot be changed after it has been set.
Using class-wide constants
A class-wide constant represents a value that is common to all instances of a class. For our Credit Account example, suppose that this kind of credit card account has a name, such as “Super Platinum Card.” This name will apply to all cards of the same type, so it logically belongs to the class rather than each instance. Let us further suppose that the name associated with the card class isn’t going to change. This makes it a candidate for a class-wide constant.
You can create a class-wide constant by using the literal keyword, as shown here:
literal String ^name = "Super Platinum Card";
A literal can have an initial value placed in the class definition. If you do this, it must be a value that the compiler can calculate. In other words, it can’t depend on something that will only be known at run time.
Let’s see how to add the name to the CreditAccount class.
Continue using the project from the previous exercise.
Open CreditAccount.h and add the declaration of a literal to the public section of the class declaration.
literal String ^name = "Super Platinum Card";
Because name is a constant, we can make it public because there is no danger that anyone can modify it. You can declare literals of built-in types, ref types, and value types.
You can access the literal through the class name. Add the following code to display the name to the start of main, before you create any CreditCardAccount objects:
Console::Write("Card name is ");
Console::WriteLine(CreditCardAccount::name);
Because the name belongs to the class, you do not have to have any instances in existence in order to use it.
Build and run the application to see the value of the name printed out.
Using instance constants
You can use the initonly keyword to mark a data member as per-instance constant. A data member marked as initonly can have its value set in the constructor for the class but cannot be modified after that. The following short exercise shows you how to use initonly in the CreditCardAccount class.
Open CreditAccount.h and add initonly to the declaration of accountNumber.
initonly long accountNumber;
Build the application.
It should run exactly the same as before because you are setting the value for accountNumber in the constructor, as required by initonly.
Open CreditAccount.cpp and try to assign a new value to accountNumber in one of the other member functions, such as SetCreditLimit.
Notice that accountNumber is underlined in red, and if you hover over the variable name, a ToolTip appears, informing you that the variable cannot be modified here.
Remove this line of code before continuing!
Defining object relationships
For the remainder of this chapter, you will see how to define relationships between objects in a C++/CLI application. Applications typically contain many objects, and these objects communicate with one another to achieve the overall functionality needed in the application.
To illustrate object relationships, you will add a new class named LoyaltyScheme to your credit card application. With the LoyaltyScheme class, credit card owners can collect bonus points when they use their credit card. These points act as a reward for the customer’s loyal use of the credit card.
When a CreditCardAccount object is first created, it doesn’t have a LoyaltyScheme object. The LoyaltyScheme object is created when CreditCardAccount reaches 50 percent of its credit limit. Subsequently, every $10 spent using the credit card will add one bonus point to the LoyaltyScheme object, as long as the account stays above the 50 percent mark.
To achieve this functionality, you will complete the following exercises:
Define the LoyaltyScheme class
Implement the LoyaltyScheme class
Create and use LoyaltyScheme objects
Test the application
Defining the LoyaltyScheme Class
In this exercise, you will define the LoyaltyScheme class in a new header file named LoyaltyScheme.h.
Continue using the project from the previous exercise.
On the Project menu, click Add New Item.
In the Add New Item dialog box, select the template Header File (.h). In the Name box, type LoyaltyScheme.h, and then click Add.
Type the following code in the header file to define the LoyaltyScheme class:
ref class LoyaltyScheme
{
public:
    LoyaltyScheme();               // Constructor
    void EarnPointsOnAmount(double amountSpent);   // Earn one point per $10 spent
    void RedeemPoints(int points); // Redeem points
    int GetPoints();               // Return the value of totalPoints
private:
    int totalPoints;               // Total points earned so far
};
Build the application and fix any compiler errors.
Implementing the LoyaltyScheme class
In this exercise, you will implement the LoyaltyScheme class in a new source file named LoyaltyScheme.cpp.
Continue using the project from the previous exercise.
On the Project menu, click Add New Item.
In the Add New Item dialog box, select the template C++ File (.cpp). In the Name box, type LoyaltyScheme.cpp, and then click Add.
Visual Studio creates an empty source file.
Add two #include statements at the beginning of the file, as shown here:
#include "stdafx.h"
#include "LoyaltyScheme.h"
Add the following code to expose the System namespace:
#using <mscorlib.dll>
using namespace System;
Implement the LoyaltyScheme constructor as follows:
LoyaltyScheme::LoyaltyScheme()
{
    Console::WriteLine("Congratulations, you now qualify for"
                       " bonus points");
    totalPoints = 0;
}
Implement the EarnPointsOnAmount member function as follows:
void LoyaltyScheme::EarnPointsOnAmount(double amountSpent)
{
    int points = (int)(amountSpent/10);
    totalPoints += points;
    Console::Write("New bonus points earned: ");
    Console::WriteLine(points);
}
The syntax (int)(amountSpent/10) divides the amount spent by 10 and converts the value to an int.
Implement the RedeemPoints member function as follows:
void LoyaltyScheme::RedeemPoints(int points)
{
    if (points <= totalPoints)
    {
        totalPoints -= points;
    }
    else
    {
        totalPoints = 0;
    }
}
This function makes it possible for the user to redeem some or all of the accrued bonus points.
Implement the GetPoints member function as follows:
int LoyaltyScheme::GetPoints()
{
    return totalPoints;
}
Build the application and fix any compiler errors.
Creating and using LoyaltyScheme objects
In this exercise, you will extend the CreditCardAccount class to support the loyalty scheme functionality.
Continue using the project from the previous exercise.
Open CreditCardAccount.h. At the beginning of the file, add an #include directive as follows:
#include "LoyaltyScheme.h"
This makes it possible for you to use the LoyaltyScheme class in this header file.
Add a private data member to the CreditCardAccount class as follows:
LoyaltyScheme ^scheme; // Handle to a LoyaltyScheme object
This handle represents an association between a CreditCardAccount object and a LoyaltyScheme object.
Add a public member function to the CreditCardAccount class as follows:
void RedeemLoyaltyPoints();
This function acts as a wrapper to the RedeemPoints function in the LoyaltyScheme class. When you want to redeem loyalty points, you call RedeemLoyaltyPoints on your CreditCard Account object. This function calls RedeemPoints on the underlying LoyaltyScheme object to do the work.
Open CreditCardAccount.cpp and find the CreditCardAccount constructor. Add the following statement in the constructor body:
scheme = nullptr;
This statement sets the initial value of the scheme handle to nullptr. This is a special value for a handle, indicating that the handle doesn’t yet point to an object. In our application, the scheme object won’t be created until the credit card balance reaches 50 percent of the credit limit.
Modify the MakePurchase function to match the code that follows to collect bonus points when the credit card balance reaches 50 percent of the credit limit:
bool CreditCardAccount::MakePurchase(double amount)
{
    if (currentBalance + amount > creditLimit)
    {
        return false;
    }
    else
    {
        currentBalance += amount;

        // If current balance is 50% (or more) of credit limit...
        if (currentBalance >= creditLimit / 2)
        {
            // If LoyaltyScheme object doesn't exist yet...
            if (scheme == nullptr)
            {
                // Create it
                scheme = gcnew LoyaltyScheme();
            }
            else
            {
                // LoyaltyScheme already exists,
                // so accrue bonus points
                scheme->EarnPointsOnAmount(amount);
            }
        }
        return true;
    }
}
Implement the RedeemLoyaltyPoints function as shown in the code that follows. Redeem LoyaltyPoints is a new member function by which the user can redeem some or all of the loyalty points in the associated LoyaltyScheme object.
void CreditCardAccount::RedeemLoyaltyPoints() { // If the LoyaltyScheme object doesn't exist yet... if (scheme == nullptr) { // Display an error message Console::WriteLine("Sorry, you do not have a " "loyalty scheme yet"); } else { // Tell the user how many points are currently available Console::Write("Points available: "); Console::Write( scheme->GetPoints() ); Console::Write(". How many points do you want " " to redeem? "); // Ask the user how many points they want to redeem String ^input = Console::ReadLine(); int points = Convert::ToInt32(input); // Redeem the points scheme->RedeemPoints(points); // Tell the user how many points are left Console::Write("Points remaining: "); Console::WriteLine( scheme->GetPoints() ); } }Build the application and fix any compiler errors.
Testing the application
In this exercise, you will modify the code in CreditOrganizer.cpp to test the loyalty scheme functionality.
Continue using the project from the previous exercise.
Open CreditOrganizer.cpp and modify the main function as follows:
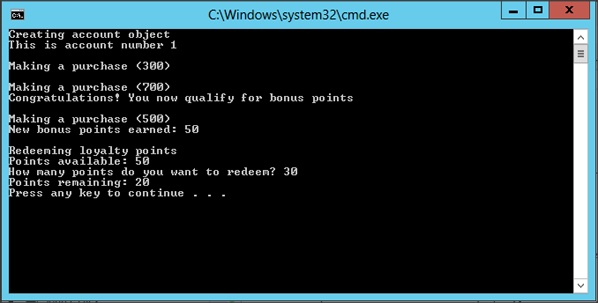
Console::WriteLine("Creating account object");
CreditCardAccount ^account1;
account1 = gcnew CreditCardAccount(12345, 2000);
Console::WriteLine("
Making a purchase (300)");
account1->MakePurchase(300);
Console::WriteLine("
Making a purchase (700)");
account1->MakePurchase(700);
Console::WriteLine("
Making a purchase (500)");
account1->MakePurchase(500);
Console::WriteLine("
Redeeming points");
account1->RedeemLoyaltyPoints();
Build the application and fix any compiler errors.
Run the application.
The application creates a CreditCardAccount object and makes various purchases. When the credit card balance reaches $1,000, a LoyaltyScheme object is created. Subsequent purchases collect a loyalty point for every $10 spent.
When you try to redeem loyalty points, the application informs you of how many points are available and asks how many you want to redeem. Type a value such as 36 and press Enter. The application displays how many points are left.
The following screen shot shows the messages displayed on the console during the application.