Chapter 14. Delegates and Events
After completing this chapter, you will be able to:
Understand what delegates are.
Create and use delegates.
Explain what events are.
Create and use events.
Delegates and events are extremely powerful and important constructs in the Microsoft .NET Framework. Events in particular are used widely in GUI applications as a means of communicating between components, but both delegates and events can be used to good effect in non-GUI code.
What are delegates?
The function pointer mechanism in C and C++ has been used by programmers for many years, and it’s a very useful way of implementing mechanisms such as event handlers. Unfortunately, function pointers are a C++ language feature, so they’re of no use in the .NET environment, where features need to be accessible from many languages. If you’re interested in knowing more about function pointers and how they work, see the sidebar that follows.
Delegates are the .NET equivalent of function pointers, and they can be created and used from any .NET language. They can be used by themselves, and they also form the basis for the .NET event mechanism discussed in the second part of this chapter.
What is the purpose of delegates?
A delegate is a class whose purpose it is to invoke one or more methods that have a particular signature. It is basically an indirect way of executing a function by delegating to an intermediate object. Here’s a simple example to show when you might want to use a delegate.
Imagine that I want to be able to perform operations on numbers by passing a number into a function and getting a transformed value back, as demonstrated in the following:
double d = 3.0;
double result = Square(d);
result = Cube(d);
result = SquareRoot(d);
result = TenToThePowerOf(d);
In each case, I’m calling a function that has the same signature: one that takes a double and returns a double as its result.
With delegates, I can define a mechanism by which I can call any of those methods because they all have the same signature. Not only can I call any of the four methods above, but I can also define other methods and call them through the delegate—provided that they are also functions that take a double and return one. This makes it possible for one class or component to define a delegate, and for other classes to attach functions to the delegate and use it. You’ll see examples of this use of delegates later in the chapter when we cover events.
In this case, I want to use the delegate to call one method at a time, but it’s possible to attach more than one function to a delegate. All the functions are called in order when the delegate is invoked. The .NET Framework defines the System::Delegate class as the base for delegates that call a single method, and System::MulticastDelegate as the base for delegates that can call more than one method. All delegates in C++/CLI are multicast delegates.
Defining delegates
This exercise uses the numerical operations example from the previous section to show you how to create and use a simple delegate in C++/CLI code.
Start Microsoft Visual Studio 2012 and create a new CLR Console Application project named Delegate.
Open the Delegate.cpp source file and add the definition of a delegate to the top of the file, immediately after the using namespace System; line.
delegate double NumericOp(double);
The delegate keyword is used to define a delegate. It might look as though this is a function prototype for a function named NumericOp, but it’s actually defining a delegate type that inherits from System::MulticastDelegate. This delegate type, named NumericOp, can be bound to any function that takes one double as an argument and returns a double.
Implementing delegates
Now that you have defined a delegate, you can write code to use it to call functions. One of the rules for using delegates is that you can only use a delegate to call functions that are members of C++/CLI classes; you can’t use a delegate to call a global function or a function that’s a member of an unmanaged C++ class.
Calling static member functions by using delegates
Let’s start by looking at the simplest case: calling static member functions by using a delegate.
Continue with the project from the previous exercise. All the functions we want to call need to be static members of a class, so add the following class to your source code file, just above the main function:
ref class Ops
{
public:
    static double Square(double d)
    {
        return d*d;
    }
};
This managed class contains one public static method, which simply takes a number and returns its square.
Create a delegate in the main function of the application, as shown here:
// Declare a delegate
NumericOp ^op = gcnew NumericOp(&Ops::Square);
When you declared the delegate, you created a new type named NumericOp, so you can now create a NumericOp object. The constructor takes one argument: this is the address of the function that is to be associated with the delegate, so you use the & operator to specify the address of Ops::square.
The object pointed to by op is now set up so that it will call the square function when it is invoked, and it will take exactly the same arguments (and return the same type) as Ops::square.
Every delegate has an Invoke method that you can use to call the function that has been bound to the delegate. Invoke will take the same arguments and return the same type as the function being called. Add the following lines to use op to call the square function:
// Call the function through the delegate
double result = op->Invoke(3.0);

Console::WriteLine("Result is {0}", result);
Build and run the application.
You can now easily create another static member, create a delegate, and call the function. Test this out by adding to the Ops class a second public static member called Cube.
static double Cube(double d)
{
    return d*d*d;
}
Create another delegate in the same way as the first; however, this time, pass it the address of the Cube function in the constructor.
// Create a second delegate and use it to call cube
op = gcnew NumericOp(&Ops::Cube);
result = op(3.0);

Console::WriteLine("Result of Cube() is {0}", result);
There are two things that you might notice about this code. The first is that you have reused the op reference to refer to the new delegate object. This means that the original delegate that you used to call Square is no longer referenced; thus, is can be garbage-collected.
The second is that there is no explicit call to Invoke. To mirror how delegates work in C# (and how function pointers work in unmanaged C++), you can actually omit the Invoke keyword, treating the delegate as if it were a function call itself.
Build and run the application and check that it runs as you expect.
Calling non-static member functions by using delegates
You can also call non-static member functions of classes by using delegates. By definition, a non-static member function must be called on an object, so you need to specify to the delegate the function it’s going to call and the object it’s going to use. You do so in the delegate’s constructor, as illustrated here:
// Declare a delegate bound to a non-static member
MyDelegate ^pDel = gcnew MyDelegate(myObject, &MyClass::MyFunction);
The constructor specifies the address of an object, myObject, and a member function belonging to the class to which myObject belongs. Invoking this delegate is equivalent to directly calling myObject->MyFunction.
Using multicast delegates
We’ve seen how it’s possible to use a delegate to call a single function, but it’s also possible for a delegate to call more than one function with a single call to Invoke. A delegate that does so is called a multicast delegate and is derived from the System::MulticastDelegate class.
All delegate objects have an invocation list that holds the functions to be called. The invocation list for a normal delegate has one member. You can manipulate the invocation lists for multicast delegates by using the Combine and Remove methods, although this is seldom done in practice.
If you look at the documentation for the Combine method, you’ll see that it takes two or more Delegate objects as its arguments. You don’t build up a multicast delegate by specifying more functions to add to its invocation list. Instead, a multicast delegate is built up by combining other delegates.
The following exercise shows you how to create and use a multicast delegate.
Create a new CLR Console Application project named Multicast.
Open the Multicast.cpp source file and add the definition of a delegate to the top of the file, immediately after the using namespace System; line.
delegate void NotifyDelegate(int);
You can bind this delegate, named NotifyDelegate, to any function that takes one int as an argument and doesn’t return anything.
You’re going to call two functions through the multicast delegate. Because all functions called by delegates have to be members of a managed class, define two classes at the start of your project, each of which contains a static member function.
ref class Client1
{
public:
    static void NotifyFunction1(int n)
    {
        Console::WriteLine("Client1: got value {0}", n);
    }
};

ref class Client2
{
public:
    static void NotifyFunction2(int n)
    {
        Console::WriteLine("Client2: got value {0}", n);
    }
};
These two classes are almost identical, both defining a single static member function that has the signature required by the delegate.
You want to call the two static member functions through one delegate, but you can’t create a delegate to bind to two functions directly. Instead, you need to create two normal delegates (as you did in the previous exercise) and combine them into a multicast delegate. So, define two delegates in the main function, each of which binds to one of the static methods.
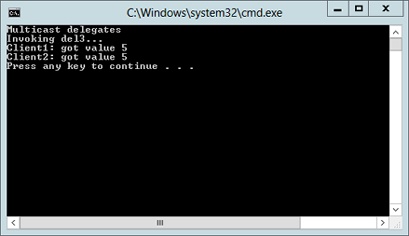
Console::WriteLine("Multicast Delegates");

// Create two delegates
NotifyDelegate ^del1 = gcnew NotifyDelegate(&Client1::NotifyFunction1);
NotifyDelegate ^del2 = gcnew NotifyDelegate(&Client2::NotifyFunction2);
At this stage, you could invoke both of the delegates, just as you did in the previous exercise.
Build a multicast delegate from del1 and del2 by using the += operator, as shown in the following:
// Create a third delegate from the first two
NotifyDelegate ^del3;
del3 += del1;
del3 += del2;
You can now invoke the multicast delegate as normal.
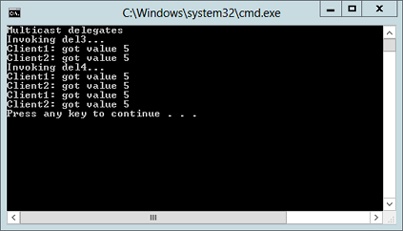
// Invoke the multicast delegate
Console::WriteLine("Invoking del3");
del3(5);
Remember that you don’t have to call Invoke explicitly. When you build and run the application, you should see two lines of output, as shown in the following screen shot:
Note that the functions are called in the order in which the delegates are combined, so if you want to change the order, you’ll need to change the way you create the multicast.
You can use this delegate as the basis for making up another one.
// Create a second multicast delegate and invoke it
NotifyDelegate ^del4 = del3 + del3;
Console::WriteLine("Invoking del4");
del4(5);
In this case, you’re combining the invocation list of del3 twice, which results in the output shown in the following screen shot when you invoke it. Notice how you can use the + operator to compose delegates at construction time.
As the final part of this exercise, you can use the –= operator to remove an item from a delegate’s invocation list.
// Remove an item
del3 -= del2;
Console::WriteLine("Invoking del3");
del3(5);
You specify the handle of the delegate that you want to remove on the right side of the –= operator. If the delegate to be removed exists in the invocation list of the first delegate, it will be removed. In this example, you have removed del2 from del3; when you invoke del3, only del1 is executed.
Delegates that return a result
You can, of course, use a delegate to call a function that returns a result. Here is an example:
ref class JMath
{
public:
    static double Square(double d) { return d*d; }
};

// Delegate to call a function that returns a double
delegate double MathOp(double d);

// Bind a delegate to Math::square
MathOp ^m = gcnew MathOp(&JMath::Square);

// Invoke the delegate
double result = m(3.3);
What happens if you create a multicast delegate that calls several such functions? Which result will be returned? It is most normal to use functions that don’t return a value with multicast delegates, but there is nothing to stop you from calling functions that do return a value. Usually, the result of the last function executed will be returned, although this is implementation dependent. If you want to be sure of retrieving a particular value (or getting values from intermediate steps), you might want to walk over the list of delegates, which you can do by using the GetInvocationList function within a for each loop, as shown here:
for each (MathOp ^m in myMultiDelegate->GetInvocationList())
{
    double val = m(...);
}
What are events?
Most, if not all, GUI platforms support the idea of events, and events are very heavily used in GUI programming. As an example, consider a button. Buttons don’t exist on their own; they are used as part of a user interface and are contained by some other item. This item is usually a form, but it could also be some other control, such as a toolbar.
The whole point of having a button on a form is so that the user can click it to signal his intent to the application and convey instructions. For example, “the user clicked the OK button, so dismiss the dialog box” or “the user clicked the Print button on the toolbar, so print the document.”
Events provide a formalized, standard mechanism by which event sources (such as a button) hook up with event receivers (such as a form). Events in the .NET Framework implement a publish-and-subscribe mechanism, where event sources make public the events that they will raise—they publish them—and event receivers inform the source as to which events they’re interested in—they subscribe to events. Event receivers can also unsubscribe when they no longer want to receive a particular event.
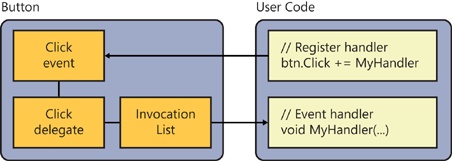
Events in the .NET Framework are based on delegates, and as is illustrated in the diagram that follows, it isn’t too hard to see how this works. An event source declares a delegate for each event that it wants to generate, such as Click, DoubleClick, and so on. An event receiver then defines suitable methods and passes them to the event source, which adds them to its delegates. When the time comes to fire the event, the event source calls Invoke on the delegate, thus calling the requisite functions in the receivers.
Implementing an event source class
The actual event mechanism simplifies the syntax so that you don’t have to deal with delegates directly, and it’s designed to fit in with the event mechanism that already exists in Microsoft Visual Basic. The following exercise takes you through creating an event source class and event receiver classes that register themselves with the source and use the events when they’re fired.
Create a new CLR Console Application project named Event.
Event sources and receivers use delegates, so define a delegate for each of the events raised by the source. In this example, two events will be used, so open the Event.cpp source file and define the following two delegates immediately after the using namespace System; line:
// Delegates
delegate void FirstEventHandler(String^);
delegate void SecondEventHandler(String^);
The delegates define the signatures of the methods that event receivers must implement to handle the events, so they’re often given names that end with Handler. Each of these events will simply pass a string as the event data, but you can make the data passed as complex as you want.
Add the implementation of the event source class to the source file.
// Event source class
ref class EvtSrc
{
public:
    // Declare the events
    event FirstEventHandler ^OnFirstEvent;
    event SecondEventHandler ^OnSecondEvent;

    // Event raising functions
    void RaiseOne(String ^msg)
    {
        OnFirstEvent(msg);
    }

    void RaiseTwo(String ^msg)
    {
        OnSecondEvent(msg);
    }
};
The first thing to note is the use of the event keyword to declare two events. You need one event declaration for each event that you want to raise, and its type is a handle to the delegate associated with the event. So, in the case of the first event object, the type is FirstEventHandler to match the FirstEventHandler delegate. Using the event keyword causes the compiler to generate a lot of delegate handling code for you; if you’re interested in exactly what’s going on, see the sidebar that follows.
You can then use the event objects in the EvtSrc class to raise the events by using them as if they were function calls and passing the appropriate argument.
Implementing an event receiver
You now have a class that can be used to fire events, so the next thing you need is a class that will listen for events and act upon them when they’ve been generated.
Continue with the project from the previous exercise and add a new class to the project named EvtRcv.
// Event receiver class
ref class EvtRcv
{
    EvtSrc ^theSource;
public:
};
The receiver has to know the event sources it’s working with to be able to subscribe and unsubscribe, so we add an EvtSrc member to the class to represent the one source with which you’ll be working.
Add a constructor to the class that takes a handle to an EvtSrc object and checks that it isn’t null. If the pointer is valid, save it away in the EvtSrc member.
EvtRcv(EvtSrc ^src)
{
    if (src == nullptr)
        throw gcnew ArgumentNullException("Must have event source");
    // Save the source
    theSource = src;
}
Define the member handler functions in EvtRcv that EvtSrc is going to call. As you know from our discussion of delegates, the signatures of these methods must match the signatures of the delegates used to define the events, as shown here:
// Handler functions
void FirstEvent(String ^msg)
{
    Console::WriteLine("EvtRcv: event one, message was {0}", msg);
}

void SecondEvent(String ^msg)
{
    Console::WriteLine("EvtRcv: event two, message was {0}", msg);
}
FirstEvent is the handler for the FirstEventHandler delegate, and SecondEvent is the handler for the SecondEventHandler delegate. Each of them simply prints out the string that’s been passed to them.
After you have the handlers defined, you can subscribe to the event source. Edit the constructor for the EvtRcv class so that it looks like the following:
EvtRcv(EvtSrc ^src)
{
    if (src == nullptr)
        throw gcnew ArgumentNullException("Must have event source");
    // Save the source
    theSource = src;

    // Add our handlers
    theSource->OnFirstEvent +=
         gcnew FirstEventHandler(this, &EvtRcv::FirstEvent);
    theSource->OnSecondEvent +=
         gcnew SecondEventHandler(this, &EvtRcv::SecondEvent);
}
You subscribe to an event by using the += operator. In the code, you’re creating two new delegate objects, which will call back to the FirstEvent and SecondEvent handlers on the current object. This is exactly the same syntax you’d use if you were manually creating a delegate. The difference is in the += operator, which combines the newly created delegate with the event source’s delegate.
As you read in the preceding sidebar, += calls the compiler-generated add_OnFirstEvent method, which in turn calls Delegate::Combine.
Although you’ve subscribed to all the events automatically in the constructor, you could also use member functions to subscribe to individual events as required.
A matching –= operator lets you unsubscribe from events. Add the following member function to EvtRcv, which will unsubscribe from the first event:
// Remove a handler
void RemoveHandler()
{
    // Remove the handler for the first event
    theSource->OnFirstEvent -= gcnew FirstEventHandler(this,
       &EvtRcv::FirstEvent);
}
The syntax for using the –= operator to unsubscribe is exactly the same as that for the += operator to subscribe.
Build the application to ensure that there are no errors.
Hooking it all together
Now that you’ve written the event source and event receiver classes, you can write some code to test them out.
Edit the main function to create event source and receiver objects.
int main(array<String^> ^args)
{
    Console::WriteLine("Event Example");

    // Create a source
    EvtSrc ^src = gcnew EvtSrc();

    // Create a receiver, and bind it to the source
    EvtRcv ^rcv = gcnew EvtRcv(src);

    return 0;
}
The EvtSrc constructor takes no arguments, whereas the EvtRcv constructor must be passed a valid EvtSrc pointer. At this point, the receiver is set up, listening for events to be fired from the source.
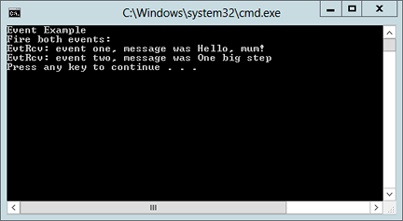
int main(array<String^> ^args)
{
    Console::WriteLine("Event Example");

    // Create a source
    EvtSrc ^src = gcnew EvtSrc();

    // Create a receiver, and bind it to the source
    EvtRcv ^rcv = gcnew EvtRcv(src);

    // Fire events
    Console::WriteLine("Fire both events:");
    src->RaiseOne("Hello, mum!");
    src->RaiseTwo("One big step");

    return 0;
}
Calls to the source’s RaiseOne and RaiseTwo functions tell it to fire both events. When you run this code, you should see output similar to the following screen shot:
The receiver has had both handlers called, so it has printed both of the messages associated with the events.
Insert some code to call the RemoveHandler function of the receiver and try firing both events again.
// Remove the handler for event one
rcv->RemoveHandler();

// Fire events again
Console::WriteLine("Fire both events:");
src->RaiseOne("Hello, mum!");
src->RaiseTwo("One big step");
This time you should see only the second message printed because the receiver is no longer handling the first event.
Standard events and System::EventHandler
You can base an event on a delegate with any signature, but the standard .NET event model requires that delegates conform to a particular standard. All standard event handler functions have the following form:
void MyHandler(Object src, EventArgs ^args)
Handler functions do not have a return value and take two arguments. The first is a reference to the object that raised the event, and the second is a reference to an object of type EventArgs or a subclass. This second argument is used to pass extra information about the event. For example, in the case of a mouse-click event, it will contain the position of the cursor and details of which mouse button was clicked and whether any modifier keys were used. Because all system events follow this pattern, it is good practice to make your events and their corresponding delegates use this model, as well.
All the delegates used in the standard event model will look the same, having the same two arguments and void return type. For this reason, you don’t need to keep defining your own delegate types; instead, you can make use of the System::EventHandler delegate, which is designed to call functions that match the standard event handler signature.
The following exercise shows you how to use the System::EventHandler delegate. You will define a Counter class that contains a single integer value, which you can increment by calling the increment function. When you construct a Counter, you can specify a limit, and an event will be fired when the limit is reached.
Create a new CLR Console Application named EventHandler.
Add a new class called Counter to the source file. This class should have two data members representing the current count and the limit, and they should be initialized in the constructor.
ref class Counter
{
    int count;
    int limit;
public:

    Counter(int lim)
    {
        count = 0;
        limit = lim;
    }
};
Add the declaration of a standard EventHandler event to the class, placing it in the public section.
event EventHandler ^LimitReached;
Implement the Increment function, arranging for it to fire the LimitReached event at the appropriate point.
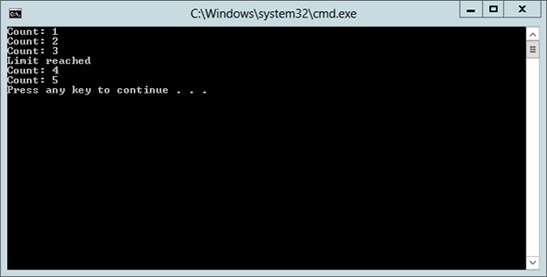
void Increment()
{
    Console::WriteLine("Count: {0}", ++count);
    if (count == limit)
        LimitReached(this, gcnew EventArgs());
}
Observe how the arguments to the event are a reference to the current object, and an EventArgs object. This default EventArgs object doesn’t pass any extra information to the client but is necessary to conform to the delegate signature.
You now need some code that will be called when the event is fired, so add an Observer class to the source.
ref class Observer
{
public:
    static void CallMe(Object ^src, EventArgs ^args)
    {
        Console::WriteLine("Limit reached");
    }
};
The static CallMe method has the right signature for an event handler; thus, it can be bound to the LimitReached event.
Implement the main function. Start by creating a Counter object with an appropriate limit set and then bind the CallMe method to the Counter’s LimitReached event. Finally, increment the Counter enough times that the limit is reached.
int main(array<System::String ^> ^args)
{
    // Define a counter with a limit of 3
    Counter count(3);

    count.LimitReached += gcnew EventHandler(&Observer::CallMe);

    for (int i=0; i<5; i++)
        count.Increment();

    return 0;
}
When you build and run the application, you should see the event handler being called when the limit is reached, as shown in the following screen shot: