
Chapter 16. Working with Files
After completing this chapter, you will be able to:
You’ve already used the Console class to perform I/O to and from the console. This chapter introduces you to the System::IO namespace, which contains the classes, structures, and enumerations that implement the Microsoft .NET I/O model.
Note
If you know anything about the Java I/O mechanism as implemented in the java.io package, you’ll find it easy to start working with .NET I/O because the two have many similarities.
The System::IO namespace
The System::IO namespace contains all the classes that are used for binary and text I/O as well as classes that help you to work with files and directories. The following table lists the main classes in the namespace:
The I/O-oriented classes in System::IO can be divided into the following three groups:
This chapter focuses on the latter two groups.
Implementing text I/O by using readers and writers
TextReader and TextWriter are the abstract base classes for a group of classes that are used to read and write characters. There are four classes in System::IO that derive from these two bases—StreamReader, StreamWriter, StringReader, and StringWriter, as well as with several other much more specialized writer classes in other namespaces.
Using TextWriter
The TextWriter class has a number of useful methods, as summarized in the following table:
Method | Description |
Closes the writer and releases any resources that it’s using | |
Releases all unmanaged resources used by the writer and optionally releases managed resources, as well | |
Causes all buffered data to be written to the underlying device | |
Causes all buffered data to be written asynchronously to the underlying device | |
Creates a thread-safe wrapper for the writer | |
Write | Writes text without a newline |
Writes text without a newline asynchronously | |
Writes text with a newline | |
Writes text with a newline asynchronously |
As you might guess from the inclusion of the Write and WriteLine functions in the table, the Console class uses a TextWriter object to perform output.
To show you how the I/O classes work together, let’s look at how you use the StreamWriter class. Before we start, though, it’s important that you understand how the .NET Framework implements I/O. Rather than create a number of classes that each perform an end-to-end I/O task—such as “write a string to a file” or “read a number from the keyboard”—.NET implements a number of smaller special-purpose classes that you can plug together to achieve the effect you want. This means that .NET doesn’t have a “write characters to a file” class. Instead, it has a “write characters to a byte stream” class and a “read bytes from a stream and write them to a file” class. If you plug the output from the first class into the input of the second, you end up writing characters to a file.
This model is flexible because you can take binary or character data, convert it into bytes, and then pass the bytes to any of several classes to output them to files, memory, or a string. Data is transferred between the classes as streams of bytes, a method that provides a flexible base on which to build. The basic functionality for handling byte streams is provided by the Stream class, and you can build your own specialized I/O classes on top of Stream, if you need to.
With that information in mind, the exercise that follows shows you how to write character data to a text file by using a TextWriter. Using the plug-and-play model for I/O that the .NET Framework uses, you need to create the following two objects:
A FileStream object that takes bytes as input and writes them to a file
A StreamWriter object that takes text and converts it to a byte stream
So, let’s get started.
Start Microsoft Visual Studio 2012 and create a new CLR Console Application project named CppWriter.
The TextWriter and file I/O classes are part of System::IO, so include a using declaration at the beginning of the application, as shown here:
using namespace System::IO;
In the main function, create a FileStream object to write to a file.
// Create a FileStream
try
{
    FileStream ^fs = gcnew FileStream("output.txt", System::IO::FileMode::Create);
}
catch(System::Exception ^pe)
{
    Console::WriteLine(pe->ToString());
}
The FileStream constructor takes a file name and a mode. In this case, the file is going to be created if it doesn’t exist or overwritten if it does. I’ve used output.txt as the file name, but you can specify any path and file name you like for the new file.
Note
See the section The FileStream class later in this chapter for more details on how to construct FileStream objects.
The code is enclosed in a try block because a lot of things could go wrong when trying to open this file.
After you have initialized the FileStream object, create a StreamWriter that uses the FileStream, as demonstrated here:
try
{
    // Create a FileStream
    FileStream ^fs = gcnew FileStream("output.txt", FileMode::Create);

    // Create a StreamWriter
    StreamWriter ^sw = gcnew StreamWriter(fs);
}
catch(System::Exception ^pe)
{
    Console::WriteLine(pe->ToString());
}
The StreamWriter constructor takes a handle to a Stream object as its one argument.
You can now use the Write and WriteLine functions to output text to the file. Place the following lines inside the try block:
// Write some text
sw->WriteLine("First line");
sw->WriteLine("Second line");
sw->WriteLine("Third line");
Ensure that all output is flushed to the file and close the stream.
// Close the file
sw->Flush();
sw->Close();
Note
WriteLine performs buffered output, which means that it doesn’t necessarily write lines to the file every time you call the function. Instead, it maintains an internal buffer and writes the buffer to hard disk as necessary. One hard disk access per buffer is more efficient than writing individual lines, but you need to call Flush at the end of the code to ensure that output currently in the buffer is transferred to the file.
Build and run the application.
A text file named output.txt should appear in the CppWriter project directory. The file contains the three lines of text written by the CppWriter application.
The FileStream class
FileStream is used to pass bytes from some other class—such as StreamWriter—to a file. There are several overloaded constructors to this class with which you can specify combinations of the following:
The file name
The file mode, which determines how the file is going to be opened
The type of access required
The sharing options
The file mode is represented by members of the FileMode enumeration, which are described in the following table:
Member | Description |
Append | Opens an existing file or creates a new file and appends text to the end. |
Create | Creates a new file or opens an existing one and overwrites it. |
CreateNew | Creates a new file, throwing an exception if the file already exists. |
Open | Opens an existing file. |
OpenOrCreate | Opens an existing file or creates a new one. |
Truncate | Opens an existing file and truncates its size to 0 bytes. An exception will be thrown if the file doesn’t exist. |
The access is represented by members of the FileAccess enumeration, as listed in the following table:
Member | Description |
Read | Represents read access |
ReadWrite | Represents read/write access |
Write | Represents write access |
Similarly, the sharing access is specified by the FileShare enumeration, as presented in the following table:
Member | Description |
None | No sharing |
Read | Represents shared read access |
ReadWrite | Represents shared read/write access |
Write | Represents shared write access |
Delete |
The following example shows how to construct a FileStream by using these permissions:
FileStream ^fs2 = gcnew FileStream(
    "foo.txt",              // the filename
    FileMode::Create,       // create or overwrite
    FileAccess::ReadWrite,  // request read/write access
FileShare::Read); // allow shared readingUsing TextReader
The structure and operation of the TextReader class parallels that of TextWriter. The following table lists the methods provided for you by TextReader:
Method | Description |
Closes the reader and releases any resources that it’s using | |
Releases all unmanaged resources used by the reader and, optionally, releases managed resources, as well | |
Returns the next character from the input stream without removing it | |
Read | Reads one or more characters from the input stream |
Reads one or more characters from the input stream asynchronously | |
Reads a block of characters | |
Reads a block of characters asynchronously | |
Reads a line | |
ReadLine | Reads a line asynchronously |
Reads to the end of the input stream | |
Reads asynchronously to the end of the stream | |
Provides a thread-safe wrapper for TextReader objects |
As with TextWriter, you use TextReader by plugging a reader into an object that is going to act as a source of bytes. There are several of these, including the one you’ve already seen, FileStream.
The exercise that follows shows you how to write an application similar in functionality to the Linux less command, which reads a file and echoes its contents to the screen, a few lines at a time. After it has displayed some lines, the user is presented with the choice of pressing the Enter key to continue or pressing Q to quit.
Create a new CLR Console Application project named CppReader.
Include a using declaration for System::IO at the top of the project.
using namespace System::IO;
Add code to main to ensure that the user has entered a file name.
The argument to main is an array of the command-line arguments, not including the application name.
// Check for required argument
if (args->Length < 1)
{
    Console::WriteLine("Usage: CppReader path");
    return 0;
}

String ^path = args[0];
If the user hasn’t given an argument, an error message is printed and the application exits. If the user has provided it, the argument is saved for later use.
It’s wise to check that the path represents an existing file before continuing, so add the following code:
if (!File::Exists(path))
{
    Console::WriteLine("Invalid filename!");
    return -1;
}
The File::Exists method checks whether a file with the specified name exists, returning false if it doesn’t. It will also return false if you give the name of a directory rather than a file. Notice the return value of –1. It’s a common convention for C/C++ applications to return 0 to indicate success, with negative values being used to denote error conditions.
Start listing the file. The first step is to create a FileStream and connect it to a StreamReader.
try
{
    FileStream ^fs = gcnew FileStream(path, System::IO::FileMode::Open);
    StreamReader ^sr = gcnew StreamReader(fs);
}
catch(System::Exception ^pe)
{
    Console::WriteLine(pe->Message);
}
In this case, you’re opening the file by using FileMode::Open, which will throw an exception if the file doesn’t already exist.
Listing the file is done in this loop, which you should place after creating the StreamReader object, like this:
int count = 0;
for(;;)
{
    String ^line  = sr->ReadLine();
    count++;
    // If there are no more lines, break out of the loop
    if (line == nullptr) break;

    Console::WriteLine(line);

    if (count % 20 == 0)
    {
        Console::Write("--more-- ");
        String ^response = Console::ReadLine();
        if (response->Equals("q")) break;
        count = 0;
    }
}

Console::WriteLine("-- end --");
The count variable is going to be used to count the lines as they’re read so that the application knows where to break. The loop reads a line into a String by using the ReadLine function of StreamReader; if there are no more lines to read, a null will be returned. The line is then echoed to the console and the count checked. I’ve set the number of lines displayed at one time to an arbitrary value of 20; when the count is exactly divisible by 20, the application writes “--more--” to the console and waits for the user to input something. If the user presses a lowercase q, the application stops; otherwise, it outputs the next set of lines.
Remember that for(;;) sets up an infinite loop, which you need to terminate somehow. In this example, when there are no more lines to read, the call to ReadLine returns nullptr, and this causes the loop to terminate.
Build and run the application, giving the name of a suitable text file as the argument.
You can do this in one of two ways. The first is to open a command prompt, navigate to the directory containing the executable file, and then execute the application from the command line just as you would with any other application.
The second is to run the application from within Visual Studio, providing the command-line arguments that you need. In Solution Explorer, right-click the project name, and then, in the shortcut menu that appears, click Properties. When the Properties page appears, in the pane on the left, select Configuration Properties, click Debugging, and then enter the file name into the Command Arguments box in the center pane.
Working with files and directories
The System::IO namespace contains several classes to help you work with files and directories.
Getting information about files and directories
The Directory and DirectoryInfo classes provide you with functions to help you work with directories. The difference between them is that the Directory class only contains static methods, whereas DirectoryInfo contains non-static instance methods. Why the need for two different classes? It’s necessary for .NET to perform a security check before allowing you access to a directory or a file. The Directory class performs this check every time you use one of its static methods, which can be time-consuming. Objects of the DirectoryInfo class, on the other hand, work with one directory, and the security check is done once when the object is constructed. It can, therefore, be a lot more efficient to use DirectoryInfo if you’re going to perform multiple operations on one directory. The following table lists the main methods of the Directory class:
Method | Description |
Creates a directory | |
Deletes a directory and, optionally, its subdirectories | |
Returns an enumerable collection of the directories in a specified path | |
Returns an enumerable collection of the files in a specified path | |
Returns an enumerable collection of all the files and directories in a specified path | |
Checks whether a directory exists | |
Gets the creation time of a directory | |
Returns a string representing the path to the application’s current directory | |
Gets an array of strings representing the names of subdirectories in a given directory | |
Returns the root portion of a path | |
Gets an array of strings representing the names of the files in a given directory | |
Gets an array of strings representing the names of the files and directories in a given directory | |
Gets the last access time for the directory | |
Gets the last write time for the directory | |
Gets a list of the logical drives on the computer | |
Gets the parent directory of a specified directory | |
Moves a directory and its contents | |
Sets the application’s current directory | |
Sets the last access time for the directory | |
Sets the last write time for the directory |
The following two tables list the properties and methods of the DirectoryInfo class:
Property | Description |
Gets or sets the FileAttributes for the directory | |
Gets or sets the creation time for the directory | |
Value is true if the directory path exists | |
Gets the extension part of the directory name | |
Gets the full path of the directory | |
Gets or sets the time when the directory was last accessed | |
Gets or sets the time at which the directory was last written | |
Name | Represents the name of the directory |
Gets a DirectoryInfo object representing the parent of this directory | |
Gets a DirectoryInfo object representing the root portion of a directory path |
Two classes, File and FileInfo, are used to work with files. Like the Directory and DirectoryInfo classes discussed earlier, File contains static methods, and FileInfo contains non-static instance methods. The following table lists the methods provided by the File class:
The following two tables list the main properties and methods exposed by the FileInfo class:
Property | Description |
Directory | Returns a DirectoryInfo object representing the file’s parent directory |
Returns a string representing the file’s full path | |
Returns true if the file exists | |
Gets the full path of the directory or file | |
Gets or sets the time the file or directory was last accessed | |
Gets or sets the time the file or directory was last written | |
Returns the length of the file in bytes | |
Name | Returns the name of the file |
Method | Description |
Creates a StreamWriter to append text to a file | |
Copies a file to another location | |
Creates a new file and a FileStream to write to it | |
Creates a StreamWriter to write to a new text file | |
Deletes a file | |
Moves a file to a new location | |
Returns a FileStream with a specified level of access to a file | |
Returns a FileStream with read access to a file | |
Creates a StreamReader to read from an existing file | |
Returns a FileStream with read/write access to a file | |
Takes a snapshot of the file from the file system | |
Replaces the content of one file with another, deleting the original and creating a backup of the replaced file | |
Returns the file path as a string |
The following example illustrates the use of the directory and file manipulation classes. You’ll construct a simple directory-listing application, similar in functionality to the MS-DOS dir command. Here’s how it will work:
If the path represents a file, the details of the file will be printed.
If the path represents a directory, the contents of the directory will be listed.
In addition to the name, the user can choose to display size, last modification date, and attributes. For directories, only the last modification date applies.
Create a new CLR Console Application named CppFiles.
Because all the file and directory classes are part of System::IO, add a using declaration at the beginning of the application.
using namespace System::IO;
When the application is run, the user can supply options in addition to a file or directory path. Add the following code to main to check that you have the minimum number of options:
if (args->Length < 1)
{
    Console::WriteLine("Usage: CppFiles [options] [path]");
    return 0;
}
If the user has specified options, we need to check what they are. Each option is specified by a single letter, and multiple options are specified as a string, for example, “sa” to choose the “s” and “a” options. The options supported by this simple application are “s” (for the file size), “d” (for the last modified date), and “a” (for the file attributes). You can also use “v” (for verbose) as a shorthand to indicate that you want them all. It doesn’t matter in what order the options letters are specified, or even if they are repeated.
Add the following code to main:
String ^options = nullptr;
String ^path = nullptr;
bool hasOptions = false;

bool size = false;
bool date = false;
bool atts = false;

// If we have two arguments, we have options
if (args->Length == 2)
{
    hasOptions = true;
    options = args[0];
    path = args[1];

    // Parse the option string to set the option flags
    ParseOptions(options, size, date, atts);
}
else
    path = args[0];
Add the function that is going to process the options, placing it before main:
void ParseOptions(String ^opts, bool &size, bool &date, bool &atts)
{
    opts = opts->ToLower();

    if (opts->Contains("v"))
    {
        size = date = atts = true;
    }
    else
    {
        if (opts->Contains("s")) size = true;
        if (opts->Contains("d")) date = true;
        if (opts->Contains("a")) atts = true;
    }
}
The three bool variables are passed in by reference rather than by value; thus setting them in this function will change their value back in the main function.
Check whether the path represents a file or a directory by adding the following code to the main function:
bool isAFile = false;
bool isADirectory = false;

FileInfo ^fi = gcnew FileInfo(path);
DirectoryInfo ^di = gcnew DirectoryInfo(path);

if (fi->Exists)
    isAFile = true;
else if (di->Exists)
    isADirectory = true;
else
{
    Console::WriteLine("No such file or directory");
    return -1;
}
This isn’t quite as straightforward as you might think. You have to create both FileInfo and DirectoryInfo objects and then use their Exists properties to check whether either of them recognizes the path. If neither of them returns true, the most likely explanation is that the path doesn’t exist, so you print an error message and exit.
Now that you know what kind of object you have and what options the user wants, you can print out the details. The first case is that for a single file, and the code for that is very simple, as illustrated here:
if (isAFile)
{
    ProcessFile(fi, size, date, atts);
}
Again, in the interests of modularity, place the code for processing a file in a separate function before main:
void ProcessFile(FileInfo ^fi, bool size, bool date, bool atts)
{
    // Echo the filename and length
    Console::Write("{0,30}", fi->Name);

    if (size) Console::Write(" {0,10}", fi->Length);
    if (date) Console::Write(" {0}",
        File::GetLastAccessTime(fi->ToString()));
    if (atts)
    {
        FileAttributes fa = File::GetAttributes(fi->ToString());
        Console::Write(" ");
        if ((fa & FileAttributes::Normal) == FileAttributes::Normal)
            Console::Write("<normal>");
        else
        {
            if ((fa & FileAttributes::Archive) == FileAttributes::Archive)
                Console::Write("a");
            if ((fa & FileAttributes::Hidden) == FileAttributes::Hidden)
                Console::Write("h");
            if ((fa & FileAttributes::System) == FileAttributes::System)
                Console::Write("s");
            if ((fa & FileAttributes::ReadOnly) == FileAttributes::ReadOnly)
                Console::Write("r");
        }
        Console::WriteLine();
    }
}
The function first prints the file name and then displays other details, depending on the options chosen by the user. The last access time can be obtained by calling one of the static methods on the File class, passing it the path. The easiest way to get the path is to call ToString on the FileInfo object.
Observe the use of a field width when printing the name; format specifiers can take an optional field width after the field number. If this value is positive, the value is right-justified in the field; if it is negative, the value is left-justified. A field width of 30 characters should be wide enough for most files.
If the user has requested attributes, use the static GetAttributes method on the File class to obtain the FileAttributes. You can then use the bitwise AND operator (&) to match against the various values defined in the FileAttributes class. This code only checks for four attributes. There are many more, and it would be simple to extend the application to check for them.
If the user has entered a directory, list its contents. We will list subdirectories first, followed by files; directory names will be printed in uppercase letters, and file names in lowercase, but you can obviously change this to display them however you want. Add the following code for listing the subdirectories:
else if (isADirectory)
{
    // Process the subdirectories
    array<String^> ^dirs = Directory::GetDirectories(di->ToString());

    for (int i=0; i<dirs->Length; i++)
    {
        DirectoryInfo ^inf = gcnew DirectoryInfo(dirs[i]);
        String ^name = inf->Name->ToUpper();
        Console::Write("{0,30}", name);
        Console::Write(" {0,10}", "--");  // no size for dirs

        if (date) Console::WriteLine(" {0}",
            Directory::GetLastAccessTime(inf->ToString()));
    }

    // Now do the files
}
The Directory::GetDirectories function returns an array of strings representing the names of the subdirectories. Loop over this list, creating a DirectoryInfo object from each entry, and printing out its details. Because there is no size for a directory, simply print a couple of dashes.
Process the files by using the same function you defined earlier. Place the following code after the “Now do the files” comment:
array<String^> ^files = Directory::GetFiles(di->ToString());
for (int i=0; i<files->Length; i++)
{
    FileInfo ^fi = gcnew FileInfo(files[i]);
    ProcessFile(fi, size, date, atts);
}
As you can see, it is simply a case of retrieving a list of file names by using GetFiles, creating a FileInfo object for each file, and then passing it to the processFile function.
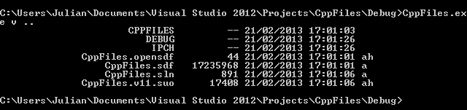
Build the application, open a console window, and then change to the project’s Debug directory. You can then run the application with a suitable command line, such as the following:
CppFiles v ..
You should see output similar to the following screen shot, listing the files in the parent directory:
Tip
If you want to run the application under the Visual Studio debugger, you will need to provide the command-line arguments for the application. To do so, bring up the property pages for the project. In the Configuration Properties section, click the Debugging option, and then, in the Command Arguments edit control, enter the arguments. You can now run the application in debug mode.
Binary I/O
Binary I/O in the .NET Framework uses the BinaryReader and BinaryWriter classes, which read and write .NET primitive types in binary format. As with the TextReader and TextWriter classes, the binary I/O classes use an underlying Stream object to provide a byte stream. Both BinaryReader and BinaryWriter have a BaseStream property that gives access to the underlying Stream.
The BinaryWriter class
The following table lists the methods provided by BinaryWriter:
Method | Description |
Closes the writer and the underlying stream | |
Releases all unmanaged resources used by the writer and, optionally, releases managed resources, as well | |
Causes all buffered data to be written to the underlying device | |
Sets the seek position within the underlying stream | |
Write | Writes a value to the stream |
Writes a 32-bit integer in a compressed format |
If you look at the Visual Studio 2012 documentation, you’ll see that the Write function has no fewer than 18 overloads for you to cope with when writing the various basic types provided by the .NET Framework. Because not all the types provided by .NET are compliant with the Common Language Specification (CLS), you need to be careful when using some of the Write methods if you intend for the data to be read from code written in other .NET languages.
Note
The CLS defines types that all .NET languages must support. The signed byte and unsigned integer types are not included in the CLS, so they might not be usable from some .NET languages. The most important of these is Microsoft Visual Basic .NET, which doesn’t support any of the non–CLS-compliant types.
The BinaryReader class
The following table describes the functions provided by BinaryReader:
Unlike BinaryWriter, BinaryReader provides separate functions to read each of the basic types.
The exercise that follows shows you how to use the BinaryReader and BinaryWriter classes to write binary data to a file and read it back. It uses a class, Customer, which represents a bank customer who has a name, an account number, and a current balance. The application writes customer details to a file in binary and reads them back.
Create a new CLR Console Application project named CppBinRead.
Add the using declaration for System::IO to the beginning of the code, like this:
using namespace System::IO;
Add a new class definition before the main function.
// The Customer class
ref class Customer
{
    String ^name;
    long accNo;
    double balance;

public:
    // Default constructor
    Customer() : name(nullptr), accNo(0), balance(0.0) { }

    Customer(String ^n, long ac, double bal)
        : name(n), accNo(ac), balance(bal) { }

    // Properties to retrieve instance data
    property String ^Name
    {
        String ^get() { return name; }
    }

    property long AccountNumber
    {
        long get() { return accNo; }
    }

    property double Balance
    {
        double get() { return balance; }
    }


    // Write object
    void Write(BinaryWriter ^bw)
    {
        bw->Write(name);
        bw->Write(accNo);
        bw->Write(balance);
    }

    // Read object
    void Read(BinaryReader ^br)
    {
        name = br->ReadString();
        accNo = br->ReadInt32();
        balance = br->ReadDouble();
    }
};
The class has three data members: a String for the name, a long for the account number, and a double for the balance. There are constructors to create default and fully populated objects, and there’s a set of read-only properties to allow access to the data members.
The Read and Write functions use BinaryReader and BinaryWriter objects to read and write the state of the object in binary format.
Add the following code to main to check that the user passes in a file name and save the path as a String:
if (args->Length == 0)
{
    Console::WriteLine("Usage: CppBinRead [path]");
    return 0;
}

String ^path = args[0];
This code is very similar to the argument-handling code that has been used in other exercises in this chapter. Note that for simplicity I’m not checking the path for validity, but it’s easy—and advisable—to add such a check in a real application.
Create some Customer objects.
// Create some customers
Customer ^c1 = gcnew Customer("Fred Smith", 1234567, 100.0);
Customer ^c2 = gcnew Customer("Jane Doe", 2345678, 1000.0);
Customer ^c3 = gcnew Customer("Gill Evans", 3456789, 500.0);
To write the objects, you need a BinaryWriter and a FileStream to do the output to the file.
FileStream ^fs = nullptr;
try
{
    // Create a FileStream to write to the file
    fs = gcnew FileStream(path, FileMode::Create, FileAccess::ReadWrite);

    // Create a BinaryWriter
    BinaryWriter ^bw = gcnew BinaryWriter(fs);
}
catch(IOException ^iex)
{
    Console::WriteLine(iex->Message);
    return -1;
}
finally
{
    if (fs != nullptr) fs->Close();
}
The FileStream writes to a file, creating it if necessary, and the file will be opened with read/write access because you’ll be reading from it later in the application. Again, it’s good practice to put the I/O class creation code in a try block to catch any problems that might occur. The finally block ensures that the file is closed, no matter what happens, but you obviously do not want to do this if creating the FileStream failed.
Writing the object data to the file is simply a case of calling the Write function, passing in a pointer to the BinaryWriter. Add the following code at the end of the try block:
// Write the objects to the file
c1->Write(bw);
c2->Write(bw);
c3->Write(bw);
Because the file was opened with read/write access, you can now read from the file. To do so, create a BinaryReader object and attach it to the same FileStream, as shown here:
// Create a BinaryReader that reads from the same FileStream
BinaryReader ^br = gcnew BinaryReader(fs);
Before you can read from a file to which you’ve written, you have to move the position of the seek pointer.
// Move back to the beginning
br->BaseStream->Seek(0, SeekOrigin::Begin);
Notice that this code uses the BaseStream property and its associated seek pointer to get at the underlying Stream object. If you haven’t encountered seek pointers before, read the explanation in the following sidebar.
Continue with the project from the previous exercise.
Create a new empty Customer object and read its details from the file, as follows:
Customer ^c4 = gcnew Customer();
c4->Read(br);
Console::WriteLine("Balance for {0} (a/c {1}) is {2}",
          c4->Name, c4->AccountNumber, c4->Balance);
The new Customer object has all its fields set to default values. The call to Read directs it to read its data from the current position in the file.
The obvious potential problem is that the Read function will read from wherever the BinaryReader is currently positioned. If it isn’t at the beginning of a Customer object’s data, you can expect to get an exception thrown.
Build and run the application, providing a suitable file name.