
Chapter 19. Writing a Service by Using Windows Communication Foundation
After completing this chapter, you will be able to:
Describe what Windows Communication Foundation is.
Write services by using Windows Communication Foundation.
Write clients to use Windows Communication Foundation services.
What is Windows Communication Foundation?
Windows Communication Foundation (WCF) is Microsoft’s platform for writing distributed, service-based applications. Previously known as Indigo, it provides a framework for writing services and clients.
Note
More Info WCF is a very complex topic, and this chapter can only provide an introduction. If you want to read more, I would suggest Windows Communication Foundation 4 Step by Step by John Sharp, published by Microsoft Press.
We live in an increasingly connected and distributed world. When you visit a website, your browser connects across the Internet to a server, and that server in turn might be using other servers to provide it with resources.
When you do this, you have in effect created a distributed application. Your browser provides the user interface, the web server provides the middle tier, and there can be other back-end servers providing the data tier. One very important feature of systems like this is that you can connect completely separate pieces together at run time to get the functionality that you want.
These pieces might be written by using different languages and frameworks, and run on different operating systems. All that is important is the functionality that they provide, not the details of their implementation.
With WCF, you can define contracts that specify, in a language and platform-independent manner, what services your components can provide, and these define the interface of your component to the outside world. The implementation details are immaterial to the user.
Distributed systems
Early frameworks for distribution tended to be proprietary. Microsoft’s Distributed Component Object Model (DCOM) was intended to connect components written by using Microsoft technologies running on Windows. Java’s Remote Method Invocation (RMI) was intended to do the same thing in the Java world.
Although these are still in use, the world has moved toward a need for more connectivity and independence, and so service-based systems have become increasingly popular.
Services
One of the hallmarks of modern service-based systems is the ability to compose parts together that have been developed independently.
This is done through the use of standards rather than proprietary technologies. So, for example, we can use XML and HTTP to connect two components rather than RMI, which was designed to work between Java components.
You will see shortly how WCF supports a wide range of the most popular and widely used standards, making it possible for you to create any type of service that you might need.
Characteristics of services
Services have the following distinguishing characteristics:
Platform and language independence Services are written in such a way that they are not dependent on clients using a particular language or framework to access them.
Independent and autonomous Services are independent in the same way that a website is independent.
Use well-known standards Services make use of standard protocols, such as TCP/IP and HTTP, and data representations, such as XML. Doing this decouples clients of the service from the implementation.
Discoverability Many services publish metadata so that potential clients can discover what they offer and how to access them.
Reusability Because services are independent, when properly designed they can be combined into new distributed applications.
Connectivity
A component that you want to interact with could reside in another process on the same computer, on another computer on your local network, or out on the Internet. You have several options for connecting to such components.
For components that reside on the same computer, you would use an inter-process communication (IPC) mechanism such as named pipes, whereas for components deployed on other computers, you could use TCP/IP for binary communication or HTTP for text communication. In the enterprise world, it is also common to use messaging systems such as Microsoft MSMQ or IBM MQ to connect components located on different devices.
The problem here is that each of these communication mechanisms is implemented in a different way, using different libraries and techniques. A developer experienced in using TCP would have to learn how to use messaging.
WCF simplifies this by letting developers indicate how they want their components to be connected and leaving it up to the framework to implement the connection. For example, you can use an attribute to say that a class should be exposed as a web service using HTTP, and WCF will generate all the required code and configuration.
The ABCs of WCF
WCF contains a lot of detail—a lot of moving parts—and it is very easy to lose sight of what is important in a mass of detail. There is, however, a certain number of things that you need to know to work with WCF, and so in this section I present enough details on how WCF works and what it does that you will be able to write and consume a simple service, and appreciate other features of WCF that you might want to use in future projects.
Endpoints
A service in WCF is called an endpoint. Endpoints are characterized by three facets:
Address Where to find the service
Binding How to talk to the service
Contract What the service can do
The following figure shows how address, binding, and contract are related to a service:
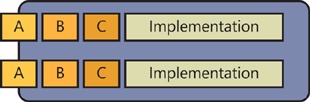
The client talks to the service through an address linked to a binding. The binding then invokes the service operation through the contract, but the implementation is well hidden from the client. A service can also expose more than one endpoint; these might be the same operations using different bindings (for example, HTTP and TCP) or different logical sets of operations (such as user and administrator interfaces).
Endpoint definitions are used by both services and clients to instruct the WCF framework what to do. You can set up endpoints in code, but setting them up declaratively in configuration makes it possible to reconfigure services without having to rebuild the code.
The next three sections look at each of the three endpoint aspects in turn.
Address
Every endpoint has an address composed from the following items:
The transport protocol—http: is one example.
The name of the server running the service, such as //myserver.com or //localhost. This might be followed by a port number, if necessary, such as //localhost:8080.
The path to the service endpoint; for example, /MyService.
Thus, to use HTTP to talk to a service called MyService, which is located at port 8080 on the local computer, you would use the following address:
http://localhost:8080/MyService
WCF supports four transports, as summarized in the following table:
Transport | Protocol | Comments |
HTTP | http: or https: | Port 80 (443 for HTTPS) |
net.tcp: | Default port is 8080 | |
net.pipe: | Must use localhost or local computer name | |
Can use private queues |
Base addresses
You might have several endpoints on the same server, which means that they will have the first part of their addresses in common. To make configuration simpler (and save typing!) you can specify a base address, and then assign relative addresses to the endpoints.
Metadata Exchange addresses
WCF services can publish metadata to clients, and this is done through a Metadata Exchange (MEX) address. This takes the form of an endpoint address with /mex appended to the end. Requests to this address will return the metadata for the service. This will be in the form of Web Service Definition Language (WSDL). You will see a MEX endpoint in use later in the chapter when Microsoft Visual Studio uses it to create a proxy in client code.
Binding
A binding describes the details of how to connect to a service, such as the transport to use, the message encoding, and whether security or transaction support is required.
A binding is simply a collection of settings, and you can create your own bindings. However, you seldom need to do this because WCF supports several bindings to cover for the most standard scenarios, as summarized in the following table:
Name | Transport | Encoding | Used |
HTTP/HTTPS | Text, MTOM | Clients expecting legacy ASMX web service | |
HTTP/HTTPS | Text, MTOM | Non-WCF client | |
HTTP | Text, MTOM | Non-WCF client (bidirectional) | |
TCP/IP | Binary | WCF client on another computer | |
MSMQ | Binary | WCF client using Microsoft Message Queuing (MSMQ) | |
Named pipes | Binary | WCF client on the same computer |
This table demonstrates that if you want to use HTTP as the transport, you could pick WSHttpBinding or WSHttpDualBinding, depending on whether or not you need bidirectional communication.
Contract
Contracts define what a service can do, and contract details are expressed in metadata for clients to use.
WCF supports four kinds of contracts:
Service contracts A service contract exposes a .NET class or interface as a service.
Operation contracts An operation contract exposes a method on a type as a service. (You can only make methods into operations, not properties).
Data contracts A data contract is used to instruct WCF how to use custom types in service calls. WCF knows about a range of basic types, such as numbers and strings, but if you want to use a Person type as an operation parameter or return type, WCF will need to know what a Person object contains.
Fault contracts A fault contract is used to define error behavior.
You use contracts declaratively, by adding attributes to code. Here is a simple example of a service contract:
[ServiceContract]
interface class Foo
{
    [OperationContract]
    int SomeFunction(double d);
};
The interface is annotated with the ServiceContract attribute, which informs WCF that you are defining a set of operations. Individual functions within the interface are marked with Operation Contract, which makes them available to clients. Any function that isn’t marked with OperationContract will not be exposed to clients.
The operation SomeFunction only uses built-in types, and WCF knows how to marshal those. Suppose, though, that you wanted to expose a function like the following as an operation:
Person^ GetPersonById(int id);
Note
Marshaling is the process of converting data and sending it to another component. This can involve converting it to an intermediate form for transmission over a network, and it can result in the receiver getting a different representation than that of the sender.
In this case, you would have to instruct WCF how to marshal objects of type Person, and you could do this by using a DataContract:
[DataContract]
ref class Person
{
    [DataMember]
    String ^name;
    ...
};
The DataContract class defines this as being a serializable class, and you apply DataMember to all fields that you want to be serialized. If you don’t want or need to send a field, don’t annotate it; this will cut down the amount of data being sent over the wire.
Message exchange patterns
Communication between clients and services can be one-way or bi-directional. WCF supports three message exchange patterns (MEPs) that govern how clients communicate with services:
Request-response
One-way (also called simplex)
Duplex (also called bi-directional)
Request-response is the default, and is typically used when the client expects a reply from the service. For example, consider this operation:
Person^ GetPersonById(int id);
The client calls the service with an ID and expects to get a Person back. Using request-response messaging, the client will block (and the connection will be maintained) until either the response has been received or a fault has been sent. This means that request-response message is synchronous, as demonstrated in the following illustration:
Note
The operation does not have to have a return type in order to use request-response messaging; it is quite possible to use it with an operation that has a void return type.
When using one-way (or simplex) messaging, the client sends a request but does not expect a response. This allows WCF to drop the connection to the service as soon as the call has been made because it does not have to wait for a reply. It also means that the operation must have a void return type because nothing will be returned, and it cannot declare a fault contract, because there is no way to get the error details back to the caller. One-way operations are useful for fire-and-forget operations such as logging or event notifications. They can also be useful for performing long-running operations asynchronously, where the client can use polling to ascertain when the server has the results ready. The following figure illustrates one-way messaging:
Duplex operation implies two-way communication between a client and service. Both ends can initiate a call, and neither has to wait for the other to finish before sending. To achieve this, service contracts specify a callback contract that the client must implement and which the service will call when it wants to call back to the client, as depicted in the following illustration:
Not all bindings support all MEPs. The following table summarizes what you can use:
Binding | MEPs | Comments |
One-way and request-response only | HTTP does not support duplex operation | |
One-way and request-response only | ||
All MEPs | Simulates duplex by using two channels | |
All MEPs | Supports full duplex messaging | |
Supports one-way and duplex | Does not support request-response | |
One-way, request-response, and half-duplex | Duplex messaging, but not in both directions at once |
Behaviors
Services have default ways of working. If you want to modify these, you use behaviors, which modify or extend the operation of services.
Examples of behaviors include:
How service objects are created. Is there just one or is there a new object created per call?
How the service handles concurrent calls.
Limiting the number of simultaneous connections.
Handling transactions.
A detailed description of behaviors and how to use them is beyond the scope of this book.
Creating a service
In this exercise, you will see how to create and test a simple service that provides mathematical operations. To follow best practices, the service will be defined as an interface, with the implementation in a separate class.
Create a CLR Console Application project named MathService.
Add an external reference to System::ServiceModel and then add the following two using declarations:
using namespace System::ServiceModel;
using namespace System::ServiceModel::Channels;
Add a header file named IMathService.h to the project, and use it to define the following interface:
#ifndef IMATHSERVICE_H
#define IMATHSERVICE_H

[ServiceContract]
public interface class IMathService
{
    [OperationContract]
    virtual double Square(double d);

    [OperationContract]
    virtual double Cube(double d);
};

#endif
This declares a service as an interface. It is good practice to define services using an interface because this decouples the implementation from the definition. This is being declared in a separate header file because the client will need the interface definition, as well.
Open the MathService.cpp file and add the definition for a class that implements the service. You’ll need to add an include statement to get the interface definition.
#include "IMathService.h"

ref class MathService : IMathService
{
public:
    virtual double Square(double d)
    {
        return d*d;
    }

    virtual double Cube(double d)
    {
    return d*d*d;
    }
};
You can now start to implement the main method to host the service.
int main(array<System::String ^> ^args)
{
    WSHttpBinding ^binding = gcnew WSHttpBinding();
    Uri ^baseAddress = gcnew Uri("http://localhost:8080/MathService");
}
These first two lines create a binding and a base address for the service. Because this is a basic HTTP service, you create a WSHttpBinding and an HTTP address.
Create a ServiceHost object and add an endpoint to it.
ServiceHost ^host = gcnew ServiceHost(MathService::typeid, baseAddress);
host->AddServiceEndpoint(IMathService::typeid, binding, baseAddress);
The ServiceHost is the object that implements the WCF behavior for you. It is initialized with details of the service implementation class (so that it knows what to call when requests come in) and the base address. You can then add an endpoint to the ServiceHost so that it knows to support the WSHttpBinding on the given base address and that it is supporting the IMathService contract.
Run the service.
host->Open();
Console::WriteLine("Service running... press Enter to terminate");
Console::ReadLine();
host->Close();
The call to Open starts the service listening for connections. But this is not a blocking call, so you need to keep the application running until you’re ready to close the connection. An easy way to do this is simply to output a prompt and wait for the user to press Enter. When the user does press Enter, ensure that you close the host to free resources.
Build the application and run it to check that you have no errors.
When you try to run the application, you should find that it crashes with an exception of type System::ServiceModel::AddressAccessDeniedException. This is because Windows wants to prevent possibly malicious code running without authorization, so you need to run the application with sufficient privilege. There are two ways to do this: one is to register the service by using the netsh command so that Windows will allow it to run; the other is to run the application as an administrator, because administrators have rights to run services. To do that, you can either start a command prompt as administrator and run the application from the command line or run Visual Studio as administrator and run the application from there.
To run applications as administrator in Windows 8, right-click the application’s tile on the Start screen and then, on the appbar menu that slides up from the bottom of the screen, click Run As Administrator.
Writing a service client
The next step is obviously to write a client to test out the service. There is a WCF Test Client included with Visual Studio, but you won’t be able to use that until you’ve added metadata support to the service, and we will leave that until later in the chapter.
Create another CLR Console Application named TestClient.
In Windows Explorer, copy the IMathService.h file to the project directory and add it to the project. Right-click the project name. On the shortcut menu, point to Add, point to Existing Item, and then click the header file.
You need to add this file because your client code needs the definition of the interface.
Add an external reference to the System::ServiceModel assembly, just like you did when creating the service.
Add the two using directives for the System::ServiceModel and System::ServiceModel::Channels namespaces.
using namespace System::ServiceModel;
using namespace System::ServiceModel::Channels;
Add an #include statement for IMathService.h to the source file TestClient.cpp.
Start implementing the main function by creating a WSHttpBinding and EndPointAddress.
WSHttpBinding ^binding = gcnew WSHttpBinding();

String ^url = "http://localhost:8080/MathService";
EndpointAddress ^address = gcnew EndpointAddress(url);
Communication is handled by a Channel, and you get one of those from a ChannelFactory.
ChannelFactory<IMathService^> ^factory =
        gcnew ChannelFactory<IMathService^>(binding, address);
IMathService ^channel = factory->CreateChannel();
Note how the channel implements the interface of the service you want to call, and also has a binding and address. It therefore has all the details it needs to contact the service and use the operations it provides.
Call an operation on the service.
double value = channel->Square(3.0);
Console::WriteLine("Value is {0}", value);
When you’re done, close the channel.
((IChannel^)channel)->Close();
You need to cast the channel to an IChannel handle because the IMathService doesn’t implement the Close function.
Build the application to ensure that you have no errors.
Run the MathService executable that you created in the previous exercise, which you’ll find located in the Debug directory of the project. When this has started, run the client as administrator and you should see the result message printed out.
Adding metadata to the service
One of the characteristics of services is that they are discoverable. This means that there is some way for potential clients to get details of the service, what it can do and how to call it. The standard way to provide this metadata is as a WSDL document, which describes the service in XML.
Note
More Info It isn’t important for you to understand WSDL to create and use services, but if you are interested, you can learn more about it at the w3schools website at http://www.w3schools.com/wsdl/wsdl_intro.asp.
The next question is how you ask a service for its metadata. WCF services expose their metadata through an MEX endpoint. When you add such an endpoint, you can choose which transports (HTTP, TCP) that you want to support, and provide the URL.
You can use the WCF Test Client to examine and call service operations, but your service needs to publish metadata through an MEX endpoint before you can use this.
This next exercise adds an MEX endpoint to the service. It then shows how you can see the metadata and then use the WCF Test Client to exercise the service.
Continue with the project from the previous exercise.
Add a using directive for System::ServiceModel::Description to MathService.cpp.
using namespace System::ServiceModel::Description;
Add the following lines after the call to AddServiceEndpoint and before the call to Open:
// Add MEX endpoint
ServiceMetadataBehavior ^mex = gcnew ServiceMetadataBehavior();
mex->HttpGetEnabled = true;
host->Description->Behaviors->Add(mex);

host->AddServiceEndpoint(
    IMetadataExchange::typeid,
    MetadataExchangeBindings::CreateMexHttpBinding(),
    "http://localhost:8080/MathService/mex");
Earlier in the chapter, you learned that behaviors are used to modify the behavior of a service. The ServiceMetadata behavior makes it possible for the service to expose its metadata via an MEX endpoint, and you can configure how it exposes this data. In this case, I’ve chosen to allow clients to access it via an HTTP GET request. The behavior object is added to the host’s Behaviors collection, and then you add a service endpoint.
The endpoint exposes the IMetadataExchange contract at the URL by using HTTP at the given address. Note how the standard MEX endpoint address is the service address with /mex appended.
Build the project and then start the service as administrator.
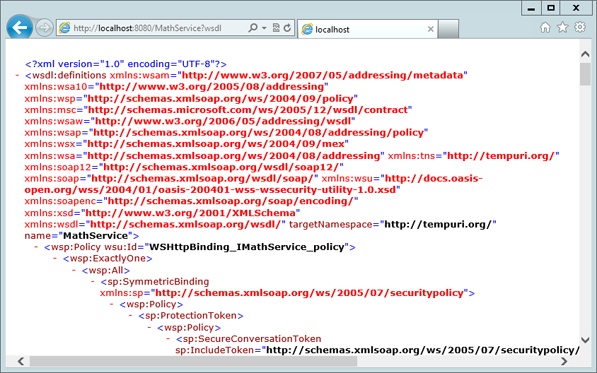
Start Internet Explorer and type the following URL in the address bar:
http://localhost:8080/MathService?wsdl
By setting the HttpGetEnabled property, you can request the metadata using HTTP by passing the wsdl parameter. When the request executes, you should see the following WSDL describing your service in the browser:
You can now run the WCF Test Client, WcfTestClient.exe, which you can find in C:Program FilesMicrosoft Visual Studio 11Common7IDE (or if you are running a 64-bit version of Windows, it will be in C:Program Files (x86)Microsoft Visual Studio 11.0Common7IDE).
When the application starts, in the pane on the left side of the window, right-click the MyService Projects entry, and then, on the shortcut menu that appears, click Add Service.
In the Add Service dialog box that opens, enter the service URL (http://localhost:8080/MathService) into the text box and press OK.
After a short interval, you should see details of the service contract appear in the pane on the left in the WTF Test Client application window.
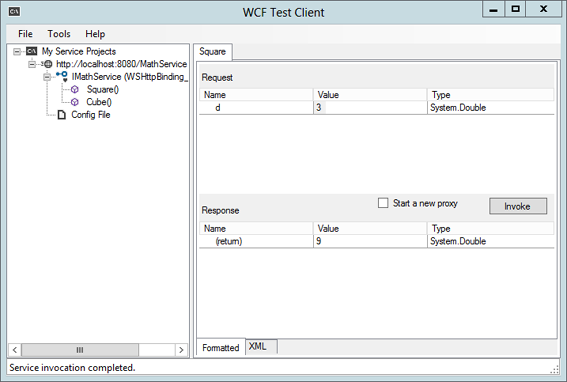
Double-click one of the operations—for example, Square. The pane on the right side shows you details of how to call the operation. Enter a number in the Value field and press Invoke. After a short pause, you should see the response appear in the lower part of the pane, as shown in the following figure:
Accessing a service by using a proxy
You have seen how to connect to a service manually by using the WCF APIs. It is also possible to get Visual Studio to create a proxy class for you, one that encapsulates the details of where the service is and what the endpoints are; in this way, you don’t have to be concerned with the low-level mechanics.
This is often the way that you would do it in C# and Microsoft Visual Basic .NET, asking Visual Studio to add a service reference to your project, and then using the generated proxy class. The problem is that this feature isn’t supported by C++/CLI in Visual Studio, but it turns out to be quite simple to do if you use a C# wrapper.
Creating the wrapper DLL
In this next exercise, you will create a simple C# Dynamic-Link Library (DLL) project and add a reference to the MathService project. This will add a proxy class to the project, but because it is a public class, you will be able to use it from C++/CLI code. And even though you create a C# project, you don’t have to write a single line of C# in order to make it work.
Continue with the project (MathService) from the previous exercise.
Create a C# Class Library project named WcfClientLib.
Add a reference to MathService. In Solution Explorer, under the project, right-click References, and then, on the shortcut menu, click Add Service Reference.
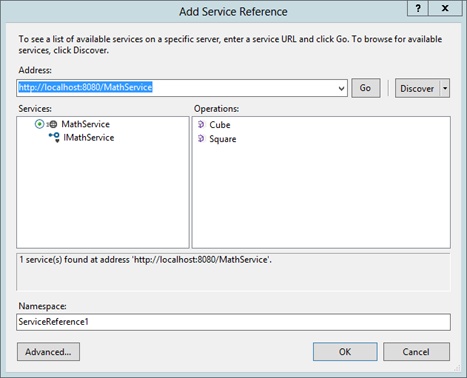
In the Add Service Reference dialog box that opens, type the URL of the service into the address box and press Go. After a few seconds, you should see the MathService added to the Services pane. You can expand this entry and click on IMathService to see the operations in the pane on the right.
Observe the Namespace name at the lower left, which by default is ServiceReference1: the generated code will be placed in this namespace. You can change it if you want, but you’ll need to remember it for subsequent steps.
When you’re happy that you have a reference to the appropriate service, press OK and Visual Studio will generate a proxy class and application configuration file for you.
You don’t need to add anything else to this project, so just build it to create the DLL.
Using the wrapper
You now have a DLL that contains all the code necessary to call MathService. In the second part of the exercise, you’ll see how to use this DLL in a C++/CLI application.
Create a CLR Console Application project named TestWcf.
Add an external reference to System::ServiceModel.
Add a second external reference to the WcfClientLib DLL, which you’ll find in the WcfClientLib/bin.debug directory.
Add a using directive for the namespace WcfClientLib.ServiceReference1.
using namespace WcfClientLib::ServiceReference1;
If you changed the namespace for the generated proxy code, edit the using directive appropriately.
The proxy class is driven by configuration information, so add an application configuration file to the project. Right-click the project name, and then, on the shortcut menu, click to Add New Item.
In the dialog box that opens, in the Utility section, click Configuration file (app.config).
The configuration details you need are in the DLL’s app.config file, so open that in the editor and copy the <system.ServiceModel> element shown here:
<system.serviceModel>
  <bindings>
    <wsHttpBinding>
      <binding name="WSHttpBinding_IMathService" />
    </wsHttpBinding>
  </bindings>
  <client>
    <endpoint address="http://localhost:8080/MathService" binding="wsHttpBinding"
        bindingConfiguration="WSHttpBinding_IMathService"
        contract="ServiceReference1.IMathService"
        name="WSHttpBinding_IMathService">
      <identity>
        <userPrincipalName value="WIN8PREVIEWJulian" />
      </identity>
    </endpoint>
  </client>
</system.serviceModel>
The entries in the configuration file give all the details that the proxy needs to contact the service. Ensure that you replace the value of userPrincipalName with your details.
You are now ready to use the service. Add the following code to the main function:
try
{
    MathServiceClient ^msc = gcnew MathServiceClient();
    double result = msc->Cube(3.0);
    Console::WriteLine("Result: {0}", result);
}
catch(Exception ^ex)
{
    Console::WriteLine(ex->Message);
}
The proxy class is called MathServiceClient, based on the name of the service with “Client” appended. This class directly implements the operations exposed by the service, so you can just call the Square and Cube functions without even having to know that it is a service.
Ensure that the service is still running and then build and run the client. You should see the result displayed on the console.