
Chapter 24. Living with COM
After completing this chapter, you will be able to:
Describe how you can use Component Object Model (COM) objects from .NET projects.
Use COM objects through early and late binding.
Use ActiveX controls in Windows Forms projects.
Expose .NET objects as COM objects.
Although the types provided in the Microsoft .NET Framework are sufficient for the vast majority of applications, sometimes you’ll need to interact with existing components, particularly COM components and ActiveX controls. This chapter shows you how the worlds of .NET and COM can interoperate, making it possible for you to take advantage of the best use of new and existing technologies.
Many people assumed that COM was dead when .NET arrived on the scene, and it is undeniable that .NET provides a better solution for creating a lot of component-based solutions. If you program in C++, though, it is still worth knowing about COM for two main reasons.
First, there is a lot of COM code out there, in the form of ActiveX controls and lower-level components, which is not going to go away. In fact, there are still some features of Windows that aren’t wrapped by .NET for which you need to use COM to access.
The second, and perhaps more interesting reason, is that the Windows RT APIs are COM based. If you want to get the maximum performance out of Windows RT code (for example, if you’re writing games in C++), you’ll want to use COM.
Note
This chapter assumes that you know what COM objects are and something about how to use them outside the .NET world. If terms such as GUID, HRESULT, IUnknown, IDispatch, and type library don’t mean anything to you, you should learn more about COM before proceeding with this chapter.
COM components and the COM Interop
The designers of the .NET Framework recognized that even though the framework is easier to use and more flexible than COM for many applications, it doesn’t totally replace COM. For this reason, they developed the COM Interop facility so that .NET and COM objects can interact.
As you’ll see shortly, it is easy to use a COM object from .NET code, and this gives .NET developers access to hundreds of existing COM objects. It is also possible to use a .NET object from COM code, although I’d expect this to be a less common occurrence.
Using COM components from .NET code
To use a COM object from .NET code, you first create a Runtime Callable Wrapper (RCW). You need the RCW because of several major differences between COM and .NET, which are summarized in the following table:
COM | .NET |
Clients must manage the lifetimes of the COM objects they create. | The Common Language Runtime (CLR) manages the lifetime of .NET objects. |
Clients use QueryInterface or browse the object’s type information to find out whether a particular interface is supported. | Clients can use reflection to query an object. |
COM objects are accessed through raw pointers and are therefore fixed in memory. | .NET objects are accessed through references and can be moved around by the CLR for performance reasons. |
Wrapper classes are needed to bridge these differences so a COM object can appear as a .NET object, and vice versa.
How do RCWs work?
The wrapper takes the form of a proxy class that does all the work of creating and talking to the COM object, so you can use COM objects just as if they were .NET objects. You can see how this works in the diagram that follows. The RCW does all the housekeeping by interacting with the Windows Registry, creating the object, forwarding calls to the object, and managing its lifetime. The primary goal of the RCW is to hide the complexity of COM objects from .NET programmers; in some cases, .NET programmers might not even know they are using a COM object.
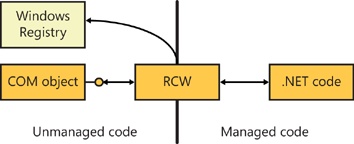
The wrapper class maintains a cache of interface pointers on the object it is using and releases these pointers when the object is no longer needed. The RCW itself is governed by the usual .NET garbage-collection rules because it is a managed object.
Because data types often differ in the .NET and COM worlds, the RCW performs standard marshaling so that both sides can use data types with which they are familiar. For example, when passing string data through an RCW, the .NET side works with String objects, but the COM side will probably use its own BSTR type; the RCW automatically converts between the two as necessary.
If you’ve used COM objects from C++, you’re aware that COM objects implement several standard interfaces—such as IUnknown and IDispatch—that COM client programmers have to know about. The RCW simplifies the process of using COM objects by automatically handling many of the standard interfaces, as listed in the following table:
Interface | Description |
IUnknown | The RCW uses IUnknown for object identity checking, type coercion via QueryInterface, and lifetime management. |
IDispatch | Used for late binding to COM objects by using reflection. |
Used for providing error information. | |
If the COM object being wrapped implements this interface, the RCW uses it to provide better type identity. | |
If the COM object uses connection points, the RCW exposes them to .NET clients as delegate-style events. | |
If the COM object implements IDispatchEx, the RCW exposes and implements the .NET IExpando interface. | |
The RCW enables COM types that expose this interface to be treated as .NET collections. |
Creating and using RCWs
You can create RCW classes in two ways:
If you’re using Microsoft Visual Studio 2012, you can use a wizard to create the RCW for you.
If you’re compiling C++/CLI code from the command line, you can use the .NET Framework tool called tlbimp.exe (for Type Library Importer) to read a COM type library and create a wrapper class based on the information it finds.
The exercise that follows shows you how to use Visual Studio to create a wrapper for a COM object and then use the object.
Note
I’ve created a simple COM object for use in this exercise called TempConverter. It implements simple temperature conversion functionality between Fahrenheit and Celsius. You’ll find the source and executable for the TempConverter project, plus a ReadMe.txt file with directions for installing it, in this book’s sample files. Be sure TempConverter is installed before starting this exercise.
Start Visual Studio 2012 and create a new CLR Console Application project named ComWrapper.
On the Project menu, click ComWrapper Properties to open the Project Properties dialog box. Select Common Properties, and then, in the pane on the left, click Frameworks And References, and then click the Add New Reference button.
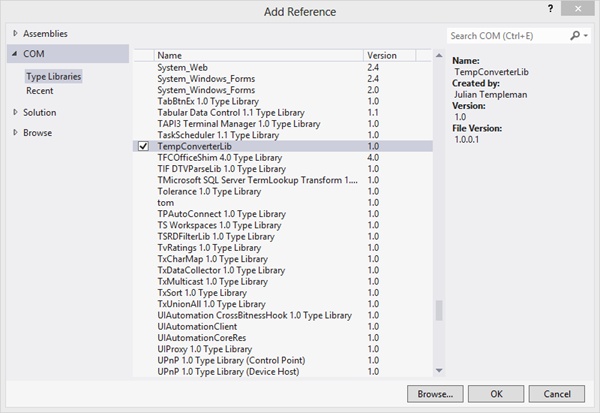
In the Add Reference dialog box that opens, in the pane on the left, choose the COM entry.
It might take a few seconds to populate the list box with details of the COM components registered on your system.
Browse the list to find the entry for the TempConverterLib component. Click to the left of this entry to add a check mark and then click OK.
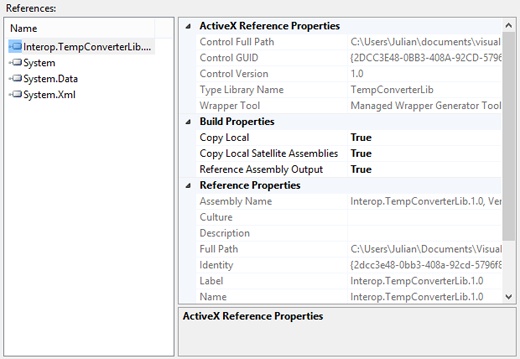
You will see that a new entry for TempConverterLib has been added to the project’s list of references.
Open Windows Explorer and look in the project’s Interop directory. You will see that it contains a file called Interop.TempConverterLib.1.0.dll, which contains the RCW assembly. These files are always named Interop.XXX.YYY.dll, where XXX and YYY are the name and version of the COM component to which the RCW refers.
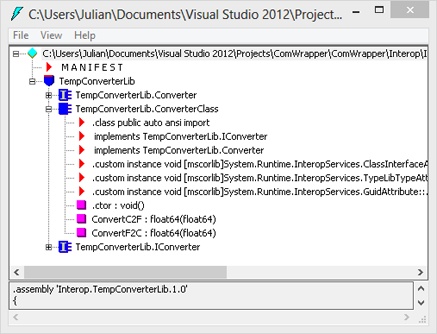
Open the IL disassembler tool (ISDASM) and use it to examine Interop.TempConverter.1.0.dll.
The shield-like symbol with the red top represents a namespace, so the namespace you need to import is TempConverterLib. You can see that the assembly contains three types. Converter and IConverter represent the original COM co-class and interface definitions, respectively; their symbol is marked with an I (a capital “i”) to show that they are interfaces. ConverterClass is a real type, so its symbol doesn’t contain the I. The RCW is produced by the tlbimp tool.
To deduce the name of the wrapper class without using ILDASM, you take the name of the COM co-class and append Class.
Add a using directive to your code to make it easier to reference the RCW.
using namespace TempConverterLib;
Add code to create a wrapper object, and use it to call methods on the COM object, as shown in the following:
int main(array<String^>^ args)
{
    Console::WriteLine("COM Interop Sample");

    // Create a COM object
    ConverterClass ^conv = gcnew ConverterClass();

    // Call a conversion method and print the result
    double d = conv->ConvertC2F(27.0);
    Console::WriteLine("27C is {0}F", d);

    return 0;
}
Observe how the wrapper is created just like any other managed object, and methods are called on it in exactly the same way as normal. There’s no way to determine from this code that you’re using a COM object, and the wrapper performs all the lifetime management for you.
Build and run the application, checking that the output is what you expect.
Handling COM errors
You know that COM methods return status and error information by using 32-bit HRESULTs. The RCW converts all error HRESULTs into exceptions that you can catch in your code. The test Converter project returns an error if the conversion methods are passed any values less than –273C or –459°F because temperatures less than absolute zero have no meaning. Here’s the COM code:
STDMETHODIMP CConverter::ConvertC2F(double dCelsius, double* dFahr)
{
if (dFahr == 0) return E_POINTER;
// Temperatures below -273C are meaningless...
if (dCelsius < -273.0) return E_INVALIDARG;
*dFahr = (9/5.0 * dCelsius) + 32;
return S_OK;
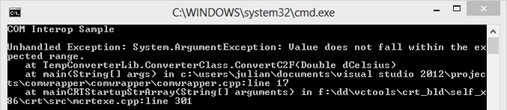
}This code might return two error HRESULTs. The first, E_POINTER, occurs if the pointer to the result variable is null, which won’t happen when called by the RCW. The second, E_INVALIDARG, occurs if an invalid temperature is passed. These are converted to exceptions by the RCW, and as usual, you need to catch them to prevent your application from terminating. Here’s what you’ll see on the console if you pass an invalid temperature:
You can handle this by adding a try/catch block to the code in the main function:
try
{
    double d = conv->ConvertC2F(-280.0);
    Console::WriteLine("-280C is {0}F", d);
}
catch(Exception ^ex)
{
    Console::WriteLine("Exception from COM object: {0}", ex->Message);
}
Again, build and run the application and check that the output is correct.
Late binding to COM objects
RCWs implement early binding connections to COM objects, because when you have a type library, you have all the details of what the COM object can do available to you at compile time. If you want to use a COM object that implements IDispatch, you can also call it at run time, but the process is a little more complex.
The exercise that follows shows how to use the TempConverter object with late binding. This COM object was created with a dual interface, so it can be accessed via both early binding and late binding.
Create a new CLR Console Application project named LateBind.
Add code to main to get a Type object that represents the COM component. (Consult Chapter 23, for more details on the Type class and its uses.)
// Get a type representing the COM object
Guid g = Guid("75F3EDC5-AA71-437A-ACB6-F885C29E50F7");
Type ^t = Type::GetTypeFromCLSID(g);
if (t == nullptr)
{
    Console::WriteLine("Error getting type for TConverter");
    return -1;
}
Console::WriteLine("Got type for TConverter");
The GetTypeFromCLSID static method takes a COM class ID (CLSID) as a Guid object and creates a Type object to represent the co-class. If there is a problem creating the Type object because the CLSID can’t be found or because of some other registry-related problem, a null is returned. Overloads of this function let you specify that an exception be thrown instead of returning a null, if that suits your code better.
You can find the CLSID of a component by examining the .idl file that was used when creating it.
Use the System::Activator class to create the COM object for you, as demonstrated here:
// Use System::Activator to create an instance
Object ^obj = Activator::CreateInstance(t);
The Activator class creates instances of local or remote objects for you. The reference returned is a general object reference; you don’t need to cast it to any specific type because this will be taken care of for you later.
Build the parameter list before you call a conversion method on the object. This takes the form of an array of Objects, as shown here:
// Make up the argument list

array<Object^> ^argarray = { 27.0 };
Here, the array contains only one value: the temperature to be converted.
Call the conversion method dynamically, using the InvokeMember method of the Type class.
// Invoke the method try { Object ^result = t->InvokeMember("ConvertC2F", Reflection::BindingFlags::InvokeMethod, nullptr, obj, argarray); double d = Convert::ToDouble(result); Console::WriteLine("27C is {0}F", d); } catch(Exception ^ex) { Console::WriteLine("Exception from Invoke: ", ex->Message); }InvokeMember, as its name implies, dynamically invokes a member of an object. The arguments supplied to the function are the name of the member to be invoked, the type of operation (in this case, you’re invoking a method rather than accessing a property or field), a handle to a Binder object (which you’re not using), a handle to the object on which the operation is to be invoked, and a handle to the argument array.
If the call works, you’ll be passed back an Object reference representing the result, which is then converted to the appropriate type by using one of the static methods of the Convert class.
Build and run the application, and check that you get the right answer (which is 80.6F).
Using .NET components as COM components
In addition to using COM objects from .NET clients, you can use .NET objects in the COM world. The process for exposing .NET classes as COM objects is complex because interacting with COM at the C++ level is difficult. For this reason, this section introduces the topic but leaves the practical implementation of .NET-to-COM code for more advanced texts.
Again, wrapper classes are used, only this time they are called COM Callable Wrappers (CCWs). In effect, a CCW puts a COM layer onto a .NET object so that the .NET object behaves in exactly the way a COM object is expected to behave. The process is shown here:

The CCW exposes all the interfaces expected by clients using COM, such as IUnknown and IDispatch, and it lets the client code manage its lifetime in the normal COM manner.
What must .NET types implement to be used as COM objects?
COM objects have a particular set of characteristics, and .NET types need to follow some rules if they’re to be exposed as COM objects using COM Interop. Here’s a summary of what the .NET type must to do:
It must supply a default constructor—one that doesn’t take arguments—because COM objects are always created uninitialized, and there’s no standard way to pass over initialization data. For this reason, it must be possible to create .NET objects uninitialized if they’re to be used as COM objects.
The type’s assembly must be signed with a strong name. See the upcoming sidebar Names and signing for details on strong names and how to use them.
The type’s assembly must be placed where the CLR can find it. See the upcoming sidebar Installing assemblies for more details.
The correct COM-related registry entries must be made for the .NET object. This is done for you automatically if you’re using Visual Studio.