
Chapter 9. Value Types
After completing this chapter, you will be able to:
Distinguish between reference and value types.
Work with structures.
Work with enumerations.
In preceding chapters, you learned about object-oriented programming and how to apply it within the Microsoft .NET Framework. You’ve seen how many data types within .NET are represented by classes, and you’ve learned how to create and use your own classes. However, not every data type in .NET is a class, and now you’re going to meet the other fundamental building block of .NET types—the value type.
In this chapter, you’ll discover what value types are and how they differ from the reference types you’ve already met. You will also learn about two important value types, structures and enumerations, which will be useful in your own code.
Reference types and value types
Let’s summarize what you’ve learned about classes so far. Classes are known as reference types because you always access objects by using reference variables, known as handles. Consider the following line of code:
MyClass ^pc = gcnew MyClass();
In this example, pc is a reference variable by which we can refer to the MyClass object created by the gcnew operator. Accessing objects by using references in this way makes it possible for the .NET garbage-collection mechanism to reclaim the resources used by an object when there are no longer any references to it. This feature of .NET makes for efficient memory usage and means that you won’t suffer from one of the traditional problems of C++ applications: memory leaks.
The second thing you’ve learned about classes is that they consist of data members and member functions. Data members represent the state of the object, and it’s good practice to make them private to the class. Member functions provide the behavior of the object, and they use the data members to determine how to respond. All operations on objects are done by calling member functions, using the -> operator, as in the following line of code:
result = pc->DoOperation();
You also saw how with C++/CLI, you can use stack semantics to create objects, making it look as if they are traditional C++ local variables, and how you can use the dot operator (.) to access members, as demonstrated here:
MyClass m;
result = m.DoOperation();
In fact, they work in exactly the same way as objects you create by using gcnew.
The need for value types
So, how are value types different from reference types, and why do we need them? As the name “value type” implies, they have been designed to hold values, such as integers, floating-point numbers, Booleans, and characters. Anything that is basically a wrapper around a simple value—and is less than about 16 bytes in size—is a good candidate for a value type.
We need value types because we want simple values to be used as efficiently as possible, but we also want them to be usable as objects. Using values as objects is a problem with object-oriented languages because if basic types are represented as objects, all operations (such as addition and multiplication of integers) must be done by calling functions, which isn’t efficient at all. On the other hand, if basic types are not represented as objects, operations on them can be very efficient, but we can’t use them where objects are needed.
.NET gets around this problem with value types, which are represented and used as efficiently as built-in types, but which can also be used as objects when necessary. You don’t need to know this is happening most of the time. This process is called boxing, and it is discussed in Chapter 22.
The following table summarizes the most common value types provided by the .NET Framework.
Description | C++/CLI equivalent | |
An 8-bit unsigned integer | unsigned char | |
An 8-bit signed integer | char | |
A 16-bit signed integer | short | |
Int32 | A 32-bit signed integer | int or long |
A 64-bit signed integer | __int64 or long long | |
A 16-bit unsigned integer | unsigned short | |
A 32-bit unsigned integer | unsigned int or unsigned long | |
UInt64 | A 64-bit unsigned integer | unsigned __int64 or unsigned long long |
Single | A single-precision, 32-bit floating-point number | float |
Double | A double-precision, 64-bit floating-point number | double |
Boolean | bool | |
A 16-bit Unicode character | wchar_t | |
A signed integer used to represent pointers | No built-in type | |
UIntPtr | An unsigned integer used to represent pointers | No built-in type |
Note that the C++ equivalents are simply names for the types—aliases, if you like—that fit better with C++ syntax. Although it’s more natural to use the native language equivalents, you could use the underlying .NET types, instead, which means that the following two lines of code mean exactly the same thing:
int n = 0;      // use managed C++ type
Int32 n = 0;    // use .NET native type
Properties of value types
A value type is a type that inherits from the System::ValueType class. Value types have several special properties:
Value types are stored on the stack (unlike references, which are stored on the run-time heap).
Value types are not garbage collected.
Instances of value types are always accessed directly (unlike reference types, which are accessed through references). Direct access means that you don’t use the gcnew operator when creating instances.
Copying value types copies the value, rather than the reference.
Value types can’t be used as base classes for inheritance.
As you can see, value types behave just like the standard built-in types such as int and char, and they are just as efficient to use. As mentioned in the previous section, the main difference between value types and built-in types is that value types can also be treated as objects when necessary.
Although you can’t add new basic types to the language, you can create your own value types in the form of structures and enumerations. We’ll explore these in the rest of this chapter.
Structures
Structures (commonly referred to as structs) provide a way to create the compound data or record types that you might have come across in other programming languages. Similar to classes, structures can contain member functions, data members, and other .NET features that you’ll learn about in later chapters, but there’s one important difference: structures are value types, not reference types. Therefore, if you have a value type that needs to have some internal structure, such as a point with X and Y coordinates, you can implement it by using a struct.
Creating and using a simple struct
The following exercise shows how to create a structure representing a point with X and Y coordinates, how to create instances of the structure, and how to use the instances in code.
Note
Both standard C++ and C++/CLI use the struct keyword to define structures. This chapter discusses the use of .NET (managed) structs rather than the traditional struct. Declaring .NET structures has the advantage of working within the .NET world and also makes it possible for you to exchange structures with other .NET languages.
Start Microsoft Visual Studio 2012 and create a new CLR Console Application project named Structs.
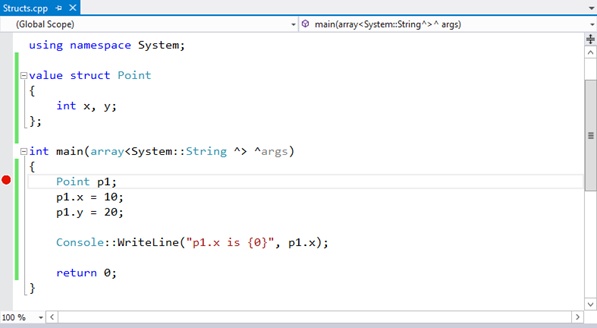
At the top of the Structs.cpp file, immediately below the using namespace System; line, add the following structure definition:
// The Point structure definition
value struct Point
{
    int x, y;
};
The value and struct keywords start a structure definition, and you’ll notice that structures look very similar to classes in the way that they are defined. The body of the structure is enclosed in braces and finishes with a semicolon, and the public and private keywords can be used to set the access level for structure members.
Notice the use of the value keyword here. This keyword instructs the compiler that this is a .NET value type and not a traditional C++ structure. It’s important that you remember to use value when defining your structures.
This simple structure represents a point on a graph, so it has two integer data members representing the X and Y coordinates.
Note
In standard C++ the only difference between a struct and a class is in the default access level. Members of a class are private by default, whereas members of a struct are public, unless marked otherwise. This has been carried over into C++/CLI, so there is no need to make structure members public.
To create and initialize a Point object, add the following lines to the main function of your application:
// Create a Point
Point p1;

// Initialize its members
p1.x = 10;
p1.y = 20;
Notice that the code doesn’t use the gcnew operator. The gcnew operator is used to create references to objects, and value types aren’t accessed by reference. Instead, a Point has been created on the program stack, and you access it directly as p1. Because the data members are public at this point, you can access them by using the familiar dot notation.
Add two lines to print out the value of one of the structure members, like this:
Console::WriteLine("p1.x is {0}", p1.x);Compile and run the application.
At this point, you should see the output “p1.x is 10”.
Investigating the structure
In this exercise, you will run the application under control of the debugger so that you can look at the structure of the value type you have created.
If you closed the Structs project, open it again and open the source file Structs.cpp.
Insert a debug breakpoint by clicking in the gray border to the left of the code. Click next to the declaration of p1.
A red dot appears in the border, as illustrated in the screen shot that follows.
Press F5 to start the debugging session.
After the application loads, it executes and stops at the breakpoint. You can now use the Locals pane at the bottom of the window to look at the structure of the Point type.
You should see an entry for the variable p1. Any type that has internal structure—such as Point—is indicated by a plus sign (+) to the left of the variable name.
Click the plus sign to expand the structure.
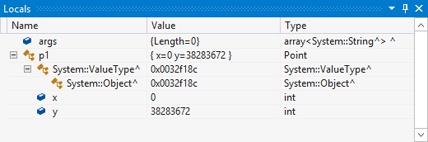
The Locals pane opens, appearing similar to the one shown in the following screen shot:
You can see that p1 has three entries below it. The first shows that it’s derived from System::ValueType, which is in turn derived from System::Object. The other two are the x and y members, which are both 32-bit integers. At this point in in the code, the structure hasn’t been fully initialized, so they don’t contain sensible values.
Press F10 three times to initialize p1 and execute the next two assignment statements.
This action results in p1 being initialized, and you will see the values of x and y change to reflect the values you set. The values also change from black to red in the Locals pane, showing that they were changed in the previous execution step.
Continue pressing F10 to single-step through the code, examining the changes that occur to p1 as you execute each line. When you’re done, discontinue debugging by clicking the Stop Debugging button on the toolbar (the dark-red square), clicking the Stop Debugging command on the Debug menu, or pressing Shift+F5.
The differences between structures and classes
Structures and classes have several fundamental differences:
You can’t initialize members in a structure definition. If you need to provide initialization for a structure type, you must provide a constructor.
You can’t override the default no-argument constructor for a structure. This is because the runtime automatically sets all members of a structure to their default values: 0 for numeric types, and false for Booleans.
Structures can’t have destructors or finalizers, because they aren’t garbage collected.
Inheritance isn’t applicable to structures, so they can’t inherit from anything else and you can’t use them as a base class.
Structures can implement interfaces.
Implementing constructors for a structure
In this next exercise, you will add a constructor to the Point structure so that instances can be initialized on creation.
Continue using the project from the previous exercise.
Add a constructor to your Point structure so that the code looks like this:
value struct Point
{
    int x, y;
    Point(int xVal, int yVal) { x = xVal; y = yVal; }
}
The constructor takes two int values and uses them to initialize the x and y data members. In this case, the arguments are simply being copied into the data members, but it would be simple to add some checking to ensure that the data passed in is correct.
You can now add extra code to your main function to create initialized Points.
Point p2(10,20);   // use the second constructor to set x
                   // to 10 and y to 20
Console::WriteLine("p2.x is {0}", p2.x);
Build and run the application. Check that the result is what you expect.
Using one structure within another
It’s possible—and often useful—to use one structure within another. Imagine that you have a structure named Person for describing a person. The structure contains the name and date of birth, among other data. You could use separate fields for each item, but you could also make the date entries into another structure and refer to it inside Person. Here’s an example:
// A Date structure containing day, month and year
value struct Date
{
    int dd, mm, yyyy;
};

// A Person structure containing a Date member
value struct Person
{
    String ^name;
    Date DOB;
};
You can see how the Date structure contains three members representing the day, month, and year. This structure is quite general, so you could use it in other applications. The Person structure contains a String reference to hold the name, and a Date object to hold the date of birth.
In this exercise, you’ll use these two classes to investigate how structure data members work.
Create a new CLR Console Application project named Person.
At the top of the file, immediately below the using namespace System; line, add the structure definitions for Date and Person.
In the main function, create a Person object. Remember that you don’t use gcnew, because structures are value types.
// Create a Person
Person p1;
Fill in the values for the fields.
// Fill in the name
p1.name = "Fred";
p1.DOB.dd = 10;
p1.DOB.mm = 3;
p1.DOB.yyyy = 1960;
Notice how structure data members are accessed. Because the DOB member has members of its own, you simply extend the dot notation to another level to access its members. You can continue this nesting to as many levels as you like, although it is unusual to go much deeper than you’ve done here.
You can also initialize all the members of Person in one line. Remove the four initialization lines you entered in step 4 and then change the line where you create the Person.
Person p1 = {"Fred", {10, 3, 1960}};Can you see what is going on here? The data in the braces—called an aggregate initializer—provides data for the initialization of the structure. The Person structure contains two items: a String and a Date. Therefore, there are two items in the list. Because Date has members of its own, its entries are also enclosed in braces.
If you decide that the date of birth is wrong, you can simply create a new Date and copy it into the Person object, such as in the following:
// Create a new Date
Date newDOB = {1, 4, 1955};
p1.DOB = newDOB;
The new Date takes the values specified in the initializer and then copies it into the Person object, overwriting the values in the Date that’s already there.
You can see the configuration of the Person structure by running the application under control of the debugger. Place a breakpoint in the application at the line where p1 is created by clicking in the gray margin to the left of the code.
Press F5 to start the debugging session.
After the application loads, it executes and stops at the breakpoint. You can now use the Locals pane at the bottom of the window to look at the structure of the Person type.
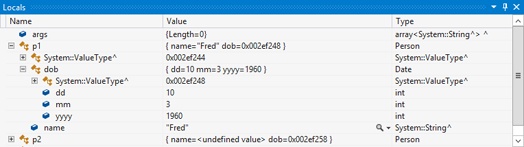
Click the plus sign to the left of p1 in the Locals pane to expand the structure of Person.
Observe that it has Name and DOB members, and if you click the plus sign to the left of DOB, you can expand its structure, as well.
Press F10 to step through the code until all the members are initialized.
The members of p1 display in red as each value changes.
When you’ve finished, press Shift+F5 to stop debugging or, on the toolbar, click the Stop Debugging button.
Finally, let’s consider nested structure definitions. If you don’t want to use the Date structure anywhere except inside your Person structure, you can define Date inside Person, as shown here:
// A Person structure containing a Date structure
value struct Person
{
    String ^name;
    value struct Date
    {
        int dd, mm, yyyy;
    };
    Date DOB;
};
You create Person variables and access their members exactly the same as before. The big difference is that the Date structure is now a part of Person, so you can’t create Date variables on their own.
Copying structures
Because structures are value types, copying them makes a copy of the values they contain. Contrast this behavior with classes, for which copying objects results in references being copied.
Person p1;
Person p2;
...
p2 = p1;   // p1's data is copied into p2
MyClass m1;
MyClass m2;
...
m2 = m1;   // m2 and m1 now refer to the same object.
// No data is copied.Enumerations
An enumeration (commonly referred to as enum) is a set of named integer constants. Enumerations are especially suitable for representing types that can take one of a set of fixed values such as the days of the week or the months of the year. Enumerations are value types, and they derive from the abstract System::Enum class, which in turn derives from System::ValueType.
Creating and using an enumeration
In the following exercise, you will create an enumeration to hold values representing the days of the week and then use it in an application.
Create a new CLR Console Application project named Enums.
At the top of the Enums.cpp file, immediately below the using namespace System; line, add the following structure definition:
// The Weekday enum definition
public enum class WeekDay
{
    Monday, Tuesday, Wednesday, Thursday, Friday,
    Saturday, Sunday
};
The enum class keywords start an enumeration definition, and you’ll notice that, once again, enums are defined similarly to classes. The body of the enumeration is enclosed in braces and finishes with a semicolon. The use of the enum and class keywords indicates to the compiler that this is a value type and not a traditional C++ enumeration.
The enumeration itself consists of a comma-separated set of names, each of which represents an integer constant.
You create enumeration variables the same as you create any other type. To create and initialize a WeekDay object, add the following lines to the main function of your application:
// Create a WeekDay
WeekDay w = WeekDay::Monday;
As with structures, the code doesn’t use the gcnew operator. An enumeration variable of type WeekDay has been created on the program stack, and you access it directly as w. Notice how the enumeration variable is initialized with one of the members of the enumeration. This syntax is how you initialize enumeration variables and how you can change their values later on.
Try printing out the value of the WeekDay object like this:
Console::WriteLine("Value of w is {0}", (int)w);The value 0 should be printed. Each of the named constants making up the enumeration represents an integer value. By default, these values start from 0 and increase by one for each subsequent member of the enumeration. You can test this output by changing the value that you initially assigned to w, for example, WeekDay::Saturday. When you run the code again, the value 5 should print.
You must cast the enumeration to an int in order to be able to print it; you will get an error if you try to print the enumeration without casting it.
It would be good to be able to print out the symbol associated with the enumeration as well as its numeric value. You can do this using the Format member of the Enum base class, as in the following example:
String ^s = Enum::Format(WeekDay::typeid, w, "G");
Console::WriteLine("The day is {0}", s);
Format needs to be informed as to the type of the enumeration, which you do it by using Enum::typeid and the value itself. The “G” indicates the format for the conversion: this is general format, which means a string.
Note
Ensure that you qualify your enumeration with either public or private. If you don’t, you will get an error (C2664) when you try to use Enum::Format. This is because the new C++ standard (C++11, which this version of Microsoft C++ supports) has a new enumeration type; if the compiler does not see public or private on an enumeration declaration, it assumes that you have declared a C++11 enumeration.
More about enumerations
Even though the value given to an enumeration is an integer, there’s no implicit conversion between enumerations and integers. If you consider the following lines of code, you’ll understand why:
//** This code won't compile! **//
// '1' would mean Tuesday
w = 1;
// What would '8' mean?
w = 8;
If converting between integers and enumerations were allowed, it would be possible to put invalid values into the enumeration. If you do want to convert between integers and enumeration values, you need to use an explicit cast to inform the compiler as to what you want to do, such as in the following example:
int day = static_cast<int>(w);
You can also use a cast to go the other way, from integer to enumeration, but that isn’t good practice.
You don’t have to rely on the default numeric values that are assigned to the enumeration members. Suppose that you want the integer equivalents of the weekdays to range from 1 through 7 instead of 0 through 6; simply assign 1 to the Monday member, as shown here:
public enum class WeekDay
{
    Monday = 1, Tuesday, Wednesday, Thursday, Friday,
    Saturday, Sunday
};
The enumeration now starts with 1, and because you haven’t given any other values for the remaining members, they are numbered 2 through 7.
If you want, you can give a completely discontinuous series of values for the enumeration members, as in this example:
public enum class StatusCodes
{
    OK=0, FileNotFound=2, AccessDenied=5, InvalidHandle=6,
    OutOfMemory=8
};
Using enumerations in applications
In this exercise, you’ll see how to use an enumeration to control application execution by using it in a switch statement.
Continue using the project from the previous exercise. If you’ve closed it, on the File menu, click Open Solution to open the project again.
After the WriteLine statements, add the following switch statement code:
// Switch on the weekday
switch(w)
{
case WeekDay::Monday:
    Console::WriteLine("It's a Monday!");
    break;
case WeekDay::Tuesday:
    Console::WriteLine("It's a Tuesday!");
    break;
case WeekDay::Wednesday:
    Console::WriteLine("It's a Wednesday!");
    break;
default:
    Console::WriteLine("It's some other day...");
}
You are allowed to use an enumeration variable as a switch control variable because it’s basically an integer. Likewise, you can use the names of enumeration members as switch case labels because they’re also integers. The example code has cases for Monday through Wednesday; everything else is handled by the default case. Remember to put the break statements in after the code for each case, or the application won’t behave as you expect.
Using memory efficiently
By default, an enum is an int, and therefore, enumerations are 32 bits in size, which gives you a range of values of –2,147,483,648 through 2,147,483,647. If you’re going to use only small values for enumeration members, memory will be wasted if each variable takes up 32 bits. For this reason, it’s possible to base an enumeration on any integer type. In the case of our WeekDay example, all our values can quite happily fit into 1 byte. Thus, you could base the enum on a char, as shown here:
// WeekDay variables are one byte in size
public enum class WeekDay : char
{
    Monday = 1, Tuesday, Wednesday, Thursday, Friday,
    Saturday, Sunday
};