
Chapter 1. Hello C++!
After completing this chapter, you will be able to
Recognize C++ functions.
Recognize C++ keywords and identifiers.
Create a C++ application.
Welcome to the exciting world of programming Microsoft .NET with Microsoft Visual C++. This chapter introduces the C++/CLI language and shows you how to perform simple input/output (I/O).
What is C++/CLI?
C++/CLI is a version of the C++ programming language designed to run on the .NET Framework. It has been available since Microsoft Visual Studio 2005 and is the subject of an international standard. You can find details of the ECMA standard at http://www.ecma-international.org/publications/standards/Ecma-372.htm.
To achieve this, some changes had to be made to standard C++. There are some things that you can do in standard C++ that are not permitted in C++/CLI (for example, you cannot inherit from multiple base classes) and there have been some changes to the language geared to support .NET features (such as interfaces and properties) and to work with the .NET Runtime.
Why would you choose to use C++/CLI to write .NET code instead of another .NET language such as C#? Apart from personal preference, there are two very good reasons to choose C++/CLI. The first is for interoperability; C++/CLI makes it simple to incorporate standard C++ code into .NET projects. The second is that we have a .NET version of the C++ Standard Template Library (STL), and so people used to coding against the STL will find it possible to work in the same way in .NET.
Even if neither of these reasons applies to you, C++/CLI is still a perfectly good way to learn about .NET programming because it exposes all of the features that you need to write .NET programs and explore the .NET platform.
Your first C++/CLI application
It’s time to get our hands dirty with a simple C++/CLI application. Of course, no programming book would be complete without including the customary “Hello World” application, so let’s start with that.
using namespace System;

int main()
{
  Console::WriteLine("Hello, World!");
  return 0;
}
This short application illustrates some fundamental C++/CLI concepts:
The first line (which begins with using) informs the compiler that you’re using the .NET System library. Many different libraries could be used in a single project; the using statement specifies to the compiler which library you want to use.
The rest of the application is an example of a C++ function. All blocks of code in C++ are called functions—there’s no such thing as a procedure or a subroutine. Each C++ function contains the header (the first line of this application) and the function body (all of the text between the braces, { and }). The header shows the return type of the function (in this case int, short for integer), the name of the function (main), and the list of parameters inside round brackets. Note that you still need to include the round brackets even if you don’t have anything to pass to the function.
All statements in C++ are terminated with a semicolon.
Of the six lines of code in the example application, only two contain C++ statements: the Console line and the return line. The Console line outputs characters to the console, and the argument to the function consists of the string that you want to output. The return line exits from the function—in this case, the application, because there is only one function—and returns zero, which is the standard value to return when execution is successful.
The main function
Why is the only function in the previous example called main? The simple answer is that the code won’t compile if it isn’t! However, it might be more useful to explain how the language works.
A normal C++ application contains many functions (and also many classes, as is discussed in Chapter 2). How does the compiler know which function should be called first? Obviously, you can’t allow the compiler to just randomly choose a function. The rule is that the compiler always generates code that looks for a function named main. If you omit the main function, the compiler reports an error and doesn’t create a finished executable application.
So, the compiler will expect a function named main. Is that all there is to it? Well, not quite. There are some additional items, such as the return type and parameters being correct, but in the case of main, some of the C++ rules are relaxed. In particular, main can take parameters that represent the command-line arguments, but you can omit them if you don’t want to use the command line.
C++ keywords and identifiers
A C++ keyword (also called a reserved word) is a word that means something to the compiler. The keywords used in the example application are using, namespace, and return. You’re not allowed to use these keywords as variable or function names; the compiler will report an error if you do. You’ll find that Visual Studio helps you identify keywords by displaying them in a special color.
An identifier is any name that the programmer uses to represent variables and functions. An identifier must start with a letter and must contain only letters, numbers, or underscores. The following are legal C++ identifiers:
My_variable
AReallyLongName
The following are not legal C++ identifiers:
Invalid identifier | Reason for being invalid |
0800Number | Must not start with a number |
You+Me | Must contain only letters, numbers, and underscores (the plus sign is the culprit here) |
return |
Outside of these restrictions, any identifier will work. However, some choices are not recommended, such as the following:
Identifier | Reason it’s not recommended |
main | Could be confused with the function main. |
INT | Too close to the reserved word int. |
B4ugotxtme | Just too cryptic! |
_identifier1 | Underscores at the beginning of names are allowed, but they are not recommended because compilers often use leading underscores when creating internal variable names, and they are also used for variables in system code. To avoid potential naming conflicts, you should not use leading underscores. |
Creating an executable application—theory
Several stages are required to build an executable application; Microsoft Visual Studio 2012 helps you accomplish this by automating them. To examine and understand these stages, however, let’s look at them briefly. You’ll see these stages again later in the chapter when we build our first application.
Editing the application source files
Before you can create an application, you must write something. Visual Studio 2012 provides an integrated C++ editor, complete with color syntax highlighting and Microsoft IntelliSense to show function parameter information and provide word completion.
Compiling the source files
The C++/CLI compiler is the tool for converting text source files into something that can be executed by a computer processor. The compiler takes your source files (which usually have a .cpp extension) and builds them into either a stand-alone executable file (with a .exe extension) or a library file to be used in other projects (with a .dll extension).
Running and testing the application
After you have successfully built the application, you need to run it and test it.
For many development environments, running and testing is often the most difficult part of the application development cycle. However, Visual Studio 2012 has yet another ace up its sleeve: the integrated debugger. The debugger has a rich set of features with which you can easily perform run-time debugging, such as setting breakpoints and variable watches.
Creating an executable application—practice
Go ahead and start Visual Studio 2012. An invitingly blank window appears on your screen.
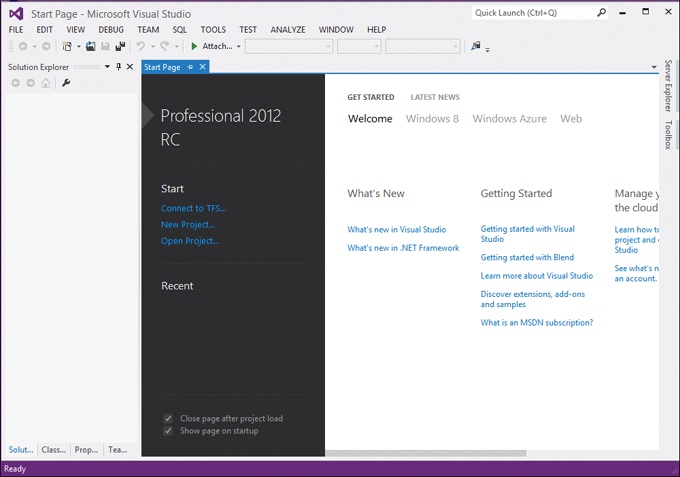
This window is the powerful Visual Studio integrated development environment (IDE). It contains all the tools you’ll need to create full-featured, easy-to-use applications.
Note
This book was written by using the Release Candidate (RC) version of Visual Studio 2012. As a result, screen shots and other details might differ from the version you’re using when you read this.
Creating a project
The first task is to create a new project for the “Hello, World” program.
In Visual Studio, on the File menu, point to New, and then click Project. (Alternatively, you can press Ctrl+Shift+N.)
Note
I am using the Professional version of Visual Studio 2012. If you are using other versions, the way in which you create a project might be different. For example, in the Express version, you will find New Project on the File menu.
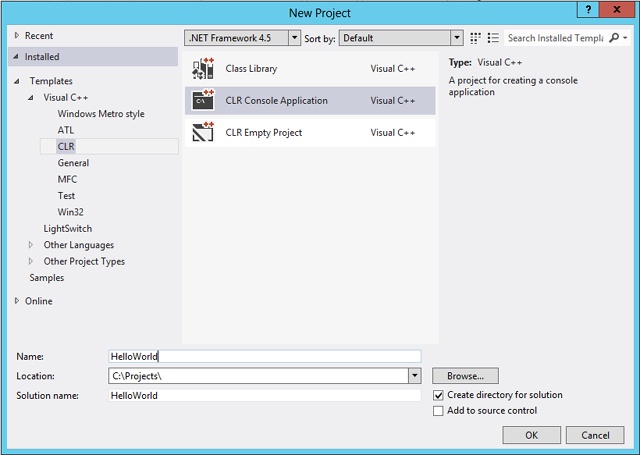
The New Project dialog box opens.
In the navigation pane on the left, under Templates, click Visual C++, and then click CLR. In the center pane, click CLR Console Application and then, toward the bottom of the dialog box, in the Name box, type HelloWorld.
Click the Location list and select a location for your new project or click Browse and navigate to an appropriate directory.
Click OK to create the project.
The wizard correctly initializes all the compiler settings for a console project.
Editing the C++ source code
The wizard creates a project for you with all the files needed for a simple console application. It also opens the main source file in the editor that contains just the code we want.
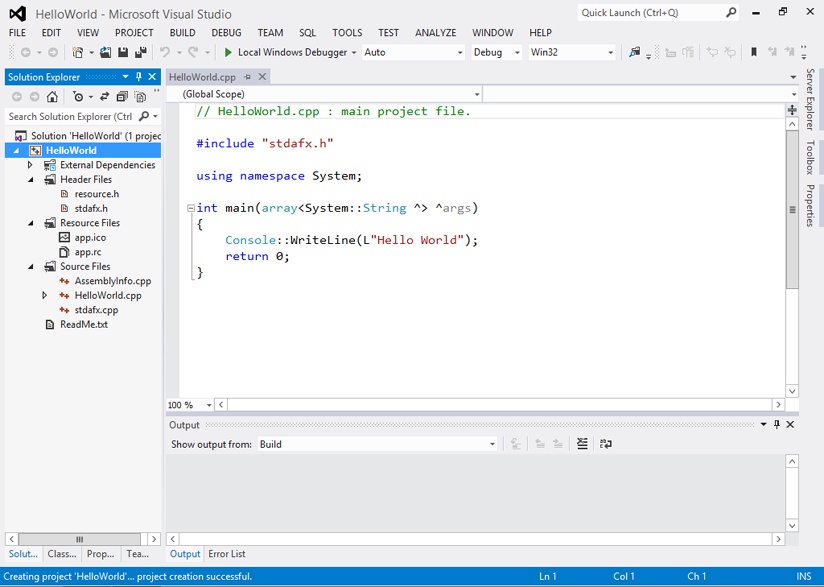
Notice that the keywords automatically appear in blue (provided that you spell them correctly).
There are a few things in the automatically generated source code that we don’t need, so let’s remove them. This will give you some practice in using the editor as well as making the code easier to understand. The application is not going to receive any command-line arguments when you run it, so remove everything between the opening and closing parentheses following main—in this example, array<System::String ^> ^args. In addition, the “L” before the “Hello World” string isn’t necessary either (for reasons that I’ll explain later), so you can remove that, as well.
Building the executable
The next step is to build the executable. The term build in Visual Studio 2012 refers to compiling and linking the application. Visual Studio compiles any source files that have changed since the last build and—if no compile errors were generated—performs a link.
To build the executable, on the Build menu, click Build Solution or press F7.
Note
The shortcut keys might differ depending on the version of Visual Studio you are using. For example, in the Ultimate edition, the shortcut is F6.
An Output window opens near the bottom of the Visual Studio window, showing the build progress. If no errors are encountered, the message Build: 1 succeeded, 0 failed, 0 up-to-date, 0 skipped will appear in the Output window. If this window is closed, you can open it by selecting Output from the View menu.
If any problems occur, the Error List window will contain a list of errors and warnings.
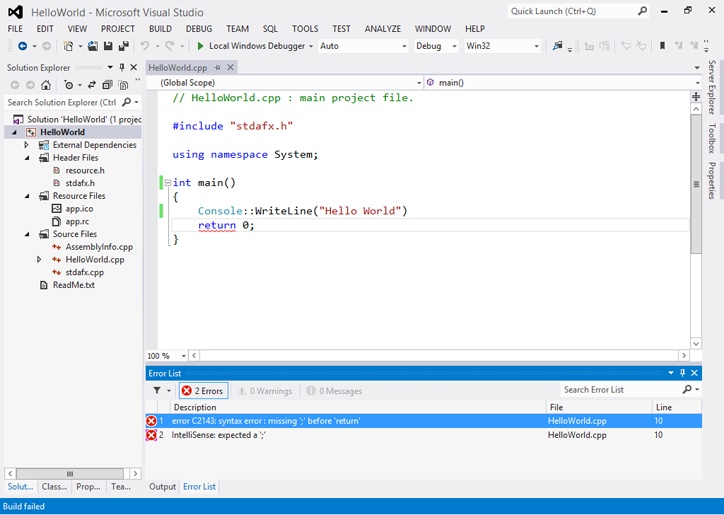
You can double-click the error line in the Error List window to place the cursor at the line in the source file where the compiler encountered the error. Fix the error (you might have misspelled a keyword or forgotten a semicolon) and rebuild the project. If the Error List pane is closed, you can open it by selecting Error List from the View menu.
Executing the application
After you’ve eliminated all errors and you’ve successfully built the project, you can finally execute the application. On the Debug menu, click Start Without Debugging to run the application. You can also press Ctrl+F5 to execute the application.
You’ll see the output of your application, with the message “Press any key to continue” at the bottom of the output. This line is added by the IDE so that the console window doesn’t simply disappear when the application has finished running.
Conclusion
Although the example in this chapter isn’t the most exciting application ever written, it demonstrates some key C++ development points. It introduces the Visual Studio 2012 IDE and the ability to compile and link a application, and it serves as an introduction to the C++/CLI language.
Now, there’s no turning back. Every new C++/CLI and Visual Studio 2012 feature that you learn about will fire your imagination to learn more and be increasingly productive. Software development is an exciting world.
Finally, don’t forget to have some fun. Go back and try a few variations on the example application, click a few menus, and take some time to become familiar with the environment.
Quick reference
To | Do this |
Create a new project in Visual Studio 2012. | Click File | New | Project, or press Ctrl+Shift+N. In the Express version, on the File menu, click New Project. |
Add a file to a project. | Click File | New | File, or press Ctrl+N. |
Build a Visual Studio 2012 project. | Click Build | Build Solution, or press Ctrl+Shift+B. |
Execute a program from within Visual Studio 2012. | Click Debug | Start Without Debugging, or press Ctrl+F5. |