
Chapter 21, described the types of home networking we rely on every day to keep our PCs connected to the Internet, including connecting to wireless hotspots. This chapter, on the other hand, covers less frequently used networking technologies:
Ad hoc networking. Connect two PCs to each other wirelessly. This is good for sharing files between PCs when you travel.
Bluetooth. Connect your PC to wireless accessories such as keyboards, mouse devices, and headphones. You can even use Bluetooth to transfer files between PCs and devices.
3G/4G mobile broadband. Along with a service agreement with a wireless broadband provider, keep your mobile PC connected wherever you go (within range of a wireless signal).
PCs connect to wireless access points most of the time. You probably don’t travel with a wireless access point, however. If you need to connect two PCs together when there isn’t a wireless access point around, you can use ad hoc networking. You can also use that same ad hoc network to share an Internet connection, which is incredibly useful in hotels where you might otherwise have to pay separately for each device connected to their network.
Note
Creating an ad hoc network Watch the video at http://aka.ms/WinIO/adhoc.
Not all wireless devices support ad hoc networking, but most seem to. To determine whether your PC supports ad hoc networks, open a command prompt with administrative privileges, which you can do by selecting Command Prompt (Admin) from the WinX menu, and then run the command netsh wlan show drivers. If the Hosted Network Supported line shows Yes, then your PC supports creating an ad hoc network. The following shows the output.
C:>netsh wlan show drivers

Interface name: Wi-Fi
    Driver                    : Intel(R) Centrino(R) Advanced-N 6230
    Vendor                    : Intel Corporation
    Provider                  : Microsoft
    Date                      : 10/7/2011
    Version                   : 14.2.1.3
    INF file                  : C:WINDOWSINF
etwns64.inf
    Files                     : 2 total
                                C:WINDOWSsystem32DRIVERSNETwNs64.sys
                                C:WINDOWSsystem32driversvwifibus.sys
    Type                      : Native Wi-Fi Driver
    Radio types supported     : 802.11a 802.11b 802.11g
    FIPS 140-2 mode supported : Yes
    802.11w Management Frame Protection supported : No
Hosted network supported : YesWindows 7 provided graphical tools to create ad hoc networks. However, with Windows 8.1, you need to run commands at a command prompt with administrative privileges. Open the command prompt and run these commands, replacing <name> and <password>:
netsh wlan set hostednetwork mode=allow ssid=<name> key=<password>
netsh wlan start hostednetwork
For example, you might run the following command:
C:>netsh wlan set hostednetwork mode=allow ssid=QuickNet key=mG9s5Unx
The hosted network mode has been set to allow.
The SSID of the hosted network has been successfully changed.
The user key passphrase of the hosted network has been successfully changed.

C:>netsh wlan start hostednetwork
The hosted network started.
As shown in Figure 22-1, the new (QuickNet) network appears in the Network And Sharing Center.
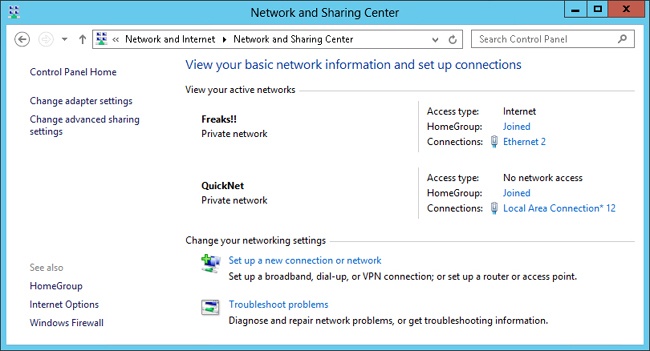
Now you’ll be able to connect to the network from other wireless devices using the SSID and password that you specified, just as if it were a wireless access point. Once connected, you should be able to connect to other Windows PCs by name and by using homegroups.
When you no longer need the network, run the following command at the administrative command prompt to stop it: netsh wlan stop hostednetwork.
You can also use an ad hoc network to share an Internet connection. This is useful when you’re at a hotel that only supports a single Internet connection per room, but you have up to 20 devices that need to share the connection.
I know it might sound silly that you’d travel with multiple wireless devices, but for me, I typically travel with a mobile PC and a smartphone that supports wireless, and then each person in my family has a wireless device that they want to use to access the Internet. Particularly when in foreign countries/regions, I can save quite a bit in data roaming fees if I set up my own ad hoc wireless network in the hotel room to share the hotel’s Internet connection instead of having each person’s smartphone connect to the Internet via a mobile data provider.
First, connect one computer to the Internet with a wired or wireless connection. You can use a single wireless adapter to both connect to the Internet and create an ad hoc network to share the connection. Then, follow the instructions in the section Creating an ad hoc wireless network. Finally, share the Internet connection by following these steps:
In Network And Sharing Center, click Change Adapter Settings.
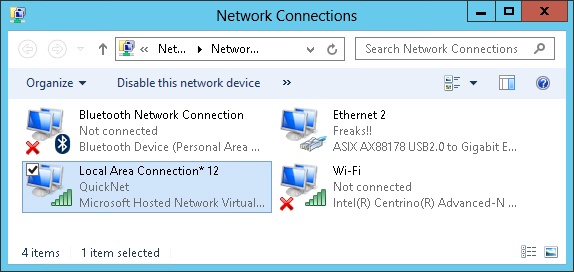
In the Network Connections window, make note of the name of your ad hoc network adapter name. It shows the SSID you specified, and it’s not the name of your normal Wi-Fi adapter. For example, in Figure 22-2, it’s Local Area Connection* 12. Don’t do anything with it, just remember the name for the next steps.
Right-click your Internet connection (Ethernet 2 in Figure 22-2), and then click Properties.
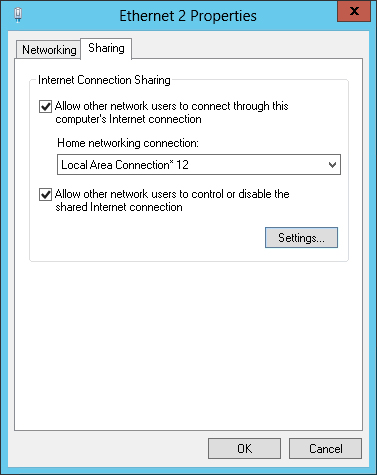
Select the Sharing tab in the Ethernet 2 Properties dialog box. As shown in Figure 22-3, select Allow Other Network Users To Connect Through This Computer’s Internet Connection. In the Home Networking Connection list, select the network adapter you identified in step 2, and then click OK.
You can now connect other wireless devices to your ad hoc network and access the Internet. If any wireless devices were previously connected to your ad hoc wireless network, disconnect them and then reconnect them.
This process turns your PC into a Network Address Translation (NAT) server and DHCP server, as described in Chapter 21. In many cases, even the PC’s wired Internet adapter will have a private IP address. That’s okay; you can have NAT within NAT.
If you’re curious about the inner workings of Internet Connection Sharing (ICS), run ipconfig /all at a command prompt on the PC sharing the Internet connection and then on the clients. You’ll find that the PC sharing the Internet connection has separate IP addresses for the Internet and private links. The private link will always be 192.168.137.1. Any computers connecting to the Internet will have an IP address in the range 192.168.137.127 to 192.168.137.255 and will have 192.168.137.1 as their default gateway and DNS server.
You might want to change these IP addresses if you are replacing an existing router and don’t want to renumber the clients. You can change these IP addresses by modifying several registry entries on the Windows 8.1 PC that will be sharing the connection. Modifying registry entries isn’t common in Windows 8.1; most settings are now defined using Group Policy. However, if you’re an old-school Windows user like I am, you probably already know the registry well, and you probably hate it, too.
To modify a registry entry, launch the Registry Editor. From the Start screen, type regedit and then press Enter. Next, browse to HKEY_LOCAL_MACHINESYSTEMCurrentControlSetServicesSharedAccessParameters, as shown in Figure 22-4.
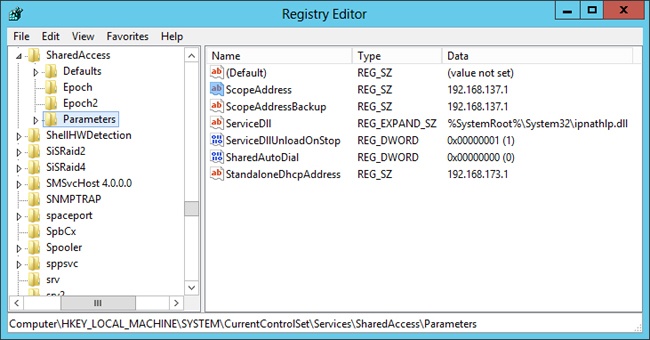
To change the IP address ICS uses, modify the following values by double-clicking them:
ScopeAddress. Set this to the private IP address that you want the PC sharing the Internet connection to have on your ad hoc network.
StandaloneDhcpAddress. Set this to the same IP address.
Windows 8.1 automatically figures out the IP addresses to assign to clients and the subnet mask based on the IP address you choose. In other words, if you set the ScopeAddress to 10.1.1.1, ICS will assign clients addresses on the 10.1.1.0 network with a subnet mask of 255.255.255.0. ICS always uses a subnet mask of 255.255.255.0.
The previous sections described how to share an Internet connection using nothing but a wireless PC running Windows 8.1. The steps are rather complicated, though: you need to open an administrative command prompt, type a bunch of commands (which won’t be easy on a tablet), modify adapter properties to share a connection, and finally connect to the wireless network.
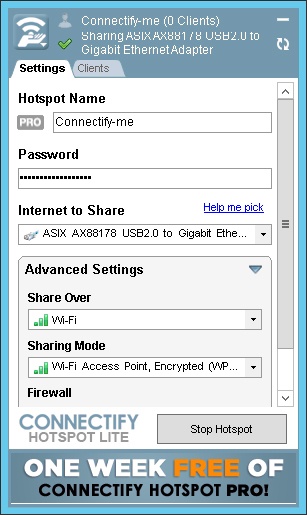
There are a couple of easier ways. Still using only Windows 8.1, you can run the Connectify Hotspot desktop app, available at http://www.connectify.me/. As shown in Figure 22-5, the free version works great. When prompted, be sure to allow Connectify Hotspot to communicate through Windows Firewall. After installation, you can start Connectify Hotspot from the Start screen and manage it from the desktop.
You can also bring a router with you. You could simply unplug your home router and bring it with you when you travel, though it might take up more room in your suitcase than you’re willing to sacrifice. As an alternative, you can buy a travel router for US$12–$50. Either way, just plug your router into your hotel’s Internet connection and then connect your devices to your router to share the connection.
Bluetooth is a low-power, low-speed, and short-range (about 30 feet) networking technology. The low power makes it ideal for mobile devices because it doesn’t drain too much of their battery power. The low speed and short range limit the use of the technology to short network communications. As a result, Bluetooth is primarily used to connect wireless accessories such as keyboards and mouse devices to mobile PCs.
PCs and Bluetooth accessories connect via the pairing process. Pairing a PC and a Bluetooth device is an authentication process. Basically, the pairing process prevents the guy sitting next to you at the café from controlling your PC with his mouse (accidentally or deliberately).
Pairing can occur only when both the Bluetooth device and the PC are in discoverable mode. Discoverable mode causes Bluetooth to actively look for other devices in discoverable mode. Bluetooth ignores any devices that aren’t in discoverable mode.
Note
Pairing Bluetooth accessories Watch the video at http://aka.ms/WinIO/bluetooth.
To add a Bluetooth accessory, first put the accessory in discoverable mode. Check the accessory’s manual for specific instructions, but typically there’s a button you need to press. Sometimes, you need to press and hold the button. On smartphones, you should find the Bluetooth section of the settings.
On your PC, select PC & Devices from PC Settings, select Devices, and then select Add A Device. As shown in Figure 22-6, Windows will display any nearby Bluetooth devices that are in discoverable mode. Select a device to connect to it.

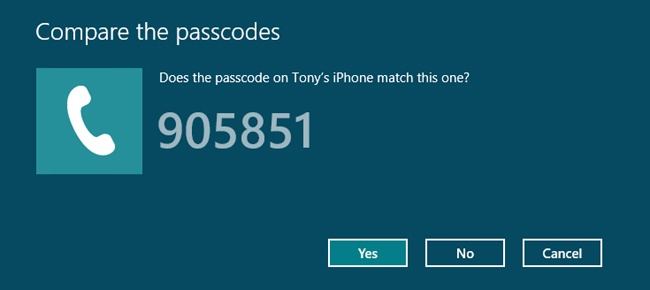
Next, Windows 8.1 might ask you to perform some sort of authentication. This might involve typing a code into a keyboard or, as shown in Figure 22-7, confirming that two codes match. This authentication process helps prevent a sneaky person within a few feet of you from intercepting your connection.
You don’t need to remove a Bluetooth device when you’re done with it. Simply leave it configured, and it’ll be available the next time you want to use it. If you do want to remove a Bluetooth pairing, select PC & Devices from PC Settings, select Devices, select the device, and then select the – symbol in the upper-right corner.
You can use Bluetooth to send files between two PCs. This is a clumsy and slow process (a maximum of 721 Kbps), but it’s an effective way to send a file or two when other forms of networking aren’t available and you don’t have a USB flash drive to exchange files.
The process involves five high-level steps:
Enable discovery on one of the PCs. To pair the two PCs, you need to make one of them discoverable. From the Start screen, search for bluetooth and then select Change Bluetooth Settings. In the Bluetooth Settings dialog box, select Allow Bluetooth Devices To Find This Computer, as shown in Figure 22-8. Click OK.
Pair the two PCs. On the other PC, select PC & Devices from PC Settings, select Devices, and then select Add A Device. Choose the other PC. Then, type the passcode provided, as shown in Figure 22-9. Click Next to complete the pairing.
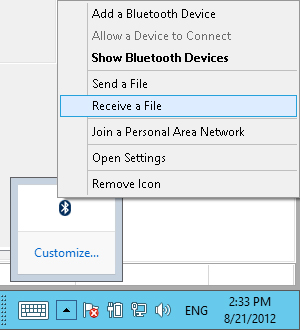
Start receiving a file on one PC. On the receiving PC, open the desktop. Expand the system tray icon next to the clock. Click the Bluetooth icon, and then select Receive A File, as shown in Figure 22-10. Windows opens the Bluetooth File Transfer wizard to the Waiting For A Connection page.
Send the file from the other PC. On the sending PC, click the Bluetooth icon in the system tray and then click Send A File. As shown in Figure 22-11, select the PC to send the file to and then click Next. Then, select the file you want to transfer.
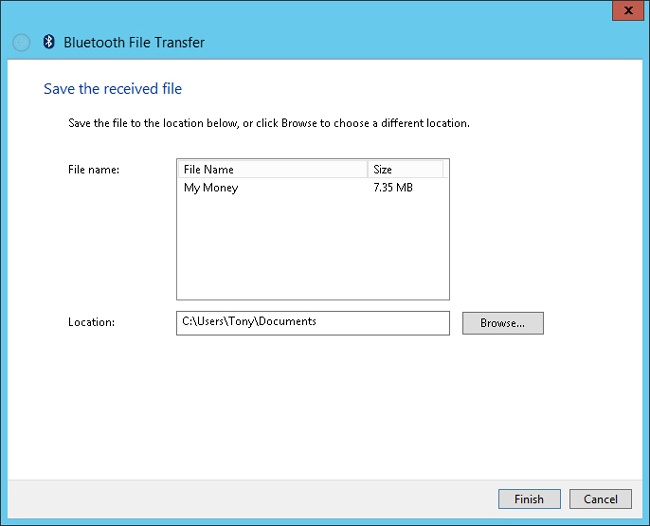
Save the file. On the receiving PC, choose where you want to save the file and click Finish, as shown in Figure 22-12.


If you need to send multiple files, compress them into a ZIP archive before transferring them. You can use the same process for transferring files to other devices, including smartphones. You might need to run a special app to transfer files to your smartphone, however.
Windows 8.1 has built-in support for 3G and 4G wireless broadband. Of course, your mobile computer needs to have a mobile broadband radio and a SIM card, and you’ll need a service agreement from a mobile broadband provider such as AT&T or Verizon Wireless.
Windows 8.1 automatically detects the hardware and, if the mobile broadband adapter was designed for Windows 8.1, will even automatically download your service provider’s app from the Store. With that capability, you’ll be able to click View My Account under your mobile broadband network and open the mobile broadband provider’s app.
Windows 8.1 apps can be made aware of whether your current connection might charge you for data. They can then make intelligent choices to minimize the bandwidth usage. For example, if you’re connected to a metered mobile broadband connection and run an app that downloads video from the Internet, the app could choose to stream a lower quality (and thus lower bandwidth) version of the video. When you connect to a nonmetered Wi-Fi network, it could automatically switch you to a higher quality, higher bandwidth video stream.
You manage mobile broadband connections alongside standard Wi-Fi connections. For example, if you enable airplane mode, Windows 8.1 also turns off your mobile broadband connection. The Wi-Fi network overview in Chapter 21 applies to most aspects of using mobile broadband.
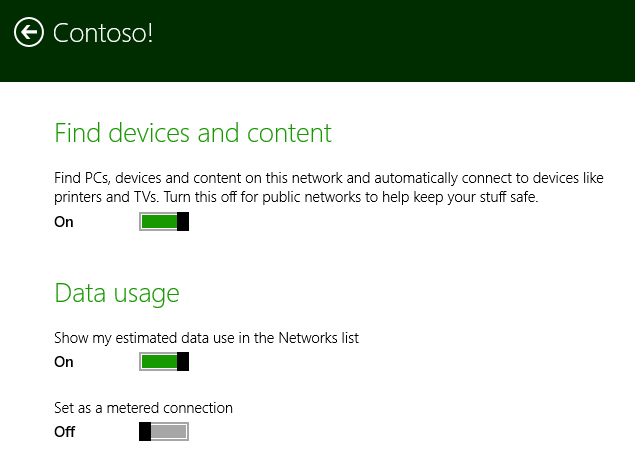
Windows 8.1 will configure mobile broadband connections as metered connections by default, which minimizes the amount of unnecessary communications sent across the connection. For example, Windows 8.1 won’t download updates while you’re connected to a metered connection. If your mobile broadband provider doesn’t charge you for data usage (or if you’re always under the amount included in your service), open PC Settings, Network, Connections, and then select your connection. As shown in Figure 22-13, turn off Set As A Metered Connection.
When multiple network connections are available, Windows 8.1 intelligently chooses which network to send data across. For example, if you have a nonmetered Wi-Fi connection available, Windows 8.1 will use that connection instead of sending data across your metered mobile broadband network. If you move out of range of the Wi-Fi network, Windows 8.1 will automatically use the mobile broadband network, providing you seamless connectivity while minimizing your cost.
You can monitor the amount of data a connection is using by expanding a mobile broadband network from the networks panel. To view how much metered bandwidth individual apps are using, launch Task Manager, select More Details, and then select the App History tab. As shown in Figure 22-14, clicking the Metered Network column heading sorts the apps from most to least bandwidth used.
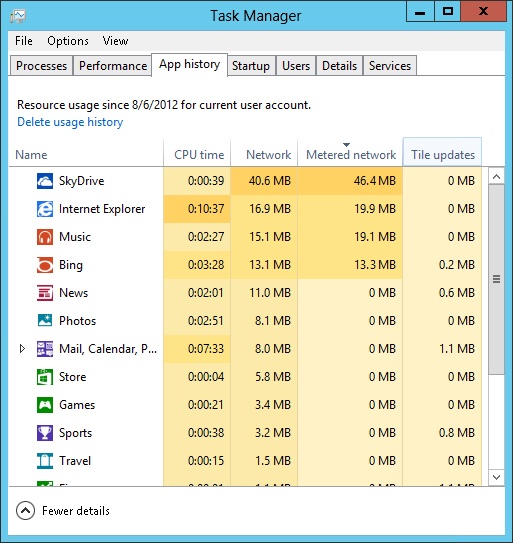
Figure 22-14. Use the App History tab of Task Manager to determine which apps use the most mobile bandwidth.
If your PC doesn’t include built-in mobile broadband, you can purchase a USB mobile broadband adapter. Most smartphones also support tethering, which allows your PC to use your smartphone’s Internet connection. Tethering connects the PC to the smartphone by using a USB cable, Wi-Fi, or Bluetooth. You might need to pay extra for tethering support.