f you plan to upgrade an existing version of Windows, read Buying Windows 8.1 in this chapter, and then skip to Chapter 4.
You might want to try out Windows 8.1 before installing it. If you want to get a quick idea about what it’s like to use Windows 8.1, use VirtualBox to run Windows 8.1 within a virtual machine, as described in Chapter 20. Be careful not to use your product key to activate your virtual machine, however. If you want to see how Windows 8.1 performs with your hardware, but you don’t want to change your existing operating system, you can dual-boot your PC by following the steps in Dual-booting Windows 8.1 near the end of this chapter.
Windows 8.1 is available in four different editions:
Windows 8.1. The basic edition of Windows 8.1. If you’re upgrading from Windows 7 Home Basic or Windows 7 Home Premium, this is the right choice.
Windows 8.1 Pro. The complete edition of Windows 8.1. If you’re upgrading from Windows 7 Professional or Windows 7 Ultimate, this is the right choice.
Windows 8.1 RT. The only edition of Windows 8.1 for ARM-based PCs, such as the Microsoft Surface.
Windows 8.1 Enterprise. The business edition of Windows 8.1, which isn’t recommended for home users or even most small business users.
The decision about which version to buy is easier than it seems. If you have an ARM-based PC, such as a Microsoft Surface, it will come preinstalled with Windows 8.1 RT. There’s nothing more for you to do.
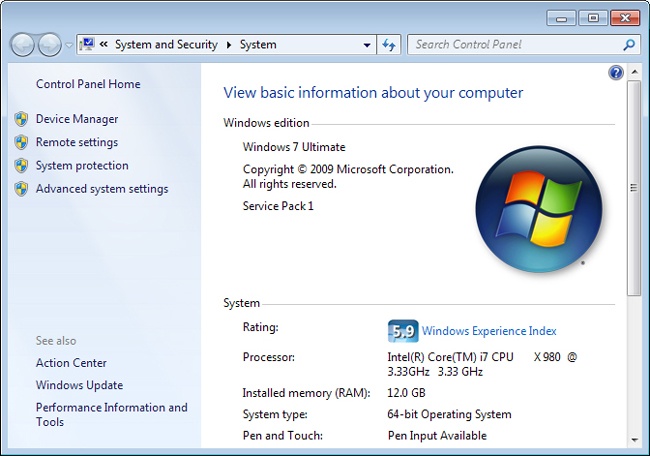
Inside OUT: Which version of Windows 7 am I running?
If you’re not sure which version of Windows 7 you’re running, open the Start menu, right-click Computer, and then select Properties. The System window shows the edition at the top of the page. In Figure 3-1, the PC is running Windows 7 Ultimate.
Windows 8.1 Enterprise is only for business use. If you’re not using your PC at a business that has an Active Directory infrastructure, you don’t need it.
So, that leaves two choices for the average consumer with a typical home PC: Windows 8.1 or Windows 8.1 Pro. Windows 8.1 Pro is a bit more expensive, but it includes many more features. If you decide to start with Windows 8.1, you can easily upgrade to Windows 8.1 Pro later, so don’t stress too much about the choice.
Windows 8.1 Pro offers these features that are not available in Windows 8.1:
Remote Desktop host. Lets you accept Remote Desktop connections, which allow you to control a PC remotely from another PC. I love using Remote Desktop to connect from a laptop or tablet to my desktop PC when I’m at home or traveling and need to access something on my desktop.
Encrypting File System (EFS). Encrypt your files with Encrypting File System, which helps to protect individual files from other users on your PC or from someone with physical access to your PC. For more information about EFS, refer to Chapter 9.
BitLocker. Encrypt entire drives with BitLocker, which can help to protect you from some malware and helps to protect your confidential files if someone steals your PC or hard drive. For more information about BitLocker, refer to Chapter 9.
Hyper-V. Allows you to run virtual machines, which act like another PC within a window on your PC. Virtual machines are useful for testing apps and running other operating systems. For more information about virtual machines, refer to Chapter 20.
Windows Media Center. Enables your PC to act as a Home Theater PC (HTPC) and supports DVD playback. Windows Media Center requires a separate download, which might (or might not) be free, depending on when you bought Windows 8.1 and whether you are upgrading from a previous version of Windows that had Media Center installed. For more information, refer to Chapter 17.
Virtual hard disk (VHD) booting. Allows you to boot directly from a VHD file. A VHD file is like a separate hard drive stored within a file on your hard drive. You might boot from a VHD file if you want to run a separate copy of Windows with different settings and Hyper-V isn’t powerful enough to meet your needs (for example, if you want to be able to play games or connect hardware accessories that Hyper-V doesn’t support.)
Active Directory domain join. Allows you to join an Active Directory domain. Businesses use Active Directory domains to manage large numbers of computers. If you don’t plan to have your PC join a domain, or you don’t know what this is, then it doesn’t matter to you.
For information about purchasing Windows 8.1, visit http://windows.microsoft.com/.
This section describes how to install Windows 8.1 if you’re installing Windows 8.1 on a new PC without an operating system, or you want to perform a clean install of Windows 8.1 to remove any apps, settings, and files.
If you want to upgrade an existing installation of Windows to Windows 8.1, refer to Chapter 4. If your PC is misbehaving and you just want to reinstall Windows to clean out whatever unwanted software might be causing problems, you should start by refreshing or resetting your PC, as described in Chapter 27.
Note
Installing Windows 8.1 Watch the video at http://aka.ms/WinIO/install.
Many new tablets and ultrabooks don’t have a DVD drive. You can purchase USB DVD drives that you can then use to install Windows from a DVD, but there’s an easier way: create a bootable flash drive from an ISO file. Unfortunately, this isn’t as simple as copying the files from the DVD to the flash drive, because that wouldn’t result in a bootable DVD.
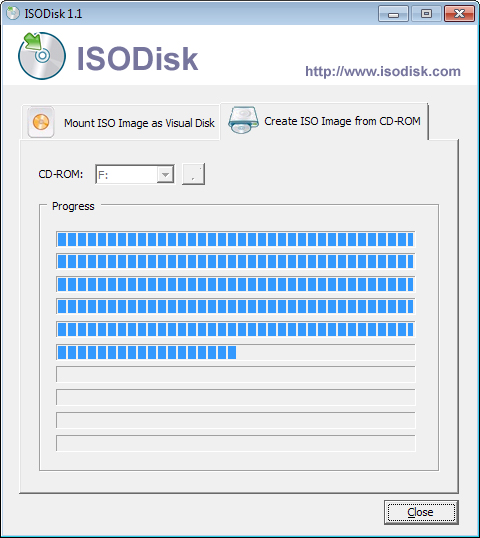
If you don’t have an ISO file of Windows 8.1, you can create one from the Windows 8.1 DVD (presuming you have access to a PC with a DVD drive). Download and install ISODisk from http://www.isodisk.com/. Insert your Windows 8.1 DVD, run ISODisk, select the Create ISO Image From CD-ROM tab, and click the Save button to select the file to create. Figure 3-2 shows ISODisk in action.
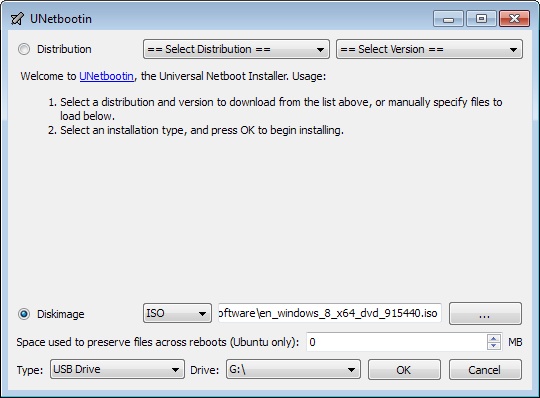
After saving the ISO file, use the UNetbootin tool (available at http://sourceforge.net/projects/unetbootin/) to create a bootable USB flash drive. Select the Diskimage option, specify your Windows 8.1 ISO file, select the USB flash drive that you want to be bootable, and click OK. Figure 3-3 shows UNetbootin in action.
If Windows prompts you to press a key to start from the CD or DVD, that means that the Windows setup program found an existing operating system on your PC. This is normal if you’re installing Windows over an existing version of Windows, and you should press a key to start setup. Otherwise, your existing operating system will load as if the Windows 8.1 DVD were not connected.
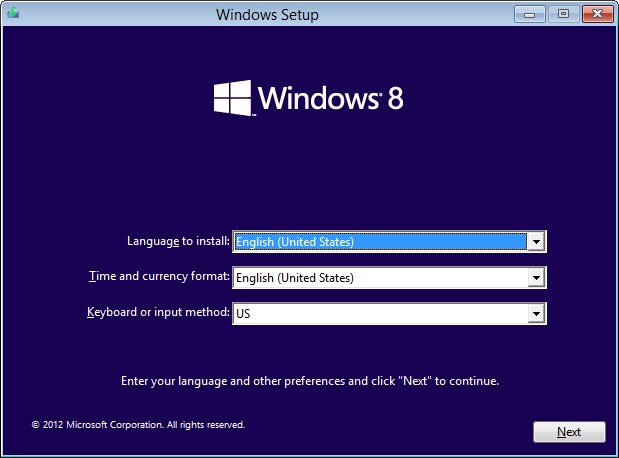
On the first page of Windows Setup, as shown in Figure 3-4, select your language, time and currency format, and input preferences, and then click Next. On the next page, click Install Now.
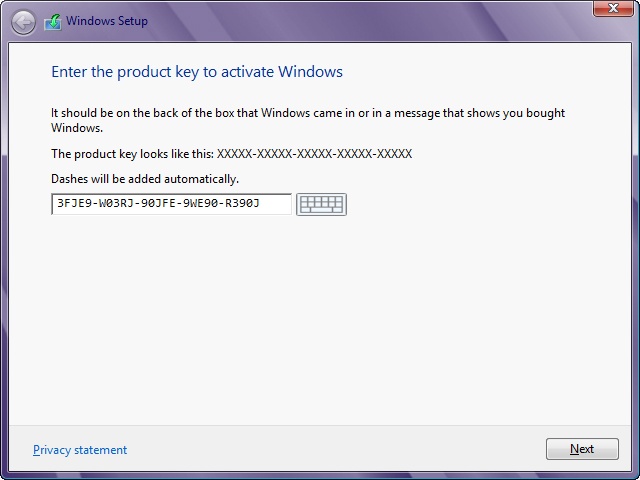
Windows prompts you for your product key as shown in Figure 3-5. There’s no way to bypass this; you need to enter a valid product key to continue. Windows Setup hasn’t made any changes to your PC at this point, so if you don’t have a product key, you can just restart your PC and any existing operating system will still work. By the way, the product key shown in Figure 3-5 is the result of me mashing the keys. It doesn’t work.
Windows doesn’t need to immediately activate your product key. Therefore, if you enter a product key for a different PC, setup will continue, but once Windows is running and connected to the Internet, Windows will detect that your product key is already in use and prompt you to enter a new product key or purchase a valid product key for Windows 8.1.
Prepare yourself to smirk: on the next page, you should carefully review the license terms before accepting them. It wouldn’t hurt to also search the Internet for “Windows 8.1 license agreement” and find a good summary or two. Who am I kidding, most people won’t even read this entire paragraph.
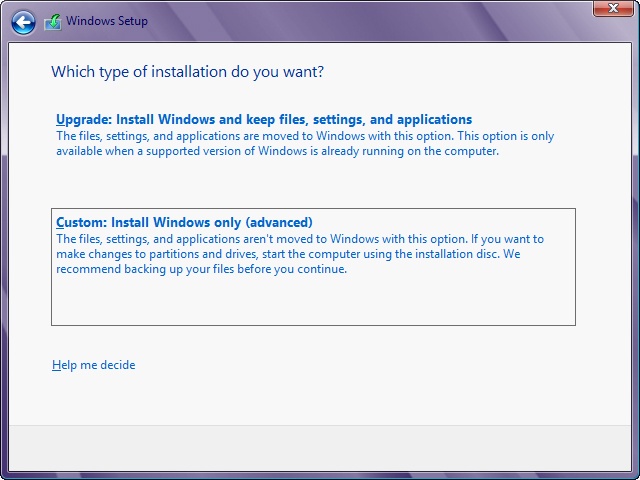
On the Which Type Of Installation Do You Want page, as shown in Figure 3-6, click Custom. I have no idea why it’s called Custom or Advanced, or why this page even exists. If you were to click Upgrade, Windows Setup would tell you that you have to start an upgrade from a running version of Windows and then force you to restart the entire setup process. So, click Custom, but don’t worry, there’s nothing custom or advanced about this process.
The Where Do You Want To Install Windows page shows all available partitions. Most of the time, you can just click Next and go on with setup. If you’re installing Windows 8.1 onto a hard drive that has never been used before, you might see only a single partition. Otherwise, you might see a small reserved partition and a larger primary partition, as shown in Figure 3-7.
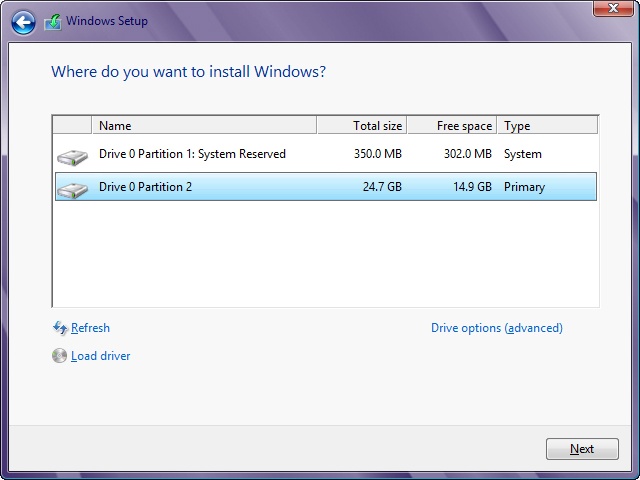
If you’re installing Windows on a new PC or a new hard drive, or you don’t have any files that you care about, you should delete the existing partitions to be sure you get the most usable space out of your drive. Click Drive Options and delete every partition. Then select the unallocated space. Windows will automatically create a partition in that space and format your drive when you click Next.
After you select your partition, Windows spends a few minutes copying system files to your drive. Then it automatically restarts your computer and continues setup. When Windows restarts, don’t press a key when you see the Press Any Key To Boot From CD Or DVD prompt. Just wait a moment and setup will continue from your hard drive. You can remove the Windows 8.1 DVD or flash drive now.
The next stage of setup is your first glimpse of the new Windows 8.1 interface: big type and large, touch-friendly buttons, as shown in Figure 3-8. Pick a color you like and type a name for your PC. If you have any accessibility needs (such as using alternative input methods, requiring text-to-speech, magnifying the screen, or using high contrast), click the icon in the lower-left corner.
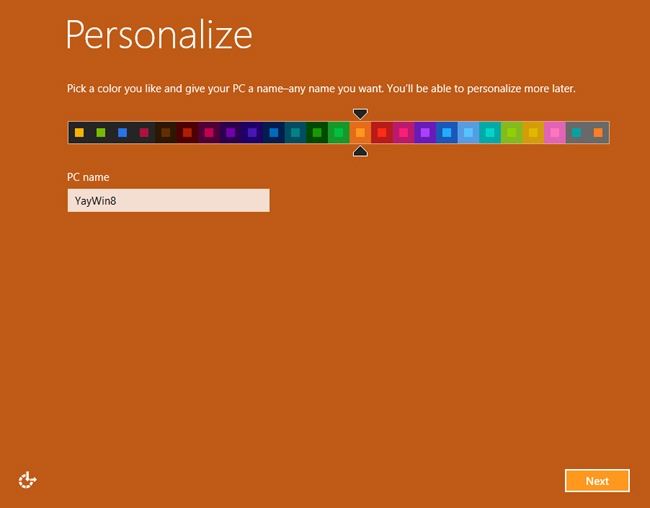
The PC name is important because you’ll see it when you browse shared files or connect to the PC across the network. Make it a name everyone in your family can remember. I tend to name my PC after the model number, such as “XPS13,” but my eight-year-old daughter has an easier time remembering them as “Tablet,” “SmallLaptop,” or “BigLaptop.” You can’t use spaces or any special characters in the PC name. As discussed in Chapter 5, users can select their own color, so don’t worry if not everyone in your family likes the color you choose. You can change the PC name later, too.
On the Settings page of Windows Setup, I usually just click Use Express Settings. Express settings make the following default choices for your PC, any of which you can change after Windows is installed:
Send anonymous usage information to Microsoft, including some URLs that apps use, information about potentially malicious apps, and some location data with location-aware apps. Express settings also configure your computer to participate in the Customer Experience Improvement Program (CEIP) and Help Experience Improvement Program (HEIP), which sends Microsoft information about how you use Windows. If you’re really sensitive about your privacy, you might not want these settings enabled.
Automatically install important and recommended updates, including updated drivers. For more information about updates, refer to Chapter 25.
Check online for solutions to problems using Windows Error Reporting, which sends crash reports to Microsoft and helps Microsoft identify the bugs that are impacting the most customers.
Turn on Do Not Track in Internet Explorer, which configures Internet Explorer to send requests to websites that they not track you, but whether the websites do anything to respect that request is up to each website. It doesn’t hurt, though.
Turn on SmartScreen, which checks URLs you visit and warns you if they’re known to be phishing sites or malware sites or present some other threat. SmartScreen requires Windows to send anonymous browsing information to Microsoft. For more information about SmartScreen, refer to Chapter 19.
Use Internet Explorer Compatibility lists to help identify optimal settings for Internet Explorer to use on different websites.
Of course, you don’t have to use Internet Explorer. If you install a different browser and use it, the settings related to Internet Explorer won’t impact you.
If you select Customize instead of Express Settings, Windows 8.1 will walk you through several different prompts. You can change any of the settings later.
Sharing. If you’re connected to a home or work network, and you trust the other people and devices connected to the network, select Yes, Turn On Sharing And Connect To Devices. If not, select No, Don’t Turn On Sharing Or Connect To Devices. For information about changing this setting after setup is complete, refer to Chapter 24.
Help Protect And Update Your PC. The default settings are almost always the right choice. For more information about updates, refer to Chapter 25. For information about SmartScreen, refer to Chapter 19.
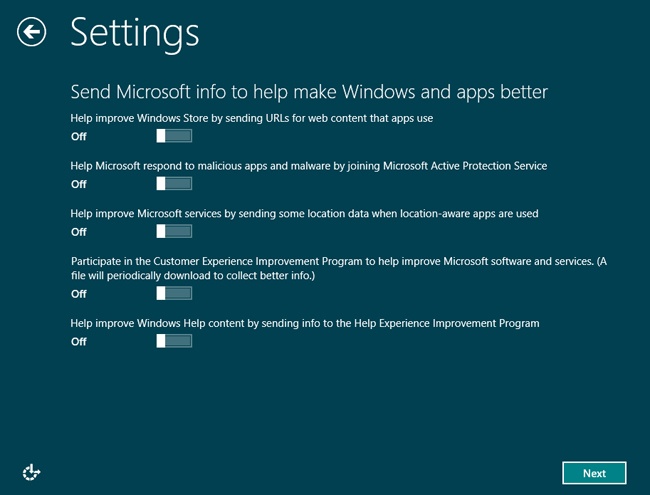
Send Microsoft Info To Help Make Windows And Apps Better. By default, Windows will not send any usage information to Microsoft, and those settings (see Figure 3-9) will work well for you. Turning these options on doesn’t impact your daily usage of Windows in any way, but it does cast an anonymous vote with Microsoft about how you use your computer, which can help guide Microsoft’s development efforts in a direction that might better suit your needs.
Check Online For Solutions To Problems. Enabling these settings can improve your experience with Windows. If you turn on Windows Error Reporting, Windows will send information about any crashes you experience to Microsoft. This lets Microsoft know that you’re having a problem with something, and while Microsoft doesn’t respond to every problem, it does prioritize troubleshooting efforts based on the number of people having a problem. Therefore, by turning on Windows Error Reporting, you’re casting a vote that any problems you have are important. Windows Error Reporting can also find existing solutions to a problem you have, so you might be able to get an update that solves your problem. The information sent in is quite anonymous, but if you’re really concerned about your privacy, you should turn this setting off. Using Internet Explorer compatibility lists just refers to a list Microsoft has created of websites that work better with older versions of Internet Explorer. If a website is on that list and you have this option enabled, Internet Explorer can automatically render the website as you would see it in an older version of Internet Explorer, improving your experience. Most popular websites don’t need this, however.
Share Info With Apps. Windows 8.1 apps that you install can communicate with Windows to find some information about you, including your name, your picture, and your location. If you only install apps that you trust, enabling these settings shouldn’t be a problem. If you’re worried that an app might share your name, picture, or location, turn these settings off.
Whether you choose express settings or custom settings, Windows Setup will prompt you to create a user account for your PC. Most of the time, you should sign in with your email address. This creates a Microsoft account (if you didn’t already have one) and synchronizes your settings with Microsoft’s servers on the Internet.
Much of what’s great about Windows 8.1 is built around using your Microsoft account. However, if you don’t want Microsoft to manage your account information and credentials, click Sign In Without A Microsoft Account to create a local account, the same as you used in earlier versions of Windows. For detailed information about account types, refer to Chapter 18.
After you configure your user account, Windows starts for the first time, and setup is complete. Refer to Chapter 5 for information about how you can further customize Windows.
Dual-booting allows you to run multiple operating systems (one at a time) on your PC. When you start your PC, you can choose which operating system you want to start.
Ten years ago, dual-booting was incredibly common. Just about every geek out there had set up a system to boot between two or more operating systems. Today, virtual machines provide most of the same capabilities as dual-booting, and with much less hassle. For information about using a virtual machine to run different operating systems, refer to Chapter 20.
There are still many valid reasons to dual-boot your PC. When you dual-boot your PC, the operating systems communicate directly with your PC’s hardware, providing many benefits:
Operating systems run faster than they would in a virtual machine.
Operating systems take full advantage of tablet features, such as touch screen, accelerometers, and gyroscopes.
Operating systems can communicate with all your hardware accessories.
Therefore, if you want to be able to choose from different operating systems when starting your PC, and the drawbacks of using a virtual machine are too great, you should configure your PC for dual-booting.
Windows 8.1 supports two different techniques for dual-booting:
Installing Windows 8.1 to a separate partition
Booting Windows 8.1 from a virtual hard drive (VHD) file
Both approaches can be a little complicated to configure. Typically, installing Windows 8.1 to a separate partition is easier, but booting from a VHD file can make more efficient use of free space. The sections that follow describe both techniques, as well as how to configure startup options.
Every installation of Windows 8.1 requires a separate partition. A partition is a section of your hard disk. Usually, each partition has its own drive letter, such as C, D, or E.
Most PCs have only a single hard drive, and Windows automatically configures that hard drive with a single partition. That’s perfect if you have only one operating system installed, but you’ll need to create a separate partition for each installation of Windows.
If your drive has plenty of free space, you can probably split the existing drive into multiple partitions. If your drive doesn’t have at least 30 gigabytes (GB) of free space, you should free up some disk space (refer to Chapter 9) or install another disk (refer to Chapter 12).
To split an existing drive into multiple partitions, first free up all the disk space you can. Within Windows 7 or Windows 8.1, open the Computer Management console by running compmgmt.msc from the Start screen or, from Windows 8.1 only, by using the WinX menu. Select Storage, Disk Management.
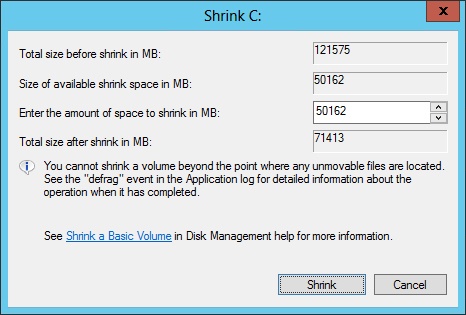
In the Disk Management console, right-click your C drive and then click Shrink Volume. The Shrink dialog box appears, as shown in Figure 3-10. The default value shows the maximum amount of space you can shrink your C drive, which is also going to be the maximum size of your new partition. If it doesn’t read at least 20,000, you won’t be able to shrink the volume enough to create a new partition large enough to install Windows 8.1.
Once you click Shrink, Disk Management reduces the size of your existing Windows partition and leaves the remaining space unallocated. Now, you can install Windows 8.1 to the unallocated space as described in Installing Windows 8.1 earlier in this chapter. On the Where Do You Want To Install Windows page, select the drive that matches the size you specified for the new partition and shows Unallocated Space.
Troubleshooting: Why can’t I shrink my drive more?
The amount you can shrink your drive is often much less than the available free space. That’s because Windows needs the free space to be contiguous; that is, to maintain one big undivided block. Often, free space on a disk is broken up by random blocks of data. The longer you’ve been using your PC, the more likely it is that your free space is segmented.
In theory, Windows could simply rearrange your data for you so you can free up more disk space. Windows 8.1 won’t do this for you, but you can use a free tool called GParted, available at http://www.hirensbootcd.org/. Though I’ve never had a problem with the tool, you should back up your PC before using it, because Microsoft does not support it, and if something goes wrong, you could lose your data. After unzipping the ISO file, insert a blank CD into your computer, right-click the ISO file in File Explorer on the desktop, and then click Burn Disk Image. If you can’t boot from a CD, use the Unetbootin tool (available at http://sourceforge.net/projects/unetbootin/) to create a bootable USB flash drive.
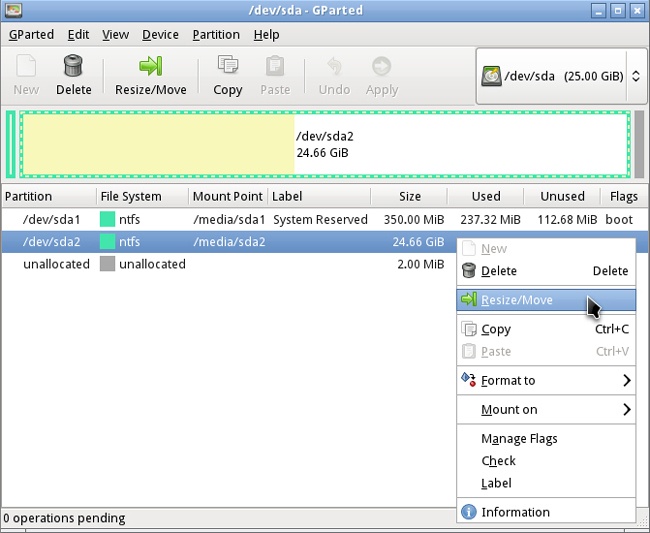
When you start from Hiren’s BootCD, select Linux Based Rescue Environment and start with the default settings. Then, launch Partition Manager from the desktop to open the GParted tool. Right-click your system drive (check the size of the drive to identify it) and click Resize/Move, as shown in Figure 3-11.
The Resize/Move dialog box in GParted works very differently from the Shrink dialog box in Windows. The default settings don’t do anything useful, and you might even have to resort to doing math.
To calculate the maximum size of your new partition, first subtract the Minimum Size from the Maximum Size, as shown in Figure 3-12. If you choose that size, you won’t leave any free space for your existing installation of Windows. So, subtract at least a few gigabytes of space, and then enter the size of the new partition you want in the Free Space Following box.
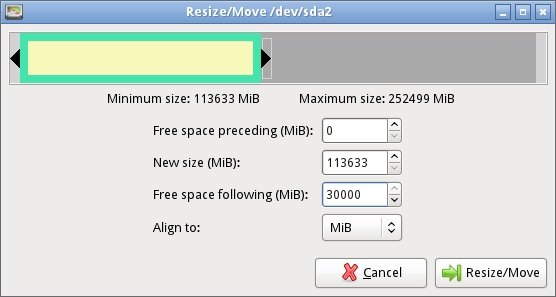
Click Resize/Move, and then click Apply on the toolbar. Because GParted actually rearranges your data on the disk, resizing your partition can take some time.
These steps apply equally well to Windows 7 or Windows 8.1:
Open the Computer Management console by running compmgmt.msc from the Start screen or from the WinX menu.
Select Storage, Disk Management.
Wait until you see the list of drives, and then right-click Disk Management and select Create VHD.
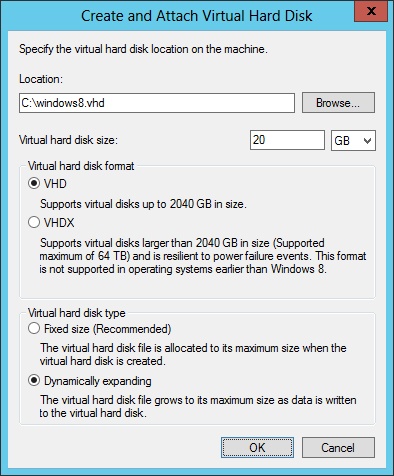
As shown in Figure 3-13, select a location for your VHD file.
To make the next steps easy for you, I suggest placing the file in the root of a drive. Set the size to at least 20 GB. This is going to be a very large file, so be sure you have plenty of disk space. If you want to minimize wasted disk space, select Dynamically Expanding. If you want better performance, select Fixed Drive.
When you click OK, the Disk Management console creates the file you specified and adds it as if it were a physically separate drive. On the new drive, right-click Not Initialized and then click Initialize Disk. You can accept the default setting of Master Boot Record (MBR).
Now, insert your Windows 8.1 setup DVD or connect your bootable flash drive and restart your computer. If prompted, press a key at the Press Any Key To Boot From CD Or DVD prompt.
Windows Setup isn’t going to be able to find the VHD file you just created, so you need to mount it as a drive. Fortunately, you can open a command prompt and run a command to mount the VHD as a drive.
Once Windows Setup prompts you to select the language, press Shift+F10 to open a command prompt.
The first thing you need to do from the command prompt is determine the drive letter of the drive you stored the VHD file on, because the drive letters aren’t necessarily the same as when you’re running Windows.
From the command prompt, run the command wmic logicaldisk get name. This command lists all the drives that are visible to Windows, as shown in this example output:
wmic logicaldisk get name
Name
C:
D:
E:
X:
Normally, your system drive is your C drive. However, the drive lettering can change when you start Windows setup. To find your system drive, run the command dir <drive_letter>: for each drive letter until you find the one that contains the Windows folder. For example, you might run dir C:, dir D:, and dir E:.
Now that you know the drive letter your VHD file is stored on, you can run the DiskPart command to mount the VHD file as a drive. Run the following commands:
diskpart
select vdisk file=<drive_letter>:<vhd_file>
attach vdisk
exit
The commands and output will resemble the following, with user input shown in bold:
X:Sources>diskpart

Microsoft DiskPart version 6.2.9200

Copyright © 1999-2012 Microsoft Corporation.
On computer: MINWINPC

DISKPART> select vdisk file=C:Windows8.vhd

Diskpart successfully selected the virtual disk file.

DISKPART> attach vdisk

  100 percent completed

DiskPart successfully attached the virtual disk file.

DISKPART> exit

Leaving DiskPart...
Now, close the command prompt and continue your Windows 8.1 installation. On the Which Type Of Installation Do You Want page, select Custom.
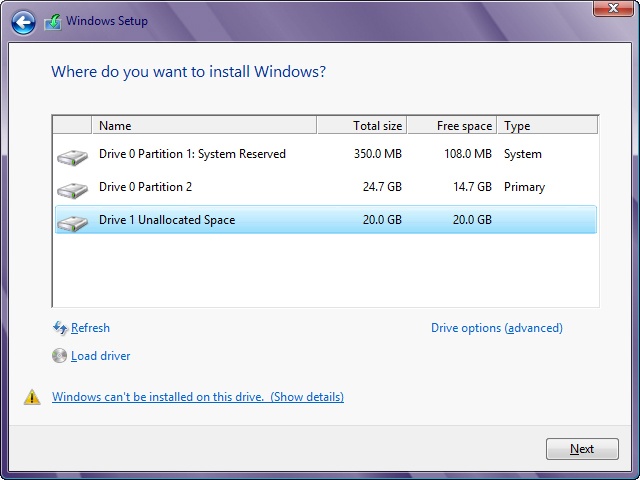
On the Where Do You Want To Install Windows page, select the drive that matches the size you specified and shows Unallocated Space. As shown in Figure 3-14, you’ll see the warning message Windows Can’t Be Installed On This Drive. Ignore that and click Next, you reckless daredevil, you.
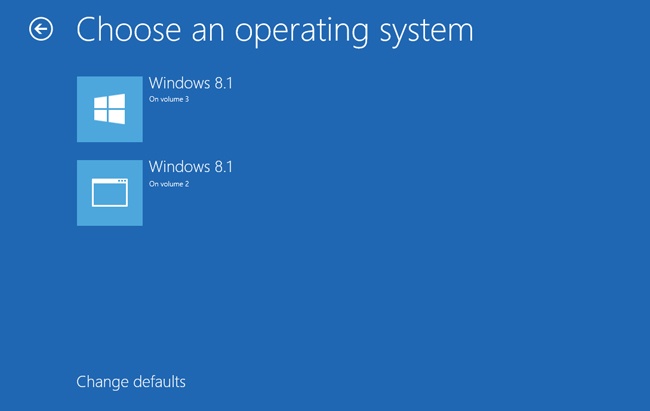
Setup will continue normally. Once it’s done, Windows will greet you with the Choose An Operating System page, as shown in Figure 3-15. The first choice is your new Windows 8.1 installation, and you’ll have to select it to continue setup. For information about how to configure the names of the options, the default choices, and how long the menu waits, refer to the next section, Configuring boot options.
Once you configure dual-booting, Windows 8.1 shows you a startup menu each time your PC boots. However, it displays the menu for only three seconds by default. That’s plenty of time if you’re staring at the screen and you have the reflexes of a PC gamer. If you have an attention span like mine, though, you’re probably already distracted by reddit.com on your smartphone.
To change the timer and other startup options, restart your PC (assuming it’s already configured to dual-boot) and be patient for once. Stare at the screen. When the menu appears, quickly click Change Defaults Or Choose Other Options at the bottom of the screen. You’ll see the options page, as shown in Figure 3-16. If you don’t have your PC configured for dual-boot, you can view the startup options on the General page of PC Settings. Under Advanced Startup, select Restart Now.
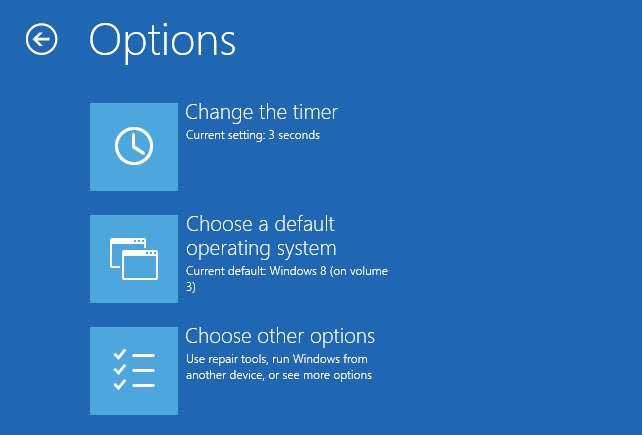
Figure 3-16. Use the Options page to configure how long Windows waits for you to select an operating system.
The options are self-explanatory. For example, the Options page allows you to choose startup timers of 3 seconds, 30 seconds, and 5 minutes.
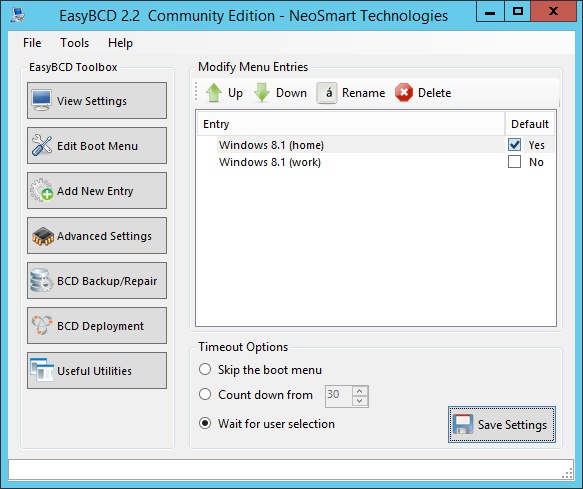
If you want to set it for one minute, or to wait indefinitely, you’ll need to use more powerful tools. Windows includes the command-line tool BCDEdit for this purpose, and I could tell you how to use it, but there’s an easier way: EasyBCD.
To use EasyBCD, visit http://neosmart.net/EasyBCD/. There’s a version of the tool that’s free for home use. Once it’s installed, click Edit Boot Menu. Then, you can reorganize and rename the different boot menu items. The Timeout Options at the bottom of the screen allow you to control how long the menu waits. Figure 3-17 shows EasyBCD configuring a PC with separate Windows 8.1 installations for home and work. The timer is set to wait indefinitely for the user.