
1
Primer in Excel VBA
This chapter is intended for those who are not familiar with Excel and the Excel macro recorder, or who are inexperienced with programming using the Visual Basic for Applications (VBA) language. If you are already comfortable with navigating around the features provided by Excel, have used the macro recorder, and have a working knowledge of VBA and the Visual Basic Editor (VBE), you might want to skip straight to Chapter 3.
If this is not the case, this chapter has been designed to provide you with the information you need to be able to move on comfortably to the more advanced features presented in the following chapters. We will be covering the following topics:
- The Excel macro recorder
- User-defined functions
- The Excel Object Model
- VBA programming concepts
Excel VBA is a programming application that allows you to use Visual Basic code to run the many features of the Excel package, thereby allowing you to customize your Excel applications. Units of VBA code are often referred to as macros. We will be covering more formal terminology in this chapter, but we will continue to use the term macro as a general way to refer to any VBA code.
In your day-to-day use of Excel, if you carry out the same sequence of commands repetitively, you can save a lot of time and effort by automating those steps using macros. If you are setting up an application for other users, who don't know much about Excel, you can use macros to create buttons and dialog boxes to guide them through your application as well as automate the processes involved.
If you are able to perform an operation manually, you can use the macro recorder to capture that operation. This is a very quick and easy process and requires no prior knowledge of the VBA language. Many Excel users record and run macros and feel no need to learn about VBA.
However, the recorded results might not be very flexible, in that the macro can only be used to carry out one particular task on one particular range of cells. In addition, the recorded macro is likely to run much more slowly than the code written by someone with knowledge of VBA. To set up interactive macros that can adapt to change and also run quickly, and to take advantage of more advanced features of Excel such as customized dialog boxes, you need to learn about VBA.
Don't get the impression that we are dismissing the macro recorder. The macro recorder is one of the most valuable tools available to VBA programmers. It is the fastest way to generate working VBA code. But you must be prepared to apply your own knowledge of VBA to edit the recorded macro to obtain flexible and efficient code. A recurring theme in this book is to record an Excel macro and then show how to adapt the recorded code.
In this chapter you will learn how to use the macro recorder and you will see all the ways Excel provides to run your macros. You will see how to use the Visual Basic Editor to examine and change your macros, thus going beyond the recorder and tapping into the power of the VBA language and the Excel Object Model.
You can also use VBA to create your own worksheet functions. Excel comes with hundreds of built-in functions, such as SUM and IF, which you can use in cell formulas. However, if you have a complex calculation that you use frequently and that is not included in the set of standard Excel functions—such as a tax calculation or a specialized scientific formula—you can write your own user-defined function.
Using the Macro Recorder
Excel's macro recorder operates very much like the recorder that stores the greeting on your telephone answering machine. To record a greeting, you first prepare yourself by rehearsing the greeting to ensure that it says what you want. Then, you switch on the recorder and deliver the greeting. When you have finished, you switch off the recorder. You now have a recording that automatically plays when you leave a call unanswered.
Recording an Excel macro is very similar. You first rehearse the steps involved and decide at what points you want to start and stop the recording process. You prepare your spreadsheet, switch on the Excel recorder, carry out your Excel operations, and switch off the recorder. You now have an automated procedure that you and others can reproduce at the press of a button.
Recording Macros
Say, you want a macro that types six month names as three letter abbreviations, “Jan” to “Jun”, across the top of your worksheet, starting in cell B1. We know this is rather a silly macro as you could do this easily with an AutoFill operation, but this example will serve to show us some important general concepts:
- First, think about how you are going to carry out this operation. In this case, it is easy—you will just type the data across the worksheet. Remember, a more complex macro might need more rehearsals before you are ready to record it.
- Next, think about when you want to start recording. In this case, you should include the selection of cell B1 in the recording, as you want to always have “Jan” in B1. If you don't select B1 at the start, you will record typing “Jan” into the active cell, which could be anywhere when you play back the macro.
- Next, think about when you want to stop recording. You might first want to include some formatting such as making the cells bold and italic, so you should include that in the recording. Where do you want the active cell to be after the macro runs? Do you want it to be in the same cell as “Jun”, or would you rather have the active cell in column A or column B, ready for your next input? Let's assume that you want the active cell to be A2, at the completion of the macro, so we will select A2 before turning off the recorder.
- Now you can set up your screen, ready to record.
In this case, start with an empty worksheet with cell A1 selected. If you like to work with toolbars, use View ![]() Toolbars to select and display the Visual Basic toolbar as shown in Figure 1-1 in the top right of the screen. Press the Record Macro button, with the red dot, to start the recorder. If you prefer, start the recorder with Tools
Toolbars to select and display the Visual Basic toolbar as shown in Figure 1-1 in the top right of the screen. Press the Record Macro button, with the red dot, to start the recorder. If you prefer, start the recorder with Tools ![]() Macro
Macro ![]() Record New Macro … from the Worksheet menu bar.
Record New Macro … from the Worksheet menu bar.
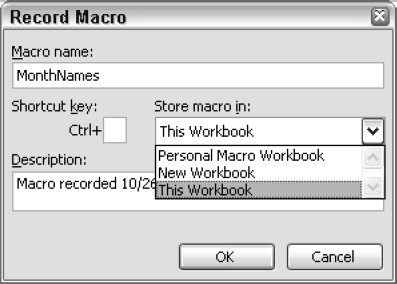
Figure 1-1
In the Macro name: box, replace the default entry, such as Macro1, with the name you want for your macro. The name should start with a letter and contain only letters, numbers and the underscore character with a maximum length of 255 characters. The macro name must not contain special characters such as !, ?, or blank spaces. It is also best to use a short but descriptive name that you will recognize later. You can use the underscore character to separate words, but it is easy to just use capitalization to distinguish words.
Note that distinguishing words within a variable name by an initial uppercase letter is called Pascal-casing, as in ThisIsPascalCased. Making the first word's first letter lowercase and all subsequent word's first letter uppercase is called camel-casing, as in thisIsCamelCased. With case-sensitive languages like C++, Pascal or C# using variations on name-casing is a convention that many programmers follow. Because VBA is not case-sensitive you may use any standard you like, just be consistent.
Call the macro MonthNamesl, because we will create another version later.
In the Shortcut key: box, you can type in a single letter. This key can be pressed later, while holding down the Ctrl key, to run the macro. We will use a lower case m. Alternatively, you can use an upper case M. In this case, when you later want to run the macro, you need to hold down the Ctrl key and the Shift key while you press M. It is not mandatory to provide a shortcut key. You can run a macro in a number of other ways, as we will see.
In the Description: box, you can accept the default comments provided by the recorder, or type in your own comments. These lines will appear at the top of your macro code. They have no significance to VBA but provide you and others with information about the macro. You can edit these comments later, so there is no need to change them now. All Excel macros are stored in workbooks.
You are given a choice regarding where the recorded macro will be stored. The Store macro in: combo box lists three possibilities. If you choose New Workbook, the recorder will open a new empty workbook for the macro. Personal Macro Workbook refers to a special hidden workbook that we will discuss next. We will choose This Workbook to store the macro in the currently active workbook.
When you have filled in the Record Macro dialog box, click the OK button. You will see the word Recording on the left side of the Status Bar at the bottom of the screen and the Stop Recording toolbar should appear on the screen. Note that the Stop Recording toolbar will not appear if it has been previously closed during a recording session. If it is missing, refer to the following instructions under the heading Absolute and Relative Recording to see how to reinstate it. However, you don't really need it for the moment because we can stop the recording from the Visual Basic toolbar or the Tools menu.
If you have the Stop Recording toolbar visible, make sure that the second button, the Relative Reference button, is not selected. It shouldn't have a border, that is, it should not be as it appears in this screenshot in Figure 1-2. By default, the macro recorder uses absolute cell references when it records.

Figure 1-2
You should now click cell B1 and type in “Jan” and fill in the rest of the cells, as shown in Figure 1-3. Then, select B1:G1 and click the Bold and Italic buttons on the Formatting toolbar. Click the A2 cell and then stop the recorder.
You can stop the recorder by pressing the Stop Recording button on the Stop Recording toolbar, by pressing the square Stop Recording button on the Visual Basic toolbar—the round Start Recording button changes to the Stop Recording button while you are recording—or you can use Tools ![]() Macro
Macro ![]() Stop Recording from the menu bar. Save the workbook as Recorder.xls.
Stop Recording from the menu bar. Save the workbook as Recorder.xls.
It is important to remember to stop the recorder. If you leave the recorder on, and try to run the recorded macro, you can go into a loop where the macro runs itself over and over again. If this does happen to you, or any other error occurs while testing

Figure 1-3
your macros, hold down the Ctrl key and press the Break key to interrupt the macro. You can then end the macro or go into debug mode to trace errors. You can also interrupt a macro with the Esc key, but it is not as effective as Ctrl+Break for a macro that is pausing for input.
The Personal Macro Workbook
If you choose to store your recorded macro in the Personal Macro Workbook, the macro is added to a special file called Personal.xls, which is a hidden file that is saved in your Excel Startup directory when you close Excel. This means that Personal.xls is automatically loaded when you launch Excel and, therefore, its macros are always available for any other workbook to use.
If Personal.xls does not already exist, the recorder will create it for you. You can use Window ![]() Unhide to see this workbook in the Excel window, but it is seldom necessary or desirable to do this as you can examine and modify the Personal.xls macros in the Visual Basic Editor window. An exception, where you might want to make Personal.xls visible, is if you need to store data in its worksheets. You can hide it again, after adding the data, with Window
Unhide to see this workbook in the Excel window, but it is seldom necessary or desirable to do this as you can examine and modify the Personal.xls macros in the Visual Basic Editor window. An exception, where you might want to make Personal.xls visible, is if you need to store data in its worksheets. You can hide it again, after adding the data, with Window ![]() Hide. If you are creating a general-purpose utility macro, which you want to be able to use with any workbook, store it in Personal.xls. If the macro relates to just the application in the current workbook, store the macro with the application.
Hide. If you are creating a general-purpose utility macro, which you want to be able to use with any workbook, store it in Personal.xls. If the macro relates to just the application in the current workbook, store the macro with the application.
Running Macros
To run the macro, either insert a new worksheet in the Recorder.xls workbook, or open a new empty workbook, leaving Recorder.xls open in memory. You can only run macros that are in open workbooks, but they can be run from within any other open workbook.
You can run the macro by holding down the Ctrl key and pressing m, the shortcut that we assigned at the start of the recording process. You can also run the macro by clicking Tools ![]() Macro
Macro ![]() Macros… on the Worksheet menu bar and double-clicking the macro name, or by selecting the macro name and clicking Run, as shown in Figure 1-4.
Macros… on the Worksheet menu bar and double-clicking the macro name, or by selecting the macro name and clicking Run, as shown in Figure 1-4.

Figure 1-4
The same dialog box can be opened by pressing the Run Macro button on the Visual Basic toolbar, as shown in Figure 1-5.
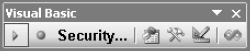
Figure 1-5
Shortcut Keys
You can change the shortcut key assigned to a macro by first bringing up the Macro dialog box, by using Tools ![]() Macro
Macro ![]() Macros, or the Run Macro button on the Visual Basic toolbar. Select the macro name and press Options. This opens the following dialog box shown in Figure 1-6.
Macros, or the Run Macro button on the Visual Basic toolbar. Select the macro name and press Options. This opens the following dialog box shown in Figure 1-6.
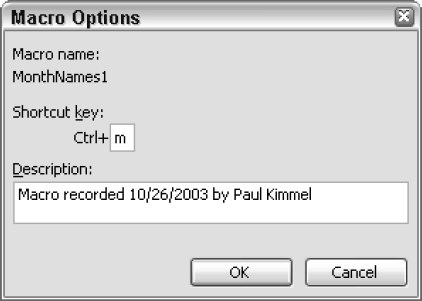
Figure 1-6
It is possible to assign the same shortcut key to more than one macro in the same workbook using this dialog box (although the dialog box that appears when you start, the macro recorder will not let you assign a shortcut that is already in use).
It is also quite likely that two different workbooks could contain macros with the same shortcut key assigned. If this happens, which macro runs when you use the shortcut? The answer is, it is always the macro that comes first alphabetically that runs.
Shortcuts are appropriate for macros that you use very frequently, especially if you prefer to keep your hands on the keyboard. It is worth memorizing the shortcuts so you won't forget them if you use them regularly. Shortcuts are not appropriate for macros that are run infrequently or are intended to make life easier for less experienced users of your application. It is better to assign meaningful names to those macros and run them from the Macro dialog box. Alternatively, they can be run from buttons that you add to the worksheet, or place on the toolbars. You will learn how to do this shortly.
Absolute and Relative Recording
When you run MonthNamesl, the macro returns to the same cells you selected while typing in the month names. It doesn't matter which cell is active when you start, if the macro contains the command to select cell B1, then that is what it selects. The macro selects B1 because you recorded in absolute record mode. The alternative, relative record mode, remembers the position of the active cell relative to its previous position. If you have cell A10 selected, and then turn on the recorder and you go on to select B10, the recorder notes that you moved one cell to the right, rather than noting that you selected cell B10.
We will record a second macro called MonthNames2. There will be three differences in this macro compared with the previous one:
- We will use the Relative Reference button on the Stop Recording toolbar as our first action after turning on the recorder.
- We will not select the “Jan” cell before typing. We want our recorded macro to type “Jan” into the active cell when we run the macro.
- We will finish by selecting the cell under “Jan”, rather than A2, just before turning off the recorder.
Start with an empty worksheet and select the B1 cell. Turn on the macro recorder and specify the macro name as MonthNames2. Enter the shortcut as uppercase M—the recorder won't let you use lowercase m again. Click the OK button and select the Relative Reference button on the Stop Recording toolbar.
If the Stop Recording toolbar does not automatically appear when you start recording, click View ![]() Toolbars from the worksheet's menu and select Stop Recording. The Stop Recording toolbar will now appear. However, you will need to immediately click the Stop Recording button on the Stop Recording toolbar and start the recording process again. Otherwise, the recorded macro will display the Stop Recording toolbar every time it is run. The Stop Recording toolbar will now synchronize with the recorder, as long as you never close it while recording.
Toolbars from the worksheet's menu and select Stop Recording. The Stop Recording toolbar will now appear. However, you will need to immediately click the Stop Recording button on the Stop Recording toolbar and start the recording process again. Otherwise, the recorded macro will display the Stop Recording toolbar every time it is run. The Stop Recording toolbar will now synchronize with the recorder, as long as you never close it while recording.
If you needed to resynchronize the Stop Recording toolbar using the instructions above, upper case M will already be assigned. If you have difficulties assigning the uppercase M shortcut to MonthNames2 on the second recording, use another key such as uppercase N, and change it back to M after finishing the recording. Use Tools ![]() Macro
Macro ![]() Macros… and, in the Macro dialog box, select the macro name and press the Options button, as explained earlier in the Shortcut Keys section.
Macros… and, in the Macro dialog box, select the macro name and press the Options button, as explained earlier in the Shortcut Keys section.
Type “Jan” and the other month names, as you did when recording MonthNamesl. Select cells B1:G1 and press the Bold and Italic buttons on the Formatting toolbar.
Make sure you select B1:G1 from left to right, so that B1 is the active cell. There is a small kink in the recording process that can cause errors in the recorded macro if you select cells from right to left or from bottom to top. Always select from the top left hand corner when recording relatively. This has been a problem with all versions of Excel VBA. (Selecting cells from right to left will cause a Runtime error 1004 when the macro runs.)
Finally, select cell B2, the cell under “Jan”, and turn off the recorder.
Before running MonthNames2, select a starting cell, such as A10. You will find that the macro now types the month names across row 10, starting in column A and finishes by selecting the cell under the starting cell.
Before you record a macro that selects cells, you need to think about whether to use absolute or relative reference recording. If you are selecting input cells for data entry, or for a print area, you will probably want to record with absolute references. If you want to be able to run your macro in different areas of your worksheet, you will probably want to record with relative references.
If you are trying to reproduce the effect of the Ctrl+Arrow keys to select the last cell in a column or row of data, you should record with relative references. You can even switch between relative and absolute reference recording in the middle of a macro, if you want. You might want to select the top of a column with an absolute reference, switch to relative references and use Ctrl+Down Arrow to get to the bottom of the column and an extra Down Arrow to go to the first empty cell.
Excel 2000 was the first version of Excel to let you successfully record selecting a block of cells of variable height and width using the Ctrl key. If you start at the top left hand corner of a block of data, you can hold down the Shift+Ctrl keys and press Down Arrow and then Right Arrow to select the whole block (as long as there are no gaps in the data). If you record these operations with relative referencing, you can use the macro to select a block of different dimensions. Previous versions of Excel recorded an absolute selection of the original block size, regardless of recording mode.
The Visual Basic Editor
It is now time to see what has been going on behind the scenes. If you want to understand macros, try to modify your macros, and tap into the full power of VBA, you need to know how to use the Visual Basic Editor (VBE). The VBE runs in its own window, separate from the Excel window. You can activate it in many ways.
First, you can run VBE by pressing the Visual Basic Editor button on the Visual Basic toolbar. You can also activate it by holding down the Alt key and pressing the F11 key. Alt+F11 acts as a toggle, taking you between the Excel Window and the VBE window. If you want to edit a specific macro, you can use Tools ![]() Macro
Macro ![]() Macros… to open the Macro dialog box, select the macro, and press the Edit button. The VBE window will look something like Figure 1-7.
Macros… to open the Macro dialog box, select the macro, and press the Edit button. The VBE window will look something like Figure 1-7.
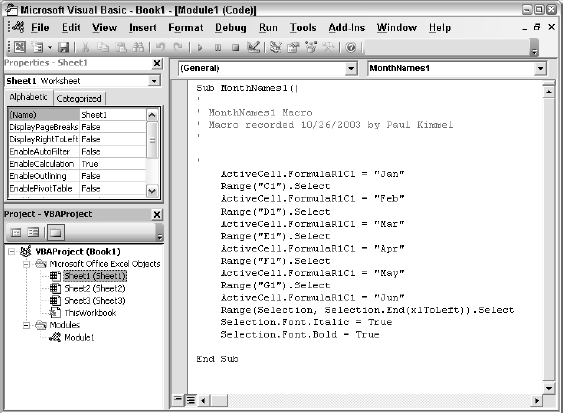
Figure 1-7
It is quite possible that you will see nothing but the menu bar when you switch to the VBE window. If you can't see the toolbar, use View ![]() Toolbars and click the Standard toolbar. Use View
Toolbars and click the Standard toolbar. Use View ![]() Project Explorer and View
Project Explorer and View ![]() Properties Window to show the windows on the left. If you can't see the code module on the right, double-click the icon for Module1 in the Project Explorer window.
Properties Window to show the windows on the left. If you can't see the code module on the right, double-click the icon for Module1 in the Project Explorer window.
Code Modules
All macros reside in code modules like the one on the right of the VBE window shown in Figure 1-7. There are two types of code modules—standard modules and class modules. The one you see on the right is a standard module. You can use class modules to create your own objects. See Chapter 6 for more details on how to use class modules.
Some class modules have already been set up for you. They are associated with each worksheet in your workbook and there is one for the entire workbook. You can see them in the Project Explorer window, in the folder called “Microsoft Excel Objects”. You will find out more about them later in this chapter.
You can add as many code modules to your workbook, as you like. The macro recorder has inserted the one above, named Module1. Each module can contain many macros. For a small application, you would probably keep all your macros in one module. For larger projects, you can organize your code better by filing unrelated macros in separate modules.
Procedures
In VBA, macros are referred to as procedures. There are two types of procedures—subroutines and functions. You will find out about functions in the next section. The macro recorder can only produce subroutines. You can see the MonthNamesl subroutine set up by the recorder in the above screenshot.
Subroutines start with the keyword Sub followed by the name of the procedure and opening and closing parentheses. The end of a sub procedure is marked by the keywords End Sub. By convention, the code within the subroutine is indented to make it stand out from the start and end of the subroutine, so that the whole procedure is easier to read. Further indentation is normally used to distinguish sections of code such as If tests and looping structures.
Any lines starting with a single quote are comment lines, which are ignored by VBA. They are added to provide documentation, which is a very important component of good programming practice. You can also add comments to the right of lines of code. For example:
Range(“B1”).Select 'Select the B1 cell
At this stage, the code may not make perfect sense, but you should be able to make out roughly what is going on. If you look at the code in MonthNames1, you will see that cells are being selected and then the month names are assigned to the active cell formula. You can edit some parts of the code, so if you had spelled a month abbreviation incorrectly, you could fix it; or you could identify and remove the line that sets the font to bold; or you can select and delete an entire macro. Notice the differences between MonthNames1 and MonthNames2. MonthNames1 selects specific cells such as B1 and C1. MonthNames2 uses Offset to select a cell that is zero rows down and one column to the right from the active cell. Already, you are starting to get a feel for the VBA language.
The Project Explorer
The Project Explorer is an essential navigation tool. In VBA, each workbook contains a project. The Project Explorer displays all the open projects and the component parts of those projects, as you can see in Figure 1-8.
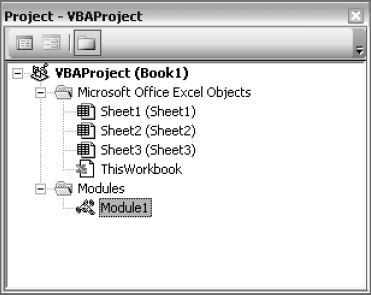
Figure 1-8
You can use the Project Explorer to locate and activate the code modules in your project. You can double click a module icon to open and activate that module. You can also insert and remove code modules in the Project Explorer. Right-click anywhere in the Project Explorer window and click Insert to add a new standard module, class module, or UserForm.
To remove Module1, right-click it and choose Remove Module1…. Note that you can't do this with the modules associated with workbook or worksheet objects. You can also export the code in a module to a separate text file, or import code from a text file.
The Properties Window
The Properties window shows you the properties that can be changed at design time for the currently active object in the Project Explorer window. For example, if you click Sheet1 in the Project Explorer, the following properties are displayed in the Properties window. The ScrollArea property has been set to A1:D10, to restrict users to that area of the worksheet.
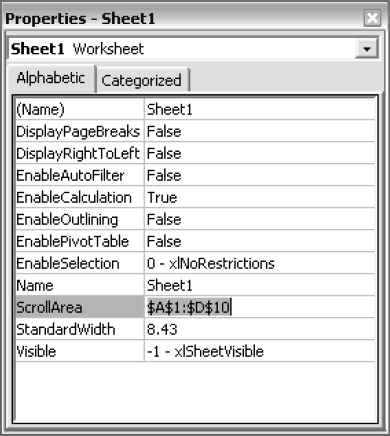
Figure 1-9
You can get to the help screen associated with any property very easily. Just select the property, such as the ScrollArea property, which is shown selected in Figure 1-9, and press F1.
Other Ways to Run Macros
You have seen how to run macros with shortcuts and how to run them from the Tools menu. Neither method is particularly friendly. You need to be very familiar with your macros to be comfortable with these techniques. You can make your macros much more accessible by attaching them to buttons.
If the macro is worksheet specific, and will only be used in a particular part of the worksheet, then it is suitable to use a button that has been embedded in the worksheet at the appropriate location. If you want to be able to use a macro in any worksheet or workbook and in any location in a worksheet, it is appropriate to attach the macro to a button on a toolbar.
There are many other objects that you can attach macros to, including combo boxes, list boxes, scrollbars, check boxes and option buttons. These are all referred to as controls. See Chapter 10 for more information on controls. You can also attach macros to graphic objects in the worksheet, such as shapes created with the Drawing toolbar.
Worksheet Buttons
Excel 2003 has two different sets of controls that can be embedded in worksheets. One set is on the Forms toolbar and the other is on the Control Toolbox toolbar. The Forms toolbar has been inherited from Excel 5 and 95. The Forms controls are also used with Excel 5 and 95 dialog sheets to create dialog boxes. Excel 97 introduced the newer ActiveX controls that are selected from the Control Toolbox toolbar. You can also use these on UserForms, in the VBE, to create dialog boxes.
For compatibility with the older versions of Excel, both sets of controls and techniques for creating dialog boxes are supported in Excel 97 and above. If you have no need to maintain backward compatibility with Excel 5 and 95, you can use just the ActiveX controls, except when you want to embed controls in a chart. At the moment, charts only support the Forms controls.
Forms Toolbar
Another reason for using the Forms controls is that they are simpler to use than the ActiveX controls, as they do not have all the features of ActiveX controls. For example, Forms controls can only respond to a single, predefined event, which is usually the mouse-click event. ActiveX controls can respond to many events, such as a mouse click, a double-click or pressing a key on the keyboard. If you have no need of such features, you might prefer the simplicity of Forms controls. Display the Forms toolbar by selecting View ![]() Toolbars
Toolbars ![]() Forms, and to create a Forms button in a worksheet, click the fourth button from the left in the Forms toolbar as shown in Figure 1-10.
Forms, and to create a Forms button in a worksheet, click the fourth button from the left in the Forms toolbar as shown in Figure 1-10.

Figure 1-10
You can now draw the button in your worksheet by clicking where you want a corner of the button to appear and dragging to where you want the diagonally opposite corner to appear. The dialog box shown in Figure 1-11 will appear, and you can select the macro to attach to the button.
Click OK to complete the assignment. You can then edit the text on the button to give a more meaningful indication of its function. After you click a worksheet cell, you can click the button to run the attached macro. If you need to edit the button, you can right-click it. This selects the control and you get a shortcut menu. If you don't want the shortcut menu, hold down Ctrl and left-click the button to select it. (Don't drag the mouse while you hold down Ctrl, or you will create a copy of the button.)
If you want to align the button with the worksheet gridlines, hold down Alt as you draw it with the mouse. If you have already drawn the button, select it and hold down Alt as you drag any of the white boxes that appear on the corners and edges of the button. The edge or corner you drag will snap to the nearest gridline.
Control Toolbox Toolbar
To create an ActiveX command button control, click the sixth button from the left side of the Control Toolbox toolbar, as shown in Figure 1-12.
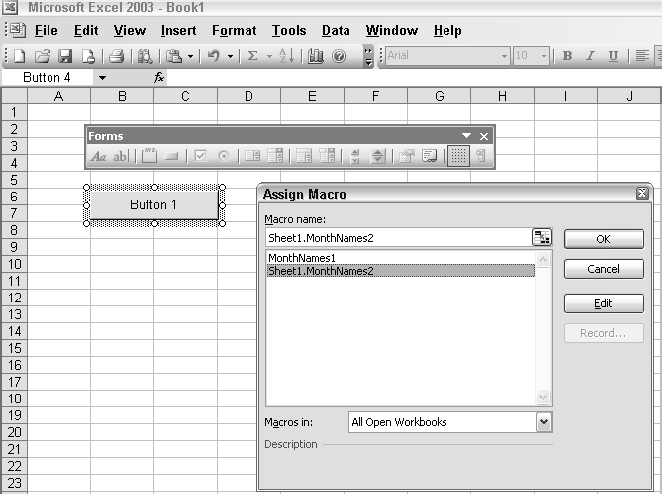
Figure 1-11

Figure 1-12
When you draw your button in the worksheet, you enter into the design mode. When you are in the design mode, you can select a control with a left-click and edit it. You must turn off the design mode if you want the new control to respond to events. This can be achieved by unchecking the design mode icon on the Control Toolbox toolbar or the Visual Basic toolbar, as shown in Figure 1-13.
You are not prompted to assign a macro to the ActiveX command button, but you do need to write a click-event procedure for the button. An event procedure is a sub procedure that is executed when, for example, you click a button. To do this, make sure you are still in the design mode and double-click the command button. This will open the VBE window and display the code module behind the worksheet. The Sub and End Sub statement lines for your code will have been inserted in the module and you can add in the code necessary to run the MonthName2 macro, as shown in Figure 1-14.
To run this code, switch back to the worksheet, turn off the design mode, and click the command button.
If you want to make changes to the command button, you need to return to the design mode by pressing the Design Mode button. You can then select the command button and change its size and position on the worksheet. You can also display its properties by right-clicking it and choosing Properties to display the window, as shown in Figure 1-15.
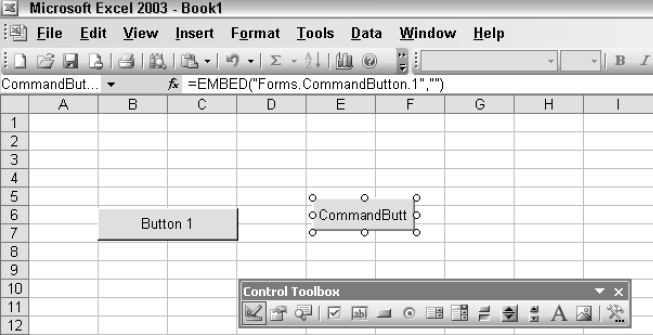
Figure 1-13

Figure 1-14
To change the text on the command button, change the Caption property. You can also set the font for the caption and the foreground and background colors. If you want the button to work satisfactorily in Excel 97, it is a good idea to change the TakeFocusOnClick property from its default value of True to False. If the button takes the focus when you click it, Excel 97 does not allow you to assign values to some properties such as the NumberFormat property of the Range object.
Toolbars
If you want to attach a macro to a toolbar button, you can modify one of the built-in toolbars or create your own. To create your own toolbar, use View ![]() Toolbars
Toolbars ![]() Customize… to bring up the Customize dialog box, click New… and enter a name for the new toolbar (see Figure 1-16).
Customize… to bring up the Customize dialog box, click New… and enter a name for the new toolbar (see Figure 1-16).
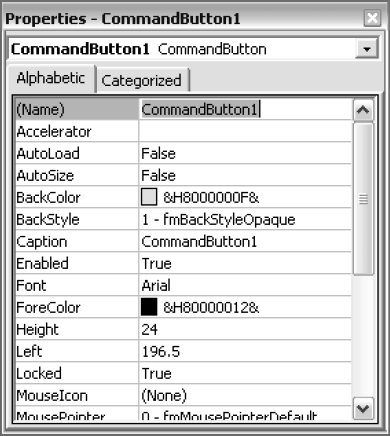
Figure 1-15
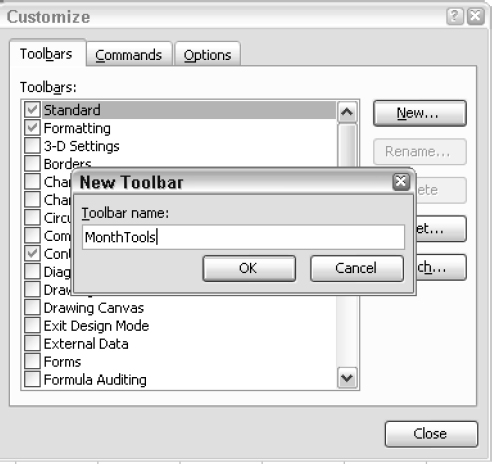
Figure 1-16
Staying in the Customize dialog box, click the Commands tab and select the Macros category. Drag the Custom Button with the smiley face icon to the new toolbar, or an existing toolbar. Next, either click the Modify-Selection button, or right-click the new toolbar button to get a shortcut menu.
Select Assign Macro… and then select the name of the macro, MonthNames2 in this case, to be assigned to the button. You can also change the button image by clicking Change Button Image and choosing from a library of preset images, or you can open the icon editor with Edit Button Image. Note that the Customize dialog box must stay open while you make these changes. It is a good idea to enter some descriptive text into the Name box, which will appear as the ScreenTip for the button. You can now close the Customize dialog box.
To run the macro, select a starting cell for your month names and click the new toolbar button. If you want to distribute the new toolbar to others, along with the workbook, you can attach the toolbar to the workbook. It will then pop up automatically on the new user's PC as soon as they open the workbook, as long as they do not already have a toolbar with the same name.
There is a potential problem when you attach a toolbar to a workbook. As Excel will not replace an existing toolbar, you can have a toolbar that is attached to an older version of the workbook than the one you are trying to use. A solution to this problem is provided in the next section on event procedures.
To attach a toolbar to the active workbook, use View ![]() Toolbars
Toolbars ![]() Customize… to bring up the Customize dialog box, click the Toolbars tab, if necessary, and click Attach… to open the Attach Toolbars dialog box as shown in Figure 1-17.
Customize… to bring up the Customize dialog box, click the Toolbars tab, if necessary, and click Attach… to open the Attach Toolbars dialog box as shown in Figure 1-17.
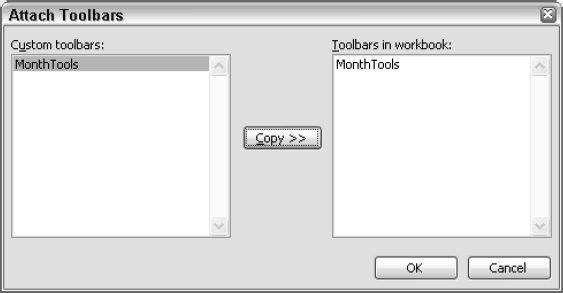
Figure 1-17
Select the toolbar name in the left list box and press the middle button, which has the caption Copy >>.
If an older copy of the toolbar is already attached to the workbook, select it in the right-hand list box and press Delete – shown when you select an item in the right-hand-side column – to remove it. Then select the toolbar name in the left list box and press the middle button again, which will now have the caption Copy >>. Click OK to complete the attachment and then close the Customize dialog box.
Event Procedures
Event procedures are special macro procedures that respond to the events that occur in Excel. Events include user actions, such as clicking the mouse on a button, and system actions, such as the recalculation of a worksheet. Versions of Excel since Excel 97 expose a wide range of events for which we can write code.
The click-event procedure for the ActiveX command button that ran the MonthNames2 macro, which we have already seen, is a good example. We entered the code for this event procedure in the code module behind the worksheet where the command button was embedded. All event procedures are contained in the class modules behind the workbook, worksheets, charts, and UserForms.
We can see the events that are available by activating a module, such as the ThisWorkbook module, choosing an object, such as Workbook, from the left drop-down list at the top of the module and then activating the right drop-down, as shown in Figure 1-18.
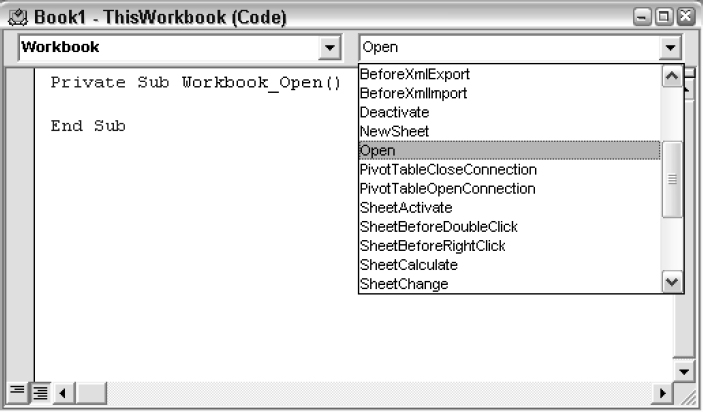
Figure 1-18
The Workbook_Open() event can be used to initialize the workbook when it is opened. The code could be as simple as activating a particular worksheet and selecting a range for data input. The code could be more sophisticated and construct a new menu bar for the workbook.
For compatibility with Excel 5 and 95, you can still create a sub procedure called Auto_Open(), in a standard module, that runs when the workbook is opened. If you also have a Workbook_Open() event procedure, the event procedure runs first.
As you can see, there are many events to choose from. Some events, such as the BeforeSave and BeforeClose, allow cancellation of the event. The following event procedure stops the workbook from being closed until cell A1 in Sheet1 contains the value True.
Private Sub Workbook_BeforeClose(Cancel As Boolean)
  If ThisWorkbook.Sheets(“Sheet1”).Range(“A1”).Value <> True _
    Then Cancel = True
End Sub
This code even prevents the closure of the Excel window.
Removing an Attached Toolbar
As mentioned previously in this chapter, if you have attached a custom toolbar to a workbook, there can be a problem if you send a new version of the toolbar attached to a workbook, or the user saves the workbook under a different name. The old toolbar is not replaced when you open the new workbook, and the macros that the old toolbar runs are still in the old workbook.
One approach that makes it much less likely that problems will occur, is to delete the custom toolbar when the workbook is closed:
Private Sub Workbook_BeforeClose(Cancel As Boolean)
  On Error Resume Next
  Application.CommandBars(“MonthTools”).Delete
End Sub
The On Error statement covers the situation where the user might delete the toolbar manually before closing the workbook. Omitting the On Error statement would cause a runtime error when the event procedure attempts to delete the missing toolbar. On Error Resume Next is an instruction to ignore any runtime error and continue with the next line of code.
User Defined Functions
Excel has hundreds of built-in worksheet functions that we can use in cell formulas. You can select an empty worksheet cell and use Insert ![]() Function… to see a list of those functions. Among the most frequently used functions are SUM, IF, and VLOOKUP. If the function you need is not already in Excel, you can write your own user defined function (or UDF) using VBA.
Function… to see a list of those functions. Among the most frequently used functions are SUM, IF, and VLOOKUP. If the function you need is not already in Excel, you can write your own user defined function (or UDF) using VBA.
UDFs can reduce the complexity of a worksheet. It is possible to reduce a calculation that requires many cells of intermediate results down to a single function call in one cell. UDFs can also increase productivity when many users have to repeatedly use the same calculation procedures. You can set up a library of functions tailored to your organization.
Creating a UDF
Unlike manual operations, UDFs cannot be recorded. We have to write them from scratch using a standard module in the VBE. If necessary, you can insert a standard module by right-clicking in the Project Explorer window and choosing Insert ![]() Module. A simple example of a UDF is shown here:
Module. A simple example of a UDF is shown here:
Function CentigradeToFahrenheit(Centigrade)
  CentigradeToFahrenheit = Centigrade * 9 / 5 + 32
End Function
Here, we have created a function called CentigradeToFahrenheit() that converts degrees Centigrade to degrees Fahrenheit. In the worksheet we could have column A containing degrees Centigrade, and column B using the CentigradeToFahrenheit() function to calculate the corresponding temperature in degrees Fahrenheit. You can see the formula in cell B2 by looking at the Formula bar in Figure 1-19.
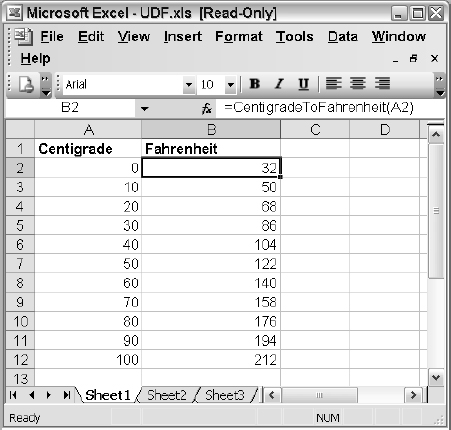
Figure 1-19
The formula has been copied into cells B3:B13.
The key difference between a sub procedure and a function procedure is that a function procedure returns a value. CentigradeToFahrenheit() calculates a numeric value, which is returned to the worksheet cell where CentigradeToFahrenheit() is used. A function procedure indicates the value to be returned by setting its own name equal to the return value.
Function procedures normally have one or more input parameters. CentigradeToFahrenheit() has one input parameter called Centigrade, which is used to calculate the return value. When you enter the formula, = CentigradeToFahrenheit(A2), the value in cell A2 is passed to CentigradeToFahrenheit() through Centigrade. In the case where the value of Centigrade is zero, CentigradeToFahrenheit() sets its own name equal to the calculated result, which is 32. The result is passed back to cell B2, as shown earlier. The same process occurs in each cell that contains a reference to CentigradeToFahrenheit().
A different example that shows how you can reduce the complexity of spreadsheet formulas for users is shown in Figure 1-20. The lookup table in cells A2:D5 gives the price of each product, the discount sales volume (above which a discount will be applied), and the percent discount for units above the discount volume. Using normal spreadsheet formulas, users would have to set up three lookup formulas together with some logical tests to calculate the invoice amount.
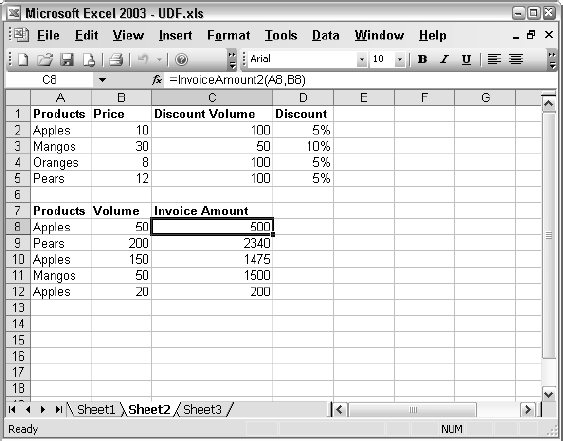
Figure 1-20
The InvoiceAmount() function has three input parameters: Product is the name of the product; Volume is the number of units sold, and Table is the lookup table. The formula in cell C8 defines the ranges to be used for each input parameter:
Function InvoiceAmount(ByVal Product As String, _
  ByVal Volume As Integer, ByVal Table As Range)

  ' Lookup price in table
  Price = WorksheetFunction.VLookup(Product, Table, 2)

  ' Lookup discount volume in table
  DiscountVolume = WorksheetFunction.VLookup(Product, Table, 3)

  ' Compare volume to discount volume to determine if customer
  ' gets discount price
  If Volume > DiscountVolume Then
    ' calculate discounted price
    DiscountPercent = WorksheetFunction.VLookup(Product, Table, 4)
    InvoiceAmount = Price * DiscountVolume + Price * _
      (1 - DiscountPercent) * (Volume - DiscountVolume)
  Else
    'calculate undiscounted price
    InvoiceAmount = Price * Volume
  End If
End Function
The range for the table is absolute so that the copies of the formula below cell C8 refer to the same range. The first calculation in the function uses the VLookup function to find the product in the lookup table and return the corresponding value from the second column of the lookup table, which it assigns to the variable Price.
If you want to use an Excel worksheet function in a VBA procedure, you need to tell VBA where to find it by preceding the function name with WorksheetFunction and a period. For compatibility with Excel 5 and 95, you can use Application instead of WorksheetFunction. Not all worksheet functions are available this way. In these cases, VBA has equivalent functions, or mathematical operators, to carry out the same calculations.
In the next line of the function, the discount volume is found in the lookup table and assigned to the variable DiscountVolume. The If test on the next line compares the sales volume in Volume with DiscountVolume. If Volume is greater than DiscountVolume, the calculations following, down to the Else statement, are carried out. Otherwise, the calculation after the Else is carried out.
If Volume is greater than DiscountVolume, the percent discount rate is found in the lookup table and assigned to the variable DiscountPercent. The invoice amount is then calculated by applying the full price to the units up to DiscountVolume plus the discounted price for units above DiscountVolume. Note the use of the underscore character, preceded by a blank space, to indicate the continuation of the code on the next line.
The result is assigned to the name of the function, InvoiceAmount, so that the value will be returned to the worksheet cell. If Volume is not greater than DiscountVolume, the invoice amount is calculated by applying the price to the units sold and the result is assigned to the name of the function.
Direct Reference to Ranges
When you define a UDF, it is possible to directly refer to worksheet ranges rather than through the input parameters of the UDF. This is illustrated in the following version of the InvoiceAmount2() function:
Public Function InvoiceAmount2(ByVal Product As String, _
    ByVal Volume As Integer) As Double

     Dim Table As Range
  Set Table = ThisWorkbook.Worksheets(“Sheet2”).Range(“A2:D5”)
  Dim Price As Integer
  Price = WorksheetFunction.VLookup(Product, Table, 2)

  Dim DiscountVolume As Integer
  DiscountVolume = WorksheetFunction.VLookup(Product, Table, 3)

  Dim DiscountPercent As Double
  If Volume > DiscountVolume Then
    DiscountPercent = WorksheetFunction.VLookup(Product, Table, 4)
    InvoiceAmount2 = Price * DiscountVolume + Price * _
      (1 – DiscountPercent) * (Volume – DiscountVolume)
  Else
    InvoiceAmount2 = Price * Volume
  End If
End Function
Note that Table is no longer an input parameter. Instead, the Set statement defines Table with a direct reference to the worksheet range. While this method still works, the return value of the function will not be recalculated if you change a value in the lookup table. Excel does not realize that it needs to recalculate the function when a lookup table value changes, as it does not see that the table is used by the function.
Excel only recalculates a UDF when it sees its input parameters change. If you want to remove the lookup table from the function parameters, and still have the UDF recalculate automatically, you can declare the function to be volatile on the first line of the function as shown in the following code:
Public Function InvoiceAmount2(ByVal Prod As String, _
  ByVal Volume As Integer) As Double
Application.Volatile
          Dim Table As Range
Set Table = ThisWorkbook.Worksheets(“Sheet2”).Range(“A2:D5”)
…
However, you should be aware that this feature comes at a price. If a UDF is declared volatile, the UDF is recalculated every time any value changes in the worksheet. This can add a significant recalculation burden to the worksheet if the UDF is used in many cells.
What UDFs Cannot Do
A common mistake made by users is to attempt to create a worksheet function that changes the structure of the worksheet by, for example, copying a range of cells. Such attempts will fail. No error messages are produced because Excel simply ignores the offending code lines, so the reason for the failure is not obvious.
UDFs, used in worksheet cells, are not permitted to change the structure of the worksheet. This means that a UDF cannot return a value to any other cell than the one it is used in and it cannot change a physical characteristic of a cell, such as the font color or background pattern. In addition, UDFs cannot carry out actions such as copying or moving spreadsheet cells. They cannot even carry out some actions that imply a change of cursor location, such as an Edit ![]() Find. A UDF can call another function, or even a subroutine, but that procedure will be under the same restrictions as the UDF. It will still not be permitted to change the structure of the worksheet.
Find. A UDF can call another function, or even a subroutine, but that procedure will be under the same restrictions as the UDF. It will still not be permitted to change the structure of the worksheet.
A distinction is made (in Excel VBA) between UDFs that are used in worksheet cells, and function procedures that are not connected with worksheet cells. As long as the original calling procedure was not a UDF in a worksheet cell, a function procedure can carry out any Excel action, just like a subroutine.
It should also be noted that UDFs are not as efficient as the built-in Excel worksheet functions. If UDFs are used extensively in a workbook, recalculation time will be greater compared with a similar workbook using the same number of built-in functions.
The Excel Object Model
The Visual Basic for Applications programming language is common across all the Microsoft Office applications. In addition to Excel, you can use VBA in Word, Access, PowerPoint, Outlook, FrontPage, PowerPoint, and Project. Once you learn it, you can apply it to any of these. However, to work with an application, you need to learn about the objects it contains. In Word, you deal with documents, paragraphs, and words. In Access, you deal with databases, record sets, and fields. In Excel, you deal with workbooks, worksheets, and ranges.
Unlike many programming languages, you don't have to create your own objects in Office VBA. Each application has a clearly defined set of objects that are arranged according to the relationships between them. This structure is referred to as the application's object model. This section is an introduction to the Excel Object Model, which is fully documented in Appendix A (available online at www.wrox.com).
Objects
First, let's cover a few basics about Object-Oriented Programming (OOP). This not a complete formal treatise on the subject, but it covers what you need to know to work with the objects in Excel.
OOP's basic premise is that we can describe everything known to us as classes. Instances of classes are called objects. You and I are objects of the Person class, the world is an object and the universe is an object. In Excel, a workbook is an object, a worksheet is an object, and a range is an object. These objects are only a small sample of around 200 object types available to us in Excel. Let us look at some examples of how we can refer to Range objects in VBA code. One simple way to refer to cells B2:C4 is as follows:
Range(“B2:C4”)
If you give the name Data to a range of cells, you can use that name in a similar way:
Range(“Data”)
There are also ways to refer to the currently active cell and selection using shortcuts.
In the screenshot shown in Figure 1-21, ActiveCell refers to the B2 cell, and Selection refers to the range B2:E6.
Collections
Many objects belong to collections. A city block has a collection of buildings. A building has a collection of floor objects. A floor has a collection of room objects. Collections are objects themselves—objects that contain other objects that are closely related. Collections and objects are often related in a hierarchical or tree structure.
Excel is an object itself, referred to by the name Application. In the Excel Application object, there is a Workbooks collection that contains all the currently open Workbook objects. Each Workbook object has a Worksheets collection that contains the Worksheet objects in that workbook.
Note that you need to make a clear distinction between the plural Worksheets object, which is a collection, and the singular Worksheet object. They are quite different objects.

Figure 1-21
If you want to refer to a member of a collection, you can refer to it by its position in the collection, as an index number starting with 1, or by its name, as quoted text. If you have opened just one workbook called Data.xls, you can refer to it by either of the following:
Workbooks(l)
Workbooks(“Data.xls”)
If you have four worksheets in the active workbook that have the names North, South, East, and West, in that order, you can refer to the second worksheet by either of the following:
Worksheets(2)
Worksheets(“South”)
If you want to refer to a worksheet called Datalnput in a workbook called Sales.xls, and Sales.xls is not the active workbook, you must qualify the worksheet reference with the workbook reference, separating them with a period, as follows:
Workbooks(“Sales.xls”).Worksheets(“DataInput”)
In object-oriented speak special characters like >, <, =, and . are called operators. The period (.) is called the member of operator. For example, we say that the Worksheets collection is a member of the Workbook class.
When you refer to the B2 cell in DataInput, while another workbook is active, you use:
Workbooks(“Sales.xls”).Worksheets(“DataInput”).Range(“B2”)
The preceding code is understood to mean that Workbooks(“Sales.xls”) returns an instance of the Workbook class. The . Worksheets(“DataInput”) part returns a single Worksheet, and the .Range(“B2”) part returns a single range. As you might have intuitively guessed, we are getting one Workbook, one Worksheet from that Workbook, and a specific Range.
Let us now look at objects more closely and see how we can manipulate them in our VBA code. There are four key characteristics of objects that you need to be aware of to do this. They are the fields, properties, methods, and events associated with an object.
Fields
Fields are variables that capture the state of an object. Fields can be anything that helps describe what instances of a class should know. For example, a Customer class may need to know the name of the customer. The reason we say a Customer class “may need to know” something is because what a class needs to know is subjective and relative to the problem domain. Extending our example further a Customer class may need to contain the Employer Identification Number (EIN). However, if the Customers were not business then the EIN doesn't make any sense, but perhaps a Social Security Number would be a better field.
An example of our EIN field might be:
Private FEmploymentIdentificationNumber As String
By convention, we will use an F-prefix simply to denote that a name is a field (and drop the F for properties, described in the next section.) Another convention is that fields are declared private and accessed indirectly through a Property. We will talk more about access modifiers like Private in Chapter 5. Let's look at properties next.
Properties
Properties are an evolution. Originally, classes contained fields and methods. It was soon discovered that fields needed associated methods to ensure that proper values were being assigned to the fields. The dichotomy of ease-of-use and validation converged, resulting in a property. The property is really a special method that looks like a field to the consumer (class user), but behaves and is coded like a method by the producer (class author). Properties are purely about controlling access to state information about an object.
Consequently, properties are attributes just like fields that implicitly combine the technical behavior of a method call with the notational convenience of a field. By convention, we will drop the F-prefix of a field to derive each field's property name. Other conventions exist by other contributors to this book. Rather than pretend these philosophical differences to naming styles don't exist, you will see a couple of conventions and can choose for yourself which one makes sense. (Other naming conventions used include a prefix notation that includes information about the data type of a field or property. Pick one convention and use it consistently.)
Examples of properties in Excel include worksheet Range object, which has a RowHeight property and a ColumnWidth property. A Workbook object has a Name property, which contains its file name. Some properties can be changed easily, such as the Range object's ColumnWidth property, by assigning the property a new value. Other properties, such as the Workbook object's Name property, are read-only. You can't change the Name property by simply assigning a new value to it.
You refer to the property of an object by referring to the object, then the property, separated by a period (the member-of operator). For example, to change the width of the column containing the active cell to 20 points, you would assign the value to the ColumnWidth property of the ActiveCell using
ActiveCell.ColumnWidth =20
To enter the name Florence into cell C10, you assign the name to the Value property of the Range object:
Range(“C10”).Value = “Florence”
If the Range object is not in the active worksheet in the active workbook, you need to be more specific:
Workbooks(“Sales.xls”).Worksheets(“DataInput”).Range(“C10”).Value = 10
VBA can do what is impossible for us to do manually. It can enter data into worksheets that are not visible on the screen. It can copy and move data without having to make the sheets involved active. Therefore, it is very seldom necessary to activate a specific workbook, worksheet, or range to manipulate data using VBA. The more you can avoid activating objects, the faster your code will run. Unfortunately, the macro recorder can only record what we do and uses activation extensively.
In the previous examples, we have seen how we can assign values to the properties of objects. We can also assign the property values of objects to variables or to other objects' properties. We can directly assign the column width of one cell to another cell on the active sheet using
Range(“C1”).ColumnWidth = Range(“A1”).ColumnWidth
We can assign the value in C1 in the active sheet to D10 in the sheet named Sales, in the active workbook, using
Worksheets(“Sales”).Range(“D10”).Value = Range(“C1”).Value
We can assign the value of a property to a variable so that it can be used in later code. This example stores the current value of cell M100, sets M100 to a new value, prints the auto recalculated results and sets M100 back to its original value:
OpeningStock = Range(“M100”).Value
Range(“M100”).Value = 100
ActiveSheet.PrintOut
Range(“M100”).Value = OpeningStock
Some properties are read-only, which means that you can't assign a value to them directly. Sometimes there is an indirect way. One example is the Text property of a Range object. You can assign a value to a cell using its Value property and you can give the cell a number format using its NumberFormat property. The Text property of the cell gives you the formatted appearance of the cell. The following example displays $12,345.60 in a Message box:
Range(“B10”).Value = 12345.6
Range(“B10”).NumberFormat = “$#,##0.00”
MsgBox Range(“B10”).Text
This is the only means by which we can set the value of the Text property.
Methods
While properties are the quantifiable characteristics of objects, methods are the actions that can be performed by objects or on objects. If you have a linguistic bent, you might like to think of classes as nouns, objects instances of those nouns, fields and properties as adjectives, and methods as verbs. Methods often change the properties of objects. A zoologist might define a Homosapien class with the verb Walk. Walk could be implemented in terms of Speed, Distance, and Direction, yielding a new Location. A credit card company may implement a Customer class with a Spend method. Charging items (spending, a method) reduces my available credit line (AvailableCredit, a property).
A simple example of an Excel method is the Select method of the Range object. To refer to a method, as with properties, we put the object name first, a period, and the method name with any relevant arguments. Backtracking to our Walk method, we might pass in the direction, speed, and time to the walk method, yielding a new Location (assuming our present location is known). The following method invocation (or call) selects cell G4:
Range(“G4”).Select
Another example of an Excel method is the Copy method of the Range object. The following copies the contents of range A1:B3 to the clipboard:
Range(“A1:B3”).Copy
Methods often have parameters (or arguments) that we can use to modify the way the method works. For example, we can use the Paste method of the Worksheet object to paste the contents of the clipboard into a worksheet, but if we do not specify where the data is to be pasted, it is inserted with its top left-hand corner in the active cell. This can be overridden with the Destination parameter (parameters are discussed later in this section):
ActiveSheet.Paste Destination:=Range(“G4”)
Note that the value of a parameter is specified using :=, not just =.
Often, Excel methods provide shortcuts. The previous examples of Copy and Paste can be carried out entirely by the Copy method:
Range(“A1:B3”).Copy Destination:=Range(“G4”)
This is far more efficient than the code produced by the macro recorder:
Range(“A1:B3”).Select
Selection.Copy
Range(“G42).Select
ActiveSheet.Paste
Events
Another important concept in VBA is that objects can respond to events. A mouse click on a command button, a double-click on a cell, a recalculation of a worksheet, and the opening and closing of a workbook are examples of events. In plain English, events are things that happen. In the context of VBA, events are things that happen to an object.
All of the ActiveX controls from the Control Toolbox toolbar can respond to events. These controls can be embedded in worksheets and in UserForms to enhance the functionality of those objects. Worksheets and workbooks can also respond to a wide range of events. If we want an object to respond to an event, then we have to write the event handler for a specific event. An event is really nothing more than an address (a number). All things in computers are just numbers. How those numbers are used is what is important to the computer. An event's number is the address—that is, the number—that can refer to the address (again just a number) of a method. When the event is raised, the address associated with the event is used to call the method referred to by its number. These special methods are called event handlers. Fortunately, the compiler manages the assignment of numbers internally. All we need to know is the grammar used to indicate that we want a particular object's event to respond using a specific event handler, a method. Fortunately, the VBE environment goes one step further: the VBE will automatically manage generating and assigning event handlers on our behalf. Of course, we also have the option of assigning event handlers manually, which is useful when we define events for classes that are not Excel or ActiveX controls.
For example, we might want to detect that a user has selected a new cell and highlight the cell's complete row and column. We can do this having the VBE generate the SelectionChange event handler and then by entering code in the event handler. By convention, the VBE precedes an event handler's name with the object's name and an underscore prefix; thus SelectionChange is coded as Worksheet_SelectionChange. Complete the following steps to create this event handler:
- First activate the VBE window by pressing Alt+F11 and double-clicking a worksheet in the Project Explorer
- From the Object drop-down list on the left select Worksheet, and from the Procedure drop-down list on the right select SelectionChange.
- Enter the following code in the generated subroutine:
Private Sub Worksheet_SelectionChange(ByVal Target As Range)
  Rows.Interior.ColorIndex = xlColorIndexNone
  Target.EntireColumn.Interior.ColorIndex =36
  Target.EntireRow.Interior.ColorIndex = 36
End Sub
This event handler runs every time the user selects a new cell, or block of cells. The parameter, Target, refers to the selected range as a Range object. The first statement sets the ColorIndex property of all the worksheets cells to no color, to remove any existing background color. The second and third statements set the entire columns and entire rows that intersect with the selected cells to a background color of pale yellow. The predefined color xlColorIndexNone can yield a color other than a creamy yellow if you have modified Excel's color palette.
The use of properties in this example is more complex than we have seen before. Let's analyze the constituent parts. If we assume that Target is a Range object referring to cell B10, then the following code uses the EntireColumn property of the B10 Range object to refer to the entire B column, which is the range B1:B65536, or B:B for short:
Target.EntireColumn.Interior.ColorIndex = 36
Similarly, the next line of code changes the color of row 10, which is the range A10:IV10, or 10:10 for short:
Target.EntireRow.Interior.ColorIndex = 36
The Interior property of a Range object refers to an Interior object, which is the background of a range. Finally, we set the ColorIndex property of the Interior object equal to the index number for the required color.
This code might appear to many to be far from intuitive. So how do we go about figuring out how to carry out a task involving an Excel object?
Getting Help
An easy way to discover the required code to perform an operation is to use the macro recorder. The recorded code is likely to be inefficient, but it will indicate the objects required and the properties and methods involved. If you turn on the recorder to find out how to color the background of a cell, you will get something like the following:
With Selection.Interior
   .ColorIndex = 36
   .Pattern = xlSolid
End With
This With… End With construction is discussed in more detail later in this chapter. It is equivalent to:
Selection.Interior.ColorIndex = 36
Selection.Interior.Pattern = xlSolid
The second line is unnecessary, as a solid pattern is the default. The macro recorder is a verbose recorder, rather than rely on implicit values and behaviors it includes everything explicitly. The first line gives us some of the clues we need to complete our code. We only need to figure out how to change the Range object, Selection, into a complete row or complete column. If this can be done, it will be accomplished by using a property or method of the Range object.
The Object Browser
The Object Browser is a valuable tool for discovering the fields, properties, methods, and events applicable to Excel objects. To display the Object Browser, you need to be in the VBE window. You can use View ![]() Object Browser, press F2, or click the Object Browser button on the Standard toolbar to see the window shown in Figure 1-22.
Object Browser, press F2, or click the Object Browser button on the Standard toolbar to see the window shown in Figure 1-22.
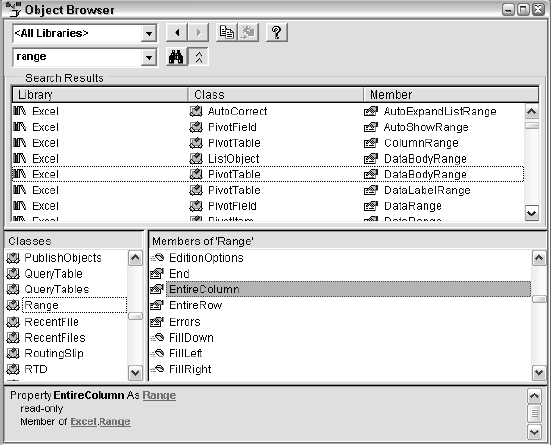
Figure 1-22
The objects are listed in the window with the title Classes. You can click in this window and type an r to get quickly to the Range object.
Alternatively, you can click in the search box, second from the top with the binoculars to its right, and type in range. When you press Enter or click the binoculars, you will see a list of items containing this text. When you click Range, under the Class heading in the Search Results window, Range will be highlighted in the Classes window below. This technique is handy when you are searching for information on a specific property, method, or event.
We now have a list of all the fields, properties, methods and events for this object, sorted alphabetically. If you right-click this list, you can choose Group Members, to separate the properties, methods, and events, which makes it easier to read. If you scan through this list, you will see the EntireColumn and EntireRow properties, which look likely candidates for our requirements. To confirm this, select EntireColumn and click the ? icon at the top of the Object Browser window to go to the window shown in Figure 1-23.
Also this can often lead to further information on related objects and methods. Now, all we have to do is connect the properties we have found and apply them to the right object.
Experimenting in the Immediate Window
If you want to experiment with code, you can use the VBE's Immediate window. Use View ![]() Immediate Window, press Ctrl+G, or press the Immediate Window button on the Debug toolbar to make the Immediate window visible. You can tile the Excel window and the VBE window so that you can type commands into the Immediate window and see the effects in the Excel window as shown in Figure 1-24.
Immediate Window, press Ctrl+G, or press the Immediate Window button on the Debug toolbar to make the Immediate window visible. You can tile the Excel window and the VBE window so that you can type commands into the Immediate window and see the effects in the Excel window as shown in Figure 1-24.
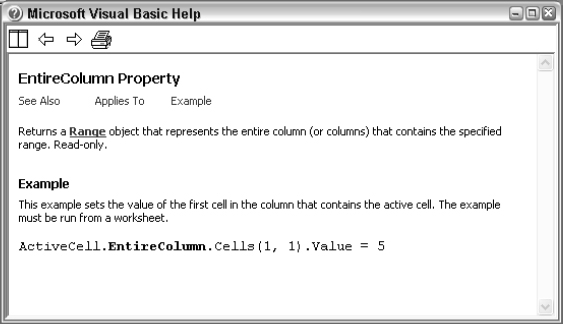
Figure 1-23
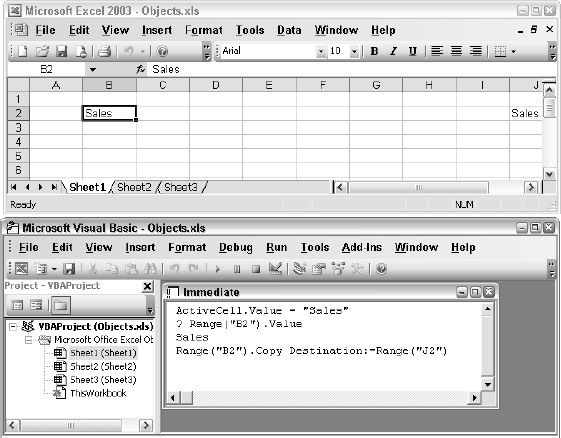
Figure 1-24
When a command is typed in the Immediate window (see lower right corner of Figure 1-24), and Enter is pressed, the command is immediately executed. To execute the same command again, click anywhere in the line with the command and press Enter again.
Here, the Value property of the ActiveCell object has been assigned the text “Sales”. If you want to display a value, you precede the code with a question mark, which is a shortcut for Print:
?Range(“B2”).Value ‘is equivalent to Print Range(“B2”).Value
This code has printed “Sales” on the next line of the Immediate window. The last command has copied the value in B2 to J2.
The VBA Language
In this section, you will see the elements of the VBA language that are common to all versions of Visual Basic and the Microsoft Office applications. We will use examples that employ the Excel Object Model, but our aim is to examine the common grammar. Many of these structures and concepts are common to other programming languages, although the grammar varies. We will look at:
- Storing information in variables and arrays
- Conditional statements
- Using loops
- Basic error handling
Basic Input and Output
First, let's look at some simple communication techniques that we can use to make our macros more flexible and useful. If we want to display a message, we can use the MsgBox function. This can be useful if we want to display a warning message or ask a simple question.
In our first example, we want to make sure that the printer is switched on before a print operation. The following code generates the dialog box shown in Figure 1-25, giving the user a chance to check the printer. The macro pauses until the OK button is pressed:
MsgBox “Please make sure that the printer is turned on”
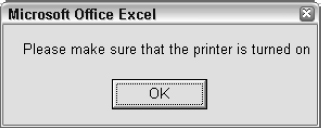
Figure 1-25
If you want to experiment, you can use the Immediate window to execute single lines of code. Alternatively, you can insert your code into a standard module in the VBE window. In this case, you need to include Sub and End Sub lines as follows:
Sub Test1()
  MsgBox “Please make sure that the printer is turned on”
End Sub
An easy way to execute a sub procedure is to click somewhere in the code to create an insertion point, then press F5.
MsgBox has many options that control the type of buttons and icons that appear in the dialog box. If you want to get help on this, or any VBA word, just click somewhere within the word and press the F1 key. The Help screen for the word will immediately appear. Among other details, you will see the input parameters accepted by the function:
MsgBox(prompt[, buttons] [, title] [, helpfile, context])
Parameters in square brackets are optional, so only the prompt message is required. If you want to have a title at the top of the dialog box, you can specify the third parameter. There are two ways to specify parameter values, by position and by name.
Parameters Specified by Position
If we specify a parameter by position, we need to make sure that the parameters are entered in the correct order. We also need to include extra commas for missing parameters. The following code provides a title for the dialog box, specifying the title by position (see Figure 1-26):
MsgBox “Is the printer on?”, , “Caution!”
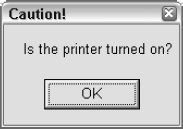
Figure 1-26
Parameters Specified by Name
There are some advantages to specifying parameters by name:
- We can enter them in any order and do not need to include extra commas with nothing between them to allow for undefined parameters
- We do need to use := rather than just = between the parameter name and the value, as we have already pointed out
The following code generates the same dialog box as the last one:
MsgBox Title:=“Caution!”, Prompt:=“Is the printer on?”
Another advantage of specifying parameters by name is that the code is better documented. Anyone reading the code is more likely to understand it.
If you want more information on buttons, you will find a table of options in the VBE help screen for the MsgBox function as follows:
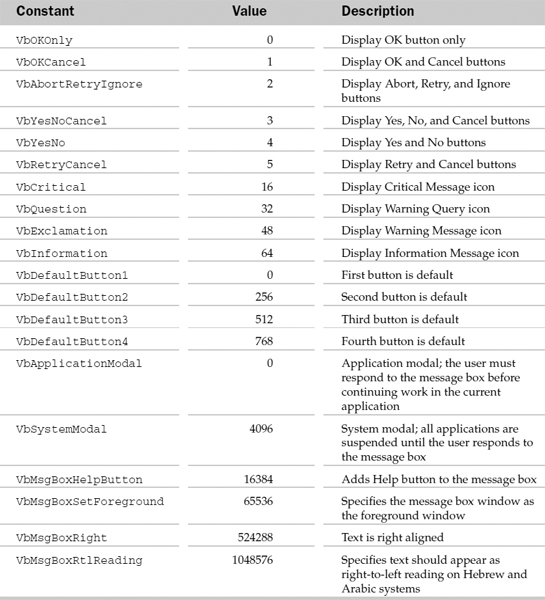
Values 0 to 5 control the buttons that appear (see Figure 1-27). A value of 4 gives Yes and No buttons:
MsgBox Prompt:=“Delete this record?”, Buttons:=4
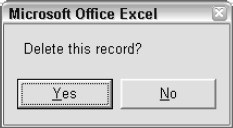
Figure 1-27
Values 16 to 64 control the icons that appear (see Figure 1-28). 32 gives a question mark icon. If we wanted both value 4 and value 32, we add them:
MsgBox Prompt:=“Delete this record?”, Buttons:=36
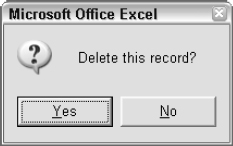
Figure 1-28
Constants
Specifying a Buttons value of 36 ensures that our code is indecipherable to all but the most battle-hardened programmer. This is why VBA provides the constants shown to the left of the button values in the Help screen. Rather than specifying Buttons by numeric value, we can use the constants, which provide a better indication of the choice behind the value. The following code generates the same dialog box as the previous example:
MsgBox Prompt:=“Delete this record?”, Buttons:=vbYesNo + vbQuestion
The VBE helps you as you type by providing a popup list of the appropriate constants after you type Buttons:=. Point to the first constant and press + and you will be prompted for the second constant. Choose the second and press the Spacebar or Tab to finish the line. If there is another parameter to be specified, enter a “,” rather than Space or Tab.
Constants are a special type of variable that do not change. They are used to hold key data and, as we have seen, provide a way to write more understandable code. VBA has many built-in constants that are referred to as intrinsic constants. We can also define our own constants, as we will see later in this chapter.
Return Values
There is something missing from our last examples of MsgBox. We are asking a question, but failing to capture the user's response to the question. That is because we have been treating MsgBox as a statement, rather than a function. This is perfectly legal, but we need to know some rules if we are to avoid syntax errors. We can capture the return value of the MsgBox function by assigning it to a variable.
However, if we try the following, we will get a syntax error:
Answer = MsgBox Prompt:=“Delete this record?”, Buttons:=vbYesNo + vbQuestion
The error message, “Expected: End of Statement”, is not really very helpful. You can press the Help button on the error message, to get a more detailed description of the error, but even then you might not understand the explanation.
Parentheses
The problem with the above line of code is that there are no parentheses around the function arguments. It should read as follows:
Answer = MsgBox(Prompt:=“Delete this record?”, Buttons:=vbYesNo + vbQuestion)
The general rule is that if we want to capture the return value of a function, we need to put any arguments in parentheses. We can avoid this problem by always using the parentheses when calling a procedure. If you aren't capturing a return value you can skip the parentheses or precede the procedure call with the keyword Call, as in
Call MsgBox(Prompt:=“Delete this record?”, Buttons:=vbYesNo + vbQuestion)
The parentheses rule also applies to methods used with objects. Many methods have return values that you can ignore or capture. See the section on object variables later in this chapter for an example.
Now that we have captured the return value of MsgBox, how do we interpret it? Once again, the help screen provides the required information in the form of the following table of return values:
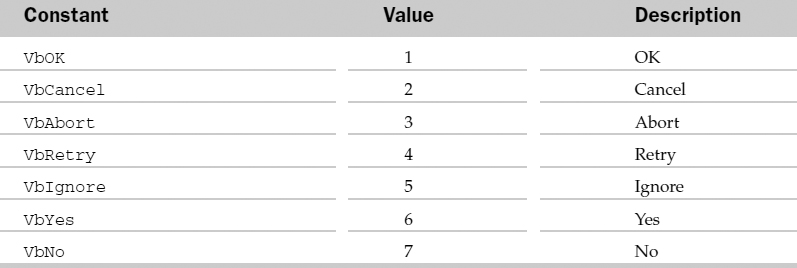
If the Yes button is pressed, MsgBox returns a value of six. We can use the constant vbYes, instead of the numeric value, in an If test:
Answer = MsgBox(Prompt:=“Delete selected Row?”, Buttons:=vbYesNo + vbQuestion)
If Answer = vbYes Then ActiveCell.EntireRow.Delete
…
InputBox
Another useful VBA function is InputBox, which allows us to get input data from a user in the form of text. The following code generates the dialog box shown in Figure 1-29.
UserName = InputBox(Prompt:=“Please enter your name”)
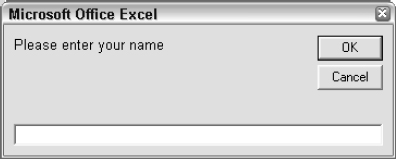
Figure 1-29
InputBox returns a text (string) result. Even if a numeric value is entered, the result is returned as text. If you press Cancel or OK without typing anything into the text box, InputBox returns a zero length string. It is a good idea to test the result before proceeding so that this situation can be handled. In the following example, the sub procedure does nothing if Cancel is pressed. The Exit Sub statement stops the procedure at that point. Otherwise, it places the entered data into cell B2:
Sub GetData()
   Sales = InputBox(Prompt:=“Enter Target Sales”)
   If Sales = “” Then Exit Sub
   Range(“B2”).Value = Sales
End Sub
In the code above, the If test compares Sales with a zero length string. There is nothing between the two double quote characters. Don't be tempted to put a blank space between the quotes.
There is a more powerful version of InputBox that is a method of the Application object. It has the ability to restrict the type of data that you can enter. It is covered in Chapter 3.
Calling Functions and Subroutines
When you develop an application, you should not attempt to place all your code in one large procedure. You should write small procedures that carry out specific tasks, and test each procedure independently. You can then write a master procedure that runs your task procedures. This approach makes the testing and debugging of the application much simpler and also makes it easier to modify the application later.
The following code illustrates this modular approach, although, in a practical application your procedures would have many more lines of code:
Sub Master()
  Dim SalesData As String
  SalesData = GetSalesData()
If (SalesData <> “”) Then
    Call PostInput(SalesData, “B3”)
  End If
End Sub

Function GetSalesData()
  GetSalesData = InputBox(“Enter Sales Data”)
End Function

Sub PostInput(InputData, Target)
   Range(Target).Value = InputData
End Sub
Master uses the GetSalesData function and the PostInput sub procedure. GetSalesData is the one passes the prompt message for the InputBox function and returns the user's response. Master tests for a zero length string in the response. If the value is not an empty string then PostInput adds the data to the worksheet.
Note that subroutines and functions can both accept arguments. However, you cannot subroutine with input parameters directly by pressing F5.
The Call Statement
The Call keyword is as old as procedures. Call is actually a carry over from an assembly language instruction with the same name. By using Call and parentheses, it is clear that your code is invoking a method and that the parameters are arguments to the procedure call.
Variable Declaration
We have seen many examples of the use of variables for storing information. Now we will discuss the rules for creating variable names, look at different types of variables, and talk about the best way to define variables.
Variable names can be constructed from letters and numbers, and the underscore character. The name must start with a letter and can be up to 255 characters in length. It is a good idea to avoid using any special characters in variable names. To be on the safe side, you should only use the letters of the alphabet (upper and lower case) plus the numbers 0-9 plus the underscore (_). Also, variable names can't be the same as VBA key words, such as Sub and End, or VBA function names.
So far we have been creating variables simply by using them. This is referred to as implicit variable declaration. Most computer languages require us to employ explicit variable declaration. This means that we must define the names of all the variables we are going to use, before we use them in our code. VBA allows both types of declaration. If we want to declare a variable explicitly, we do so using a Dim statement or one of its variations, which we will see shortly. The following Dim statement declares a variable called SalesData:
Sub GetData()
   Dim SalesData As String
   SalesData = InputBox(Prompt:=“Enter Target Sales”)
   …
Implicit variable declaration is supported but should be avoided. Your code should be as explicit as possible. Explicit code and variable declaration conveys more meaning and makes your code more precise. In addition, implicit variables are invariant data types. The problem with using invariant data types is that extra code must be added behind the scenes to determine the type of the data each time it is used. This extra decision code is added automatically, and in addition to conveying less meaning, it adds unnecessary overhead to execution time.
Option Explicit
There is a way to force explicit declaration in VBA. We place the statement Option Explicit at the top of our module, as demonstrated in Figure 1-30.
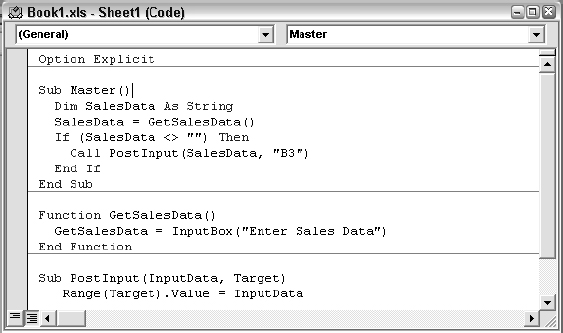
Figure 1-30
Option Explicit only applies to the module it appears in. Each module requiring explicit declaration of variables must repeat the statement in its declaration section.
When you try to compile your module or run a procedure, using explicit variable declaration, VBA will check for variables that have not been declared, highlight them, and show an error message. This has an enormous benefit. It picks up spelling mistakes, which are among the most common errors in programming. Consider the following version of GetSalesData, where there is no Option Explicit at the top of the module and, therefore, implicit declaration is used:
Sub GetData()
   SalesData = InputBox(Prompt:=“Enter Target Sales”)
   If SaleData = “” Then Exit Sub
   Range(“B2”).Value = SalesData
End Sub
This code will never enter any data into cell B2. VBA happily accepts the misspelled SaleData in the If test as a new variable that is empty, and thus considered to be a zero length string for the purposes of the test. Consequently, the Exit Sub is always executed and the final line is never executed. This type of error, especially when embedded in a longer section of code, can be very difficult to see.
If you include Option Explicit in your declarations section, and Dim SalesData at the beginning of GetSalesData, you will get an error message, “Variable not defined”, immediately after you attempt to run GetSalesData. The undefined variable will be highlighted so that you can see exactly where the error is.
You can have Option Explicit automatically added to any new modules you create. In the VBE, use Tools ![]() Options… and click the Editor tab. Check the box against Require Variable Declaration. This is a highly recommended option. Note that setting this option will not affect any existing modules, where you will need to insert Option Explicit manually.
Options… and click the Editor tab. Check the box against Require Variable Declaration. This is a highly recommended option. Note that setting this option will not affect any existing modules, where you will need to insert Option Explicit manually.
Scope and Lifetime of Variables
There are two important concepts associated with variables:
- The scope of a variable defines the accessibility of the variable
- The lifetime of a variable defines how long that variable retains the values assigned to it
The following procedure illustrates the lifetime of a variable:
Sub LifeTime()
  Dim Sales As Integer
  Sales = Sales + 1
  Call MsgBox(Sales)
End Sub
Every time LifeTime is run, it displays a value of one. This is because the variable Sales is only retained in memory until the end of the procedure. The memory Sales is released when the End Sub is reached. Next time LifeTime is run, Sales is recreated and treated as having a zero value. The scope of Sales is procedure scope and the lifetime of Sales is the time taken to run the procedure within which it is defined. We can increase the lifetime of Sales by declaring it in a Static statement:
Sub LifeTime()
  Static Sales As Integer
  Sales = Sales + 1
  MsgBox Sales
End Sub
The lifetime of Sales is now extended to the time that the workbook is open. The more times LifeTime is run, the higher the value of Sales will become.
The following two procedures illustrate the scope of a variable:
Sub Scope1()
  Static Sales As Integer
  Sales = Sales + 1
  MsgBox Sales
End Sub

Sub Scope2()
  Static Sales As Integer
  Sales = Sales + 10
  MsgBox Sales
End Sub
The variable Sales in Scope1 is not the same variable as the Sales in Scope2. Each time Scope1 is executed, the value of its Sales will increase by one, independently of the value of Sales in Scope2. Similarly, the Sales in Scope2 will increase by 10 with each execution of Scope2, independently of the value of Sales in Scope1. Any variable declared within a procedure has a scope that is confined to that procedure. A variable that is declared within a procedure is referred to as a procedure-level variable.
Variables can also be declared in the declarations section at the top of a module as shown in the following version of our code:
Option Explicit
Dim Sales As Integer

Sub Scope1()
  Sales = Sales + 1
  MsgBox Sales
End Sub

Sub Scope2()
  Sales = Sales + 10
  MsgBox Sales
End Sub
Scope1 and Scope2 are now processing the same variable, Sales. A variable declared in the declarations section of a module is referred to as a module-level variable and its scope is now the whole module. Therefore, it is visible to all the procedures in the module. Its lifetime is now the time that the workbook is open.
If a procedure in the module declares a variable with the same name as a module-level variable, the module-level variable will no longer be visible to that procedure. It will process its own procedure-level variable.
Module-level variables, declared in the declarations section of the module with a Dim statement, are not visible to other modules. If you want to share a variable between modules, you need to declare it as Public in the declarations section:
Public Sales As Integer
Public variables can also be made visible to other workbooks, or VBA projects. To accomplish this, a reference to the workbook containing the Public variable is created in the other workbook, using Tools, References… in the VBE.
Variable Type
Computers store different types of data in different ways. The way a number is stored is quite different from the way text, or a character string, is stored. Different categories of numbers are also stored in different ways. An integer (a whole number with no decimals) is stored differently from a number with decimals. Most computer languages require that you declare the type of data to be stored in a variable. VBA does not require this, but your code will be more efficient if you do declare variable types. It is also more likely that you will discover any problems that arise when data is converted from one type to another, if you have declared your variable types.
The following table has been taken directly from the VBA Help files. It defines the various data types available in VBA and their memory requirements. It also shows you the range of values that each type can handle:
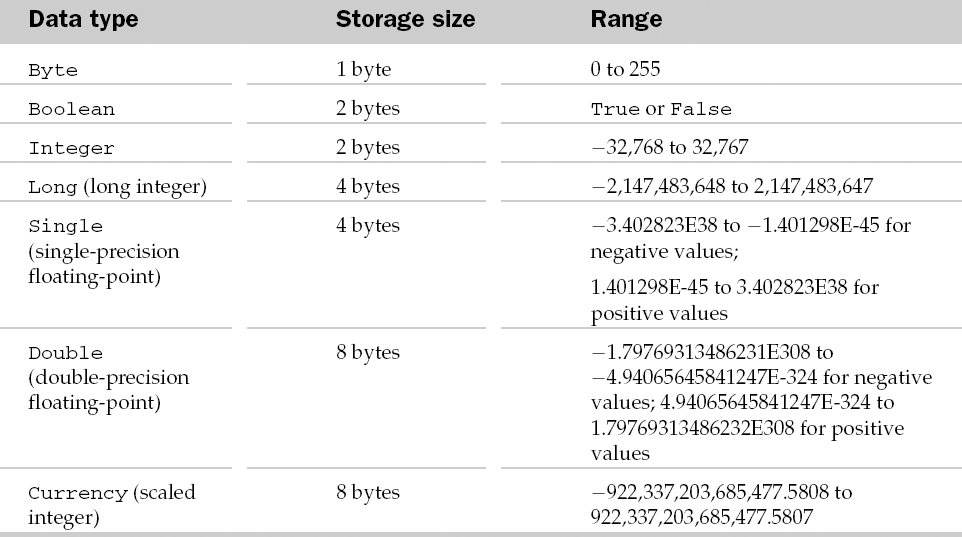
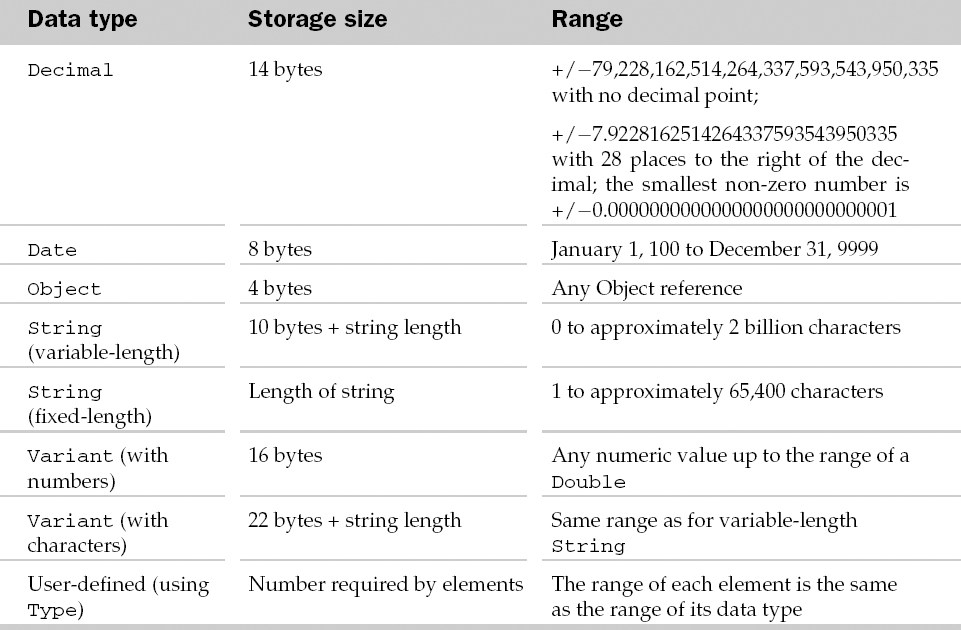
If you do not declare a variable's type, it defaults to the Variant type. Variants take up more memory than any other type because each Variant has to carry information with it that tells VBA what type of data it is currently storing, as well as store the data itself.
Variants use more computer overhead when they are processed. VBA has to figure out what types it is dealing with and whether it needs to convert between types in order to process the number. If maximum processing speed is required for your application you should declare your variable types, taking advantage of those types that use less memory when you can. For example, if you know your numbers will be whole numbers in the range of −32000 to C32000, you would use an Integer type.
Declaring Variable Type
You can declare a variable's type on a Dim statement, or related declaration statements such as Public. The following declares Sales to be a double precision floating-point number:
Dim Sales As Double
You can declare more than one variable on a single line:
Dim SalesData As Double, Index As Integer, StartDate As Date
Dim Col, Row, Sheet As Integer
Many users assume that this declares each variable to be Integer. This is not true. Col and Row are Variants because they have not been given a type. To declare all three as Integer, the statement should be written as follows:
Dim Col As Integer, Row As Integer, Sheet As Integer
Declaring Function and Parameter Types
If you have input parameters for subroutines or functions, you can define each parameter type in the first line of the procedure as follows:
Function IsHoliday(WhichDay As Date)

Sub Marine(CrewSize As Integer, FuelCapacity As Double)
You can also declare the return value type for a function. The following example is for a function that returns a value of True or False:
Function IsHoliday(WhichDay As Date) As Boolean
Constants
We have seen that there are many intrinsic constants built into VBA, such as vbYes and vbNo discussed earlier. You can also define your own constants. Constants are handy for holding numbers or text that do not change while your code is running, but that you want to use repeatedly in calculations and messages. Constants are declared using the Const keyword, as follows:
Const Pi = 3.14159265358979
But, you should include the constant's type in the declaration:
Const Version As String = “Release 3.9a”
Constants follow the same rules regarding scope as variables. If you declare a constant within a procedure, it will be local to that procedure. If you declare it in the declarations section of a module, it will be available to all procedures in the module. If you want to make it available to all modules, you can declare it to be Public as follows:
Public Const Error666 As String = “It's the end of the world as we know it.”
Variable Naming Conventions
The most important rule for naming variables in VBA (or any programming language) is to adopt one style and be consistent. Many programmers are habituated to use a prefix notation, whereby the first couple of letters are an abbreviation for the data type. This prefix notation is attributed to Charles Simonyi at Microsoft. It was invented for the very weakly typed C programming language and is called the Hungarian notation.
(A strongly typed language is a language whose compiler makes a careful distinction between the types of the arguments declared and the types actually passed to methods.) Because languages are much more strongly typed now, even Microsoft is encouraging programmers to use explicit declarations, rely on strong types, and context to clearly indicate what a variable is used for and to drop prefix notations.
You may certainly use whatever naming convention you like but computers don't care and humans aren't particularly good at reading abbreviations. If you want to include the variables type then we would encourage the use of the complete class name, for example, ButtonUpdateStatus rather than btnUpdateStatus. Alternatively, you can use UpdateStatusButton which is very readable. Consistency counts here.
Object Variables
The variables we have seen so far have held data such as numbers and text. You can also create object variables to refer to objects such as worksheets and ranges. The Set statement is used to assign an object reference to an object variable. Object variables should also be declared and assigned a type as with normal variables. If you don't know the type, you can use the generic term Object as the type:
Dim MyWorkbook As Object
Set MyWorkbook = ThisWorkbook
MsgBox MyWorkbook.Name
It is more efficient to use the specific object type if you can. The following code creates an object variable aRange referring to cell B10 in Sheet1, in the same workbook as the code. It then assigns values to the object and the cell above:
Sub ObjectVariable()
  Dim aRange As Range
  Set aRange = ThisWorkbook.Worksheets(“Sheet1”).Range(“C10”)
  aRange.Value = InputBox(“Enter Sales for January”)
  aRange.Offset(−1, 0).Value = “January Sales”
End Sub
If you are going to refer to the same object more than once, it is more efficient to create an object variable than to keep repeating a lengthy specification of the object. It is also makes code easier to read and write.
Object variables can also be very useful for capturing the return values of some methods, particularly when you are creating new instances of an object. For example, with either the Workbooks object or the Worksheets object, the Add method returns a reference to the new object. This reference can be assigned to an object variable so that you can easily refer to the new object in later code:
Sub NewWorkbook()
  Dim aWorkbook As Workbook, aWorksheet As Worksheet

  Set aWorkbook = Workbooks.Add
  Set aWorksheet = aWorkbook.Worksheets.Add( _
    After:= aWorkbook.Sheets(aWorkbook.Sheets.Count))
  aWorksheet.Name = “January”
  aWorksheet.Range(“A1”).Value = “Sales Data”
  aWorkbook.SaveAs Filename:=“JanSales.xls”
End Sub
This example creates a new empty workbook and assigns a reference to it to the object variable aWorkbook. A new worksheet is added to the workbook, after any existing sheets, and a reference to the new worksheet is assigned to the object variable aWorksheet. The name on the tab at the bottom of the worksheet is then changed to “January”, and the heading “Sales Data” is placed in cell A1. Finally, the new workbook is saved as JanSales.xls.
Note that the parameter after the Worksheets.Add method is in parentheses. As we are assigning the return value of the Add method to the object variable, any parameters must be in parentheses. This is a convention we prefer. If the return value of the Add method was to be ignored, you might see other developers write the statement without parentheses as follows:
Wkb.Worksheets.Add After:=Wkb.Sheets(Wkb.Sheets.Count)
Again, consistency counts here. A good policy is to adopt a coding style you are comfortable with and use it consistently. (Keep in mind few other languages support method calls without parentheses. Hence, if you begin programming in some other language then you may stumble on method calls without parentheses. Because we program in several languages it is easiest for us to use parentheses everywhere.)
With … End With
Object variables provide a useful way to refer to objects in short-hand, and are also more efficiently processed by VBA than fully qualified object strings. Another way to reduce the amount of code you write, and also increase processing efficiency, is to use a With…End With structure. The previous example could be rewritten as follows:
With aWorkbook
  .Worksheets.Add After:=.Sheets(.Sheets.Count)
End With
VBA knows that anything starting with a period is a property or a method of the object following the With. You can rewrite the entire NewWorkbook procedure to eliminate the aWorkbook object variable, as follows:
Sub NewWorkbook()
  Dim aWorksheet As Worksheet
  With Workbooks.Add
    Set aWorksheet = .Worksheets.Add(After:=.Sheets(.Sheets.Count))
    aWorksheet.Name = “January”
    aWorksheet.Range(“A1”).Value = “Sales Data”
    .SaveAs Filename:=“JanSales.xls”
  End With
End Sub
You can take this a step further and eliminate the Wks object variable:
Sub NewWorkbook()
  With Workbooks.Add
    With .Worksheets.Add(After:=.Sheets(.Sheets.Count))
      .Name = “January”
      .Range(“A1”).Value = “Sales Data”
    End With
    .SaveAs Filename:=“JanSales.xls”
  End With
End Sub
If you find this confusing, you can compromise with a combination of object variables and With…End With:
Sub NewWorkbook4()
  Dim aWorkbook As Workbook, aWorksheet As Worksheet

  Set aWorkbook = Workbooks.Add
  With aWorkbook
    Set aWorksheet = .Worksheets.Add(After:=.Sheets(.Sheets.Count))
    With aWorksheet
      .Name = “January”
      .Range(“A1”).Value = “Sales Data”
    End With
    .SaveAs Filename:=“JanSales.xls”
  End With
End Sub
With…End With is useful when references to an object are repeated in a small section of code.
Making Decisions
VBA provides two main structures for making decisions and carrying out alternative processing, represented by the If and the Select Case statements. If is the more flexible, but Select Case is better when you are testing a single variable.
If Statements
If comes in three forms: the IIf function, the one line If statement, and the block If structure. The following Tax function uses the IIf (Immediate If) function:
Function Tax(ProfitBeforeTax As Double) As Double
  Tax = IIf(ProfitBeforeTax > 0, 0.3 * ProfitBeforeTax, 0)
End Function
IIf is similar to the C, C++, and C# programming languages' ternary operator (?:), as in, test?if-true: if-false and the Excel worksheet IF function. IIf has three input arguments: the first is a logical test, the second is an expression that is evaluated if the test is true, and the third is an expression that is evaluated if the test is false. In this example, the IIf function tests that the ProfitBeforeTax value is greater than zero. If the test is true, IIf calculates 30 percent of ProfitBeforeTax. If the test is false, IIf returns zero. The calculated IIf value is then assigned to the return value of the Tax function. The Tax function can be rewritten using the single line If statement as follows:
Function Tax(ProfitBeforeTax As Double) As Double
  If ProfitBeforeTax > 0 Then Tax = 0.3 * ProfitBeforeTax Else Tax = 0
End Function
One difference between IIf and the single line If is that the Else section of the single line If is optional. The third parameter of the IIf function must be defined. In VBA, it is often useful to omit the Else:
If ProfitBeforeTax < 0 Then MsgBox “A Loss has occured”, , “Warning”
Another difference is that, while IIf can only return a value to a single variable, the single line If can assign values to different variables:
If JohnsScore > MarysScore Then John = John + 1 Else Mary = Mary + 1
Block If
If you want to carry out more than one action when a test is true, you can use a block If structure, as follows:
If JohnsScore > MarysScore Then
  John = John + 1
  Mary = Mary − 1
End If
Using a block If, you must not include any code after the Then, on the same line. You can have as many lines after the test as required, and you must terminate the scope of the block If with an End If statement. A block If can also have an Else section, as follows:
If JohnsScore > MarysScore Then
  John = John + 1
  Mary = Mary − 1
Else
  John = John − 1
  Mary = Mary + 1
End If
A block If can also have as many ElseIf sections as required:
If JohnsScore > MarysScore Then
  John = John + 1
  Mary = Mary − 1
ElseIf JohnsScore < MarysScore Then
  John = John − 1
  Mary = Mary + 1
Else
  John = John + 1
  Mary = Mary + 1
End If
When you have a block If followed by one or more ElseIfs, VBA keeps testing until it finds a true section. It executes the code for that section and then proceeds directly to the statement following the End If. If no test is true, the Else section is executed.
A block If does nothing when all tests are false and the Else section is missing. Block Ifs can be nested, one inside the other. You should make use of indenting to show the scope of each block. This is vital—you can get into an awful muddle with the nesting of If blocks within other If blocks and If blocks within Else blocks etc. If code is unindented, it isn't easy, in a long series of nested If tests, to match each End If with each If:
If Not ThisWorkbook.Saved Then
  Answer = MsgBox(“Do you want to save your changes”, vbQuestion + _
                                                                  vbYesNo)
  If Answer = vbYes Then
    ThisWorkbook.Save
    MsgBox ThisWorkbook.Name & “ has been saved”
  End If
End If
This code uses the Saved property of the Workbook object containing the code to see if the workbook has been saved since changes were last made to it. If changes have not been saved, the user is asked if they want to save changes. If the answer is yes, the inner block If saves the workbook and informs the user.
Select Case
The following block If is testing the same variable value in each section:
Function Price(Product As String) As Variant
  If Product = “Apples” Then
    Price = 12.5
  ElseIf Product = “Oranges” Then
    Price = 15
  ElseIf Product = “Pears” Then
    Price = 18
  ElseIf Product = “Mangoes” Then
    Price = 25
  Else
    Price = CVErr(xlErrNA)
  End If
End Function
If Product is not found, the Price function returns an Excel error value of #NA. Note that Price is declared as a Variant so that it can handle the error value as well as numeric values. For a situation like this, Select Case is a more elegant construction. It looks like this:
Function Price(Product As String) As Variant
  Select Case Product
    Case “Apples”
      Price = 12.5
    Case “Oranges”
      Price = 15
    Case “Pears”
      Price = 18
    Case “Mangoes”
      Price = 25
    Case Else
      Price = CVErr(xlErrNA)
  End Select
End Function
If you have only one statement per case, the following format works quite well. You can place multiple statements on a single line by placing a colon between statements:
Function Price(Product As String) As Variant
  Select Case Product
    Case “Apples”: Price = 12.5
    Case “Oranges”: Price = 15
    Case “Pears”:   Price = 18
    Case “Mangoes”: Price = 25
    Case Else:      Price = CVErr(xlErrNA)
  End Select
End Function
Select Case can also handle ranges of numbers or text, as well as comparisons using the keyword Is. The following example calculates a fare of zero for infants up to 3 years old and anyone older than 65, with two ranges between. Negative ages generate an error:
Function Fare(Age As Integer) As Variant
  Select Case Age
    Case 0 To 3, Is > 65
      Fare = 0
    Case 4 To 15
      Fare = 10
    Case 16 To 65
      Fare = 20
    Case Else
      Fare = CVErr(xlErrNA)
  End Select
End Function
Looping
All computer languages provide a mechanism for repeating the same, or similar, operations in an efficient way. VBA has four constructs that allow us to loop through the same code over and over again. They are the While…Wend, Do…Loop, For…Next, and For Each loop.
The While…Wend and Do…Loop place the test at the beginning of the loop. The While…Wend loop places the test at the beginning, and consequently, the test while run 0 or more times. The Do…Loop can place the test at the beginning or the end. If the test is at the end then the loop will run at least once. The For…Next loop is typically used when a specific number of iterations are known, for example, looping over an array of 50 items. The For Each statement is used to process objects in a collection. Check out the subsections that follow for examples of each.
While … Wend
The syntax of the While…Wend loop is While(test)…Wend. Place lines of code between the statement containing While and Wend. An example of a While Wend loop that changes the interior color of alternating rows of cells is show next.
Public Sub ShadeEverySecondRowWhileWend()
  Range(“A2”).EntireRow.Select
  While ActiveCell.Value <> “”
    Selection.Interior.ColorIndex = 10
    ActiveCell.Offset(2, 0).EntireRow.Select
  Wend
End Sub
Do … Loop
To illustrate the use of a Do…Loop, we will construct a sub procedure to shade every second line of a worksheet, as shown in Figure 1-31, to make it more readable. We want to apply the macro to different report sheets with different numbers of products, so the macro will need to test each cell in the A column until it gets to an empty cell to determine when to stop.
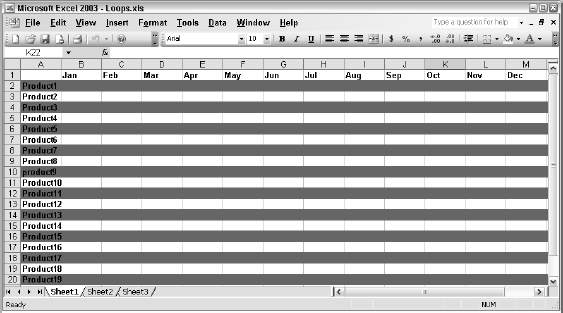
Figure 1-31
Our first macro will select every other row and apply the following formatting:
Public Sub ShadeEverySecondRow()
  Range(“A2”).EntireRow.Select
  Do While ActiveCell.Value <> “”
    Selection.Interior.ColorIndex = 15
    ActiveCell.Offset(2, 0).EntireRow.Select
  Loop
End Sub
ShadeEverySecondRow begins by selecting row 2 in its entirety. When you select an entire row, the left-most cell (in column A) becomes the active cell. The code between the Do and the Loop statements is then repeated While the value property of the active cell is not a zero length string, that is, the active cell is not empty. In the loop, the macro sets the interior color index of the selected cells to 15, which is gray. Then, the macro selects the entire row, two rows under the active cell. When a row is selected that has an empty cell in column A, the While condition is no longer true and the loop terminates.
You can make ShadeEverySecondRow run faster by avoiding selecting. It is seldom necessary to select cells in VBA, but you are led into this way of doing things because that's the way you do it manually and that's what you get from the macro recorder.
The following version of ShadeEverySecondRow does not select cells, and it runs about six times faster. It sets up an index i, which indicates the row of the worksheet and is initially assigned a value of two. The Cells property of the worksheet allows you to refer to cells by row number and column number, so when the loop starts, Cells(i,1) refers to cell A2. Each time around the loop, i is increased by two. We can, therefore, change any reference to the active cell to a Cells(i,1) reference and apply the EntireRow property to Cells(i,1) to refer to the complete row:
Public Sub ShadeEverySecondRow()
  Dim i As Integer
  i = 2
  Do Until IsEmpty(Cells(i, 1))
    ` use different color for contrast
    Cells(i, 1).EntireRow.Interior.ColorIndex = 23
    i = i + 2
  Loop
End Sub
To illustrate some alternatives, two more changes have been made on the Do statement line in the above code. Either While or Until can be used after the Do, so we have changed the test to an Until and we have used the VBA IsEmpty function to test for an empty cell. The slight variations in the two preceding examples was made to illustrate that Do While loops execute as long as the condition is True, and the Do Until will stop executing when the test condition is True.
The IsEmpty function is the best way to test that a cell is empty. If you use If Cells (i,1) = “”, the test will be true for a formula that calculates a zero length string.
It is also possible to exit a loop using a test within the loop and the Exit Do statement, as shown below, which also shows another way to refer to entire rows:
Public Sub ShadeEverySecondRow()
  i = 0
  Do
    i = i + 2
    If IsEmpty(Cells(i, 1)) Then Exit Do
    Rows(i).Interior.ColorIndex = 15
  Loop
End Sub
Yet another alternative is to place the While or Until on the Loop statement line. This ensures that the code in the loop is executed at least once. When the test is on the Do line, it is possible that the test will be false to start with, and the loop will be skipped.
Sometimes, it makes more sense if the test is on the last line of the loop. In the following example, it seems more sensible to test PassWord after getting input from the user, although the code would still work if the Until statement were placed on the Do line.
Public Sub GetPassword()
  Dim Password As String, i As Integer
  i = 0
  Do
    i = i + 1
    If i > 3 Then
      MsgBox “Sorry, Only three tries”
      Exit Sub
    End If
    PassWord = InputBox(“Enter Password”)
    Loop Until PassWord = “XXX”
  MsgBox “Welcome”
End Sub
GetPassword loops until the password XXX is supplied, or the number of times around the loop exceeds three.
For… Next Loop
The For…Next loop differs from the Do…Loop in two ways. It has a built-in counter that is automatically incremented each time the loop is executed and it is designed to execute until the counter exceeds a predefined value, rather than depending on a user-specified logical test. The following example places the full file path and name of the workbook into the center footer for each worksheet in the active workbook:
Public Sub FilePathInFooter()
  Dim i As Integer, FilePath As String

  FilePath = ActiveWorkbook.FullName
  For i = 1 To Worksheets.Count Step 1
    Worksheets(i).PageSetup.CenterFooter = FilePath
  Next i
End Sub
Versions of Excel prior to Excel 2003 do not have an option to automatically include the full file path in a custom header or footer, so this macro inserts the information as text. It begins by assigning the FullName property of the active workbook to the variable FilePath. The loop starts with the For statement and loops on the Next statement. i is used as a counter, starting at one and finishing when i exceeds Worksheets.Count, which uses the Count property of the Worksheets collection to determine how many worksheets there are in the active workbook.
The Step option determines the increment value. By default, For…Next increments the counter by 1. You can use any positive or negative integer to count by 2s, 3s, −1, 5s, etc. In the example loop, i is used as an index to the Worksheets collection to specify each individual Worksheet object. The PageSetup property of the Worksheet object refers to the PageSetup object in that worksheet so that the CenterFooter property of the PageSetup object can be assigned the FilePath text.
The following example shows how you can step backwards. It takes a complete file path and strips out the filename, excluding the file extension. The example uses the FullName property of the active workbook as input, but the same code could be used with any file type. It starts at the last character in the file path and steps backwards until it finds the period between the filename and its extension and then the backslash character before the filename. It then extracts the characters between the two:
Public Sub GetFileName()
  Dim BackSlash As Integer, Point As Integer
  Dim FilePath As String, FileName As String
  Dim i As Integer
  FilePath = ActiveWorkbook.FullName
  For i = Len(FilePath) To 1 Step -1
    If Mid$(FilePath, i, 1) = “.” Then
      Point = i
      Exit For
    End If
  Next i
  If Point = 0 Then Point = Len(FilePath) + 1
  For i = Point - 1 To 1 Step -1
    If Mid$(FilePath, i, 1) = “” Then
      BackSlash = i
      Exit For
    End If
  Next i
  FileName = Mid$(FilePath, BackSlash + 1, Point - BackSlash - 1)
  MsgBox FileName
End Sub
The first For…Next loop uses the Len function to determine how many characters are in the FilePath variable and i is set up to step backwards, counting from the last character position, working towards the first character position. The Mid$ function extracts the character from FilePath at the position defined by i and tests it to see if it is a period.
When a period is found, the position is recorded in Point and the first For…Next loop is exited. If the file name has no extension, no period is found and Point will have its default value of zero. In this case, the If test records an imaginary period position in Point that is one character beyond the end of the file name.
The same technique is used in the second For…Next loop as the first, starting one character before the period, to find the position of the backslash character, and storing the position in BackSlash. The Mid$ function is then used to extract the characters between the backslash and the period.
For Each… Next Loop
When you want to process every member of a collection, you can use the For Each…Next loop. The following example is a rework of the FilePathInFooter procedure:
Public Sub FilePathInFooter()
  Dim FilePath As String, aWorksheet As Worksheet

  FilePath = ActiveWorkbook.FullName
  For Each aWorksheet In Worksheets
    aWorksheet.PageSetup.CenterFooter = FilePath
  Next aWorksheet
End Sub
The loop steps through all the members of the collection. During each pass a reference to the next member of the collection is assigned to the object variable aWorksheet.
The following example lists all the files in the root directory of the C drive. It uses the Microsoft Office FileSearch object to generate a FoundFiles object containing the names of the required files. The following example uses a For Each…Next loop to display the names of all the files:
Public Sub FileList()
  Dim File As Variant
  With Application.FileSearch
    .LookIn = “C:”
    .FileType = msoFileTypeAllFiles
    .Execute
    For Each File In .FoundFiles
      MsgBox File
    Next File
  End With
End Sub
If you test this procedure on a directory with lots of files, and get tired of clicking OK, remember that you can break out of the code with Ctrl+Break.
Arrays
Arrays are VBA variables that can hold more than one item of data. An array is declared by including parentheses after the array name. An integer is placed within the parentheses, defining the number of elements in the array:
Dim Data(2) As Integer
You assign values to the elements of the array by indicating the element number as follows:
Data(0) = 1
Data(1) = 10
Data(2) = 100
The number of elements in the array depends on the array base. The default base is zero, which means that the first data element is item zero. Dim Data(2) As Integer declares a three element array of integers if the base is zero. Alternatively, you can place the following statement in the declarations section at the top of your module to declare that arrays are one based:
Option Base 1
With a base of one, Dim Data(2) As Integer declares a two element integer array. Item zero does not exist.
You can use the following procedure to test the effect of the Option Base statement:
Public Sub Array1()
  Dim Data(10) As Integer
  Dim Message As String, i As Integer

  For i = LBound(Data) To UBound(Data)
    Data(i) = i
  Next i
  Message = “Lower Bound = ” & LBound(Data) & vbCr
  Message = Message & “Upper Bound = ” & UBound(Data) & vbCr
  Message = Message & “Number of Elements = ” & WorksheetFunction.
Count(Data) _
                                                                 & vbCr
  Message = Message & “Sum of Elements = ” & WorksheetFunction.Sum(Data)
  MsgBox Message
End Sub
Array1 uses the LBound (lower bound) and UBound (upper bound) functions to determine the lowest and highest index values for the array. It uses the Count worksheet function to determine the number of elements in the array. If you run this code with Options Base 0, or no Options Base statement, in the declarations section of the module, it will show a lowest index number of zero and 11 elements in the array. With Options Base 1, it shows a lowest index number of one and 10 elements in the array.
Note the use of the intrinsic constant vbCr, which contains a carriage return character .vbCr is used to break the message text to a new line.
If you want to make your array size independent of the Option Base statement, you can explicitly declare the lower bound and upper bounds as demonstrated:
Dim Data(1 To 2) As Integer
Arrays are very useful for processing groups of items. If you want to create a short list, you can use the Array function as follows:
Dim Data As Variant
Data = Array(“North”, “South”, “East”, “West”)
You can then use the list in a For…Next loop. For example, you could open and process a series of workbooks called North.xls, South.xls, East.xls, and West.xls:
Sub Array2()
  Dim Data As Variant, aWorkbook As Workbook
  Dim i As Integer

  Data = Array(“North”, “South”, “East”, “West”)
  For i = LBound(Data) To UBound(Data)
    Set aWorkbook = Workbooks.Open(FileName:=Data(i) & “.xls”)
    'Process data here
    aWorkbook.Close SaveChanges:=True
  Next i
End Sub
Multi-dimensional Arrays
So far we have only looked at arrays with a single dimension. You can actually define arrays with up to 60 dimensions. While computers can easily manage the complexities of n-dimensional arrays greater than 4 or 5, people find this very difficult to do. The following statements declare two-dimensional arrays:
Dim Data(10,20) As Integer
Dim Data(1 To 10,1 to 20) As Integer
You can think of a two-dimensional array as a table of data. The previous example defines a table with 10 rows and 20 columns.
Arrays are very useful in Excel for processing the data in worksheet ranges. It can be far more efficient to load the values in a range into an array, process the data, and write it back to the worksheet, than to access each cell individually.
The following procedure shows how you can assign the values in a range to a Variant. The code uses the LBound and UBound functions to find the number of dimensions in Data. Note that there is a second parameter in LBound and UBound to indicate which index you are referring to. If you leave this parameter out, the functions refer to the first index:
Public Sub Array3()
  Dim Data As Variant, X As Variant
  Dim Message As String, i As Integer

  Data = Range(“A1:A20”).Value
  i = 1
  Do
    Message = “Lower Bound = ” & LBound(Data, i) & vbCr
    Message = Message & “Upper Bound = ” & UBound(Data, i) & vbCr
    MsgBox Message, , “Index Number = ” & i
    i = i + 1
    On Error Resume Next
    X = UBound(Data, i)
    If Err.Number <> 0 Then Exit Do
    On Error GoTo 0
  Loop
  Message = “Number of Non Blank Elements = ” _
    & WorksheetFunction.CountA(Data) & vbCr
  MsgBox Message
End Sub
The first time round the Do…Loop, Array3 determines the upper and lower bounds of the first dimension of Data, as i has a value of one. It then increases the value of i to look for the next dimension. It exits the loop when an error occurs, indicating that no more dimensions exist.
By substituting different ranges into Array3, you can determine that the array created by assigning a range of values to a Variant is two-dimensional, even if there is only one row or one column in the range. You can also determine that the lower bound of each index is one, regardless of the Option Base setting in the declarations section.
Dynamic Arrays
When writing your code, it is sometimes not possible to determine the size of the array that will be required. For example, you might want to load the names of all the .xls files in the current directory into an array. You won't know in advance how many files there will be. One alternative is to declare an array that is big enough to hold the largest possible amount of data—but this would be inefficient. Instead, you can define a dynamic array and set its size when the procedure runs.
You declare a dynamic array by leaving out the dimensions:
Dim Data() As String
You can declare the required size at runtime with a ReDim statement, which can use variables to define the bounds of the indexes:
ReDim Data(iRows, iColumns) As String
ReDim Data(minRow to maxRow, minCol to maxCol) As String
ReDim will reinitialize the array and destroy any data in it, unless you use the Preserve keyword. Preserve is used in the following procedure that uses a Do…Loop to load the names of files into the dynamic array called FNames, increasing the upper bound of its index by one each time to accommodate the new name. The Dir function returns the first filename found that matches the wild card specification in FType. Subsequent usage of Dir, with no parameter, repeats the same specification, getting the next file that matches, until it runs out of files and returns a zero length string:
Public Sub FileNames()
  Dim FName As String
  Dim FNames() As String
  Dim FType As String
  Dim i As Integer

  FType = “*.xls”
  FName = Dir(FType)
  Do Until FName = “”
    i = i + 1
    ReDim Preserve FNames(1 To i)
    FNames(i) = FName
    FName = Dir
  Loop
  If i = 0 Then
    MsgBox “No files found”
  Else
    For i = 1 To UBound(FNames)
      MsgBox FNames(i)
    Next i
  End If
End Sub
If you intend to work on the files in a directory, and save the results, it is a good idea to get all the filenames first, as in the FileNames procedure, and use that list to process the files. It is not a good idea to rely on the Dir function to give you an accurate file list while you are in the process of reading and overwriting files.
Runtime Error Handling
When you are designing an application, you should try to anticipate any problems that could occur when the application is used in the real world. You can remove all the bugs in your code and have flawless logic that works with all permutations of conditions, but a simple operational problem could still bring your code crashing down with a less than helpful message displayed to the user.
For example, if you try to save a workbook file to the floppy disk in the A drive, and there is no disk in the A drive, your code will grind to a halt and display a message that may be difficult for the user to decipher.
If you anticipate this particular problem, you can set up your code to gracefully deal with the situation. VBA allows you to trap error conditions using the following statement:
On Error GoTo LineLabel
LineLabel is a marker that you insert at the end of your normal code, as shown below with the line label errorTrap. Note that a colon follows the line label. The line label marks the start of your error recovery code and should be preceded by an Exit statement to prevent execution of the error recovery code when no error occurs:
Public Sub ErrorTrap1()
  Dim Answer As Long, MyFile As String
  Dim Message As String, CurrentPath As String

  On Error GoTo errorTrap
  CurrentPath = CurDir$

  ` Try to change to the A: drive
  ChDrive “A”
  ChDrive CurrentPath
  ChDir CurrentPath
  MyFile = “A:Data.xls”
  Application.DisplayAlerts = False
  ` Try to save the current worksheet to the A: drive
  ActiveWorkbook.SaveAs FileName:=MyFile

TidyUp:
  ChDrive CurrentPath
  ChDir CurrentPath
Exit Sub

errorTrap:
  Message = “Error No: = ” & Err.Number & vbCr
  Message = Message & Err.Description & vbCr & vbCr
  Message = Message & “Please place a disk in the A: drive” & vbCr
  Message = Message & “and press OK” & vbCr & vbCr
  Message = Message & “Or press Cancel to abort File Save”
  Answer = MsgBox(Message, vbQuestion + vbOKCancel, “Error”)
  If Answer = vbCancel Then Resume TidyUp
  Resume
End Sub
Once the On Error statement is executed, error trapping is enabled. If an error occurs, no message is displayed and the code following the line label is executed. You can use the Err object to obtain information about the error. The Number property of the Err object returns the error number and the Description property returns the error message associated with the error. You can use Err.Number to determine the error when it is possible that any of a number of errors could occur. You can incorporate Err.Description into your own error message, if appropriate.
In Excel 5 and 95, Err was not an object, but a function that returned the error number. As Number is the default property of the Err object, using Err, by itself, is equivalent to using Err.Number and the code from the older versions of Excel still works in Excel 97 and later versions.
The code in ErrorTrap1, after executing the On Error statement, saves the current directory drive and path into the variable CurrentPath. It then executes the ChDrive statement to try to activate the A drive. If there is no disk in the A drive, error 68 (Device unavailable) occurs and the error recovery code executes. For illustration purposes, the error number and description are displayed and the user is given the opportunity to either place a disk in the A drive, and continue, or abort the save.
If the user wishes to stop, we branch back to TidyUp and restore the original drive and directory settings. Otherwise, the Resume statement is executed. This means that execution returns to the statement that caused the error. If there is still no disk in the A drive, the error recovery code is executed again. Otherwise, the code continues normally.
The only reason for the ChDrive “A” statement is to test the readiness of the A drive, so the code restores the stored drive and directory path. The code sets the DisplayAlerts property of the Application object to False, before saving the active workbook. This prevents a warning if an old file called Data.xls is being replaced by the new Data.xls. (See Chapter 18 for more on DisplayAlerts.)
The Resume statement comes in three forms:
- Resume—causes execution of the statement that caused the error
- Resume Next—returns execution to the statement following the statement that caused the error, so the problem statement is skipped
- Resume LineLabel—jumps back to any designated line label in the code, so that you can decide to resume where you want
The following code uses Resume Next to skip the Kill statement, if necessary. The charmingly named Kill statement removes a file from disk. In the following code, we have decided to remove any file with the same name as the one we are about to save, so that there will be no need to answer the warning message about overwriting the existing file.
The problem is that Kill will cause a fatal error if the file does not exist. If Kill does cause a problem, the error recovery code executes and we use Resume Next to skip Kill and continue with SaveAs. The MsgBox is there for educational purposes only. You would not normally include it:
Public Sub ErrorTrap2()
  Dim MyFile As String, Message As String
  Dim Answer As String

  On Error GoTo errorTrap

  Workbooks.Add
  MyFile = “C:Data.xls”
  Kill MyFile
  ActiveWorkbook.SaveAs FileName:=MyFile
  ActiveWorkbook.Close

  Exit Sub

errorTrap:
  Message = “Error No: = ” & Err.Number & vbCr
  Message = Message & Err.Description & vbCr & vbCr
  Message = Message & “File does not exist”
  Answer = MsgBox(Message, vbInformation, “Error”)
  Resume Next
End Sub
On Error Resume Next
As an alternative to On Error GoTo, you can use:
On Error Resume Next
This statement causes errors to be ignored, so it should be used with caution. However, it has many uses. The following code is a rework of ErrorTrap2:
Sub ErrorTrap3()
  Dim MyFile As String, Message As String

  Workbooks.Add
  MyFile = “C:Data.xls”
  On Error Resume Next
  Kill MyFile
  On Error GoTo 0
  ActiveWorkbook.SaveAs FileName:=MyFile
  ActiveWorkbook.Close
End Sub
We use On Error Resume Next just before the Kill statement. If our C:Data.xls does not exist, the error caused by Kill is ignored and execution continues on the next line. After all, we don't care if the file does not exist. That's the situation we are trying to achieve.
On Error GoTo 0 looks a little confusing. All On Error GoTo really does is reset the Err object.
You can use On Error Resume Next to write code that would otherwise be less efficient. The following sub procedure determines whether a name exists in the active workbook:
Public Sub TestForName()
  If NameExists(“SalesData”) Then
    MsgBox “Name Exists”
  Else
    MsgBox “Name does not exist”
  End If
End Sub

Public Function NameExists(myName As String) As Boolean
  Dim X As String
  On Error Resume Next
  X = Names(myName).RefersTo
  If Err.Number <> 0 Then
    NameExists = False
    Err.Clear
  Else
    NameExists = True
  End If
End Function
TestForName calls the NameExists function, which uses On Error Resume Next to prevent a fatal error when it tries to assign the name's RefersTo property to a variable. There is no need for On Error GoTo 0 here, because error handling in a procedure is disabled when a procedure exits, although Err.Number is not cleared.
If no error occurred, the Number property of the Err object is zero. If Err.Number has a non-zero value, an error occurred, which can be assumed to be because the name did not exist, so NameExists is assigned a value of False and the error is cleared. The alternative to this single pass procedure is to loop through all the names in the workbook, looking for a match. If there are lots of names, this can be a slow process.
Summary
In this chapter we have seen those elements of the VBA language that enable you to write useful and efficient procedures. We have seen how to add interaction to macros with the MsgBox and InputBox functions, how to use variables to store information and how to get help about VBA keywords.
We have seen how to declare variables and define their type, and the effect on variable scope and lifetime of different declaration techniques. We have also used the block If and Select Case structures to perform tests and carry out alternative calculations, and Do…Loop and For…Next loops that allow us to efficiently repeat similar calculations. We have seen how arrays can be used, particularly with looping procedures. We have also seen how to use On Error statements to trap errors.
When writing VBA code for Excel, the easiest way to get started is to use the macro recorder. We can then modify that code, using the VBE, to better suit our purposes and to operate efficiently. Using the Object Browser, Help screens, and the reference section of this book, you can discover objects, methods, properties, and events that can't be found with the macro recorder. Using the coding structures provided by VBA, we can efficiently handle large amounts of data and automate tedious processes.
For VBA programmers the primary tool is the VBE. In the next section we will spend some time getting accustomed to the capabilities of this editor. Familiarity and comfort here will aid us when we begin more advanced programming topics in Chapter 4.