IN THIS CHAPTER
Previous chapters in this book covered a broad range of topics related to scripting in general and PowerShell in specific. Although the authors of this book expect that all this information will be helpful to you as your knowledge of PowerShell progresses, it might be a little overwhelming at first. As you are getting started, it is sometimes most useful to focus on the salient ideas in a given topic and expand your knowledge from there. The goal of this chapter is to bring the key points of this book together in a format that provides you with a framework for understanding and using PowerShell, and it discusses a structured approach to scripting that can be applied to a wide variety of coding and development projects. Although not every scripting project requires this level of detail, any scripts that are used in a production environment will benefit tremendously from applying a clear, well documented, and supportable scripting methodology. Although we don’t expect every scripter to be a budding software developer, extending software development guidelines to scripting best practices can give you a good foundation for improving your script writing.
Several best practice recommendations apply specifically to configuring the PowerShell 2.0 CTP environment. These practices relate primarily to using PowerShell in a secure manner and are also discussed in Chapter 5, “Understanding PowerShell Security.”
As a rule, you should always digitally sign your PowerShell scripts and configuration files so that users and machines running your scripts can trust that the code is actually from you and hasn’t been tampered with or corrupted. Adhering to this practice also means you can keep the PowerShell execution policy on your machine, in addition to others in your organization, set to AllSigned.
NOTE
Code signing doesn’t apply just to PowerShell scripts and configuration files. You can apply the principles of code signing to other items, such as executables, macros, DLLs, other scripts, device drivers, firmware images, and so forth. Other code can benefit from the security of digital signatures, and you can further limit the possibility of untrusted code running in your environment.
Setting your execution policy to Unrestricted is like leaving an open door for malicious code to run on your systems. Because of this risk, you should set your execution policy to RemoteSigned at a minimum. This setting still enables you to run scripts and load configuration files created locally on your machine, but it prevents remote code that hasn’t been signed and trusted from running. Note: The RemoteSigned setting isn’t foolproof and can allow some remote code to run through PowerShell.
Following these guidelines and becoming proficient in code signing are crucial to guaranteeing that your PowerShell environment doesn’t become a target for malicious code. Setting your execution policy to AllSigned increases security even more because it requires that all scripts and configuration files be signed by a trusted source before running or loading them.
IT security practices include following the principle of least privileges, which ensures that entities such as users, processes, and software are granted only the minimum rights needed to perform a legitimate action. For example, if a user doesn’t need administrative rights to run a word processing program, there’s no reason to grant that user the administrative level of privileges. This principle of least privileges also applies to scripting. When you’re developing a script, make an effort to code in a manner that requires the minimum rights to run the script. If users don’t know the required rights to run a script, they might try running it with administrative rights, which increases the possibility of causing unwanted and possibly damaging changes to your environment.
NOTE
When you are designing scripts that will be used in a production environment, it is important to provide a clear understanding of what the script does, as well as the rights which are required for the script to run successfully. A great way to accomplish this is to make the script self-documenting by including key details in the usage statement for the script. For example, when a user runs a script with no arguments or a question mark (?), it is possible for the script to display details on the parameters that the script uses. This usage information can easily include details on the rights required to run the script, as well as the specific properties that the script is reading or writing. (This can also be done in the comments for the script.) Although documenting scripts to this level of detail can be tedious and does add some time to the script development cycle, this kind of information is invaluable for troubleshooting and is well worth the additional time required.
One of the most powerful new features in PowerShell 2.0 CTP is the introduction of PowerShell Remoting, which allows PowerShell commands to be run on a remote machine. This remoting functionality depends on two components: Windows Remote Management (WSMAN) and Windows Remote Shell (WinRS). Both WSMAN and WinRS support a variety of different authentication options, which if improperly configured can reduce the effective security of your environment and leave machines vulnerable to attack. Although WSMAN and WinRS are generally secure when the installation defaults are left in place, it is easy for a locally privileged user to change these settings. To ensure that WSMAN and WinRS configuration settings are consistently applied to machines that belong to an Active Directory domain, WSMAN and WinRS configuration can be performed through Active Directory Group Policy. A step-by-step procedure for establishing a domain-wide Group Policy to administer WSMAN and WinRS settings is described in Chapter 5.
The following sections offer best practices for script development that applies to scripting in general. It is highly recommended that when you are developing your own scripts, follow the practices discussed in these sections to some extent or another. By doing this, you should find that your scripts will start to meet stated project requirements, take less time to develop, and have fewer issues when deployed into production.
Developing a script can take as much effort as any software development project. For example, you should make sure to incorporate some prototyping and testing to prevent the script from having any negative impact on an environment. So, whenever you write a script, check the scope of the effect it might have. If the script is complex, takes more than a few minutes to complete its tasks, requires more resources than yourself (such as other people), or carries a high level of risk when its runs, turning the script job into a project might be appropriate.
As with all software development projects, you should choose a development life cycle model that fits the needs of your scripting project. These models range from the traditional waterfall model to newer models, such as Agile, Extreme Programming (XP), Spiral, Iterative, and so forth. The choice of a model isn’t as important as having a formal process for managing your scripting projects, however.
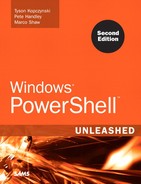
If the models mentioned here seem overly complex for a scripting project, Figure 12.1 shows a simple series of steps developed for scripting projects.
Although similar to a full development life cycle model, the steps are simply pointers to tasks that need to be completed for a typical scripting project. You can follow this scripting model or develop your own, but the point of this practice is to choose a method for managing your scripting projects.
The idea behind designing and prototyping a script by using pseudocode is that it enables you to develop a script’s structure and logic before writing any code. Working out the structure and logic beforehand helps you ensure that your script meets its requirements, and it helps you detect possible logic flaws early in the process. Furthermore, pseudocode is language independent and can be written so that other people, especially those who need to give input on the script design, can read and understand it easily. The following is an example of pseudocode:
![]()
![]()
As with any project, you need to define the problem your script will be solving to determine what’s required of it. Sometimes, a script just solves a simple automation need, so its requirements are easy to determine. When a script needs to solve more complex business automation needs, however, you might need to learn more about the business processes being automated to determine its requirements. In either case, to ensure success, you must identify the requirements for a script and have all parties sign off on those requirements. Overlooking these steps in the development process might mean that your final script fails to meet its requirements and is then rejected as a solution for the original business need.
Most scripts are designed to make changes to a system, so there’s always the chance that running a script in a production environment could have unwanted or possibly damaging results. Even if a script makes no changes, it could have an undesirable effect, or you might not fully understand the impact. Even worse, when you run the script to test its functionality, you might accidentally run the script outside your designated testing scope and affect production systems. Therefore, developing your scripts in a production environment isn’t a good idea.
NOTE
One of the cardinal rules of script development is to avoid making unintended changes to your production environment. Scripts are very powerful and fast-acting tools that can be exceptionally helpful and great time-savers, but with this power must come knowledge and responsibility. Until you fully understand exactly what a script will do, it should only be executed in an isolated lab environment. Because of the recent advances in virtualization technology, it is possible to set up a very capable isolated virtual lab environment on a single physical machine. While it does require some additional time to set up this type of isolated lab environment, it provides the flexibility to learn from mistakes in your scripts without accidentally putting your business out of business.
Scripts are usually written to perform some automation task, such as modifying an attribute on every user in an Active Directory domain. The automation task might carry a high or low level of impact, but some form of quality assurance testing should be conducted on the code before running it in a production environment. Scripts in particular should be tested thoroughly because of their potential effect on an environment.
NOTE
A key point to keep in mind when developing your own scripts is that scripts which are only reading information are generally quite safe to run. For example, a script that creates a list of Active Directory user attributes but does not write any information to Active Directory has a very low probability of causing any problems. Whenever your scripts make modifications to objects, it is important to understand what changes are being made, and provide a rollback strategy wherever possible. For example, if you were writing a script to modify the description field of every user object in Active Directory, you could use the CSVDE utility to export the existing user description fields to a file prior to running your script. This way, if the script produced some unexpected results, you could review the export file and even reimport the description fields if necessary.
Many scripters tend to view scripting as a quick and easy way to complete tasks and don’t see the need for professional considerations, such as planning, documentation, and standards. This mindset is likely a holdover from the days when scripting was considered a clandestine task reserved for UNIX and Linux coders. Clearly, this view is changing with Microsoft’s release of PowerShell. CLI use, scripting, and automation are becoming the foundation for how Windows systems administrators manage their environments. With this change, scripting, with its flexibility and raw power, will be increasingly viewed as a solution to business automation needs and, therefore, a task that should be done with professionalism.
To be professional when creating scripts, you should make sure your work meets a certain level of quality by developing standards for all your scripts to meet: writing clear and concise documentation, following best practices in planning and layout, testing thoroughly, and so forth. Adhering to professional standards can also ensure that others accept your work more readily and consider it more valuable.
The following sections offer some ideas on best practices for PowerShell script design. The term “design” is used lightly here, because the goal is to provide insight into design practices that should and should not be followed when writing a PowerShell script. For example, when writing a script, you should validate information that is provided to the script. Again, it is highly recommended that you apply the practices reviewed in these sections to scripts that you develop. Following these practices will help make your scripts more readable, usable, robust, and less buggy.
When setting variables, parameters, and so on that control script configuration, you should always place them near the beginning of a script to make locating these items easy for anyone using, reading, or editing the script, as shown in this example:
![]()
![]()
Another reason for this practice is to reduce the number of errors introduced when editing the script configuration. If configuration information is spread throughout a script, it’s more likely to be misconfigured, declared multiple times, or forgotten.
You can’t assume users or other team members who work with your scripts will understand the logic you’ve used in a script or be familiar with the methods you used to perform tasks. Therefore, using comments to assist users in understanding your script is a good practice. Comments don’t always have to be extensive, but should provide enough information to help users see how the script logic flows. In addition, if your script includes a complex method, class, or function, adding a comment to explain what it does is helpful. Another benefit of comments is that the information makes it easier for you to review or update a script. The following example shows the use of comments to provide helpful information:
![]()
![]()
NOTE
Taking the time to add comments to your script can make the difference between a simple one-off script and a clearly understood production process. You may be able to understand what your script does, but your team members who support the script may not have the same level of familiarity with coding. In addition, you may need to revisit or modify a script years after writing it, and having to review and re-learn your old undocumented code is a recipe for making mistakes. As the proverb goes, the palest ink is better than the sharpest memory!
Hard-coding configuration information is a common mistake. Instead of asking users to supply the required information, the configuration information is hard-coded in variables or randomly scattered throughout the script. Hard-coding requires users to manually edit scripts to set the configuration information, which increases the risk of mistakes that result in errors when running the script. Remember that part of your goal as a scripter is to provide usable scripts; hard-coding information makes using a script in different environments difficult. Instead, use parameters or configuration files, as shown in the following example, so that users can set configuration information more easily.
![]()
![]()
If configuration information does need to be hard-coded in a script, use variables to represent the information. Defining configuration information in a variable in one place, instead of several places throughout a script, decreases the chance of introducing errors when the information needs to be changed. Furthermore, having configuration information in a single place, particularly at the beginning of a script, helps reduce the time to reconfigure a script for different environments.
Most scripts you develop are written for use by others, such as customers. Therefore, your users are often administrators who aren’t comfortable with code and command-line interfaces. Remember that your scripts have to be usable and useful. If you don’t include instructions to make sure a novice can run the script and understand what it does, you haven’t succeeded as a scripter.
It’s common to see scripts without any instructions, with incorrect instructions, or with little explanation of what the script does. For users, these scripts are usually frustrating. Even worse, the users might have no clue about the impact a script might have on their environment, and running it could result in a disaster.
The following example includes instructions that might be in a readme file to explain the script’s purpose and how it works:
![]()
![]()
Failing to perform basic validity checks on required parameters is a common mistake. If your script requires input from users, neglecting these validity checks might mean that users enter the wrong input, and the script halts with an error. This oversight might not be a major issue with small scripts, but, with large, complex scripts, it can seriously affect their usability.
Let’s say you wrote a script that performs a software inventory. In your development environment consisting of a few machines, you run the script, but fail to provide the correct information for a required parameter. The script runs, and a couple of seconds later, it fails. You realize that you mistyped a parameter, so you correct your mistake and rerun the script.
Then, the systems administrator runs your script against thousands of machines; it runs for six hours and then fails. Reviewing the error information, the administrator discovers the script failed because of a mistyped parameter. At that point, the administrator has already invested six hours only to encounter an error and might conclude your script isn’t usable. In other words, you wrote a script that works for your environment, but not the administrator’s environment. To prevent this problem, make sure you perform validity checking on required parameters, as shown in the following example:
![]()
![]()
If you have spent time developing sophisticated script functionality, you should take the time to make that functionality reusable. With a common set of scripts or functions, you can also save time when you need to create new scripts. For example, in one script, you created logic for parsing data from a comma-separated value (CSV) file to create an HTML table. Instead of copying and modifying that logic for new scripts, you can create a script or library file that includes this logic so that it can be reused in any script.
Reusability is an important best practice. In PowerShell, the concept of reusability makes even more sense because scripts and library files can be ported easily by calling reusable code from a PowerShell console session or loading the script or library file with a dot-sourced statement. The following example shows a series of script files being called from the PowerShell console as part of the pipeline.
![]()
![]()
Using aliases in PowerShell can save time, but they make your scripts difficult for users to read. The PowerShell language is designed to be easy to write and read, but your naming standards and use of aliases have an effect on readability. To ensure readability, follow consistent naming standards and use descriptive names rather than aliases whenever possible.
Making your code more readable benefits users trying to understand it and means that future updates and changes will be easier for you, too. If you take the time to follow consistent naming standards and avoid the overuse of aliases, making modifications to the script should be easy.
Providing status information in an automation script is essential so that users understand how the script is progressing during execution and can confirm whether script tasks have been completed successfully. Status information also lets users know whether any errors have occurred, and it can even indicate how much longer until the script has finished running.
You can provide status information to users in the form of console displays by using the Write-Host and Write-Progress cmdlets, write status information to a log file, or leverage Windows Forms to report on the status of your script. Figure 12.2 shows PowerShell being used to provide status information on a scripted operation which provisions web folders for a group of users.

NOTE
Regardless of the method, the idea is to provide enough status information without overloading users with useless details. If you need different levels of detail when displaying information to users, you can use the Write-Verbose and Write-Debug cmdlets, the Verbose and Debug parameters, or create custom output.
PowerShell includes two cmdlet parameters that are designed to help prevent scripters and systems administrators from making unintended changes. The WhatIf parameter is designed to return information about changes that would occur if the cmdlet runs don’t actually make those changes, as shown in this example:
![]()
![]()
In this example, the process object returned from the Get-Process cmdlet is explorer.exe. Normally, if a process object is then piped to the Stop-Process cmdlet, the received process stops. However, when using the WhatIf parameter with the Stop-Process cmdlet, the command returns information about the changes that would have happened instead of carrying out the command. For example, say you entered this command:
![]()
![]()
Without the WhatIf parameter, this command would stop your PowerShell console session and your system. Adding the WhatIf parameter gives you information warning that the command would likely result in a system crash, as shown here:
![]()
![]()
The Confirm parameter prevents unwanted modifications by forcing PowerShell to prompt users before making any changes, as shown in this example:
![]()
![]()
As a best practice, you should use the WhatIf and Confirm parameters whenever possible to identify potentially harmful changes and give users a choice before making these changes.
NOTE
The WhatIf and Confirm parameters are a programmatic way to provide a safety net for the users of your scripts. These parameters are unique to PowerShell and are often not leveraged by scripters. Although you need to include the support for the WhatIf and Confirm parameters in your script, doing so makes it far less likely that your script will accidentally perform an unintentional damaging action. The WhatIf parameter specifically allows you to see the results of a script without actually executing it, making it easy to fine-tune your script before actually running it live. Please note that the WhatIf and Confirm parameters are valid only with cmdlets that actually make modifications, and will not be effective for cmdlets that are merely reading data.
As in software development, your scripting practices should incorporate some form of standardization. The term “standardization” as used here doesn’t mean a formal standard, such as one from the International Organization for Standardization (ISO) or Institute of Electrical and Electronics Engineers (IEEE). Instead, it refers to using consistent methods for how your scripts are named, organized, and structured; how they function; and how they handle errors. Standardizing these aspects of your scripts ensures consistency in how others interact with, troubleshoot, and use your scripts.
Using a consistent naming standard across scripts or even within a single script can improve a script’s readability. Using a standard script layout benefits those trying to read, troubleshoot, or modify your script. Standardization can also reduce the time you need to develop new scripts. For example, you can create standard forms for common tasks, such as error handling, log file creation, and output formatting. Once these standard forms have been created and tested, it is easy to include these standard forms in future scripts since they have already been proven to function in a consistent manner. This technique allows you to maximize the investment of time that you make in your scripts by reusing script functionality that you have previously developed.
Subsequent chapters in this book focus on real-world examples for PowerShell scripts. Working scripts were pulled from actual projects developed to meet business requirements and are used throughout the remainder of this book. Although the full source code for these scripts is presented in the remaining chapters, the source code has also been provided on the PowerShell Unleashed Reference Web site, which enables you to examine the scripts in usable format. The URL for this Web site is www.informit.com/title/9789780768687187.
To address a few potential problems of standardization, some choices were made for how to present scripts in this book:
• Scripts are limited to the PowerShell and VBScript languages to reduce the complexity of dealing with many different scripting languages.
• VBScript scripts reside in a Windows Scripting File (WSF).
• Each PowerShell and VBScript is structured with a common layout that’s easy to comprehend.
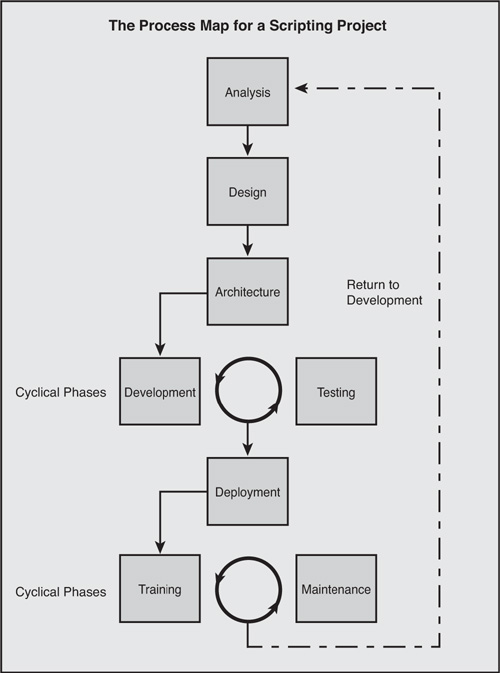
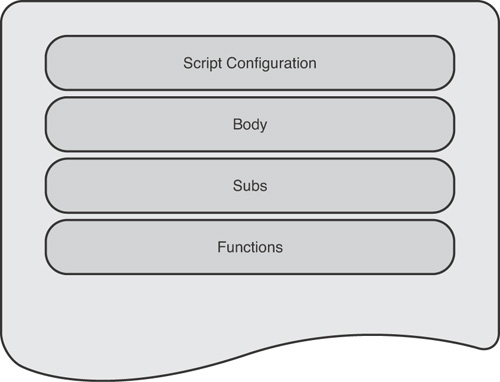
Figures 12.3 and 12.4 are examples of the layouts used in this book.
• A digital code-signing certificate from Thawte was purchased, and all PowerShell scripts have been signed by the entity companyabc.com. If you have followed best practices for your execution policy setting, you need to configure companyabc.com as a trusted publisher to run the PowerShell scripts.
NOTE
The scripts provided with this book are functioning scripts. They have been tested and should perform according to their intended purposes. However, this doesn’t automatically mean the scripts can be used in a production environment. If you plan to run one of these scripts in a production environment, you should conduct testing on that script first.
• PowerShell and VBScript scripts tend to provide the same type of interaction for input and output, although differences can emerge when new concepts are introduced. Overall, however, methods for providing input and output are clear and concise through use of the PowerShell console, log files, and Windows Forms.
One of the defining characteristics of PowerShell as a language is its adoption and advancement by a diverse, worldwide group of scripters and technology professionals. One example of this type of adoption is the PowerShellCommunity.org Web site at http://powershellcommunity.org. The members of PowerShellCommunity.org collaborate on a wide variety of PowerShell topics, including scripts, blog entries, and the latest PowerShell developments from technology vendors. In addition to these types of individual contributions, the community maintains a library of generally agreed-upon best practices for scripting and related topics. Several examples of the PowerShellCommunity.org scripting standards are summarized in this chapter for reference, covering best practices for naming and best practices for script reliability.
• Name your scripts and functions using the Verb(-)Noun syntax.Although you are free to name your scripts and functions in any way you choose, using a Verb-Noun syntax (as in Get-Process) makes it easier for others to understand the purpose of your script, and it also provides consistency with the native PowerShell cmdlets. The Verb-Noun syntax is also used by several other programming languages, such as VAX VMS/DCL and AS/400 CL, so following this syntax will also help ensure that your script names are understandable to users with experience in these languages.
• Wherever possible, use verbs from the standard PowerShell verb list.One of the goals of the PowerShell team was to enable systems administrators to accomplish most of their tasks using just the standard set of PowerShell verbs. This makes it easier for administrators to learn about the properties of new PowerShell nouns, because they will already be familiar with the common verbs that are used to work with new nouns. Running the following commands in a PowerShell session returns a list of all the standard PowerShell verb names:
• Use unique noun names.Many times, using generic nouns, such as Computer or User in a script or function, causes a name collision with an existing noun of the same name. If a name collision does occur, users need to explicitly reference the full path and filename of your script to run it successfully. PowerShell addresses this issue by applying a PS prefix to make its nouns unique (as in PSDrive or PSBreakpoint), and it is recommended that you use a similar method for any nouns that you reference in your scripts (as in MyTable or MyPrinter).
• Make noun names singular.Because the English language handles pluralization for different nouns in different ways (as in a single potato or several potatoes, a single mouse or several mice), using pluralization in PowerShell noun names can be confusing, especially for those PowerShell users whose first language might not be English. This issue is made more complicated by the fact that not all cmdlets provide support for multiple return values. For example, the Get-Date cmdlet can return only a single value, but the Get-Process cmdlet can return multiple values. If users of PowerShell had to guess at the capabilities of a cmdlet based on whether the noun portion of the cmdlet name was singular or plural, ease of use would quickly grind to a halt. By using only singular noun names, the issues of pluralization are removed, and PowerShell users can focus on getting the results they need instead of worrying about the peculiarities of English grammar.
• Use pascal casing for script and function names and use camel casing for variable names.Pascal casing capitalizes the first letter of each word, such as Get-Process and ConvertFrom-StringData. Camel casing has the first letter of a word in lower case and capitalizes subsequent first letters, such as remoteComputerName. Using pascal casing for script names follows the standard used by other PowerShell cmdlets, whereas using camel casing for variable names follows the standards established in the .NET style guidelines. Because of PowerShell’s frequent interaction with .NET objects, methods, and properties, it makes sense to adhere to the .NET naming standards for variable names. Both pascal casing and camel casing are discussed in the guide for the NET Framework Design Guidelines. This guide can be found by navigating to http://msdn.microsoft.com and searching on the phrase “NET Framework Design Guidelines for Class Library Developers”.
• Provide descriptive variable names.When you are writing a script, the variable names that you choose can go a long way toward clarifying the actions that a script performs. Applying some thought to your choice of variable names can make your scripts almost self-documenting. Although the variables $comp and $remoteComputerDNSName function the same way when used in a script, the $remoteComputerDNSName variable clearly illustrates the data that the variable contains, and any code statements that contain this variable are much easier to understand as a result. This is especially important in environments where your scripts might be used and modified by multiple administrators with different levels of scripting knowledge. By consistently using descriptive variable names and applying a comparable level of detail in your use of other scripting commands, you can do a great deal to ensure that your scripts will be easier to support and maintain in a production environment.
• For global variables, add a unique namespace as a prefix.As with PowerShell verbs and nouns, it is possible to create naming collisions with existing environment variables and produce unpredictable results. One way to reduce the possibility of variable name collisions is to prefix any global variables that you define with a unique identifier for the namespace. This identifier could be your company name, the name of your software application, or similarly unique data. The following example shows the syntax for defining a global variable including the string CompanyABC prefixed to the variable name:
![]()
![]()
• Ensure that your scripts run successfully in strict mode.Using strict mode in PowerShell is an optional setting that causes PowerShell to raise a terminating error when a script or expression does not follow best practice coding standards (such as referencing a variable that does not exist). In this respect, it is similar to using the Option Explicit statement in VBScript. Strict mode in PowerShell can be turned on or off by using the Set-StrictMode cmdlet, and it is enforced only in the scope where you set it. Because some users always run PowerShell with strict mode turned on, it is to your advantage to verify that your scripts will run in strict mode without errors. Otherwise, users have to disable strict mode to run the script, and it is possible that a script that raises an error in strict mode might be written in a way that causes the script to produce unreliable results. A script that can be run successfully in strict mode meets at least a baseline set of programming standards, which helps to validate that the script is suitable for use in a production environment.
• Whenever possible, avoid using aliases in scripts.Although there is no technical obstacle to including aliases in a script, aliases make the script harder to read and understand for those scripters who are not familiar with all of the PowerShell command aliases. Because the reason behind the PowerShell command aliases is to reduce the number of keystrokes needed when working interactively at the PowerShell command line, there is only a minimal time savings achieved when aliasing commands in a script, which is quickly erased the next time that you need to review the script and have to spend time recalling the commands that you aliased to understand the script. In general, readability and ease of understanding should override speed of data entry when creating a script that will be reused.
In this chapter, you were presented with several PowerShell scripting best practices. These practices focused on how you develop, design, and secure your scripts so that your overall ability as a scripter improves. The sources for these practices are based both from software development best practices and real-world scripting experience. They are not all inclusive or set in stone to how they apply to your own scripting practices. The goal of this chapter was to prompt your own thought processes around what is considered a good scripting practice. In the end, you might choose to expand on or add to these practices as long as you consider them when sitting down to write your next PowerShell script. After all, the PowerShell team went through all the trouble to produce the perfect shell. That favor should be repaid by trying to produce a well thought out, well designed, and secure script.