
Hour 7 Creating Advanced State Machine Workflows
What You’ll Learn in This Hour:
![]()
StateMachineWorkflowInstance introspection and manipulation capabilities
![]() Workflow queuing to retrieve current blocking activities
Workflow queuing to retrieve current blocking activities
![]() Dim and activate form controls based on workflow state and workflow queues
Dim and activate form controls based on workflow state and workflow queues
This hour starts with a workflow identical to what you created in the previous hour. You will learn to use the workflow queuing system to retrieve information about what events are available at a given time. This information will then be used to control which buttons are enabled. These capabilities are important because they are one of the main factors that increases state machine workflow’s ability to be monitored and introspected. You will also use additional members of the StateMachineWorkflowInstance type.
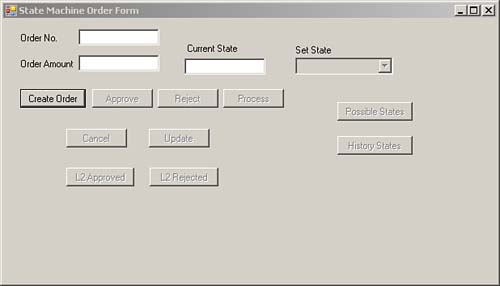
The new form you will create this hour will look like Figure 7.1.
1. Open the AdvancedStateMachineWorkflowSolution solution in the C:SamsWf24hrsHourHour07StateMachineWorkflowLab1AdvancedStateMAchineWorkflowSolution directory.
2. Open the StateMachineOrderForm form in design mode.
3. Add a combo box named comboBoxStates to the form and add a label above it and set its Text property to Set State.
4. Add two command buttons. Name the first buttonPossibleStates and set its Text property to Possible States. Name the second buttonHistoryStates and set its Text property to History States.
5. Open the form in code view and add the following variable declarations to the top of the class:
private StateMachineWorkflowInstance stateMachineWorkflowInstance;
private delegate void UpdateDelegate( );
6. Add the following using directives:
using System.Workflow.Runtime.Tracking;
using System.Workflow.ComponentModel;
using System.Collections.ObjectModel;
7. Add the following to the end of the form load method:
dimControls( );
buttonCreate.Enabled = true;
This is where the majority of the activity in this hour resides. It is where you will modify the host to interact with the workflow.
We will finally add logic to dim buttons that are not valid in the current workflow state. You will first extract the current events awaiting input and then retrieve their corollary event names. You will then compare the event names to the form buttons to see which ones should be active.
Most of the logic is similar to the work involved in determining which form controls should be dimmed or active in a UI application. The method to retrieve these events, however, calls for using WF’s underlying queuing technology. So far, HandleExternalEvent activities have been used to wait for external input, and CallExternalMethod activities have been used to send data from workflow to host. These and all other communication between WF and external applications are abstractions on top of WF’s queuing. The WorkflowQueueInfo and WorkflowQueue types are the two types that support WF’s queuing. There are times when the best—or only—way to accomplish a WF task is through its queues. One case when queues usage is necessary is to retrieve the current blocking activity (covered later in this hour); another is in place of higher-level host-workflow data exchange abstractions, which may be the appropriate or preferred method for some programmers and some scenarios.
The UpdateControls method you create in this section dims all the buttons, extracts the current active events, and activates the corollary buttons.
1. Add a method to dim all the controls as shown, and place it in the state machine helper functions region:
void dimControls( )
{
buttonCreate.Enabled = false;
buttonApprove.Enabled = false;
buttonCancel.Enabled = false;
buttonL2Approve.Enabled = false;
buttonL2Reject.Enabled = false;
buttonProcess.Enabled = false;
buttonReject.Enabled = false;
buttonUpdate.Enabled = false;
buttonHistoryStates.Enabled = false;
buttonPossibleStates.Enabled = false;
comboBoxStates.Enabled = false;
}
2. Add a method signature named UpdateControls below the dimControls method as shown:
// Extracts the event names from the workflow queues
// for the currently active blocking activities on the
// workflow instance and matches them with the appropriate buttons
3. Add the following code to the UpdateControls method to dim all the controls before beginning to selectively activate the requisite controls:
// dim all the controls before retreiving current ones
dimControls( );
4. Add the following code to retrieve a collection of WorkflowQueueInfo objects:
// collection of in scope workflow queues. In scope means
// that if in the Approval Level 2State, the
// L2 Approved and L2 Rejected
// events will be in scope (as well as the workflow-wide canceled)
ReadOnlyCollection<WorkflowQueueInfo> wqi =
workflowInstance.GetWorkflowQueueData( );
5. Iterate through each WorkflowQueuInfo object in the returned WorkflowQueueInfo collection by adding the following code:
// iterate through each of the in scope queues and match
// them with the proper form buttons
foreach (WorkflowQueueInfo q in wqi)
{
}
6. Cast the WorkflowQueueInfo.QueueName property as an EventQueueName type, which contains the method name property needed. Add this code between the foreach beginning and ending brackets.
// Get the event name associated with the queue
EventQueueName eq = q.QueueName as EventQueueName;
7. After ensuring the queue is not null, compare the MethodName property of the EventQueueName type to the list of values in the switch statement to determine which buttons should be activated. Add this code following the code entered in the prior step, and again within the foreach brackets.
if (eq != null)
{
switch (eq.MethodName)
{
case "OrderWorkflowApproved":
buttonApprove.Enabled = true;
break;
case "OrderWorkflowRejected":
buttonReject.Enabled = true;
break;
case "OrderWorkflowCanceled":
buttonCancel.Enabled = true;
break;
case "OrderWorkflowProcessed":
buttonProcess.Enabled = true;
break;
case "OrderWorkflowApproved2":
buttonL2Approve.Enabled = true;
break;
case "OrderWorkflowRejected2":
buttonL2Reject.Enabled = true;
break;
}
}
8. If the collection of WorkflowQueueInfo objects returned at the top of the method is true, activate the create button, because there are no blocking activities and therefore there is no workflow instance. If, on the other hand, it is not null, activate the helper controls. This code should be inserted below the closing bracket of the foreach statement.
// if none are in scope then there is no workflow instance
// loaded and therefore the create button should be undimmed.
if (wqi.Count == 0)
buttonCreate.Enabled = true;
else
{
// If there is a workflow instance undim the additional
// "nonevent" buttons
buttonHistoryStates.Enabled = true;
buttonPossibleStates.Enabled = true;
comboBoxStates.Enabled = true;
}
9. Build the AdvancedWindowsForm project and fix errors, if any.
The UpdateControls method should look like Listing 7.1.
LISTING 7.1 Update Controls Method with Direct Workflow Queue Access
// Extracts the event names from the workflow queues
// for the currently active blocking activities on the
// workflow instance and matches them with the appropriate buttons
void UpdateControls( )
{
// dim all the controls before retreiving current ones
dimControls( );
// collection of in scope workflow queues. In scope means
// that if in the Approval Level 2State, the
// L2 Approved and L2 Rejected
// events will be in scope (as well as the workflow-wide canceled)
ReadOnlyCollection<WorkflowQueueInfo> wqi =
workflowInstance.GetWorkflowQueueData( );
// iterate through each of the in scope queues and match
// them with the proper form buttons
foreach (WorkflowQueueInfo q in wqi)
{
// Get the event name associated with the queue
EventQueueName eq = q.QueueName as EventQueueName;
if (eq != null)
{
switch (eq.MethodName)
{
case "OrderWorkflowApproved":
buttonApprove.Enabled = true;
break;
case "OrderWorkflowRejected":
buttonReject.Enabled = true;
break;
case "OrderWorkflowCanceled":
buttonCancel.Enabled = true;
break;
case "OrderWorkflowProcessed":
buttonProcess.Enabled = true;
break;
case "OrderWorkflowApproved2":
buttonL2Approve.Enabled = true;
break;
case "OrderWorkflowRejected2":
buttonL2Reject.Enabled = true;
break;
}
}
}
// if none are in scope then there is no workflow instance
// loaded and therefore the create button should be undimmed.
if (wqi.Count == 0)
buttonCreate.Enabled = true;
else
{
// If there is a workflow instance undim the additional
// "nonevent" buttons
buttonHistoryStates.Enabled = true;
buttonPossibleStates.Enabled = true;
comboBoxStates.Enabled = true;
}
}
The current queues are retrieved and the proper form controls are activated.
We will now look through the built-in members in the StateMachineWorkflowInstance class that interact with workflow queue info on our behalf. The first one of these methods retrieves all the states on the state machine workflow.
The states will be loaded when the workflow instance is created. They are retrieved from the StateMachineWorkflowInstance, thereby requiring it to be created first. A good place to do this is right after the workflow instance is started.
1. Add the following code to the buttonCreate_click handler below the line that starts the workflow instance (workflowInstance.Start). This instantiates the StateMachineWorkflowInstance and calls a method to update the comboBoxStates combo box:
// Initiate a state machine workflow instance
stateMachineWorkflowInstance =
new StateMachineWorkflowInstance(
workflowRuntime, workflowInstance.InstanceId);
// Load all the states on the state machine into a combo box.
loadStatesComboBox( );
2. Create the loadStateComboBox method to load all workflow states via the StateMachineWorkflowInstance.States property that is iterated through and added to the combo box. Add this method to the end of the state machine helper functions region.
// Loads all the states in the workflow into the combo box
// where they can simply be viewed or the current state can
// be overridden
private void loadStatesComboBox( )
{
comboBoxStates.Items.Clear( );
foreach (Activity a in stateMachineWorkflowInstance.States)
{
comboBoxStates.Items.Add(a.Name);
}
}
3. Build the AdvancedWindowsForm project and fix errors, if any.
A collection of all states the workflow has transitioned to can be retrieved through the StateMachineWorkflowInstance.StateHistory property if and only if you are using the SqlTrackingService. This can be useful for auditing or other purposes.
1. Add the SqlTrackingService to the host by inserting the following code into the GetWorkflowRuntime method below the code where the external data exchange service is added (des.AddService(this);) as shown:
// Add the sql tracking service to the runtime
SqlTrackingService sts =
new SqlTrackingService(connectionString);
workflowRuntime.AddService(sts);
2. Double-click the History States button and add the following code to return a collection of the states that were previously transitioned to and display them in a message box:
string historyStates = "";
foreach (string s in stateMachineWorkflowInstance.StateHistory)
{
historyStates = historyStates + s + " ";
}
MessageBox.Show(historyStates);
The possible transitions can also be obtained from the StateMachineWorkflowInstance. You can use this to monitor the possible transitions during runtime.
1. Double-click the Possible States button and add the following code to return a collection of valid states to transition to and then display them in a message box:
// Use the StateMachineWorkflowInstance.PossibleStateTransitions method
// to retrieve all states that may be transitioned to (directly or
// indirectly) from the current state
string possibleTransitions = "";
foreach (string stateName in
stateMachineWorkflowInstance.PossibleStateTransitions)
{
possibleTransitions = possibleTransitions + stateName + " ";
}
MessageBox.Show("Possible transitions: " +
stateMachineWorkflowInstance.PossibleStateTransitions.ToString( ));
2. Build the AdvancedWindowsForm project and fix errors, if any.
So far you have simply introspected the state machine workflow. You can manipulate it as well using the StateMachineWorkflowInstance.SetState method. This should obviously be used sparingly, but there may be times when it is necessary to manually override the process and switch the workflow to a different state. It is consistent with the state machine autonomy premise that you can move forward and backward through the states without consequence in many scenarios.
When selecting state in the comboBoxState combo box (created earlier), its changed handler is called where the state is switched.
1. Add the following code to the comboBoxState's on change event handler by double-clicking the SetState combo box to manually set a state on a state machine workflow.
// Sets the state machine to the new state selected in
// the combo box.
stateMachineWorkflowInstance.SetState(comboBoxStates.Text);
2. For readability purposes, cut and paste the methods you have created in the last few steps to the bottom of the state machine helper functions region.
The UI is updated when the workflow idles to reflect the state change that may occur after an event fires and the workflow then idles. This will generally happen after the workflow acts on an event, so it is a good place to update the newly available events (buttons).
1. Add the following code to the workflowRuntime_WorkflowIdled handler:
UpdateDelegate ud = delegate( )
{
if (stateMachineWorkflowInstance.CurrentState != null)
textBoxCurrentState.Text =
stateMachineWorkflowInstance.CurrentStateName;
else
textBoxCurrentState.Text = "";
UpdateControls( );
};
this.Invoke(ud);
It is also a good place to update the available buttons on a UI when the workflow completes.
Finally, update the available buttons and UI when the workflow terminates.
The buttons should now dim and activate as you use the form. Use the state combo box to see all workflow states and to override the current state, the PossibleStates button to see the possible transitions, and the HistoryStates to see past workflow transitions.
1. Set the AdvancedWindowsForm project as the startup project.
2. Press F5 to run the workflow.
3. Enter any order number and an amount less than 1,000 (so that second-level approval will not be required).
4. Click the Create button to create the order, then click the Approve button, and finally the Process button. The order should now be approved.
5. Enter any new order number and an amount larger than 1,000.
6. Click the Create button to create the order, then click the Approve button, the L2Approved button, and finally the Process button. The order that required second-level approval should now be approved.
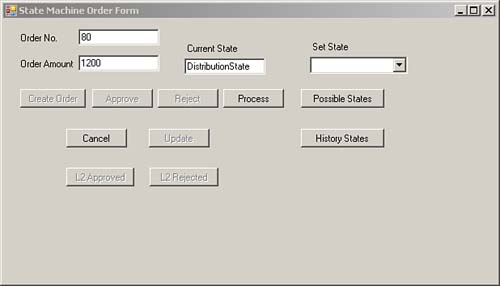
7. Enter any new order number and an amount larger than 1,000.
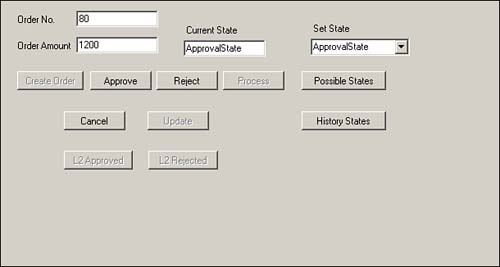
8. When the workflow reaches the Distribution state (shown in Figure 7.2), change it to the approval state. Notice that the manual override of state changes which buttons are activated, and the Current State text box also reflects the state change (shown in Figure 7.3).
9. Continue submitting orders; try the Cancel button and other buttons and overrides until you are comfortable with the form’s operations.
This demonstrated WF’s sate machine workflow introspection through enhanced use of the StateMachineWorkflowInstance type. Workflow queues—the underlying WF communication technology—were used to access information for the currently scoped events. Finally, the state machine workflow’s ability to override the current state was used. The manual override of states is particularly powerful and dangerous if used incorrectly.