
Hour 8 Working with Parallel Activities and Correlation
What You’ll Learn in This Hour:
![]() Using the
Using the Parallel activity
![]() Using the
Using the SynchronizationScope activity
![]() Updating the local service to use correlation to support the concurrent approval workflow
Updating the local service to use correlation to support the concurrent approval workflow
![]() Updating the approval workflow to allow concurrent approval through correlation
Updating the approval workflow to allow concurrent approval through correlation
Many applications call for concurrent processing. This hour first shows how to use the Parallel activity, an activity that contains two or more child branches that run concurrently. Each branch is a Sequence activity. It then shows how to lock a branch of a Parallel activity in cases when a branch shares resources with one or more other branches. Finally, it demonstrates creating an approval workflow that requests approvals from two reviewers simultaneously. This requires not only using the Parallel activity but instrumenting the workflow and local service with correlation configuration parameters.
This hour contains two separate solutions. You will create the first one in the next steps and the second one later in the hour.
1. Open Visual Studio and select File, New, Project.
2. Expand other project types by clicking the +, then select Visual Studio Solutions, Blank Solution Template.
3. Name the solution ParallelExecution and place it in the C:SamsWf24hrsHoursHour08ParallelAndCorrelationLab1ParallelExecution directory.
Create a Sequential Workflow project that will be used to test the basic operation of the Parallel activity.
1. Right-click the solution, select Add New Project, and click the + to expand Visual C# projects.
2. Choose Workflow and select the Sequential Workflow Console Application project template.
3. Name the project ParallelTesters and place it in the default directory.
4. Click OK.
5. Rename Workflow1.cs ParallelTester.cs in the Solution Explorer.
In the subsections in this section, you build and run a workflow that runs in Parallel in both the default interleaved format and the synchronized format.
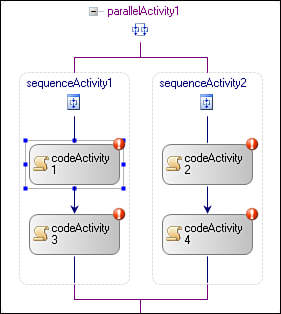
In the next steps, you will add a Parallel activity to the workflow and then add two Code activities to each of its branches. The Code activities will be instrumented and the results will be sent to the console so that you can see how the Parallel activity works.
1. Add a Parallel activity to the workflow.
2. Add two Code activities to each left and right branch (in any order; you will give them names shortly).
3. Your workflow should now look like Figure 8.1.
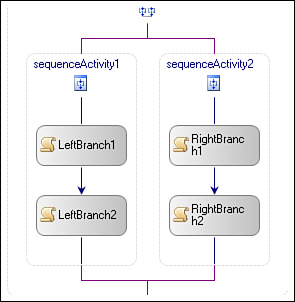
4. Now change the Name property of the Code activities in the left branch to LeftBranch1 and LeftBranch2.
5. Change the Name property of the Code activities in the right branch to RightBranch1 and RightBranch2.
6. Double-click the LeftBranch1 code handler and add the following to print the current activity name, the time it begins execution, and to then pause for two seconds:
CodeActivity ca = sender as CodeActivity;
Console.WriteLine
(ca + " Executed at " +
System.DateTime.Now.ToLongTimeString( ));
Thread.Sleep(2000);
7. Repeat step 6 for each of the remaining activities.
In the next steps, you perform a couple of housecleaning items and then run and evaluate the workflow’s execution.
1. Add the following code to Program.cs after the line that contains waitHandle.WaitOne( ); to pause the host:
Console.WriteLine("Press enter to continue");
Console.Read( );
2. Add the following using directive to ParallelTester.cs:
using System.Threading;
3. Your workflow should now look like Figure 8.2.
4. Run your workflow and you should receive results similar to Figure 8.3.
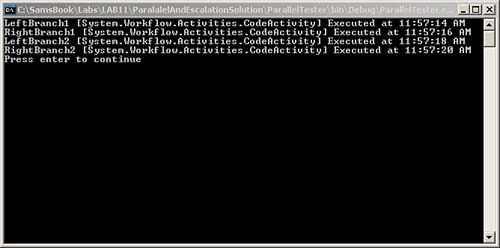
As you can see, the Code activities executed from left to right and then top to bottom. The activity execution is two seconds apart for each activity. A workflow instance operates on one and only one thread, so the execution is not truly parallel; each branch takes a turn. One activity in a branch executes and then onto the next activity in another branch, and when all branches are done, back to the next activity in the first branch. From a business perspective this is parallel. For example, if each branch was sending an email requesting approval, the fact that the approvals are a fraction of a second apart is not material to most business processes. If the first branch sends an email and waits for a response, and then the second branch does the same, this would be sequential business process execution. The vast majority of approval processes will run fine under WF’s Parallel activity. For scenarios where you need true parallel execution, this is not the activity; you may need another tool or explore creating your own custom activity.
This SynchronizationScope activity permits one or more children of a Parallel activity to execute in cases where shared resources must be locked. The SynchronizationScope activity contains a SynchronizationHandles property that can be used to associate branches that use a shared resource. Otherwise, it is essentially a Sequence activity like any other Parallel activity branch.
In the next steps, you reconfigure the Parallel activity with SynchronizationScope activity branches so that each branch executes in full before the next branch begins.
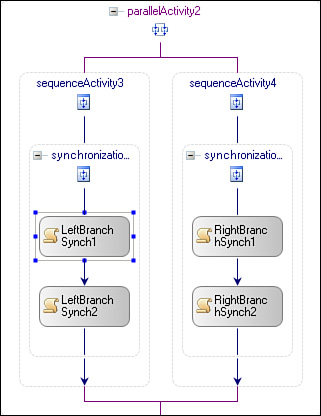
1. Add another Parallel activity to the workflow below the one you added earlier.
2. Add a SynchronizationScope activity to each parallel branch (insert them within the Sequence activities of each branch).
3. Add two Code activities within the SynchronizationScope activity in the left branch of the Parallel activity.
4. Add two Code activities within the SynchronizationScope activity in the right branch of the Parallel activity.
5. Rename the Code activities LeftBranchSynch1, LeftBranchSynch2, RightBranchSynch1, and RightBranchSynch2.
6. Your new Parallel activity should look like Figure 8.4.
7. Double-click each of the Code activities in the Parallel activity you just added and add the following code to each handler:
CodeActivity ca = sender as CodeActivity;
Console.WriteLine
(ca + " Executed at " +
System.DateTime.Now.ToLongTimeString( ));
Thread.Sleep(2000);
8. Now add the word “same” to the SynchronizationScope.SynchornizationHandles property for each SynchronizationScope activity to specify that they should run independently, as shown in Figure 8.5.
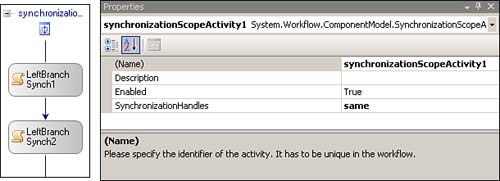
9. Click the first Parallel activity and set its Enabled property to false so that it will no longer execute.
10. Run the workflow and you should see the result in Figure 8.6:
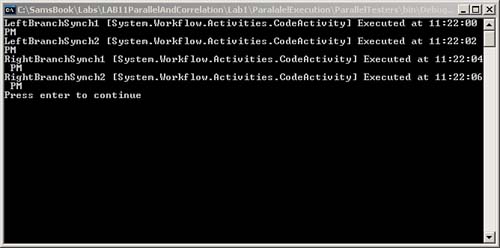
The first branch now completes before beginning the second branch. Some branches can be equipped with a SynchronizationScope activity and others not. Furthermore, branches may have independent SynchronizationHandles property settings. It is only the branches equipped with SynchronizationScope activities that share the same SynchronizationHandles property value that executes in isolation. Other branches will execute under normal WF parallel processing. Change some of the settings if you want to see the different execution semantics.
Approval processes in this book have so far executed in serial. Some have supported escalation, but this was still a serial process where the workflows awaited a response from each approver before proceeding. There are many approval scenarios where waiting for each approver to complete his or her review before engaging the services of another reviewer would be grossly inefficient. These scenarios require allowing multiple reviewers to be engaged in parallel.
The first step, as many of you probably guessed, is to use an activity that allows for concurrent processing, such as the Parallel activity. There is another area that must be supported: correlation. So far, the only correlation needed was to map the event back to the correct workflow instance. This singular level of correlation is provided for you out-of-the-box by WF. This is why the WorkflowInstance.InstanceId value is always passed to EventArgs classes in WF. But if there are concurrent approvers, how does the workflow know where to route the incoming event? It doesn’t automatically; you have to configure correlation to tell it.
Following is a brief description of the three steps that must be performed to provide the additional level of correlation necessary to support concurrent processing. Each will be described in more detail when they are implemented.
1. Additional attributes must be added to the local service interface to tell it what value to correlate on and when to begin a correlation dependency between an initiating activity (for example, CallExternalMethod) and a receiving activity (HandleExternalEvent).
2. The initiating activity (CallExternalMethod) must be configured with a CorrelationToken to begin the coupling with its partner receiving activity. It must also pass information that identifies the value to be correlated on.
3. The receiving activity (HandleExternalEvent) likewise must be configured to follow (or be bound to) the CorrelationToken specified by the initiating activity.
The upcoming figure illustrates the need for correlation, where the left branch of the Parallel activity requests approval from Robert, and the HandleExternalEvent activity below responds to Robert’s approval. Likewise the right branch does the same for Patricia.
You will now work with the second solution in this hour that is used to explore correlation. The form host is already created. You have to add a workflow project and a class library project to hold the workflow and the local service.
In the next steps you add the CorrelationWorkflows project.
1. Open the solution C:SamsWf24hrsHoursHour08ParallelAndCorrelationLab2CorrelationSolution.sln.
2. Add a Sequential Workflow Library project to the solution and name it CorrelationWorkflows.
3. Right-click the Workflow1.cs file and rename it CorrelationWorkflow.cs.
4. Add a Class Library project to the solution and name it LocalServices.
5. Right-click the Class1.cs file and rename it LocalService.cs.
6. Add references to System.Workflow.Runtime and System.Workflow.Activities from the LocalServices project.
7. Add references to the CorrelationWorkflows and LocalServices projects from the HostProject. (The HostProject is the precreated project.)
Most of the code in this local service will be familiar to you. There are a few items, though, that are correlation specific. As specified earlier (this is step 1 in the overall correlation process), you will configure the local service to tell it what value to correlate on and when correlation should commence.
Perform the following steps to add correlation-related attributes to the local service.
1. Add the following namespace directives:
using System.Workflow.Activities;
using System.Workflow.Runtime;
2. Replace the current class declaration with the following code. The [CorrelationParameter("approver")] attribute you are adding to the class tells the local service that the data in the approver parameter should be used to match an outgoing request and a response. Replace the current class declaration with the following:
[ExternalDataExchange]
[CorrelationParameter("approver")]
public interface IOrderCorrelationLocalService
{
}
3. Add the following code to the class you just added. The second line contains a standard event signature as you have seen in previous hours. The CorrelationAlias attribute maps the value in the EventArgs class to the CorrelationParameter.
[CorrelationAlias("approver", "e.Approver")]
event EventHandler<OrderResponseEventArgs> OrderWorkflowApprove;
4. Now add the following code to the event you just added. This code signifies for correlation to be initialized for each approver when the CallExternalMethod activity bound to this method executes.
[CorrelationInitializer]
void GetResponse(string approver);
You have done three things to enable correlation in the local service. First, you identified the CorrelationParameter by adding an attribute to the local service interface. Second, you mapped the value in the EventArgs class to the CorrelationParameter by adding an attribute to the event member. Third, you told WF where correlation should begin by adding an attribute to the method. You will soon configure the CallExternalMethod and HandleExternalEvent activities to use these correlation values.
The code for the interface you just created is contained in Listing 8.1:
LISTING 8.1 Local Service with Correlation
namespace LocalServices
{
[ExternalDataExchange]
[CorrelationParameter("approver")]
public interface IOrderCorrelationLocalService
{
[CorrelationAlias("approver", "e.Approver")]
event EventHandler<OrderResponseEventArgs> OrderWorkflowApprove;
[CorrelationInitializer]
void GetResponse(string approver);
}
}
The payload itself, the EventArgs class, is no different than those created in previous hours. Although it does contain the approver that is used for correlation, it is just another class member. There are no special attributes or commands necessary.
Follow the next steps to add the EventArgs class with correlation support.
1. Right-click the LocalService project, select Add, Class, and name it EventArgs.
2. Add the following using directive:
using System.Workflow.Activities;
3. Replace the class declaration in the EventArgs class with the content of Listing 8.2.
LISTING 8.2 EventArg Class with Correlation Support
[Serializable]
public class OrderResponseEventArgs : ExternalDataEventArgs
{
private string approver;
public string Approver
{
get { return this.approver; }
set { this.approver = value; }
}
private string status;
public string Status
{
get { return this.status; }
set { this.status = value; }
}
public OrderResponseEventArgs(Guid instanceId,
string approver,
string status)
: base(instanceId)
{
this.approver = approver;
this.status = status;
}
}
4. Build the LocalServices project so that it will be available to the workflow.
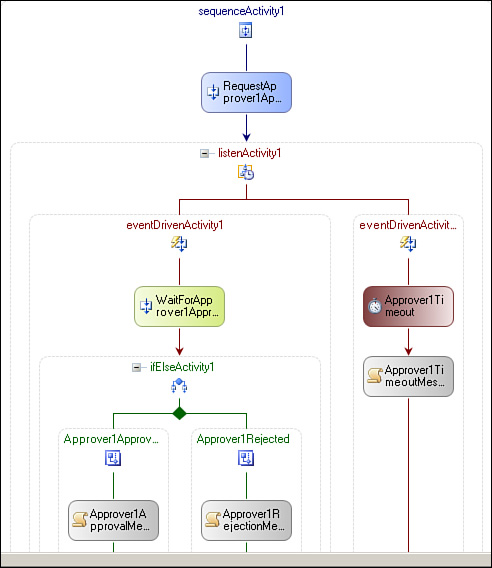
You will create the workflow shown in Figure 8.7.

As you can see, it is similar to ones created in earlier hours. It allows for concurrent approval from two people instead of being limited to one. This is done by placing CallExternalMethod activities that request approval from the respective approvers at the top of the individual parallel branches. Each branch then contains its own Listen activity equipped with a HandleExternalEvent activity and a Delay activity. There is nothing new here to this point. What is new is that each CallExternalMethod activity needs to be correlated with its respective HandleExternalEvent activity. For example, the left branch of the Parallel activity requests approval from Robert and the right one from Patricia. When Patricia responds, her reply must be mapped to the HandleExternalEvent activity in the right branch, which requires configuring these activities with correlation parameters.
Perform the following preparatory steps on the CorrelationWorkflow class.
1. Enter the following variable declarations below the constructor of the workflow code-behind file in CorrelationWorkflow.cs.
int numOfApprovals = 0;
string approver1Status = "";
string approver2Status = "";
2. Add references to System.Windows.Forms and to the LocalServices project.
3. Add the following using directive:
using System.Windows.Forms;
Follow the next steps to configure Approver 1.
1. Add a Parallel activity to the workflow.
2. Over the next few steps you will configure Approver 1 (the left branch of the Parallel activity) as shown in Figure 8.8.
3. Add a CallExternalMethod activity to the left branch of the Parallel activity.
4. Add a Listen activity below the CallExternalMethod activity.
5. Add a HandleExternalEvent activity to the left branch and a Delay activity to the right branch of the Listen activity.
6. Add an IfElse activity below the HandleExternalEvent activity.
7. Add a Code activity to both the left and right branches of the IfElse activity and another one below the Delay activity.
Two correlation-related items must be set on the CallExternalMethod activity. (This is step 2 in the overall correlation process.) The first is setting its CorrelationToken and the CorrelationToken's owner. These values are static values that are used to begin a chain between an initiating and a receiving activity. In our case, this CallExternalMethod activity will be bound to a HandleExternalEvent activity. The second is adding and populating a parameter that holds the value used to correlate on. This value is mapped to the CorrelationParameter in the local service you specified ([CorrelationParameter("approver")]). This value is dynamic and subject to change at runtime. The approver property is used for this. Some workflows may require approval from Robert and others from another person. On the other hand, this CallExternalMethod and HandleExternalEvent activity will always be bound to each other. Therefore the CorrelationToken binding them is determined at design time.
Follow the next steps to configure the CallExternalMethod for Approver 1.
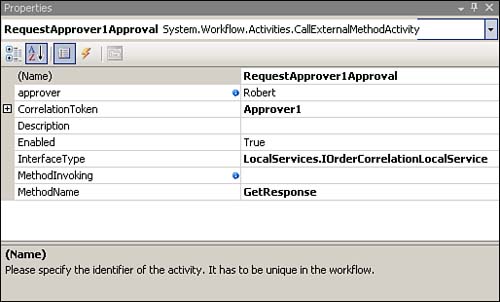
1. Click the CallExternalMethod activity and name it RequestApprover1Approval.
2. Map it to the interface and method by clicking the ellipsis in the InterfaceType property, then select LocalServices and IOrderCorrelationService in the middle of the form, and click OK.
3. Select the GetResponse method in the MethodName property drop-down.
4. Enter Approver1 in the CorrelationToken property and press Enter.
5. Click the + on the side of the CorrelationToken property, click OwnerActivityName and select sequenceActivity1 (or substitute the proper name if this is not the name of the parent Sequence activity) from the drop-down.
6. Enter Robert in the approver property. (Your activity property windows should look like Figure 8.9.)
This completes the configuration for your first CallExternalMethod activity that requires correlation. Let’s look at a couple of the additional parameters we set to support correlation:
The CorrelationToken.OwnerActivityName property is to provide a qualified name for the CorrelationToken. It can be set, in this case, to its direct parent or any other activity that precedes it in the workflow hierarchy. However, it should be set to its immediate parent because doing so is necessary in other dynamic approval scenarios we will encounter later. It is also less ambiguous to use the immediate parent.
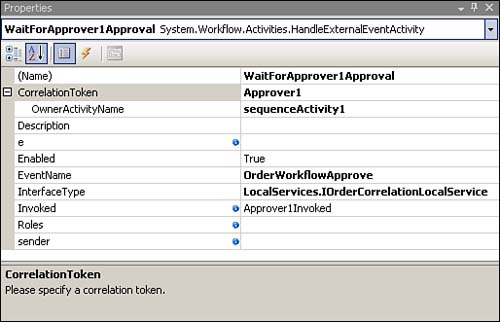
This is step 3 in the overall correlation process. Most of the work has now been done. All that remains is to bind this HandleExternalEvent activity to the proper CallExternalMethod activity. You do not need to specify Robert or another approver. This value is obtained from the EventArgs class and specifically the [CorrelationAlias("approver", "e.Approver")] attribute you specified in the local service.
Follow these steps to configure the HandleExternalMethod activity for Approver 1.
1. Click the HandleExternalEvent activity and name it WaitForApprover1Approval.
2. Map it to the interface and method by clicking the ellipsis in the InterfaceType property, select LocalServices, and IOrderCorrelationService in the middle of the form, and click OK.
3. Select the OrderWorkflowApprove event in the EventName property drop-down.
4. Enter Approver1Invoked in the Invoked property and the following code in its handler:
approver1Status = (e as LocalServices.OrderResponseEventArgs).Status;
5. Click the drop-down in the CorrelationToken property and select Approver1. This also associates the correct OwnerActivityName. The completed HandleExternalMethod activity’s Properties window should look like Figure 8.10.
Follow the next steps to configure the remaining activities for Approver 1.
1. Name the Delay activity Approver1Timeout and set its TimeoutDuration property to 00:00:30.
2. Name the Code activity below the Delay activity Approver1TimeoutMessage and add the following code to its handler:
MessageBox.Show
("Timeout waiting for Approver One's response.");
3. Name the left branch of the IfElse activity Approver1Approved and the right branch Approver1Rejected.
4. Click the drop-down in the Condition property of the left branch of the IfElse activity, select Declarative Rule Condition, click the + that appears next to the Condition property, and enter Approver1Rule in the Condition Name property. Click the ellipsis in the ConditionName property, click the Edit button (to update the Approver1Rule), and enter the following in the dialog box.
this.approver1Status=="Approved"
5. Click OK twice to close both dialog boxes.
6. Name the left branch Approver1ApprovalMessage and add the following code to the left Code activity handler:
MessageBox.Show("Order Approved by Approver 1!");
numOfApprovals = numOfApprovals + 1;
7. Name the right branch Approver1RejectionMessage and add the following code to the right Code activity handler:
MessageBox.Show("Order Rejected by Approver 1!");
That’s it. You have configured Approver 1; now on to Approver 2.
Perform the following steps that largely mirror configuring Approver 1 to configure Approver 2.
1. Add a CallExternalMethod activity to the right branch of the Parallel activity.
2. Add a Listen activity below the CallExternalMethod activity.
3. Add a HandleExternalEvent activity to the left branch and a Delay activity to the right branch of the Listen activity.
4. Add an IfElse activity below the HandleExternalEvent activity.
5. Add a Code activity to both the left and right branches of the IfElse activity and below the Delay activity.
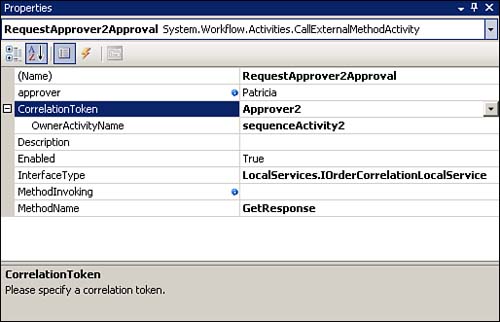
Perform the following steps to configure the CallExternalMethod activity for Approver 2.
1. Click the CallExternalMethod activity and name it RequestApprover2Approval.
2. Map it to the interface and method by clicking the ellipsis in the InterfaceType property, select LocalServices and IOrderCorrelationService in the middle of the form, and click OK.
3. Select the GetResponse method in the MethodName property drop-down.
4. Enter Approver2 in the CorrelationToken property and press Enter.
5. Click the + on the side of the OwnerActivityName property and select sequenceActivity2 (or substitute the proper name if this is not the name of the parent Sequence activity) from the drop-down.
6. Enter Patricia in the approver property. (The activity property window should look like Figure 8.11.)
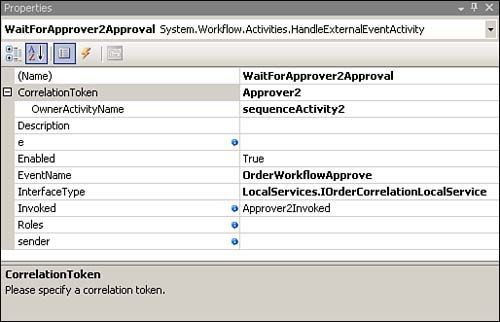
Follow the next steps to configure the HandleExternalMethod activity for Approver 2.
1. Click the HandleExternalEvent activity and name it WaitForApprover2Approval.
2. Map it to the interface and method by clicking the ellipsis in the InterfaceType property, select LocalServices and IOrderCorrelationService in the middle of the form, and click OK.
3. Select the OrderWorkflowApprove event in the EventName property drop-down.
4. Enter Approver2Invoked in the Invoked property and the following code in its handler:
approver2Status = (e as LocalServices.OrderResponseEventArgs).Status;
5. Click the drop-down in the CorrelationToken property and select Approver2. This also associates the correct OwnerActivityName (the activity property windows should look like Figure 8.12).
Follow the next steps to configure the remaining activities for Approver 2.
1. Name the Delay activity Approver2Timeout and set its TimeoutDuration property to 00:00:30.
2. Name the Code activity below the Delay activity Approver2TimeoutMessage and add the following code to its handler:
MessageBox.Show
("Timeout waiting for Approver Two's response.");
3. Name the left branch of the IfElse activity Approver2Approved and the right branch Approver2Rejected.
4. Click the drop-down in the Condition property of the left branch of the IfElse activity, select Declarative Rule Condition, click the + that appears next to the Condition property, and enter Approver2Rule in the Condition Name property. Click the ellipsis in the ConditionName property, click the Edit button (to update the Approver2Rule), and enter the following in the dialog box.
this.approver2Status=="Approved"
5. Click OK twice to close both dialog boxes.
6. Name the Code activity in the left branch Approver2ApprovalMessage and add the following code to its handler:
MessageBox.Show("Order Approved by Approver 2!");
numOfApprovals = numOfApprovals + 1;
7. Name the Code activity in the right branch Approver2RejectionMessage and add the following code to its handler:
MessageBox.Show("Order Rejected by Approver 2!");
That’s it. You have configured Approver 1 and 2.
Now you need to check whether the order is approved or rejected. Two approvals mean the order is approved, and any other number equals rejection. This check is done by adding a rule that checks the numApprovals variable within an IfElse activity.
Perform the following steps to add total order validation.
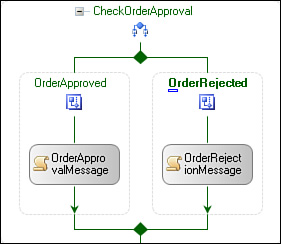
1. Add an IfElse activity below the entire Parallel activity and name it CheckOrderApproval.
2. Name the left branch OrderApproved and the right branch OrderRejected.
3. Add a Code activity in each branch and name the one in the left branch OrderApprovalMessage and the one in the right branch OrderRejectionMessage.
4. Update the OrderApprovalMessage handler with the following:
MessageBox.Show("Entire Order Approved!");
5. Update the OrderRejectionMessage handler with the following:
MessageBox.Show("Entire Order Rejected!");
6. Click the drop-down in the Condition property of the left branch of the IfElse activity, select Declarative Rule Condition, click the + that appears next to the Condition property, enter TotalWorkflowRule in the ConditionName property, and click the ellipsis in the ConditionName property. Click the Edit button (to update the Approver1Rule), and enter the following in the dialog box.
this.numOfApprovals==2
7. Click OK twice to close both dialog boxes. The CheckOrderApproval activity should look like Figure 8.13.
Follow the next steps to run the workflow.
1. Build and run the solution.
2. Click the CreateOrder button (see Figure 8.14) to create an order and then select Approved or Rejected for each reviewer. After an order is created, the CreateOrder button will be dimmed and the approval buttons will be activated. When the entire order is approved or rejected, the CreateOrder button will be activated again.
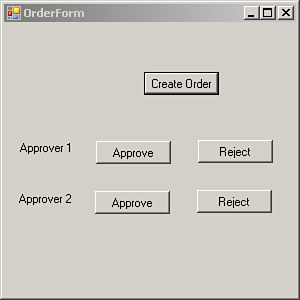
![]()
Although in a real-world application, the approval and rejection would be presented to the users in an email, SharePoint task, or other means, the principles of correlation remain.
This concludes correlation. The approval scenario is useful in that it supports concurrent, correlated processing. The workflow is also very descriptive. It serves as a good flowchart of the overall process. It is very hard-coded and limited to exactly two approvers that approve in one level. The next two hours will address other activities that remedy these limitations.
This hour covered the Parallel activity in its default form, where it executes one activity per branch, goes back to the first branch, and executes the next activity, which provides for parallel execution at the business level. This is so even though WF is single threaded. Then SynchronizationScope activities were explored, which provide a way to ensure that entire branches are executed independently. The SynchronizationScope activity is useful when there are shared resources among the branches. Finally, you built on your experience with host-workflow data exchange by using correlation. This allows concurrent approval and other scenarios to be carried out in WF. As stated, the next two hours will build on this by showing other activities that allow the number of approvers and even the number of levels of approval to be determined at design time.