
Hour 9 Working with the Replicator and While Activities
What You’ll Learn in This Hour:
![]() How to use the
How to use the Replicator activity in sequence
![]() How to use a
How to use a Dictionary object to pass parameters to a workflow
![]() How to use the
How to use the While activity
![]() How to use the Replicator activity in parallel
How to use the Replicator activity in parallel
The Replicator is an advanced WF activity commonly used in approval scenarios. The Replicator is similar to a C# foreach statement that can process n number of an item designated at runtime. The Replicator can perform work in serial or parallel, which is useful in approval scenarios where it is desired to call out for and receive multiple responses simultaneously and not wait for each approver. Another nifty feature of the Replicator is that its default behavior to complete when all children complete can be overridden to, say, complete when a condition is met, such as over half the votes already tallied for one side or the other. The Replicator is used to power almost all SharePoint workflows that come with the MOSS SDK, which are heavily document approval-centric and fairly complex.
You will use a While activity to perform dynamic sequential approval, which serves as a viable substitute to the Replicator in some scenarios.
You will use an alternative form of host-workflow communication that allows the passing of a Dictionary object from the host to the workflow when the workflow is created. This form of communication is similar to standard method-to-method communication.
Some of the techniques for using the Replicator activity in conjunction with the CallExternalMethod and HandleExternalEvent activities in this hour were learned from reading the following blog by a WF team member:
For brevity, I omitted instructions for creating projects and solutions. See previous hours if you need help creating projects or solutions.
Follow the next steps to create the solution and projects for this hour.
1. Open the WorkflowReplicator solution in the C:SamsWf24hrsHoursHour09ReplicatorAndWhile directory.
2. Add a Sequential Workflow Library to the solution and name it ReplicatorWorkflows.
3. Rename Workflow1.cs to ReplicatorWorkflow.cs.
4. Add a reference to the LocalServices project.
5. Click the ReplicatorHostForm project and add references to the LocalServices and ReplicatorWorkflows projects.
In this section you create and configure the Replicator activity.
Follow the next steps to create some properties.
1. Open the ReplicatorWorkflow code-beside file and add the following variables below the constructor:
ArrayList children;
int counter = 0;
2. Right-click below the variable declarations, select Insert Snippet, double-click Other, double-click Workflow, and double-click DependencyProperty—Property to insert a new dependency property. You should see the stub dependency property, and the text MyProperty should be highlighted.
3. Enter NumberOfApprovers (replacing MyProperty), press Tab and enter int. Press Enter to leave the wizard.
4. Repeat steps 2 and 3 to add a new dependency property named ApprovalStyle with the exception that it is a string and not an int.
5. Add the following using directive:
using System.Windows.Forms;
Part of the beauty of the Replicator is that workflows can use it to power complex processes with relatively few activities required. This also surfaces its limitation in that the workflows it powers are not always the most self-descriptive. The hard-coded workflows that contained one entry per parallel branch are very descriptive. Unfortunately, it is frequently inefficient to be limited to a fixed number of approvers.
Follow the next steps to add child activities to the Replicator activity.
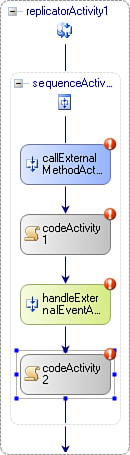
1. Add a Replicator activity.
2. Place a Sequence activity inside the Replicator. (This is necessary because the Replicator can only hold a single activity; this is worked around by inserting a composite activity in it, which is discussed in the “ActivityExecutionContext Overview” section later in this hour.)
3. Add a CallExternalMethod activity to the Sequence activity.
4. Add a Code activity below the CallExternalMethod activity.
5. Add a HandleExternalEvent activity below the Code activity.
6. Add another Code activity below the HandleExternalEvent activity.
You will configure the activities in this section.
Follow the next steps to configure the CallExternalMethod activity.
1. Click the CallExternalMethod activity, click the ellipsis in its InterfaceType property, select IOrderCorrelationLocalService, and click OK.
2. Click the MethodName property and select GetResponse.
3. Enter TheToken in the CorrelaionToken property and press Enter.
4. Click the + next to the CorrelationToken property, then click the down arrow in the OwnerActivityName property and select sequenceActivity1. (It is important that you select sequenceActivity1 in the OwnerName property because of the way correlation tokens are generated in dynamic activities.)
Follow the next steps to configure the HandleExternalEvent activity.
1. Click the HandleExternalEvent activity, click the ellipsis in its InterfaceType property, select the IOrderCorrelationLocalService, and click OK.
2. Click the EventName property and select the OrderWorkflowApprove event.
3. Click the down arrow in the CorrelationToken property and select TheToken.
The first Code activity you added will spawn a message box when the approval is requested, and the second will spawn another message when approval (or rejection) is received.
Follow the next steps to configure the Code activities.
1. Double-click the first Code activity and enter the following in its handler:
MessageBox.Show("Approval no: " + counter.ToString() + "
requested.");
2. Double-click the second Code activity and enter the following in its handler:
MessageBox.Show("Approval no: " + counter.ToString() + "
completed.");
The Initialized handler constructs an array with the number of elements specified on the host form. The array, for example, will have two entries if two approvers are requested and five if five are. The array is then placed in the Replicator’s ChildInitialized property. The ChildInitialized property is similar to the customer’s portion of this foreach statement: foreach customer in customers. Finally, you specify that the Replicator should execute sequentially.
1. Click the Replicator activity, enter RepInitialized in the Initialized property, and enter the following in its handler to populate an array with the number of approvers requested on the form:
// Populate the data used for each instance of the Replicator's
// child instance that are created
children = new ArrayList();
for (int num = 0; num < NumberOfApprovers; num++ )
{
children.Add("Approver" + (num + 1));
}
2. Add the following code below the code you just added to place the array contents in the InitialChildData property, which is the property the Replicator will iterate through and run all instances of before terminating (unless overridden by an UntilCondition).
replicatorActivity1.InitialChildData = children;
3. Add the following code below the code you just added to set the Replicator to run sequentially. This means it waits for each approver before going to the next. (We will change this later.)
replicatorActivity1.ExecutionType = ExecutionType.Sequence;
4. The code in the Initialized handler you just created should look like this:
// Populate the data used for each instance of the Replicator's
// child instance that are created
children = new ArrayList();
for (int num = 0; num < NumberOfApprovers; num++)
{
children.Add("Approver" + (num + 1));
}
replicatorActivity1.InitialChildData = children;
replicatorActivity1.ExecutionType = ExecutionType.Sequence;
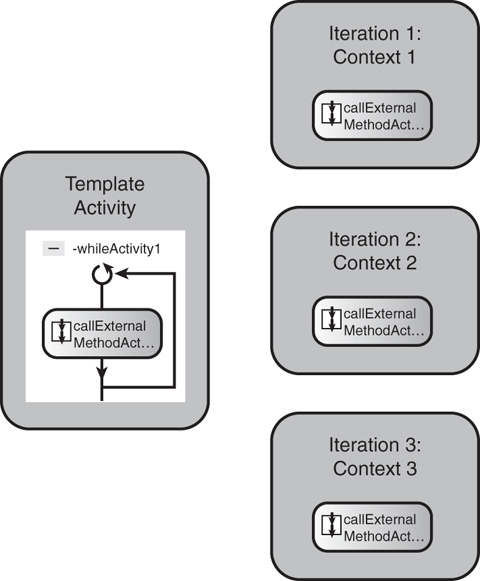
Now it is time to configure the individual elements (the customer in the foreach customer in the customers example) in the ChildInitialized property, which, in this case, is populated with CallExternalMethod activities. Each one needs to be identified uniquely by labeling it with a unique correlation value. This is where we run into one of WF’s intricate architectural components: ActivityExecutionContext, which is explained in this section. In workflows run to date, our concern has been with the activities as they are placed on the workflow. The activity can be accessed by specifying its name, such as callExternalMethodActivity1.name.
However, in this case, there will be one CallExternalMethod activity (callExternalMethodActivity1) that will execute multiple times, potentially even in parallel. At first thought, this implies the need for callExternalMethodActiivty1, callExternalMethodActivity2, and so on. However, this design-time hard-coding approach is exactly what we are attempting to avoid. The answer: WF can spawn individual contexts of a single activity on a workflow. This means that callExternalMethodActivity1 will be cloned and then altered for each subsequent use. Figure 9.2 identifies spawned contexts, which may occur for children in an iterative WF activity (While, Replicator, ConditionedActivityGroup). Creating individual contexts are necessary for other reasons, including compensation (or specifically intra-activity compensation). It is the need to track individual contexts that precludes the While, Replicator, and other WF activities from accepting multiple children. This is worked around by inserting a Sequence or another composite activity and then placing multiple children in it. This does frequently force an additional activity layer to be added when creating WF workflows.
Now it is time to access our CallExternalMethod activities and update their approver properties that are used for correlation within the context of dynamic replicator processing.
Follow the next steps to configure the CallExternalMethod activities.
1. Click the Replicator activity, enter RepChildInit in the ChildInitialized property, and enter the following code in its handler:
// Extract the "correct" CallExtnernalMethodActivity
CallExternalMethodActivity act =
e.Activity.GetActivityByName("callExternalMethodActivity1",
true)
as CallExternalMethodActivity;
To ensure that the correct spawned context is accessed, the activity is obtained from the e.Activity.GetActivitiyByName(), which is passed the activity name and true. True states the activity should be taken from the current context, e, and not from the workflow root, which would always represent the static CallExternalActivity placed on the workflow.
2. Add the remaining code below the code you just added to the ChildInitialized handler to assign the proper approver value to the approver property of the activity retrieved from the context.
act.ParameterBindings["approver"].Value =
children[counter].ToString();
counter = counter + 1;
That’s it. You have now created a general-purpose workflow that can be passed the number of approvers at runtime and send out requests and wait for responses for each.
3. Build the project before creating the form.
You have to add one method and update a dictionary object that passes the number of reviewers to the otherwise completed form.
The ViewQueues method you will create in the next steps retrieves the correlation values from the workflows queues. This is necessary because the activity-method name combination no longer uniquely identifies the queue.
1. Add the following method stub below the button_SubmitClick handler:
void ViewQueues()
{
}
2. Add the code to the ViewQueues method to set up the queues shown next, which contains nothing new yet:
StringBuilder sb = new StringBuilder();
textBoxQueues.Text = "";
// collection of in scope workflow queues. In scope means
// that if in the Approval Level 2State, the
// L2 Approved and L2 Rejected
// events will be in scope (as well as the workflow-wide canceled)
ReadOnlyCollection<WorkflowQueueInfo> wqi =
workflowInstance.GetWorkflowQueueData();
3. Create a variable that will be able to hold the returned correlation name (for example, approver1).
// Name and value pair containing correlation information
CorrelationProperty[] cp;
4. Add the code to iterate the queues and retrieve the method name and correlation value.
// iterate through each of the in scope queues and match
// them with the proper form buttons
foreach (WorkflowQueueInfo q in wqi)
{
// Get the event name associated with the queue
EventQueueName eq = q.QueueName as EventQueueName;
if (eq != null)
{
cp = eq.GetCorrelationValues();
sb.Append(eq.MethodName);
sb.Append(" Corr: " + cp[0].Value.ToString() + " ");
sb.AppendLine(); }
}
textBoxQueues.Text = sb.ToString();
Specifically, the number of reviewers is not part of the event-response flow; but, rather, metadata needed by the workflow to process. Therefore, this value will be passed in as a parameter to the workflow. WF can receive values in a Dictionary object (see Hour 2, “A Spin Around Windows Workflow Foundation”) that will contain the variable name and value. WF will match the variable names to public (both dependency and standard) properties when the workflow is initialized. You will populate a dictionary object and employ a workflow constructor that can process dictionary objects.
Follow the next steps to create pass parameters from the host to the workflow.
1. Add the following code in the buttonCreateOrder method above the line that creates the workflow to produce a Dictionary object that holds the number of approvers, as shown:
// Add the parameters via a dictionary object
Dictionary<string, object> parameters = new Dictionary<string,
object>();
parameters.Add("NumberOfApprovers",
int.Parse(textBoxNumApprovers.Text));
2. Add the Dictionary object to the line of code that creates the workflow, as shown:
You will fill in the form shown in Figure 9.3.
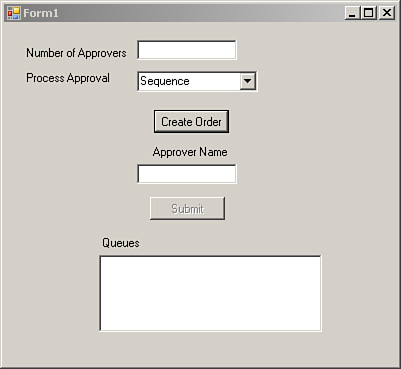
1. Enter 3 in the Number of Approvers text box and click the Create Order button. (The Process Approval combo box is not yet implemented. All approval will be sequential regardless of the value entered.)
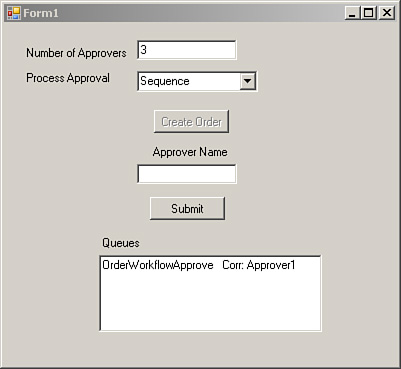
2. Click OK in the dialog that shows approval requested of Approver1.
3. Notice that the Queues text box is filled in with the event name and first approver (correlation information), as shown in Figure 9.4.
The Replicator in sequential form is very similar to the While activity. In fact, the workflow just created could be remodeled using a While activity.
Follow the next steps to configure the workflow with a While activity to support sequential processing.
1. Click the Replicator activity and set its Enabled property to false.
2. Add a While activity above the Replicator activity.
3. Drag and drop the Sequence activity contained in the Replicator activity with all its children intact into the While activity.
4. The While activity should now look like Figure 9.5.
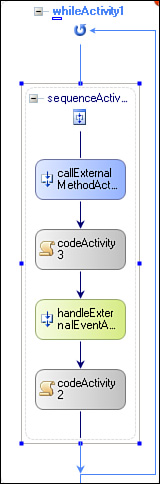
5. Click the drop-down in the Condition property of the left branch of the While activity, select Declarative Rule Condition, click the + that appears next to the Condition property, and enter ApproversRule in the Condition Name property. Then click the ellipsis in the ConditionName property, click the Edit button (to update the ApproversRule), and enter the following in the dialog box.
this.counter < this.NumberOfApprovers
6. Click OK twice to close both dialog boxes.
Adding code for the While activity consists of both moving the logic from the Replicator Initialize and ChildInitialize handlers and changing the way the CallExternalActivity is retrieved from the context because of differences that arise from being accessed from a different handler.
Follow the next steps throughout this section to update the workflow code to work with the While activity instead of the Replicator activity.
1. Add a Code activity above the While activity and copy the code from the Replicator.Initialized handler shown next. (Only the code that creates and populates the array is included. The Replicator-specific code is omitted.)
// Populate the data used for each instance of the Replicator's
// child instance that are created
children = new ArrayList();
for (int num = 0; num < NumberOfApprovers; num++)
{
children.Add("Approver" + (num + 1));
}
2. Change the comments in the preceding step to reflect being used in the While activity.
3. Enter CallExtMethInvoked in the MethodInvoking property of the CallExternalMethod activity and add the following code to its handler (based off ReplicatorChild.Initialized handler):
// Extract the "correct" CallExternalMethodActivity
CallExternalMethodActivity act =
((CallExternalMethodActivity)sender)
as CallExternalMethodActivity;
act.ParameterBindings["approver"].Value =
children[counter].ToString();
counter = counter + 1;
The code in the MethodInvoking handler varies in that the CallExternalMethod activity is retrieved from the sender in contrast to e. The syntax in the MethodInvoking handler is now ((CallExternalMethodActivity)sender) in contrast to e.Activity.GetActivityByName("callExternalMethodActivity1", true) when working with the Replicator activity. This is a manifest of the environment available in each of the activity handlers. In the end, it shows how to get the current activity context from e and sender.
4. Run the workflow and it should operate identically to the Replicator-powered solution you just ran.
So far, we have improved on previous hours because the number of approvers is no longer hard-coded at design time. At the same time, we have regressed because we must process our approvals in a serial, which frequently runs counter to real-world demands. Changing the Replicator to support parallel approval requires changing its ExecutionType property from Sequence to Parallel. The combo box is already on the form to pass the correct value to the Replicator. That is an important distinction—the ExecutionType property may be updated at runtime, enabling one instance of a workflow to be processed sequentially and another instance in parallel. This property that controls sequential or parallel operation joins the number of approvers in being dynamic.
Follow the next steps to reconfigure the Parallel activity to process in parallel.
1. Set the enabled properties on the Code and While activities you added in the previous section to false and drag and drop the Sequence activity in the While activity back into the Replicator activity.
2. Set the enabled property on the Replicator activity to true.
3. Click the CallExternalMethod activity and remove the text in its MethodInvoking property.
4. Replace the current code that specifies that the Replicator should process sequentially in the Replicator.Initalized handler with the code shown to set the Replicator’s execution style at runtime to either sequential or parallel:
// Specify whether child instances should execute in serial or
parallel
if (ApprovalStyle == "Parallel")
replicatorActivity1.ExecutionType = ExecutionType.Parallel;
else
replicatorActivity1.ExecutionType = ExecutionType.Sequence;
5. Add the following code in the buttonCreateOrder method below the line that adds the number of approvers to the dictionary object, as shown:
parameters.Add("ApprovalStyle", comboBoxProcessingStyle.Text);
Follow the next steps to run the workflow with the newly configured Replicator activity.
1. Run the project, enter 3 approvers, select Parallel in the Process Approval combo box, and click the Create Order button (and click through all dialogs, because they are no longer useful as programmed when approving in parallel).
2. You should see all three approvers in the Queues text box as shown in Figure 9.6. This is because they are all active and awaiting response.

3. Enter Approver2 and press Enter (you can enter the approvers in any order).
4. You should now see only Approver 1 and 3 in the Queues text box.
5. Enter the remaining two approvers in any order.
6. Try running the form again and selecting sequential order; the approval should be processed one-by-one, as was the case in previous examples.
You now have a Replicator that can support n number of approvers and can carry out these approvals sequentially or in parallel. One other very useful property of the Replicator we have not used is the UntilCondition property. It can override the default behavior to complete when all children are done. A particularly useful scenario is to terminate a Replicator when over 50% of the votes have been received as approvals or rejections, because there is no need to continue processing. We will not use this property, but it should be considered as another useful Replicator property that makes it more useful than a standard While activity at times.
This hour covered the Replicator activity in detail. The Replicator is one of the most critical activities in conducting WF approval workflows and in showing the power of activities in general in WF. The While activity was also used for sequential, dynamic approval. You also used an alternative overload of the WorkflowRuntime.CreateWorkflow method to pass a Dictionary object to the workflow at startup. You are now well on your way to producing real-world approval workflows with WF. In the next hour you will learn how to change workflows midflight.