
• Understanding the Chart of Accounts
• Importing a Chart of Accounts
• Preferences That Affect the Chart of Accounts
• Accounts That QuickBooks Creates Automatically
• Methods to Troubleshoot and Correct Chart of Account Issues
• Chart of Accounts Chapter Checklist
The chart of accounts is a list of income and expense accounts to which you assign your daily transactions. This list is one of the most important lists you will use in QuickBooks; it helps you keep your financial information organized. If this list is created properly you can capture information in a timely manner that will help you make good financial and management decisions for the business.
Understanding the chart of accounts isn’t too complicated; there are simply six standard accounting categories: assets, liabilities, equity, income, cost of goods sold, and expense.
Assets include items you have purchased in the past that will be used in the future to generate economic benefit. QuickBooks offers these categories in the order of how fluid the asset is, or in simple terms how quickly you can turn the asset into cash:
• Bank—You use this account type to track your cash in and out of the business. This account type (in addition to the credit card account type) is the only account type that you can select as the payment account in the Pay Bills or Write Checks dialog.
• Accounts Receivable—This account type requires a Customer or Customer and Job name with each entry. You use this account type when generating an invoice or credit memo form or when receiving a customer payment. You can create more than one Accounts Receivable type account if you want.
• Other Current Asset—This account type is general in nature and includes the QuickBooks Inventory Asset as well as the Undeposited Funds account used for deposits “in transit.”
• Fixed Asset—This account type shows purchases of goods or materials that will be used by the business long term in generating revenue. Accumulated Depreciation totals are also held in this account type as a negative fixed asset.
• Other Assets—User-defined other asset accounts are created in this section.
Liabilities are the debt the company has yet to pay. QuickBooks includes these subgroupings:
• Current Liability—This is debt that is expected to be paid within one year. This grouping includes the QuickBooks Accounts Payable account plus any user-defined liability accounts.
• Credit Cards—Optionally, users can use this grouping to track the charges and payments made against a company credit card. One benefit is that you can reconcile this account like you do your bank account and download your credit card transactions directly into your data.
• Other Current Liability—This is debt that is expected to be paid within one year. This grouping includes the QuickBooks-created Payroll Liabilities and Sales Tax Payable, as well as other user-defined liability accounts.
• Long Term Liability—This is debt that will not be paid within one year.
The Equity account category holds the owner’s (or owners’) residual interest in the business after the liabilities are paid. Accounts for this section include Common Stock; Owner’s Equity; Retained Earnings; and Open Bal Equity, an account created by QuickBooks that is discussed in more detail in Chapter 13, “Reviewing and Correcting the Opening Balance Equity Account.”
Money that is earned after paying expenses is recorded as income. Your company might have one income account or several depending on the detail needed for your financial analysis. Other categories include Other Income, or income that is generated from the sale of a product or service not normal to your operations.
This account type is for costs that are directly related to producing a service or good for sale. There is a direct relationship between these costs and your revenue. If your company sells a product, your cost of goods sold (COGS) expenses would be the material and labor costs to make and sell the product. By contrast, your office expenses for rent or advertising are considered indirect and should not be posted to the Cost of Goods Sold account type.

When you are creating your Cost of Goods Sold accounts, consider using summary accounts such as material, labor, and subcontract and letting your Item List track more detail. For example, if you are a construction company and you have expenses for site work, concrete, framing, painting, and so on, rather than have a COGS account for each cost type use the Item List. Select Lists, Item List to open the Item List dialog. Click Item, New and create an item for each cost type, assigning the Cost of Goods Sold account. Reports by item are available to break down the total of Cost of Goods Sold account into more detail.
An expense is recorded when an asset is used or there is an outflow of cash. The expense accounts created during the EasyStep Interview will provide you with the basic classifications needed for properly tracking your expenses.
Additionally, while QuickBooks does not automatically create other groupings within the expenses category, a recommendation would be to group your expenses by fixed (or uncontrollable) and variable (or controllable). When you review your costs, these additional groupings will make easy work of determining which costs you have more control over.
You can also categorize expenses as an Other Expense, which is an expense that is not normal to your operations.
Are you familiar with Excel? Does your accountant have a preferred chart of accounts? Create the list in Excel with a few required fields. Then, import the list into your QuickBooks data file. Before performing any import, it is recommended that you make a backup of your data file. The import is not reversible!

When importing your chart of accounts from an Excel file format into a data file with an existing chart of accounts, you might encounter some import errors. However, the import tool provides a preview window that identifies whether any errors or duplications are expected with the import. If errors are detected in the import, QuickBooks gives you a dialog asking whether you want to save the error log file. A .csv log file is created that you can review for a line-by-line detail of the errors.
For accountants, the ability to import an existing chart of accounts from an Excel worksheet makes sharing a common chart of accounts with multiple clients easy.
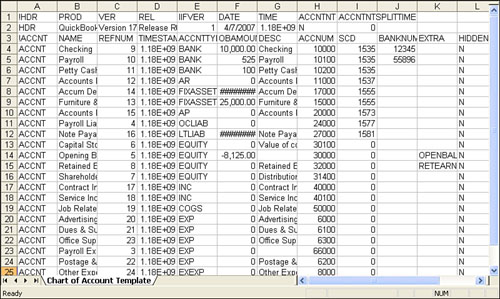
Create a spreadsheet in Excel, shown in Figure 2.1, with the following fields:
• Type—This field is required. It refers to account categories and subcategories in QuickBooks. The spelling must be exactly like the QuickBooks account type.
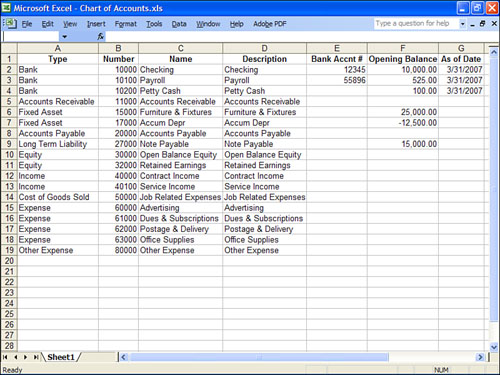
• Number—This field is optional and is the account number assigned in the Add New Account or Edit Account dialog. Using account numbers is optional in QuickBooks. See the section titled “Preferences That Affect the Chart of Accounts,” later in this chapter, for information about account numbering preferences.
• Name—This field is required. You can set default preferences in QuickBooks for including name only, description only, or name and description on reports.
• Description—This field is optional. You can set default preferences in QuickBooks for including name only, description only, or name and description on reports. For more information about the appearance of the description on reports, see Chapter 16, “Reporting Tips and Tricks.”
• Bank Account/Credit Card/Account Number—This field is optional and contains the account’s number assigned by its holding institution.
• Opening Balance—This field is optional. If you enter a balance in this field, QuickBooks will debit or credit the account, with the offset going to the Open Bal Equity account. If you do not enter any value, no transaction will be created.
QuickBooks will not import a balance for Accounts Receivable or Accounts Payable type accounts due primarily to the one customer, one vendor per journal entry limitation. In general, I do not recommend using the Opening Balance column for beginning balances unless the import is supervised by an accounting professional who can review the resulting information for accuracy.
• As of Date—This field is optional. This is the date assigned to the transaction created when a value is placed in the opening balance column. If no date is entered and an opening balance amount was recorded, QuickBooks will default the transaction date to today’s computer system date.
Other fields you can include are reminder to order checks, track reimbursed income, income account for reimbursed expenses, and an option to mark the account as inactive in QuickBooks.
To import the list you first must map the Excel column data to the appropriate QuickBooks data field.
From a new QuickBooks data file:
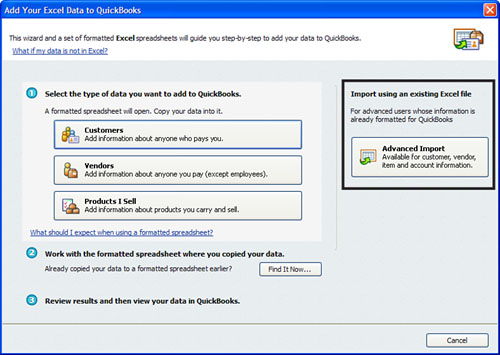
1. Click File, Utilities, and select Import, Excel Files. The Add Your Excel Data to QuickBooks dialog opens.
2. Select the Advanced Import button on the right, as shown in Figure 2.2.
Figure 2.2 New for QuickBooks 2008; the Add Your Excel Data to QuickBooks Wizard helps users import lists from Excel, including the Chart of Accounts.
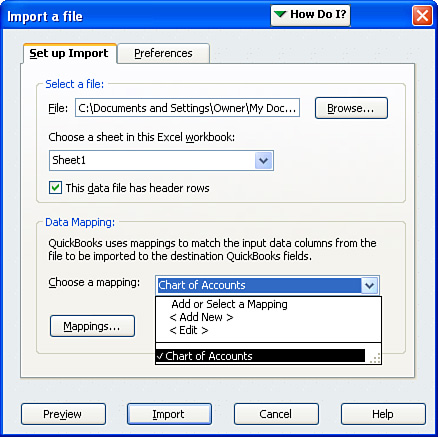
3. In the Import a File dialog, browse to the file location where you stored the Excel document.
4. Select the Excel workbook sheet that you want to import.
5. Indicate whether there is a header row by clicking the check box.
6. Choose a mapping. If this is your first mapping, click < Add New >. If you are editing a previously saved mapping, select < Edit >, or if you have stored a previously created mapping, the name you gave it will appear at the bottom of the drop-down list and you can select it here (see Figure 2.3). After selecting the mapping, a dialog opens allowing you to change how the imported data will be assigned in QuickBooks.
7. After the mapping dialog is open (see previous step) you will select the Import Type (Customers, Vendors, Items, or Accounts). QuickBooks will list on the left those fields in QuickBooks that you can populate with information from Excel. On the right side of the Mappings dialog you will see the column headers as you defined them in Excel. Select which column is assigned to which QuickBooks data field (see Figure 2.4).

8. Select the Preview item on the lower left of the Import a File dialog to review the data for any errors. Figure 2.5 shows the type name changed to Checking and the import tool reported it as an invalid account type.

Clicking the Preview button enables you to see whether the information will import correctly.
Using the correct types is critical to the success of the import. These types are Bank, Accounts Receivable, Other Current Asset, Fixed Asset, Other Asset, Accounts Payable, Credit Card, Other Current Liability, Long Term Liability, Cost of Goods Sold, Income, Other Income, Expense, and Other Expense.
If you do not include a type or you have an unrecognized type, QuickBooks will provide an error log from the Preview window. Refer to Figure 2.5, where the term Checking was put in the account type instead of the proper term Bank.
Importing from Excel can be an easy method to use when you want to use a chart of accounts list from your accountant or want the flexibility of creating it in the Excel program. However, there are other options that offer similar functionality, including the IIF format file.
The term Intuit Interchange Format (IIF) refers to data exchange functionality that has been around for quite some time. It is a method for exporting lists from one QuickBooks data file and importing these lists (not transactions) into a new QuickBooks data file. The process creates a comma-separated value format file with the extension of .iif. You can view and edit this file using Excel.
The most common use for this tool is to export lists from one QuickBooks data file to a new QuickBooks data file. The process is easy and relatively error free. Other uses for the tool include transaction imports. This book does not cover this topic; however, you can find more information about this utility by typing IIF in the search field at www.quickbooks.comsupport.
The IIF format is a preferred and easy method to use if you already have a QuickBooks data file with a chart of accounts (or other lists) that you want to duplicate.
The only disadvantage to working with an IIF format file is all the extra information that is in the worksheet, making it awkward to edit or add to the existing information.
Perform the following steps to export an IIF-formatted chart of accounts file from an existing QuickBooks file:
1. Click File, Open to open the QuickBooks file that has the chart of accounts (or other lists) that you want to export and duplicate in another file.
2. Click File, Utilities, select Export, Lists to IIF Files.
3. Select Chart of Accounts by clicking to place a check mark in the box, as shown in Figure 2.6.
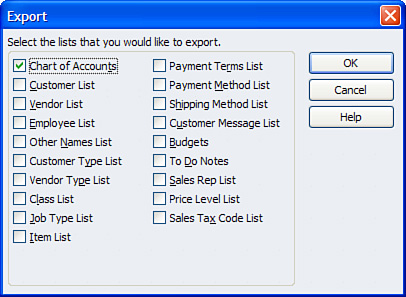
Creating individual IIF files for each of the master lists you want to export is preferred to creating one combined file. In other words, create one file for your Chart of Accounts separate from a file for Vendors or Customers. This way, if one list has trouble importing it won’t prevent the other lists from importing.
4. Click OK; you are prompted to save the file.
Figure 2.7 shows the exported QuickBooks chart of accounts in the IIF format in an Excel workbook. You can see that it is not as user friendly a format as the Excel import discussed previously.
The IIF file format is very sensitive to changes in rows and columns. I recommend not changing the order or width of rows and columns when editing or adding data. Additionally, the file has several header rows that cannot be removed if the import tool is to work correctly.
To import the saved IIF file into a new QuickBooks file, do the following:
1. Click File, Open to open the new QuickBooks file, preferably one that does not have a chart of accounts or other list types you are importing. (Importing into a file with an existing chart of accounts is possible. QuickBooks might not import an account if it detects a duplicate account already in the data file.)
If you have not already created your new file, click File, New and follow the prompts. (See Chapter 1, “Creating a New QuickBooks Data File,” for more information on using the EasyStep Interview to create a new QuickBooks data file.)
2. Click File, Utilities, and select Import, IIF Files.
3. The Import dialog opens, browse to the location of the stored IIF formatted file.
4. With your mouse pointer select the file and click on Open.
5. QuickBooks then imports the IIF formatted file into the QuickBooks data file.
Now that you have your new data file with new lists from another file you are ready to begin entering transactions. Just think of all the time you saved by not having to manually create each list item in the new file.
Using specific preferences, you can modify much of how the QuickBooks features work. Click Edit, Preferences, and select the Accounting preference. Next, click the Company Preferences tab (see Figure 2.8).

Here is a list of the preferences that affect the chart of accounts. They are all found in the Accounting preferences section.
• Use account numbers—Selecting this option turns on the data field that holds a numeric assignment for each chart of accounts. By default, this feature is not selected in a newly created QuickBooks file.
For accounts that had an account number assigned, not selecting the Use Account Numbers option does not remove the account number; it simply makes the field not visible. For you accountants, turn on the feature and assign your desired account numbers then turn the feature off when the file is returned to your client. When you review the file again, any accounts created since your last review will not have an account number, which makes locating them easy.
• Show lowest subaccount only—If you have created a subaccount listing under a main (parent) listing, any drop-down menu will show only the lowest subaccount level, preventing users from posting to the main account.
If you see a subaccount under a main account on a report called Other, it might be due to someone posting to the main (or parent) account rather than to the appropriate subaccount.
• Require accounts—By default, this feature is selected in a newly created QuickBooks file. If this feature is not selected, any transactions saved without an appropriate income or expense account will be posted to a QuickBooks automatically created uncategorized income or uncategorized expense account. This process follows the rule that there must always be a debit and credit side to each transaction. Fortunately, you do not have to know how to post a debit or credit because QuickBooks does this thinking for you with each transaction.
Account Numbering
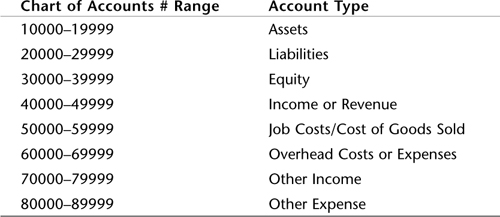
Beginning with QuickBooks 2007, the chart of accounts offers a new standard five-digit numbering system. Although account numbering is not required in QuickBooks, many accountants recommend that their clients assign account numbers to the chart of accounts list.
The standard chart of accounts number range that QuickBooks recommends is as follows:
Although you are given quite a bit of flexibility in creating the chart of accounts using a variety of methods, QuickBooks creates certain accounts that are hard-coded into the programming of the software, meaning you do not need to create them yourself.
A common mistake is to create these accounts, not recognizing that they were already created or will be created when the related form is chosen.
I usually recommend to my clients to accept the default chart of accounts because they can be modified at anytime. Even if you select None/Other during the EasyStep Interview when creating a chart of accounts, there are specific accounts in QuickBooks that are automatically created. These accounts are
• Payroll Liabilities (Other Current Liability)
• Capital Stock (Equity)
• Opening Bal Equity (Equity)
• Retained Earnings (Equity)
• Shareholder Distributions (Equity)
• Payroll Expenses (Expense)
Additionally, if you selected None/Other during the EasyStep Interview when presented with a list of industry-specific chart of accounts, QuickBooks creates the following accounts only when the associated form or transaction is used or a related preference is selected:
• Inventory Asset (Asset)—(Inventory item created)
• Accounts Receivable (Asset)—(Invoice form opened)
• Sales Tax Payable (Liability)—(Sales Tax preference enabled)
• Accounts Payable (Liability)—(Vendor bill form opened)
• Purchase Orders (Non-Posting)—(Purchase Order form opened)
• Estimates (Non-Posting)—(Estimate form opened)
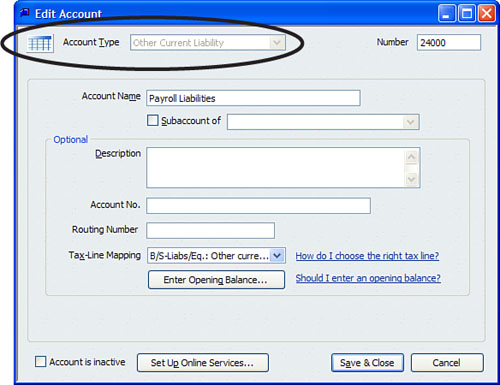
To determine whether an account was created by QuickBooks, simply edit the account in question; if the Account Type field is not active (grayed out), then this account was automatically created by QuickBooks (see Figure 2.9).
When searching for reasons why your financial statements do not appear correct, the first place to look is often the chart of accounts. It is also important to carefully consider the impact of the change on your financials and make sure you choose the right method for correction.
There are many ways to resolve errors found on the chart of accounts. However, before attempting any of the suggested methods here you should consider the following:
• The effect the change could have on prior-period financials
• The effect the change could have on previously recorded transactions
• The impact the changes would have on the records your accountant has kept for the company
A quick review of the chart of accounts should include
• Duplicated accounts
• Unnecessary accounts (too much detail)
• Accounts placed in the wrong account type category
• Misplaced subaccounts
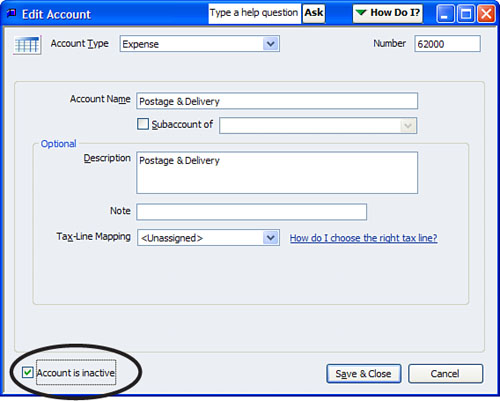
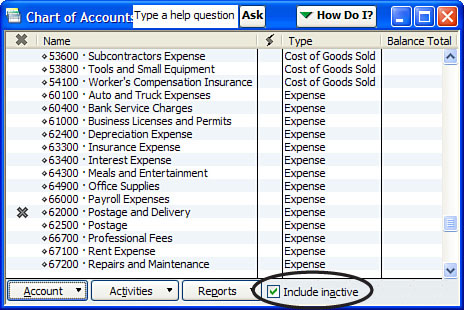
Marking an account inactive is usually the best choice when you have duplicate or extra list items on your chart of accounts (see Figure 2.10). Making an account inactive removes it from any drop-down list on any forms. However, for reporting periods where the account has a value, any reports generated for this time period will include the inactive account balance.
Figure 2.10 Select the Account Is Inactive check box to remove the list item from any drop-down menus.
In earlier versions of QuickBooks you might have accounts that have an asterisk (*) in front of the name to indicate a duplicate account name. This situation usually only happens when you did not select to use one of the sample charts of accounts. QuickBooks has certain accounts that it creates automatically. For example, if you did not select a sample default chart of accounts and created your own Accounts Receivable chart of accounts, then later when you opened a customer invoice form, QuickBooks created the Accounts Receivable account but recognized that one existed with the same name. You should merge your created account (the one without the *) into the QuickBooks-created account. See the later section titled, “Merging Duplicated Accounts,” for instructions on how to merge two like accounts.
Need to mark several accounts as inactive? Simply select the Include Inactive check box at the bottom of the Chart of Accounts list (after at least one account is inactive) as shown in Figure 2.11. You can mark any list item you want to become inactive by clicking in front of the list item name.
Another method to remove duplicated accounts is to merge the similar accounts. To perform a chart of accounts merge, both accounts must be in the same chart of accounts category; in other words, you cannot merge an Asset with a Liability account.
Before merging accounts be sure to perform a backup of your data, just in case the result is not what you expected. When the accounts are merged, all transactions previously assigned to the removed account will now appear as if they were always assigned to the remaining account.
This method potentially changes your financials and should be cautiously performed only after discussing the effect with the company’s accountant and after making a backup of the data file.
To merge two accounts, do the following:
1. Click Lists, Chart of Accounts, highlight the account you want to remove with the merge. With the account highlighted press Ctrl+E on your keyboard to open the Edit Account dialog.
2. If you are using account numbering, replace the account number with the account number for the account you want to retain. (If you are not using account numbering, you can simply type the exact spelling of the name of the other account you are merging this one into.)
QuickBooks cautions you that the name is already being used and asks whether you want to continue (see Figure 2.12).
3. Click Yes.
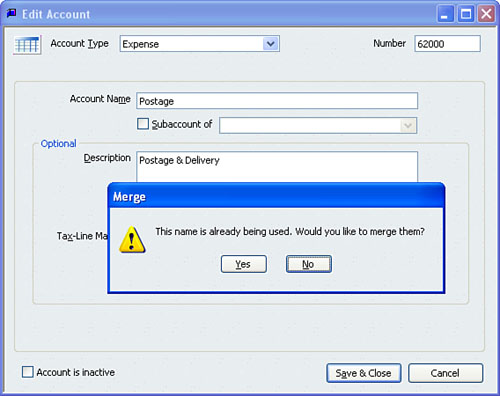
Chart of accounts, customers, jobs, vendors, and other names lists can all be merged within their own type or category. Be careful—there is no undo function, making the action irreversible.
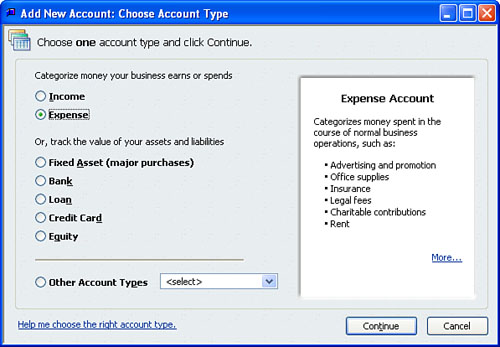
The mistake most often made when creating your own chart of accounts is assigning the wrong account type. QuickBooks provides additional subcategories under the six standard accounting types, as identified in the “Understanding the Chart of Accounts” section at the beginning of this chapter.
The Add New Chart of Account entry dialog, shown in Figure 2.13, reduces errors that occur when creating a new chart of accounts. When creating a new account you select an account type and QuickBooks provides a description of what a typical transaction would be for this type. In prior versions of the software, the default type was a Bank Account and users would mistakenly create their accounts as if they were bank accounts.
Again, exercise caution before changing an account type. The change will affect any prior-period financials. If this consequence is a limitation for your company, a simple solution would be to create a general journal to remove the amount from one account and assign it to another. This method preserves the integrity of prior-period financials. Also, the always on audit trail in QuickBooks does not track that a change was made to an account type. (See Chapter 5, “Power Reports for Correcting Beginning Balance Differences,” for more information on the Audit Trail report.)
Merging accounts can also be advantageous when you want to fix future transactions as well as prior-period transactions. For example, suppose you created a Current Asset account type instead of the correct Expense account type. Simply changing the account type via the Edit Account dialog box (see following steps) corrects all prior period and future transactions to be assigned to the new account type.
Any changes to account types as well as merging accounts are not captured by the “always on” audit trail.
To change an account type, follow these steps:
1. Click Lists, Chart of Accounts (or press Ctrl+A). The Chart of Accounts dialog list appears.
2. Select the account for which you want to change the type.
3. Click the Account drop-down menu at the bottom of the list. Select Edit Account (or press Ctrl+E to open the account for editing). The Edit Account dialog box appears.
4. Click the drop-down arrow next to Account Type (see Figure 2.14) and choose a new account type from the list.

5. Click Save & Close.
Not all account types can be changed. Accounts Receivable, Accounts Payable, Credit Cards (with online access configured), and of course any of the default accounts created by QuickBooks cannot be changed to a different type. In addition, for any bank account that the account type is changed QuickBooks will warn that you can no longer enter transactions directly into the register.
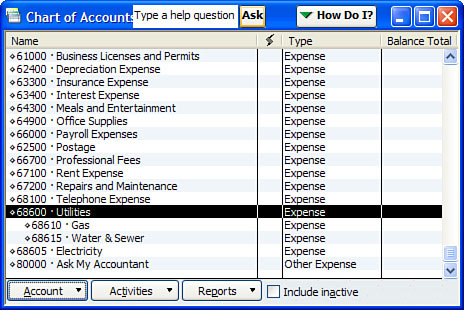
Often in accounting reports you have specific accounts for which you want to see a more detailed breakdown of the costs. You can get this breakdown easily by creating the main account and associating subaccounts with the main account.
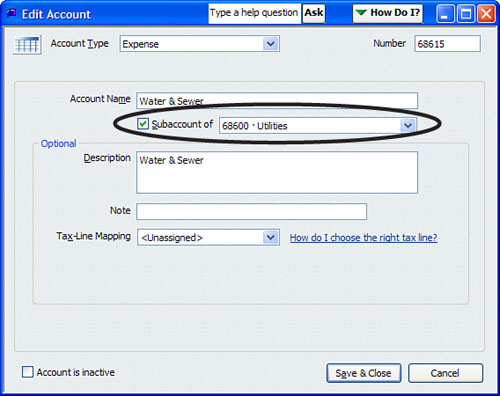
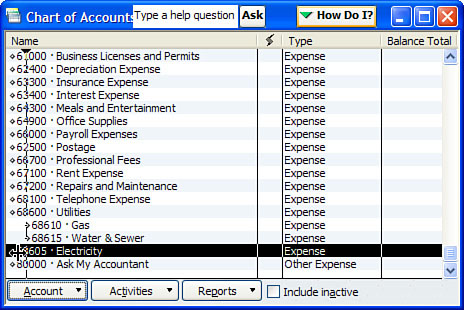
Figure 2.15 shows Utilities as a main account with an indented subaccount for each type of utility expense. To create an account as a subaccount:
1. Click Lists, Chart of Accounts (or press Ctrl+A). The Chart of Accounts list appears.
2. Select the account for which you want to add a subaccount or edit the subaccount.
3. Click the Account drop-down menu at the bottom of the list. Select Edit Account (or press Ctrl+E to open the account for editing). The Edit Account dialog box appears.
4. Place a check mark in the Subaccount of box.
5. Click Save & Close.
Users can only assign a subaccount that is in the same general account type. For example, an Expense type cannot be a subaccount of a Current Asset type account (see Figure 2.16).
If you need to change the subaccount to another General Ledger account type, first deselect the Subaccount Of check box. Click Save & Close to save the change. Then edit the account and change the type. You cannot change subaccount types when they are associated with a main account.
You can also change account relationships directly on the Chart of Accounts list:
1. To remove or add a subaccount directly from the list, place your mouse pointer over the diamond in front of the list item (see Figure 2.17). The cursor changes to indicate that you can drag the item.

2. Drag the diamond to the right and up under the main account (but it must be in same account category) to create a subaccount relationship (see Figure 2.18).
The Chart of Account list shows the corrected relationship (see Figure 2.19).

Financial reporting is more accurate when you take the time to review and correct your chart of accounts setup. Often you can manage the information better when you group similar income or expense accounts using the subaccount feature.
So whatever you choose to do, QuickBooks makes it convenient and easy to make the changes necessary to improve the quality of your financial reports.

Before creating or modifying a chart of accounts list, you should consider the following.
About the chart of accounts:
• Understanding the different types of accounts. (Page 38)
• Creating a new data file. (See Chapter 1)
• Modifying or adding to an existing chart of accounts. (Pages 55 and 14)
• Importing a preferred chart of accounts from your accountant. (Page 40)
• Importing a chart of accounts from another QuickBooks data file. (Page 46)
• Setting chart of account preferences. (Page 48)
• Enabling chart of account numbering in QuickBooks. (Page 49)
• QuickBooks required chart of accounts created automatically. (Page 50)
Troubleshooting and correcting the chart of accounts:
• What method is appropriate for your business? (Page 51)
• Making accounts inactive. (Page 52)
• Merging duplicated accounts. (Page 53)
• Chart of account list item with an “*” in the name. (Page 53)
• Correcting the chart of account type. (Page 55)
• Audit trail report and changes to chart of accounts. (Page 56)
• Assigning or removing subaccounts from specific accounts. (Page 57)