
• How Can These Power Reports Help Me?
• The Working Trial Balance Window
• Tracking Changes to Closed Accounting Periods
• Using the Audit Trail Report
• Using the Credit Card Audit Trail
• Using the Voided/Deleted Transactions Summary or Detail Report
• Creating the Retained Earnings QuickReport
• Using the Ctrl+Y Keyboard Shortcut
• Running the Transaction List by Date Report
• Documenting Changes Made to a Data File
In Chapter 4, “Easily Review Your QuickBooks Data,” a series of reports were provided that are useful for reviewing your business data file or, for accounting professionals, your client’s data.
This chapter goes over some specific reports (I like to call them “power reports”) that offer a quick way to get behind the numbers and identify just what might be causing issues, particularly with opening balance differences.

What exactly do I mean by “opening balance differences”? This term often means that the numbers you gave your accountant for the prior year have changed, or that when you attempt to reconcile a new month’s bank statement the beginning balance does not agree with the last month’s ending balance.
These reports include
• The Working Trial Balance window
• Closing Date Exception report
• Audit Trail report
• Voided/deleted transactions report
• Retained Earnings QuickReport
• Ctrl+Y keyboard shortcut (Journal Transaction report)
• Transaction List by Date report
For the business owner or accounting professional, these reports can help pinpoint exactly what might have changed with the balances since the last review of the data.
Did you know that you can prevent changes to prior accounting periods by setting a closing date and optional password? To learn more about this feature, see Chapter 15, “Sharing Data with Your Accountant or Your Client.” You also can troubleshoot other types of bank reconciliation issues using the information in Chapter 6, “Bank Account Balance or Reconciliation Errors.”
The choices of reports QuickBooks offers you vary depending on the QuickBooks edition and year’s version you are working with. Several of the reports discussed in this chapter were made available in the last few years, so if your file does not offer them, you might want to compare your version of QuickBooks to newer versions to see what other improvements besides the reports you are missing out on. To do so, go to www.quickbooks.com and select What’s New for 2008 from the left.
The instructions given in this chapter are specific to the QuickBooks: Premier Accountant Edition; you might find some differences in the menus for QuickBooks Simple Start, Pro, Premiere, and Enterprise.
One of the most useful tools for accounting professionals is the Working Trial Balance window. In it you have the same information accessible in reports, but it offers so much more flexibility in creating new adjusting transactions and previewing the resulting effect on the client’s financials from your changes.
This tool is available only in the QuickBooks: Premier Accountant Edition and the QuickBooks Enterprise Accountant Edition.
To open the Working Trial Balance window, shown in Figure 5.1:
1. Click Accountant, Working Trial Balance.
2. From the Selected Period drop-down menu identify the accounting period you want to review.
3. From the Basis drop-down menu select Accrual or Cash.
Figure 5.1 The Working Trial Balance window offers the features of reports with real-time convenience in editing or modifying transactions.

You now have easy access to the following:
• Beginning Balance—This represents the calculated balances as of the day before the From date selected in this window. In Figure 5.1 the beginning balance date would be 9/30/06.
• Transactions—These represent the transactions that are recorded to the specific account during the date range selected. Simply place your cursor over these numbers and double-click to see the detail behind the numbers.
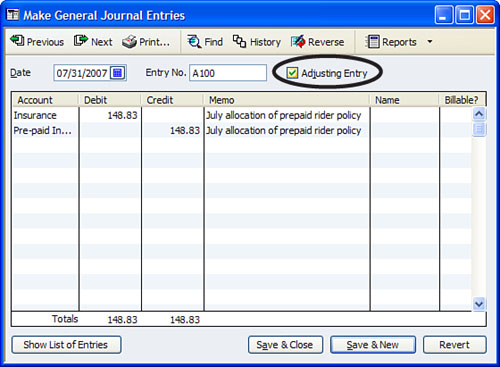
• Adjustments—These represent journal entry transactions that are marked as Adjusting Entry (see Figure 5.2).
• Ending Balance—This represents the final balance after transactions and adjustments. In Figure 5.1 the ending balance is as of 9/30/07.
• Workpaper Reference—You use this field to record any notes regarding the line detail.
• Make Adjustments—Clicking this button opens a Make General Journal Entries dialog with Adjusting Entry preselected, as shown in Figure 5.2.
You can then print the Working Trial Balance window by clicking Print. Other options include selecting to see only accounts with non-zero balances.
As you make changes to transactions, the QuickBooks Working Trial Balance window immediately reflects the net change to Income or (Loss) for the period being reviewed.
If after your review of a data file you have found differences from the prior period ending balances, you can use any or all of the additional power reports that are detailed in this chapter to research and review what transactions were added, modified, voided, or deleted from the prior accounting period causing the difference. Use the details provided by the reports to re-create the transactions or make adjusting entries to balance the books to the prior period.
QuickBooks offers real flexibility for companies that want to protect prior period data and those that need or want to make changes to prior period accounting records. What exactly is a “closed” accounting period? Well, a business can decide to close a month when tasks such as a bank reconciliation is done or a sales tax return is filed, or a business can simply close once a year when the data is provided to the accountant for tax preparation. Because QuickBooks does not require you to close the books, it really is a decision of the business owner, perhaps based on the advice of your accounting professional (see Chapter 15).
The option of setting a closing date and password makes it easy to protect prior period transactions from unwanted modifications. With additional user-specific security settings, the business owner and accountant can also manage who has the privilege to make changes to transactions dated on or before a specific closing date.
The Closing Date option is available in QuickBooks Pro, Premier (all editions), and Enterprise (all editions). The Closing Date Exception report is available with the QuickBooks: Premier Accountant Edition and all versions of the QuickBooks Enterprise edition.
The first step in controlling changes to closed accounting periods is to set a closing date, and optionally a closing date password that the user must provide when adding or modifying a transaction dated on or before the closing date.
The second step is to set user-specific security settings that give the selected user permission to change a transaction dated on or before the closing date.
With these controls in place, QuickBooks will gather information for the Closing Date Exception report.
You must set a closing date and optionally a password if you want to track changes made to transactions dated on or before the closing date. When a closing date is not set, QuickBooks will not track the changes.
To set the closing date and optionally a password (different from the Admin password), follow these steps after first logging in to the data file as the Admin user:
1. Click Company, Set Closing Date to open the Accounting, Company Preferences dialog.
2. Click the Set Date/Password button. The Set Closing Date and Password dialog appears.
3. Enter a closing date and optional password. You might want to discuss this date with your accountant first.
4. Click OK to accept the closing date and optional password.
Setting a closing date was only step one. Next you must set user-specific privileges for users you want to allow access to adding or modifying a transaction dated on or before the closing date.
To be certain that the closing date control is managed properly, review all users for their specific rights to change transactions prior to a closing date. To view the following menu you will need to log in to the file as the Admin user:
1. Click Company, Set Up Users and Passwords and select the option to Set Up Users. The User List dialog opens.
2. To view a user’s existing security privileges from the User List dialog, select the user with your cursor and click the View User button. You will be able to view in summary form the security settings for that user, as shown in Figure 5.3.
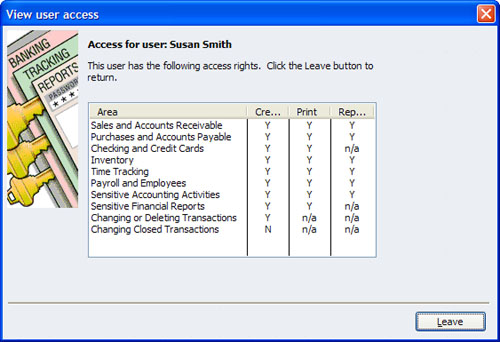
3. Any user who should not have rights to changing closed period transactions should have an “N” placed in the last setting, Changing Closed Transactions (see Figure 5.3).
4. If after reviewing a user’s existing security privileges, you need to edit the setting referenced earlier, click Leave to close the View User Access dialog.
5. QuickBooks returns you to the User List dialog. Select the username and click the Edit User button.
6. On the Change User Password and Access dialog optionally modify the user name or password. Click Next to continue.
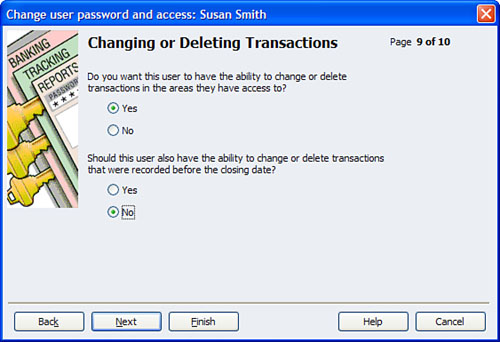
7. The User Access dialog for the specific user appears. Select Selected Areas and click Next to continue through each of the security selections until you reach the selection on Page 9, as shown in Figure 5.4.
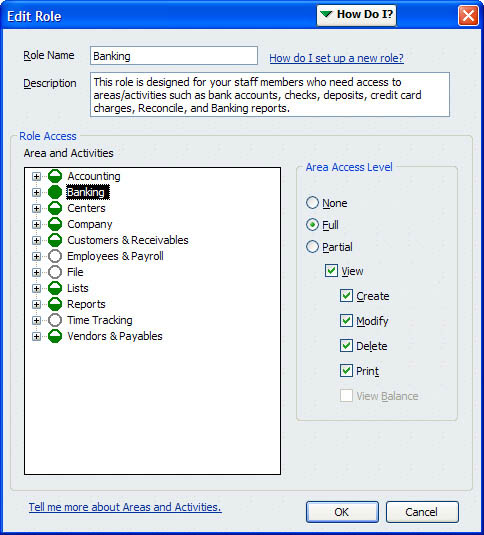
If after setting the user security levels in QuickBooks you want to have more levels of restriction, such as allowing users to access certain bank accounts but not others, you might want to consider the QuickBooks Enterprise product that offers more sophisticated security levels as represented in Figure 5.5.
Having set a closing date and optional closing date password and defined which users are allowed to add or modify transactions dated on or before the closing date, QuickBooks is now gathering information for the Closing Date Exception report.
To have QuickBooks track information for the Closing Date Exception report you first had to set a closing date and optionally set specific users access to adding or modifying transactions on or before this date.
If you have compared your or your clients’ data to prior year financials or tax returns, and the ending balances for the “closed” period have changed and you set a closing date for the file, you will want to view the Closing Date Exception report to see exactly who made the change and what specific transaction(s) were added or modified.

Exceptions, additions, and changes are not tracked during the time period that a closing date was not set.
To create the Closing Date Exception report, shown in Figure 5.6, click Reports, Accountant & Taxes and choose the Closing Date Exception Report.
Figure 5.6 Review the Closing Date Exception report for changes made to transactions dated on or before a closing date.

This report allows you to identify changes that were made to transactions dated on or before the closing date. For modified transactions, the report will detail both the latest version of a transaction and the prior version (as of the closing date). With privileges to change closed period transactions, you can then re-create the original transaction or change the date of added transactions so that you can once again agree with the ending balance from the previously closed period.
The Audit Trail report provides details of additions and changes made to transactions, grouping the changes by username. The detail on this report shows the prior as well as the latest version of the transaction, if it was edited. You can filter the report to show a specific date range to narrow the amount of detail.
The Audit Trail report is available in QuickBooks Simple Start, Pro, Premier (all industry editions) and Enterprise (all industry editions). Further, ever since QuickBooks 2006, the Audit Trail feature is permanently enabled and the report cannot be “purged” of the detail.
To create the Audit Trail report shown in Figure 5.7 click Reports, Accountant & Taxes and select the Audit Trail report.
Figure 5.7 The QuickBooks Audit Trail report helps to identify what changes were made to transactions and by which user.
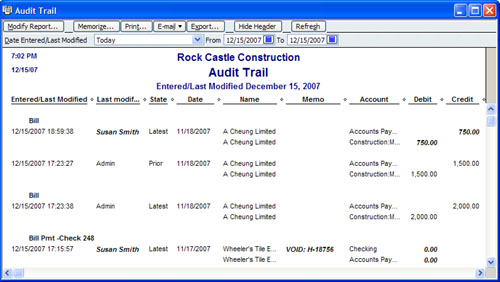
The report can be lengthy to review; however, if as a business owner or accountant you are trying to track down specific user activity with transactions, this can be a useful report to review because the changes are grouped by username.
If you find undesired transaction changes, consider setting a closing date password and setting specific user security privileges as detailed earlier in this chapter.
New for QuickBooks 2008 is added security surrounding the critical activity of maintaining a record of your customer’s confidential credit card information. QuickBooks users can now stay in compliance with credit card industry security requirements by enabling security around who can view, add, or edit your customer’s credit card numbers.
Additionally, when enabled, you can track which user viewed, edited, added, or removed a customer’s credit card number with the new Credit Card Audit Trail report, as shown in Figure 5.10.
There are three basic steps to using this new feature correctly:
1. Enable the customer credit card protection feature.
2. Select which users are given security rights to view the credit card numbers and which users are not given this privilege.
3. View the new Credit Card Audit Trail report to track viewing, editing, adding, and deleting activity with your customer’s credit cards.
The first step to viewing details on the Credit Card Audit Trail report is to enable Customer Credit Card Protection in QuickBooks. (Note: These instructions are provided for the QuickBooks Premier Edition; QuickBooks Enterprise Set Up Users dialog will differ.)
1. Log in to the data file as the Admin user and click Company, Customer Credit Card Protection to open the Enable QuickBooks Customer Credit Card Protection dialog.
2. Click the Enable button to open the Customer Credit Card Protection Setup dialog as shown in Figure 5.8. Type a complex password. The new complex password must be seven characters, including one number and one uppercase character. For example, this is a complex password: coMp1ex. This is now the password that is required when the Admin user logs in.
Figure 5.8 New for QuickBooks 2008, protect the confidentiality of your customer’s credit card numbers.
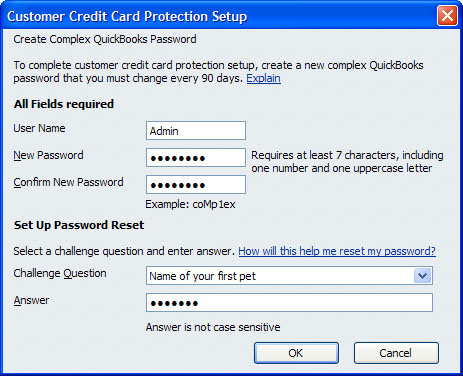
3. You are also required to choose a challenge question from the drop-down menu and provide an answer to that question. This question will be used to reset your password if you forget it. Click OK.
4. A message dialog opens letting you know that you will be reminded in 90 days to change the password. Click OK.
5. QuickBooks notifies you that you have enabled Customer Credit Card Protection and details how to allow access by user to the credit card numbers (see step 6). Click OK. You are now returned to QuickBooks logged in as the Admin user.
6. To select which employees have access to view the full credit card numbers, add, or change customer credit card numbers click Company, Set Up Users and Passwords and select the Set Up Users option.
7. The QuickBooks login dialog opens and requires you to enter the Admin password to gain access to user security settings. Click OK to open the User List dialog.
8. Select a username and click the Edit button. Optionally, edit the username or password, or click Next to accept these fields as they are.
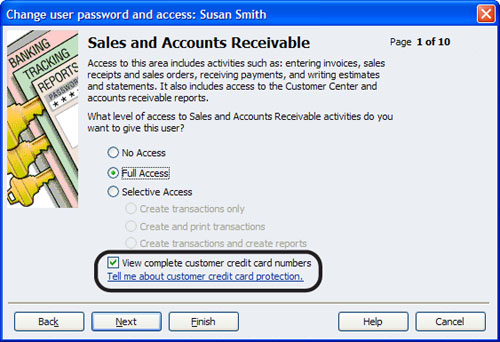
9. The Access window for the specific user opens. Choose the Selected Areas of QuickBooks option. Click Next.
10. The Sales and Accounts Receivable access options are displayed. Choose either Full Access or Selective Access; either of these choices combined with a check mark in the View complete credit card numbers (as shown in Figure 5.9) will allow the user to view and add, delete, or modify the credit card number. Or if no check mark is placed the user will see only the last four digits of the customer’s credit card when recording transactions that use this sensitive information.
11. Click Finish if this is the only setting you wanted to modify or click Next through additional security setting dialogs. Click Finish when completed. You are returned to the User List dialog. Click Close to close the User List dialog.
You have now properly enabled the customer credit card protection and granted or removed user access to these confidential credit card numbers.
With this feature enabled, your data file is now tracking critical user activity about your customer’s credit card numbers. Track when credit card security was enabled, when a user entered a credit card number, modified a credit card, or even viewed the credit card audit trail report (see Figure 5.10).
Figure 5.10 The new Customer Credit Card Audit Trail report cannot be modified, filtered, or purged.
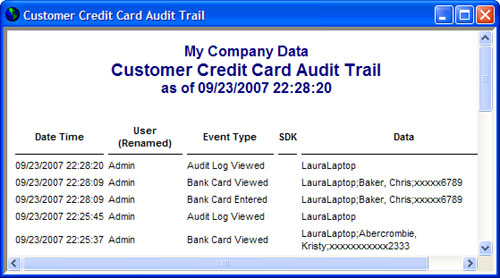
This Customer Credit Card Audit Trail report is always tracking customer credit card activity as long as the feature remains enabled. The report cannot be filtered or modified in any way.
If you want to disable this setting, you must first log in to the data file as the Admin user, enter the complex password that was created when you enabled the protection, and click Company, Customer Credit Card Protection and click the Disable Protection button. Click Yes to accept that your customer’s credit card number viewing, editing, and deleting activity by users is no longer being tracked for audit purposes.
QuickBooks offers tremendous flexibility for handling changes to transactions. If you have granted users rights to create transactions, they will also have rights to void and delete transactions. Don’t worry: You can view these voided transaction changes in the Voided/Deleted Transactions Summary (see Figure 5.11) or Voided/Deleted Transactions Detail reports.
Figure 5.11 The QuickBooks Voided/Deleted Transactions Summary report quickly identifies which transactions were either voided or deleted, making troubleshooting so much easier!
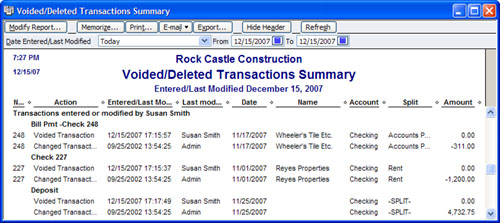
To create the Voided/Deleted Transactions Summary report, click Reports, Accountant & Taxes and select the Voided/Deleted Transactions Summary or Detail report.
Use this report to view transactions prior to and after the change, and to identify which user made the change. After viewing this information, you might want to set additional user restrictions in security as discussed in the section of this chapter titled “Setting User-Specific Security.”
Users familiar with QuickBooks will know just how useful QuickReports can be. They can be created for many types of information, but one of the most useful, especially for accounting professionals, is the QuickReport that can be created for details in the Retained Earnings account.
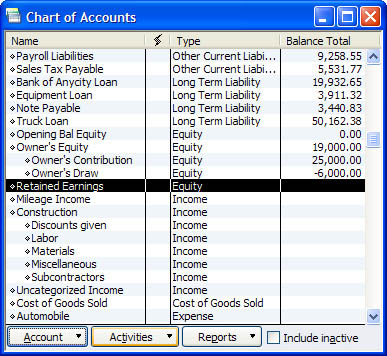
To describe the QuickReport for the Retained Earnings account, you first must know that all Balance Sheet accounts have a QuickBooks register. Registers are available for nearly all Balance Sheet accounts. One method to access a register is to click Lists, Chart of Accounts and simply-double click any of the Balance Sheet accounts.
The registers make it easy to view a specific account’s transactions without creating a report. You don’t typically work in registers but on occasion you might want to review the details found there.
The exception is the Retained Earnings account, a Balance Sheet account that does not have a register. The Retained Earnings account is where QuickBooks “closes” Net Income or (Loss) each year. Users do not have to manually do this entry; in fact, QuickBooks recalculates it each time you create a Balance Sheet report.
Typically, you never should be posting any transactions to this account, except when you close the Open Bal Equity account (another account that QuickBooks created automatically) into the Retained Earnings account. This usually is done only when you first begin using QuickBooks for a business with historical transactions.
For more information on these accounts see Chapter 2, “Reviewing the QuickBooks Chart of Accounts” and also Chapter 13, “Reviewing and Correcting the Opening Balance Equity Account.”
To create a Retained Earnings QuickReport, follow these steps:
1. Click Lists, Chart of Accounts to open the Chart of Accounts list.
2. Double-click the Retained Earnings account, as shown in Figure 5.12.
Figure 5.12 Create the Retained Earnings Account QuickReport by double-clicking the Retained Earnings account list item.
QuickBooks creates the Retained Earnings Account QuickReport, as shown in Figure 5.13.
Figure 5.13 The Retained Earnings Account QuickReport helps you troubleshoot changes to prior period financials.
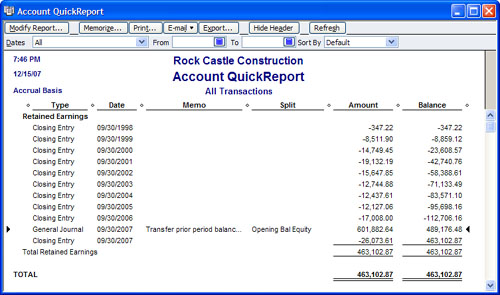
The Closing Entry type entries shown in Figure 5.13 are those done automatically by QuickBooks; they are recalculated each and every time you generate the report.
Any other transaction types are user entered and as with other reports in QuickBooks, you can double-click on a user-created transaction and “drill down” to the original transaction.
Did you know that you can set a preference to warn users if they try to record a transaction to the Retained Earnings account?
Click Edit, Preferences and select the Accounting preference on the left. Click the Company Preference tab (if you are logged in as the Admin user) and place a check mark in the Warn When Posting a Transaction to Retained Earnings check box. Users then receive the message shown in Figure 5.14.

The Ctrl+Y keyboard shortcut is one of the best-kept QuickBooks reporting secrets, yet it is especially useful for accounting professionals.
QuickBooks users do not have to be concerned with understanding debit and credit accounting. QuickBooks does all of this behind the scenes. However, be assured that every transaction in QuickBooks creates a debit and credit transaction.
For accounting professionals, seeing the actual resulting debit and credit effect of a transaction can be useful. To do so, follow these steps:
1. Open any transaction. The example shown in Figure 5.15 is a vendor bill.
Figure 5.15 With a vendor bill or any other type of transaction open, press Ctrl+Y to create a Transaction Journal report for that transaction.
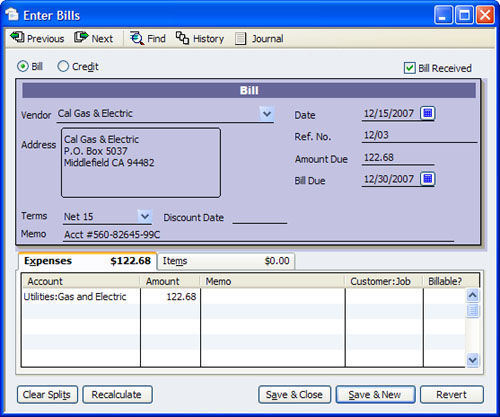
2. On your computer keyboard press Ctrl+Y.
QuickBooks creates a Transaction Journal report on the specific transaction that was open as shown in Figure 5.16.
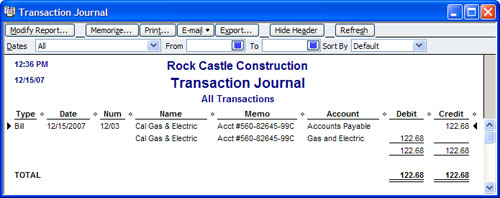
The Accountant Edition of QuickBooks will open the Transaction Journal report and will show the line totals in debit and credit format. Other editions of QuickBooks will open the same report but will not show the totals in debit and credit format. If you want to see the report totals in debit and credit format, click Modify Report on the report and select the columns for debit and credit.
Although the title of Transaction List by Date report seems to not indicate as much “power” as the other reports discussed in this chapter, I use this report most often when reviewing a data file.
If you are new to QuickBooks, you will soon learn that the date you give your transactions is very important. The year you assign to the transaction is the year that QuickBooks will report the transaction in your financials. If you record a transaction with a date error—for example, you wanted to create a 2003-dated transaction but in error typed 2030—this date would cause your financials not to show the effect until year 2030!
Follow these steps to create the Transaction List by Date report, shown in Figure 5.17:
1. Click Reports, Accountant & Taxes and select the Transaction List by Date report.
2. From the Dates drop-down menu select All dates.
Figure 5.17 The QuickBooks Transaction List by Date report can be used to identify whether any incorrectly dated transactions exist.

You can use this report to see both the oldest dated transaction (when the file was started) and the furthest dated transaction (to identify whether date errors have been made). Then, as with all other QuickBooks reports, simply double-click a specific transaction to change the date if needed.
Fortunately, QuickBooks preferences help avoid transaction dating errors by allowing you to set warning date ranges.
To open the date warning preference:
1. Log in to the QuickBooks data file as the Admin user.
2. Click Edit, Preferences. In the Preferences dialog that appears, choose the Accounting preference on the left.
3. Click the Company Preferences tab.
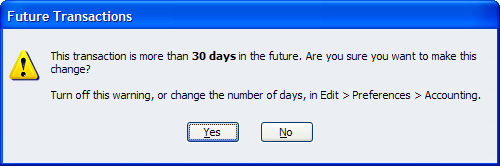
4. Type in the user-defined date warning range you want to work with in the past and in the future. QuickBooks sets the default warnings at 90 days in the past and 30 days in the future. An attempt to enter transactions dated before or after this date range prompts QuickBooks to give the user a warning message, as shown in Figure 5.18.
Figure 5.18 Set the Date Warning preference so that users will be warned when dating a transaction outside an acceptable date range.
If you are using an older version of QuickBooks (prior to 2007) you might not have this important preference option.
Be cautious when making changes to the dates, especially if the year in question has already had a tax return prepared on the existing information.
For accounting professionals, documenting changes made to a client’s data file is very important.
QuickBooks makes this documentation easy if you put a few controls in place and use the power reports I have talked about in this chapter.
One method is to make sure that as an accounting professional you have created a QuickBooks user name specifically for your work.
To create a user for yourself as the accounting professional, follow the same steps that were detailed in the section of this chapter titled “Setting Up User-Specific Security.” The only change to the setup might be in step 7. Choose Selected Areas of QuickBooks if you want to set access rights for specific areas of QuickBooks. Click Next to navigate through the various modules for setting specific access rights.
Alternatively, choose All Areas of QuickBooks to give the user access rights similar to those of the Admin user, including adding or modifying transactions dated on or before a closing date. When you choose this option, QuickBooks provides a warning message that this user will have full access to sensitive information; click Yes or No to indicate acceptance or rejection of granting all rights.
Now that you have created a user name specific for your accounting professional, make sure he or she logs in with this user name. To log in to the data file:
1. Click File, Close Company/Logoff. The No Company Open dialog appears.
2. Select the data file and click the Open button. The QuickBooks Login window appears.
3. Enter your User Name and Password (if one was set).
All transactions added or modified will now record to this logged-in user. Creating a unique user name for the accounting professional is very important because you will create reports that are sorted by the user name assigned to the transaction.
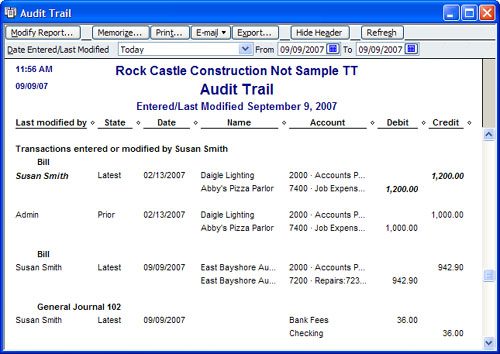
Create an Audit Trail report as detailed earlier in this chapter. The default date range is set to Today. Scroll through the report until you see the transaction additions or modifications assigned to your user name; see the example in Figure 5.19.
The chapters so far in this QuickBooks Solutions Guide have prepared you with basic instructions for tools that you can use to make your review of your data efficient. You are now ready to dig into some more detailed reviews of specific accounts in QuickBooks!