
• Accounts Payable Forms and Workflow
• Preferences That Affect Accounts Payable
• Reports to Review When Troubleshooting Accounts Payable Errors
• Correcting Accounts Payable Errors
• Unique Accounts Payable Transactions
Similar to the flexibility found in the QuickBooks accounts receivable tasks in Chapter 7, “Reviewing and Correcting Accounts Receivable Errors,” you also have choices in how to manage your company’s purchasing workflow. Your company can choose to use the purchase order form for controlling and monitoring costs, or you can simply create a bill and later pay the bill.
If you created your data file using the QuickBooks EasyStep Interview, QuickBooks enabled all or some of the features discussed in this chapter, depending on your answers to a few questions.
If you did not use the EasyStep Interview, QuickBooks will create accounts or turn on features after you open a vendor form or enable the related preference. (See Chapter 2, “Reviewing the QuickBooks Charts of Accounts” in the section titled, “Accounts That QuickBooks Creates Automatically.”)
If you are considering using the accounts payable process for the first time, be sure to review Chapter 3, “Reviewing and Correcting Item List Errors,” which discusses the use of items in QuickBooks and how to set them up properly.
If you choose to use the purchase order form you will need to create items. Items are simply a list of the products or services that you buy (and can also be those that you sell). The primary purpose of items is to perform the accounting behind the scenes and to automate the data entry process by defaulting descriptions, costs, and sales price on both purchase and sales forms.
What If You Both Buy and Sell the Same Item?
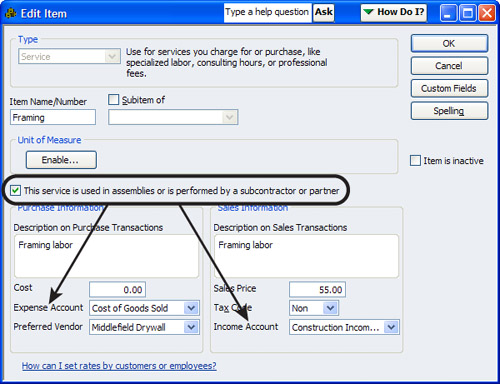
Did you know that if you create an item in QuickBooks and assign only one account, all your expenses and revenue associated with that item will record to that single account? The Add New Item or Edit Item dialog for the item types of Service, Non-inventory part, and Other Charge are the only items that by default show only one account assignment, the primary cause of the issue being discussed in this sidebar.
An easy but all-too-often-overlooked solution is to assign both an expense and an income account in the Add New Item or Edit Item dialog (select Lists, Item List, click the Item drop-down menu, and click New Item or Edit Item). Figure 11.1 shows where you can place a check mark in the This Service... or This Item Is Used... box (depending on what type of item you are creating) when creating a new item or editing an existing item. Chapter 3 offers more detail on creating items.
Figure 11.1 Place a check in the This Service... box so that you can use the same item on both a purchase document and sales document.
When you create an item, these settings are optional except for the inventory item type, which should have a value entered in the default cost field:
• Purchase and sales description
• Default cost and sales price
• Preferred vendor
These settings are required:
• A name for the item
• At least one account (usually an expense account if you sell the item or an income account if you buy the item)
• An inventory asset account (if creating an inventory item type)
Choosing to set up items correctly can be one of the most important decisions you will make in using accounts payable properly.
Should you use items even if you do not plan on using the QuickBooks purchase order or item receipt documents? I recommend that you do, especially if you follow the instructions in the preceding sidebar. A powerful feature of items is that each time the item is purchased or sold, QuickBooks records the amount to the specific account(s) originally defined in the Add New or Edit Item dialog, reducing or entirely eliminating potential errors created from recording the transaction to the wrong account when using the Expense tab of a purchase document.

How can items help me track my customer’s profitability? Many of the QuickBooks reports that provide customer and job profitability information are based on transactions recorded using items and will not provide the same information provided by using only the Expenses tab on a transaction.
For example, a home builder creates a budget for the project (using an estimate form) and wants to track actual versus budgeted expense. To take advantage of the many customer and job profitability reports, you must enter your expenses using the Items tab on an accounts payable bill (and use the same process for the check form), as shown in Figure 11.2.
Figure 11.2 Use the Items tab to record expenses that you want to track in customer or job profitability reports.

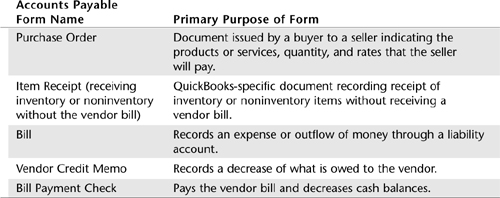
Table 11.1 lists the transaction forms available in accounts payable and the purpose each form serves. You will also want to review Table 11.2 (later in this chapter), which outlines the accounting that goes on behind the scenes with the forms.
I hope you are convinced by now about the importance of using the accounts payable process instead of simply writing a check for your business expenses. The QuickBooks Home page and Vendor Center, as shown in Figures 11.3 and 11.4, respectively, make managing all your purchasing activities easy.

You can easily perform typical vendor-related activities from the QuickBooks Home page, as shown in Figure 11.3:
1. Create a vendor (you do this just one time).
2. Create a purchase order to the vendor (optional).
3. Receive items without a bill (optional).
4. Create a bill to the vendor.
5. Pay the bill (can be a date different from when the bill is dated).
Some companies choose not to use accounts payable bills, but instead pay their vendors directly with the check form (available by selecting Banking, Write Checks). Often this choice is made because the process of paying a vendor with a check is quick and easy and takes fewer steps than creating and paying a vendor bill.
However, by choosing not to use accounts payable bills you ignore several important controls for managing the purchases your company makes. These purchasing controls include
• Associating the bill with the purchase order (or item receipt) to automatically calculate quantity and cost—As soon as you enter the vendor’s name on a bill, QuickBooks prompts you with an open purchase order (or item receipt) dialog, as shown in Figure 11.5.
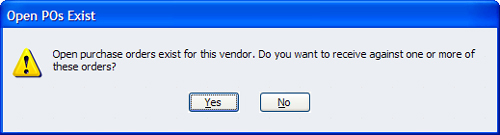
For example, you agree to purchase from the vendor a service or product for a specific amount. Later when you receive and enter the bill, QuickBooks prefills the bill with the quantity and cost as recorded on the purchase order document. You can then compare the billed quantity and cost to the ordered quantity and cost. (To learn more about the use of items in QuickBooks, refer to Chapter 3.)
• Receiving a warning when entering a vendor invoice number twice—It can happen: a vendor sends you a bill more than once and you pay it more than once. However, if you choose to use a bill form (versus the Write Check form) and you enter the vendor’s invoice number in the Company Preferences for Bills dialog, as shown in Figure 11.6, QuickBooks warns you if the invoice number was used on a previous bill.
Figure 11.6 QuickBooks provides a warning message when you enter a bill with the same reference (vendor invoice) number.
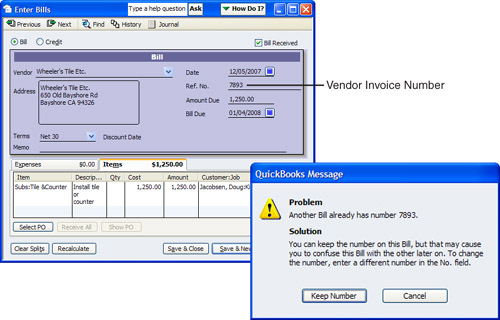
This warning is enabled in the preference; see the “Preferences That Affect Accounts Payable” section later in this chapter.
• Not recognizing costs in the month they were incurred—When you opt to use a Write Check form instead of a bill form, QuickBooks uses the date of the check form as the date the expense is recorded (recognized). How often do you pay the vendor’s bill the same day or month that you receive it? You might be overstating or understating the expenses incurred in a specific month if you use the check form instead of the bill form.
The purchasing controls and warnings provided in QuickBooks make using the accounts payable process a smart choice for your company. Additionally, your company will benefit from having financials that can be viewed in both cash and accrual basis. To learn more about the differences between these two types of financial reporting preferences, see the section titled “Choosing a Reporting Basis” in Chapter 4, “Easily Review Your QuickBooks Data.”
Did you know that you can simplify your processes in accounts payable by setting certain QuickBooks preferences? These preferences can save you keystrokes, which in turn can save data entry time.
Not every preference that affects accounts payable impacts your financials directly; some preferences simply enable specific features. To set preferences in QuickBooks, click Edit, Preferences and select the type of preference on the left.
Preferences in QuickBooks come in two forms:
• My Preferences—Settings that are unique to the user logging in to the data file and are not shared by other users. Click the My Preferences tab to modify the logged-in user specific settings.
• Company Preferences—Settings that are common for all users. When a preference is selected on the Company preference window, the change or setting affects all users. Click the Company Preferences tab to modify settings globally for all users.

To set company preferences you need to open the file as the Admin user and switch to single-user mode (if you are using the data file in a multiuser environment). The Admin user is the default user created when you begin using QuickBooks for the first time.
Proper data entry security includes limiting which employees have access to logging in as the Admin and setting company preferences that are global for all users.
The following sections detail the preferences that can affect your use of the accounts payable forms.
The Accounting preferences are important to review when you first create your data file. These choices affect much of how your accounting information is recorded in accounts payable.
Company preferences are shared globally by all users. The Accounting preferences include
• Accounts—These settings are important for proper management of recording revenue and expenses. The following are the preference settings for Accounts:
• Use account numbers—Requires the use of an account number in addition to account name when creating a new chart of account list item. Users can type either the number or the name to place that account on a transaction.
• Show lowest subaccount only—Prevents users from posting directly to a parent account that has subaccounts. If you see an “other” named account on your financials, users probably recorded a transaction to the parent account and not to one of the available subaccounts.
• Require accounts—If not selected and a transaction is recorded without an account assigned, QuickBooks will assign it to an automatically created uncategorized income or uncategorized expense account, depending on the transaction form used. Note: When creating a new data file this default is automatically selected.
• Use Class Tracking—See the QuickBooks Help menu for more information on how you can use class tracking to track multiple profit centers on your income statement.
• Automatically Assign General Journal Entry Number—This preference will sequentially number any general journal entries automatically. Each entry number can be modified at the time of input.
• Warn When Posting a Transaction to Retained Earnings—You can post to the Retained Earnings account but you should not because QuickBooks uses this account at year-end to close out the year’s Profit & Loss report. Note: When creating a new data file this default is automatically selected.
• Date Warnings—When you create a new data file, its valid date range is from 90 days in the past to 30 days in the future, calculated from your current computer system date. Users can modify these dates, and QuickBooks will warn users when they enter (not modify) a transaction outside these dates.
• Closing Date—the Admin login can set a date in the past for which transactions cannot be modified or added on, or prior to, that date. (Review Chapter 15, “Sharing Data with Your Accountant or Your Client” for more details on setting a closing date and controlling which employees have access to transactions in closed periods.)
Review your Bills preferences to determine whether the defaults set by QuickBooks are appropriate for your company’s needs.
Company preferences are shared globally by all users. The following are the Bills preferences:
• Entering Bills—This is the global default for terms for all vendors for aging the due date of the vendor’s bill. You can change this global default on each vendor’s list information or on a specific transaction. By default, QuickBooks sets the default due date for bills (where a vendor record does not have payment terms set) to 10 days. Users can modify this for their company’s specific bill-paying terms.
• Warn About Duplicate Bill Numbers from the Same Vendor—Being warned of this situation is one of the important reasons for using accounts payable.
• Paying Bills—The Automatically Use Discounts and Credits option enables QuickBooks to apply the discount to your vendor bill payments automatically if your vendor is set up with discount terms and the bill is being paid within the discount date defined.
The Checking preferences improve the accuracy of your day-to-day data entry. Be sure to review them carefully when setting up a new data file.
Company preferences are shared globally by all users. The following are the Checking preferences:
• Print Account Names on Voucher—This option has no effect for vendor bills. The default is to print the General Ledger account on Write Check forms only (not bill payment checks).
• Change Check Date When Check Is Printed—If you prepare your bill payment checks several days in advance of printing them, this setting will change the check date to the current date when you print the checks.
• Start with Payee Field on Check—When selected, your cursor will be on the payee field of the check (and skips the check number and check date fields).
• Warn About Duplicate Check Numbers—QuickBooks will warn the user if reusing a check number that the system has already recorded.
• Auto-fill Payee Account Number in Check Memo—You can assign the account number with which your vendor has identified you and have this number print on the Memo field of the bill payment check.
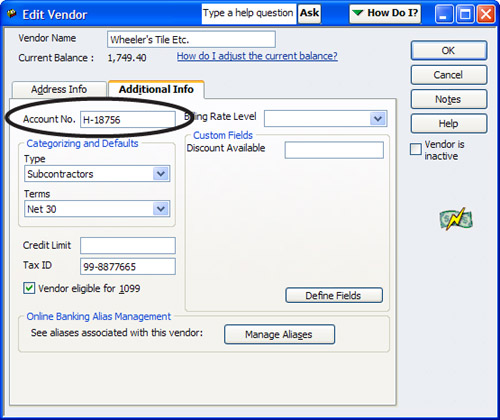
To assign the vendor account number to the vendor record:
1. Click Vendors from the QuickBooks home page.
2. Click on the vendor list to select the vendor to which you want to assign the account number.
3. Click the Edit Vendor button.
4. Click the Additional Info tab.
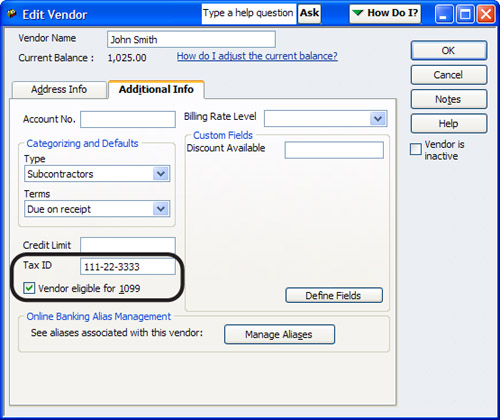
5. Type the account number the vendor has assigned to your account (see Figure 11.7). Click OK.
Figure 11.7 Add the account number your vendor has assigned to your business and QuickBooks will optionally print it on the memo line of a check or bill payment check.
• Select Default Accounts to Use—You can assign from your bank accounts the default account for QuickBooks to use when creating paychecks or payroll liability checks.
• Payee Aliasing—This feature can be turned on or off and is used only when you enable credit card downloading of transactions into your data file. If turned on you can create an alias name with which all credit card transactions for that vendor will be associated.
My Preferences are unique to the user name logged in to the data file. These settings are not shared globally.
• Select Default Accounts to Use—Assign what account you write your bill payment checks from. This setting can be unique for each user that manages different bank accounts.
Every company using QuickBooks needs to review the settings in General Preferences. While I have named only a couple here, many are worth selecting and customizing for your company’s specific needs.
My Preferences are unique to the user name logged in to the data file. These settings are not shared globally.
• Automatically Recall Information—Select this option to recall both the account used and the amount or just the account when creating a new vendor transaction.
• Default Date to Use for New Transactions—Exercise caution to ensure that the appropriate choice is selected. If you are entering transactions from the past, you might want to choose the last entered date. Otherwise, I recommend setting the default to use today’s date.
Also see the “Assigning Default Expense Accounts to a Vendor Record” section, later in the chapter.
When setting the Company preferences for reminders, do not forget to also set the My Preferences for this section.
On the Reminders preference page you can tell QuickBooks reminders to show a list or summary of all checks to print, bills to pay, or purchase orders to print.
If you want reminders to show when you open the QuickBooks data file, select the My Preferences tab of the Reminders preference and choose to Show Reminders List when opening a Company file.
The person responsible for how QuickBooks reports your Accounts Receivable Aging and Accounts Payable Aging will want to review these setting choices.
Company preferences are shared globally by all users. The Reports and Graphs preferences include
• Summary Reports Basis—This feature is important because it tells QuickBooks what basis you want to view your Balance Sheet and Profit & Loss report in by default. You can always override the default when you prepare the report.
• Aging Reports—You can choose to age your reports from the due date or from the transaction date.
The remaining preferences affect how your reports look but have no effect on accounting transactions.
There are no My preferences that would affect your workflow or accounting for accounts payable.
Setting up your vendors for proper 1099 status is important. However, be assured that if after reviewing this information you determine the original setup was incorrect, any changes made to this preference will correct prior-and future-dated reports and forms.
The Internal Revenue Service requires that a business provide a 1099—Misc. Income form at the end of the tax year to any person paid $600 or more for services in one year. Most incorporated businesses are not required to get a 1099—Misc. Income form. You should contact your accountant for more specific information.
You can select the Do You File option to let QuickBooks know that you will be providing 1099 forms to your vendors at the end of the year.
The dialog shown in Figure 11.8 lists several 1099 form lines. However, QuickBooks will track the information but only prints the 1099—Misc. Income form (or the Box 7 data).
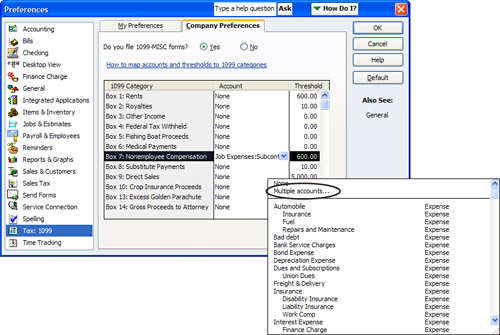
To finish setting up this option you must assign a QuickBooks account on the specific 1099 category and box detail line. Highlight the appropriate 1099 tax line you want to assign, and from the drop-down menu select the account you want to assign. You can also assign multiple accounts (as shown in Figure 11.8). See the section titled, “Reviewing and Printing Year-end Vendor Tax Forms” later in this chapter for more information on how to properly set up vendors and prepare 1099 documents at the end of the year.
Accounts payable mistakes often can be one of the primary reasons for misstated company financials. Knowing which reports are best to review will make you much more efficient at keeping your accounts payable “clean,” meaning the data is correct and up to date. Often the most difficult task when troubleshooting data errors is not knowing exactly what you should be looking for. This problem is addressed in the next section, which explains some of the more common reports used to identify whether your accounts payable information is correct.
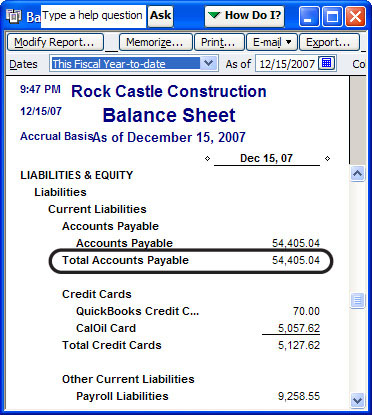
An important check to do with your file is to compare your Balance Sheet report balance for accounts payable with the A/P Aging Summary report total.
With QuickBooks you don’t often have to worry that the Balance Sheet Accounts Payable balance will match the A/P Aging Summary report total because any transaction posting to the accounts payable account must have a vendor assigned. When providing year-end documentation to your accountant, be sure to include the A/P Aging Summary or Detail report and compare the total amount from these reports to the Balance Sheet balance for accounts payable.
To compare the Balance Sheet Standard report balance for accounts payable with the A/P Aging Summary report total do the following:
1. Click Reports, Company & Financial, and select Balance Sheet Standard. On the report dialog that opens select the As of Date you want to compare to. To accurately compare Balance Sheet report accounts payable balance and the A/P Aging Summary report total, you must create your Balance Sheet in Accrual Basis. If your reporting preference default was for Cash Basis, you can change the reporting basis temporarily by clicking the Modify Report button on the active report window and selecting Accrual as the report basis. Click OK to return to the report dialog.
2. Note the balance of your accounts payable account(s) on your Balance Sheet report (see Figure 11.9).
3. Click Reports, Vendors & Payables and select A/P Aging Summary, as shown in Figure 11.10, making sure the date is the same as the date you selected in step 1.
Figure 11.10 You can use the A/P Aging Summary report to compare to the Balance Sheet accounts payable total.
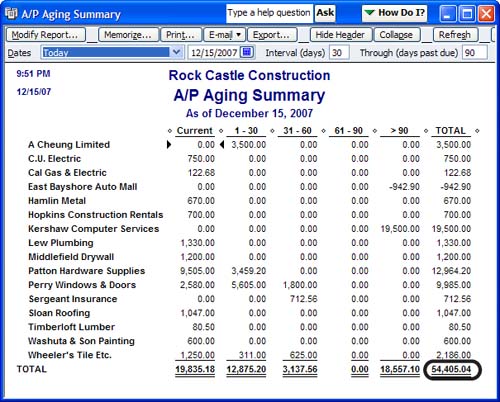
Your accounts payable balance on the Balance Sheet Standard report should match the total on the A/P Aging Summary report. If it does not, the reason might be a data integrity issue. First, make sure your Balance Sheet Standard report is created in the accrual basis. I don’t think I have personally ever seen this but if you do, you might want to verify your data. To verify click File, Utilities, and select Verify Data. If you receive a data integrity message, you can contact QuickBooks Technical Support for assistance.
Unlike the A/P Aging Summary report the Unpaid Bills Detail report is useful because it groups, by vendor, individual lines for each open vendor transaction. By default this report is perpetual, which means that even if you create it using a date in the past, QuickBooks will show only those open vendor bills, or unapplied credit memos, as of today’s computer system date. The following steps show you how to override this default, and then properly reconcile the Unpaid Bills Detail report to your Balance Sheet and your A/P Aging Summary report for a date prior to today’s date:
1. Click Reports, Vendors and select the Unpaid Bills Detail report. As mentioned previously, this report includes all payments made to your vendor as of today’s computer system date.
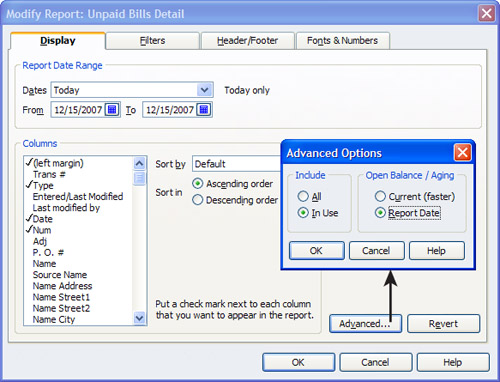
2. If you are creating this report for some date other than today, it is important that you click the Modify Report button on the active report window. On the Display tab that opens, click the Advanced button. The Advanced Options dialog box opens. Under Open Balance/Aging Report Date select the Report Date option, as shown in Figure 11.11, and click OK to close the Advanced Options dialog. Click OK to return to the report.
Figure 11.11 Modify the Unpaid Bills Detail report so that it will agree with the Balance Sheet for a date in the past.
Modifying the report enables you to see each open vendor bill or unapplied credit detail as of some date in the past. This report becomes very useful for reconciling your accounts payable unpaid bills or open credit detail to your Balance Sheet accounts payable total. Be sure to send a copy of this modified report to your accountant after verifying that it agrees with the Balance Sheet.
If an amount is listed on this report, it is presumed that you owe the money, or in the event of a credit, that your vendor owes you. See the section in this chapter titled “Correcting Accounts Payable Errors” for a discussion of how you can remove old aged payables from your accounting that you do not owe.
Often when goods are purchased for both inventory and non-inventory your vendor will ship the product without the final vendor bill. One reason for doing this is that receiving departments in a warehouse should not know the value of the goods being delivered. Another reason might be that the vendor needs to add freight and handling to the final bill before sending it to your company.
The QuickBooks Item Receipt form is used to record the receipt of the stock into your place of business, increase the quantity on hand for this item, and increase your accounts payable due to that vendor.
However, because you have not yet received the final bill from the vendor, QuickBooks does not include these item receipts in the Pay Bills window. This is because QuickBooks recognizes an Item Receipt form as not yet having received the final bill to be paid.
The problem is if you entered a bill and ignored the warning message that outstanding item receipts existed for that vendor and created another bill, or perhaps you created a Write Check form paying for the same charge as recorded on the original item receipt. Both of these types of mistakes would overstate your expenses or inventory value.
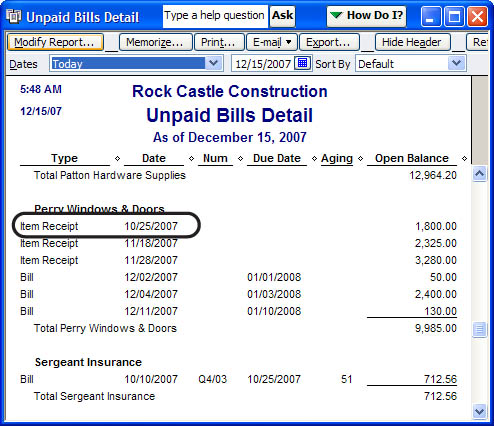
First, to see if this type of transaction is a problem for your data file, create the Unpaid Bills Detail report by clicking Reports, Vendors, and selecting the Unpaid Bills Detail report. On the report do you have line items with a transaction type of Item Receipt (see Figure 11.12)? If you do, these are from receiving inventory or non-inventory items without receiving the vendor bill in QuickBooks.
How exactly does QuickBooks manage the use of Item Receipt documents?
• They age like other open payables on the A/P Aging Summary report.
• The Unpaid Bills Detail report does not show any days in the aged column, yet they are aging.
• QuickBooks does not let you pay an item receipt in the Pay Bills dialog.
If after reviewing your Unpaid Bills Detail report you find outdated Item Receipts that you do not owe the vendor, determine whether they have been paid by requesting an open payables statement from your vendor. To see if the bill was paid with a Write Check form instead of the proper Bill Payment check form follow these steps:
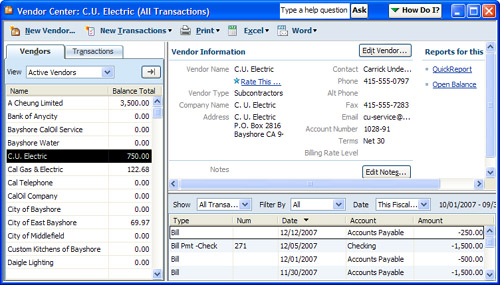
1. Click the Vendors button from the Home page as shown in Figure 11.3 at the beginning of this chapter.
2. Select the Vendor name on the left. You can also type the first letter of the name and QuickBooks will jump to the first list entry with that letter.
3. Click the Show drop-down list to select the Checks transaction type, as shown in Figure 11.13.
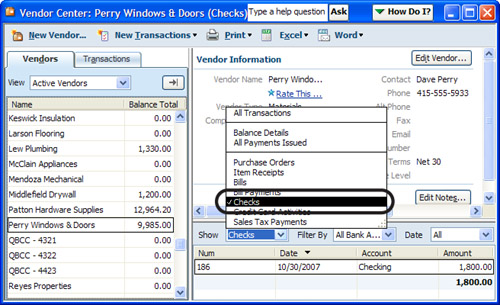
You can print the transaction list if needed via the Print tab at the top of the Vendor Center dialog.
In the example shown previously in Figure 11.12, Perry Windows has an open item receipt dated 10/25/07. To easily see whether a check form was used to pay this vendor, follow the steps listed previously to see any checks (not bill payment checks) that were written to the vendor.
The section in this chapter titled “Correcting Accounts Payable Errors” discusses options you have for fixing this type of error.
As discussed in this chapter in the earlier sidebar titled, “What If You Both Buy and Sell the Same Item?,” items play an important part in the accounts payable process if you use purchase orders, item receipts, or enter bills and checks using the Items tab.
In Figure 11.1, you can see a service type item with a check mark placed in the box titled This Service Is Used.... Having this check mark is very important if you both buy and sell the same item. If this option is not selected and you use the same item on a purchase and a sales document, QuickBooks would record both the revenue and the expense to the single account selected on the New or Edit item dialog.
It is perfectly acceptable to create an item with only one account if you know you will never both buy and sell the same item. However, I usually recommend that each item be set up as two-sided, or needing both an expense and an income account.
Properly setting up items is discussed in more detail in Chapter 3. This section focuses on how you can determine whether your items are the cause of errors on your financials for a company data file with transactions. If your data file does not have transactions in it yet, you will not be using this report to check your item setup.
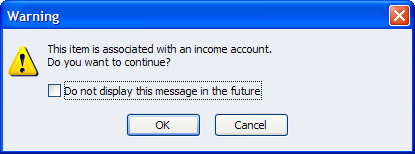
Presume that an item was created with only an income account assigned. The item was used on a vendor bill and the user decided to ignore the warning shown in Figure 11.14.
Figure 11.14 The warning you receive when using an item on a vendor purchase document that has only an income account assigned.
To see if this type of error is affecting your or your client’s data, create the following report:
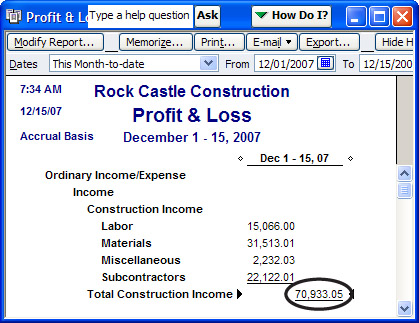
1. Click Reports, Company & Financial and select Profit & Loss Standard.
2. Double-click the Total Construction Income amount, as shown in Figure 11.15. QuickBooks creates a Transaction Detail by Account report.
Figure 11.15 Double-click the Total Construction Income amount to create a Transaction Detail by Account report.
3. On the top right of the resulting Transaction Detail by Account report, select Type from the Sort By drop-down menu. QuickBooks groups all transactions by type within each income account or subaccount. Notice in Figure 11.16 that the Construction Income subaccount, Materials, has a vendor bill transaction posting to an income account. Refer to the section titled “Fixing Item Errors in QuickBooks” in Chapter 3 for methods to fix these types of errors.

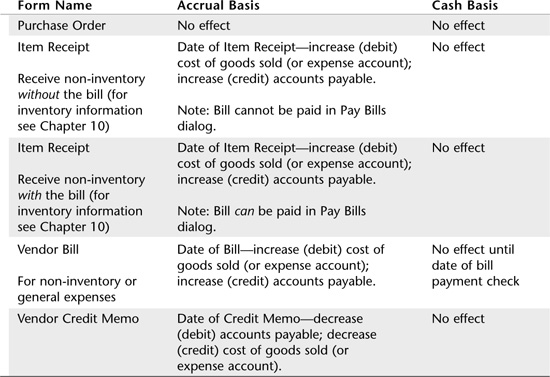
The very nature of accounts payable suggests that when you are reviewing your financials in cash basis you would not see an accounts payable balance. See Table 11.2 for a listing of the forms you can use in accounts payable and the effect the form has on both accrual and cash basis reporting.
So why exactly do you have an Accounts Payable balance on a cash basis balance sheet? Any of the following can be the cause:
• A/P transactions have expenses or items posting to other balance sheet accounts.
• Inventory items on an invoice or credit memo (typically inventory management should be done only in accrual basis reporting).
• Transfers between balance sheet accounts.
• Unapplied accounts payable vendor payments.
• Payments applied to future-dated vendor bills.
• Preferences that contradict each other. (This can happen if you selected cash basis on your summary reports but accrual basis as your sales tax preference.)
• Data corruption. To confirm this problem, select File, Utilities, Verify Data.
When You Have Accounts Payable Balances on a Cash Basis Balance Sheet
Some of the reasons why you might have an accounts payable balance on your cash basis balance sheet were listed previously. What can you do if you do have an accounts payable balance on your cash basis balance sheet? First, modify the following report to help you locate the transactions making up this balance:
1. Click Reports, Company & Financial and select Balance Sheet Standard (see Figure 11.17).
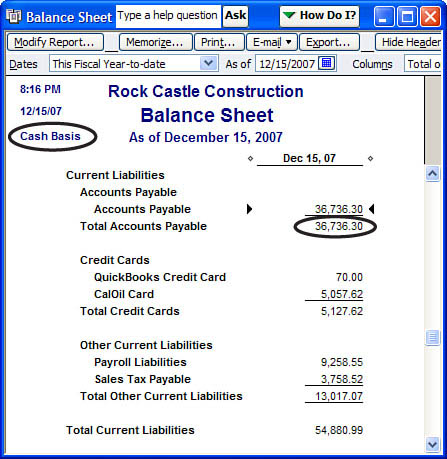
3. The Display dialog opens. In the Report Basis pane select the Cash option, and then click OK to return to the report.
4. Double-click the accounts payable amount in question to open the Transactions by Account report.
5. Click Modify Report.
6. The Display dialog opens. In the Report/Date Range pane remove the From date (leave it blank) and leave the To date as it defaulted (see Figure 11.18.)
Figure 11.18 Clicking the Advanced button on the Modify Report window to filter a report for transaction status as of a specific date in the past.
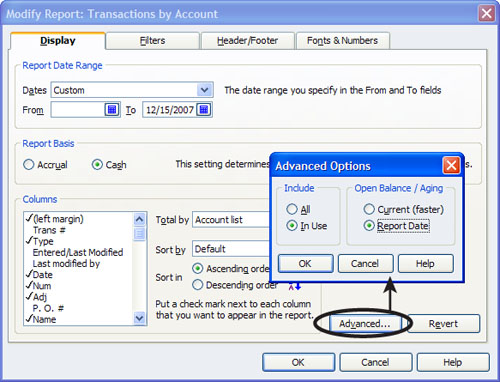
7. Click the Advanced button (lower right) and select the Report Date option from the Open Balance/Aging dialog (see Figure 11.18), and then click OK to return to the display dialog.
8. Click on the Filters tab. From the Choose Filters pane scroll down to select Paid Status and select the Open option for paid status.
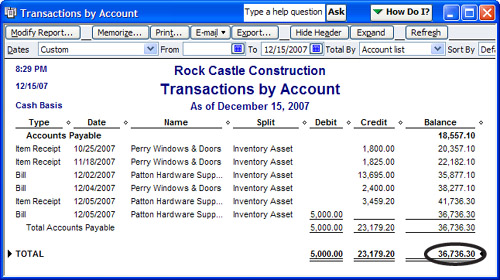
9. Click OK to return to the report and look for transactions that fall into any of the categories described earlier. The Transaction Detail report shown in Figure 11.19 shows several inventory transactions, one of the causes of accounts payable showing on a cash basis balance sheet.
If your company pays individuals and certain types of business (refer to your accountant for advice) $600.00 or more in one tax year, you are required by the Internal Revenue Service to provide that person or business with a 1099—Misc. Income form at year end. The 1096 document is a summary document the IRS requires along with the detailed 1099—Misc. Income forms. QuickBooks does not print the 1096 but will provide all the information you need to put on the form.
Additionally, you will need to print the 1099s on IRS-approved preprinted forms available from Intuit or from any office supply store.
Earlier in this chapter, we provided details on setting up the Company preference for how QuickBooks will handle the accounting for your 1099 forms. You can also use the 1099/1096 Wizard to set up QuickBooks and your vendors for 1099 filing.
To prepare to process your 1099 forms, follow these steps:
1. Click Vendors, Print 1099s/1096; the wizard opens, as shown in Figure 11.20.
Figure 11.20 The 1099 and 1096 Wizard provides a step-by-step process to make sure your documents have the correct information.
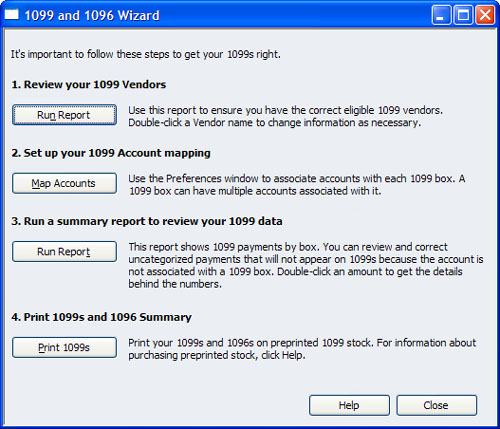
2. From the wizard dialog, you can review your 1099 vendors by clicking the Run Report button to create a Vendor 1099 Review report, as shown in Figure 11.21. Use this report to check that you have the needed information for each of your vendors. With your cursor on any vendor name on this report, double-click to access the Additional Info tab of the Edit Vendor dialog box as shown in Figure 11.22 to add or modify the information you see on the report.
Figure 11.21 Review the vendor 1099 Review report before printing your 1099—Misc. Income forms at year end.
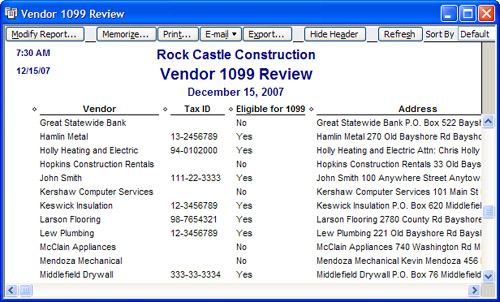
Figure 11.22 Recording the vendor’s tax ID number and eligibility for receiving a 1099 form at year end.
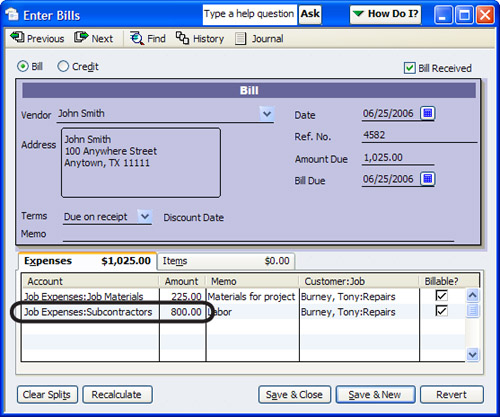
3. Set up your 1099 chart of account mapping by clicking on the Map Accounts button and editing or adding Company preferences settings for Tax: 1099. (Refer to Figure 11.8 and the section “Preferences That Affect Accounts Payable.”) The significance of this mapping is that if a vendor is paid for multiple types of expenses, you can properly instruct QuickBooks to only prepare the 1099 amount for expenses subject to 1099 reporting (see Figure 11.23).
Figure 11.23 Only the amount recorded to the Subcontractors account will be reported on the vendor’s 1099—Misc. form.
4. Click the Run Report button to create a 1099 Summary report so you can review your 1099 data. This report is automatically filtered for the last calendar year; all vendors marked eligible for 1099 (refer to Figure 11.7) and all allowed accounts (references those accounts that you assigned in step 3 for account mapping). Double-click any line listing to see the individual transactions. Uncategorized indicates that a payment was made to a 1099 eligible vendor but not recorded to one of the mapped 1099 accounts (see Figure 11.24).
Figure 11.24 The vendor 1099 Summary report can help you identify payment totals made to your vendors who are eligible for 1099s.
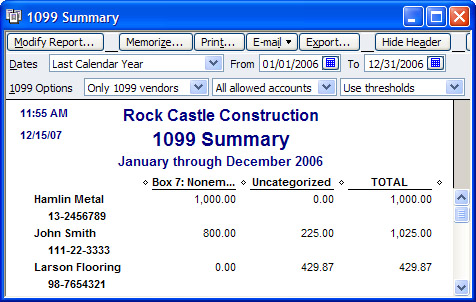
QuickBooks reports 1099 earnings on cash basis only, or amounts for bills that have been paid in the tax year that the 1099–Misc. Income forms are being created.
5. Print your 1099s and 1096 Summary by clicking the Print 1099s button to open the Print dialog. In this dialog you will specify a date range for QuickBooks to calculate which forms to print.
Properly setting up your 1099 tax form preferences in QuickBooks will ensure compliance with federal tax reporting guidelines. If you have specific questions as to what type of vendor should receive this document, refer to the www.irs.gov website or contact your company’s accountant.
The previous topics in this chapter have provided recommended workflow and preference settings that will help you avoid making mistakes with your accounts payable transactions. This section provides specific details on methods you can use to correct existing accounts payable errors.
The purpose of this book is not to give your business specific accounting or tax advice, but rather to introduce you to ways you might consider fixing specific mistakes you have found.
Before making any of the suggested changes, be sure you have made a backup of your data in case the change does not give you the desired result. Additionally, contacting your accountant and obtaining his or her advice on the changes you are going to be making would be prudent.
Earlier in this chapter, in the section titled “Review the Unpaid Bills Detail Report,” you were provided a way to reconcile your A/P Aging Summary report total to your balance sheet accounts payable total (refer to Figure 11.10). As important as this task is, it is also necessary for you to review those items listed as unpaid to your vendor. If you notice an open bill that you know you do not owe the vendor, it might be because you paid the vendor with a Write Check form instead of the proper bill payment form.
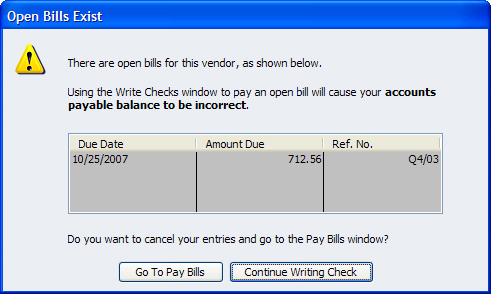
You should experience fewer of these types of mistakes because QuickBooks directs you to the Pay Bills dialog, as shown in Figure 11.25, when you attempt to write a check to a vendor with open bills.
If you choose to modify the original vendor check, carefully consider the accounting effect this type of correction will have on your financials:
• Is the change a significant dollar amount? Both cash and accrual basis reports will be affected.
• Consider the date of the check and the date of the bill—are they in different tax years?
• Is the correction going to affect a year where the data has already been used to prepare a tax return?
If you answered yes to any of these questions, be sure to discuss with your accountant the impact this change could have on your financials.
Use the following steps to modify this check, making the check become a vendor credit. In other words, it will decrease (debit) accounts payable and maintain the original decrease (credit) to your cash account:
1. Locate the vendor check. One easy way is to click the Vendors button on the Home page to open the Vendor Center. With your cursor select the vendor from the list on the left and choose Checks from the Show drop-down menu, as shown previously in Figure 11.13.
2. Double-click the check to open the Write Checks - Checking dialog box for the selected transaction.
3. On the Expenses tab, in the account column, replace the currently listed account with the accounts payable account. This creates a decrease (debit) to the accounts payable account.
4. Select the vendor name from the drop-down menu in the Customer:Job column. This assigns the accounts payable decrease to a specific vendor. You cannot save the transaction without assigning a vendor name.
5. Click Save & Close, and then click Yes to record your changes.
6. Click Vendors, Pay Bills and using the arrow key on your keyboard move up and down through the list of vendors. Before placing a checkmark in the box next to the vendor’s specific invoice, QuickBooks will show the total number of credits and their total value in the Discount & Credit Information for Highlighted Bill pane. (See Figure 11.26.)
Figure 11.26 When a vendor has available credits QuickBooks will display the total of the credits in the Pay Bills dialog.
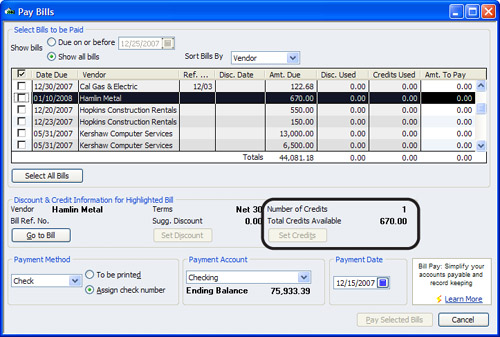
7. When you have located the correct bill, place a check mark in the box to the left of the Date Due column. When an invoice is selected QuickBooks will automatically apply the available credits to the selected vendor invoice. If you want to modify the amount or which credits are selected, click the Set Credits button. The Discount and Credits dialog appears as shown later in the chapter in Figure 11.28. Users can modify which credit is selected by changing the check mark from one credit to another or by manually overriding the amount of the credit.
8. Click the Done button when the credit is assigned.
9. QuickBooks shows in the Pay Bills window that the bill is being paid by a credit (if the entire bill is being paid by the credit QuickBooks will not create a check). Click Pay Selected Bills when you are finished.
10. QuickBooks offers you Pay More Bills or Done choices. Click Done if you do not have any other transactions to correct using this method.
Often, the safest way to not inadvertently affect prior year financials is to create another correcting transaction in the current year, especially if you have already used your prior year’s data to prepare and file a tax return.
The vendor credit enables you to correct prior year Accounts Payable errors, but gives you the opportunity to date the credit in the current tax year. (Refer to Table 11.2 for a listing of accounts payable forms and their effects on your accounting.) To create a vendor credit, follow these steps:
1. Click Vendors, Enter Bills and, as shown in Figure 11.27, select Credit at the top of the form. Select the appropriate vendor, date, vendor reference number (optional), and amount, and on the Expenses tab select the appropriate account or use the Items tab and use the same item that was on the original bill.
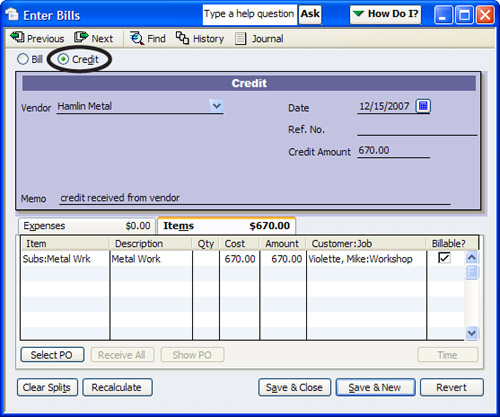
2. Click Save & Close. QuickBooks records this transaction as a credit memo or decrease (debit) to accounts payable and a decrease (credit) to the account on the account column of the Expenses tab or, if you’re using the Items tab, the expense account assigned to that item. You are not yet done; this vendor credit now needs to be assigned to the unpaid vendor bill.
3. Click Vendors, Pay Bills and move up and down through the list of vendors. Before placing a checkmark in the box next to the vendor’s specific invoice, QuickBooks will show the total number of credits and their total value in the Discount & Credit Information for Highlighted Bill pane (see Figure 11.26).
4. When you have located the correct bill, place a checkmark in the box to the left of the Date Due column. When an invoice is selected QuickBooks will automatically apply the available credits to the selected vendor invoice. If you want to modify the amount or which credits are selected, click the Set Credits button. The Discount and Credits dialog appears as shown in Figure 11.28. Users can modify which credit is selected by changing the checkmark from one credit to another or by manually overriding the amount of the credit.
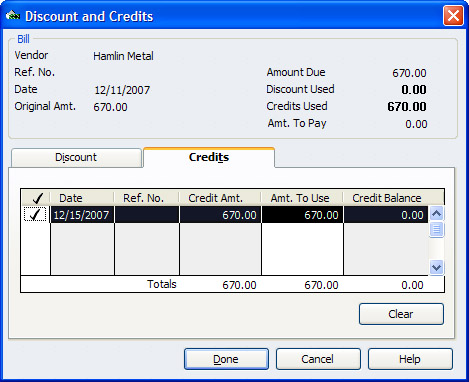
5. Click Done to close the Discount and Credits dialog. Click Pay Selected Bills to exit the Pay Bills dialog. If you are only associating a credit memo with a vendor bill, no additional check transaction will be created.
6. Click Done in the Payment Summary dialog or click Pay More Bills if you want to return to the Pay Bills dialog.
Have you ever been given a credit from a vendor, only to find out later that your vendor applied the credit to a different open bill than you did in your data?
Follow these easy steps to reassign a vendor credit from one open accounts payable bill to another bill:
1. Click the Vendors button on the Home page to open the Vendor Center.
2. Select the vendor with the misapplied credit.
3. From the Show drop-down menu select Bills (this will also show vendor credits).
4. From the transactions listed select the misapplied credit memo by double-clicking it. The Credit dialog opens for that transaction.
5. On the vendor line of the credit select a different vendor. (Remember to whom you assign it.)
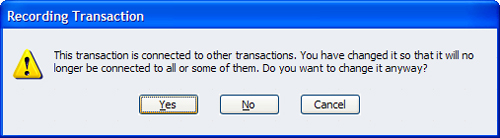
6. Click Save & Close. QuickBooks removes the credit transaction from the vendor bill it was previously associated with.
7. QuickBooks also warns that the transaction you are editing will no longer be connected. Click Yes to continue (see Figure 11.29).
8. From the same Vendor Center, select the other vendor to which you assigned the credit. From the Show drop-down menu select Bills and double-click the credit that you just assigned in step 5. The credit dialog appears.
9. On the vendor line, select the original vendor.
10. Click Save & Close and Yes to making the change.
QuickBooks now shows the credit as unapplied, and you can follow the steps outlined previously for applying the credit to the correct open vendor bill.
One of the more important tasks you can do to maintain a correct data file is to remove old, aged item receipts or payables that you do not owe.
Before making any of the suggested changes, be sure you have made a backup of your data in case the change does not give you the desired result. Additionally, contacting your accountant and obtaining his or her advice on the changes you are going to be making would be prudent.
You have three options when you want to removed these aged (old) transactions:
• Create a credit memo and apply it as discussed earlier in this chapter.
• Void the item receipt or bill.
• Delete the item receipt or bill.
To create and apply a credit memo to a vendor bill, follow the same steps as listed in the earlier section, “Creating and Applying a Vendor Credit Memo.”
You must give special consideration to applying a credit memo to an open item receipt. First, convert the item receipt to a bill:
1. Locate the open item receipt using any of the methods suggested in this chapter.
2. When you select the open item receipt, QuickBooks opens the Create Item Receipts dialog. Place a check mark in the Bill Received box at the top right, as shown in Figure 11.30.
Figure 11.30 Converting an open item receipt to a bill is necessary before applying a vendor credit memo.
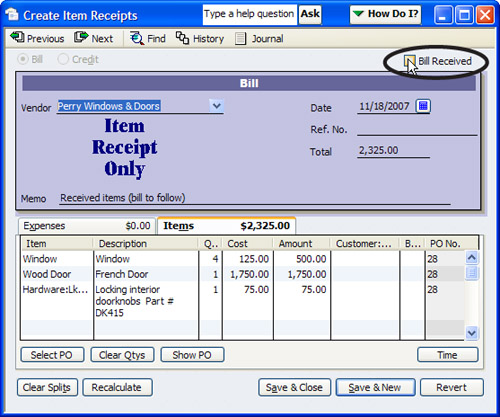
You will now be able to apply your credit memo to the item receipt form, which has been converted to a bill.
When considering whether to void or delete, I always prefer the void option because it leaves a record of the original transaction.
Before Voiding or Deleting
Before voiding or deleting you will want to verify that the aged open item receipts or bills do not have any other transactions associated with them. To verify this
1. Open the item receipt or bill using any one of the many methods discussed in this chapter.
2. From the Enter Bills or Create Item Receipts dialog, click the History link at the top. QuickBooks opens the Transaction History - Bill or Item Receipts dialog, as shown in Figure 11.31.
Figure 11.31 Before voiding, deleting, or modifying a bill, click the History link at the top of the form to see whether any transactions are associated with this bill.
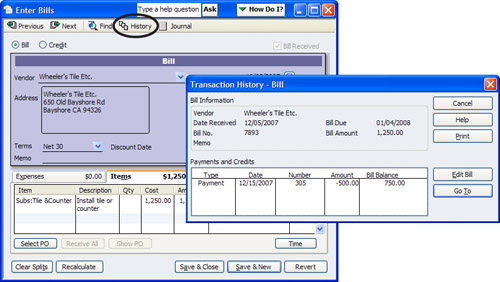
If you had voided or deleted the example shown in Figure 11.31, you would have created an unapplied vendor payment. In effect, you would have traded one correction for another problem. So be careful when making corrections to your accounts payable transactions.
All too often I find that accounting professionals are quick to make adjustments to accounts payable using the Make General Journal Entries form, also referred to as a journal entry. The following are some of the issues surrounding the use of a general journal entries form:
• Only a vendor or a customer name can be in the general journal entries form, not both a vendor and customer in the same form, minimizing the use of the form for large volume corrections.
• General journal entries do not include the option to assign an item, including service, non-inventory, inventory, and so on. The adjustment would affect the Profit & Loss reports but not specific QuickBooks reports that use item information, such as the job profitability reports or inventory valuation reports.
• You will still need to go to the Pay Bills dialog to assign the general journal to the other related vendor transactions.
Caution When Using General Journal Entries
Often the use of the general journal entries will not provide the desired results in your reporting. Did you know that the first line of any general journal entry form is considered a “source” line? Specifically, this means that if the first line of a multiple-line general journal entry form includes a vendor, customer, or any list item name in the Name column, as shown in Figure 11.32, that name element will appear in reports on the lines below the first line, even if there is no relationship (see Figure 11.33).
Figure 11.32 When the first line of a multiple-line general journal form includes a list name in the Name column, QuickBooks associates the name entry with all lines of the form.
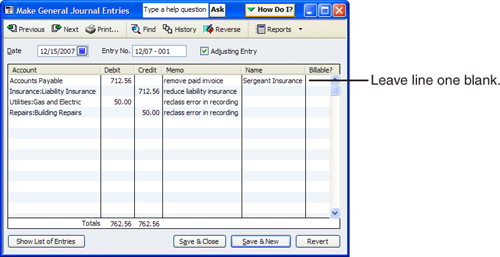
Figure 11.33 QuickBooks associated the vendor’s name with all lines of the journal entry because the vendor list name was on the first line of the general journal.
This type of error is more apparent when a Customer:Job Name is included on the first line of a multiple-line general journal entry form. When preparing a Profit & Loss by Job report, QuickBooks would include all lines of the general journal entry as belonging to that job!
A quick fix is simply to add a blank line at the beginning of each general journal entry. Another recommendation is to create a fictitious bank account and call it Adjusting Entries. If you assign the first line of the entry to this account, QuickBooks provides a “register” for you to easily locate these types of transactions and at the same time avoid the issue addressed in this section. See Figures 11.34 and 11.35 to see how adding the line at the beginning of the form solved the problem in reporting.
Figure 11.34 Including the fictitious bank account on the first line of a general journal entries form prevents the source line (line 1) from being associated with each additional unrelated line.

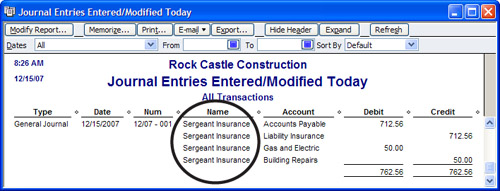
Figure 11.35 QuickBooks no longer associates the vendor’s name with the unrelated general journal lines.
Often just these simple tips can help make your QuickBooks data much more accurate!
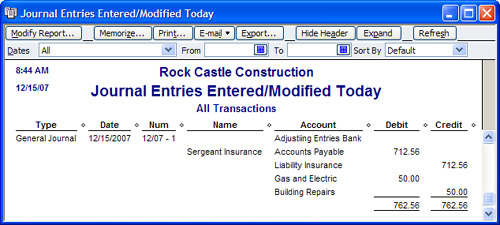
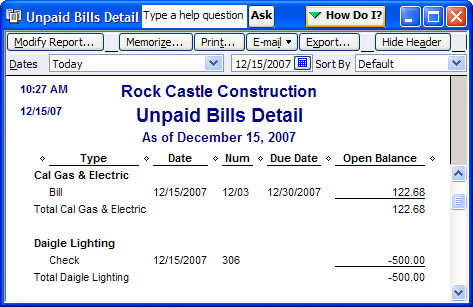
If you have journal entries recorded to your accounts payable, your unpaid bills report might look something like Figure 11.36.
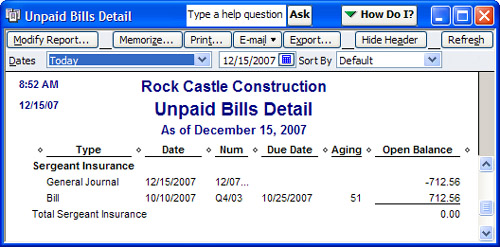
To remove these types of transactions simply follow steps 3 through 6 as outlined in the earlier section of this chapter titled “Creating and Applying a Vendor Credit” on page 301.
So far in this chapter you have learned about the accounts payable forms and workflow, preferences that you can set to improve your data entry, reports to review when troubleshooting errors, and methods of correcting accounts payable errors. This section offers specific solutions to some of those unique transactions you might need to record.
Having a vendor who is also a customer is commonly referred to as bartering. This is when your vendor also purchases your goods or services and you are going to “swap” and not pay each other for the items purchased from each other.
If you want to track the exchange of goods, you can follow these steps:
1. Click Lists, Chart of Accounts and click on the Account drop-down menu. Select New to create a new bank account type named Bartering. This bank account will always have a net zero balance if the transactions are recorded properly.
2. Click Save & Close.
3. Click Vendor, Enter Bills to record your vendor bill as if you were going to make the purchase from the vendor.
4. Click Vendor, Pay Bills. The Pay Bills dialog opens. Select the vendor’s bill you will be bartering with.
5. In the Pay Bills dialog (click Vendors, Pay Bills) select the Bartering Account as the payment account (as displayed in Figure 11.37). You can then choose to assign a fictitious check number.
Figure 11.37 When you are bartering goods with your vendor, choose the fictitious bank account when recording the “payment” of the vendor bill.

6. Click the Customers button on the Home page to open the Customers Center.
7. If you need to create the vendor as a customer, click the Customer button on the Home page. Select New Customer & Job, New Customer or Add Job, and complete the contact information for the new customer; otherwise, double-click the customer or job you will be bartering with to select it.
8. From the Customers Center, click the New Transactions drop-down menu and select Invoices. Prepare the invoice to the new customer (also your vendor) using the same items on the invoice as if you were selling them to a customer. Click Save & Close.
9. From the Customers Center, click the New Transactions drop-down menu and select Receive Payments. Record the fictitious payment from the customer (your vendor). Click Save & Close.
10. Depending on how your preferences are set up for customer payments (see Chapter 7 and refer to the “Preferences That Affect Accounts Receivable” section), deposit the fictitious customer payment into the same Bartering bank account created earlier.
11. If the value of what you purchased is equal to the value of what you sold, your Bartering bank account will have a net zero ending balance. If not, you will need to enter an adjusting entry to remove the balance or adjust your purchase or sales form total. If needed, you can easily create an adjusting entry by clicking Banking, Use Register and select your Bartering bank account from the Use Register drop-down menu. On the next available line in the account register, record a payment or deposit as needed to clear the account. You will want to ask your accountant what account is appropriate for the adjustment.
If your business is required to prepay your vendor for purchases, you can choose from a couple of methods:
• Assigning expenses to the Other Current Asset type account typically named Prepaid Expenses. (See Chapter 9, “Handling Current Asset Accounts Correctly,” specifically the section titled “Recording Prepaid Expenses in QuickBooks.”)
• Recording a decreasing (debit) transaction to accounts payable.
To record a debit balance to the vendor’s accounts payable account:
1. Click Banking, Write Checks.
2. In the Pay to the Order of field select the Vendor’s name.
3. Enter the amount of the prepayment.
4. On the Expenses tab, in the account detail area select the accounts payable account (see Figure 11.38).
Figure 11.38 Assign the accounts payable account and the vendor name to a check form when recording a vendor prepayment.
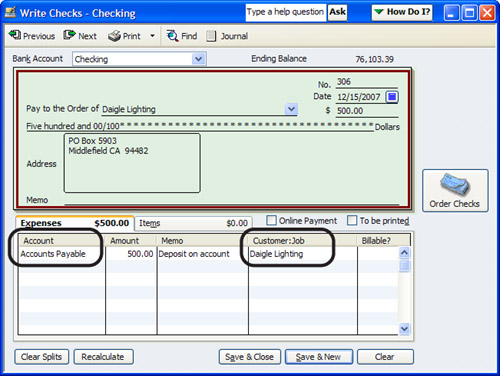
5. In the Customer: Job column, enter the Vendor name (must be a vendor type for this method to work).
6. Click Save & Close.
QuickBooks now records a vendor credit (debit to accounts payable) as in Figure 11.39.
Figure 11.39 QuickBooks records the vendor prepayment as a negative entry to accounts payable (or a debit to accounts payable).
At a later date, you would record a bill for the full purchase price and assign this credit as discussed in this chapter.
If you are starting your QuickBooks data file mid-year (or at some other time than the first of a new calendar year), you might have amounts paid previously to vendors who are eligible to receive the 1099—Misc. Income form. (See the section in this chapter titled “Reviewing and Printing Year-end Vendor Tax Forms.”)
To properly record the amounts paid to vendors in your prior accounting software, and to make sure that QuickBooks reports all amounts paid to the vendor on the 1099—Misc. Income form, follow these steps:
1. Click Company, Make General Journal Entries. In the dialog that appears, leave the first line blank, or as discussed in the “Caution When Using General Journal Entries” sidebar on page 306, use the Adjusting Entries fictitious bank account on the first line with no dollar amount assigned.
2. On the following lines (one line per vendor) in the Account column enter the cost of goods sold account or expense account assigned in the preferences for Tax: 1099. (See the section in this chapter titled “Preferences That Affect Accounts Payable.”)
3. For each Debit line amount, be sure to select the vendor’s list name (this must be a vendor type) in the Name column.
4. On the last line enter one line total assigning the same account as the other lines so that the Debit column is equal to the Credit column (see Figure 11.40).
Figure 11.40 When starting a QuickBooks file mid-year, create a general journal entries form to record year-to-date vendor 1099—Misc. Income tax payments.
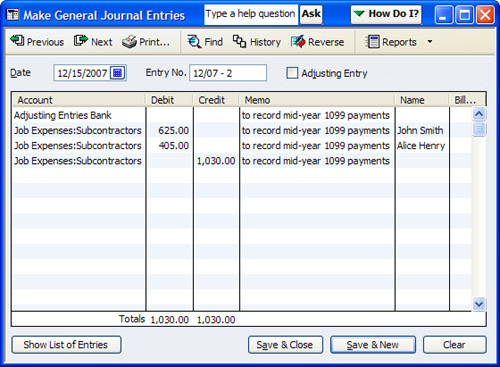
Your overall financials will not change because the same account was used for both the debit and credit side of the transaction. Including the vendor name on the debit side of the transaction lines causes QuickBooks to include the amount in the reported 1099—Misc. Income amount.
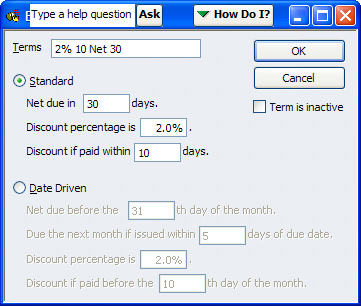
Your company might be able to save money by paying your vendors within their allowed discount terms. Discounts are offered by some vendors to encourage quick payment of their invoices.
The steps to automate taking a vendor discount are as follows:
1. Set the Bills preference to automatically calculate the discount. (See the section in this chapter titled “Preferences That Affect Accounts Payable.”)
2. Make sure your vendor’s discount terms are included in the global terms list by clicking Lists, Customer & Vendor Profile Lists and selecting Terms List. The terms list dialog opens as shown in Figure 11.41. If your specific terms are not included, click the Terms drop-down menu to create a new term or highlight with your cursor and select Edit Terms. Click OK and when completed click on the red X to close the terms list.
Figure 11.41 Set up terms in QuickBooks to calculate the discounts available when vendor’s invoices are paid quickly.
3. Assign the appropriate discount term to your vendor record by clicking the Vendors button on the Home page to open the Vendors Center and selecting New Vendor, or by double-clicking an existing vendor to open the respective New or Edit Vendor dialog box. Click the Edit Vendor button for an existing vendor, and then click the Additional Info tab for either a new or existing vendor. Assign the terms from the drop-down menu in the Categorizing and Defaults pane. Click OK to store the information.
4. When a discount term is entered on the vendor record and you enter a vendor bill, QuickBooks automatically applies the discount terms to the transaction.
5. Click Vendors, Pay Bills and select the vendor you will be paying. If you are paying the vendor within the discount terms date QuickBooks will automatically calculate the discount amount as shown in Figure 11.42 and reduce the amount that is due on the bill.
Figure 11.42 QuickBooks automatically applies the discount amount if preferences and transactions are entered correctly.

Click the Set Discount button if you want to override the amount calculated or the account assigned. If you are going to use this method, record your bills at the “gross” amount, or total amount before any discount. Then, over time you can watch the amount you have saved grow!
QuickBooks can also make it easy to not forget a recurring accounts payable bill. Memorized bills work best if the amount being paid is the same from month to month (or whatever frequency you set). An example might be your rent payment.
Here are the steps to memorize a recurring accounts payable transaction:
1. Create a vendor bill as normal, assigning the amount and expense account with which you want it to be associated.
2. With the Enter Bills dialog open, press Ctrl+M to open the Schedule Memorized Transaction dialog (see Figure 11.43).

3. Enter a name that will identify this transaction in the memorized transaction list.
4. Choose one of the available options:
• Remind Me—If you select this option you need to choose how often and the next date you want to be reminded.
• Don’t Remind Me—Use this option if you want to stop permanently, or even temporarily, your reminders for this transaction.
• Automatically Enter—Use this option if you want QuickBooks to create the entry without asking.
• With Transactions in Group—You can assign multiple transactions to a group and then process them with one keystroke. First create a group by clicking Lists, Memorized Transaction List. Click the Memorized Transaction drop-down menu, and select New Group. Give the group a name and choose options for the group from the same Remind Me, Don’t Remind Me, or Automatically Enter options.
5. Click OK to close the Schedule Memorized Transaction dialog.
6. Click Save & Close on your bill only if you want to create the vendor bill now and add it to your memorized transaction list. If not, select Clear to remove the bill details, knowing that QuickBooks will prompt you to enter it on the frequency and date you selected.
To manually enter the transactions (if they’re not set to automatically enter), click Lists, Memorized Transaction List or press Ctrl+T to quickly call up the list. Select the group or individual transactions you want to post by double-clicking the group or the individual item from the memorized transaction list.
If you clicked on a memorized group QuickBooks will create each of the transactions in the group, asking you to assign a transaction date globally to all the transactions in the group. If you created individual transactions, QuickBooks will allow you to modify the information on the individual transaction if necessary before saving the memorized transaction.
Use the memorized tool to save time and to remind you to pay those important bills.
Use this method to add a vendor refund check to your bank deposit:
1. Create your deposit (normally done with customer invoice payments) as usual. (For more detailed information, see Chapter 7.)
2. On the next available deposit line, choose one of two options:
• If you do not have an open vendor credit in your Accounts Payable, enter the vendor name in the Received From column, and select the expense account you want to reduce in the From Account column.
• If you do have an open vendor credit that you want to associate this refund with, enter the vendor name in the Received From column, and select the Accounts Payable account in the From Account column. Then apply the deposit to the open credit as discussed in this chapter in the section titled “Creating and Applying a Vendor Credit Memo.”
3. Enter an optional memo.
4. Enter the amount.
5. Click Save & Close when the total of the deposit agrees with the bank deposit total.
You have flexibility in how you choose to record and pay your credit card bills. The decision will be based on your own circumstances because no one way is the right way.
Options for recording credit card expense include the following:
• Enter a bill to the credit card vendor, summarizing the total charges on one bill and entering a separate line for each expense account amount.
• Enter individual credit card charges. Click Banking, Enter Credit Card Charges. You first need to create a credit card type account as discussed in Chapter 2.
• Use the QuickBooks Online Banking feature and automatically download your credit card charges and payments directly into your QuickBooks data file. (Not all credit card providers offer this functionality. To see whether your card offers this option, click Banking, Online Banking, and select Participating Financial Institutions.)
Options for paying your credit card bill include the following:
• If you selected to enter a bill to your credit card vendor, simply pay the bill as you do other bills, paying it partially or in full.
• If you selected one of the other two options, you need to create a vendor bill, and in the Account column of that bill assign the Credit Card type account you previously recorded the transactions to. The vendor bill will simply decrease the balance owed on the credit card liability account.
The cash basis balance sheet will often show this amount if it is not paid by the date you prepare your financials. For more information about how QuickBooks handles certain accounts on a cash basis, see the “When You Have Accounts Payable Balances on a Cash Basis Balance Sheet” sidebar earlier in this chapter.
Have you ever found that QuickBooks users will assign a different expense account each time they create a check or bill to pay for costs of the business? This can made reviewing your specific expenses for the business less accurate.
For several years QuickBooks had the Automatically Recall option (click Edit, Preferences and select the General, My Preferences tab). The problem with recall was that when you created a new transaction for the vendor it not only recalled the expense account but also the previous amount. Then QuickBooks 2007 had a Pre-fill Accounts choice that would prefill the expense account(s) but not the amount.
New for QuickBooks 2008, users can now assign up to three different accounts to each vendor record. Follow these steps to add these accounts:
1. From the Home page, click Vendors to open the Vendor Center.
2. Select the vendor to which you want to assign accounts, and click Edit to open the Edit Vendor dialog.
3. Click the Account Prefill tab. In the fields provided select the desired accounts from the drop-down list, as shown in Figure 11.44.
Figure 11.44 New for QuickBooks 2008 is the capability to assign multiple expense accounts to the vendor record.
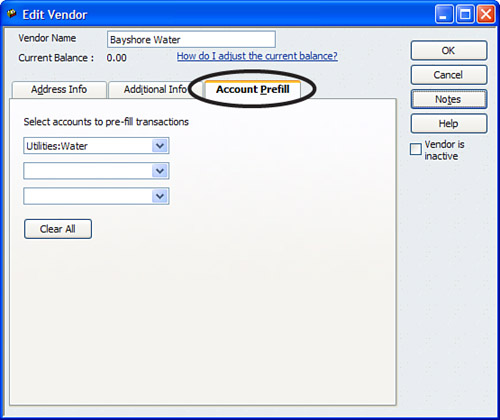
The selected accounts will override any preference setting for Recall or Prefill and will instead insert these accounts automatically on a Write Check or Bill form. This is just another method that you will find helps you keep your accounting accurate.

To determine whether you want to use accounts payable:
• You have enabled accounts payable features when you created your data file using the EasyStep Interview. (Page 276)
• You want to develop a stricter process for controlling your expenses. (Pages 270 and 273)
What to set up before using accounts payable:
• Specific accounts payable accounts. (Page 50)
• Credit card payable account, if you will be downloading transactions directly into your QuickBooks data. (Page 316)
• Properly setting up items. (Page 70)
• How items are set up where you both buy and sell the same item. (Page 270)
• Reviewing and modifying Accounts Payable preferences. (Page 276)
• Vendor’s 1099—Misc. Income tax form information. (Page 295)
• Create a Bartering bank account if you trade services with your vendors. (Page 309)
Reviewing accounts payable:
• Reconciling your A/P Aging Summary report to the Balance Sheet Accounts Payable balance. (Page 284)
• Review Unpaid Bills Detail report for unpaid transactions or open credits. (Page 285)
• Reviewing any aged open item receipts. (Page 287)
• Why accounts payable appears on a cash basis balance sheet and how to determine the transactions that make up this balance. (Page 291)
• Reviewing and preparing your year-end vendor tax documents. (Page 295)
Correcting accounts payable errors:
• Modifying the vendor check. (Page 299)
• Properly creating and applying a vendor credit. (Page 301)
• How to unapply a misapplied vendor credit. (Page 303)
• How to remove aged item receipts or vendor bills. (Page 304)
• How to handle General Journal adjustments made to your accounts payable. (Page 306)
Unique accounts payable transactions:
• Selling your product or service to your vendor (Bartering). (Page 309)
• Prepaying your vendors. (Pages 310 and 228)
• Mid-year startup balances for your 1099 vendors. (Page 312)
• Automatically having QuickBooks generate your vendor discount when paying a bill. (Page 313)
• Being reminded of recurring vendor transactions. (Page 314)
• Depositing a vendor’s refund check. (Page 316)
• Paying your credit card bills. (Page 316)