
• Preferences That Affect Sales Tax
• Sales Tax Items, Groups, and Codes
• Assigning Sales Tax Codes to Products or Services
• Assigning Sales Tax Codes and Items to Customers
• Reports to Review When Troubleshooting Sales Tax Errors
• Unique Sales Tax Transactions
Your business might sell a product or service for which your state requires you to charge and collect sales tax at the time of sale. If your business does collect sales taxes, you are simply acting as an agent for the state by collecting this fee and later remitting it to the state. Each state, county, or city may have its own sales tax rates and lists of products or services that are taxable or exempt from being taxed.
You should contact your accountant or your city/state sales tax government office to make sure your business complies with the sales tax requirements. The mistakes caused by not setting up your QuickBooks sales tax correctly, or not following your state’s sales tax guidelines, can be expensive to correct, especially if you find your business is subject to a sales tax audit by your taxing authority.
To determine whether sales tax is to be charged to a customer, QuickBooks uses the following criteria for each transaction:
• Is the sales tax preference enabled? If not, QuickBooks will not track or compute sales tax.
• Is the item being sold as a taxable item? If not, QuickBooks will not compute sales tax for that specific item.
• Is the customer taxable? If not, QuickBooks will not compute sales tax for any items, even taxable items.
To ensure QuickBooks correctly charges and tracks your sales tax, take the following required steps:
1. Set your sales tax preferences (by selecting Edit, Preferences).
2. Create your sales tax items or groups defining the rate and taxing authority to be paid.
3. Assign a taxable or non-taxable code to your products or services.
4. Assign the appropriate sales tax code and sales tax item to your customer.
Each of these steps is discussed in this chapter, as are techniques for troubleshooting and fixing errors in your sales tax setup.
Only one preference in QuickBooks directly affects sales tax collection and reporting. To locate that preference setting you must log in as the Admin user in single-user mode:
2. Select the preference for Sales Tax in the left pane.
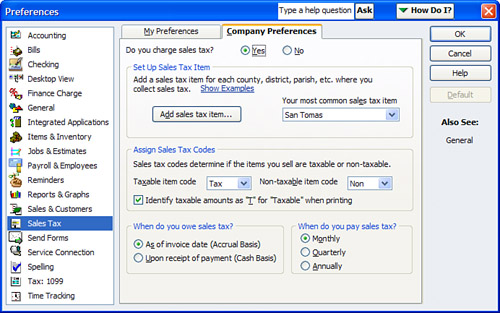
3. Click the Company Preferences tab (see Figure 12.1).
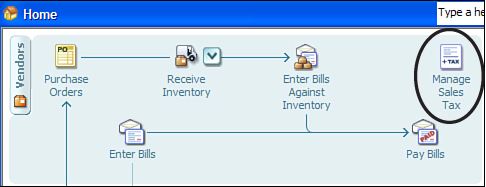
Alternatively, you can access the Sales Tax preferences from the Home page by selecting Manage Sales Tax as shown in Figure 12.2. (Sales Tax must first be enabled in Edit, Preferences, Sales Tax, Company Preferences.)
Figure 12.2 If Sales Tax is enabled you can optionally get to the Sales Tax preferences from the Home page’s Manage Sales Tax icon.
You must define each of the preference settings for your specific business needs:
• Do You Charge Sales Tax?—Click Yes if your company will be tracking sales tax. When a new QuickBooks data file is created without using the EasyStep Interview, QuickBooks defaults this setting to No. (See the section titled “EasyStep Interview—Overview” in Chapter 1, “Creating a New QuickBooks Data File.”) You can return later to this preference dialog and turn on the preference.
• Set Up Sales Tax Item—Sales Tax type items in QuickBooks record the default tax rate to charge your customers and record the taxing authority to which the sales tax collection is remitted. For more detailed information see the section in this chapter titled “Sales Tax Items, Groups, and Codes.”
• Assign Sales Tax Codes—Sales tax codes track the taxable status of the products and/or services you sell and the taxable status of the customer. You can also use sales tax codes to get reporting breakdowns on multiple types of non-taxable sales. In this preference, be sure to place an additional check mark in the Identify Taxable Amounts as “T” for “Taxable” When Printing check box. Doing so is recommended so that when a customer receives an invoice they can easily determine exactly which items the sales tax total was computed on.
• When Do You Owe Sales Tax?—The Accrual Basis selection increases your sales tax payable as of the date of the customer’s invoice. The Cash Basis selection does not increase the sales tax payable until the date of the customer payment. This setting is governed by your state or local government. If you are not sure what your state’s guidelines are, you can find Internet links to your specific state’s sales and use tax website from within the QuickBooks Help menu (see Figure 12.3):
1. To open the QuickBooks Help menu, press the F1 key on your keyboard.
2. On the Search tab, type the keyword Sales Tax.
3. Select the About Sales Tax and Overview link.
4. Click the Help Me Find This Information link.

A general description will be provided of what information you need to know. Scroll down though the topic to see a link specific to your state’s government sales tax Internet site (an Internet connection is required).
• When Do You Pay Sales Tax?—Select the appropriate payment frequency for your business as determined by your state tax authority. This setting causes QuickBooks to use this date range when it’s preparing the sales tax liability reports and creating your sales tax payment.
If you are setting up sales tax for the first time in a QuickBooks file with existing transactions, QuickBooks will prompt you with the message in Figure 12.4 to automatically set each customer and each item as taxable.
Figure 12.4 When you set up sales tax in an existing file, you can have QuickBooks automatically mark each customer or referenced item as taxable.
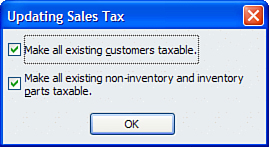
Place a check mark in the Make All Existing Customers Taxable check box if you want QuickBooks to assign your most common sales tax item as defined in the preferences.
Place a check mark in the Make All Existing Non-inventory and Inventory Parts Taxable check box if most of these items are taxable. QuickBooks does not assign the taxable item code to other item types on your item list.

Because each state has different requirements and rates for reporting sales tax, taking the time to research them and then setting up QuickBooks correctly could save your business the costly penalties incurred if you are subjected to a sales and use tax audit and found not to be in compliance.
As mentioned earlier, sales tax items and sales tax codes are required when setting up your sales tax tracking in QuickBooks. If you created your data file using the EasyStep Interview as discussed in Chapter 1, you probably have already set up your sales tax items and codes. However, I still recommend that you review this topic to make sure your initial sales tax setup was correct.
Sales tax items are used to identify specific rates charged to your customers and the tax authority vendor to which you remit the sales tax. You might have one sales tax item, or several, on your item list.
To create a sales tax item:
1. Click Lists, Item List.
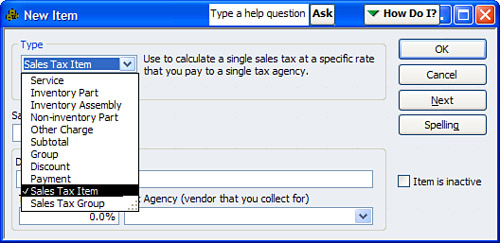
2. From the Item drop-down menu select New to open the New Item dialog.
3. Choose Sales Tax Item in the Type drop-down as shown in Figure 12.5.
4. Enter a sales tax name for the sales tax item; the name should identify the state, district, or city the tax is for (see Figure 12.6).
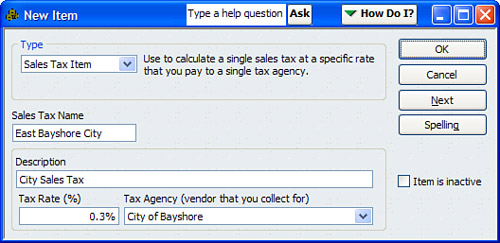
5. In the Tax Rate (%) box enter the rate this tax entity charges.
6. From the Tax Agency (vendor that you collect for) drop-down list select the vendor to which you remit your sales tax payments. If your vendor is not currently set up in QuickBooks, select Add New at the top of the list to create your vendor.
7. Click OK to save the sales tax item.
With sales tax items created you can group them into sales tax groups if your state requires collection and reporting on multiple tax entities.
Sales tax groups are optional in QuickBooks. In many states you are required to report the collection of sales tax for a combination of city, county, and state but you only have to show the customer one tax rate. In QuickBooks you can accomplish this by first creating your individual city, county, and state sales tax items, and then assigning them to a Sales Tax Group item type. The Sales Tax Group item is then assigned to the customer.
To create a Sales Tax Group item:
1. Click Lists, Item List.
2. From the Item drop-down menu select New to open the New Item dialog.
3. Select Sales Tax Group item from the type drop-down menu.
4. Enter a Group Name or Number that identifies the group.
5. In the Description box enter the description you want printed on the customer’s invoice.
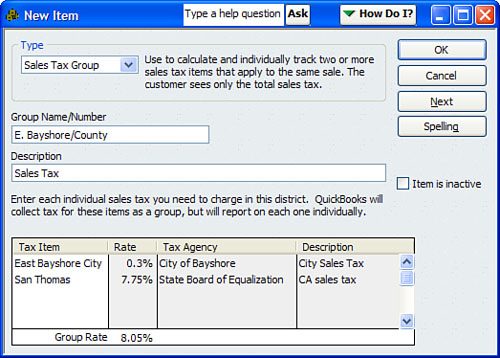
6. In the Tax Item column, from the drop-down menu select the appropriate city, county, or state sales tax items previously created (see Figure 12.7).
Figure 12.7 Use sales tax groups to track multiple taxes but show only one tax rate on a customer’s invoice.
7. Click OK to save the new Sales Tax Group item.
In the example shown in Figure 12.7, you are going to collect and pay the sales tax at a rate of 8.05 percent. Part of the payment will be made to the State Board of Equalization and the other portion will be paid to the City of East Bayshore. However, when this tax group is assigned to a customer, the invoice will show only the combined rate as being charged.
The primary purpose of sales tax codes in QuickBooks is to identify a product or service as taxable or non-taxable and identify a customer as taxable or non-taxable. If you track sales tax you will have at least one tax code for taxable but might have multiple non-taxable tax codes.
Another use of sales tax codes is for when your state has reporting requirements on the types of non-taxable sales you make. Creating a unique non-taxable sales code for each of these non-taxable sales types enables you to report the total sales on each non-taxable sales tax type.
Examples of non-taxable tax codes might include some or all of the following:
• Non-taxable reseller
• Out-of-state sale
• Sale to a nonprofit organization
• Government entity
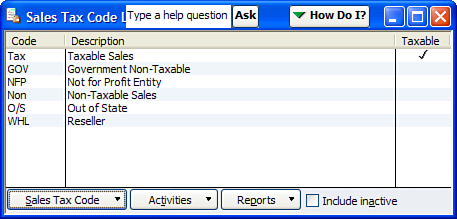
To see a list of suggested non-taxable tax codes, press the F1 key on your keyboard to open QuickBooks Help. Type sales tax code and select the non-taxable sales tax codes examples topic. QuickBooks will provide a list of commonly used sales tax codes. See Figure 12.8 for a sample sales tax code list.
When creating a customer invoice and before charging sales tax to the customer, QuickBooks determines whether the item being sold is taxable and whether the customer is assigned a taxable or non-taxable sales tax code before computing any sales tax charge on an invoice.
To create a sales tax code list or edit the existing sales tax codes, follow these steps:
1. Make sure you have enabled the sales tax preference as discussed in the section of this chapter titled “Preferences That Affect Sales Tax.”
2. Click Lists, Sales Tax Code List.
3. From the Sales Tax Code drop-down menu click New or select a sales tax code from the list and from the same drop-down menu select Edit Sales Tax Code. (Note that a new QuickBooks data file automatically defaults with one taxable tax code and one non-taxable tax code.)
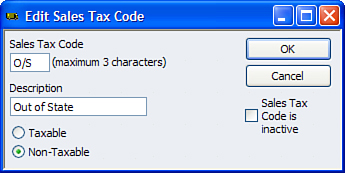
4. In the New or Edit Sales Tax dialog, enter a three-character code in the Sales Tax Code field. Make the three-digit code something meaningful. You will see this code on a New or Edit Item dialog, New or Edit Customer dialog, and optionally on the lines of the customer’s invoice (see Figure 12.9).
To complete the process, assign the appropriate code to your customer record. More detail on this is discussed in the section in this chapter titled “Assigning Sales Tax Codes and Items to Customers.”
Items are created in QuickBooks for use on sales and purchase forms. The primary purpose of creating items is to handle the behind-the-scenes accounting and to assign the taxable status for an item on a customer invoice. For general information about properly setting up items see Chapter 3, “Reviewing and Correcting Item List Errors.”
The following items in QuickBooks allow you to assign a taxable code, as shown in Figure 12.10:
• Service Item
• Inventory Part
• Inventory Assembly
• Non-inventory Part
• Other Charge
• Discount
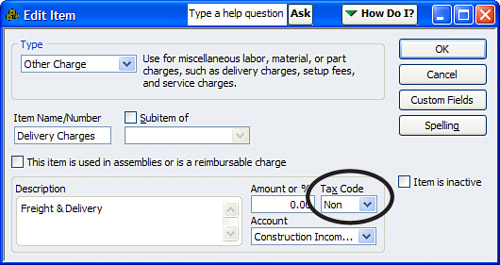
Items are typically assigned only a generic tax or non-taxable sales tax code. You might have created other sales tax codes for resellers or out-of-state sales; these more specific tax codes would be on the same list but would be assigned to customers and not the items.
If you expect to charge sales tax on an item, it should be marked as taxable even if it is sold to a non-taxable customer. As discussed in the beginning of this chapter, QuickBooks checks whether an item is taxable and then verifies that the customer is taxable before it charges sales tax.
If the item is always non-taxable even if it is sold to a taxable customer (for example, labor), it should be assigned a non-taxable sales tax code so that it will never have sales tax calculated on the sale of that item.
Some states require the sale of labor services to be taxed if it is invoiced with products and not taxed if it is invoiced separately. Although this might not be the requirement for your state, to handle this situation create two Labor Service type items—one named Taxable Labor and assigned a taxable tax code, and another named Non-Taxable Labor and assigned a non-taxable tax code. Then, depending on how you invoice your customer, you select one or the other labor item.
Enabling the sales tax preference and creating sales tax items, groups, and codes are only part of the sales tax setup. You also need to assign a tax code and a tax item to each customer.
To assign or edit a customer’s tax code (as well as tax item), as shown in Figure 12.11, do the following:
1. Click Customers from the Home page to open the Customer Center.
2. Select the customer for whom you want to assign or edit a tax code.
3. Click the Edit Customer button on the Customer Center dialog. (Or if creating a new customer, continue to the following step.)
4. In the Add New or Edit Customer dialog that appears, click the Additional Info tab.
5. Enter the appropriate Tax Code and Tax Item from the drop-down lists in the Sales Tax Information pane of the dialog.
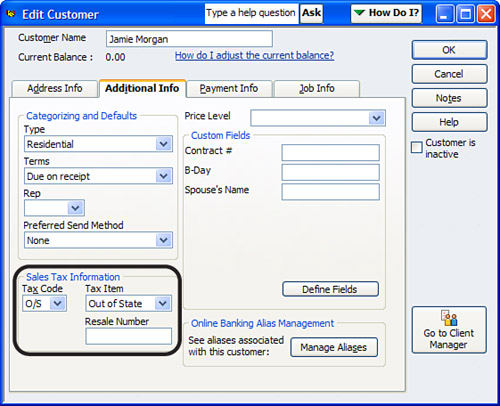
You can assign only one tax code and one tax item to each customer. You cannot assign a tax code or tax item to a job. If you have a customer with multiple locations and you are required to charge different tax rates for each location, you will need to create a unique customer for each location.
The sales tax code defines the customer as taxable or not. The sales tax item defines the rate to be charged to the customer.
Because QuickBooks allows you to save a customer record without one or both of these settings, be sure to review your customer sales tax list (discussed in the “Reviewing Customer Lists for Tax Code and Tax Item Assigned” in this chapter) often to make sure your sales tax is properly assigned to each of your customers.
This section’s title can be a bit misleading because the reports I’m referring to are reports that I recommend you review each time you get ready to pay your sales and use tax to the taxing authority. Properly “reconciling” these reports to each other helps minimize any chance that your QuickBooks data will not support what you filed on your sales tax return.
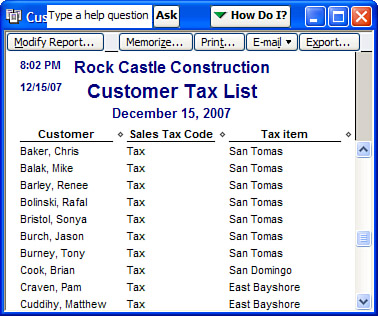
I recommend that you check often your customer’s taxable status. This task is quite easy to do often and helps prevent the costly mistakes caused by not charging sales tax or charging the incorrect rate.
1. Click Reports, Lists and select the Customer Phone List report.
2. Click the Modify Report button on the top left of the report.
3. In the Display dialog that opens, in the Columns pane, click to place a check mark next to items you want to review for the list, including Sales Tax Code and Tax Item, and include the Resale Num if you track this number for your wholesale customers.
4. Optionally, select Sort by at the top right, and from the drop-down list select Sales Tax Code.
5. Optionally, click the Header/Footer tab to change the report title.
From this list shown in Figure 12.12 you can conveniently double-click any line item detail to open the Edit Customer dialog and make any needed changes.
Figure 12.12 Prepare this report often to review the sales tax codes and items assigned to your customers and to verify the accuracy of your setup.
When you make a change to a customer’s assigned tax code or tax item or to the tax code assigned to a product or service you sell on your item list, QuickBooks will not correct or modify prior saved transactions. Only new transactions will show the change in the sales tax status or rate.
Another review that I recommend you do periodically is to look at the list of services and products that you sell and determine whether the proper tax code has been assigned (see Figure 12.13).
Figure 12.13 Prepare a report of your items and the sales tax codes assigned to them to verify the accuracy of your setup.
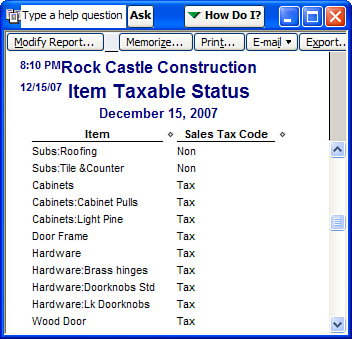
1. Click Reports, Lists and select the Item Price List report, which you will modify.
2. Click the Modify Report button at the top left of the report.
3. In the Display dialog that appears, remove check marks from those data fields you do not want displayed on this report. Place a check mark next to date fields you want to review for the list, including Sales Tax Code.
4. Optionally, select Sort by at the top right, and from the drop-down list select Sales Tax Code.
5. Optionally, click the Header/Footer tab to change the report title.
The term reconciling (also known as proofing) refers to the need to compare two related numbers from two different reports. The importance of this task cannot be overstated. If your company is selected to have a sales tax audit, one of the first numbers the auditor will want to determine is the total sales you reported on your tax returns for the time period being audited.
To compare your total sales on the Sales Tax Liability report to your total income on the Profit & Loss Report:
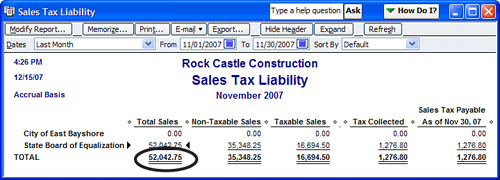
1. Click Reports, Vendors & Payables and select the Sales Tax Liability report.
2. Make a note of the total sales on this report, as shown in Figure 12.14.
Figure 12.14 Compare total sales on the Sales Tax Liability report to total income on the Profit & Loss report.
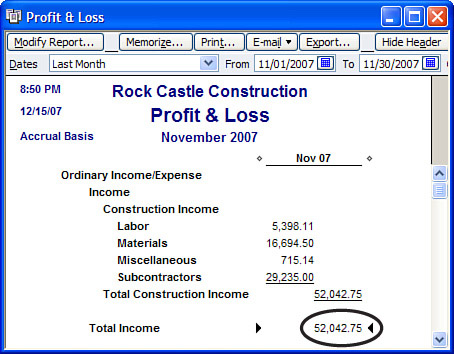
3. Click Reports, Company & Financial, and select the Profit & Loss Standard report.
4. Compare total income (see Figure 12.15) to the total sales from the Sales Tax Liability report. Note: You might have to deduct any non-sales income on your Profit & Loss Total Income amounts.
Another equally important comparison to make is between the balance on your Balance Sheet Sales Tax Payable amount and the amount showing payable on your Sales Tax Liability report.
If you created your own Sales Tax Payable account, you might not be able to correctly compare the two reports. QuickBooks creates the Sales Tax Payable account automatically. You can learn more information about automatically created accounts in Chapter 2, “Reviewing the QuickBooks Chart of Accounts.”
To compare the Balance Sheet Sales Tax Payable with the Sales Tax Liability report:
1. Click Reports, Company & Financial and choose Balance Sheet Standard (see Figure 12.16).
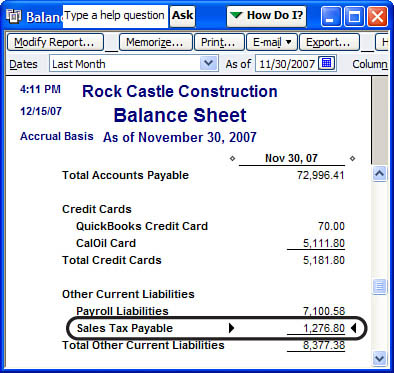
2. On the report, select the As of Date you are comparing to; this date must be the same ending date you will prepare your Sales Tax Liability report in the next step.
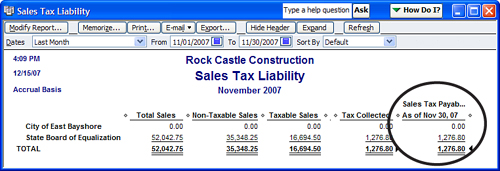
3. Click Reports, Vendors & Payables and choose the Sales Tax Liability report. QuickBooks will default the date range depending on your sales tax preference setting (see Figure 12.17).
Figure 12.17 The total sales tax liability payable should agree with your Balance Sheet Sales Tax payable.
Each month before preparing your sales tax return, compare the total of these two reports. If they do not agree, read the sections in this chapter titled “Reports to Review When Troubleshooting Sales Tax Errors” and “Fixing Sales Tax Errors.”
A common mistake is to use a write check or vendor bill form to record your sales tax payable. If these types of forms are used and the Sales Tax Payable account is assigned on the form, QuickBooks reduces the Sales Tax Payable amount on the Balance Sheet, but does not make the same adjustment in the Pay Sales Tax dialog discussed in the section titled, “Properly Paying Sales Tax.”
Use this method to find the transaction(s) that might be the cause of your not being able to compare your Balance Sheet Sales Tax Payable amount to your Sales Tax Liability report amount to be paid:
1. Open the Vendor Center by clicking the Vendors button on the Home page as shown earlier in Figure 12.2.
2. Select your sales tax vendor from the Vendor List dialog.
3. From the Show drop-down menu select Checks (or Bills), making sure that you are looking in the appropriate date range.
If you have found checks or bills, this could be one of the reasons your two reports do not agree with each other. The correct sales tax payment form is a type named TAXPMT.
Refer to the section titled, “Correcting Sales Tax Errors,” to learn how to associate these check or bill payment forms to the lines in the Sales Tax Payable dialog.
Now that you have your sales tax correctly set up you need to know how to properly pay your sales tax.
As mentioned earlier, when you collect sales tax you are acting as an agent for the state. Most often you will simply be paying to your state or city taxing authority the same amount that you collected from your customers. Sometimes your state might allow you to discount the sales tax due for prompt payment or may charge a penalty for paying late. Each of these situations is discussed in detail in this section.
After you have properly compared your Profit & Loss income total with your Sales Tax Liability report total sales and they agree, or if they don’t agree and you have identified the differences, as discussed in the section, “Reports to Review When Troubleshooting Sales Tax Errors,” you are ready to create the check to pay your sales tax.
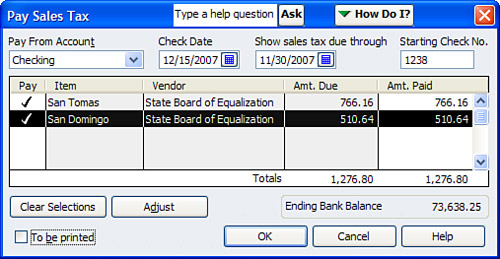
1. Click Vendors, Sales Tax and select Pay Sales Tax. The Pay Sales Tax dialog box appears (see Figure 12.18).
2. From the Pay From Account drop-down, choose the correct bank account.
You can set a user-specific default account for this drop-down by Selecting Edit, Preferences, and then choosing the Checking preference and the My Preferences tab.
3. Select the date for the check.
4. Select the appropriate Show Sales Tax Due Through date. This date should default to your preference setting as discussed early in this chapter. If the date is not the date you want to pay through, you can override it here.
5. If the check was manually created, put the check number in the Starting Check No. box. If you are going to print the check, place a check mark in the lower-left To be printed box. If you are not paying the amount in full, skip to the next section titled “Paying Sales Tax with an Adjustment.”
6. Place a check mark in the Pay column on the left for the individual items you want to pay. QuickBooks will create or print a separate check transaction for each line item with a different vendor.
7. Verify that the Amt. Paid column is in agreement with your Sales Tax Liability report for the same period.
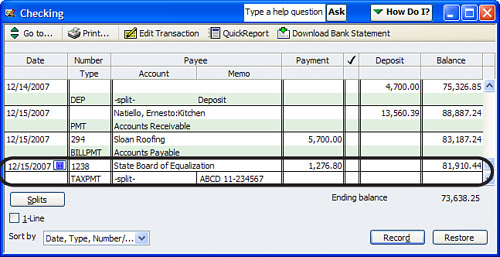
8. Click OK; QuickBooks creates a transaction with the TAXPMT type, viewable from your checkbook register as shown in Figure 12.19.
There are many reasons why your Sales Tax Payable doesn’t agree with the amount your agency is expecting you to pay, including the following:
• Discount offered for early payment
• Penalty or fee assessed for late payment
• Credit received for overpayment on a prior period’s sales tax return
• State sales tax holiday or rate reduction
• Rounding errors
If any of these apply to your business, follow these steps:
1. Perform steps 1 through 5 listed in the preceding section (“Paying Sales Tax Without an Adjustment”).
2. In the Pay Sales Tax dialog, click Adjust to open the Sales Tax Adjustment dialog as shown in Figure 12.20. Note: If you select the items to be paid first and then select the Adjust button recording the discount or increase, QuickBooks will provide a warning (refer to Figure 12.21) that your previously selected check marks will be removed and you will need to select the line items again, including the new adjustment to be paid.
Figure 12.20 You use the Sales Tax Adjustment dialog to increase or decrease your sales tax payment.

3. Select the appropriate Adjustment Date. This date should be on or before the Show Sales Tax Through date.
4. Enter an Entry No., or QuickBooks will default a number if that preference is set.
5. Select the Sales Tax Vendor for which you are decreasing or increasing your payment.
6. Select from your chart of accounts the Adjustment Account. Ask your accountant what they prefer, but typically the account can be either of the following:
• Other Income, if you are recording a discount for early payment.
• Expense, if you are recording a penalty or fine.
7. Select the option to Increase Sales Tax By or Reduce Sales Tax By and enter the appropriate dollar amount.
8. In the Memo section enter a description for your reports or accept the default description.
9. Click OK to record the sales tax adjustment. QuickBooks provides the warning message shown in Figure 12.21 when recording an adjustment to the sales tax.
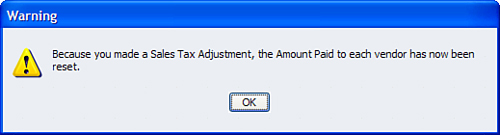
10. Click OK to close the warning.
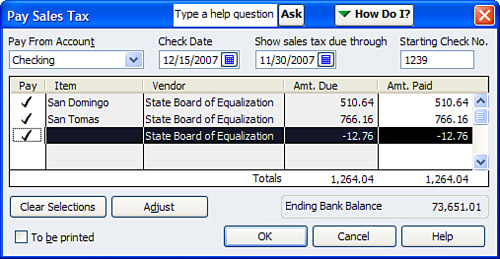
QuickBooks now shows the Pay Sales Tax dialog with an additional line showing the adjustment. This example shows a reduction in sales tax due (see Figure 12.22).
QuickBooks automatically creates a General Journal Entries form when the sales tax adjustment is recorded, as shown in Figure 12.23.

Sales tax errors can be a bit tricky to fix, so make sure you have asked yourself the following questions:
• Have you made a backup of your data?
• Have taxes or financials been prepared using the data in its current state? If yes, then you need to be concerned about the dates and types of the corrections you make.
• If the QuickBooks sales tax due is incorrect, have you determined outside QuickBooks how much was or is due?
Print your sales tax reports before you begin to make corrections to your data file. Then, when your corrections are complete print the same reports to be sure you achieved the desired end result. And, of course, keep good paper documentation of why you did what you did in case you are subject to a sales tax audit.
In newer versions of QuickBooks the error of using a check or bill form to pay sales tax should happen less often. QuickBooks provides messages to users attempting to pay their sales tax vendors incorrectly.
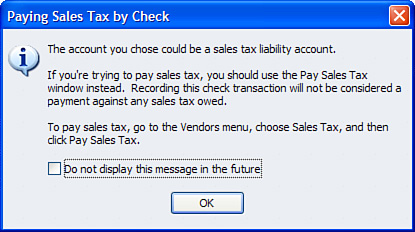
If you pay a vendor that is associated with a sales tax item, or if you use the Sales Tax Payable account on a check or bill form, QuickBooks provides the warnings shown in Figures 12.24 and 12.25.
Figure 12.24 QuickBooks warns when you create a check or bill to a vendor that is associated with a sales tax item.
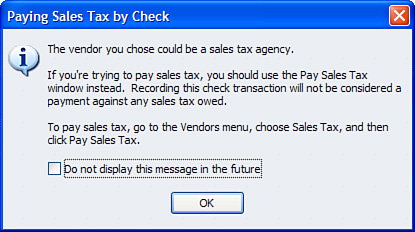
Figure 12.25 QuickBooks warns when you create a check or bill form and use the Sales Tax Payable account.
If you find your payment was made by check (or bill form), first determine whether the check has been included in a bank reconciliation; if it hasn’t, simply void the check and re-create the check per the instructions in the section titled “Properly Paying Sales Tax.”
If the check has already been included in the bank reconciliation, use this method to properly assign the sales tax payment check or bill to the line items in the Pay Sales Tax dialog:
1. Select the check or bill form from the steps listed in the previous section titled “When a Check or Bill Form Was Used to Pay Sales Tax.” Double-click the check or bill form to open the Write Checks - Account or Enter Bills dialog.
2. If not already assigned, assign the Sales Tax Payable liability account from in the Account column of the Expenses tab.
3. In the Customer:Job column, select the Sales Tax Vendor from the list of vendors (make sure it is a vendor and not an “other name” list item).
4. Click Save & Close to close the check (or bill) form.
5. Select Vendors, Sales Tax, and choose the Pay Sales Tax option.
6. Place a check mark next to each sales tax line item, including the line item with the correction to associate the check or bill payment form with the sales tax due (see Figure 12.26). If the net total amount is zero, you do not need to concern yourself with the other fields in the window.
Figure 12.26 QuickBooks now enables you to assign the corrected check (or bill) form to the sales tax payable without issuing a new check.

The net entry is zero, so no check will be issued. However, QuickBooks will now associate your check or bill payment with the related sales tax due and when you return to the Pay Sales Tax dialog, the amount previously showing as unpaid will no longer be there. If the net entry was not zero, you might need to record a sales tax adjustment as discussed in the section titled “Properly Paying Sales Tax.”
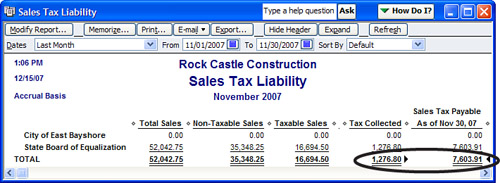
If your collected sales tax amount and the amount showing payable on the Sales Tax Liability report do not match, as shown in Figure 12.27, it is because there are sales taxes collected previous to the current report’s Sales Tax Through date that remain unpaid. Perhaps the payments were made by check or bill, in which case you should correct these errors following the instructions provided in the preceding section.
Figure 12.27 When the total collected and the sales tax payable do not match, prior sales taxes have not been recorded as paid.
Follow these steps to verify the totals and to make the needed corrections:
1. Click Vendors, Sales Tax and select the Sales Tax Liability report.
2. From the Dates drop-down list select This Month-to-Date.
3. If the Tax Collected and Sales Tax Payable totals match, your sales tax payment made previously was probably given the wrong Show Sales Tax Through date. To fix this error, you can void and reissue the payment or simply expect that the correction will catch up with you in the current month.
4. If the two totals do not match, verify that the tax collected for the current period is correct. You can verify this amount by reviewing the invoices you have issued for the month.
5. Verify that the tax collected for the prior period was correct.
6. Determine to what account(s) your sales tax payments were incorrectly recorded. The previously made payments would cause these accounts to be overstated.
In the example in Figure 12.28 it was determined that a Sales Tax Expense type account was created, and the check and bill payments had been recorded to this expense account in error.

7. Select Company, Make General Journal Entries to create a correcting entry.
8. Date the entry in the period you are correcting.
9. Give the entry a number, or let QuickBooks automatically number it if that is a preference you have set.
10. Leave the first line of the general journal entries form blank.

Leave the first line of any Make General Journal Entries form blank because QuickBooks uses this line as the source line. Any list item in the name column on the first line (source line) of a general journal entries form will also be associated in reports with the other lines of the same general journal entries form. See the sidebar titled “Caution When Using General Journal Entries” in Chapter 11 on page 306 for more specific details.
11. On the second line in the Account column select the Sales Tax Payable liability account.
12. Enter a debit amount if you are decreasing your sales tax payable amount; enter a credit amount if you are increasing your sales tax payable amount.
13. On the third line select the account that was discovered to be overstated or understated in your review (see step 6).
14. Enter the same amount from line 2 in the opposite column (debit or credit) from the previous line. Verify that your debits are equal to your credits.
15. Click Save & Close to close the General Journal form.
You will now be able to select this line item with other sales tax lines for future tax payments, as shown in Figure 12.29.
Figure 12.29 After you make the General Journal correcting entry, QuickBooks should show the correct amount due for the current period in the Pay Sales Tax dialog.

You may opt for this method to fix many months’ errors with one journal entry and then have in place better controls for future sales tax management.
One of the important comparisons to make is the Sales Tax Liability total sales with the Profit & Loss Standard total income. Both of these reports are discussed in the section titled, “Reports to Review When Troubleshooting Sales Tax Errors.” Before comparing the reports, make sure both are created using the same accounting basis: accrual or cash.
After you have reviewed your Profit & Loss statement and determined which transactions are causing the imbalance, you can create a General Journal Entries from to correct the records:
1. Verify that Total Sales on the Sales Tax Liability report does not agree with total income on the Profit & Loss Standard report. (See the section in this chapter titled, “Reports to Review When Troubleshooting Sales Tax Errors.”)
2. Determine which items were used on invoices and were not mapped to an income account. (For a detailed discussion of this topic see Chapter 3.)
3. Decide whether you will be correcting the items, as discussed in Chapter 3, and letting QuickBooks go back and fix previous transactions automatically. This method will affect prior period financials.
4. If you choose to not affect prior financials, Select Company, Make General Journal Entries.
5. Enter a date for the transaction, typically in the current accounting period if you are not going to correct prior periods.
6. Enter a number for the transaction or let QuickBooks automatically assign the number.
7. Leave the first line of the General Journal blank as discussed in the Rescue Me on page 346.
Over the years I have come across some unique sales tax transaction tracking needs. This section addresses several that you might find useful if your state has similar guidelines.
As always, because you are acting as the “agent” for the state in collecting sales tax from your customers, you should take the time to research your own state’s guidelines especially when your state has unique guidelines for charging and collecting the sales tax.
Your state might require you to collect and track multiple sales tax rates depending on where the customer is located. If you have a customer with different tax rate locations, you will need to create a customer for each tax location if you want QuickBooks to automatically collect the correct tax amount because QuickBooks tracks the sales tax rate to the customer and not to the job.
See the section, “Sales Tax Items, Groups, and Codes” in this chapter for a complete discussion of how to handle this unique transaction type.
I have encountered having to track a state-imposed maximum sales tax a few times. If your state imposes a maximum sales tax for a certain type of sale I recommend the following method:
1. Click Lists, Item List. From the Item drop-down menu select New to create a new list item. The New Item dialog appears.
2. If you do not have a subtotal item on your list, choose Subtotal from the Type drop-down list.
3. To create the new sales tax item follow steps 1 and 2 and select Sales Tax Item from the Type drop-down list.
4. For the Sales Tax Name use See Above. This name is what is viewable by the QuickBooks user when selecting this sales tax item (see Figure 12.30).
Figure 12.30 Create a sales tax item to be used on an invoice that has multiple sales tax rates charged.
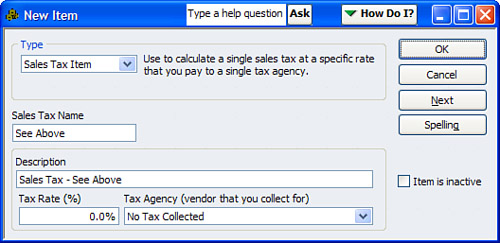
5. For the description, I simply add at the end of the default description See Above. This is the description that will print on the customer’s invoice.
6. Leave the Tax Rate at the default of 0.0%.
7. For the Tax Agency I create a vendor named No Tax Collected and do not assign it an address or any details. Because no tax will be collected with this item (because it has a rate of 0%) a check will never be prepared. Click OK.
8. To create the invoice to your customer, click Customers, Create Invoices and complete the invoice as detailed in steps 9 and 10.
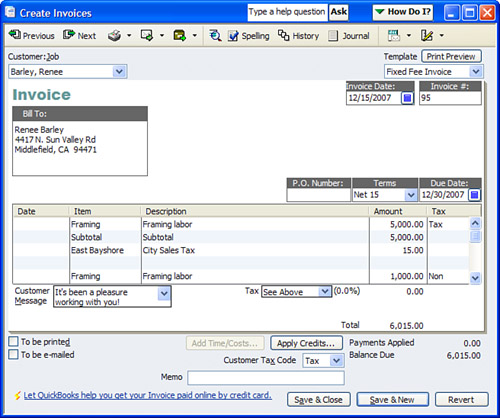
9. Enter a subtotal line after the appropriate amount that is to have sales tax collected on it. In Figure 12.31 the example is of a customer that has sales tax collected only on the first $5,000.00 of sales on the same invoice. Sales in excess of $5,000.00 in this example are not taxable (see Figure 12.31).
Figure 12.31 Example of a customer invoice that only has the first $5,000.00 of charges marked as taxable.
10. Enter the remaining items on the invoice, making sure to select the Non-taxable sales code for the lines not taxable or select the non-taxable items.
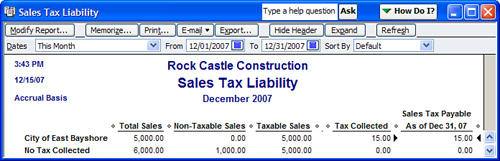
QuickBooks will record properly the total sales of $6,000.00 but will show only $5,000 in the Taxable Sales column of the Sales Tax Liability report, as shown in Figure 12.32.
In particular, if your business sells retail items, liquor, and food all on one sale, chances are that each item type is subject to a unique sales tax rate. Follow the same steps listed in the preceding section for creating the subtotal item and 0% sales tax item. Assign this 0% “See Above” sales tax item to your customer.
Next, create your customer’s invoice as detailed in the previous section, following these additional steps:
1. Make sure you have created a sales tax item for each sales tax rate to be charged and name them so that the customer will be able to tell exactly what the rate was for.
2. Enter the line item(s) subject to one tax rate.
3. Enter a subtotal line.
4. Enter the appropriate sales tax item.
5. Enter additional invoice lines, each with a subtotal and appropriate sales tax items.
QuickBooks will now accurately collect and report on the correct amount of sales tax charged for the different item types being sold.
To further clarify this point, the example shown in Figure 12.33 does not track sales by customer, but just a retail summary for the day’s sales. The example also shows how to charge multiple sales tax rates on a single invoice by placing a subtotal after each group of sales and then placing the correct sales tax rate after the subtotal.

If you would like more information on this, you can press the F1 key on your keyboard to open QuickBooks help. Click on the Search tab and on the top search bar type “sales summaries” and follow the link for more information on this topic.
Although issuing customer credit memos is necessary for correct reporting when you file your sales tax on accrual basis (sales tax payment liability accrued as of the date of the customer invoice) and not required when you report sales tax liability on cash basis (sales tax payment liability not accrued until the date of customer’s payment), I still recommend having controls in place that limit the ability to modify an invoice from a prior month.
After you have filed your sales tax return with your state, you should not adjust any invoices or sales tax payments recorded on or before your file-through date. If you do, QuickBooks will recalculate the taxable sales, non-taxable sales, and amount owed, and your return as filed with the state will no longer agree with your QuickBooks data.
In Chapter 15, “Sharing Data With Your Accountant or Your Client,” I discuss setting a closing date for your data. I recommend that this same control be placed in your file after preparing your monthly or quarterly sales tax returns for your state.
Instead of adjusting a customer’s invoice, consider using the QuickBooks customer Credit Memos/Refund form. For example, suppose you charged sales tax to a non-taxable customer by mistake. Let’s also assume that you have filed your accrual basis sales tax return for the month of that invoice, effectively overstating taxable sales.
Creating a credit memo reduces taxable sales, increases non-taxable sales, and credits the customer’s invoice for the sales tax amount, all within the current sales tax month.
1. Click Customers, Create Credit Memos/Refunds.
2. From the Customer:Job drop-down menu select the appropriate Customer or Customer:Job for which you need to issue the credit memo. Choose a date, often in the current sales tax month. For the detail beginning with line 1 of the credit memo, enter the line or lines of sales items exactly as they were recorded on the original invoice with positive amounts (see Figure 12.34).
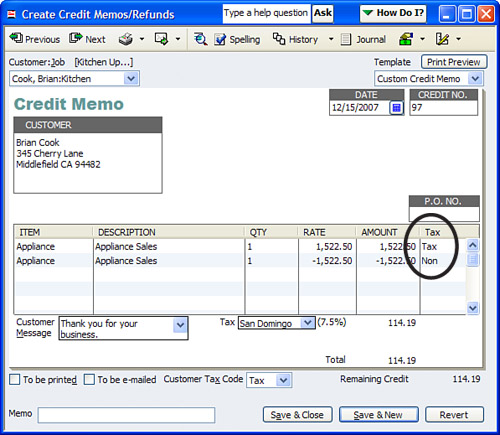
3. On the remaining lines enter the same items, each with a negative rate, making sure that Non-taxable is the sales tax code assigned to these lines. The net effect of the credit memo will be to show a credit equal to the sales tax amount charged on the customer’s original invoice.
4. Click Save & Close. QuickBooks opens the Available Credit dialog where you can choose how to handle the resulting credit (see Figure 12.35).


Determine whether you need to track sales tax:
• Let the QuickBooks help menu take you to your states sales tax website. (Page 322)
What to set up before tracking sales tax payable:
• Having QuickBooks automatically create the Sales Tax Payable liability account. (Page 50)
• Understanding item types in QuickBooks. (Page 68)
• Using the proper accounts receivable forms. (Page 144)
• Setting sales tax preferences specific for your company. (Page 322)
• Creating sales tax items for each unique sales tax rate. (Page 326)
• Creating sales tax codes to assign to items and for tracking sales totals for non-taxable sales. (Page 328)
• Creating sales tax groups if you collect and remit sales tax to more than one tax entity but only show the customer a single tax rate. (Page 327)
• Assigning sales tax codes to your products or services you sell. (Page 330)
• Assigning sales tax codes and sales tax rates to your customers. (Page 331)
Reviewing sales tax payable:
• Reviewing the sales tax code and sales tax rate assigned to your customers. (Page 332)
• Reviewing the sales tax code assigned to the products and services you sell. (Page 333)
• Reconciling monthly your total sales on your sales tax liability report to total income on your profit and loss report. (Page 334)
• Reconciling monthly sales tax payable on the sales tax liability report to your sales tax payable balance on your balance. (Page 336)
• If a check or bill form was used to pay the sales tax liability. (Page 337)
• If your sales tax liability is overstated. (Page 345
• Paying sales tax without an adjustment. (Page 338)
• Paying sales tax with an adjustment. (Page 340)
Correcting sales tax errors:
• When a check or bill form was used in error to pay sales tax. (Page 343)
• If your sales tax liability report shows you owe more than you do. (Page 345)
• What to do when total sales on your sales tax liability report does not agree with total income on your profit and loss report. (Page 347)
Unique sales tax transactions:
• Tracking and collecting sales tax for multiple tax entities. (Page 348)
• Creating an invoice with a maximum sales tax amount. (Page 348)
• Charging multiple sales tax rates on a single invoice. (Page 350)
• What to do if you have charged a customer sales tax in error. (Page 352)