
• Payroll & Employees Preference
• Payroll Forms and Workflow in QuickBooks
• Using the Run Payroll Checkup Diagnostic Tool
• Reports to Review When Troubleshooting Payroll
• Adjusting Payroll Liabilities
• Unique Payroll Transactions and Processes
If your company defines employees as, “a person in the service of another under any contract of hire, express or implied, oral or written, where the employer has the power or right to control and direct the employee in the material details of how the work is to be performed,” then your company is probably responsible for paying wages, collecting certain federal and state payroll taxes, and filing quarterly and annual forms.
Much like dealing with sales tax, your company becomes an agent of the state and federal government remitting the collection of certain payroll-related taxes on pre-determined payment schedules.
Properly setting up your payroll is certainly one of the most important tasks you have when creating a new QuickBooks data file or reviewing an existing data file. This chapter shows you not only how to set up your payroll properly, but also how to efficiently review your data and handle some of those unique payroll transactions.
This chapter introduces you to the many tools already built into QuickBooks to make setting up and reviewing your data easy and efficient. I also share with you some common ways to handle those unique payroll transactions. First, you need to select a payroll service option. Intuit offers several choices; one is certain to be right for your company’s needs.
To have QuickBooks automatically calculate your payroll, you need to purchase a payroll subscription from Intuit in addition to your QuickBooks software.
The QuickBooks Financial Software partnered with an Intuit-provided payroll service makes setting up payroll, collecting taxes, remitting timely payments of the collected taxes, and filing the required payroll reports easy.
When you create a new data file, or if you have not previously purchased a payroll subscription, you can click the Learn about Payroll Options icon on the QuickBooks Home page to see your options. Or you can visit http://quickbooks.intuit.com/.
As of the writing of this book Intuit has the following payroll service options, one of which is sure to meet the needs of your company (see Table 14.1).
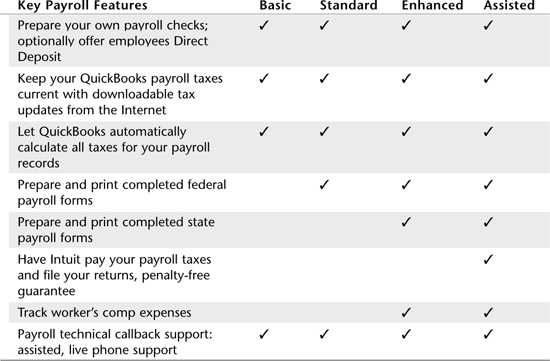

Each of these payroll options requires a paid subscription; visit the website listed previously for current pricing.
You can select the Basic option if you are going to partner your payroll reporting with your accountant. Or choose other options, such as Assisted if you want Intuit to make your payroll payments and file your forms.
After you sign up for one of the Intuit payroll subscription offerings, you will need to enable payroll and set some payroll-specific and employee-specific preferences as follows:
1. Log in as the Admin user for your data file and in single-user mode.
2. Click Edit, Preferences and select the Payroll & Employees preference from the left side.
3. Click on the Company Preferences tab as shown in Figure 14.1.
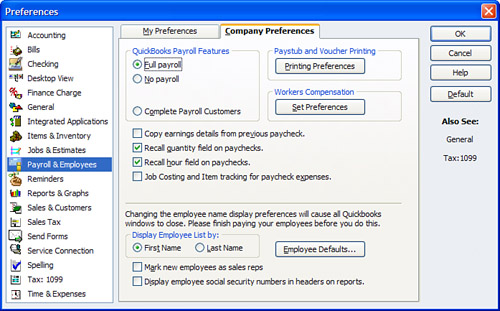
4. Click the Full Payroll button in the QuickBooks Payroll Features pane. This button enables the remaining features in the Preferences dialog.
5. Click the check box next to the features that are appropriate to your business:
• Copy earnings details from previous check (copies hours, rates, and Customer:Jobs from prior paycheck).
• Recall quantity field on paychecks (recalls line 1 of a previous paycheck, payroll item, and rate only; no Customer:Job recalled).
• Recall hour field on paycheck (recalls total hours only and places total number of hours on a single line even if prior paycheck had several lines).
• Job Costing for paycheck expenses (enables QuickBooks to add the cost of company-paid taxes to the burdened costs for time that is assigned to a Customer:Job). QuickBooks also offers the Class Tracking by Paycheck or Earnings Item option if you have the class tracking preference enabled.
6. Display Employee list by selecting the button to display your employee lists by first name or last name.
7. Click the check box next to Mark new employees as sales reps if you want new employees automatically added to the sales rep list and available to be added to a customer invoice form.
8. Click the check box next to Display employee social security numbers in headers on reports if you want to display this sensitive information on reports.
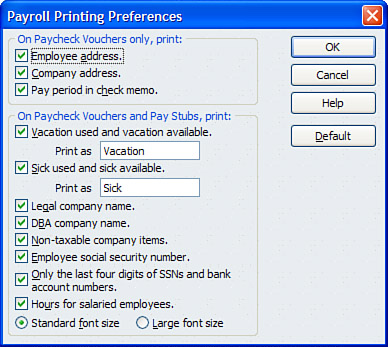
9. Click the Printing Preferences button to open the Payroll Printing Preferences dialog shown in Figure 14.2. In the printing preferences dialog you can customize what detail will print on employees’ paycheck stubs.
10. Click the Set Preferences button in the Workers Comp Preferences pane to set the preference to track worker’s comp, to be warned when worker’s comp is not assigned, and to exclude overtime hours from workers compensation calculations.
11. Click the Employee Defaults button to set default employee rates, tax preferences, pay schedule, and many other options. Using this setting can save data entry time when you are creating new employees because your common employee defaults will pre-fill when setting up new employees.
Payroll is like other areas of QuickBooks—it works best when the forms designed for use in this module are used to manage payroll expenses and liabilities. By following the proper payroll workflow you can ensure that payroll is done correctly.
The following forms are unique to payroll processing:
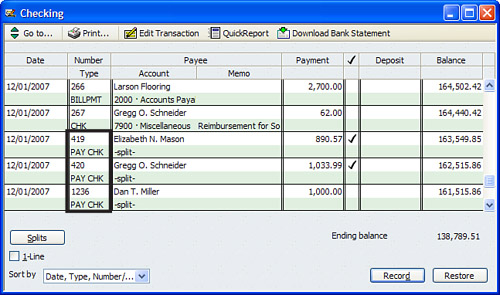
• Paycheck—The only form used by QuickBooks to pay an employee and automatically calculate all additions and deductions. You can identify these in your bank register as the transactions with a PAY CHK transaction type as shown in Figure 14.3.
Figure 14.3 Properly created employee paychecks look like this transaction in your checkbook register.
• Payroll Liability Adjustment—The only form used by QuickBooks to modify the balances computed from actual paychecks. Click the Employee radial button if the adjustment needs to affect an employee’s year-end W-2 form (see Figure 14.11 later in this chapter). This form also can affect your account balances, depending on what type of correction is to be made. For example, if the Balance Sheet report is correct but the Payroll Liabilities Balances is incorrect, you can create a payroll liability adjustment and click Affect Accounts and choose to Not Affect Account Balances. You can identify these transactions in your bank register as transactions with a LIAB CHK transaction type.
• Deposit Refund for Liabilities—You use this special deposit form to record any refund received from overpaying your payroll liabilities. (See Figure 14.25 later in this chapter.)
You can conveniently create these forms from the Payroll Center, accessible from the QuickBooks home page, employees section.
These forms are the only ones recognized by the payroll module when you are preparing payments of payroll liabilities due or when preparing state and federal payroll reports in QuickBooks. (Your ability to prepare the state and federal forms is dependent on the type of payroll service subscription you have.)
The payroll workflow is much more defined beginning with the 2006 release of QuickBooks, making setting up and managing payroll tasks easier than before. Improved features include the Employee Center, Payroll Center, Scheduled Payroll, and Scheduled Payroll Liabilities.
The preferred payroll workflow that I detail here, when combined with the proper review of reports, can help you manage your company’s payroll efficiently and accurately.
Follow the steps in this general payroll workflow order:
1. Sign up for an Intuit Payroll Subscription at http://quickbooks.intuit.com/, or, if you have not signed up for a payroll service, click the Learn about Payroll Options link located directly on the QuickBooks Home page in the payroll workflow area.
2. Set Payroll and Employee preferences for your company. (See the section earlier in this chapter titled, “Payroll & Employees Preference.”)
3. Complete (if your data is new) the Payroll Setup or perform a payroll data review (for existing payroll) with the Run Payroll Checkup diagnostic tool. (See the sections, “Using the Payroll Setup” and “Using the Run Payroll Checkup Diagnostic Tool” in this chapter.)
4. Set up scheduled payrolls and conveniently pay your employees directly from the QuickBooks home page.
5. Pay your scheduled payroll liabilities, also accessible from Payroll Center. For more details on this newer feature, see the section in this chapter called “Scheduled Payroll and Liabilities.”
6. Reconcile your bank account each month to identify any uncleared payroll checks that you do not expect to clear your bank.
7. Review and compare your financials and payroll reports frequently. (See the section “Comparing Payroll Liabilities Balances to the Balance Sheet” later in this chapter.)
8. Prepare your quarterly state and federal payroll forms directly in QuickBooks (depending on which payroll subscription you have purchased).
The purpose of this book is to provide methods for reviewing and correcting existing data. With the enhancements made in QuickBooks 2006 and improved in QuickBooks 2007 and 2008, new users as well as advanced users will find payroll setup much easier to do. And with the enhanced Run Payroll Checkup diagnostic tool, troubleshooting payroll just got a lot easier.
Using the Payroll Setup tool is helpful to both new and existing QuickBooks payroll users.
• New Users to QuickBooks Payroll—The Payroll Setup will help you with your payroll setup
• Existing Users QuickBooks Payroll—The Payroll Setup will prefill the dialogs in the setup tool with your information, notifying you of any missing information
For new QuickBooks payroll users, have the following information available before you begin the Payroll Setup tool:
• Compensation payment items: hourly, salary, and vacation to name just a few.
• Other additions or deductions to payroll.
• Employee name, address, and social security number, as well as other relevant information you want to track.
• Payroll tax payment schedules and rates; that is, what frequency your business is required to pay payroll taxes, including the rate you pay for your state unemployment payroll tax, also known as SUTA.
• If starting payroll during the year, have available your employees’ year-to-date amounts paid. It can be useful to have these amounts totaled by the payroll calendar quarter. (For more detailed information on this, see the section “Setting Up Payroll Mid-Year,” later in this chapter.)
• Year-to-date payroll liability payments made prior to using QuickBooks to produce your payroll liabilities.
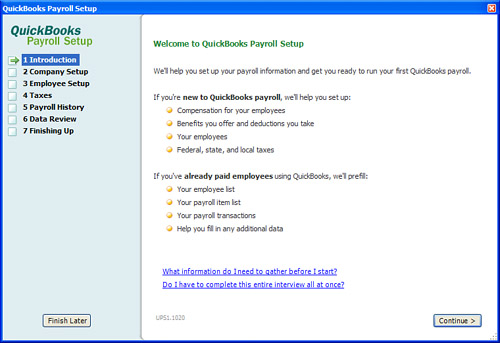
To begin setting up payroll, click Employees and choose the Payroll Setup menu option. QuickBooks takes a few minutes to load the Payroll Setup dialog. The first page of the payroll setup is shown in Figure 14.4.
Figure 14.4 Use the Payroll Setup dialog to start a new payroll in QuickBooks or to check an existing payroll setup.
When you click Employees, if you do not have a Payroll Setup menu choice it is probably because you have not yet signed up for one of Intuit’s payroll subscriptions. See the earlier section, “Payroll Service Options,” for more information.
The Payroll Setup tool prompts with the following dialogs, which must be completed or reviewed in this order:
1. Introduction—Explains some of the basics of this tool.
2. Company Setup—Here you define your compensation items and any employee benefits you offer.
3. Employee Setup—Enter personal information, pay rates, and form W-4 information as well as any direct deposit information.
4. Taxes—Identify your state tax identification number and tax agencies you pay as well as any applicable local payroll taxes.
5. Payroll History—This menu provides the option to indicate whether you have had payroll earnings prior to starting payroll in QuickBooks. If you choose No to your company issuing prior paychecks, QuickBooks skips the remaining submenus of this step. If you choose Yes, QuickBooks provides summary screens to enter employee year-to-date earnings and record your prior payroll liability payments.
6. Data Review—This menu is optional for the Standard and Enhanced Intuit payroll subscriptions (see the beginning of this chapter). If you chose Yes at this step QuickBooks performs a diagnostic to review your payroll setup and paycheck data; any errors will be identified. If you chose No to the reviewing, QuickBooks advances to the next menu in the payroll setup.
For more detailed information on this menu see the following section, “Using the Run Payroll Checkup Diagnostic Tool.”
7. Finishing Up—Overview information is provided about where you can find the information you have set up as well as instructions on how to use the Payroll Center. This menu is useful for any company new to using QuickBooks payroll.
Any time the Payroll Setup identifies an error, you can either correct the error at the time or select Finish Later to exit the Payroll Setup. You will be able to return to where you left off, but you cannot go forward without first fixing any identified errors.
The next section discusses the Run Payroll Checkup menu option in QuickBooks. You will find many similarities in the Payroll Setup menu option number 6 to the Run Payroll Checkup diagnostic tool.
After you have subscribed to one of Intuit’s payroll services, modified the payroll preferences to meet your company’s specific needs, and completed the payroll setup, and you have created payroll checks in QuickBooks, you are now ready to complete the Run Payroll Checkup.
This menu option is similar to the previously listed step 6 in the Payroll Setup feature. In fact, when you open the Run Payroll Checkup diagnostic tool it also opens the Payroll Setup feature but some of the menus are modified.
What makes the Run Payroll Checkup tool different than the Payroll Setup tool? After you have set up your payroll, you will most likely use the Run Payroll Checkup tool to diagnose errors with both setup and transactions because it does not require you to preview all the setup information provided in the Payroll Setup menu.
The QuickBooks Run Payroll Checkup allows you to “Finish Later” and return where you left off. Before you begin the Run Payroll Checkup dialog, make sure you have the following information available:
• Employees’ names, address, social security numbers, and state for W-2
• Compensation, benefits, other additions, or deductions your company offers
• Prior payroll wage and tax totals if starting a payroll mid-year

When performing a diagnostic review of the previous quarter or current quarter payroll, you will not be able to continue to the next screen without successfully correcting any discrepancies found.
You will want to print the details of the error screen and then close the Run Payroll Checkup diagnostic tool to make the needed corrections.
The QuickBooks Run Payroll Checkup diagnostic tool (also known as Payroll Setup) assists in setting up or reviewing your existing payroll data for:
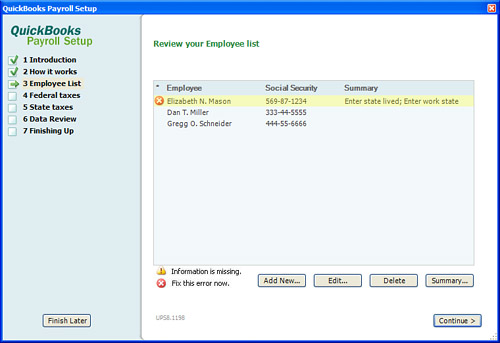
• Missing or incomplete information for employees, as shown in Figure 14.5
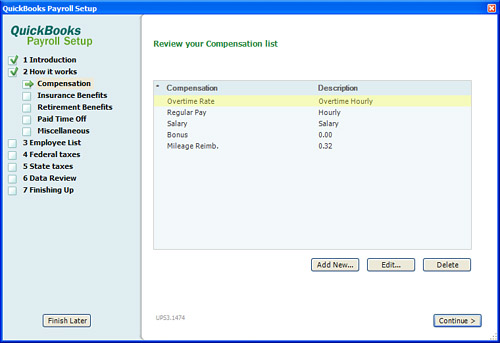
• Compensation items, other additions, and deductions for missing or incomplete information (see Figure 14.6)
• For existing data, review of actual wage and tax amounts provides an alert if any discrepancy is found, as shown in Figure 14.7.
Figure 14.7 Alert provided if the QuickBooks Payroll Setup diagnostic tool detects wage or tax errors.

The Run Payroll Checkup diagnostic tool is optional for Intuit’s Basic, Standard, or Enhanced Payroll subscribers. If you subscribe to Intuit’s Assisted Payroll (see the section, “Payroll Service Options,” in this chapter) you are required to complete the Run Payroll Checkup diagnostic tool before processing a payroll.
However, I recommend that you process the Run Payroll Checkup (click Employees, My Payroll Service and select Run Payroll Checkup) regardless of what payroll option you select. Running the Payroll Checkup diagnostic at least as often as once a quarter before your quarterly payroll tax returns are prepared will help ensure that your data is correct.
Be prepared to take the time to fix the errors that are detected. The QuickBooks Run Payroll Checkup diagnostic tool will not allow you to go to the next review dialog until the errors are corrected. You can, however, leave the tool and later return to where you left off.
To have the payroll diagnostic tool within QuickBooks review your payroll setup for missing information and paycheck data for discrepancies, do the following:
1. Click Employees, My Payroll Service and select the Run Payroll Checkup menu option. Follow each of the dialogs through step 5, clicking Continue through each window. Note: If QuickBooks detects an error in the setup, it will identify the error and you will need to correct it before moving on through the remainder of the payroll checkup, or click Finish Later to leave the Run Payroll Checkup and return later to finish the review.
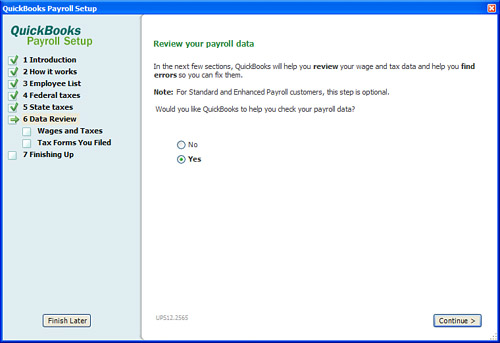
2. In the Review Your Payroll Data dialog (step 6), click Yes (see Figure 14.8). Note: Be sure to say Yes to menu 6, Data Review, in the Payroll Checkup (Setup) tool. QuickBooks will then check the payroll setup and data you have recorded for accuracy.
Figure 14.8 Click Yes when you want the Run Payroll Checkup diagnostic tool to verify wages and taxes for prior quarters and/or the current quarter.
3. If errors are detected (refer to Figure 14.7), click the View Errors button and QuickBooks will open the error detail, as shown in Figure 14.9.
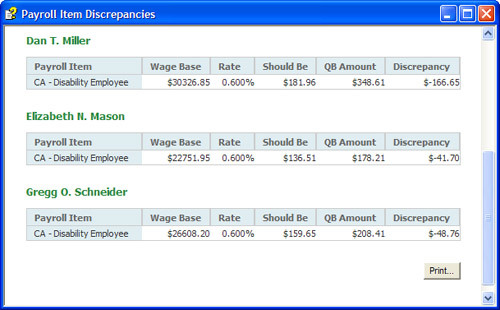
4. Click the Print button in the Payroll Item Discrepancies dialog, as shown in Figure 14.9. You must close this dialog before creating any adjusting entries.
5. Click the Finish Later button to close the Run Payroll Checkup diagnostic tool so that you can create correcting entries.
Carefully consider the adjustments that need to be made if they affect a prior calendar quarter that has already had the necessary payroll returns filed.
Be prepared to promptly file a correcting return with the federal government or state agency when you adjust your QuickBooks payroll data from what was previously reported.
Correcting prior quarters can often be the best choice, especially if your data is ever audited.
Using the errors displayed earlier in Figure 14.7 as an example, the following are the typical steps for correcting them. (Your errors will be different and might require adjustments to other types of payroll items than are displayed in this example.)
1. Click Reports, Employees & Payroll and select Payroll Summary. Review this report for either prior or current payroll quarters (depending on where the error was detected). In Figure 14.10 you can easily compare your Payroll Summary report to the Payroll Item Discrepancies report in Figure 14.9. The QB Amount should equal what your Payroll Summary report shows when printed today.
Figure 14.10 Compare your Payroll Summary report to your Payroll Item Discrepancies QB Amount column.

2. Click Employees, Payroll Taxes and Liabilities, and select Adjust Payroll Liabilities to open the Liability Adjustment dialog shown in Figure 14.11.
Figure 14.11 Create a payroll liability adjustment when correcting payroll from previously filed payroll quarters.

3. Enter the Date and Effective Date. Both should be dated in the quarter you want to effect the change.
4. Select either Company or Employee for the adjustment. Company indicates it is a company-paid adjustment. Employee indicates an employee-paid adjustment and will affect W-2 reported amounts.
5. Optionally, assign a Class if your business tracks different profit centers.
6. You click Accounts Affected only if you do not want to affect balances. This would be necessary if your Balance Sheet is correct but your Payroll Liabilities balances are incorrect.
7. Click OK.
8. QuickBooks might open another dialog (see Figure 14.12) with the default account that is going to be affected. QuickBooks shows you this dialog to suggest the recommended account for the adjustment based on how the payroll item is set up. If you need to change the account assignment, choose the appropriate account from the drop-down menu.
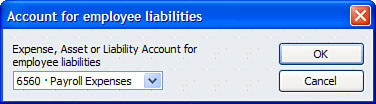
9. Click OK to save the transaction.
10. Return to the Run Payroll Checkup menu to review your payroll data again after the correction. If your adjustments were successful, QuickBooks displays a Congratulations message showing all adjustments have corrected the discrepancies.
Using the QuickBooks Run Payroll Checkup diagnostic tool can be one of the most useful ways to review and validate the accuracy of your payroll data. You can also review your data setup and accuracy manually, by reviewing the reports detailed in this section.
One of the first reports I prepare when working with a customer is the Payroll Item Listing.
Click Reports, Lists, and select Payroll Item Listing. You will not need to modify or filter this report (see Figure 14.13).
Figure 14.13 Review the Payroll Item Listing report to manually verify that QuickBooks payroll is set up correctly.
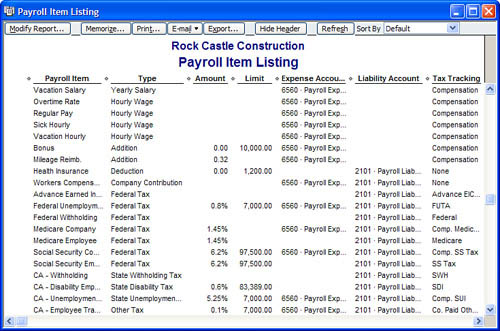
The Payroll Item Listing report provides several pieces of critical information (see Figure 14.13):
• Type—This is from a predefined list in QuickBooks. The type determines whether it is added to gross wages, or deducted.
• Amount—This figure is determined by the QuickBooks-provided payroll tax tables, with the exception of State Unemployment, which is user defined.
• Limit—This figure is determined by the QuickBooks-provided tax tables and is not modifiable by the user. Incorrect limits could be due to a payroll tax table that is not current.
When you review your company’s payroll item listing do the tax limits listed not match up to what the IRS currently requires? You might need to update your QuickBooks payroll tax table. To update your payroll tax tables your company’s payroll subscription must be active.
Click Employees, Get Payroll Updates to see the current status of your payroll subscription. This information is also shown on the Payroll Center, which you can access from the Home page.
• Expense Account—If the payroll item type is considered an expense, users can define the default expense account from the chart of accounts list in the payroll setup. QuickBooks defaults this account to a generic Payroll Expense account that is created automatically by QuickBooks when payroll is enabled.
• Liability Account—This account is used for payroll items that are accrued with payroll and paid to the state or federal government. QuickBooks defaults these items to a generic liability account created when payroll is enabled. You can define what liability account is assigned but you should use the one QuickBooks provides if you want to see certain warnings that are provided when you try to create a transaction incorrectly.
• Tax Tracking—When you create a new payroll item and select a payroll item type, QuickBooks provides a predetermined list of tax tracking types associated with that item type. Tax tracking determines how QuickBooks treats the item on the W-2 year-end employee tax form.
You should also compare your Balance Sheet payroll liabilities account balance to the amount on the Payroll Liabilities Balances report. To do so, follow these steps:
1. Click Reports, Company & Financial and select the Balance Sheet Standard report.
2. On the report dialog that opens, set the date to include the period you are reviewing.
3. Click Reports, Employees & Payroll and select the Payroll Liability Balances report.
4. From the Dates drop-down menu select All from the top of the list. Leave the From date box empty. In the To date box enter the same date that was used on the Balance Sheet Standard report. Doing so ensures that you are picking up all transactions for this account, including any unpaid balances from prior years. Click Print if you want to have a copy of this report to compare to your Balance Sheet payroll liabilities balance.
These two reports should have matching totals. In the example shown in Figures 14.14 and 14.15, notice that the Balance Sheet and Payroll Liabilities reports do not match.


The totals might not match due to non-payroll transactions being used to record adjustments or payments to payroll liabilities using non-payroll forms such as a General Journal Entry, Bill, or Write Check.
To troubleshoot payroll liabilities differences, I prefer to work with the Custom Transaction Detail report. To access the report, follow these steps:
1. Click Reports, Custom Transaction Detail Report. The Modify Report dialog opens.
2. From the Dates drop-down list, select All. Leave the From date box empty; in the To date box enter the date you used on the Balance Sheet Standard report.
3. In the Columns box, remove or add a check mark for the information you want to display on the report. Be sure to include Type.
4. On the Sort By drop-down menu select Type.
5. Click the Filters tab; in the Choose Filters pane the Accounts filter is already selected. From the Accounts drop-down menu to the right select the Payroll Liabilities account.
6. Click OK to create the report.
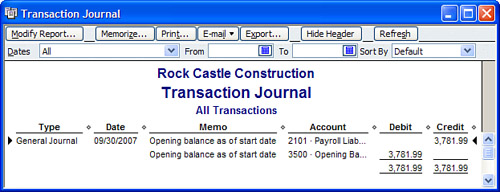
QuickBooks will create a very useful and telling report, as shown in Figure 14.16. When this report is sorted by type of transaction you can easily see what non–payroll related transactions are affecting your Balance Sheet Standard report Payroll Liability balance and are not affecting your Payroll Liability Balances report.
Figure 14.16 Use the Custom Transaction Detail report to easily identify non-payroll transactions that are recorded to the Payroll Liabilities account.

QuickBooks makes viewing details of transactions easy. Simply hover your mouse pointer over a transaction and single click to select (highlight) the transaction.
With the transaction selected, simultaneously press the Ctrl+Y keys on your keyboard.
QuickBooks provides the transaction detail in the traditional debit and credit format as shown in Figure 14.17.
You can double-click on any of the listed transactions to see more detail about the transaction. If you want to view the transaction in the form it was originally created in, simply double-click the transaction to open up the original form.
Because the General Journal Entries form is not a recommended form for managing payroll liabilities balances, a better form to use would have been the Payroll Liabilities Adjustment Transaction form as discussed in the section titled “Adjusting Payroll Liabilities.”
Has your company ever received a notice from the IRS indicating that your year-end payroll documents do not agree with your quarterly payroll return totals? Or have you received a similar notice from your state payroll agency?
Listed in this section are some basic comparisons that you should do both before filing a payroll return and after, in the event that you allow users to make changes to transactions from previous payroll quarters. You can avoid these period changes by following the advice listed in Chapter 15, “Sharing Data with Your Accountant or Your Client,” in the section titled, “Setting a Closing Date.”
Compare the following items routinely while doing payroll in QuickBooks:
• When reviewing the Payroll Summary, verify that each calendar quarter in QuickBooks agrees with your filed payroll return totals. Look at these specific areas:
![]() Total Adjusted Gross Pay in QuickBooks agrees with the Federal 941 Form, Wages, Tips, and Other Compensation.
Total Adjusted Gross Pay in QuickBooks agrees with the Federal 941 Form, Wages, Tips, and Other Compensation.
![]() Federal Withholding in QuickBooks agrees with the Federal 941 Form, Total income tax withheld from wages, and so on.
Federal Withholding in QuickBooks agrees with the Federal 941 Form, Total income tax withheld from wages, and so on.
![]() Employee and Company Social Security and Medicare in QuickBooks agree with the computed Total Taxable Social Security and Medicare on the Federal 941 Form.
Employee and Company Social Security and Medicare in QuickBooks agree with the computed Total Taxable Social Security and Medicare on the Federal 941 Form.
• Ensure total payroll tax deposits for the quarter in QuickBooks agrees with your paper trail. Whether you file online or use a coupon that you take to the bank, check to make sure that you recorded the correct calendar quarter with the IRS for your payments.
• Total Adjusted Gross Pay for the calendar year in QuickBooks agrees with the reported Gross Wage total on the annual Federal Form W-3, Transmittal of Wage and Tax Statements.
• Total Adjusted Gross Pay for the calendar quarter in QuickBooks agrees with the Total Gross Wage reported to your state payroll agency.
• Total Payroll expense from the Profit & Loss report agrees with total Adjusted Gross Pay on the Payroll Summary report.
I have mentioned several times in this chapter that with recent versions of QuickBooks it is less likely that you will make any errors setting up or managing payroll from pay period to pay period.
This is due in great part to the new Payroll Setup Tool. If you do not have this menu choice, you first need to subscribe to one of Intuit’s payroll offerings. There is a service that is just right for your company’s payroll needs.
QuickBooks payroll works best when you perform all activity from within the payroll menus. This includes paying your accrued payroll taxes to the respective taxing authorities. If your company has written checks or vendor bills paying for these liabilities, and the QuickBooks-created Payroll Liabilities account was assigned, the following warning message appears (see Figure 14.18).
Figure 14.18 The warning message that appears if you try to create a liability payment using a check (or bill) and assign the QuickBooks-created Payroll Liabilities account.
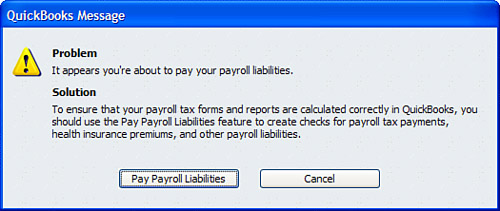
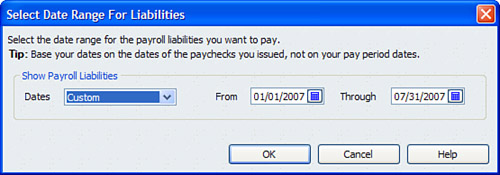
This warning prevents users from using the wrong type of payment form when attempting to make payroll liability payments. When the user clicks the Pay Payroll Liabilities button in the warning message, the user is directed to the Select Date Range for Liabilities dialog (see Figure 14.19). The message directs the user to create the proper form for a payroll liability check.
Figure 14.19 QuickBooks redirects you to create a proper payroll liability check if you attempt to use a check or bill form.
The warning in Figure 14.18 appears only if you are assigning your payroll liabilities to the QuickBooks automatically created Payroll Liabilities account, not an account you manually created and called Payroll Liabilities.
For more information on the importance of using these automatically created accounts see Chapter 2, “Reviewing the QuickBooks Chart of Accounts,” in the section titled “Accounts that QuickBooks Creates Automatically.”
Earlier in this chapter in the section, “Comparing Payroll Liabilities Balances to the Balance Sheet,” I detailed a method for locating non-payroll transactions that affect your payroll liabilities.
You can also use this process to identify when non–payroll forms were used to complete payroll activities:
1. Click the Vendors tab from the QuickBooks Home page to open the Vendor Center.
2. Select the vendor to which you pay your payroll liabilities.
3. On the right, from the Show drop-down menu, select Checks (or Bills), and review whether a check or bill form was used to pay payroll liabilities.
4. Make a note of what chart of account list item the check or bill form was assigned to.
You have two methods for correcting these. First, if you have identified non-payroll forms paying for your payroll liabilities, you can properly fix them after determining that the check or bill payment check has not cleared the bank and has not been included in the monthly bank reconciliation.
Void the existing check or bill that is paying the payroll liabilities and recreate it correctly by clicking Employees, Payroll Taxes & Liabilities and selecting Pay Scheduled Liabilities.
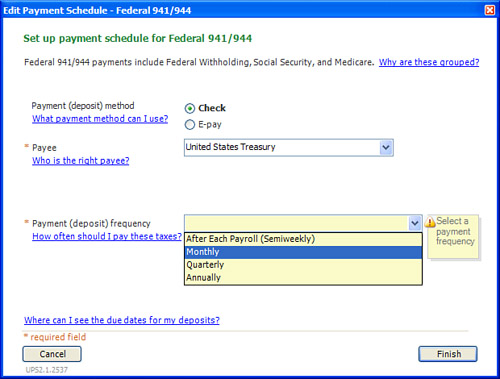
If you need to review or edit your liability payment schedules, click Employees, Payroll Taxes & Liabilities and select Edit Payment Due Dates/Methods (see Figure 14.20). QuickBooks will open the Payroll Setup tool specifically on the Edit Payment Schedule dialog. After setting this schedule, QuickBooks will remind you on the Payroll Center dialog when the payment is due.
You use a second method if you have marked the check (or bill payment check form) that improperly paid your payroll liabilities as cleared in a bank reconciliation. You will not want to void the check or bill payment check as it would negatively affect your recorded bank reconciliation.
In recent versions of QuickBooks you will rarely make the mistake of not properly paying your payroll liabilities. However, to have QuickBooks automatically warn you when improperly paying these payroll liabilities the payroll liabilities account must be the chart of accounts list item that QuickBooks created automatically (see the section titled “Accounts That QuickBooks Creates Automatically” in Chapter 2). Using any other user-created payroll liabilities chart of account will not provide the valuable user warning.
Beginning with QuickBooks 2008, the warning will direct you to the proper menu for paying payroll liabilities.
Rather than using a General Journal Entries form to correct payroll liability errors, use the Payroll Liability Adjustment form following these steps:
1. Click Employees, Payroll Taxes & Liabilities and select Adjust Payroll Liabilities to open the Liability Adjustment dialog. (Refer to Figure 14.11.)
2. Choose Employee if you want to effect the change on the employee’s W-2, or Company if you only want to effect the change for the Federal Form 940 or 941.
3. Assign a class if you track department profitability.
4. In the Taxes and Liabilities pane, Item Name column, from the drop-down menu select the Payroll Item your review indicated that needed to be adjusted.
5. In the Amount column enter the amount of the adjustment. Enter a positive number (to increase) or a negative number (to decrease) the selected totals of the payroll item on that line.
6. If you are creating an Employee adjustment, an additional column will appear for Wage Base. Typically, you should not adjust what defaults in this column. (If your adjustment was for the Company selection you will not see the wage base column.)
7. Optionally, enter a memo that will appear in detailed reports.
8. Click Accounts Affected to open the Accounts Affected dialog as shown in Figure 14.21. Here you have these two important options:
• Do not affect accounts—Selecting this option will only adjust your Pay Scheduled Liabilities totals and not Balance Sheet or Profit & Loss report totals.
• Affect liability and expense accounts—Selecting this option will adjust your Pay Scheduled Liabilities and your Balance Sheet and/or Profit & Loss accounts.
Figure 14.21 Choose to not affect accounts with a liability adjustment when only the Pay Scheduled Liabilities amounts are incorrect.

9. Click OK to save your Affect Accounts? selection.
10. Click OK to save the payroll liability adjustment.
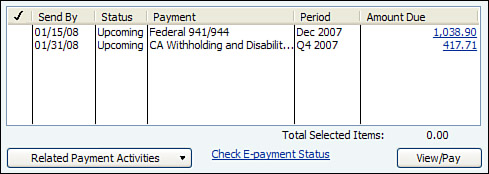
11. Click Employees, Payroll Center and verify that the correct amounts to be paid are listed in the Pay Scheduled Liabilities dialog. (See Figure 14.22.)
In this section, I discuss a few of the more unusual payroll transactions or processes.
Although several acceptable methods exist for accomplishing these tasks, the ones discussed in this section are those that I recommend to my clients.
One of the most useful features in recent versions of QuickBooks payroll is the ability to define a scheduled payroll and scheduled payroll liabilities.
A scheduled payroll allows you to set multiple payroll frequencies to organize your payroll; for example, you can pay your clerical staff weekly and the management staff bi-weekly.
To create a scheduled payroll, follow these steps:
1. Click Employees, Add or Edit Payroll Schedules. The New Payroll Schedule dialog appears, as shown in Figure 14.23.
Figure 14.23 Adding a scheduled payroll to QuickBooks helps keep payroll processing timely and organized.
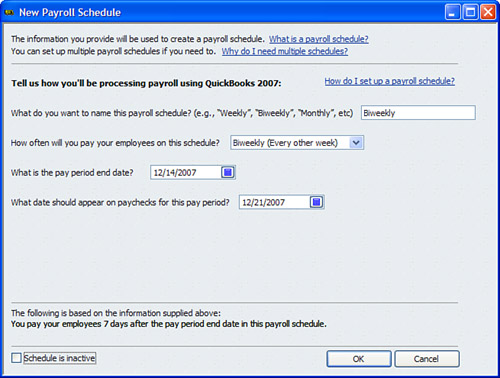
2. Click the Payroll Schedule drop-down menu and select New. Or if you selected an existing payroll schedule in step 1 you can choose Edit Payroll Schedule.
3. For a new schedule give the schedule a name, select from a predetermined list of frequencies, enter the pay period ending date, and select the date the paychecks will be given out. Click OK.
QuickBooks displays the payroll schedules you have created, making an easy task of processing payrolls that have different pay periods. Click the red X in the upper right to close this list.
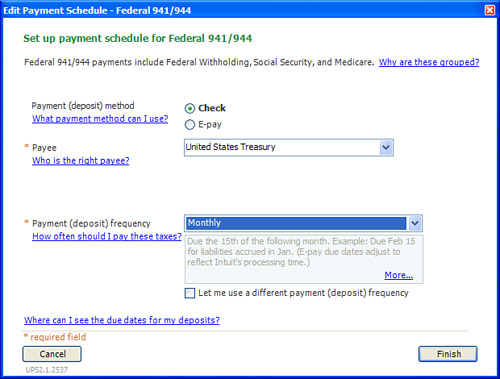
4. To schedule or edit your payroll liabilities (if you have not already done so with the Run Payroll Checkup), click Employees, Payroll Taxes and Liabilities and select the option to Edit Payment Due Dates/Methods. QuickBooks opens the Payroll Setup tool, but only shows the specific menu for scheduling your tax payments. (See Figure 14.24.)
With a payroll schedule defined and payroll liabilities scheduled, QuickBooks can make your payroll processing more efficient and accurate.
If you received a refund from an overpayment of payroll taxes, you would not want to simply add it to a Make Deposits form (like other deposit documents you create). If you did, the refunded amount would not correct your overpayment amount showing in the payroll liability reports and in certain payroll forms.
Again, this type of payroll error should rarely, if at all, occur in current versions of QuickBooks thanks to improved messaging and ease in working from the QuickBooks home page. However, if you were paying your payroll liabilities outside the QuickBooks payroll menus, and you had an overpayment that you requested and received a refund for, the following is the proper method to use to record the deposit if you want your payroll reports to reflect receipt of the overpayment:
1. Click Employees, Payroll Taxes and Liabilities and select Deposit Refund of Liabilities. The Refund Deposit for Taxes and Liabilities dialog appears.
2. Select the name of the vendor.
3. Enter the Refund Date (the date of your deposit).
4. Enter the For Period Beginning date (this should be the payroll quarter the overpayment was in).
5. From the Deposit To drop-down menu, you can choose to group with other deposits by selecting the Undeposited Funds account or deposit directly to the bank account.
6. Select the Item that needs to be adjusted.
7. Enter the Amount of the refund.
8. Optionally, add a Memo, and click OK.
See Figure 14.25 for a completed Refund Deposit for Taxes and Liabilities form.

When any other check in QuickBooks is lost, you typically void the check in QuickBooks and report it to your bank so that it cannot be cashed.
With payroll you need to be a bit more cautious about voiding the transaction because when you void a payroll transaction and then reissue it, certain payroll taxes could be recalculated on the replacement check different from the originally issued payroll check. QuickBooks warns you as shown in Figure 14.26 if you attempt to void a paycheck.

Certain payroll taxes are based on limits; for example, Social Security, federal unemployment and state unemployment taxes are examples of taxes that are charged to employees or to the company up to a certain wage limit. When you void a previously issued check, QuickBooks recalculates these taxes for the current replacement check, and these amounts may differ from the original check, potentially affecting the net amount of the check.
Proper control would be to report the missing check to your bank so that it cannot be cashed. In QuickBooks, instead of voiding the payroll check and then re-creating it, print a new payroll check (from the same original payroll check details) and record the new check number, and then separately create a voided Write Check form for the lost check. Follow these steps to record these transactions:
1. Locate the lost check in your checking register by clicking Banking, Use Check Register.
2. From the Select Account drop-down menu select the bank account that has the missing check and click OK to open the bank register.
3. Find the check in the register that was reported missing. With your cursor, double-click the list item to open the paycheck form and make a note of the check number, date, and payee.
4. On the open Paycheck dialog place a check mark in the To Be Printed check box as shown in Figure 14.27.
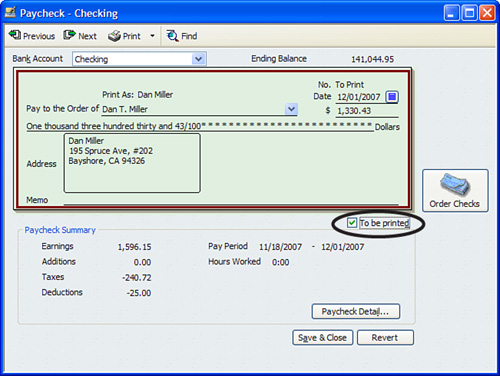
5. Print the paycheck form singly or with others by clicking the Print button at the top of the check form.
6. QuickBooks asks for the check number. After printing the check QuickBooks will assign the new check number, and use the check date and totals assigned to the original check.
7. To keep track of the lost check in your accounting, click Banking, Write Checks. Using the original check number, date, and payee, record the check with a zero amount to an account of your choosing. You might get a message warning not to pay employees with a check, but because you are recording a zero transaction, you can ignore this warning.
8. With the lost check created in step 7 still open, click Edit, Void Check. QuickBooks prefills the Amount with a -0- and the Memo line of the check with Void. This will now show this check as voided in your register just in case the employee was able to cash the check. You would notice when reconciling that you have marked it as voided.
Using this method for printing a lost payroll check ensures that you do not inadvertently change any prior period payroll amounts and reported payroll totals; at the same time, recording the lost check helps keep a record of each check issued from your bank account.
In the accounting community the term “mid-year” refers to setting up payroll at any other time than at the beginning of the year. Interestingly, when accountants use the term mid-year they are technically saying that you are starting your first payroll in QuickBooks sometime during the calendar year (not at the beginning of the calendar year) for a business that has already paid out payroll to employees in the same calendar year (perhaps in another software or using an outside payroll agency).
This method is only needed for companies converting to QuickBooks payroll in a calendar year that had prior payroll produced from some other source.
When you make the decision to begin using QuickBooks payroll in a year that you have already had payroll transactions you can
• Manually re-create in detail all your previous payroll transactions, and then you do not need to follow the steps in this section
• Record year-to-date totals for previously issued payroll checks, and then you should follow the steps given in this section
You need to record year-to-date (YTD) payroll amounts in QuickBooks for the payroll process to calculate state and some federal taxes correctly, as well as to be able to print an accurate Federal Form W-2 from QuickBooks.
Before beginning this process, make sure you have accurate records of the prior period payrolls, preferably subtotaled by calendar quarter.
To set up mid-year payroll YTD amounts using the Payroll Setup:
1. Click Employees, Payroll Setup and complete the setup process through step 4 (Taxes).
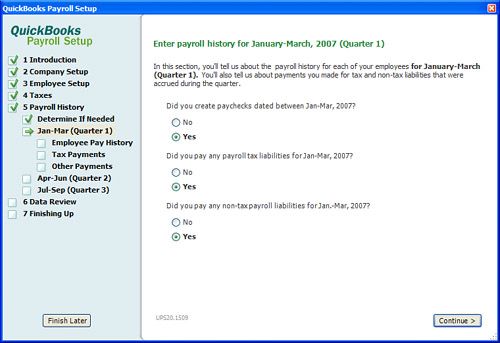
2. On step 5 (Payroll History) QuickBooks first determines whether you have had payroll in the current year or the last year. If you answer yes, QuickBooks asks you to identify by placing a mark in the YES or NO button for each of the listed payroll quarters (see Figure 14.28). Click Continue.
Figure 14.28 Answering Yes to the previous payroll question enables you to record year-to-date payroll information for employees.
3. For each employee, QuickBooks opens dialogs where you can record gross earnings, gross withholdings, and company paid taxes all conveniently associated with the specific payroll quarter selected in step 3, as shown in Figure 14.29. Just provide the needed information and click Next.
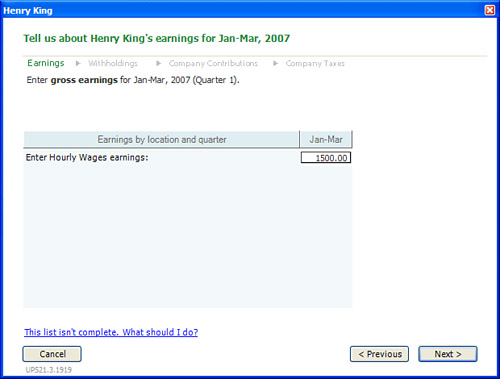
4. Continue through the remaining steps, which prompt you to record payroll totals for each employee, as well as details of prior payroll liability payments.
These balances affect the Payroll Summary and all payroll forms but do not affect the Balance Sheet or Profit & Loss reports. So, if you are going to record your year-to-date payroll amounts, you also want to be sure to record your year-to-date payroll liability payments. Record them by the calendar quarter so that you can track and reconcile the quarterly information with the payroll returns that were filed.
When paying an employee a bonus, or in other words, an unscheduled payroll, and to include this amount in their taxable wages (as it should be), do the following:
1. Click Employees, Pay Employees and select the Unscheduled Payroll option. The Enter Payroll Information dialog appears.
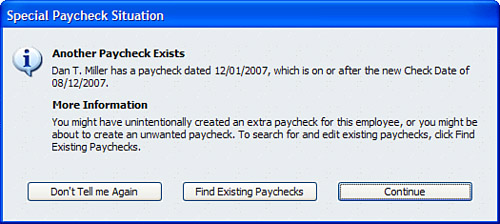
2. Place a check mark next to the employee(s) receiving a bonus check. Note: QuickBooks might display a warning as shown in Figure 14.30 that a paycheck already exists for the date you have selected. Click Continue to close the warning.
3. You are returned to the Enter Payroll Information dialog, and if the employee is paid hourly, you can adjust the hours from the regular pay column.
4. Often, you will want to edit or remove the default Gross Earnings or Federal Taxes Withheld on a bonus check. To adjust this detail, on the same Enter Payroll Information dialog click the Open Paycheck Detail button to modify the default amounts.
QuickBooks might display a warning dialog titled Special Calculation Situation simply to inform you that certain payroll items have reached their limits.
In the example shown in Figure 14.31, the Federal Withholding amount that was automatically calculated was removed. QuickBooks now shows that this paycheck was adjusted.
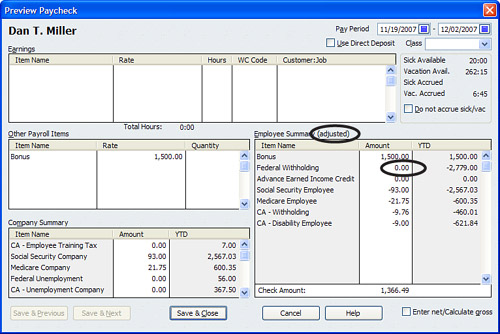
Adjust paychecks cautiously, making sure that you do not adjust those items that have a predefined tax table amount, such as Social Security and Medicare. If you do, and the adjustment causes the calculated totals to be incorrect for the year, QuickBooks will “self adjust” the taxes on the next payroll check you create for this employee. You should also obtain the advice of your tax accountant before adjusting taxes withheld on bonus payroll checks.
Your business might offer a loan to an employee in advance of payroll earnings. This amount should not be taxed at the time of payment if you expect the loan to be paid back to the company.
When you offer to pay an employee an advance on their earnings, you are creating a loan payment check. If this is a loan to be paid back to the company follow these steps:
1. Click Employees, Pay Employees and select Unscheduled Payroll to open the Enter Payroll Information dialog.
2. Place a check mark next to the employee you are creating the loan check for.
3. QuickBooks may warn that a paycheck for that period already exists as previously shown in Figure 14.30. Click Continue if you want to create the loan payment check. You are returned to the Enter Payroll Information dialog.
4. To modify the check to be an employee loan check click the Open Paycheck Detail button from the same Enter Payroll Information dialog.
5. Remove any amounts from the Earnings box (if you expect to be repaid this amount, the amount is not considered taxable earnings).
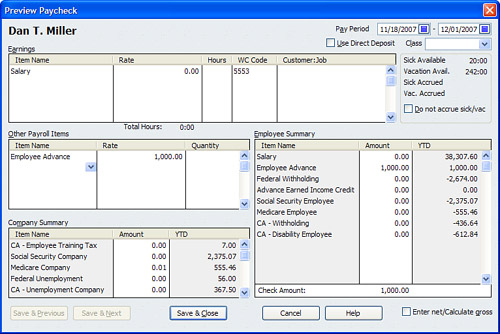
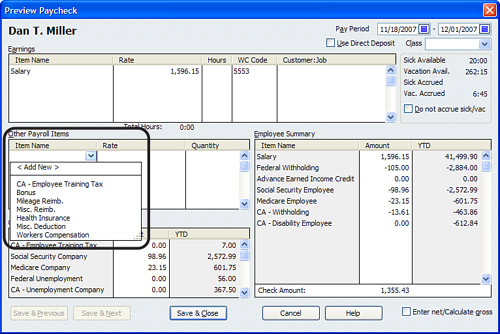
6. From the Other Payroll Items drop-down menu, select the Employee Advance (or whatever name you may have given it) Addition type payroll item as shown in Figure 14.32 and skip to step 15.
Figure 14.32 Use an Addition type payroll item in the Other Items pane to record a non-taxable loan (advance).
If you do not have an employee advance Addition type payroll item you can easily create one right from this Preview Paycheck dialog. Click Add New from the Other Payroll Items pane drop-down menu, as shown in Figure 14.33 and continue with step 7.
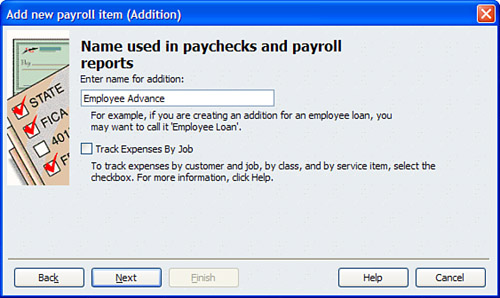
7. From the Add new payroll item dialog select the button for the Addition type and click Next.
8. The Add new payroll item (Addition) dialog opens. Name the item Employee Advance as in Figure 14.34 (do not select the Track Expenses by Job box). Click Next.
9. The Expense account dialog opens. From the drop-down menu select your Employee Loans, Other Current Asset account. You can also scroll to the top of this menu and click Add New in this dialog to create the Other Current Asset account. (See Chapter 2 for more details on creating accounts.) Click Next.
10. For the Tax Tracking type, from the drop-down menu select None (at the top of the list) and click Next.
Carefully consider what option you choose when selecting the Tax Tracking type for a new payroll item or editing an existing payroll item. The selection you choose here will affect how QuickBooks taxes or doesn’t tax the payroll item on paychecks and how QuickBooks will handle reporting the payroll item on forms, such as the W-2 form given to employees at the end of a calendar year.
When you select each Tax Tracking type, QuickBooks provides detailed information about how it will be treated for tax calculations and form preparation. Be sure to take the time to read these.
If you are unsure of the proper tax tracking type, consult your accounting professional.
11. The Taxes dialog opens. On this dialog leave them all not selected and click Next.
12. The Calculate Based on Quantity dialog opens. Leave the default of Neither selected and click Next.
13. The Gross vs. Net dialog opens, leave the default of Gross. This setting has no impact because you are setting it up with a tax tracking type of None. Click Next.
14. The Default Rate and Limit dialog opens. Leave it blank because you define the limit amounts individually for each employee. Click Finish to close the Add new payroll item setup or Edit payroll item setup dialog.
15. You are returned to the Preview Paycheck dialog. From the Other Payroll Items pane, in the Item Name column, select a line and from the drop-down menu choose the Employee Advance payroll addition item. Enter the dollar amount of the loan you are providing the employee in the Rate column. QuickBooks creates a payroll advance check without deducting any payroll taxes (see Figure 14.32 shown previously). (Note: you do not need to enter anything in the Quantity column).
Now QuickBooks has on record a loan paid to the employee.
If you have defined payment terms with the employee you now need to edit the employees’ record so that on future payroll checks the agreed to amount will be deducted.
When a company provides an advance to an employee that is to be paid back over time in installments you can have QuickBooks automatically calculate this amount and even stop when the total of the loan has been completely paid back to the company.
Follow these steps to record a payroll deduction on the employees setup so that QuickBooks will automatically deduct loan repayments from future payroll checks.
1. From the icon bar in QuickBooks click the Employee Center to open the list of employees.
2. Select the employee that was given a payroll advance or loan.
3. Click the Edit Employee button from the Employee Center. The Edit Employee dialog opens.
4. From the Change tabs drop-down menu, select the Payroll and Compensation Info menu. The Payroll tab dialog opens.
5. In the Additions, Deductions, and Company Contributions pane, in the Item column, select your Employee Loan Repay deduction item (and skip to step 15) or click Add New to open the Add new payroll item dialog.
6. If creating a new item, select type Deduction.
7. Name the item Employee Loan Repay and click Next.
8. The Add new payroll item (Deduction) dialog opens. Leave the Agency Name and Number field blank. For the Liability account, select the drop-down menu and choose your Employee Loans, Other Current Asset account created previously when you created the employee advance check. Click Next.
9. The Tax Tracking type dialog opens. Leave the default for Tax Tracking type of None and click Next.
10. The Taxes dialog opens. Accept the default of none of them selected and click Next.
11. The Calculate Based on Quantity dialog opens. Leave the default of Neither selected and click Next.
12. The Gross vs. Net dialog opens. Leave the default of Gross. This setting has no impact because you are setting it up with a tax tracking type of None. Click Next.
13. The Default Rate and Limit dialog opens. Leave it blank, because you define the limit amounts individually for each employee. Click Finish to return to the New Employee or Edit Employee payroll info pane.
14. From the Additions, Deductions, and Company Contributions pane, in the Item Name column select a line. From the drop-down menu, choose the Employee Loan Repay deduction item that was just created.
15. In the Amount column enter the per pay period amount you want to deduct.
16. In the Limit column, enter the amount of the total loan. QuickBooks will stop deducting the loan when the limit is reached. Click OK to record your changes to the employee setup.
QuickBooks is now properly set up to deduct the stated amount on each paycheck until the employee loan has been fully paid back. If you provide additional employee loans, do not forget to go back to step 15 and add the new amount to the previous loan total.
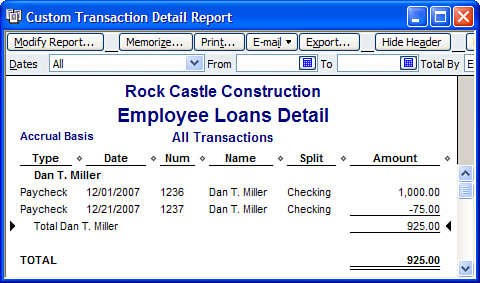
It is equally important to track the actual details of the employee loan. Use a modified version of my favorite report, Custom Transaction Detail report (as shown in Figure 14.35) following these steps:
1. Click Reports, Custom Transaction Detail Report. The Modify Report dialog appears.
2. From the Report Date Range drop-down menu, choose the date range you are reviewing.
3. In the Columns pane, select or deselect the detail you want to see displayed on the report.
4. From the Total by drop-down menu, select Employee.
5. Click the Filters tab; Account is already selected in the Choose Filters pane. From the Account drop-down menu to the right select the Employee Loans, Other Current Asset account.
6. In the Choose Filters pane, select the Amount filter and optionally select an amount greater than or eaual to .01. Doing so provides a report of only those employees with non-zero balances.
7. Optionally, click the Header/Footer tab and customize the report title.
8. Click OK to view the modified report.
9. Optionally, click Memorize to save the report for use later.
You are now prepared to advance money to an employee and track the employee’s payments against the loan accurately. Don’t forget to review the balances and to increase the limit when new loans are paid out.
There are very few reasons why you should adjust a paycheck record in QuickBooks. However, one reason might be if you hand-prepared the check, and later when you recorded the paycheck using QuickBooks automatic calculations you noticed that your hand-prepared check was for a different amount.
In this example, the check amount cashed by the employee differs from what QuickBooks computed, so adjusting the QuickBooks paycheck is acceptable.
To adjust a prepared employee check before it is printed, or to adjust a paycheck that had the wrong amount in QuickBooks from what was recorded on the actual check, follow these steps:
1. Locate the paycheck in your checking register by clicking on Check Register from the Banking section on the QuickBooks Home page.
2. If you have multiple checking accounts, select the one that the paycheck was recorded to and click OK to open the bank register.
3. Find the check with the incorrect amount; open the paycheck form by double-clicking with your cursor on the check.
4. Click the Paycheck Detail button to display the detail of the check to be modified.
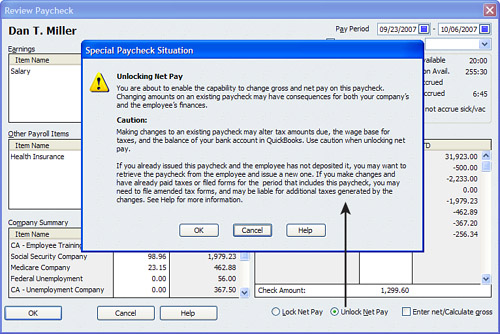
5. Click Unlock Net Pay and review the message that QuickBooks provides about cautiously changing net pay on existing checks. Click OK to close the message, as shown in Figure 14.36.
Figure 14.36 QuickBooks protects inadvertent changes by requiring you to unlock net pay before modifying a paycheck record.
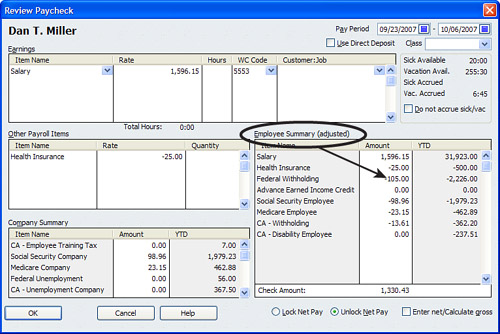
6. Modify the check as needed, being careful not to modify the Social Security or Medicare taxes. In Figure 14.37 the Federal Withholding was modified and the net check changed to reflect the actual check amount that cleared. (Your paycheck detail might vary depending on what payroll subscription you have purchased. The Enter Net/Calculate Gross option is only available with the Enhanced for Accountants payroll subscription.)
Figure 14.37 QuickBooks also identifies on the Preview Paycheck window when the automatically computed information was adjusted.
7. Click OK to close the paycheck detail dialog.
8. Click Save & Close to save the changes to the paycheck.
Cautiously consider the effect of changes you make to existing paychecks. To prevent these types of changes, consider setting a closing date password, discussed in Chapter 15, “Sharing Data With Your Accountant or Your Client.”

Determine whether you need to process payroll:
• If you are a new business just starting. (Page 378)
• If you are an existing business with previous payroll transactions. (Page 409)
What to do first:
• Choose a payroll subscription that fits your needs. (Page 378)
• Customize payroll preferences for your company. (Page 379)
Understanding how payroll works in QuickBooks:
• Use the correct payroll forms. (Page 382)
• Process payroll with a standard workflow. (Page 383)
Setting up payroll or using the diagnostic tool to review your payroll setup:
• Use the Payroll Setup tool to guide you through your initial payroll setup. (Page 384)
• Use the Run Payroll Checkup if you already set up payroll and want to perform a diagnostic check of the setup and paycheck data. (Page 386)
• Need to run a diagnostic check of payroll for a prior year? (Page 393)
Periodically reviewing your payroll data:
• Review your payroll items including current tax rates and wage thresholds. (Page 393)
• Is your payroll subscription current? (Page 394)
• Matching your Balance Sheet report to your Payroll Liabilities Balances. (Page 395)
• Comparing your Payroll Summary report to your filed payroll returns. (Page 398)
Handling other types of payroll transactions:
• Using the proper forms to adjust any payroll errors. (Page 399)
• Letting QuickBooks remind you when your payroll taxes are due. (Page 404)
• Depositing a refund of your overpaid payroll liabilities. (Page 405)
• Reprinting a lost paycheck. (Page 406)
• Preparing a bonus payroll check. (Page 411)
• Paying and tracking an employee loan. (Page 412)
• Manually adjusting an employee paycheck. (Page 418)