
Chapter 13. Using the Web Viewer
In this chapter
Adding a Web Viewer to Issue Tracking
Setting Up a Web Viewer with the Templates
Controlling the Web Viewer with the Set Web Viewer Script Step
GetLayoutObjectAttribute with Web Viewer
FileMaker Extra: Using the Web Viewer for Files
 Introducing the Web Viewer
Beginning with the interim FileMaker Pro 8.5 release, a Web Viewer has been added to the elements you can place on a layout. The Web Viewer is exactly that: a layout element that uses the platform’s native Web controls (Internet Explorer on Windows and Safari/Web Kit on Mac OS X) to display web pages.
Although it displays web pages, the Web Viewer is not a browser. Many of a browser’s features, such as cookies, are not present. But, by the same token, any basic functionality built into the Web controls or added by the user is available. This includes plug-ins such as Flash.
You can use the Web Viewer to display a static address that you hard-code into the layout. You can also use the Web Viewer to display data from a URL stored in a given database record—perhaps the home page of a client or a Contact Us page with updated names and phone numbers. You can also use built-in templates to merge a database field, such as a tracking number, with a request to a delivery service to display the delivery status.
The Web Viewer is frequently used in a tab control. It fills with web data when necessary—for example, in a tab control, when its tab is clicked. In general, Web Viewers do not unduly slow down FileMaker, but they do involve Internet access and imaging, both of which can take time. There is no cancel button or feature for the Web Viewer: You simply go to another record, another layout, or another tab. The current Web Viewer will stop loading, and if another one is visible, it will load.
In this chapter, the primary example is a modification of the Issue Tracking Starter Solution. It is available for download in the Chapter 13 area of the author’s website as well as the publisher’s website. See the Introduction at the front of this book for more information.
Renovating Issue Tracking
Issue Tracker is one of the many Starter Solutions that you can use as is or with your own modifications. The Starter Solutions have evolved through various versions of FileMaker Pro; not all of them use the latest features. In particular, the common layout of Starter Solutions that frequently contains a tabbed view at the bottom of the layout is generally implemented using the pre-tab control method. In this method, separate layouts were created for each highlighted tab and the entire layout is copied from one to the other, with the highlighted tab being modified for each one.
With the tab control, this multiplicity of layouts is no longer necessary. A few steps will help you convert the old style to the new one. Because the tab control is more powerful than the old technique, you will be able to get rid of at least one layout and a certain degree of complexity, so it is worthwhile taking a moment to see how to do it.
Figure 13.1 shows the original Issue Tracking Starter Solution in Layout mode. As you can see, when you click a tab, the tab (which is a graphical element, not a true tab) is highlighted.
Figure 13.1. In the old style, tabs were graphical elements, not parts of true tab controls.
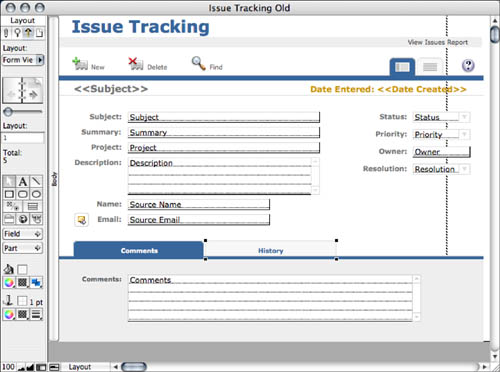
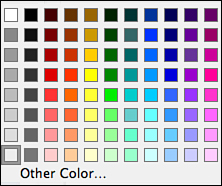
In this case, the conversion is quite simple. Each tab contains one field and its label. Because the tabs identify the field, you can remove the labels, but if there were more than one field on each tab, you would need to retain them. Click the background of the tab and note the color used for the background. You can do this by clicking the background color selector in the tool area and looking to see what color has been selected. In the Issue Tracking Starter Solution, it is the bottom color in the first column as shown in Figure 13.2.
Figure 13.2. Note the background color for the old tab.
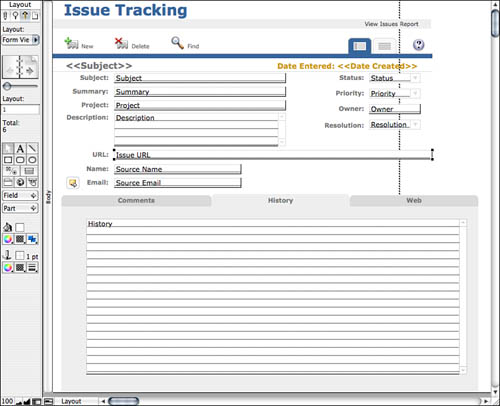
Move the two fields aside and delete the tab with all of its associated graphics (tabs, backgrounds, horizontal rule, and so forth). Now draw a true tab control where you want it. Set the tabs to Comments, History, and Web, which will be a new tab, as shown in Figure 13.3.
Figure 13.3. Create a new tab control.

In this case, the default front tab is set to the new Web tab. The default front tab is a new feature in FileMaker Pro 9. Move the old Comments and History fields onto the appropriate tabs, and your renovation is complete.
In many cases, scripts are implemented to switch from one “tab” to another (actually switching from one layout to another). If that is the case, you might have to adjust some scripts. In this case, and in the case of many other Starter Solutions, the apparent tab behavior is created by attaching a Go to Layout action to the tab graphic elements. If the behavior were implemented with a script, you would need to adjust it, but because it is implemented with the Go to Layout action, you need to do nothing. The tab graphics and their Go to Layout actions are no more after you create the true tab control.
Adding a Web Viewer to Issue Tracking
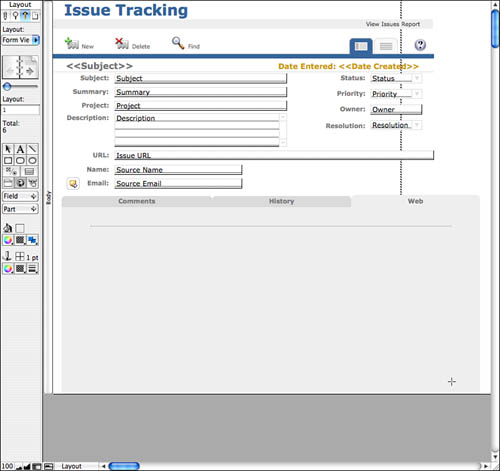
A Web Viewer displays a URL from a data field or a calculation. Unlike a browser, there is no address field for you to type in a URL unless you explicitly create one. When you draw the Web Viewer, you will need to specify the URL to use. Thus, to create a Web Viewer, the first step is to modify the database to add a URL field. The layout will be modified to add that field (called Issue URL) below the Description field as shown in Figure 13.4.
Figure 13.4. Add a URL field to the database and the layout.
Now, click the Web Viewer icon in the tool area (in the middle of the bottom row) and draw a Web Viewer in approximately the location you want. Figure 13.5 shows the basics of selecting the Web Viewer icon and drawing the Web Viewer. In your case, you would draw the Web Viewer in the Web tab of the tab control.
Figure 13.5. Draw a Web Viewer.
As soon as you finish drawing the Web Viewer, the Web Viewer Setup window opens as shown in Figure 13.6. The various templates are explained later in this chapter in the section “Setting Up a Web Viewer with the Templates.”
Figure 13.6. When you have drawn the Web Viewer, the Web Viewer Setup window opens.

For now, click the first option (Custom Web Address), and use the Specify button to select the Issue URL field as shown in Figure 13.7.
Figure 13.7. Select the field for the custom Web address.

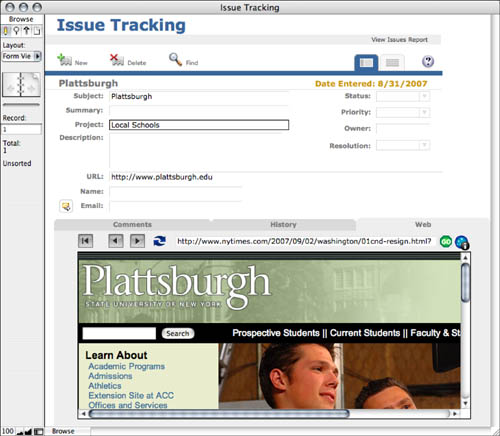
When you click OK, the creation of the Web Viewer is complete. If you go into Browse mode and type a URL into the IssueURL field (which has the label URL:), the Web Viewer displays the page as soon as you click out of the field, provided that you are connected to the Internet. Figure 13.8 shows the result. The Forward, Back, and other controls are not part of the Web Viewer; you will see how to create them later in this chapter along with implementing a separate URL to control the Web viewer in the section “Controlling the Web Viewer with the Set Web Viewer Script Step.”
Figure 13.8. The Web page will be displayed.
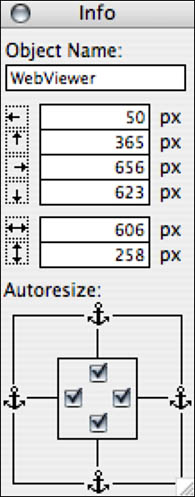
Web pages are often larger than the space you have available. There are several ways of handling this. One is to use the new autoresizing features of FileMaker Pro 9. Select the tab control, and use the Object Info window to anchor it on all four sides. As the window resizes, the tab control expands appropriately. Do the same for the Web Viewer within the tab control’s Web tab, as shown in Figure 13.9.
Figure 13.9. Anchor the Web Viewer and the tab control to the right and bottom as well as the top and left.
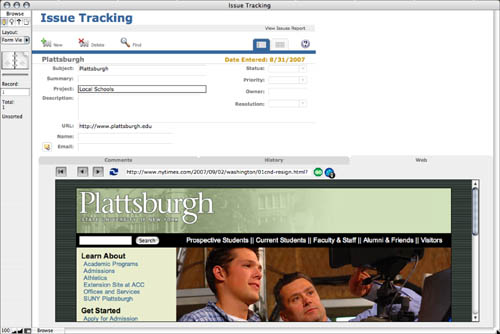
Now, if you resize the window, the Web Viewer and the tab control resize as shown in Figure 13.10.
Figure 13.10. The Web Viewer and tab control automatically resize.
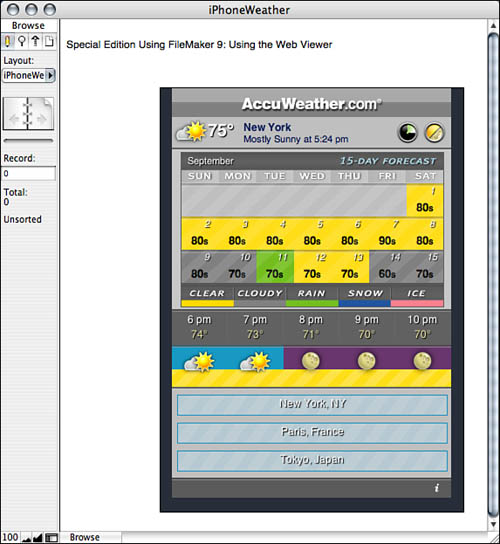
Another way to handle the limited space available for a Web Viewer is to use alternative URLs that take up less space. For example, AccuWeather’s home page is large, but it has a very nice smaller version, designed for the iPhone, located at http://apple.accuweather.com/widget/iphone1/iphone.html. Figure 13.11 shows that page in a FileMaker Web Viewer.
Figure 13.11. The AccuWeather iPhone page in a FileMaker Web Viewer.
Setting Web Viewer Options
You can set four Web Viewer options as shown at the bottom on the Web Viewer Setup window shown previously in Figure 13.6.
- Allow Interaction with Web Viewer Content— If you turn off this option, the web page displays, but no links are active. This can be the appropriate setting if the web page contains static information—for example, a known site’s known page about contact information. You can “trap” a user there, but the user will not be able to wander off to other places on the Web.
- Display Content in Find Mode— By default, this option is off. When the user is in Find mode, it is often the case that the Web Viewer should be blank: When a Find operation completes, its result can be used to display data in the Web Viewer. However, if the Web Viewer is based on a global or on data that will be entered during the Find setup, you might want to make the Web Viewer active at that time.
- Display Progress Bar— This new feature provides a small progress bar across the bottom of the window. It is on by default.
- Display Status Messages— This controls whether status messages appear. It is on by default.
Setting Up a Web Viewer with the Templates
In this example, you used a field in the database to store the URL for the Web Viewer. The templates in the Web Viewer Options let you construct complex URLs from templates and specific database fields. For example, in Figure 13.6, you saw the default Google template. It appears quite complex, but if you click the Specify button next to the Web Address calculation field, you can open the Specify Calculation window and add some line feeds to rearrange the calculation as shown in Figure 13.12.
Figure 13.12. Make the Google mapping template more readable.
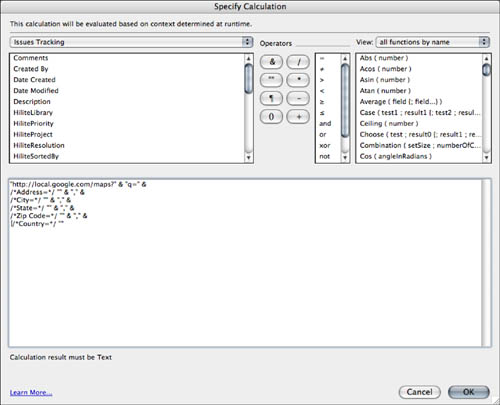
Note that all that has been done here is some reformatting. You can see that prompts enclosed as comments (/*Address=*/, for example), have been inserted into the calculation. Because they are comments, they have no effect on the calculation’s evaluation. In fact, if you enter no data at all, this complex calculation does, in fact, produce a Google map.
If you want to customize the template, use the various fields at the right of the window. For each one, you can use the control at the right to enter a calculation or to select a field to use. Thus, you can use a template to combine address, city, state, and ZIP code fields in your database to a Web Address URL that can be mapped automatically. As you go from record to record, the Web Viewer shows the appropriate map for the location of each record. The same principle applies to tracking FedEx packages and the other templates.
Controlling the Web Viewer with the Set Web Viewer Script Step
The Web Viewer itself provides no controls, but you can add your own controls as shown in Figure 13.8. The addition of the Web Viewer to FileMaker layouts was one of the catalysts for providing object names. To control a Web Viewer, it must be named in the Object Info window. Then you can use the Set Web Viewer script step in ScriptMaker to control it as shown in Figure 13.13.
Figure 13.13. Use Set Web Viewer script step.
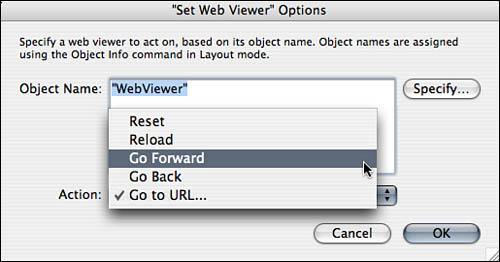
Many of the options are simple—Forward, Back, and so forth. Reset sets the Web Viewer to its initial URL. You also can specify a URL to go to. If you choose the Go to URL option, the Web Viewer Setup dialog (shown previously in Figure 13.6) opens.
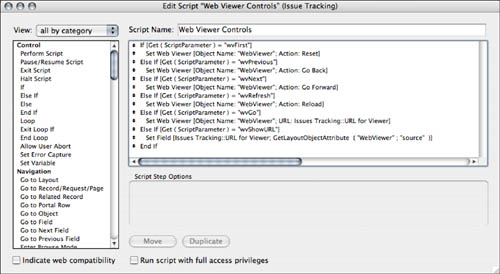
Figure 13.14 shows an all-purpose script that you can use for Web Viewer controls. It takes a variety of parameters (wvFirst, wvPrevious, wvNext, and wvRefresh). Depending on which one is sent, one of the standard actions is performed. wvGo is used to go to a URL entered in a field other than Issue URL—URL for Viewer. That field is described in the following section along with the wvShowURL parameter for the script.
Figure 13.14. Use a script to control the Web Viewer.
![]() For more information on script parameters, see Chapter 16, “Advanced Scripting Techniques,” p. 477.
For more information on script parameters, see Chapter 16, “Advanced Scripting Techniques,” p. 477.
GetLayoutObjectAttribute with Web Viewer
Because users can navigate around the Web using the Web Viewer if you have enabled Allow interaction, you cannot necessarily know what page the Web Viewer is displaying. To provide this information, FileMaker now provides a new function that lets you retrieve information about a layout object. That function enables you to find out the current page in the Web Viewer as well as much else; it applies to any layout object.
This is not a Get function in the sense of Get ( ScriptParameter ). The name of the function is GetLayoutObjectAttribute (with no space after Get).
The GetLayoutObjectAttribute function requires two parameters; it may take two addtional ones. The first parameter is the name of the object, as set in the Info window. In this example, the name of the Web Viewer is WebViewer. Because you name the object from which to get an attribute, that means that you can have multiple Web Viewers and manage them easily provided that each has its own name and FileMaker enforces the uniqueness of layout object names within a layout.
The second parameter is the attribute you want returned. Table 13.1 shows the various attributes you can query and what the results are. All measurements are in pixels.
Table 13.1. Attributes for GetLayoutObjectAttribute
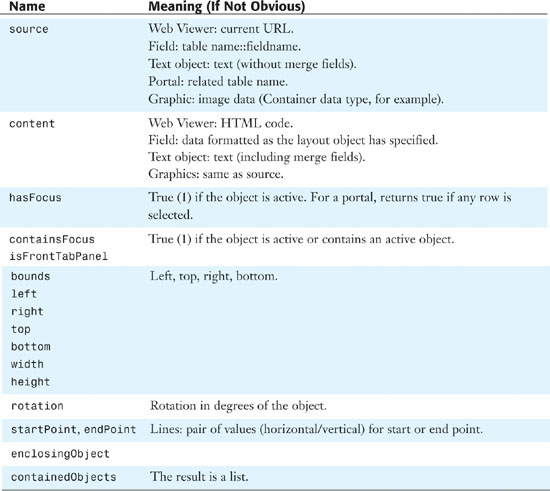
Now you can see how the last clause of the script’s If statement works. If the script parameter is wvShowURL, the source attribute is queried, and its value is placed in the URL for Viewer field.
You can also set the URL to embedded HTML. Instead of typing an address into the URL, you can type in a string that contains raw HTML preceded by the word data, as in the following code.
"data:, <html><body><b>Bold-faced Heading</b>The rest of the body</body></html>"
FileMaker Extra: Using the Web Viewer for Files
Any URL that can be processed by the appropriate control can be displayed in a Web Viewer. That means that you can use a File URL to display files in the Web Viewer. This provides an additional way of displaying graphics files in FileMaker. You can add them to container fields themselves or you can place references to them in container fields. You can also store the file location in a database field either as a File URL or as the file name part of the File URL. Then you can construct a File URL as you want.
For example, if the file you are interested in is logo.gif and logo.gif is stored in the database field fileLocation, you can display it in a Web Viewer by calculating a URL that is File://serverAddress/graphicsFolder & fileLocation.
This handles an issue with file references in which they break when the files move. In a case like this, you can store the prefix in a global or database field, and then concatenate it with the unchanging filename as necessary.