
Chapter 25. Instant Web Publishing
In this chapter
An Overview of Instant Web Publishing
An Overview of Instant Web Publishing
Instant Web Publishing (IWP) lets you publish your FileMaker databases to a web server with remarkably little effort.
What Is IWP?
Broadly speaking, Instant Web Publishing is one of several options for sharing data from a FileMaker database to the Web. The other options include exporting static HTML, exporting XML and transforming it into HTML (Hypertext Markup Language) with a style sheet, and Custom Web Publishing (CWP), which involves doing HTTP (Hypertext Transfer Protocol) queries against the Web Publishing Engine and transforming the resulting XML (Extensible Markup Language) into HTML or using PHP (Hypertext Preprocessor) with the Web Publishing Engine.
![]() For more on XML export, see Chapter 24, “Sharing Data with XML,” p. 661.
For more on XML export, see Chapter 24, “Sharing Data with XML,” p. 661.
![]() For more on Custom Web Publishing with XML/XSLT, see Chapter 26, “Custom Web Publishing with XML/XSLT,” p. 715.
For more on Custom Web Publishing with XML/XSLT, see Chapter 26, “Custom Web Publishing with XML/XSLT,” p. 715.
![]() For more on Custom Web Publishing with PHP, see Chapter 27, “Custom Web Publishing with PHP,” p. 749.
For more on Custom Web Publishing with PHP, see Chapter 27, “Custom Web Publishing with PHP,” p. 749.
The goal of IWP is to translate to a web browser as much of the appearance and functionality of a FileMaker Pro database as possible, without requiring that a developer do any additional programming. FileMaker layouts are rendered in the user’s browser almost exactly as they appear to users of the FileMaker Pro desktop application. To give you an idea of what this looks like from the user’s perspective, Figures 25.1 and 25.2 show an example of a layout rendered both in FileMaker Pro and through IWP in a web browser.
Figure 25.1. Using Instant Web Publishing, the layouts that you create in FileMaker are dynamically turned into web pages for you.
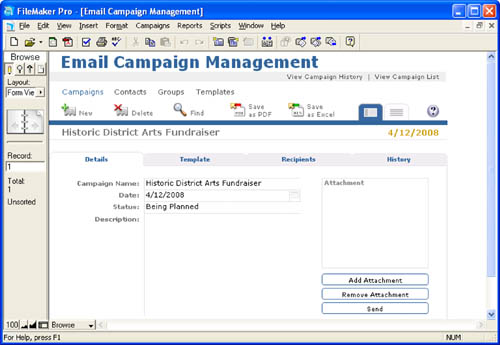
Figure 25.2. Instant Web Publishing renders FileMaker layouts almost flawlessly as web pages.

IWP is more, though, than simply rendering your layouts as web pages. IWP users have much, if not all, of the same application functionality as do FileMaker Pro users. They can run scripts and view, create, edit, and delete data just like traditional FileMaker Pro users.
Almost all the differences between IWP and FileMaker access to databases have to do with the fact that in IWP the database displays in a web browser, and in FileMaker it displays in a FileMaker window. The consequence of this is that the menus at the top of the window or display belong to the browser, not to FileMaker. Therefore, all FileMaker menu commands available in IWP have to be provided as buttons or other controls in the IWP Status Area.
Getting Started with IWP
After you decide that IWP is something you want to try, there isn’t too much you’ll need to do to get started. There are two ways to deploy IWP. You can use the regular FileMaker Pro desktop application, in which case you’re limited to publishing a maximum of 10 database files to at most five concurrent users. Alternatively, you can use FileMaker Server Advanced, which allows for significantly more files and users. The configurations for these options are covered in detail in the next section.
The host machine—whether running FileMaker Pro or FileMaker Server Advanced—of course needs to have an Internet (or intranet) connection. Ideally, it will be a persistent connection (for example, cable, T1 or DSL). The host machine also must have a static IP address. If you don’t have a static IP address on the host machine, remote users can have a difficult time accessing your solution. Finally, any databases you want users to access via IWP need to be open on the host machine.
A static IP address can be provided by your ISP; it will allow people outside your organization to connect to the IWP databases. If you have a local area network that communicates with the Internet through a single connection, each machine on the network has a separate IP address. They can be created dynamically or they can be assigned within the network. (They typically start with 192.168 or with 10.0, depending on the size of the network.) Your IWP host machine can have a static IP address within the network that you assign even if the entire network’s IP address (visible from the outside) changes. This static IP address will allow everyone inside the network to consistently connect to the IWP host, but outsiders will not be able to do so.
To access your IWP-enabled files, remote users need to have an Internet connection and a compatible browser. Because IWP makes heavy use of Cascading Style Sheets (CSS), the browser restrictions are important, and are something you need to consider carefully if you intend to use IWP as part of a publicly accessible website.
On Windows, the supported web browsers are Internet Explorer 6.0, Internet Explorer 7.0, and Firefox 2.0. On Macintosh, users need Safari 1.2 or 1.3 (Mac OS 10.3), Safari 2.0 (Mac OS 10.4), or Firefox 2.0. Obviously, these options might change with new releases of browsers and new versions of operating systems, so consult the www.filemaker.com website for the latest configuration guidelines. Whichever approved browser is used, JavaScript needs to be enabled, and the cache settings should be set to always update pages.
Some organizations forcibly disable JavaScript in all browsers. If you, or any of your remote users, work for such an organization, be aware of this and its ramifications for your web publishing strategy: IWP will not work unless JavaScript is enabled in the browser.
Enabling and Configuring IWP
To publish databases to the Web via IWP, you must enable and configure IWP on the host machine, and you have to set up one or more database files to allow IWP access. Each of these topics is covered in detail in the sections that follow.
Configuring FileMaker Pro for IWP
Using FileMaker Pro, you can share up to 10 databases with up to five users. To share more files or share with more users, you need to use FileMaker Server Advanced as your IWP host. FileMaker Pro can serve only files that it opens as a host. That is, it’s not possible for FileMaker Pro to open a file as a guest of FileMaker Server Advanced and to further share it to IWP users.
Figure 25.3 shows the Instant Web Publishing setup screen in FileMaker Pro. In Windows, you get to this screen by choosing Edit, Sharing, Instant Web Publishing. On Mac, choose FileMaker Pro, Sharing, Instant Web Publishing. The top half of the Instant Web Publishing dialog box relates to the status of IWP at the application level; the bottom half details the sharing status of any currently open database files. The two halves function independently of one another and are discussed separately here. For now, we’re just concerned with getting IWP working at the application level and therefore limit our discussion to the options on the top half of the Instant Web Publishing dialog box.
Figure 25.3. To enable Instant Web Publishing in FileMaker Pro, simply select On on the IWP configuration screen.

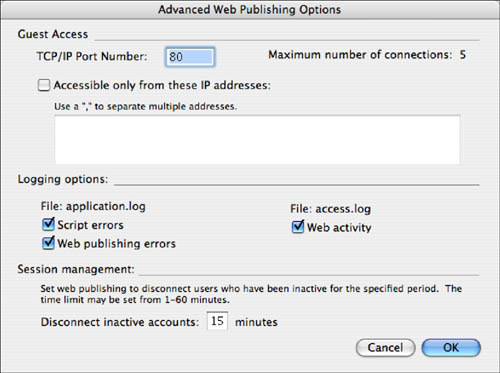
Turning Instant Web Publishing on and off is as simple as toggling the Off/On selection. Selecting On enables this particular copy of FileMaker Pro to act as an IWP host. You can choose the language that will be used on the IWP Database Homepage and in the Status Area. You can also configure a handful of advanced options, as shown in Figure 25.4.
Figure 25.4. On the Advanced Web Publishing Options dialog box, you can configure the port number, logging options, IP restrictions, and session disconnect time.
Port Number
By default, IWP is configured to use port 80 on the host machine. If another application, such as a web server, is already using that port, you see an error message and are asked to specify a different port to use. FileMaker, Inc., has registered port 591 with the Internet Assigned Numbers Authority (IANA), so that’s the recommended alternative port number. The only downside of using a port other than 80 is that users need to explicitly specify the port as part of the URL to access IWP. For instance, instead of typing 127.0.0.1, your users would have to type 127.0.0.1:591 (or whatever port number you specified).
If you are using Mac OS X, you might be asked to type your computer’s pass phrase if you attempt to change the port number when configuring IWP within the FileMaker client.
Security
If you know the IP addresses of the machines your IWP users will use when accessing your solution, you can greatly increase your solution’s security by restricting access to only those addresses. Multiple IP addresses can be entered as a comma-separated list. You can use an asterisk (*) as a wildcard in place of any part of the IP address (except for the first part). That is, entering 192.168.101.* causes any IP address from 192.168.101.0 to 192.168.101.255 to be accepted. Entering 192.* allows access to any user whose IP address begins with 192.
If you don’t set IP restrictions, anyone in the world who knows the IP address of your host machine and has network access to it can see at least the IWP Database Homepage (which lists IWP-enabled files). And if you’ve enabled the Instant Web Publishing extended privilege on the Guest privilege set, remote users could open the files as well. This is, of course, exactly the behavior you’d want when IWP is used as part of a publicly accessible website.
Logging
You can enable two activity logs for tracking and monitoring your IWP solution: the application log and the access log. The application log tracks script errors and web publishing errors:
- Script errors— These errors occur when a web user runs a script that contains non–web-compatible script steps. See the section “Scripting for IWP,” later in this chapter, for more information about what particular steps are not web compatible. A script error can also occur if a user attempts to do something (via a script) that’s not permitted by that user’s privilege set. Logging script errors—especially as you’re testing an existing solution for IWP friendliness—is a great way to troubleshoot potential problems.
- Web publishing errors— These errors include more generic errors, such as “page not found” errors. The log entry generated by one of these generic errors is very sparse and might not be terribly helpful for troubleshooting purposes.
The access log records all IWP activity at a granular level: Every hit is recorded, just as you’d find with any web server. As a result, the access log can grow quite large very quickly, and there are no mechanisms that allow for automatic purging of the logs. Be sure to check the size of the logs periodically and to prune them as necessary to keep them from eating up disk space. (A knowledgeable system administrator can configure both Windows and Mac OS X to periodically trim or rotate logs to prevent uncontrolled log growth.)
Each of the two logs can be read with any text editor, but you might find it helpful to build a FileMaker database into which you can import log data. It will be much easier to read and search that way.
Ending a Session
The final option on the Advanced Web Publishing Options dialog box is the setting for the session disconnect time. As mentioned previously, IWP establishes a unique database session for each web user. This means that as a user interacts with the system, things such as global values, the current layout, and the active found set are remembered. Rather than just treating requests from the Web as discrete and unrelated events, as was the case in previous incarnations of IWP, the host maintains session data on each IWP user.
Because only five sessions can be active at any given time when using FileMaker Pro as an IWP host, it’s important that sessions be ended at some point. A session can be ended in several ways:
- A user can click the Log Out button in the Status Area.
- The Exit Application script step ends an IWP session and returns the user to the Database Homepage.
- You can terminate a session after a certain amount of inactivity. The default is 15 minutes, but you can set it to anything from 1 to 60 minutes.
 Are your IWP sessions not ending when you think they should? See “Problems Ending IWP Sessions” in the “Troubleshooting” section at the end of this chapter.
Clicking the house icon in the Status Area to return to the Database Homepage does not end a session. If a user reenters the file from the Database Homepage without ending his session, he returns to exactly the same place he left, even if a startup script or default layout is specified for the file.
Configuring FileMaker Server Advanced for IWP
One of the best features of the FileMaker product line is the capability to do web publishing directly from files hosted by FileMaker Server Advanced. Using FileMaker Pro as an IWP host works well for development, testing, and some limited deployment situations, but for many business applications, you’ll find that you want the added power and stability that come from using FileMaker Server Advanced for this purpose.
Using FileMaker Server Advanced as your IWP host provides several significant benefits. The first is simply that it scales better. With FileMaker Pro, you are limited to 5 concurrent IWP sessions; with FileMaker Server Advanced, you can have up to 100 IWP sessions. FileMaker Server Advanced can also host up to 125 files, compared to FileMaker Pro’s 10. Even more important, you have the option to use SSL for data encryption when using FileMaker Server Advanced as the web host. FileMaker Server Advanced is a more reliable web host as well. It is more likely that the shared files will always be available for web users, that they’ll be backed up on a regular basis, and that the site’s IP address won’t change when you use FileMaker Server. (Even in organizations that use dynamic addressing for desktop machines, servers are typically assigned static IP addresses.)
Chapter 29, “FileMaker Server and Server Advanced,” covers in detail the various components and installation options of FileMaker Server and the Web Publishing Engine. Chapter 26, “Custom Web Publishing with XML/XSLT,” also contains a good deal of installation and configuration information. Here, we’ll assume that you have all the required components in place and will merely touch on the relevant configuration screens in the FileMaker Server Admin Console.
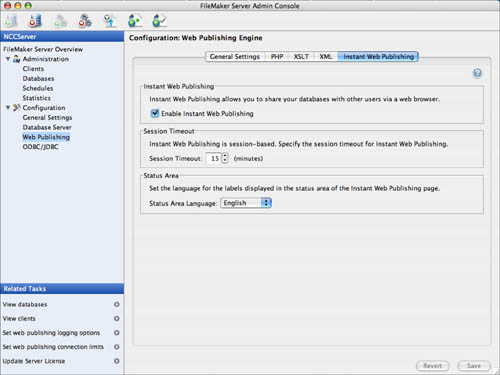
FileMaker Server Admin Console is a Java configuration tool that allows you to attach a Web Publishing Engine to a FileMaker Server and configure it. As shown in Figure 25.5, you turn on Instant Web Publishing for FileMaker Server simply by checking the box on the Instant Web Publishing pane of the Web Publishing screen.
Figure 25.5. Use the FileMaker Server Admin Console to allow FileMaker Server Advanced to host IWP-enabled databases.
You can see a list of the databases accessible via IWP on the server by going to the Databases page, shown in Figure 25.6. For a database to be IWP-accessible, one or more privilege sets needs to have the fmiwp extended privilege enabled in the database itself as described in the following section. There’s no configuration or setup that you need to do in FileMaker Server Admin Console nor to the files themselves before hosting them with FileMaker Server Advanced. In fact, even while a file is being hosted by FileMaker Server, a user with the privilege to manage extended privileges can use FileMaker Pro to open the file remotely and edit the privilege sets so that the file is or isn’t IWP accessible.
Figure 25.6. FileMaker Server Admin Console lists all the web-accessible databases on the server, but you don’t need to do any configuration here at the file level to allow something to be shared to IWP.

If you want a file to be accessible via IWP, but not to show up on the Database Homepage, you have to open the file with FileMaker Pro (open it directly, that is, not simply as a client of FileMaker Server) and go into the Instant Web Publishing configuration screen. After you are there, select the file and then check the Don’t Display in Instant Web Publishing Homepage check box. You do not need to actually enable IWP or add any extended privileges to privilege sets to have access to this setting.
Sharing and Securing Files via IWP
Security for Instant Web Publishing users is managed the same way it’s managed for FileMaker Pro users: via accounts and privileges. Accounts and privileges also dictate which database files are accessible via IWP. To be shared via IWP, a particular file must be open, and one or more privilege sets in that file must have the fmiwp extended privilege enabled. This is true regardless of whether you plan to use FileMaker Pro or FileMaker Server Advanced as the web host. You assign the fmiwp extended privilege to a privilege set in any of three ways:
- Go to File, Manage, Accounts & Privileges. On the Extended Privileges tab, you’ll see a list of the various extended privileges and be able to assign fmiwp to any privilege sets you want.
 For more information on what extended privileges are and how to assign them to a privilege set, see “Extended Privileges,” p. 390.
 - Also in File, Manage, Accounts & Privileges, on the Privilege Sets tab, you can select fmiwp as an extended privilege for the currently active privilege set as shown in Figure 25.7.
- On the Instant Web Publishing setup screen (refer to Figure 25.3), the bottom half of the screen shows a list of open database files. When you select a particular database, you can manage the fmiwp extended privilege right from this screen. If you select All Users or No Users, the fmiwp extended privilege is granted or removed from all privilege sets in the file. You can also select Specify Users By Privilege Set to select those privilege sets that should have access to IWP. Although the words extended privilege and fmiwp never appear on this screen, it functions exactly the same as the Extended Privilege detail screen. This screen is intended to be more user friendly and convenient, especially when working with multiple files.
Figure 25.7. Make certain that fmiwp is an extended privilege for the relevant privilege sets.
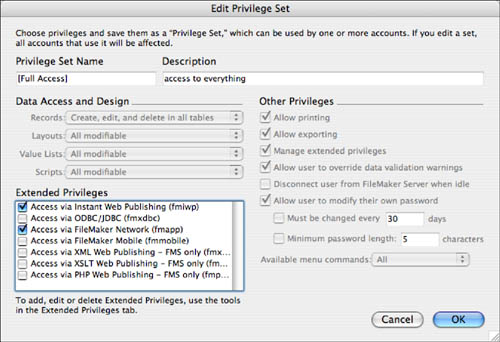
To assign extended privileges in any of these ways, a user must be logged in with a password that grants rights to Manage Extended Privileges.
The other sharing option you can configure on the Instant Web Publishing setup screen is whether the database name appears on the Database Homepage. In a multifile solution, you might want to have only a single file appear so that users are forced to enter the system through a single, controlled point of entry.
Any changes made in the sharing settings and privileges for a file take effect immediately; you do not need to restart FileMaker or close the file.
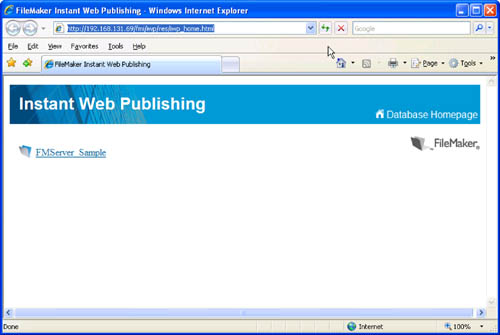
When users type the IP address (or domain name) of the IWP host in their browsers, the first thing they’ll see is the IWP Database Homepage, an example of which is shown in Figure 25.8. The Database Homepage lists, in alphabetical order, all files on the host machine that have at least some privilege sets with the fmiwp extended privilege enabled. The Database Homepage cannot be suppressed, although it can be customized or replaced, as explained later in this chapter.
Figure 25.8. The Database Homepage provides users with a list of accessible files.
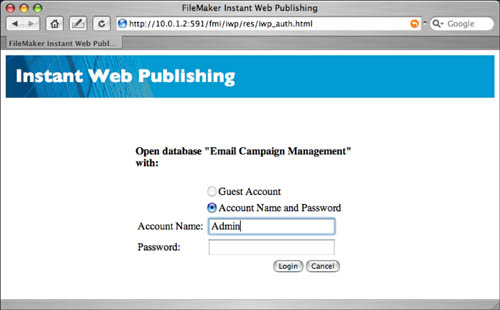
Users aren’t prompted for a password on their way to the Database Homepage. The password prompt occurs (unless you are logged in as a guest, as described in the following bulleted list) when users first try to interact with a database. IWP now uses an HTML forms-based interface for entering a username and password as shown in Figure 25.9. To be authenticated, users must enter an active, valid username and password, and their accounts must be associated with a privilege set that has the fmiwp extended privilege enabled.
Figure 25.9. You need to log in to the database to access it.
You should know a number of things about how accounts and privileges are authenticated under IWP:
- As in regular FileMaker authentication, the password is case sensitive (although the account name is not).
- IWP ignores any default login account information that has been set up under File Options.
- IWP does not support the Account option to require users to change their passwords after the next successful login. Changing passwords is not a feature supported by IWP. If this option has been set, a web user who tries to log in with that username and password receives an Error 211,
Password Has Expired, and cannot enter the system. - If the Guest account has been activated and given the fmiwp extended privilege, users might not be prompted for a username/password to access the database. To skip the login screen, though, it’s necessary that the fmiwp extended privilege be assigned only to the [Read-Only Access] privilege set (the privilege set used by the Guest account). Anyone automatically logged in in this fashion will have the privileges of the Guest account. Such a configuration would typically be used only for websites that need to be accessed by the general public.
You can create a script that uses the account management script steps to create your own customized login routine. Users would use Guest privileges to get to your login screen, and then your script would use the Re-login step to reauthenticate them as different users.
After a user is authenticated as a valid user of the file, that user’s privilege set then controls which actions can be performed, just as it does for users of the FileMaker Pro desktop application. Field and layout restrictions, record level access, creation and deletion of records—all of these are managed exactly the same for IWP users as for FileMaker Pro users. The capability to make use of this unified security model is truly one of the best features of FileMaker IWP and makes it much simpler to deploy robust and secure IWP solutions.
![]() For more information about setting up user accounts and privileges, see Chapter 12, “Implementing Security,” p. 371.
For more information about setting up user accounts and privileges, see Chapter 12, “Implementing Security,” p. 371.
Designing for IWP Deployment
The preceding section discussed how to enable IWP at the application level and how to set a file so that users can access it via IWP. Although this is enough for IWP to function, there are usability issues to consider as well. Not all layouts and scripts translate well to the Web, and some FileMaker features simply don’t work via IWP. This section discusses the constraints that you, as a developer, must be aware of when deploying an IWP solution. We also discuss a number of development techniques that can make an IWP solution feel more like a typical web application.
Constraints of IWP
Most of the core functionality of FileMaker Pro is available to IWP users. This includes being able to view layouts, find and edit data, and perform scripts attached to buttons. However, a number of FileMaker features are not available to IWP users. It’s important to keep these points in mind, especially when trying to port an already existing solution to the Web:
- IWP users have no database development tools. This means IWP users can’t create new files; define tables, fields, and relationships; alter layouts; manage user privileges; or edit scripts.
- IWP users can’t use any of the FileMaker Pro keyboard shortcuts. Be sure that you leave the Status Area visible or provide your users with ample scripted routines for tasks such as executing finds and committing records.
- There is no capability to import or export data from an IWP session. In general, any action that interacts with another application, the file system, or the operating system is not possible via IWP.
- IWP has no Preview mode. This means that sliding, subsummary reports, and multicolumn layouts, all of which require being in Preview mode to view, are not available to IWP users. Similarly, printing is not supported. IWP users can choose to print the contents of the browser window as they would any other web page, but the results will not be the same as printing from FileMaker Pro. (That is, headers and footers won’t appear on each page, page setups will not be honored, and so on.)
- There are a few data-entry differences for IWP users. For instance, web users can’t edit rich text formatting in fields. That is, they can’t change the style, font, or size of text in a field. They can generally, however, see rich text formatting that has already been applied to a field.
- Most window manipulation tools and techniques do not translate well to IWP. The user’s browser can show only the contents of the currently active window in the virtual FileMaker environment. That environment can maintain multiple virtual windows and switch between them, but a user can’t have multiple visible windows in the browser, and cannot resize or move windows except to the extent allowed by the browser. In other words, the users can manually resize their browser windows, but precision movement and placement of windows using script steps such as Move Window is not supported in IWP.
- None of the FileMaker Pro toolbars is available via IWP. IWP does offer its own toolbars in the Status Area, however, and these contain some of the same functionality found in the FileMaker Pro toolbars.
- Spell-checking is not available via IWP.
- Many graphical layout elements are rendered differently, or not at all, on the Web. This includes diagonal lines, rounded rectangles, rotated objects, ovals, and fill patterns. The sections that follow discuss this topic in greater detail.
- IWP users can’t edit value lists through a web browser.
- There is no built-in way for users to change their passwords via IWP, even if they have the privilege to do so. If you need this sort of functionality, you have to use the account management script steps and come up with your own scripted routine.
Scripting for IWP
One of the greatest recent advances in Instant Web Publishing is script support. In versions of FileMaker before version 7, only a handful of script steps could be executed from the Web, and scripts could be no more than three steps long. Under those severe restrictions, it was quite difficult to build anything but the most basic web applications.
IWP supports more than 70 script steps, and scripts can be of any length and complexity. Also, because IWP is now session-based, scripts executed from the Web operate within what might be thought of as a virtual FileMaker environment. This means that changes to the environment (active layout, found set, and so on) are persistent and affect the browser experience, which is a good thing.
Even though IWP script support has come a long way, there are still some behaviors, constraints, and techniques you should be aware of.
Unsupported Script Steps
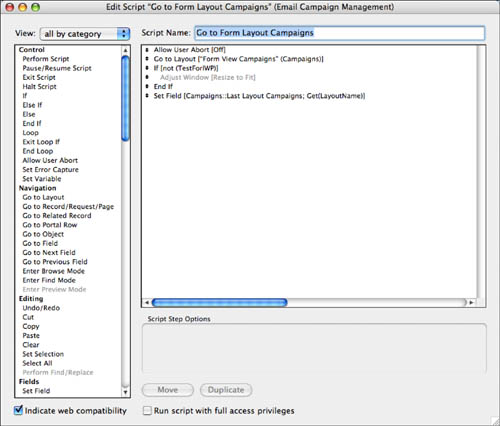
ScriptMaker itself has an option that makes identifying unsupported script steps quite easy. When you check the Indicate Web Compatibility check box, all the unsupported script steps are dimmed. This affects both the list of script steps and the steps in whatever script you’re viewing. Figure 25.10 shows an example of what script step dimming looks like. The Indicate Web Compatibility check box has no effect other than showing you which steps are not supported; how you choose to use that information is up to you (although unsupported script steps are dimmed out, you can still add them to a script). Additionally, its status is not tied to any particular script. That is, it is either turned on or off for the entire file, and it remains that way until a developer changes it. We point this out explicitly because the check box right next to it, Run Script with Full Access Privileges, is a script-specific setting.
Figure 25.10. When writing scripts that will be used via IWP, turn on the Indicate Web Compatibility check box to dim out incompatible script steps.
Additionally, the option to perform with a dialog is not supported in a number of supported script steps. These include Delete Record/Request, Replace Field Contents, Omit Multiple Records, and Sort Records. These steps are always performed without a dialog via IWP, regardless of which dialog option has been selected in ScriptMaker.
Error Capture
The outcome of running a script (from the Web) that contains unsupported script steps depends on whether the Allow User Abort setting has been turned on or off. If it’s not explicitly specified, a script executes on the Web as if Allow User Abort had been turned on. So, not specifying any setting is the same as explicitly turning it on.
If user abort is on (or not set at all), script execution halts when an unsupported step is encountered. Steps before the offending script step are performed as normal. If you’ve chosen to log script errors, the offending step is logged as an error in the application log. The user does not see any error message or have any knowledge that anything is amiss.
If user abort has been turned off, a script simply bypasses any unsupported scripts and attempts to perform subsequent steps. It’s performed as if the offending step were simply not there. No error is logged to the application log when this occurs.
Script steps with the unsupported “perform with dialog” options discussed earlier are not affected at all by the error capture setting. These script steps will always be performed as if Perform Without Dialog had been checked, regardless of error capture.
Committing Records
If a script run via IWP causes a record to be altered in any way (such as using a Set Field script step), be sure that you explicitly save the change by using the Commit Record/Request step sometime before the end of the script. If you don’t, your web user will be left in Edit mode and, provided that the Status Area is visible, will have the option to Submit or Cancel the changes, which is likely not an option you want to offer at that point. Canceling would undo any changes made by the script.
Startup and Shutdown Scripts
If you have specified a startup script for a file, it is performed for IWP users when the session is initiated. Similarly, IWP also switches to a particular layout on startup if you’ve selected that option. The shutdown script is performed when the user logs out, even if the logout is the result of timing out.
The startup script executes only once per session, when the user navigates there from the Database Homepage or follows an equivalent link from another web page. The startup script is not run if a file is activated through the performance of an external script.
Performing Subscripts in Other Files
A script can call a subscript in another file, but that file has to be open and enabled for IWP for the subscript to execute. Calling a subscript does not force open an external file, as happens in the FileMaker Pro desktop application.
If your subscript activates a window in the external file, the IWP user sees that window in the browser. Unless you provide navigation back to the first file, a user has no way of returning, except by logging out and logging back in. You should make sure that any record changes are fully committed before navigating to a window in another file. It’s possible that the record will remain in an uncommitted, locked state, even though the IWP user has no idea this has occurred.
Testing for IWP Execution Within a Script
If you have a solution that will be accessed by both FileMaker Pro desktop users and IWP users, chances are that they’ll use some of the same scripts. If those scripts contain unsupported script steps, you might want to add conditional logic to them so that they behave differently for IWP users than they do for FileMaker users. You can do this by using the Get (ApplicationVersion) function. If the words Web Publishing are found within the string returned by this function, it means the person executing the script is a web user. It’s not possible to discriminate between an IWP user and a CWP user with this function; you simply know you have a web user. The actual syntax for performing the test is as follows:
PatternCount (Get (ApplicationVersion); "Web Publishing")
Layout Design
Most layouts you design in FileMaker Pro will be rendered almost perfectly in a web browser via Instant Web Publishing. IWP does this by using the absolute positioning capability of Cascading Style Sheets, Level 2. The CSS requirements of IWP are the reason there are browser restrictions for its use. We’ve already mentioned a few layout elements that don’t translate well to IWP—we’ll recap them here as well—but there are several additional things to keep in mind when creating or modifying layouts for IWP use.
Graphic Elements
Rounded rectangles, ovals, diagonal lines, rotated objects, and fill patterns are not rendered properly in the web browser and should be avoided. In some cases, IWP displays altered versions of the objects; in other cases the objects simply do not show up.
As is always the case with web pages, there is no substitute for testing each page (in this case, each FileMaker layout) with a variety of browsers and operating systems. In practice, you can drastically short-circuit the process. If you are starting from scratch, repeatedly open the layouts in IWP and compare them to the FileMaker versions. As you see the few items that are different, you will learn what to avoid.
“View As” Options
Web users have the same ability that FileMaker desktop users have to switch between View As Form, View As List, and View As Table on a given layout, unless you restrict that ability at the layout level. To do so, go into the Layout Setup options, shown in Figure 25.11, and simply uncheck any inappropriate views. The additional Table view options that can be specified all translate well to IWP, except for resizable and reorderable columns.
Figure 25.11. In Layout Setup, you can specify the views to which a user should be able to switch for a given layout.

You should be aware of a few special characteristics of List and Table views in IWP. By default, View As List shows a set of at most 5 records, and View As Table shows a set of at most 20 records. You cannot change these settings. Also, while in List or Table view, whenever a user clicks on a record to edit it, the active record jumps to the top of the set. This can be slightly disconcerting for users habituated to working with lists of records in FileMaker. For instance, if a user is viewing records 6–10 of a set as a list, and clicks on record 8, record 8 jumps to the top, and the screen then displays records 8–12.
Layout Parts
IWP can render any and all parts that compose a layout. There are a few differences, however, between how and when parts display in IWP and how and when they display in the FileMaker desktop application.
First of all, in Form view, the vertical size of a part displayed via IWP is the size that the part was defined to be. It doesn’t stretch to fill the vertical space. This is different from how FileMaker Pro behaves. In FileMaker Pro, the last visible part expands to fill any remaining vertical space. Say, for instance, that you have a layout that consists of only a single, colored body part. Via IWP, if a user resizes a browser window so that it’s larger (vertically) than the body part, the space between the bottom of the part and the bottom of the browser is a white void. This also means that if your layout has a footer part, it won’t necessarily (indeed, won’t likely) be displayed at the very bottom of the browser window.
View As List in a browser also has some differences from its FileMaker counterpart. In FileMaker, a header or footer part is locked on the screen at the top or bottom. The area in between displays as many body records as space permits. In FileMaker, leading and trailing grand summary parts display in List view, but title header, title footer, and subsummary parts do not (in Browse mode).
As we’ve mentioned, in a browser, List view always contains 25 records (except, of course, when the found set is fewer than 5 or if the active record is one of the last four of the found set). The header and footer are not fixed elements as they are in FileMaker. If the 25 records of the list take up less than the full browser window, the footer simply shows up in the middle of the screen; if they take up more than the full window, a user would need to scroll to see the footer. Another major difference is that title header, title footer, and subsummary parts are all visible in the browser at all times (in List view). Even if the database is sorted properly, however, subsummary parts do not show correct values—they show the same values that a leading or trailing grand summary would show. For this reason, it’s unlikely to be a good idea to allow your IWP users access to layouts that contain subsummary parts.
Container Fields
You should know about a few special restrictions and considerations when using container fields in an IWP solution. Most important, there is no capability to add or edit data in a container field via IWP; these fields are strictly view-only. Entry and updating of pictures, sounds, QuickTime movies, files, and objects is available only to regular FileMaker Pro users.
The visibility and/or accessibility of a container field’s contents are dependent on the types of objects they are and how they were entered into the container field in the first place:
- Graphic images that have been directly stored in a container field (that is, not stored as a reference) are visible through a browser. Images should be stored as pictures, not as files.
- Graphic images that have been stored as a reference are visible to IWP users only if the images are stored in the web folder of the FileMaker Pro application (if FileMaker Pro is the IWP host) or if they are stored in the root folder of the web server (if FileMaker Server is the IWP host).
- QuickTime movies can’t be accessed directly from the web browser. If you insert them as files rather than as QuickTime, however, a user can play or download them.
- Files stored directly in a container field render to an IWP user as a hyperlink. Clicking the link begins a download of the file. No icon or other graphic representation of the file is visible to web users.
- Sounds that have been stored directly in container fields cannot be played via IWP.
Application Flow
We’ve discussed many of the technical limitations and details of how various FileMaker features translate to the Web. We turn now to more practical development matters. There are certain routines and development habits that work well in the FileMaker desktop application that don’t work as well from a web browser. The following sections discuss how the constraints of IWP will influence how you develop solutions.
If you’re designing a new solution and you know that you’ll have IWP users, you might consider thinking about how you would develop the solution if it were a web application. Because there are more constraints placed on designing for the browser, anything you build for the browser should work well for FileMaker users also.
Explicit Record Commits
HTTP—the underlying protocol of the Web—is a stateless protocol. This means that every request a browser makes to a web server is separate and independent from every other request. Put differently, the web server doesn’t maintain a persistent connection to the web client. After it has processed a request from someone’s browser, it simply stands by waiting for the next request to come in. To make HTTP connections appear to be persistent, web programmers need to add information to each request from a single client, and then let some piece of web server middleware keep track of which client is which, based on this extra request data. This technique is referred to as session management.
The client/server connection between FileMaker Pro and FileMaker Server is persistent. The two are constantly talking back and forth, exchanging information and making sure that the other is still there. FileMaker Server is actively aware of all the client sessions. When FileMaker Server receives new record data from any client on the network, it immediately broadcasts that information to all the other clients. And when a user clicks into a field and starts editing data, FileMaker Server immediately knows to consider that record as locked and to prevent other users from modifying the record.
The fact that IWP is now capable of performing session management means that FileMaker maintains information about what’s happening on the Web in a virtual FileMaker environment. Even though this doesn’t change the fact that HTTP is stateless, using sessions gives IWP a semblance of persistence. Essentially, the server stores a bunch of information about each IWP user; each request from a user includes certain session identifiers that enable the server to recognize the IWP guest and to know the context by which to evaluate the request. One of the benefits of this session model is that IWP users can lock records, and they are notified if they try to edit a record that a regular FileMaker Pro user has locked.
Still, the statelessness of the Web makes the application flow for something even as basic as editing a record much different in IWP than it is in FileMaker. In FileMaker, of course, a user just clicks into a field, makes some changes, and then clicks out of the field to commit (save) the change. On the Web, editing a record involves two distinct transactions. First, by clicking an editable field or using the Edit Record button in the Status Area, the user generates a request to the server to return an edit form for that record and to mark the record as locked. As we discussed earlier in this chapter, Edit mode in the browser is distinctly different from Browse mode.
The second transaction occurs when the user clicks the Commit button in the Status Area (or clicks a similar button you’ve provided for this purpose). No actual data is modified in the database until and unless the record is committed explicitly.
This transaction model for data entry might feel very alien to users who are accustomed to working with a FileMaker interface. As you evaluate the web-friendliness of existing layouts or build new layouts for IWP users, try to make the application flow work well as a series of discrete and independent transactions. One common way to do this is by having tightly controlled routines that users follow to accomplish certain tasks. For instance, rather than letting users just create new records anywhere they want, create a “new record” routine that walks users through a series of screens where they enter data and are required to click a Next Screen or Submit button to move forward through the routine.
Hiding the Status Area
As when designing a solution for FileMaker users, you have the option to leave the Status Area visible for your IWP users or to hide it from them. And as with regular FileMaker, unless you lock it open or closed, users can toggle it themselves.
By default, the Status Area is visible for your IWP users. The script step Show/Hide Status Area enables you to programmatically control the visibility of the Status Area. Typically, if you want to hide the Status Area, you do so as part of a startup script.
There are certainly benefits to having the Status Area visible. Most important, the Status Area provides a wealth of functionality for the IWP user. Navigation, complex searching, and a host of record manipulation tools are all features that come at no charge in the Status Area. Also, the Status Area heightens the “FileMaker-ness” of the user experience. If one of your goals is to make your IWP deployment feel like FileMaker to your users, the Status Area can certainly help you accomplish this goal.
There are also reasons that developers want to hide the Status Area from users. The first is simply to constrain users’ activities by forcing them to use just the tools you give them. This is generally why developers hide the Status Area for FileMaker desktop deployments as well. Hiding the Status Area also makes your application more weblike. If you are using IWP alongside an existing website or plan to have the general public access your site, you’ll probably want to hide the Status Area. Public users are more likely to expect a web experience than a FileMaker experience.
If you do decide to hide the Status Area, you must provide buttons in your interface for every user action you want or need to allow, including committing records, submitting Find requests, and logging out of the application. Because users have no keyboard shortcuts—including using the Enter key to do things like submit Find requests and continue paused scripts—and no pull-down menus, you’ll probably need even more buttons than you would when designing without the Status Area for FileMaker users.
Portals
Instant Web Publishing does an astonishingly good job of displaying portals in a browser, complete with scrollbars, alternating row colors, and the capability to add data through the last line of a portal (providing, of course, that the underlying relationship allows it). Another nice thing about portals in IWP is that you can edit multiple portal rows at once and submit them together as a batch.
When designing an IWP application that requires displaying search results as a list, consider whether you can use a portal instead of a List view. A portal gives you flexibility as far as the number of records that display, and you can use the space to the left or right of it for other purposes.
The best way we’ve found to make a portal display an ad hoc set of records, such as those returned by a user search, is to place all the record keys of the found set into a return-delimited global text field by using the Copy All Records script step, and then to establish a relationship between that field and the file’s primary key. Because you can let the portal scroll, you don’t strictly need to create Next and Previous links, but it would make your application more weblike if you did. One option to do this is to take the return-delimited list of record IDs and extract the subset that corresponds to a given page worth of IDs. The MiddleValues function comes in handy for this task. You’d simply need to have a global field that kept track of the current page number. Then the function
MiddleValues (gRecordKeys; (gPageNumber-1) * 8 + 1; 8)
would return the eight record IDs on that page. Substitute a different number of records per page in place of 8, of course, if you want to have a hitlist with some other number of records on it. The scripts to navigate to the next and previous pages then simply need to set the page number appropriately and refresh the screen.
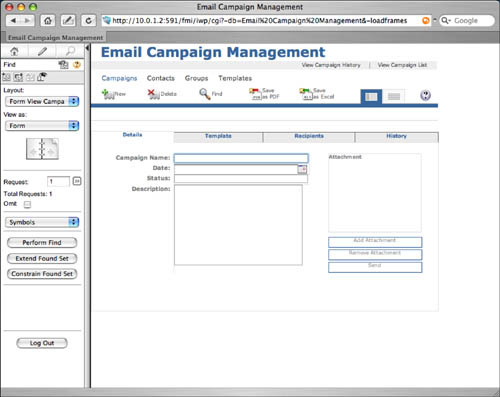
Creating Links to IWP from Other Web Pages
The IWP Database Homepage provides a convenient access point for entering web-enabled databases. It’s possible also to create your own links into a file from a separate HTML page, which is perhaps more desirable for publicly accessible sites. To do this, you simply create a URL link with the following syntax:
http://ip address:port number/fmi/iwp/cgi?-db=database name&-loadframes
This syntax is different than it was in versions of FileMaker prior to version 7, so be sure to update external links if you’re upgrading an IWP solution from FileMaker 6 or earlier.
If you are using FileMaker Pro itself as your IWP host (as opposed to FileMaker Server Advanced), you can place static HTML files and any images that need to be accessible to IWP users in the web folder inside the FileMaker Pro folder. The web folder is considered the root level when FileMaker Pro acts as a web server. If you had, for example, an HTML page called foo.html in the web folder, the URL to access that page would be the following:
http://ip address:port number/foo.html
If you develop a solution that uses FileMaker Pro as the host and later decide to migrate to FileMaker Server Advanced, you should move the entire contents of the web folder (if you’ve put any documents or images there) to the root folder of your web server.
Creating a Custom Home Page
You can override the default page with a page of your own devising. The new file must be called iwp_home.html. It can be used when serving files via IWP either from FileMaker Pro (in which case it belongs in the web directory inside the FileMaker Pro application folder) or from FileMaker Server Advanced (in which case it belongs in the FileMaker Server/Web Publishing/iwp folder).
There are several approaches to creating such a file. You could devise your own file from scratch, creating your own look and feel, and populate that file with hard-coded links to specific databases, as described in the preceding section. Or if you want a file that dynamically assembles a list of all available databases, the way the default home page does, you’ll want to customize the default page. An example of that default page can be found on the FileMaker Pro product CD. (For the curious, it can also be found in the FileMaker application folder: On Windows, it’s found in Extensions/Web Support/Resources/iwpres. On Mac OS, it’s found in Extensions/Web Support/FM Web Publishing/Contents/Resources/iwpres. On Mac OS, Extensions/Web Support/FM Web Publishing is an OS X package, not a directory, so you’ll have to right-click it and select Show Package Contents to drill deeper.) The default page makes heavy use of JavaScript and in particular of JavaScript DOM function calls, so familiarity with those technologies will be desirable if you want to customize the IWP home page.
Using an IWP Solution
The focus of this chapter is on what a developer needs to know to create and share databases to the Web using Instant Web Publishing. One crucial piece is an understanding of what IWP looks like and how it functions from the user’s perspective.
Browse Mode
If you’ve hidden the Status Area from your users, you have complete control over what a user can do and how it’s done. With the Status Area active, however, a user has access to a great many built-in features, including the capability to perform complex finds, sort records, navigate to other layouts, and manipulate data. Even so, you can still constrain a user’s options by placing restrictions on the privilege sets assigned to IWP users.
To avoid a user navigating to a non–IWP-friendly layout, edit the layout options of the IWP-enabled privilege sets. Mark any layouts you want users to avoid as No Access.
Figure 25.12 shows the Status Area a user sees while in Browse mode. Unless you explicitly lock the Status Area either open or closed, a user can toggle it open and closed while in any mode.
Figure 25.12. The IWP Status Area in Browse mode contains a number of record manipulation and navigation tools.
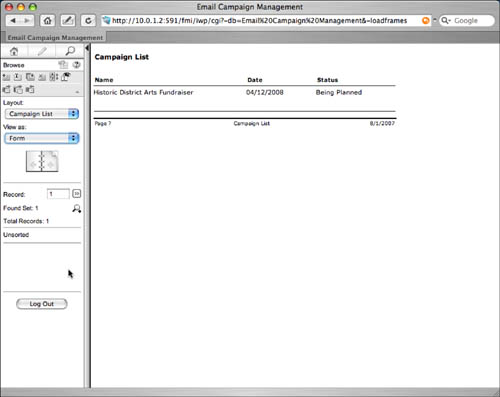
As noted previously, there is no Preview mode in IWP. Reports and layouts designed for display in Preview mode will sometimes display slightly differently in IWP because summaries and page numbers are not calculated. If this makes a substantive difference, make certain to block access to them. In Figure 25.12, you can see that the page number displays as a question mark because pagination only occurs in Preview mode. This is judged not worth the effort to block access to the layout or to create a separate one (without page number) for IWP.
While in Browse mode, providing that they have the proper privileges, users can create, edit, duplicate, and delete the current record. They can also sort, find all, omit one record, omit multiple records, and show only the omitted records. Any buttons whose functionality is not permitted by the users’ privilege sets are dimmed and inactive.
Edit Mode
As we’ve discussed, one of the biggest differences between the user experience in IWP versus the FileMaker Pro desktop application is the explicit distinction between being in Browse mode and being in Edit mode. A user can enter Edit mode in a few ways:
- By clicking any field (except container and calculation fields) where the Field Behavior is set to allow entry while in Browse mode
- By running a script that opens a record and doesn’t commit it
- By clicking the Edit Record button in the Status Area
Buttons on a layout are active regardless of whether a user is in Browse, Edit, or Find mode. Executing a script via a button does not change the mode unless a mode-changing step is in the script.
The Enter Browse Mode script step does not return an IWP user from Edit mode to Browse mode. Use the Commit Record/Request script step for this purpose.
Find Mode
Users can enter Find mode in IWP either by clicking on the magnifying glass icon in the Status Area or by clicking on a button of your creation that leaves them in Find mode. Figure 25.13 shows the Status Area as it appears in Find Mode. Users can enter their search criteria and execute the find by clicking on the appropriate buttons in the Status Area. Just as in the FileMaker Pro desktop application, users can create multiple Find requests, pick from a set of find operators, choose to omit found records, and extend or constrain the current found set.
Figure 25.13. In Find mode, the IWP Status Area contains all the tools necessary for users to create complex ad hoc searches.
If you are using the Perform Find, Constrain Found Set, or Extend Found Set script steps to execute a find, be aware that if no records are found, IWP does not display an error message to users. You need to trap for that error yourself and take appropriate action, such as navigating to a layout that has a “No records found” message.
Sorting Records
The Sort button in the Status Area takes users to a pop-up Sort dialog that looks and functions much like its FileMaker Pro counterpart. Unlike the Sort dialog in the FileMaker Pro desktop application, which lets users choose any field from the current layout’s table, the IWP Sort dialog allows them to choose only from fields that are physically present on the current layout.
Troubleshooting
Problems Ending IWP Sessions
FileMaker Pro thinks that there are active IWP sessions, but I know that all the users have closed their browsers.
Closing the browser window or quitting the browser application does not end a session, so be sure to train your users to click the Log Out button (or an equivalent button that you provide). One of the problems you could run into is that an IWP user might quit his browser but still have a record lock. Until the session times out, no other user can modify that record. If you experience this problem, try reducing the session timeout setting to something like 5 minutes.