
Chapter 11. Developing for Multiuser Deployment
In this chapter
FileMaker Extra: Development with a Team
Developing for Multiple Users
Some of the best, most lovingly developed FileMaker Pro systems are only ever used by a single person. Then there are the rest of the databases out there. FileMaker Pro enjoys a graceful growth curve from single-user applications to systems that support enterprise-level workgroups and operations of hundreds of users.
This graceful transition from single user to multiuser thankfully means that issues to take into consideration when building multiuser systems are reasonably modest. Much of what you already know about building FileMaker Pro systems—regardless of your planned deployment—also applies directly to building a multiuser application.
We’ll cover two primary topics: how the FileMaker engine handles multiple users and development techniques you need to consider when building multiuser applications. As a third discussion, we also go into some depth about audit trails, given that they often are used to help ensure data integrity in systems used by larger organizations and are used specifically to track multiple-user scenarios.
We recommend that anyone intending to deploy a system to multiple users read this chapter. Some of the issues we discuss become necessary considerations only in systems getting heavy use from multiple users, but they’re good to have in mind nonetheless.
![]() This chapter is a good companion to Chapter 28, “Deploying and Extending FileMaker,” p. 767.
This chapter is a good companion to Chapter 28, “Deploying and Extending FileMaker,” p. 767.
![]() To grasp the IT infrastructural logistics of hosting a FileMaker Pro solution, read Chapter 29, “FileMaker Server and Server Advanced,” p. 785.
To grasp the IT infrastructural logistics of hosting a FileMaker Pro solution, read Chapter 29, “FileMaker Server and Server Advanced,” p. 785.
Sessions in FileMaker Pro
FileMaker Pro is a client/server application (at least when files are hosted by an individual user or by FileMaker Server). Each time someone using FileMaker Pro (a client) connects to FileMaker Server (or, using peer-to-peer sharing, connects to a copy of FileMaker Pro sharing a database) and opens an instance of the database hosted there, he creates a session.
In practical terms, this means that one of your users can be on layout #10 while you yourself are working with layout #2. You can run a script and nothing will necessarily happen on another user’s computer; likewise, someone else can export data on her machine while you’re performing a find request in the very same database table on yours. You each have a separate connection to the database, with its own unique environment. While working with the same data, all your users can be performing separate, distinct tasks in your system. Each user can have a separate view of the database, with different active windows, active tables, or active found sets, among other things.
Generally, these individual user sessions don’t interfere with each other at all; however, there are cases in which they can conflict—for example, when two users try to edit the same record at the same time. Throughout this chapter we will cover various techniques for identifying and coping with such issues, although most of the work is already done for you inside FileMaker.
The one thing that is consistent across all user sessions is the actual data in the database. Changes you make to records you are editing are immediately visible to other users in the system and vice versa. Our discussion of sessions pertains only to global fields and variables, window states, and layouts. Actual data is stored and displayed consistently for everyone.
Before approaching how to manage sessions and potential conflicts, it is important to understand what a session is and how FileMaker Pro manages multiple users. In FileMaker Pro, sessions are implicit and enjoy a stateful, persistent, always-on connection to the server. The system preserves and isolates each user experience in the FileMaker Pro client. Keep in mind that after the session is over (an individual user closes the database), all information about that session—what layout was in use, where windows were positioned, what the found set was—is discarded. The next time that user opens the database in question, it opens in its default state, with no preservation of how the user last left the system.
You might have heard the term session as applied to the Web. FileMaker Pro is quite different. On the Web, connections are stateless by default—they have no memory. The web server does not maintain a connection to a user; the effect of a persistent session is approximated by the explicit creation of an identifier for a given user when she logs in to a system. That identifier is then passed (and often stored and retrieved via a cookie) through all the page requests a person may make in a given time period. Web developers need to explicitly create the mechanics of a session to preserve a user’s experience from page to page. Whenever you buy a book from Amazon, the developers there have no doubt labored to make sure that each page you visit tracks sensibly your use of the site—especially when it comes to the multipage shopping cart experience. FileMaker, by contrast, provides persistent database sessions with no additional effort by you, the developer.
Session-Specific Elements
FileMaker Pro’s sessions maintain a consistent user experience until the application itself is closed. This experience includes your login account (unless you explicitly log out and log back in), the position and number of windows you have open, which layouts you’re on, your current found set, your current sort order, and portal scroll positions. On the development side of things, custom colors you’ve stored in the layout tools are, unfortunately, lost at the end of a session as well. And, as you might expect, global variables (which are not stored in the database) are session-specific.
Global Behavior
Globals (fields specified as having global storage, as well as global script variables) are session specific and require additional discussion. In a multiuser client session, they utilize and hold values unique to one specific user’s session. This enables you as a developer to depend on globals storing different information for each user. A simple example is a displayed account name at the top of each layout set at the time of login.
![]() For more details on global field storage, see “Storage and Indexing,” p. 110.
For more details on global field storage, see “Storage and Indexing,” p. 110.
At the start of a session, each global field is initialized to the last value it had in single-user mode. If you run only in single-user mode, this makes the global field value appear to persist across sessions, but it’s misleading to infer that there are multiuser and single-user types of sessions. Storing information in global fields for single users is a handy way to leave things the way they were, but it also allows developers to create a default state for global fields.
Global fields are used for a range of functions in multiuser databases: They often hold images for navigation and user interface purposes and they sometimes hold session information such as the current date or the active, logged-in user. It makes sense, then, that they’d be specific to a given user’s experience.
 If your global fields suddenly seem to be holding wrong data, refer to “Unpredictable Global Default Values” in the “Troubleshooting” section at the end of this chapter.
Global variables, on the other hand, do not have stored values from session to session in single or multiuser mode. As a developer, you will have to explicitly initialize the variables you intend to have the system utilize, ideally at the beginning of each session.
![]() For a complete discussion of script variables, see “Script Variables,” p. 487.
For a complete discussion of script variables, see “Script Variables,” p. 487.
User Accounts and Session Data
One common use of global behavior in a multiuser environment is to set a global field with your currently logged-in account. This enables you always to have a central stored value that’s easy to use in calculation formulas and scripts. One could argue that simply using the Get (AccountName) function wherever necessary would accomplish the same end, but there’s an additional use for storing the current account name in a global: You can drive a relationship with it into a User table by using the account name as a unique match field.
Note that a global variable, as opposed to a global field, cannot drive a relationship. This difference can play a significant role in determining whether to store particular session data in a global field or a global variable.
This enables you to tie account information to data. You might want to do this if, for example, you need to store someone’s real name, her preference always to start on a specific layout when the system opens, or in what language she wants to use your database.
All these examples depend on your having done something with the information you store in a user table. It’s useful to store someone’s preference for a starting layout only if you then write the requisite script that uses this as a reference.
Another possibility lies with tracking database use. Although you might debate whether a database or database administrator should be looking over someone’s shoulder, you could write routines that post records to a user log table whenever users log in, log out, or even when they perform certain scripted actions (delete records, create records, run an invoice report, and so on).
One more user-friendly option is to accommodate users simply by enabling them to specify where they prefer a window to be positioned and sized. All these various options can be enabled by storing information specific to a single person’s session in global fields.
Concurrency
You might have heard the term concurrency as it relates to databases. It refers to the logic and behavior of database systems when two (or more) users attempt to interact with the same information. A simple metaphor might be two people trying to use a phone book or dictionary at once—they’re likely to trip over each other a bit. Every multiuser database platform has to address this issue. Certainly it’d be easiest simply to restrict using the database to one user or function at a time, but clearly that’s an unrealistic solution.
The ACID Test
To address issues of concurrency and transaction integrity, database engineers have developed what has come to be known as the ACID test. Database software needs to pass this test to manage concurrency issues completely. ACID stands for atomicity, consistency, isolation, and durability; these four terms describe the features and requirements for processing transactions in a database system. If a system does not meet these requirements, the integrity of the database—and its data—cannot be perfectly guaranteed.
In the context of databases, the term transaction relates to a single logical operation comprising one or more steps that results in data being posted to the system. Examples might include committing a new record to the database, performing a script that calculates summary information, or in real-world terms, completing the multiple steps of debiting one financial account and crediting another. The ACID test exists to ensure such transactions are reliable.
FileMaker Pro databases, unfortunately, do not fully meet ACID compliance, nor is it realistic to develop a solution in FileMaker that perfectly does. FileMaker Pro scripts can be interrupted (a machine crash or a force-quit of the application) and as such it is possible to leave a transaction half completed. Rolling back a half-completed operation is entirely feasible in FileMaker, but if it is necessary, you must implement it yourself.
We’re including this section not to point out a shortcoming of FileMaker, but rather to illustrate some important guidelines on how you should consider building solutions for critical business systems or large workgroups. It is possible to go a long way toward ACID compliance in a FileMaker Pro database—if it’s properly engineered. It’s also quite possible to build a FileMaker Pro database that leaves wide opportunity for data integrity problems to crop up (as with any other database tool).
As consultants, we’re pragmatists. Often the craftsman in all of us yearns to build the world’s most perfect system, but in reality there are trade-offs in complexity, time, and flexibility to consider. We use the guidelines that follow as just that—guidelines. By identifying the criticality of certain data and using sensible safeguards to ensure its integrity to the degree possible, we are able to cover all but the most extreme cases of database failures.
- Atomicity— Atomicity requires that transactions be completed either in their entirety or not at all. In other words, a logical routine (say, crediting one account and debiting another) cannot be left half done. In FileMaker Pro terms, data is either committed or not committed to your database, a script needs to reach its logical conclusion, and a calculation function stores and indexes its results properly. Although a script can be interrupted, it is important to approach atomicity by writing scripts that conclude whatever routines they’re designed for.
- Consistency— Consistency ensures that your database is left in a legal state at the beginning and end of any given transaction. This means that the transaction won’t break any of the rules, or integrity constraints, of the system. This often can encompass business logic: An example might be that all financial credit transactions be positive numbers.
- Isolation— Transactions in mid-process are never exposed to other processes or users. In the credit/debit example, a user should never see a credit appear on one account before the debit has been posted. Likewise, an account balance report should not be allowed to run when a credit or debit is in the midst of being added.
- Durability— After a transaction has been performed and completed, the information resulting from that process needs to be persistent. It should be saved with the database, and if someone pulls that computer’s plug, the information is still present in the file.
ACID compliance is a goal of development to ensure data integrity. We encourage you, especially when writing scripts, to focus on delivering on these guidelines to an appropriate degree, especially in a multiuser environment.
Even though FileMaker does not provide a mechanism for rolling back partially completed operations, your design can often use a simple technique to achieve almost the same goal. It is the technique often used to update websites. New or updated pages are created, and then, as the last step, a link from a landing page or other known location is provided to the new or updated pages.
Likewise, in a FileMaker solution, take care to make the last operation whatever it is that reveals all the other components of the transaction. You will have a structure in which, if the transaction fails in the middle, there might be some orphan or incomplete records, but they will not be visible because the main link or the main record that will point to the detail records has not been updated. This is not always possible, but, if it is, it can make your FileMaker solution more robust.
And you can also use one of the oldest techniques in the book to prevent interrupted transactions. Make certain that all nonbattery powered computers are connected to UPS systems.
Script Log
One technique we use for verifying processes and debugging is a script log. By building one, you better approach atomicity and are able to identify cases where it fails.
In large, complex solutions where transaction integrity is vital, it might be warranted to create a process that causes all scripts to write log records to a separate table (often in a separate file as well) when they start and again when they are successfully completed. It’s possible to track other data as well: who initiated the script, on what layout the user was, which instance of a window was in use, timestamp data for start and end (for performance and troubleshooting purposes), and potentially any data the script manipulates. This is not to be confused with an audit trail, covered later in the chapter. Audit trails enable you to record all data transactions in a database. A script log is a means of confirming that your functional routines are completed properly.
By adding a script log to your system and periodically checking it for incomplete conclusions, you can identify cases where scripts fail and manually address such issues when necessary. By definition, if a script log start entry doesn’t have a corresponding close entry, it failed ACID’s atomicity test and possibly the consistency test as well.
One final note on script logs: We encourage you to create a global variable that, when turned off, disables all script logging in your system. This is one of the few examples in which a global variable (rather than a local one) is a good idea.
Commit Versus Create and Serial IDs
In FileMaker 9, data is committed (saved) after a user exits the record, either by clicking outside a field or by performing a range of other actions such as running a script, changing modes, changing layouts, or pressing a “record-entry” key. The default is the Enter key, but field behaviors can be changed to allow the Return or Tab keys as well.
![]() For more details on field behaviors, see “Field Behavior,” p. 154.
For more details on field behaviors, see “Field Behavior,” p. 154.
It is possible to use the Records, Revert Records option to undo the creation of a record. Until a record has been committed, it exists in a temporary state, not yet visible to other users of the system. Relying on a transaction remaining unsaved until expressly committed helps ensure better ACID compliance. This is important to remember in a multiuser environment where you might be operating on assumptions established with prior versions of FileMaker. For example, if you’re attempting to serially number certain records and two users create two records at the same time, it is possible that one will commit the record in an order different from that in which the records were initially created. It is also possible that a user will undo his or her changes with a Revert Record command and leave you with a gap in your serialization.
In the case of auto-entry serial values, FileMaker enables you to specify when the serial number is incremented: on creation or on commit. This enables you to control auto-enter serialization; however, it does not protect you from other assumptions. For example, if you’re relying on GetSummary() calculation fields to keep track of an incremented total, remember that the calculations that control this are evaluated and displayed only after a record is committed.
Record Locking
Just as a record is not saved to your database until it is committed—maintaining an isolated state while you create new records—FileMaker does not allow editing of a record by more than one person at a time. In this way, FileMaker Pro meets the isolation test of ACID for posting data. Record locking exists to ensure that no two edits collide with each other (such as when multiple users attempt to edit the same record simultaneously).
After a user begins editing a record, FileMaker locks that record from other users and script processes, and (when not captured and suppressed by a script) presents users with an error message if they attempt to enter or change any data in that record.
It’s possible to place your cursor in a field and still leave the record unlocked (safe for other users to enter data into the same record), but at the point at which you actively begin typing, that record essentially becomes yours until you either commit or revert it.
For those of you familiar with prior versions of FileMaker Pro, remember that those versions locked records as soon as a user clicked in a field. That behavior changed in FileMaker Pro 7.
Locking applies to related records in portals as well. If you are modifying a record in a portal row, that record’s parent is also locked. This behavior occurs only when the related child record is edited via a portal or related field from the context of a parent record. If you are simply editing the child record on its own table-specific layout (within its own context), just that single child record is locked.
Also keep in mind that record locking applies only to editing. You can still find locked records, view reports with them included, change sort orders with locked records in your found set, and even export data. Only editing is protected.
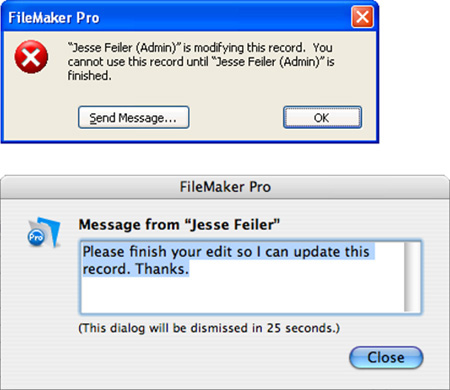
If another user is editing a record and you try to edit it, you will receive the message shown in Figure 11.1. If you choose, you can click Send Message to type a message that will be sent to the other user; when it is received, it will appear as in the second part of Figure 11.1.
Figure 11.1. You see this message if you try to edit a record someone else is modifying. If need be, use the Send Message command to ask for control.
The one downside to record locking is that you cannot force a user out of a record remotely through FileMaker Pro. If someone begins editing a record and then goes to lunch, you need to kick him off by using the server Admin Console, shut down the file, restart the server, or address the issue at the user’s local computer.
To help with multiuser account testing, refer to “Use Re-Login for Testing Access and Sessions” in the “Troubleshooting” section at the end of this chapter.
Trapping for Record Locking in Scripts
A subtle way your database might prove error prone is in always making the assumption in scripts that the routine in question has access to all the records in the current found set. Some of the records your script needs to work with might in fact be locked.
A script can explicitly open a record for editing with the Open Record/Request script step. After it has issued that script command, the record is reserved for that routine, and other users who try to edit the record get a record lock error until the script (or the user running the script) releases the record. Because any attempt to modify a record results in the same condition, explicitly using an Open Record/Request script step might not be technically necessary, but we find it helpful to turn to for clarity within scripts. The more important step is deliberately checking to see whether a given record is open for editing or if some other user (or routine) has it locked.
To capture the error that results in cases where either one’s current privileges don’t allow editing of the record in question or the record is locked by another user, we recommend testing first to see whether a record can be opened. If that doesn’t work, deal with the result prior to attempting an edit. Use the Open Record/Request script step followed by a Get(LastError) check. Here’s how it might look:
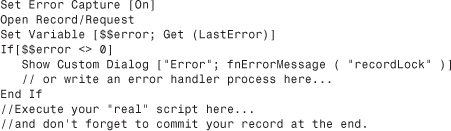
Use a Commit Record/Request script step at the end of your script to release the record back into nonedit mode and unlock it for other users.
Consider building error utility tables, or perhaps using custom functions, for error handling. This enables you to easily tailor error messages in a central, easy-to-edit location based on whatever value is held in $$error. The Custom Dialog step in the preceding code snippet references a custom function that presumably returns error handling text to the user.
Instead of checking simply for a nonzero error, you could also write a series of If -> Else If script steps checking for errors such as 301 (Record is in use by another user), 303 (Database schema is in use by another user), and so on. There is a wide range of possible errors.
Multiwindow Locking
Multiwindow locking is closely related to multiuser record locking. It is possible to open a new window, via the Window, New Window menu command, begin editing a record there, and in so doing, lock yourself out of editing the same record in your original window. If you are actively editing a record that has yet to be committed and you try to edit the same record in another window, you’ll see an error message that says, This record cannot be modified in this window because it is already being modified in a different window. FileMaker tries to ensure that you’re not losing data or edits you’re in the midst of creating.
The point here is that a user can lock himself out of a record. Someone might not realize he’s left a record in an edit state before moving on to a new window. The simple answer is simply not to try to edit a record in two places at once. A user would have to go a bit out of his way to encounter this problem. If you’ve scripted routines for creating new windows with a script, you might want to include a Commit Record/Request step before opening the new window.
Given the fact that window locking so closely resembles multiuser record locking, testing a solution with multiple windows is an effective and efficient way to ensure that your scripts manage record-locking checks properly, without having to resort to using two computers.
Multicontext Locking Within Scripts
This problem is related to the problem of multiwindow locking. We’ve seen it most often in systems converted from previous versions of FileMaker Pro to FileMaker 7 or later. Suppose that you have a script working with a series of related tables, each in its own file (as is typical of converted systems). Your script makes some edits to an invoice record, via the Set Field script step, and then calls a script in the Invoice Line Item table to do some more work at the line item level. When that script finishes, it needs to write a little more data back to the invoice record. When it attempts to do so, you see the message that This record cannot be modified in this window because it is already being modified in a different window. Because the script on the invoice side never explicitly committed the invoice record before calling the subscript, you are indeed still editing the record in another window. Again, this error is common in converted FileMaker solutions that use cross-file scripting.
The solution is simple, if tedious: If you have made edits to a record within a script, be sure to commit those changes before the flow of control leaves your script. This means you should perform an explicit Commit Records/Requests step before calling a Perform Script step to invoke a subscript, or at the end of the script.
Again, this is an issue only where scripting across multiple windows is involved, and is most typical of systems converted from FileMaker 6 and before.
Audit Trails in FileMaker Pro
Data integrity is vital in a multiuser database. A well-designed database, properly structured, goes a long way toward ensuring proper data integrity, but no database will ever be perfect. Pesky humans have a habit of introducing a certain unpredictability into the mix. Although $.02 might very well be a perfectly valid number as an invoice total, the truth that the invoice in question was actually $200.00 isn’t something a database will ever be able to discern. Then there are cases where a client accidentally makes alterations across a number of records using an import or replace function.
For cases like these, you can choose to build a mechanism to first identify and then undo changes. Possible problem records might be identifiable by date, by user, or by some other criteria. In some cases, maybe only a field needs addressing. The process of undoing changes is referred to as a rollback, and for it to be possible, you first need an audit trail of logged transactions in your database to provide the breadcrumbs necessary for a series of undo steps.
Audit trails track the edits made to a database at the granular field level. Changes tracked usually include the field name, a timestamp, and the user account for the person (or function) that made the change. Although FileMaker Pro doesn’t have audit trail capabilities built in by default, it is entirely possible to build them. The following sections illustrate three increasingly complete techniques.
Record Create/Modify Meta Data
The simplest way to track the evolution of your data is to create fields for creation and modification events. This alone doesn’t allow for rollbacks, but it certainly gives you visibility into the events of your database and provides a layer of accountability.
This sort of data is not related to a given business or organization, but helps describe when and by whom data is entered into a database. It is often referred to as meta data: data about data.
When building a system for multiuser deployment, we recommend establishing timestamps for creation and modification of records, along with account or usernames. This enables you to track who’s responsible and when edits have been made to your database so that you can, at a minimum, identify problems. For example, if one of your users consistently makes a data entry error or if a bug in development leads to wrong lookup values, you can isolate such records by timestamp and account name.
The choice of whether to use account names or usernames depends on the environment. You can rely on the fact that every FileMaker user is running under some account name (even if it is a default account). Users can modify their computer name in many environments, so they might not be reliable identifiers. On the other hand, some installations share FileMaker account names, so the computer username might be more reliable.
To explore error trapping practices, refer to “Trapping for Errors” in the “Troubleshooting” section at the end of this chapter.
Script-Controlled Editing
A second technique for controlling edits to your database solutions is scripting-intensive, but allows for the most control. It’s conceptually straightforward: Lock down the actual fields of your database in Browse mode and have your users make edits in global fields with a Submit or Cancel button. The attached script would then move the data from temporary fields into actual fields. This allows you to control, via script, any checks you might want to make on the data, and also allows you to write records to an audit trail database to record changes.
One of the more difficult aspects of this approach is what to do with portals and related records. A technique that works well (but again will have you working in ScriptMaker quite a bit) is to use a temporary scratch table. Users place edits in its temporary child records and if they click Cancel, those records are simply discarded. Your audit trail would then need to track to which table a given row of data belonged.
This approach has a number of benefits, not the least of which is that you can store the data as entered separately from the data that you moved into the “real” fields. In the case of data that fails edits, and where it will take some time to track down the correct data, you can improve the overall performance of the system if you allow such a temporary data entry process.
Auto-Entry Technique for Audit Trails
The third technique in building audit trails relies on the auto-entry options of FileMaker Pro and the capability for fields to modify their own contents. An audit trail should track when and by whom a change was made and the change itself. For situations that require an audit trail, more often than not the auto-entry approach is the one we choose. It is practical, it doesn’t require scripting, and it doesn’t impede typical use of the system (see Figure 11.2).
Figure 11.2. Notice that the AuditLog field on the bottom has a chronological (time stamped) history.

This technique might seem somewhat advanced, but it’s actually quite simple. The system stores a text string for each edit made to a given field or record; you might see some performance issues arise as your database grows, so we recommend moving this data into an archive when (and if) you need.
The AuditLog field displayed in Figure 11.3 is nothing more than a text field with auto-entry options enabled. Specify that you want to have a calculation result auto-populate the AuditLog field, be certain to turn off the Do Not Replace Existing Value for Field (If Any) option, and add some seed data to the field as well via the another Auto Entry option (see Figure 11.4).
Figure 11.3. Notice that you need two auto-entry options enabled where the timestamp seeds the field.
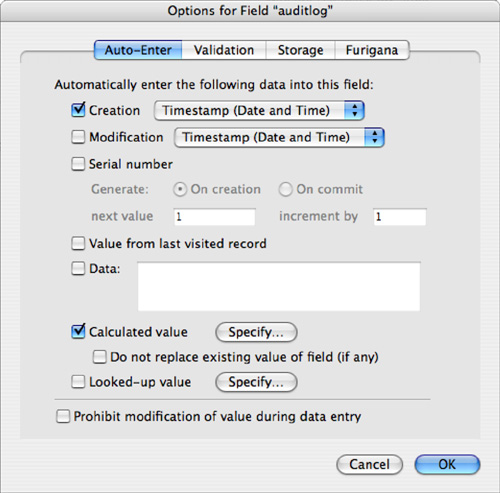
Figure 11.4. Use the Evaluate function’s optional trigger field parameters to cause the AuditLog field to be reevaluated.
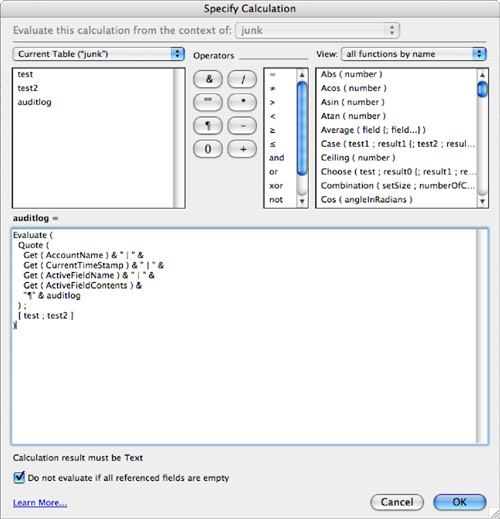
Define your calculation as shown in Figure 11.4.
You need to combine a few different functions and elements to assemble this auto-entry calculation:
Evaluate—Evaluatereturns the results from an expression passed to it. You might wonder why we’re bothering with it; after all, this is a calculation entry—by definition it will be evaluated. However, any fields added to the optional properties of anEvaluatefunction serve as triggers (much as aLookupfunction works). When they are changed, so too will be theAudit_Trailfield. Be sure to add however many trigger fields you’d like tracked in your audit trail.Quote—Quotein this approach allows you to treat text as data and prevent it from being evaluated within theEvaluatefunction. With it, you can properly concatenate the label and text values in the function. Without theQuotefunction, your evaluated result would be a “?”.Get (CurrentAccount)— Returns the account currently signed in from the database’s security settings.Get (CurrentTimeStamp)— This simply returns the time and date at which the user changed one of the trigger fields. An exceedingly minor point: The timestamp occurs when the audit log field is written/committed, not when the actual edit occurred.Get (ActiveFieldName)— ThisGetfunction returns the active field name of the field being edited. Because the field in question (say, for example,Name_First) is also listed as a trigger in theEvaluatefunction, there’s a brief moment as the record is being committed that FileMaker Pro resolves theEvaluatefunction while still recognizing the trigger field as active. It is this behavior that enables the audit trail to work.Get (ActiveFieldContents)— Just asGet (ActiveFieldName)works at the moment of a trigger to capture the edited field name,Get (ActiveFieldContents)captures the actual contents of the field in question.& "¶" & AuditLog— If you append theAuditLogfield itself to the end of your calculation, you’ll be able to save prior entries and simply keep adding to the top of the log. If you prefer to have your entries sorted chronologically, begin your formula withAuditLog & "¶" &.[Name_First; Name_Last; Date_Field; Number_Field]— These last elements of the formula are the optional criteria for theEvaluatefunction. They serve as your triggers.
The seed data you added on the Auto-Entry Options dialog (creation timestamp) allows you to leave the Do Not Evaluate If All Referenced Fields Are Empty option turned on; otherwise, you’d have to turn this option off to get the calculation to work the first time (when the AuditLog field was empty). Despite the triggers, it is the only actual field referenced in the calculation.
If you turn off the Do Not Evaluate If All Referenced Fields Are Empty option, you’ll end up with a blank row in your audit log. Somehow that didn’t feel proper to us, and theoretically it’s possible for someone to create a record and leave it unedited for a period of time. Adding at least the initial timestamp to initialize the Audit_Log at least offers more information.
You’ll want to consider some additional issues before using this technique in your database solutions. First, FileMaker cannot recognize the current field name or field contents while performing a replace function. The audit trail will record that a change was made, but it will lack both the data itself and the field name in question. This same issue applies in the case of imports, and all script steps that don’t actively mimic user actions. Set Field, for example, does not actively enter a field. In the case of using Set Field, the symptoms are identical to the case of a Replace or Import; however, presumably because Set Field exists in a script, you could opt to record whatever audit information your system required.
Second, keep in mind that your data still lives with the record in question. If you were to delete a record, you would presumably lose your audit trail. To preserve all audit trails and to ensure the capability to perform a rollback, we suggest writing a script routine that controls delete processes and properly records all data in an audit table before erasing it from your system.
Related records work in the same manner: Their audit trail routines would live in their respective records, just as in a parent record. If you delete a related record, you will need to store that state in an audit table of some kind.
For help with controlling auto-entry behaviors, refer to “Making Sure That Your Auto-Entry Always Edits” in the “Troubleshooting” section at the end of this chapter.
Creating Rollback Functionality
Regardless of whether you choose to move your audit information into its own table or leave it in each record to which it pertains, a rollback follows the same basic principles. A rollback, true to its name, allows a database administrator, in backward fashion, to re-create the state of a database as it existed at any point in time. She can do so without having to resort to deploying a backup, which might not include the latest functionality of the system.
This involves writing a script to walk through each record’s audit trail from top to bottom as an audit trail writes its data, using Set Field script steps, and re-creating a record at a given date and time. The logic relies on a loop that tests to see whether each iterative row in your audit trail data is older than or equal to the point in time you selected for rollback. If the result of the test is true, your script would be set to parse the data at the end of the line (using the Middle function), and by referencing the stored field name in that row, it would populate your data.
If your database relies on Set Field script steps, possibly for tracking various status flags or data you’ve scripted, don’t forget that you have to re-create that information via other means. It is not just the data a user sees that must be rolled back.
Launch Files
One of the challenges users on a network have is actually finding the specific FileMaker files they need to use. This is a no-brainer if you have only one FileMaker Pro solution with a single file, but over time your Hosts dialog can become quite crowded in multiuser situations. This is less problematic than in pre-FileMaker 7 versions, given that FileMaker now allows multiple tables per file and thus requires fewer files, but in large organizations or companies with many different FileMaker files, a server’s file list can be a bit daunting.
To offer a solution to this simple problem, we often build launch files. These are utility files that are distributed as single-user files and sit on each individual person’s computer. They have generally one layout and one script that calls an open routine in a network file.
We generally put a solution logo and system loading...please wait... message on the single layout.
Although it’s tempting to put other niceties in these launch files—the capability to load clusters of files or perhaps some sense of acknowledging the individual user logging in—we encourage you to leave things as simple as possible. You’ll have dozens of these files distributed on your network with no easy means of replacing them with upgrades. The simpler you keep them, the easier they will be to maintain.
A final nice touch on launch files is that they close themselves after launching the system in question. They’re no longer needed and shouldn’t have to clutter the Window menu.
Troubleshooting
Unpredictable Global Default Values
I have global fields, used for holding system settings, that have been working perfectly for weeks, but today suddenly they have different data in them. What happened?
It’s likely they got reset by some script modification you’ve recently made, or when you had files in an offline, single-user state. In our practice, we find it difficult to remember to set globals for default states in single-user mode through the course of developing and maintaining a system. This is a common source of bugs and we’ve learned over the years not to make any assumptions about global values; it’s better simply to set them explicitly within a startup script. It’s also important to either explicitly set or test for values at the beginning of a script that depends on them.
Use Re-Login for Testing Access and Sessions
One of my users is reporting a problem that I don’t see when I’m logged in. I’m getting sick of having to re-login time and again to test this. Is there an easier way to test this?
If you’re having trouble testing how other users, with different access levels, might be interacting with your system, write a re-login script that enables you to hop into another account at the click of your mouse. It’s even possible to store passwords when using the Re-Login step. Connect it to a convenient button or place it in the Scripts menu and you have one-click account switching.
Another approach might be to create a “debugging” custom menu (with the various login scripts available) and disable the menu before deploying the system.
Making Sure That Your Auto-Entry Always Edits
My auto-entry function worked the first time I edited a field, but then it got stuck and won’t update again. What setting is the likely culprit?
If the auto-entry field for your audit log isn’t updating—it does it once, but then never again—make sure that you uncheck the Do Not Replace Existing Value for Field (If Any) option. It is always checked by default and is easy to miss.
Likewise, the Audit Log routine we described depends on there being data in the field to begin with. Either seed it with something (we use Creation TimeStamp) or turn off the Do Not Evaluate If All Referenced Fields Are Empty option. It, too, is enabled by default.
Trapping for Errors
I need to tighten my scripts and don’t want to have to code for every exception under the sun. What’s the best approach to trapping for errors?
Trapping for errors is always a smart development practice. Get into the habit and you’ll save yourself years of your life debugging. A simple approach is to simply use the Get(LastError) function and use a Case or If / If Else routine to display meaningful messages and logic branches to your users. You can trap for either explicit errors or just a nonzero number.
A better way to abstract your code and provide yourself with a central place to reuse error handling is to simply write an error routine once and be done with it.
There are two ways to manage error messaging. You can either set up your own errorCodes table or build a custom function. Setting up a table is simple and allows you to add your own custom error conditions and messages. You can do this as well with a custom function. The idea is simple: Establish a global gError field in your main system and relate that to an errorID in your error table. You can also use a $$error global variable and have a custom function reference it.
FileMaker Extra: Development with a Team
Sometimes systems are big enough that they warrant multiple developers in addition to multiple users. Developing as a team can be a bit complex with FileMaker Pro, but one of the best (and often unsung) features of FileMaker is that database schema changes can be made while the database is live, on a server, as other users are in the system. This is an extraordinary boon for FileMaker developers and will make a real difference in all of our lives.
The idea is simple: Set up a server (far better than multiuser peer-to-peer hosting) and have as many developers as a given system needs work together.
It’s important to keep a few things in mind: Only one person can adjust the schema in a given file at a time. This is true for editing scripts as well. If another developer is working in ScriptMaker, you can view scripts there, but you will be unable to make changes or add new scripts until your teammate finishes. This means you can have one person focused on scripting, one defining a new calculation field, and a handful of others working on different layouts all at once. One way to avoid conflicts in this regard is to split your solution into multiple files and have those files reference external table occurrences as needed.
Over the years we’ve assembled some best practices for working on a team. Here’s a list of techniques we draw on:
- Use FileMaker Server— Server (as opposed to simply working peer-to-peer) allows you to run frequent backups, and if any one machine crashes, the files are still protected from the crash. The TechNet program at FileMaker provides as one of its benefits a development license for FileMaker Server and FileMaker Server Advanced. These licenses are limited to three simultaneous users, but that is sufficient for testing.
 For more information on TechNet, see http://www.filemaker.com/technet/index.html.
 - Use FileMaker Pro Advanced— The Script Debugger is handy to use in the multideveloper environment, and the Data Viewer is an invaluable tool as well. When another developer is editing scripts and you can’t open a script in ScriptMaker, turn on the debugging tool and you’ll at least be able to see the script in question.
- Use custom functions— Custom functions can be written while other programming activities are underway, and they provide a deep layer of possible abstraction. It’s possible to have multiple developers building custom functions while others work in the core system, and it’s also a great way to reuse code across a team.
- Set up a bug-tracking database— If you’re working on a multiuser system, testing, requests, random ideas, and other communication is vital. You’ve got some of the world’s best database software at your fingertips; put it to use and build a bug-tracking system for your development team and your users.
- Build re-login scripts, toggle status area scripts, and developer layouts— Giving developers access to the back stage area of a system is vital. Build scripts to get them there.
- Assign a chief architect— With creating a meal, too many cooks in the kitchen spoils the broth. Similarly, one person should ultimately be responsible for the overall technical directions the system requires.
- Comment— Comment. Comment. Comment. Document what you intend to do and what you have done in your scripts and field definitions. It is also useful to add comments to scripts about what has been removed or found not to work so that someone does not come along a year later and repeat a mistake.