
Chapter 30. FileMaker Mobile
In this chapter
Using FileMaker Mobile on Your Handheld Device
Synchronizing with a FileMaker Database
FileMaker Extra: Publishing Related Data
FileMaker Mobile 8 Overview
FileMaker Mobile 8 is the latest version of FileMaker’s mobile data application. It provides a solution for those users who need to take their data with them in a simple yet highly usable format on either Palm OS– or Pocket PC–based devices. FileMaker Mobile 8 consists of two applications: one, the application that you use on your computer to prepare a database to be published or synchronized to a handheld device and two, the application used on your handheld device to access data there. You will also use FileMaker Pro 9 or FileMaker Pro 9 Advanced to manage security settings within the database file with which you want to synchronize.
Simply put, FileMaker Mobile 8 allows you to synchronize a data table in a FileMaker file (note that you can work with only one table per file) with a handheld form-based interface and access your data on the go. You can then resync your data when you return to your desk and ensure that any changes you made on your handheld device are then represented within your FileMaker solution and vice versa.
Developers and users can now synchronize their mobile databases with a FileMaker file hosted on another computer, either through FileMaker Server or via peer-to-peer sharing.
Not only is FileMaker Mobile 8 the latest version of the application, it is also the last. Because web-enabled handheld devices such as Treo and iPhone are becoming more prevalent, the need for a non-web-enabled handheld interface to FileMaker is diminishing. However, many applications have been written using FileMaker Mobile 8, and many organizations have large numbers of handhelds using it. They are not moving the applications to the Web, and they are not rushing to replace the older handhelds with newer devices. Although new mobile applications are likely to use the Web most of the time, these legacy applications will be around for quite a while.
FileMaker Mobile Components
FileMaker Mobile 8 consists of three software components:
- The computer-based application that allows for the configuration of data tables to be shared on a mobile device.
- The mobile device application that presents the shared data and allows its records to be searched, edited, deleted, added, and sorted.
- The synchronization module that allows for the mediated synchronization of the mobile data tables and their associated computer-based data tables. This engine synchronizes FileMaker-to-FileMaker Mobile data tables in the same process that synchronizes a user’s other mobile applications, such as Contact Manager and Calendar.
System Requirements
FileMaker Pro Mobile 8 is compatible with computers running Windows and Mac OS X, as well as with Palm OS– and Pocket PC–based mobile devices. Note that the listed hardware and software requirements are minimum requirements. More recent versions and higher capacities are also compatible. FileMaker Mobile also requires FileMaker Pro, FileMaker Pro 8 Advance, or FileMaker Server.
Using FileMaker Mobile on Your Handheld Device
The use of FileMaker Mobile is as simple as configuring an existing FileMaker Pro data table and syncing it with your handheld device. After the data is on your handheld, the application provides the basic functions of searching and sorting of the data, as well as the addition, modification, and deletion of individual records in your data set. There isn’t any development work to do. Note that only your data is copied to your handheld—FileMaker Mobile transfers none of the layouts in your desktop FileMaker Pro database.
There are, however, a fair number of options for controlling the functionality of the application on your handheld, as well as the means for customizing the display characteristics of the data in your handheld database. The mobile application offers two primary views of your data: List and Form. This chapter covers the use and formatting of these views in more detail later.
Note that FileMaker Mobile does not present all the layout options you’re used to in FileMaker Pro. The forms it presents are simple; having access to one’s data on the road is really what this product is all about.
One alternative to FileMaker Mobile, for users of portable devices running the full Windows operating system, is to install a copy of FileMaker Pro on the handheld. This option provides FileMaker’s full set of functionality, but the synchronization of data becomes far more challenging. A developer would have to write heavily scripted routines to manage the process, or you’d have to invest in a third-party tool such as WorldSync’s SyncDeK product. A second alternative would be running with a Citrix ICA client.
For developers hoping to synchronize data between two FileMaker solutions, we recommend you look into WorldSync’s SyncDeK product. Although this entails additional setup and cost, it is an excellent option and provides powerful features.
Installing on Your Handheld Device
Assuming that you have all the hardware components required for the use of the FileMaker Mobile 8 application, its installation is worth some discussion:
- Cradle or connect your handheld device, and then run the FileMaker Mobile 8 install script contained on the provided install disk.
- Launch your handheld desktop management software (this varies between Palm and Pocket PC platforms) and select the option to install files. Select FileMaker Mobile 8 and then synchronize your handheld.
- Launch the FileMaker Mobile 8 application on your computer and enter the appropriate installation code for at least one handheld license. Note that later in the application, after installation is complete, you can add additional licenses in order to synchronize with multiple devices.
The installation process allows you to choose from among a collection of starter solutions that you want to add to your handheld. If you select one or more of these solutions, the software installs mobile databases to your handheld device (queued for the next time you sync). The FileMaker databases configured for synchronization with their mobile analogs will have been installed in a folder in the Documents directory on your computer. - Synchronize again and you will have successfully installed FileMaker Mobile 8 on your handheld and computer.
At this point, the application is ready for use on your Palm or Pocket PC handheld. You can either use one of the sample databases provided or configure a database to sync with your handheld device. The next section discusses database files.
Using Mobile Database Files
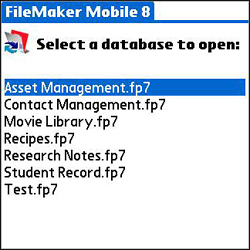
The mobile version of FileMaker has many of the same features and functions as its more full-featured PC- or Mac-based version. After launching FileMaker Mobile 8 on your handheld, you will be directed to a menu of available mobile databases, as shown in Figure 30.1. If you left a database open and turned off your device, you will return to it. When working within a database, you can always navigate to the menu of available databases by clicking the FileMaker icon in the lower left corner of every screen in FileMaker Mobile 8.
Figure 30.1. The main menu of FileMaker Mobile 8 presents you with a list of available mobile databases.
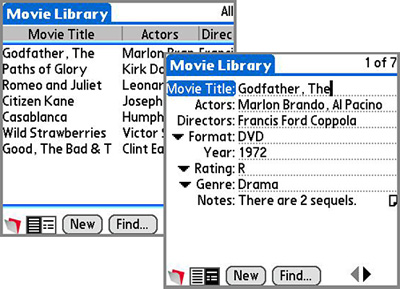
After FileMaker Mobile launches, it presents data from a table in either a List view or a Form view, as shown in Figure 30.2, and allows you to search and sort within either view. The List view presents all the fields in a horizontal grid (very similar to the Table view within FileMaker Pro), whereas the Form view presents fields in a vertical arrangement. As with FileMaker on your computer, List view presents multiple records, whereas Form view presents just one record. You can navigate between the two views by selecting the List/Form View icons at the bottom of the application screen. In addition, if data entry is not enabled in List view (more about that later), clicking a record’s data navigates to the Form view for that record.
Figure 30.2. Each mobile database can be viewed in either a List view or a Form view on your handheld device.
Using the FileMaker Mobile application should feel familiar to any experienced FileMaker user. You can create new records (by clicking the omnipresent New button at the bottom of each view, or by using the menu at the top of the screen), duplicate existing records, and delete records by selecting the appropriate menu items from the Record menu. FileMaker Mobile can sort your found set according to the contents of a given field in either ascending or descending order. You can navigate to a specific record by its record number or step forward or backward in the found set by using the record navigation icons in the bottom of both views. You can, essentially, perform all the basic data operations that you can with FileMaker Pro.
Working with List View
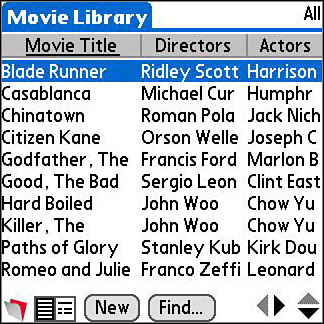
The List view in a FileMaker Mobile database is quite similar to the Table view in FileMaker Pro on your computer, as shown in Figure 30.3. Data displays in a columnar layout with field values in columns and records encompassing individual rows. No record may occupy more than one row, and the rows displayed represent the current found set.
Figure 30.3. Users can view multiple records and scroll left and right for multiple columns in List view.
Navigation in List view works consistently with Palm and Pocket PC applications and is somewhat different from what you might expect within FileMaker Pro. You use the up/down triangle icons, located at the lower right of your screen, to page up and down through sets of records. They do not change the currently active record unless you scroll beyond the point at which your active record is visible. In those cases, FileMaker Mobile won’t have an active record (Delete Record, for example, won’t work) until you select one of the visible rows available or switch to Form view. You can also use the left/right triangles to scroll horizontally to see additional columns on your List view.
Clicking a row selects the corresponding record and, if editing field values in List view has been disabled, navigates to that record’s Form view representation. If editing of field values is not disabled, clicking a field in a specific row allows editing of that field. The Form view navigation icon must then be used to switch to the selected record in Form view.
In addition, in List view, you can sort the displayed found set by whatever column you choose, merely by clicking the desired column header. Sorting can be toggled between ascending and descending order by successive clicks of the same column header.
Columns can be resized and reordered within List view in exactly the same manner as in FileMaker Pro. Resizing is accomplished by clicking the right edge of the header for the column that you want to resize and dragging it to the desired width. Likewise, to reposition a column with respect to other columns, simply click and drag the column to the desired position.
Working with Form View
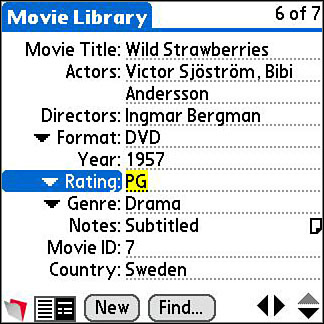
Form view on FileMaker Mobile 8 corresponds to a standard single-record layout in the FileMaker Pro client application running on your computer, as shown in Figure 30.4. Data for a single record displays with fields arranged vertically. Labels are either (by default) the names of the displayed fields or custom labels designated manually through the FileMaker Mobile configuration application on your computer.
Figure 30.4. Form view allows users to view up to 50 fields for a given record.
In the configuration of a mobile database (which is covered in more detail later in the chapter), you can specify that a field should be associated with a value list and displayed as a pop-up menu, pop-up list, single check box, or notes field. Pop-up menus and pop-up lists work as pop-up menus and drop-down lists work in FileMaker Pro.
A single check box is your only check box option in FileMaker Mobile, allowing you to toggle a single value on and off. Multiple-value check boxes are not supported.
The notes field format is specific to FileMaker Mobile: It displays a small page icon that can be used to then show the complete contents of the field in a special viewing window. If the field allows data entry, the contents will be editable in the display window. This is, of course, an accommodation to the small screen size of handhelds.
FileMaker Mobile on your handheld also supports a calendar picker for date fields. It also has a time picker that allows you to enter time by minute, second, and so on. FileMaker Mobile does not offer the radio button data display.
Record Control Functions
You access the Record Functions menu by clicking the name of the selected database at the top of the screen. This menu, available in both List view and Form view, provides options for manipulation of the records in the mobile database. These are the options:
- New Record
- Delete Record
- Delete All Records
- Find Records
- Show All
- Go to Record
- Sort Records
These options will seem familiar to any FileMaker Pro user, but there are some important differences to keep in mind.
New Record
As you would expect, the New Record option adds a new record to the database. It does not, however, act like the similar function in FileMaker Pro in that it will not perform any automatically enter functions such as serial number generation, date/time stamping, and other dynamic data entry or validations. Note that auto-enter and validation routines don’t happen during synchronization either: It is likely that solutions of any complexity will require additional scripting to support such auto-population of data for records added through a handheld device.
One additional, important detail: The computer-based database does increment the next serial value within its auto-enter features but doesn’t actually set data into the respective fields in question. In other words, let’s say that you have a database with four records, with an auto-enter serial number field with the values 1, 2, 3, and 4, respectively. Then let’s say that you add a record on your handheld device and synchronize with the source database on your computer. There will be five records, but the fifth record will have no number in the serial number field. If you then add another record on your computer, the serial number field for the next record will contain 6.
 To learn how to deal with the case of missing serial ID values, see “Missing Index Values” in the “Troubleshooting” section at the end of this chapter.
Delete Record
Delete Record performs as you would expect, except that it gives you the option to delete the corresponding record on the computer-based version of the database as well. Use this feature with care because deleting the record through this component is as irrevocable a decision as deleting it in the main version of the database on your computer. It is also important to remember that your synchronization options can defeat this option, specifically when you choose to delete a record but not to delete that record in the original computer-based version of the database. In this case, if you specify either the Bi-directional or Download to Handheld Only synchronization option, the next time you synchronize your handheld, the deleted record will be added back to your handheld.
Delete All Records
The Delete All Records option operates just as the Delete All Records option within FileMaker, and, consequently, there is an identical risk of unintentional data loss. While we are on the subject of the risk of unintentional data loss, it is also very important to note that referential integrity rules are supported during synchronization. If you have deleted records on your handheld device (with the Delete Records on Your PC option selected) that have corresponding related records in the main computer-based solution, and those relationships are set for cascading delete, the record you deleted on the handheld will be deleted on the computer along with all of its dependent related records. Therefore, with the Delete All Records option, it is possible to empty out multiple tables without necessarily intending to.
If after synchronization you have missing records in both databases, see “Missing Records” in the “Troubleshooting” section at the end of this chapter.
Performing Find Requests
FileMaker Mobile 8 does not offer users a Find mode in quite the same manner as FileMaker users are accustomed to. Rather, when you click the Find button at the bottom of each view (or choose the command from the Records menu), FileMaker Mobile presents you with a Find Records dialog as shown in Figure 30.5.
Figure 30.5. Users can change their found set by using the Find Records dialog.
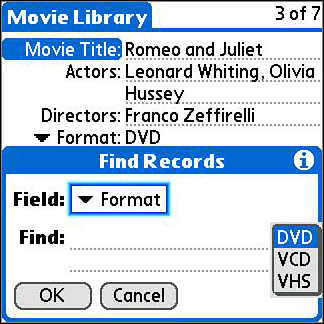
The dialog allows you to choose a field and enter criteria by which you want to search. Unlike with FileMaker Pro, you cannot enter multiple requests nor will the find process recognize operators such as greater than, less than, and so on. After you perform a find request, you are (just as with FileMaker Pro) left in the view from which you came.
The Show All option in the Record menu adds all records in the database to the found set. This overrides any found set generated by a Find request but does not, unlike in FileMaker Pro, cause the last performed sort to be lost. When all records are being displayed, the “Found:” designator in the upper right corner of the screen shows All and the most recent sort criteria are still applied.
Go to Record allows quick navigation to a specific record in the currently displayed found set by number. Accordingly, Go to Record with the option of 3 would show the third record in the current found set as the last sorted. Because this ordinal designation is based on context, it is perhaps more likely that the first record or last record options would be more useful in day-to-day use.
Sorting Recordsets
The Sort Records command in the Record menu performs the function of ordering the records in your found set according to the contents of a (single) field that you specify. This ordering is, of course, based on the data type of the selected field and your designation of whether the sort should be in ascending or descending order. The same effect can be achieved in List view by clicking the field or column header. Subsequent clicks toggle between ascending and descending sorts. You will notice that when a set is sorted by a specific field using either of the mentioned methods, that field’s name appears underlined in its List view column header. There is no “unsort” option as there is in FileMaker Pro, and note that Show All preserves and reapplies the last sort order chosen. Finally, note that sorting by number fields works only on the whole-number portion of your data. Decimal values are ignored.
For help controlling the order in which records appear in your mobile database, see “Default Sort Order” in the “Troubleshooting” section at the end of this chapter.
Edit Functions
The Edit menu options are available only in Form view and present the user with standard GUI functions such as these:
- Undo
- Cut
- Copy
- Paste
- Select All
We assume that you are familiar with these functions, except to note certain specifics of their implementation in FileMaker Mobile 8. The Undo option is limited in scope to the last field content change and undoes a change only while still in the field where the change was made. After you click to another field, the capability to undo changes in the original field using the Undo function is lost. As with FileMaker Pro, only one level of undo is available. In addition, there is no concept of committing changes as there is in FileMaker Pro. A change is made as soon as a user begins typing.
Cut, Copy, and Paste operate only on text and number fields, which must have editing of fields enabled. Just as in FileMaker Pro, number fields may contain text as well as numbers.
Options
The options presented in the Options menu pertain to display and functionality settings in the List and Form views on your handheld only:
- Font
- Form View Options—Accessible only from Form view
- List View Options—Accessible only from List view
- Field Options—Accessible only from List view
- Database Options
- About FileMaker Mobile 8
- Phone Lookup—Accessible only from Form view
Changes to font settings are local to your handheld and will remain in effect for the selected database; they are a change only for display purposes. Font choice here does not affect your data in any way.
Form View Options
The Form View Options allow you to determine whether field data is editable in Form view and whether field labels are left, center, or right justified. One important point to note is that because the Find Records dialog is independent of the view selected, you can search by any field regardless of whether its contents are editable.
List View Options
The List View Options allow you to determine whether field data is editable as well as whether columns are resizable, can be reordered, locked (first column only), or sortable by clicking the column header. Locking the first column ensures that the column is always present regardless of how far to the left a user scrolls. This is useful if that field contains a record identifier of some sort.
Field Options
Field Options allow you to choose an individual field and set its width, text alignment, and text color. The width is set in pixels, not characters. Character alignment can be set to left, center, or right alignment. Note that this option is available only in List view.
Database Options
Database Options include the following:
- Include in Global Find (Palm OS Only)— Include in Global Find allows you to have the contents of your database indexed and included in the Palm OS global search function. This then means that outside FileMaker Mobile you can search for data that lies within one of your databases and, when results are returned by that search function, click directly into the database in question.
- Backup at HotSync (Palm OS Only)— Backup at HotSync allows you to have your database backed up before the hotsync operation is performed. This gives you the option to return your database to its presynchronization condition should something go awry during the synchronization or after the synchronization on the side of the computer-based version of your database. On Palm OS–based handhelds, these backups are placed in the Palm Backup directory and, on Windows, are appended with a .pdb extension.
- Synchronize Database— Synchronization of your database can be enabled or disabled from the Synchronize Database option. You can use this setting if you want to continue to use a database on your handheld device but do not want it to synchronize each time you dock with your computer.
- Login— FileMaker Mobile 8 databases on your handheld access your computer-based databases at synchronization time. FileMaker Pro’s native security controls mediate this access by allowing or disallowing access to records and tables according to a user’s privilege set. The Login option, under the Database Options menu item, allows you to define the account used to access the specific database from your handheld.
You can select from a database file’s account (the account and password set to be tried via the File Options dialog within FileMaker Pro), the built-in FileMaker guest account, or an account that you specify. This is an extremely important capability, especially when multiple handheld users are synchronizing to the same database hosted on FileMaker Server or shared as multiuser through FileMaker Pro. It might, for instance, allow users to see only their own records in a shared contact management database.
This capability to synchronize through a specific user account also gives you the opportunity, in conjunction with scripts written for the purpose and linked to synchronization (discussed later in this chapter), to perform certain actions based on a user’s identity. These can include filtering data sets, tagging records with a user’s ID, or re-establishing serial ID values.
Synchronizing with a FileMaker Database
You must turn to your computer to prepare a mobile database to synchronize with a desktop or server-based database.
Configuring a File to Be Published
Assuming that you have available a file you want to publish to your handheld device (or devices), the process of publishing is simply a matter of configuration through the use of the FileMaker Mobile 8 application. The first step in preparing a file for publishing is turning on the extended privilege for FileMaker Mobile within the security settings for the appropriate privilege sets. You can do this from within FileMaker Mobile or from within FileMaker Pro. This allows any account associated with that privilege set to synchronize with your database.
![]() For more information on extended privileges, see “Extended Privileges,” p. 390.
For more information on extended privileges, see “Extended Privileges,” p. 390.
Important note: When you want to prepare a file for synchronization, you must have it on your local computer the first time you configure it. You cannot initially set a file for mobile access if another computer hosts it. FileMaker Mobile requires that an internal setting be established in a file; this process can happen only on a local computer. After this initial configuration finishes, you can subsequently change configuration settings while it is hosted elsewhere. Configure a file once locally with FileMaker Mobile and it remains configurable from a networked copy of FileMaker Mobile from that point forward in perpetuity.
The main screen in FileMaker Mobile, shown in Figure 30.6, provides a listing of all the FileMaker Pro files configured for handheld sharing and shows whether their sharing is currently enabled.
Figure 30.6. The FileMaker Mobile 8 desktop application allows for the configuration of the handheld publishing settings for FileMaker files.
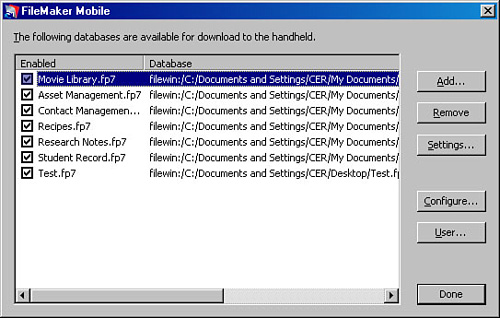
Adding and Removing Files
Clicking the Add button prompts you to select the desired FileMaker Pro file and then places you in the Settings dialog. The selected file can be a local file or a database hosted by FileMaker Server, but again you must have a file on your local computer if this is the first time you are configuring it for FileMaker Mobile access. You can also, if you choose, remove files by clicking the Remove button. Note that this only removes files from the list; any settings contained within them remain.
Permission Settings
Clicking the Settings button displays the file settings options for the selected database (see Figure 30.7). Note that you must have [Full Access] privileges to configure a FileMaker database for mobile synchronization.
Figure 30.7. The Mobile Settings dialog in FileMaker Mobile 8 allows you to configure (or reconfigure) a single file for handheld access.
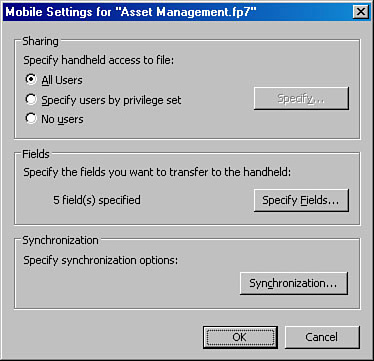
Within the Mobile Settings dialog, you have three settings to work with:
- Sharing
- Fields
- Synchronization
Sharing allows for the designation of which users, if any, are allowed to sync their handhelds to the selected database file. You can either choose to allow all users to synchronize with a given file or choose to enable specific privilege sets to have access. In all cases, FileMaker Mobile will be enabling the [fmmobile] extended privilege within your FileMaker file.
From this dialog, you can also shut off all access for users regardless of other settings. This is normally used to temporarily disallow synchronization during upgrades, maintenance, and the like.
Field Configuration Settings
The Specify Fields button of the Mobile Settings dialog allows you to specify which fields are to be published via FileMaker Mobile and to set their properties within the mobile database (see Figure 30.8).
Figure 30.8. The FileMaker Mobile 8 field options determine how your handheld device displays field information.
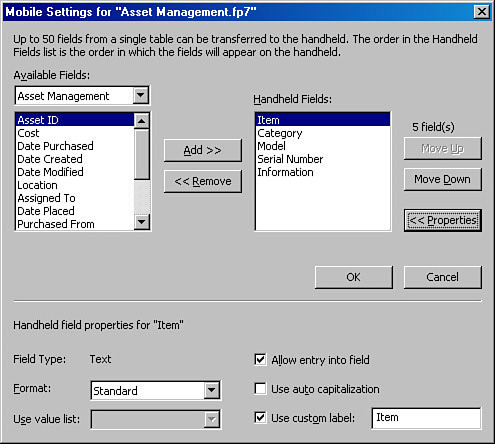
No more than 50 fields from a single table may be published as a FileMaker Mobile handheld published database. Only fields of data type Text, Number, Date, and Time are supported by FileMaker Mobile 8.
- Available Fields— Must all be from the same single table. If you try to change tables, the application clears fields added from a prior table. The FileMaker Mobile 8 handheld version does not support related tables and operations.
- Handheld Field Properties— Specify how a field appears and its behavior in the mobile database. You can choose a value list to associate if you select a format that requires one. Note that value lists in FileMaker Mobile can be derived only from fixed custom values (as opposed to being dynamically generated from field values or related records). You can opt to disallow entry into fields, essentially making them read-only. You can also enable automatic capitalization, as is the convention on handheld devices. Last, you can specify what field label to use.
It is important to keep in mind the limitations of FileMaker Mobile 8, especially that only one table and a maximum of 50 fields (of type Text, Number, Date, or Time) from that table can be published to a handheld per database file. This means that FileMaker Mobile 8 databases running on handheld devices are not relational. Methods for working around this limitation are covered in the section “FileMaker Extra: Publishing Related Data,” later in this chapter.
Synchronization Settings
The Synchronization button on the Mobile Settings dialog allows you to specify the rules by which FileMaker Mobile synchronizes data between two databases (see Figure 30.9). It is important to keep in mind that synchronization is a snapshot in time and that two data sets exist thereafter and will need to be reconciled at some future date. Also note that at the moment of synchronization, certain circumstances such as record locking can cause disparity between the computer/hosted data set and the handheld data set, so special attention must be paid to synchronization options.
Figure 30.9. The FileMaker Mobile 8 synchronization options determine the direction in which record data flows between handheld and host/desktop.
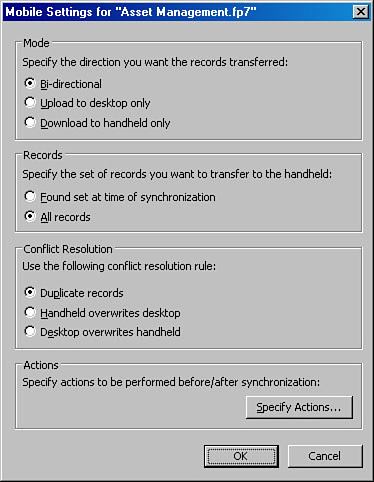
The Mode setting allows you to specify the direction in which records will transfer at synchronization time. These options control what data you want copied where and how to handle override logic:
- Bi-directional— Records are moved from handheld to computer and from computer to handheld. This is often useful when live data is to be edited or verified at some remote location and then reconciled. Inventory control systems might utilize this form of synchronization. In the case of the same record being edited on both a handheld and the source database, the timestamp for last modification is used to resolve the conflict.
- Upload to Desktop Only— Records move from handheld to computer only in a one-way transaction. In this case, the computer acts as a repository for changes made on the handheld, and the handheld data takes precedence over the desktop data. People using FileMaker Mobile 8 to manage data collection activities driven entirely from their handheld devices often use this mode. At the end of each synchronization, the handheld version of the database will be empty (contain no records).
- Download to Handheld Only— Records move from computer to handheld only, and the desktop data overrides the handheld as necessary. In this case, the handheld acts as a display tool for data maintained on the computer or hosted version of the database. Any records that have been added to the handheld and that do not exist in the source (desktop client or hosted) database will be deleted.
The Records option allows you to specify the set of records to transfer to the handheld at the time of synchronization:
- Found Set at Time of Synchronization— It is important to note that the found set is not the same found set you might have present in FileMaker Pro. Instead, a script tied to the synchronization process must establish that found set. In other words, the found set referenced here must be created and is independent of the found set that you, as the user, might be viewing at the time that the synchronization function is performed.
For help with solving the problem of establishing a found set before synchronization, see “Found Sets and Sessions” in the “Troubleshooting” section at the end of this chapter.
- All Records— All records in the given table will be synchronized.
The Conflict Resolution setting designates what rule will be used to resolve conflicts that may occur in certain synchronization scenarios. The term conflict here is used to denote a record that has been modified both on the computer (or hosted) version and on the handheld version of the database. Of course, mode settings might override these settings when one database automatically takes precedence over another. The following are the choices available when reconciling conflicts in synchronization:
- Duplicate Records— Both versions of the record will be written to both of the designated databases. This will cause two similar versions of the same record to exist and will require that the user delete or modify the extraneous record.
- Handheld Overwrites Desktop (or Server)— The handheld’s version of a conflicting record will be saved and the computer’s version deleted. Note that this operation creates a new record and deletes the conflicting record.
- Desktop (or Server) Overwrites Handheld— The computer’s version of a conflicting record will be saved and the handheld’s version deleted.
The conditions for conflict resolution are based on the time and date of the last change made to a specific record. For example, let’s say that you chose the Download to Handheld mode of synchronization, and then selected the Desktop Overwrites Handheld method of conflict resolution. In the case that a record is marked as having changed on both sides, the desktop record would overwrite the record changed on the handheld.
The Actions setting allows you to specify a script to run before synchronization occurs and another after it finishes. It is through these means that you can perform a task such as establishing a specific found set for synchronization or reconciling the lack of auto-entered serial IDs.
To learn how to deal with the case of missing serial ID values, see “Missing Index Values” in the “Troubleshooting” section at the end of this chapter.
Configure
Clicking Configure in FileMaker Mobile 8 prompts you for the selection of a FileMaker Pro file and allows you to access its FileMaker Mobile settings in one step. It will not automatically add the file to the list of handheld published files. You must use the Add button for that. Use the Configure setting if you want to configure a file but don’t intend to use your current computer for synchronization.
Users
Clicking the User button in FileMaker Mobile 8 displays the list of registered users and their handheld license keys applied on the specific copy of FileMaker Mobile 8 installed on the computer with which you’re working. Multiple handhelds may be used with a single install of FileMaker Mobile 8, but each must have its own user code and license key.
Each handheld device is tied to one of the licenses used with FileMaker Mobile 8. In this scenario it is possible for an organization to have people typically out of the office synchronize with a single workstation shared among others and set with their key.
Using iPhone with FileMaker
The handheld world is in transition, as mobile devices have integrated web capabilities into their features. Whereas a PDA needed special software to communicate with a computer running FileMaker, a web-enabled cell phone can use its web browser to accomplish the same goal. If you enable your FileMaker databases for web publishing, you can provide real-time access to FileMaker databases. Furthermore, if you provide style sheets that recognize the type of device on which they are running, you can implement custom web publishing interfaces that work well on the limited display space of such cell phones. The corporate owner of FileMaker, Apple, has information specific to the iPhone at http://developer.apple.com/iphone/. Some of the techniques (particularly those related to managing data on a small screen) can be applied to other devices as well.
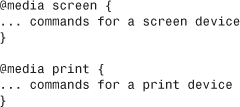
If you want to use conditional CSS in your style sheets to customize them for handheld devices and iPhone, here are some useful lines of code to use. These lines appear in your HTML file, and they check to see what device is in use. Then they select the appropriate style sheet. Replace the underlined file name with the file that you create.
The key here is the media attribute. CSS recognizes print, handheld, and screen values along with a device width. The iPhone is selected with the screen value (not the handheld value) and the width of the iPhone screen.
To specify a style sheet for iPhone within your HTML file:

Within your style sheet, you can have conditional sections based on the device. This code is inside the style sheet, not the HTML file.
![]() For more information visit the author’s website at http://www.northcountryconsulting.com.
For more information visit the author’s website at http://www.northcountryconsulting.com.
Troubleshooting
Found Sets and Sessions
When I perform a find in my database and then synchronize my handheld, all records show up on my handheld instead of just the found set that I wanted.
This is because the synchronization process occurs in its own session and does not necessarily have the same found set as the one you see in your open copy of the database. The resolution is to explicitly define the desired found set in a script that is configured, in the FileMaker Mobile 8 administration panel, to run at synchronization time. Doing so ensures that the found set loaded into your handheld is what you expect it to be.
You could write a one-line script with a find request for records set as yours, or perhaps with a specific status, and so on. FileMaker Mobile will run the script, establish the found set you need, and synchronize just those records.
If you’d like to be able to synchronize the found set showing on your own computer, you’d have to write a routine for flagging your fields in a particular way, and then searching for that flag in the script tied to synchronization.
Missing Index Values
When I add new records to my handheld, they don’t seem to have ID numbers. These usually fill in automatically when I add a new record on my computer. Then when I perform a synchronization, the IDs are missing in my FileMaker Pro database as well.
Automatic-entry functions are not performed when records are added to a master FileMaker database via handheld synchronization. Your best option is to populate these numbers manually with a script that is configured to run after synchronization. Here’s a script that will do this:

Missing Records
Help! I deleted unnecessary records from my handheld and then synced, but now those records are missing on the master database on the server.
It is very important to remember that FileMaker Mobile 8 on your handheld gives you the option of deleting records from your source or desktop/hosted database. It is also important to keep in mind that cascading deletes based on relationships are also performed as a result of deletions performed on your handheld. It is highly advisable to make backups of synchronized data often using FileMaker Server’s backup routines or manually, in the case of single-user files.
Default Sort Order
How can I have the records that I sync to my handheld sorted in a specific order?
Records transfer to your handheld at synchronization time in the order in which they exist in the synchronization session. As an example, let’s say that you want your data automatically sorted by last name and then by first name when it reaches your handheld. Simply have your presync script perform that sort for you.
Keep in mind, however, that there is no unsort function on your handheld version of FileMaker Mobile 8, so if you choose to sort your data, it remains sorted in that order by default.
FileMaker Extra: Publishing Related Data
FileMaker Mobile 8 does not support FileMaker Pro’s relational data model in the publication of databases to handheld devices. As has been discussed before, it publishes only a single table from any given database file and can publish no more than 50 fields from that single table. Although a hindrance, this should not lead you to believe that you cannot use FileMaker Mobile 8 to manage related data; it just requires a little ingenuity and the willingness to think creatively about data presentation and management.
Let’s begin with a simple and very common relational structure: a table of parent records (companies for this exercise) and a table of related children (employees). Designate a field, _kp_CompanyID in the Company table and _kf_CompanyID in the Employee table, to define the relationship. As it is, this simple database would not be publishable through FileMaker Mobile.
On a trivial level, you could consider putting the Companies and Employees databases in different physical files; this would, nominally, allow both tables to publish to your handheld simultaneously, but it would not link them to each other and would therefore not be very useful.
The other possible solutions require that you consider how the data is likely to be used in a mobile environment. Although Company is clearly the parent data structure, everyday practice might indicate that more often the focus for users is the Employee table. In that case, you might be more likely to need to contact a person at a company than the company itself. Let’s say that this is true enough in this test case; you then would need a solution to the problem of displaying a list of employees with related information from the Company table—say, for example, the name of their company. It is worth noting that when looked at from this perspective, the data contains only one-to-one correspondences between the data elements in the two tables. That is, there will be only a single company for any given person/employee.
At this point, given these assumptions, the solution is close at hand. You need merely to find a way to get the company data from the Company table, through the relationship and into a field in the Employee table, without using calculation fields (remember that FileMaker Mobile 8 does not support calculation fields). A text field must serve as the repository for this information within the Employee table. You must write a script that copies data from the Company table to the Employee table before synchronization (or you can set an auto-enter by calculation formula to pull data from the Company table and retrigger this calculation via a script). The script you might write would likely loop through your found set and push data into the Employee table (using the Set Field script step).