
Chapter 18. Advanced FileMaker Solution Architecture
In this chapter
Showing/Hiding Layout Elements
FileMaker Extra: Recursive Scripts
Window Management Techniques
Among the many important features of FileMaker, the capability to have multiple windows showing data from the same table stands out as one of the most important. To aid developers with managing this feature, several window management script steps are present in ScriptMaker, including the following:
New WindowSelect WindowClose WindowMove/Resize WindowAdjust WindowSet Window Title
There are also 11 Get functions that return data about the active window, ranging from its size and location to its name and the mode it’s in. Another function that plays a role in window management is WindowNames, which returns a list containing the names of all the open windows, ordered according to the stacking order of the windows.
FileMaker 7 introduced the window management script steps. In that release it was possible to get your windows mixed up if there were several windows open with the same name but based on different files. Now, many of the window management script steps, such as WindowNames, include an important new option to consider only windows from the current file.
These script steps and calculation functions provide you with tremendous ability to control the user experience. The amount of window management you do might vary widely from solution to solution, but having a good grounding in the options available to you is important.
The Anatomy of a Window
When you create, move, and resize windows, you have the opportunity to specify both a location for the window and its size. The unit of measure for all window manipulation is the pixel. Figure 18.1 shows the options for the Move/Resize Window script step.
Figure 18.1. The Move/Resize Window script step enables you to specify the exact coordinates (in pixels) and size for any given window.
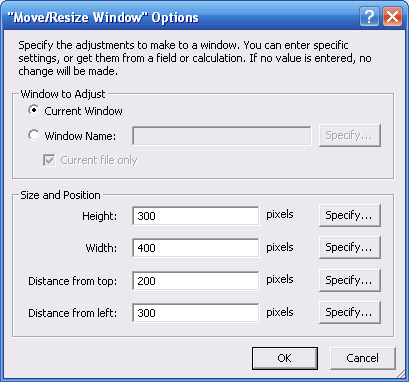
For each parameter of the Move/Resize Window script step, you can either specify a literal number or supply a calculation formula whose result determines the parameter’s value. If you leave any of the parameters empty, their values are inherited from the current active window. For instance, if you merely want to move the current window without changing its size, you don’t have to specify anything for the Height and Width parameters.
Before you start creating and moving windows around the screen, however, it’s important that you have a good understanding of the anatomy of a window. When you specify the Distance from Top values for a new window, for instance, is that the distance from the top of the screen, or from the top of the application window? Is it the distance to the window’s title bar or to the layout itself? This anatomy lesson answers those types of questions.
Working from the outside inward, there are four important objects for managing windows. These are the screen, the desktop, the window, and the content area.
Screen
The screen is the backdrop against which all window actions take place. Screen resolution can, of course, differ from user to user. You can use the Get (ScreenHeight) and Get (ScreenWidth) functions to return the absolute height and width (in pixels) of the user’s screen.
If multiple monitors are hooked up to a machine, these functions return the dimensions of whichever monitor contains the active window. If the active window straddles monitors, the active screen is considered the one that contains the majority of the window. You cannot programmatically alter the dimensions of the screen from within FileMaker Pro.
Desktop
FileMaker also has a pair of functions that return the dimensions of something called the window desktop: Get (WindowDesktopHeight) and Get (WindowDesktopWidth). In a nutshell, these represent the dimensions of the FileMaker application window.
On a Macintosh, the top menu bar, which is 22 pixels high, is not considered part of the application window. The desktop height, therefore, is 22 pixels smaller than the screen height. The desktop and screen widths should be identical.
The desktop size is slightly more complicated on Windows because an application can be maximized to fill the screen or it can float free in its own window space. The two desktop functions return the inside dimensions of the application window. The application title bar and the FileMaker menu bar are not considered part of the window desktop on Windows. Scrollbars on the right and bottom of the application, however, are considered part of the window desktop. If you fully maximize FileMaker on Windows XP, and if the taskbar has its default size and location at the bottom of the screen, the desktop height is 80 pixels less than the screen height. That includes 46 pixels for the application title bar and menu bar and 34 pixels for the taskbar.
Be aware that many system settings can affect the exact pixel sizes for various screen elements. It’s best to test on your own system.
You cannot programmatically set the dimensions of the desktop area, nor can you determine the placement of the desktop relative to the screen (which is interesting only on Windows when the application is not maximized).
Window
The next type of object to discuss is the window. This is finally where you, as the developer, get to have some control over things. You can set the size, placement, and name of windows on the screen through various script steps. The size of the active window—its outside dimensions—can be obtained with the Get (Height) and Get (Width) functions. These dimensions include both the window’s frame and its content. These concepts are discussed in depth later in this section.
When you position a window on the screen, you specify, in effect, the coordinates for the upper-left corner of the window. These coordinates are not relative to the overall screen dimensions. They are mostly relative to the window desktop. We say “mostly” here because a window positioned 0 pixels from the top and 0 pixels from the left is placed at the upper-left corner within the application window. If there are no active, docked toolbars, this window’s position would, in fact, be relative to the window desktop. It’s the potential presence of docked toolbars (either the Standard toolbar or the Text Formatting toolbar) that muddies the waters. Each of those can move the absolute position of (0,0) either downward or to the right, depending on where the toolbar is docked. Docked in the standard position at the top of the screen, each toolbar takes up 26 pixels on Mac and 27 pixels on Windows XP. The toolbars do not affect the size of the desktop area.
Further, the presence of the status bar (not to be confused with the status area) on Windows decreases the usable application window space by an additional 18 pixels. There’s no way to test for the presence or location of the toolbars or the status bar, so it’s impossible to know without experimentation the maximum size a window can be without exceeding the dimensions of the application window.
On Windows, a user can choose to use normal, large, or even extra large fonts under the display properties. The status bar does not change size, but the window and application title bars both increase in height dramatically. You should be aware that the pixel sizes for various objects provided here are not true constants.
Content
Whereas the outside dimensions of a window are described by the Get (Height) and Get (Width) functions, the inside dimensions are described by the Get (ContentHeight) and Get (ContentWidth) functions. The content area is the most important to you, the developer, because it’s the space your layouts inhabit.
It might be helpful to think of a window like a framed picture: Much as a picture frame surrounds a picture, a window’s frame surrounds the content of the window. The content dimensions refer to the dimensions of the picture, not including the frame.
The size of the window’s frame differs slightly on Mac and Windows. And because you specify window size, not content size, when creating or resizing windows, this means that to display a fixed content size, you need to use a variable window size.
On Macintosh, a window’s title bar takes up 22 pixels, and its left and bottom scrollbars are each 15 pixels thick. If the status area is visible, this adds 69 pixels to the window’s frame.
On Windows, if the current window is maximized, the window has no top title bar. If it’s not maximized, the title bar requires 38 pixels on Windows XP and 31 pixels on Windows 2000. The left and bottom scrollbars are each 16 pixels thick. If the window is not maximized, there’s a further border on the left and right sides of the window that adds 12 more pixels to the width of the frame. Finally, the status area on Windows is the same as on a Mac: 69 pixels.
The content dimensions tell you only the visible content area of the active window. That is, they don’t take into account content that you need to scroll to see.
The Adjust Window script step includes a Resize to Fit option, which resizes the window to the layout that is displayed in it. If you use a script to go to the appropriate layout and immediately adjust the window with Resize to Fit, the window will be just the right size for the layout.
Positioning a Window Relative to Another Window
One common window manipulation routine involves having a new window pop up at a position on the screen relative to another window. This technique can make for very effective user interface management. Even if a user moves a window to another part of the screen, your pop-up window appears in the same position relative to the window that called it.
 You might have difficulty when creating pop-up windows for use on Windows PCs. See “Pop-up Window Issues on a Windows PC” in the “Troubleshooting” section at the end of this chapter.
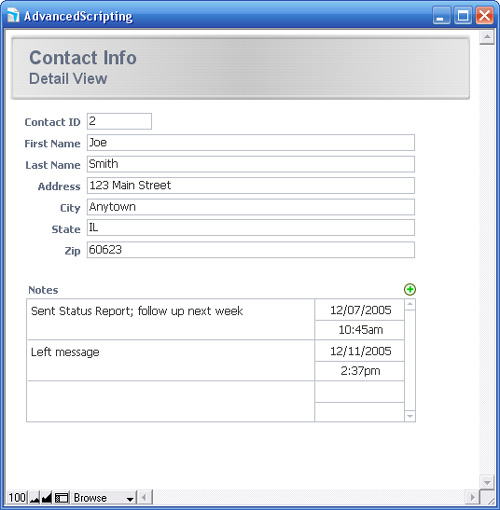
Figure 18.2 shows a layout from a basic contact management system; the portal at the bottom is used to collect notes associated with a particular contact.
Figure 18.2. A contact info layout with a portal into a Notes table becomes the anchor for a pop-up window.
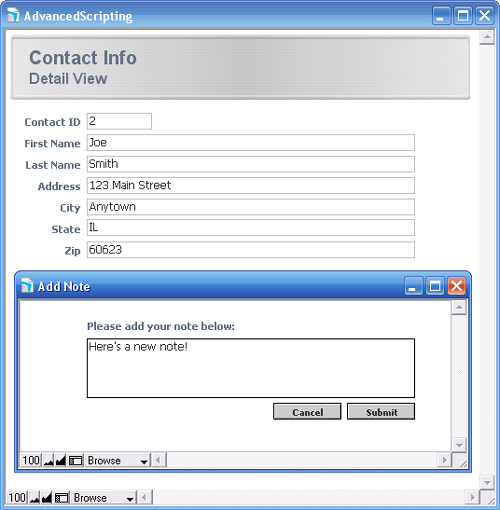
Imagine that you want to create a workflow where users are not allowed to add new notes directly from the portal. Instead, you would like a pop-up window to appear in front of the portal when users click the Add Note button, regardless of where a user has positioned the contact info window. The end result of this is shown in Figure 18.3.
Figure 18.3. The Add Note window is positioned in front of the portal on the Contact Info layout, regardless of where that window has been positioned on the screen.
The trick to having the pop-up window follow the anchor window around the screen is referencing the position of the anchor window in the coordinates for the pop-up window. You still have to know the relative placement of the two windows. However, there’s a systematic approach to this that can make the whole process quite simple.
Begin by creating a layout that contains the desired interface for the pop-up window. Use a rectangle (of any color) as the background for this layout. It’s important that you use an actual rectangle rather than just changing the color of the layout part because the size of this rectangle determines the size of the pop-up window. Position the rectangle so that it’s snug against the top and left borders of your layout. In the example shown in Figure 18.3, the background rectangle on the Add Note layout measures 463 pixels wide by 163 pixels high. Your layout should contain only a body part, and you should shrink the body up right to your background rectangle.
After the pop-up layout has been created, copy the background rectangle to your clipboard, switch over to the anchor layout (here, the Contact Info layout), and paste the rectangle onto this layout. Position it exactly where you want the pop-up window to be placed. Turn on the Object Size dialog (View, Object Size), and make a note of the top and left coordinates of the rectangle. In the example shown in Figure 18.3, these positions were 290 and 15, respectively. You can then delete the rectangle from your layout.
![]() For more on using the Object Size palette, see “Positioning Objects on a Layout,” p. 141.
For more on using the Object Size palette, see “Positioning Objects on a Layout,” p. 141.
The values for the top and left pixel of an object returned by the Object Size dialog are relative to the page margins defined for your layout. The margin settings can be set explicitly on the Printing tab of the Layout Setup dialog. If you want to know the absolute position of an object, set the top and left margins to both be 0, or subtract the top and left margin settings from the values you noted in the Object Size dialog. Your goal is to know the position of the rectangle relative to the current window, so the margins, which aren’t even visible in Browse mode, must be factored out.
In the script that generates the new window, you need to use the positions you’ve noted for the rectangle and the position of the current window to determine the location of the new window. Remember that you have to consider the size of the new window’s frame as well, and that the frame size differs on Mac and Windows. The rectangle you placed on the anchor layout determines the size of the window’s content area. The size of the window itself must be derived from this. Taking all these factors together, the parameters you need for your new window are as listed here:
Height: 139 + Case ( Abs ( Get (SystemPlatform ) ) = 1 ; 37; 54)
Width: 457 + Case ( Abs ( Get (SystemPlatform ) ) = 1 ; 15; 27)
Top: 305 + Get (WindowTop)
Left: 46 + Get (WindowLeft)
The values for Get ( SystemPlatform ) are -1 for PowerPC Macs, 1 for Intel Macs, and -2 for Windows XP / Vista. Thus, Abs ( Get ( SystemPlatform ) ) returns 1 for both PowerPC and Intel Macs.
You’ll notice that the constants at the beginning of each of these formulas come from the size and position of the pop-up window, which we noted earlier. The other constants in these formulas (the ones that were determined by checking whether the user is on a Mac or a Windows PC) are required to translate from content size to window size. Recall from the preceding section that the size of the window’s frame is different on each platform. The preceding calculations also make an assumption that the status area will be hidden in both the anchor window and the pop-up window. If that’s not the case, you can easily adjust by adding and/or subtracting 69 (the width of the status area) to the width and distance from left values as necessary.
If you plan to use pop-up windows often, consider creating custom functions for these formulas. You can have them adjust appropriately, based on platform and the visibility of the status area.
The remainder of the scripts used for the Add Note routine closely resemble those discussed in the “Rich Dialog Windows” section of “Multiwindow Interfaces,” later in this chapter. The Add Note script itself is as follows:
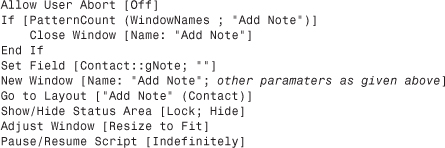
On the Add Note layout itself, both the Cancel and the Submit buttons are specified to Resume the current script. The Cancel script simply closes the current window. The Submit button, defined to pass the current record’s ContactID as a script parameter, runs the following script:
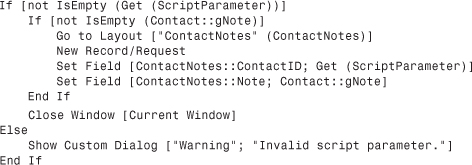
There are many ways you could script the actual addition of the note record. This example navigates to a layout based on the ContactNote table. Because the user entered the new note into a global field, after the new record is created, the ContactNotes::Note field can be directly set to the value of the gNote field. However, the ContactNotes::ContactID field, which is a foreign key relating back to the Contact table, needs to be set to the ContactID of whatever the active record was at the beginning of the routine. It could simply be placed in a field with global storage, but instead, we’ve elected to have the Submit button pass the ContactID as a script parameter to the Submit Note script.
If you have issues with found sets not being retained when you create new windows, see “Creating New Windows Loses My Found Sets” in the “Troubleshooting” section at the end of this chapter.
Multiwindow Interfaces
Opening a new window for your navigation or other button elements is only the tip of the iceberg when it comes to working with multiple windows. It is possible in FileMaker 9 to strictly control multiple windows—their positions, sizes, and titles.
The simple nuts and bolts of these features can be found in the New Window script step options. With them you can create new windows, close windows, select (bring to front) a specific window by name, adjust and resize windows, tile and cascade multiple windows at once, and control the availability of the Status Area as well. Figure 18.4 shows a simple example of the script options for the New Window script step.
Figure 18.4. This 400-pixel by 300-pixel window opens with a title of My Window and is positioned in the upper left of the screen.

The possible uses for multiple windows are quite varied:
- To view as many layouts at once as your screen real estate allows
- To create multiple List view windows of the same table, with different found sets, at once
- To use a form for editing a single record while still viewing multiple records via either List or Table view
- To create a pop-up window, similar to a dialog box
- To keep navigation, function, and other palettes off to the side of your workspace
- To view reports while not having to leave the windows/layouts in which you’re working
The possible list is virtually endless. What we will present in the following sections are some common examples that should serve to demonstrate the mechanics of working with multiple windows.
Tool and Function Palettes
As discussed previously, it’s possible to build a palette for navigation, functions, or any number of options for buttons in your solution. For example, you might want to present your users with a new window containing a portal of all the possible reports in their database solutions—that also open in their own individual windows. Another idea might be to have a central control panel that allows you as a developer to unlock certain layouts, run test scripts, re-log in, view internal field data, and so on.
The only drawback to this approach is that users need to click twice to perform button actions: once to bring the window forward, into an active state, and a second time to click the chosen button. From an implementation standpoint, this functionality is simple to deliver: Create a layout with all of your various buttons or control objects on it and write a script to open this window and tie it to your startup routine.
Rich Dialog Windows
Modal dialogs—windows that stay open in the foreground while waiting for some action to be performed by the user—are a common user interface standard that users will find familiar. Certainly the Show Custom Dialog script step will take care of some of your basic needs, but in cases in which you’d like to control the look and feel of a dialog or need more than three simple text-entry fields, you will need to turn to crafting your own window dialogs.
Scripts entirely drive this technique. You are free to build whatever type of layout and window you’d like. The only stipulation here is that you give users a means of continuing with the process after you’ve brought them to a modal dialog (a Close button, for example). Your database will be in a paused state, waiting for user input. More often than not, resuming from this state is accomplished with a Continue button or, with a bit more scripting, Submit and Cancel buttons.
Cancel buttons imply that whatever action the user has taken in the modal dialog window can be undone. That can be problematic, especially if you’ve allowed the user to add and remove records from a portal, so be careful with the use of that term. One technique for managing the undo process is to use global fields for data entry and to populate true fields only when the user clicks Submit. Other techniques involve record-level rollbacks (a rollback essentially undoes a transaction in a database, returning it to a previous state).
![]() To learn more about rollbacks and undo operations, see Chapter 11, “Developing for Multiuser Deployment,” p. 351.
To learn more about rollbacks and undo operations, see Chapter 11, “Developing for Multiuser Deployment,” p. 351.
To build a modal dialog, follow these steps:
- Build a layout intended to act as your pop-up dialog, called Pop Up. Size it in such a way that it is smaller than a main layout that is to remain behind it. You can add whatever functions and layout objects to it that you want. The layout can be as simple as a single field, or it can be as complex as one that displays a subsummary report in preview mode.
- Add a Done button to your Pop Up layout. For now, attach it to its own placeholder script with just a comment. You will deal with writing the script itself later.
- Now place a button on your main layout. For now, create a label for it:
Open. Attach it to the following script:
It’s important to disallow user abort; otherwise, users can close your window without performing the action you’re attempting to require. It’s also a good idea to lock the status area. Finally, you have to hold FileMaker in a paused state so that users can’t perform any other action while attending to the dialog. Generally it’s a bad idea to leave a script paused—users can get stuck in limbo—but in this case it is exactly the behavior you want. The script ends, leaving the user in a paused state. You need to remember that a pause state is active when performing any additional scripts or when providing other functions in your Pop Up window.
For details on the caveats and pitfalls of using this technique, see “Modal Dialog Dangers,” in the “Troubleshooting” section at the end of this chapter.
Keep in mind that your users will still be able to run scripts that are visible in the Scripts menu or elsewhere. In solutions that use this technique, developers often opt not to set scripts to display in the Scripts menu and to control or change any custom menu sets in use. Or they write their scripts such that all scripts visible in the Scripts menu take into account this paused state by either refusing to run or ending gracefully so that the user’s state in the modal dialog window is not disrupted.
Now return to ScriptMaker and create the Done script. You need to write whatever application logic your solution requires (for example, committing data to fields from globals, performing an evaluate function, or running a report) and end your script with this:
Close Window [ Name: "Pop Up" ]
One final element is critical. You’ll notice we haven’t yet dealt with the pause state. If you add a Pause/Resume script step to the Done script, FileMaker won’t know that you want it to resume a currently paused script. The behavior it normally implements is to overlay a new pause state on top of the earlier pause state. This is entirely as it should be because this allows you to build routines with multitiered pause states.
But in the case where you want to resume a previously paused script, the solution to dealing with your pause state lies with the button options attached to each button object. Select your Done button object and either right-click or navigate to the Format menu (in Layout mode) and choose the Button Setup option. Another technique is to simply double-click the button object in Layout mode. Refer to the Current Script options shown in Figure 18.5.
Figure 18.5. Notice the rarely used Current Script option in the Button Setup dialog.
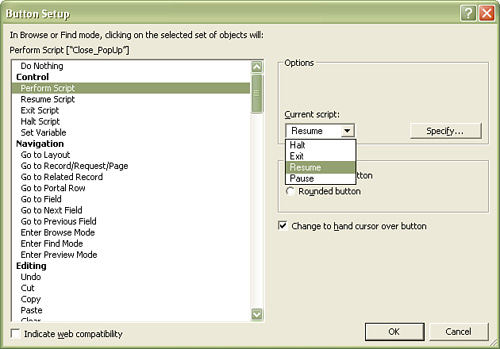
The Current Script option for the Perform Script button behavior is almost never changed. Most often its default state of pausing a currently running script while performing whatever new script is necessary will meet your needs. In this case, however, you need it to resume the current script (which will simply continue from the pause state, effectively ending it) before proceeding through the Done script and closing the pop-up window.
This then closes the pause state without creating a nested second one and allows the user back into the state of using the database solution normally. This, combined with the Close Window script step, gives the user the experience of clicking Done and seeing the window close. Clicking the Open button sends users back to the layout from which they began.
![]() For another example of working with modal dialogs using script results, see “Script Results,” p. 486.
For another example of working with modal dialogs using script results, see “Script Results,” p. 486.
Special Effects
Other window techniques don’t seem to add much more functionality to your solution, but they can certainly be fun to include for more polish (or to just show off). Calling these techniques “special effects” is probably a stretch—we hope those of you who are Flash developers will just let this section roll by for what it’s worth—but many developers in the community have had some fun coming up with a few tricks you can pull off with window script steps.
Marquee Titles
Using a simple loop, you can rename the title of a window with progressively scrolling text. Use a Set Window Title script step inside a loop. Use a number increment (stored in a variable) and apply it to a Right or Left function with the text you want to display. The script looks like this:
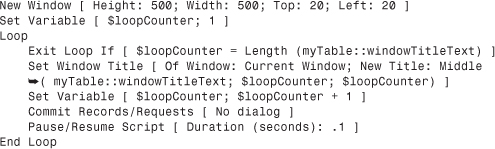
Not the greatest use of computer technology ever made, but you can certainly draw attention to a warning message or alert of some kind by using it.
Expanding Windows
By using a similar looping technique, you can alter the horizontal and vertical dimensions of a window so that it appears to grow or expand onto the screen:
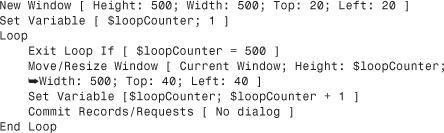
This particular example is somewhat slow because it needs to loop 500 times to draw the window in question. Play with the increments in your Set Variable [$loopCounter; $loopCounter + 1 ] script step to make your window draw more quickly. You could just as easily set the width in a similar manner.
Hiding Windows
The Adjust Window script step includes an option to hide a window that does more than just minimize it: Users can access the window only from the Window menu within FileMaker. If you use a custom menu (discussed later in this chapter) to disable that menu item, you truly have the capability of hiding a window completely from a user.
Selection Portals
We’ve covered the basics of portals thus far, and discussed the idea that portals are used to display records from a related table and that the records themselves relate in a meaningful way. In other words, the related records shown in a portal correspond somehow to the active record—Parents to their own Children, Class to its attending Students, Company to its own Employees, Neighborhoods to Houses, and so on.
These relationships are often thought of as primary. They’re the relationships that you depend on to define and determine a database’s core architecture. Your users, likewise, will intuitively understand the process of entering data for a class, for example, and then fleshing out its roster of students. There’s a direct correlation between a primary data structure and the information that users expect to view, enter, and report on.
![]() For a more in-depth discussion of data modeling, see Chapter 5, “Relational Database Design,” p. 163.
For a more in-depth discussion of data modeling, see Chapter 5, “Relational Database Design,” p. 163.
We will now venture beyond the basic functions of data entry and display and explore other uses of portals. The other, advanced uses of portals mainly revolve around user interface choices in which you might opt for a more sophisticated approach in making selections. You might choose to relate to records in another table not for primary data purposes but for any number of others. We tend to refer to these cases as utility relationships. The following sections delve into some of the ways in which you can apply utility relationships.
Basic Selection Portals
The first advanced technique we discuss is what we refer to as a selection portal. Selection portals present choices to the user in lieu of a value list or menu of some kind.
This approach is necessary when a simple value list contains too many values to display practically or perhaps has to display multiple columns of information as opposed to the two that FileMaker allows. In these cases we often choose to create a portal that displays options and permits a user to click on a row to select from among the choices presented.
Selection portals offer an alternative to the standard approach of using value lists to choose foreign key values: The only way two records in an equijoin become related is if they share a like value in match key fields. For example, if you want to relate a real estate agent to a listing record, you can either manually enter the key for an agent into an AgentID field for the listing record, or assist data entry by providing a pop-up list or menu of options.
![]() For a refresher in related value lists, see Chapter 3, “Defining and Working with Fields and Tables,” p. 87.
For a refresher in related value lists, see Chapter 3, “Defining and Working with Fields and Tables,” p. 87.
Value lists, although a quick and easy means of giving users access to choose related records, can be limited: If you have hundreds of possible values, they can become cumbersome to scroll through. In addition, you can use the contents of only two fields, the first of which has to be the values for your match field, regardless of whether you choose to have it displayed. Figure 18.6 offers a pop-up window alternative to a value list that makes use of a portal.
Figure 18.6. This portal of options allows users to pick which related record they want to associate with their current record.
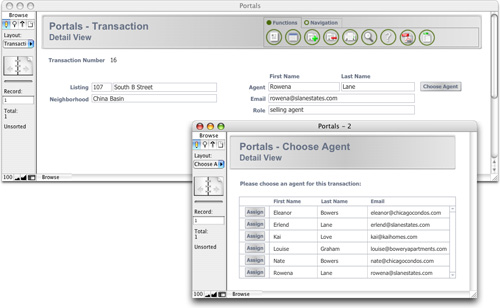
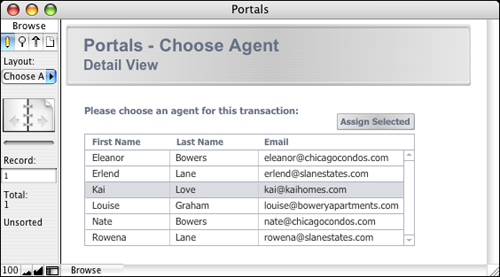
Selection portals address these issues, although they admittedly require more work to build. When a user wants to associate a record, as shown in Figure 18.6, he need only click, for example, the Rowena Lane row in the selection portal. Notice that the example shows the selection portal in a different pop-up window. This is a common way to display a selection portal for only as long as it is necessary. Clicking a row above can also close the window in question.
The basic concept for selection portals is straightforward. The goal is to display all the possible relatable matches for a given record, and then through scripting capture and populate its match key into the appropriate foreign match key on the other side of the relationship. The work involves two elements: first, creating a portal that displays all the records from the other table and, second, writing a script that captures and populates the match field (foreign key) after a user clicks one of the portal rows available.
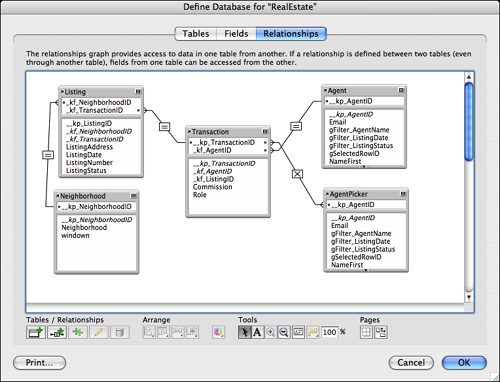
First define your data structure. In the example shown in Figure 18.7, agents can work with multiple listings, but a listing might have multiple agents as well: one representing the buyers and another representing the sellers. Notice that this now becomes a many-to-many relationship. At times there might be multiple agents on the buying or selling side as well. For the purposes of this example, use the Relationships Graph shown in Figure 18.7.
Figure 18.7. We’ve simplified the fields and relationships in this example to show just the primary data structure and a handful of fields necessary for the example.
To see this process work, first create an Agent layout and add a portal for all the listings associated with that agent. We recommend displaying your match key fields until you get comfortable with this technique.
Now you need a portal that shows all the listings in the table from which users can choose. For any portal, you always first need a relationship, so create a second table occurrence and second relationship. The example in Figure 18.7 related the _kp_agent to the _kp_listing via a Cartesian cross-product operator (x).
Note that it doesn’t matter what fields you choose as match fields for a cross-product join. The operator doesn’t make any comparison and simply relates all records to all records.
A second portal can now be placed on your existing layout, or, in all likelihood, you would have these two portals displayed on a different layout expressly established for this picking process. You can even combine it with a pop-up window, as explained in Chapter 14, “Advanced Interface Techniques.”
![]() To review how to create a pop-up window, see “Rich Dialog Windows,” p. 526.
To review how to create a pop-up window, see “Rich Dialog Windows,” p. 526.
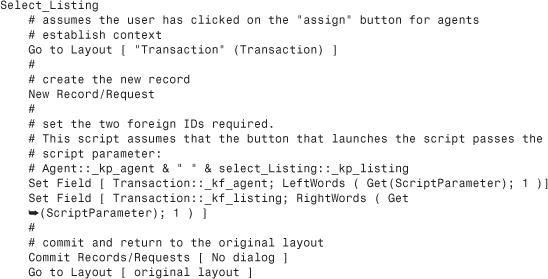
After your cross-product selection portal is in place, you need to write a script to associate the related record your user will choose. The script, which will be tied to a button that’s placed in the selection portal, needs to navigate to another layout to create the association. So that information about the current record and the selected portal row can be accessible on that other layout, you have to define the button to pass the agent and listing IDs as a script parameter. Use the following:
![]() To review script parameters and how to pass multiple parameters, see Chapter 16, “Advanced Scripting Techniques,” p. 477.
To review script parameters and how to pass multiple parameters, see Chapter 16, “Advanced Scripting Techniques,” p. 477.
This basic technique allows you to create a more complete user experience for your users and to expressly control the creation of related records. The advantages of this over a value list are that you can offer more than two fields of information to users, you can leave obscured the key values in your database, and generally the user interface can come across as more polished (depending, of course, on your artistic abilities).
Portal Row Highlights
You are now exploring ways of working with portals that go beyond simply using them to display data that is related in a real-world sense. You’re now establishing utility relationships that allow for other things in addition to basic structural relationships. In the example in the preceding section, you related your current record to all records in another table. In this example, you establish a condition by which a single portal row can be highlighted (see Figure 18.8). This is another technique to enhance usability and extend user interface.
Figure 18.8. The highlighting gives solid feedback to users that they are acting on the row in question; it allows you to establish a “selected” row.
Notice that the Assign Selected button has moved to the top of the portal, rather than placed on every row of the portal.
This technique involves setting a global field to the value of the primary key of whichever row the user clicks. You need three fields in all for this technique. We generally add them to the related table or a separate utility table, but keep in mind that you can use globals from any context. The following is a list of the fields you’ll need for this technique:
gHighlightColor— A global container field that holds a rectangle of the color you want to use as a highlight. You need only one such field in your database, regardless of how many portals will use this technique.gSelectedRowID— A global number field that holds the primary key value of whichever row the user last clicked.HighlightRow— A calculation field that returns a container as its result:If ( gSelectedRowID = _kp_relatedTable; gHighlightColor; "")
To set the global field, you need only create a script like so:

This script presumes that the user has clicked on a portal row: The_kp_relatedTableis passed from that mouse click.
Notice that in cases in which gSelectedRowID equals the primary key of the related table, the calculation returns the value (in this case a colored rectangle) from gHighlightColor. Because you’re using global fields, this solution works perfectly well in a multiuser environment. Whatever a given user has selected as her highlight row remains specific to her session.
The final element of implementing highlighted portal rows is to place the HighlightRow calculation field in the portal itself. Make the field exactly the size of the top row of the portal, and set its graphic format to Crop. (Make sure that your colored rectangle is larger than the portal rows you plan on having the highlight.) Attach the SelectRow_SetHighlight script to the field. In Browse mode, a button does not need to be the topmost object on the screen to work. Move fields above it and your highlight color fills in nicely in the background. You would generally turn off access to the fields in your portal in Browse mode so that clicking anywhere in the portal row results in a highlight appearing, rather than a field being entered for data entry.
If you’re having difficulty getting the colored rectangle to display properly, refer to “Incomplete Highlighting Rectangle” in the “Troubleshooting” section at the end of this chapter.
One additional option when storing a selected row ID and creating a highlighted portal row is that it is possible to then also create a relationship specifically for that selected record. By relating gSelectedRowID to _kp_listing, you now have a relationship that will change as a user clicks portal rows. Consider the implications: You can display related record fields directly on your current layout, based on the selected row (see Figure 18.9).
Figure 18.9. Notice that the information on the right corresponds to the related record selected by the portal on the left.
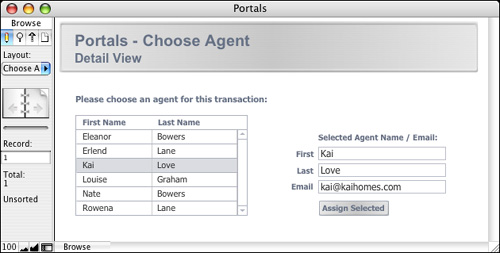
This is a great way to address a portal that is getting too crowded with fields. Instead of making each column smaller or perhaps stacking fields in rows that might then get difficult to read, simply allow users to select a row in a portal and then display additional information about the selected, related record off to the side.
There’s one flaw in the technique described. When users move from parent record to parent record, what happens to the row highlight? The gSelectedRowID would still remain associated to a record in the related table, even though a subsequent record might not include it in the selection portal. This could lead to confusion at best or, at worst, data integrity problems.
To ensure that a selected related record is visible only from its parent record, add a second predicate to the relationship so that it displays only related records from the current listing or transaction context. If the status area book icon is used to change records, the relationship will no longer be valid and no records will display.
In FileMaker 9, you can use conditional formatting to highlight fields in a portal. Select the field or fields in question, and then set up a condition to change the fill color (or any other characteristic) based on the condition you have set.
Multikey and Multirow Selections
In addition to wanting to highlight a single row, as in the preceding example, you might encounter the need to have multiple rows selected at once. In the Agent Listings example, for instance, you might want to allow users to click multiple rows in the listing portal and assign them all at once to the agent in question.
This is a particularly handy way of allowing users to do multiple things at once: Add a batch of listings to an agent, select multiple people for form letters, apply new dates to a series of records, and so on. There are dozens of possibilities.
The technique for this is nearly identical to that already presented. However, we rely on FileMaker Pro’s capability to resolve multiple match values in a single field. These multiple match value keys are often called multikeys. Consider a company table related to an agent table, as shown in Table 18.1.
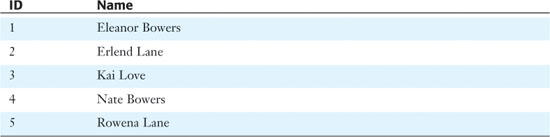
If you establish a relationship to this table by using a field—global or otherwise—FileMaker will recognize all return-delimited match key values as though they were individual values.
For example, if your company match field holds
1
3
your valid, related records will be Eleanor and Kai’s.
Likewise,
5
2
4
relate to Rowena, Erlend, and Nate. The order in which values fall doesn’t matter to FileMaker, simply that they are valid and delimited with a carriage return.
With a multikey match, it is possible to show multiple rows as highlighted or selected in a given portal. You can use again the same three fields you used to set up a single-row highlight:
gHighlightColor— A global container field that holds a rectangle of the color you want to use as a highlight.gSelectedRowID— A global text field that holds multiple primary key values, return delimited, of whichever rows the user last clicked. Note that a number field no longer works. You cannot insert line breaks in a number field. Happily, in this case, FileMaker Pro can relate a text field to a number field. Be wary of problems with field types, but in this case there will be no problem.HighlightRow— A calculation field that returns a container as its result:If ( FilterValues ( gSelectedMultiRows; _kp_listing ); gHighlightColor; "" )
If you are modifying the fields from the example given earlier in the chapter, notice that the test in the calculation is now using a FilterValues function that recognizes whether an ID is included in your global (as opposed to simply checking whether the two fields are equal). When you’re setting values in gSelectedRowID, a simple Set Field script step won’t do the trick any longer. Doing so would replace the contents of the field and you’d be left with just one row selected. Your script needs to look like this:
The mechanics of this script will result in your users adding and removing key values to your global match field as they click multiple rows in your portal. Each row will highlight, and in this manner you can have users choose multiple items from a given set of related records.
Go to Related Record
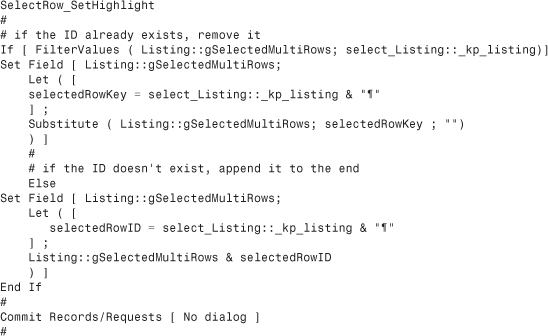
Go to Related Record is one of the most useful and important script steps. In this discussion of scripting, we’ve focused for the most part on categories of tasks that you can perform with scripts rather than on specific steps, but Go to Related Record, which we’ll refer to as GTRR, merits a discussion entirely its own.
Figure 18.10 shows the Go to Related Record Options dialog. Essentially, GTRR lets you navigate to one or more records related to whatever record or records you’re currently viewing. As we discuss in this section, there are several options for how and where that related set will be displayed. It might take a while for all the nuances of GTRR to sink in, but mastery of this script step is crucial for becoming an experienced script writer.
Figure 18.10. Go to Related Record is one of the most useful script steps. It’s also one of the most complex.
GTRR Basics
It might be helpful to think of GTRR as a way to move or jump from one point on the Relationships Graph to another point. But from where, and to where? In the GTRR options dialog (shown in Figure 18.10), the first thing you specify is the destination table occurrence for this move. The script’s context determines the starting point for the move. We’ll use the terms origin and destination to refer to these table occurrences.
Whenever a script executes, it does so in a context determined by the active window, the active layout, the active found set, and the active record. All these things can, of course, be changed during the course of a script by using a wide variety of script steps. Whatever layout is active at the point in the script at which the GTRR occurs determines the origin for a GTRR script step. The active layout situates you at a particular point on the Relationships Graph. So, managing the origin of the jump is done not in the GTRR step itself, but rather through navigation (if necessary) to the appropriate layout beforehand.
As the destination for the GTRR, you can select any table occurrence on the graph, including table occurrences tied to external tables, table occurrences unrelated to the origin, and even the origin itself. This last option produces a special result that’s discussed in the “Jumping to Disconnected Table Occurrences” section a little later in this chapter.
The other pop-up list within the GTRR dialog is for specifying a layout to use for displaying whatever set of records the GTRR returns. Unlike the choice of a destination table occurrence, you are restricted in your choice to selecting among layouts tied to the same table (not table occurrence) as the destination table occurrence. That’s a convoluted way of saying that you’re expected to specify an appropriate layout to display the related set of records. We’ll therefore refer to this layout as the display layout. If and only if the destination table occurrence is from an external file, you’ll have the option to select the Use External Table’s Layouts check box. The choices for the display layout consist of those layouts, in the external table, which are tied to the same table as the destination table occurrence.
Another option in the GTRR dialog enables you to specify that the related set of records appear in a new window. If you select this option, you have access to the same setup parameters that you do when using the New Window script step (window name, location, size). If you don’t check the Show in New Window option, one of two things happens when the GTRR executes:
- If the display layout is in the current file, that becomes the active layout.
- If the display layout is in a different file, another window must be activated (windows are file specific). If there are no windows for the required file currently open, a new window is created regardless of whether you’ve checked this option. If there are windows belonging to the external file (even hidden ones), the frontmost of those in the stacking order becomes the active window.
The final option on the GTRR dialog is Show Only Related Records. Your choice here partially determines what found set the display layout contains. It’s easier to discuss the possible implications of selecting this option in the course of a specific example, which we do in the example that follows. For now, know that in most cases, you’ll want to enable this option.
If you choose the Show Only Related Records option, you also have the choice to navigate to only those records related to the current record or to records related to any record in the current found set. For example, if you’ve isolated a subset of customer records, it is now possible to use GTRR to navigate to a found set of all products ordered by any of those customers. This was possible in previous versions of FileMaker but required a complex workaround.
GTRR—A Simple Example
As an example of GTRR in action, consider the scenario of a database that contains information about teachers and classes. Figure 18.11 shows the Relationships Graph from such a file; there is a one-to-many relationship from the Teacher table occurrence to the Class table occurrence. The relationship is defined to sort by ClassName. There are two layouts in the file—Teacher Detail and Class Detail—each tied to the obvious table occurrence.
Figure 18.11. The two table occurrences in this Relationships Graph are connected on the TeacherID field.
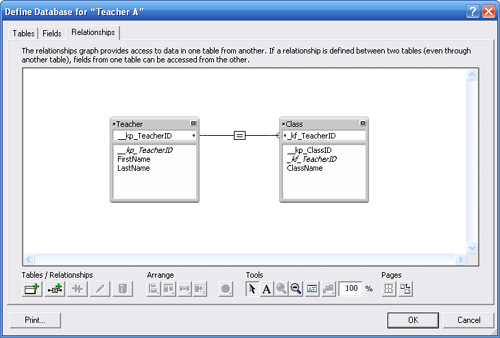
Say that you want to use a Go to Related Record script step to find all the classes taught by a particular teacher. To do this, begin by navigating to the record of the teacher you’re interested in. Place a button on the layout that performs a Go to Related Record step. Because the button is on the Teacher Detail layout, the Teacher table occurrence is the context in which the GTRR will be performed; it acts as the origin for the coming jump. In the GTRR dialog, specify the Class table occurrence as the destination for the jump. Finally, specify Class Detail as the display layout.
The found set and the sort order that will actually be displayed on the Class Detail layout depend on three things: what other options have been specified for the GTRR, the existing found set on the Class Detail, and the relationship settings that link the origin and destination table occurrences. These are the possible outcomes:
- If you enable both the Show Only Related Records option and the Match Current Record Only suboption, the found set consists of just those classes related to the current teacher record. Those records are sorted according to the sort setting in the relationship, and the first class record in the set will be the active record.
- If both the Show Only Related Records and Show in New Window options are not enabled, the found set on the Class Detail layout depends on whether the first related record was already part of the found set there. If it was, that record becomes the active record and the found set remains unchanged. If not, all records in the table display, with the first related record as the active record. The sort order of the display layout (here, Class Detail) is not altered in either case. Be aware that it’s only the presence of the first related record that matters. In fact, it’s possible that other related records might not even be part of the found set following the GTRR step.
- If the Show Only Related Records option is not enabled, but Show in New Window is, all the records in the Class table will be in the found set, regardless of what found set existed there previously. The first related record is the active record.
- If there are, in fact, no related class records for the given teacher, the found set and sort order on the Class Detail remain unchanged. Further, the display layout does not even become the active layout. Be on guard for this situation because if your scripts assume either that you have a particular found set or that you’re on a particular layout following a GTRR, you might have problems. To trap for this situation, you can test for the existence of related records before the GTRR by using the
Countfunction to determine the number of related records. Alternatively, you can check to see whether the GTRR step generates an error. Error 101,Record is missing, is returned if there are no related records. Finally, if you enabled the Show in New Window option but there are no related records, be aware that a new window will not be created.
Predicting the Found Set
The preceding section contained an example of using GTRR to navigate to a set of classes related to a particular teacher. Because only one hop was involved in this GTRR, it was very easy to conceptualize what found set would be generated by the GTRR step. A GTRR, however, is not limited to short jumps such as this. In fact, the origin and destination table occurrences can be distantly connected on the Relationships Graph. When this is the case, it can sometimes be difficult to predict exactly what set of records will be returned. A few simple rules and examples should clarify this for you.
First of all, the origin and destination table occurrences must be connected on the graph for the GTRR to function. If they aren’t, the user sees an error stating, This operation could not be completed because the target is not part of a related table. The actual error generated is error 103, Relationship is missing.
Assuming that there is some unique path from the origin to the destination, you really need to know just three rules to determine what found set will appear if you do a Go to Related Record script step:
- Every relationship along the path is evaluated.
- The found sets are cumulative.
- The sort setting of the final hop determines the sort order.
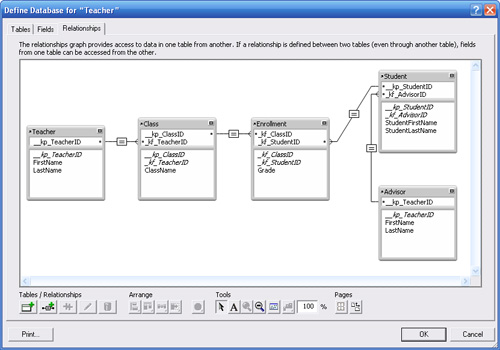
To discuss more concretely how these rules can be applied, it is helpful to consider some examples. Figure 18.12 contains a Relationships Graph with five table occurrences. Both the Teacher and Advisor occurrences are linked to the Teacher base table. The other table occurrences—Student, Enrollment, and Class—are linked to base tables of the same names. In all the examples that follow, assume that the Show Only Related Records option is checked for all the GTRR steps and that you have chosen to match only the current record. Starting from any of the table occurrences on the Relationship Graph shown in Figure 18.12, can you predict what found set you would end up with if you performed a Go to Related Record, targeting each of the other table occurrences?
Figure 18.12. From any table occurrence on this graph, you can jump to any other location on the graph using a Go to Related Records script step.
Imagine that you were on the Teacher Detail layout. In the preceding section, you saw how a GTRR directed at the Class table occurrence would find all of that teacher’s classes. What if you did a GTRR directed at the Enrollment table occurrence from the Teacher Detail layout? There’s a one-to-many relationship from Teacher to Class, and another one-to-many relationship from Class to Enrollment. The GTRR would need to traverse two hops: first to the set of classes taught by the teacher, and then to the enrollment records for those classes. The first hop might result in a set of, say, three classes. The second hop is the cumulative result of going to the related enrollments for each of the three classes. The end result would be a set of all the enrollment records for all the classes taught by that teacher.
What if you went one hop further, over to the Student table occurrence? The first two hops (Teacher to Class, Class to Enrollment) would again yield all the enrollment records for that teacher. The third hop, from Enrollment to Student, would yield the set of students that those Enrollment records represent. It’s as if a GTRR were performed on each record of the found set of enrollments. The set of student records would represent all students enrolled in any of that teacher’s classes.
Finally, what about a GTRR from the Teacher Detail layout all the way over to the Advisor table occurrence? Following the reasoning from the other examples, that would result in the set of teachers who are advisors for the students enrolled in any of that teacher’s classes.
If any of the individual hops in a multihop GTRR yield a null set, the entire GTRR behaves the same as a single-hop GTRR that yields a null set. Refer to the preceding section for a discussion of this possibility.
As stated in the third rule earlier, the last hop determines the sort order of the found set in a multihop GTRR. In this example, say that there was a sort defined for the relationship from Class to Enrollment. Even though a GTRR from Teacher to Enrollment would yield a sorted result, a GTRR from Teacher to Student would not unless the relationship from Enrollment to Student was also sorted.
There’s one final point to make about predicting the found set of a multihop GTRR. If you’re ever in doubt about what records would appear, or in what order, simply create a portal that displays records from the destination table occurrence. The same set of records that shows up in the portal would end up as the found set after a GTRR. Assuming that the portal itself wasn’t sorted, the order of the records would even be the same.
Jumping to Disconnected Table Occurrences
There’s one final behavior of the Go to Related Record step that’s worth noting: It can be used to move a found set from one table occurrence of a base table to another. This even works for disconnected table occurrences. In a given window, all the layouts associated with a given table occurrence share the same found set and sort order. This is a good thing because it means that moving back and forth between, say, a list view and a form view based on the same table occurrence doesn’t require any found set manipulation.
However, if two layouts are attached to different table occurrences, their found sets and sort orders are independent of each other, even if they’re both occurrences of the same base table. Say you have two occurrences of a Teacher base table called Teacher 1 and Teacher 2, either related or unrelated to each other, on your Relationships Graph. Imagine that you’re on a layout associated with Teacher 1 and that you’ve done a find for some subset of Teacher records.
What do you suppose would happen if from that layout you were to do a GTRR that specified Teacher 1 as the destination and a layout linked to Teacher 2 as the display layout? The origin and destination are the same table occurrence, so the answer might not be completely intuitive. The effect of such a GTRR, assuming that you had checked the Show Only Related Records option, would be that the current found set and sort order would be transferred to the Teacher 2 layout.
So, by using the same table occurrence for both the origin and the destination of a GTRR, you can move the current found set to another layout and/or window. There’s something about this behavior that defies intuition, but it’s very handy nonetheless.
Showing/Hiding Layout Elements
In addition to presenting various windows for your users, you might at times want interface objects and other layout objects to appear and disappear, or change, depending on various conditions. A simple example might be a Delete button: Not everyone who uses your database should be given delete privileges. If you have placed a button on your layouts for deleting records, you’ll need to either trap for an unauthorized attempt to use it (and likely present a graceful “you’re not permitted to do that” message with FileMaker’s security settings), or craft separate layouts that offer both the full and the limited functionalities you need.
That’s the first low-tech approach: Create different layouts that look nearly identical but offer one without a Delete button to users without that privilege. The downside to this multiple-layout approach is that you will need to build and maintain multiple layouts so that the time you spend making changes will be multiplied by however many layout versions you have. This approach also requires a sophisticated navigation scheme in which you control which version of a given layout a user sees. In many regards, maintaining multiple versions of a layout is an impractical solution.
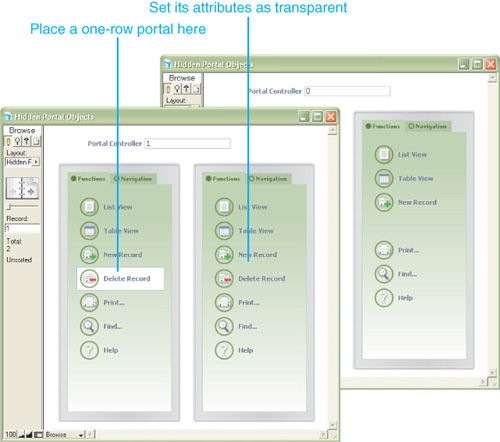
To deliver the functionality of having layout objects appear and disappear, remember that portals can contain not only fields, but buttons as well. You can place layout objects on a portal row, set the portal to display only one row, and control the availability of the layout objects within that portal by controlling that portal’s respective child record’s relationship to the parent record from which it is being viewed.
You can implement this sort of functionality in your database solution in various ways. The simplest approach is to create an on/off resource table with one record in it—simply a table you’ll use as a developer to store internal logic. When necessary, simply relate to that record by populating a global field in the current table with a constant that matches the same in the resource table. You could control the global match field by script, toggling it on and off as part of your navigation or as part of a user’s other actions. You could also create a global calculation based on checking certain privilege sets, including an extended privilege. See Figure 18.13 for an example of a Delete button being controlled by a relationship and disappearing when appropriate.
Figure 18.13. By placing a button within a one-row portal set to appear transparent, you can create a place where layout objects appear based on a relationship.
To implement one example of this technique, follow these steps:
- First create an extended privilege meant to control the appearance of a Delete button (as shown in the example in Figure 18.13). In this case, name it
portalDelete. - You will be controlling the appearance of your button objects by controlling whether a related record is available within a portal. To tie this to an extended privilege, first create a match field (called
_ka_PortalControl) and set it to be a calculation field with the following formula:Case ( PatternCount( Get(ExtendedPrivileges); "portalDelete" ) = 1; 1; 0 )
Set the field to be unstored and evaluated on demand. Make sure that it is in the table from which you intend to view this portal. - You now need a record to which to relate. Create a match field,
_ka_PortalControlconstant, to a resources table. Make sure that there’s at least one record in the table. - Create a relationship from the table occurrence that is showing data to your resources table occurrence.
- You can now place a portal, showing one row, on the layout in question, tie it to the resources table occurrence you’ve created, and then place buttons as you need within the one-row portal.
When you assign the portalDelete privilege to users, they will see the Delete Record button shown in Figure 18.13. If you have not enabled the extended privilege for the currently logged-in user, the user will see only a blank area on the screen. If the user clicks in that area, nothing will happen.
Place whatever layout objects you need in the single portal row. Because you likely won’t be drawing from any data in the resources table, you need only one related record. Note that because these are layout objects, they will appear on every related row in a portal. It actually doesn’t matter how many related records are in the resources table as long as there’s at least one.
Dedicated Find Layouts
Entering Find mode and performing find requests is a crucial part of FileMaker Pro, but it’s also one of the more difficult things to manage at the user interface level. As your solutions become more complex, Find mode will not be as intuitive for users: They might not have all the fields by which they want to search on one layout, or they might want to perform find requests on related data. Although FileMaker Pro can manage this task quite easily, users might be disoriented or confused by the results.
For example, say you’ve created a utility relationship that displays related data based on selected criteria or some temporary condition in the database. The fields sitting on your layout are not a structural one-to-many representation of your primary data architecture. Nonetheless, human users will intuitively want to hop into Find mode and have the process act on the primary relationship rather than your utility relationship.
Here’s another example: Imagine looking at an author table with a related book-title field showing the most recent book written by that author. By definition, only one book can be the most current. Now imagine that someone is searching for an author who wrote a given book a long time ago. She is likely to click into the related book-title field in Find mode and be baffled as to why her search returned zero results—or worse yet, she might not realize her mistake and might conclude wrongly that the data doesn’t exist (the book she’s looking for is not the most recent, so the search fails). Given that the fields on the right relate to only the most current book for an author, the search would be accurate but yield undesirable results. Furthermore, there might be dozens of fields in your database, related and otherwise, but users will want to search on only a small handful of these 90% of the time.
To make the Find process as intuitive as possible, you can create a separate find layout. An additional nicety is setting it up to open in a pop-up window. Your users will remain in context—in other words, they’ll see where they were in the window behind the current one—and will intuitively understand the process going on. You can build Find processes generally in two ways, each of which is covered in the following sections.
Dedicated Find Mode Layouts
The first process is perhaps the simplest. Create a separate layout and populate it with all the appropriate fields specific to the table in which a find is to be performed. Take care to place primary related fields on these layouts: Using the book example again, you’d place a book title from a primary-key-to-foreign-key relationship between the Book and the Author tables. The find result would then properly return authors who wrote books—any books, not just the most current—that matched the find criteria.
You can rely on users navigating to these find layouts themselves, along with entering Find mode and performing finds, or you can script the process. The scripted process would involve a button on your standard layouts to take the user to the special Find layout and enter Find mode. A second button on the Find layout itself would perform the request and return the user to the original layout and Browse mode.
This is a great way to give your users an intuitive process and shield them from unpredictable results. It’s also a nice way to reduce the sheer volume of fields from which they have to choose in Find mode.
Script-Driven Finds
A more complex Find routine replaces the fields in the preceding example with global fields. Providing a dedicated Find layout will likely be something you might want to deliver in Browse mode. Instead of having users work with the related fields themselves (which in Browse mode would display actual data and could potentially pose a problem if users didn’t realize they had access to actual data), you can control access and the entire process using a script, and offer users empty global fields for entering find criteria.
This is a labor-intensive approach, and it relies on heavy scripting. As in the example in the preceding section, you have to bring users to the Find layout. This time, leave them in Browse mode. After their find criteria are entered, they have to click a Find button that then takes the system into Find mode, populates and performs the find request by using Set Field script steps, and then returns the user to some proper result layout.
The difficulty here lies in replicating all the Find functionalities: inserting omit requests, extending found sets, constraining found sets, and working with multiple requests. We recommend using this technique only in rare cases when you want to fully control the user experience.
Troubleshooting
Pop-up Window Issues on a Windows PC
Pop-up windows don’t appear in front of the current window when the current window is maximized.
On the Windows platform, when a window is maximized to fill the application window, no other windows can also be visible on the screen. That is, only a single window can be maximized, and it must be the foreground window. This means that if you try to pop up a window in front of a maximized window, the background window cannot remain maximized. It instead reverts to its reduced state.
If you plan to build a user interface that makes use of multiple windows, be aware of this potential pitfall. It would be better in such cases never to have any windows maximized, even though this means you have to work within a reduced space. Users can still manually maximize a window, so test your routines thoroughly to see what effect this action would have. You’ll likely need to add some control routines like Adjust Window [Resize to Fit] to your navigation scripts to get the windows back to the size at which you intend them to be viewed.
Creating New Windows Loses My Found Sets
Whenever I create a new window, all the found sets of the nonvisible layouts are reset to show all records. What causes this behavior?
When a new window is created, either manually from the Window, New Window menu command or via script, it inherits many characteristics of the currently active window. Specifically, it keeps the same size (except when opened via script and specified otherwise), active layout, found set, sort order, and active record. To all appearances, it’s as if it’s an exact duplicate of the currently active window.
In fact, only the settings of the active layout are retained when a new window is created. All layouts that are not visible (except those tied to the same table occurrence as the active layout) lose any sense of the found set, active record, and sort order. All records are displayed, unsorted, and the first record in the table is the active record.
Incomplete Highlighting Rectangle
My row highlight is showing in its container field, but it doesn’t fill the entire portal row well. Where should I first look to address this problem?
If you place an image in a container field, and then have a calculation display the contents of that container field in a portal row, even when Maintain Original Proportions is enabled, your rectangle might show whitespace on either side. This is further complicated if you are trying to put something more complex than just a colored rectangle in the highlight field. FileMaker’s resizing of images can be unpredictable at times. The best way around this situation in many cases is simply to make the image larger than you need it to be and set the graphic format to Crop.
Omit Re-created
I am trying to create a scripted find process so that I can keep the status area hidden, but the Omit check box is found only in the status area. What’s a technique for offering the same functionality from a script?
Most of the status area functions are fairly straightforward to reproduce in a script: next record, previous record, switch mode, displays for record X of Y, sorting state, and so on. There’s one that’s not so obvious, though: the Omit check box in Find mode.
A scripted Find mode often takes users into Find mode and pauses the script in question (disallowing abort). The system then waits in a paused state for the user to click a button (often labeled something like Find, Continue, or Search). After the button is clicked, the script continues by utilizing the Perform Find script step. An alternative to this is to have users enter find criteria into global fields and to manage populating find requests programmatically.
It would be a no-brainer to add a check box to a layout, call it omit_flag, and test for a value in it when you’ve scripted a find routine. But here’s the rub: If you’re actually in Find mode, in a paused state as just described, what happens to that flag if you perform a find? That’s right—it will be included in the find request itself and FileMaker will look for records in which the omit flag equals 1.
The easiest way to deal with this is simply to make the check box a Boolean calculation with an auto-entry setting of yes or 1 (whatever the value list controlling your check box is set to). In data terms, it serves as a constant, but in Find mode it does not affect the outcome of a Find request; it is always valid for all records. As such, you can use it as a variable to check against in your Perform Find steps without having to worry about clearing it from your Find requests. You still have to manage the process of what to do with the flag if your users enable it, but at least the user interface works as they (and you) would expect.
Modal Dialog Dangers
What are the downfalls of using the Modal Dialog technique to control what data gets posted to my solution?
Using the modal dialog technique described in this chapter isn’t a foolproof way to address atomicity in FileMaker Pro.
![]() Atomicity specifies that a transaction must complete either in its entirety or not at all. For more information on atomicity and multiuser development, see Chapter 11, p. 351.
Atomicity specifies that a transaction must complete either in its entirety or not at all. For more information on atomicity and multiuser development, see Chapter 11, p. 351.
Users can close FileMaker Pro anytime they want. Depending on what assumptions you’ve made in your development and the scripts leading to opening such a dialog, your system might be left in a less-than-optimal state. We encourage you to create flags for when pop-up windows are opened and then confirm that they’re then closed. In cases when this doesn’t occur, you might create an error message or some other graceful way to alert you to this fact.
FileMaker Extra: Recursive Scripts
Chapter 15, “Advanced Calculation Techniques,” discusses how you could make custom functions recursive by including calls to themselves within their formulas. In a similar manner, you can use script parameters to create recursive scripts. Although this isn’t something you need to do on a daily basis, there are some interesting applications for recursive scripts.
A recursive script is one that calls itself repeatedly until some exit condition is satisfied. Each time the script calls itself as a subscript, it passes a script parameter that can be used as part of an exit condition test. In many ways, recursive scripts are quite similar to looping scripts, and many of the tasks you can accomplish with one can be done as easily by the other. As an example of a recursive script, consider this Recursive Add script:

This script adds 100 new records to the current table. It’s first called without a script parameter so, the first time through, the script calls itself as a subscript, passing a parameter of 1. The parameter increments each subsequent time through, until eventually the exit criteria (Get (ScriptParameter) >= 100) is met.
If there are any steps in the script after the recursive subscript call, these are all executed, from the inside, out, after the exit criteria has been met. Try to predict what would happen if you added the following steps to the end of the preceding script:
Beep
Show Custom Dialog ["The parameter is:" ; Get (ScriptParameter)]
The 100 records would be created exactly as they were originally. But after they were all created, you’d hear a beep and see a message telling you that the script parameter value is 99. After clicking OK, you’d then hear another beep and a message telling you that the parameter is 98. This would continue for some time, and eventually the last message you’d see would be that the parameter is empty, which, of course, was the condition on the very first trip through the script.
As a final example of recursive scripting, consider the following script, which flags duplicates among a set of records. Assume that the set contains a list of names, which has been sorted by name before this script is called:
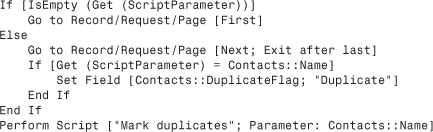
During each iteration through the script, the current record’s name is compared against the value of the script parameter, which was set to the value of the previous record’s name. The exit condition here is the Exit after last option on the fourth line; the script continues through the set of records, stopping only when there’s no next record to go to.