
Chapter 20. Converting Systems from Previous Versions of FileMaker Pro
In this chapter
FileMaker Extra: Converting Web-Enabled Databases
Migration Choices
You’ve likely heard, read, or discovered on your own that the 2004 release of FileMaker Pro 7 brought tremendous changes to the FileMaker product line. The last time the product experienced such a fundamental change was in moving from version 2.1 to 3.0. If you were working with FileMaker back then (way back in 1995), you probably remember that a lot of unlearning, relearning, converting, and rebuilding had to take place. For the first time, in FileMaker Pro 3.0, the product contained such important tools as relationships and portals. It took quite a while for developers proficient with FileMaker 2.1 to fully understand relational database concepts and the benefits that portals and related fields offered over repeating fields and lookups. It was possible to convert solutions from 2.1 to 3.0 without loss of functionality, but to take advantage of the powerful new features required either extensive redevelopment or, in some cases, rebuilding the files from scratch.
FileMaker 7 represented a revolutionary shift from its predecessors. The ability to place multiple tables in a single file, the addition of an entirely new security model, the ability to create relationships based on multiple match fields, the ability to have multiple windows open in a file, server-based web publishing tools, and custom functions are some of the biggest changes. But there were myriad subtle changes as well, ranging from being able to add comments to fields and calculation formulas to changes in how FileMaker interprets alphabetic characters placed in number fields.
Because of the sweeping changes, conversion of existing solutions into FileMaker Pro 7, 8, or 9 can become a complex issue. There are circumstances where it will be a better idea to rewrite a solution completely rather than convert it; even if you do convert, you might have to do considerable development work and testing before the converted solution can be deployed. In the end, the effort to do either is well worthwhile. This chapter helps you identify the migration strategy that makes the best sense for your solution and how to go about it.
Since the previous edition of this book, the recommendations for migration choices have been simplified. If you are running a database that uses a pre–FileMaker 7 version, you are running old and unsupported software. This software might well run for years to come, but it is not being updated and you could find yourself in an infinite loop where you cannot upgrade the operating system because the database will not run on it and vice versa. If you are running pre–FileMaker 7 software, your only serious choice is whether to rewrite the system or use the built-in converter to automatically convert it. Because the automatic conversion is so simple, it is a logical first step to use that and see what you have. You can examine the converted database and estimate the amount of manual fixing up required. Because the converted database will normally run perfectly well on the current version of FileMaker, you might choose to make improvements gradually as outlined in this chapter rather than to rewrite the database from scratch.
The major architectural format change is from pre-FileMaker 7 to FileMaker 7. Because FileMaker 8 and FileMaker 9 use the same format, this chapter applies primarily to any pre-FileMaker 7 conversions. FileMaker 7, 8, and 9 can all use the same files (as can FileMaker Server 7, 8, and 9). If for some reason you are still using FileMaker 7 or FileMaker 8, you can use this chapter to convert pre-FileMaker 7 databases to those versions. Although the chapter refers to converting to FileMaker 9, the instructions are basically the same. Although the databases are the same, a few features (such as the Web Viewer, introduced in FileMaker 8.5) have changed in these versions, but the databases and their functionality are the same. FileMaker simply works around features such as the Web Viewer if you open databases that use them in FileMaker 7 or FileMaker 8.
Converting Files
The actual conversion of files from previous versions of FileMaker is a very simple task. Even if you have decided to do a total rewrite of a solution, you will end up performing a conversion so that you can salvage scripts and layouts. You’ll probably also perform another conversion to move the data to the new version. From here on out, though, we’re going to assume that you’ve decided to migrate your solution via conversion and will focus on the process and methods to accomplish this.
FileMaker 9 can directly convert files from versions 3, 4, 5, and 6. If you have files created in FileMaker Pro 1 or 2, you need to convert them first to version 3 or higher before converting to 9. (FileMaker 7, 8, and 9 share a common file format and no conversion is necessary to move among them.)
It’s quite likely—and even expected—that you will have to perform multiple conversions on a solution during the course of migration. Typically, the first conversion is a throwaway that you’ll use for research and experimentation. We usually refer to this as the alpha conversion. We’ve found that each solution behaves a bit differently after conversion, and rather than theorizing and guessing what features will or won’t convert well, just convert them and do some poking around. You might quickly discover you need to disable startup scripts that check for the presence of plug-ins or that you can’t open the solution because you don’t remember the case of your passwords. (They’re case sensitive starting in FileMaker 7 but not in previous versions.) If necessary, make minor adjustments to the source files and make a new alpha conversion set. The goal at this stage is simply to have a set of FileMaker 9 files that you can open and dissect. These files will never see the light of day, so experiment freely.
Later in this chapter, we’ll discuss some preconversion tasks that can make the migration process go more smoothly. When you complete these tasks and are ready to proceed, you’ll convert your files again, this time creating what we call the beta conversion set. These files will eventually be deployed as your new solution. Some solutions require significant post-conversion testing and tweaking. It’s important that you make frequent backups of your beta files during this process so that if you make mistakes, you can roll back to a stable version without having to reconvert the files.
The types of mistakes that can necessitate a rollback include things such as deleting file references before you respecify any objects that use them and removing tables or table occurrences from your files without accounting for the impact on scripts or layouts.
In cases where the testing and other post-conversion work takes days or weeks to perform, you are likely to need to do another conversion of your original system so that you can import fresh data before deploying the converted solution.
Be sure to take the old files offline during this conversion and data migration to prevent users from making additional modifications.
For this final conversion, the only thing you care about is the raw data; the solution doesn’t need to function beyond letting you open the files and show all records. You can skip converting the indexes for this conversion; they won’t be necessary for the final transfer.
It’s also possible merely to export data from your old system and import into your new one. There’s no way to import directly from the old files into FileMaker 9, though. The main drawback with exporting and importing is that you cannot transfer any data in container fields. You also lose text styling information applied to bits of text within individual fields. For these reasons, we prefer to do the final import from a freshly converted set of files.
Converting Single-File Solutions
There are a few ways to go about converting files. If you have a multifile system, it’s important that you convert all the files at the same time so that links between the files are properly preserved. The next section covers the method for converting multifile solutions.
A single-file solution is one that has no links to other FileMaker databases, whether those links are relationships, external scripts, imports, or value lists. You can convert such files simply by launching FileMaker 9, choosing File, Open, and selecting your old file. When you do so, you see a dialog asking whether you want to rename the old file.
There’s no particular need to rename the old file. During conversion, the old file is unaltered and is still fully functional; a brand new, FileMaker 9 file is created for you. You have the opportunity to name the converted file and specify a location for it as well.
If your file contains a large amount of data, it might take considerable time to convert. For the alpha conversion, it’s helpful to have all the data, but for the beta conversion, consider creating a clone of your file. This speeds up both your conversion and your post-conversion development work. Memory is also a consideration if you’re converting a large system (in the 200MB or more range). We recommend multiple gigabytes of RAM for large conversions.
Converting Relational Solutions
When you convert a multifile relational solution, it’s important that you convert all the files at once. If you don’t, and instead use the method outlined in the previous section to convert each file individually, FileMaker forces you to wade through potentially numerous File Not Found messages as each file converts and opens. In addition, if you don’t specify the correct filename for the converted files by removing the Converted suffix appended by default, you might have a hard time fixing your file references later.
To convert a set of files all at once, simply select them all and drag them on top of the FileMaker 9 application icon. You can achieve the same thing by choosing multiple files from the File, Open dialog. Hold down the (![]() ) [Ctrl] key to do this.
) [Ctrl] key to do this.
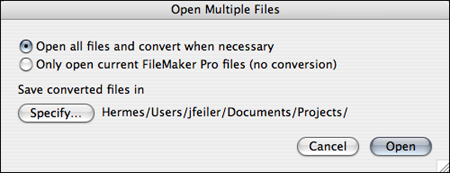
FileMaker does not prompt you to rename your old files or to name your new ones. Instead, it presents you with the dialog shown in Figure 20.1, in which you’re asked to select a directory in which to place the converted files. We recommend setting up a new directory for each set of converted files; simply placing them in the same folder where your old files live becomes a bit confusing, particularly if you’re performing multiple conversions.
Figure 20.1. When converting multiple files, your new files receive the same names as the old ones. You aren’t prompted for filenames the same way you are when converting single files.
As with single-file conversion, your old files are unaltered during conversion and you can still use them. Nonetheless, it’s certainly good practice to make sure that you have backups of your old system in case of an accident such as deleting or renaming the wrong files.
For each file in your old solution, the conversion routine creates a new FileMaker 9 file, named the same as the old file but with an .fp7 file extension (this file extension is common to FileMaker 7, 8, and 9). Each converted file contains a single table, named the same as the file. All the relationships turn into external table occurrences on your Relationships Graph (with the exception of self-relationships, which are created as local table occurrences).
 If your databases don’t open correctly immediately after conversion, see the “Disabling Startup Scripts” in the “Troubleshooting” section at the end of this chapter.
Preconversion Tasks
You can and should do a number of things before converting older solutions to FileMaker 9. Your preconversion tasks vary somewhat from solution to solution, but some categories of tasks are still common to most solutions.
Our comments here are aimed at people who are converting older relational (multifile) systems of some complexity. The purpose of doing any preconversion work at all is to make the post-conversion work go more smoothly; for single-file and simple relational solutions, you might not need to have rigorous conversion plans like this in place.
Document Your Solution
The more familiar you are with a solution, the better your conversion will go. Even if you’re the sole creator of a system, having up-to-date documentation comes in handy during the conversion process. We recommend having at least the following items:
- An ER diagram— If you’ve never taken the time to formally create an ER diagram of your system, now’s the time. For a refresher on creating ER diagrams, please see Chapter 5, “Relational Database Design.”
- Printouts of field definitions, scripts, and layouts— You might balk at the thought of actually printing out and organizing all these documents, and some people might indeed find that creating PDFs rather than printing works well for them. Many subtle changes take place during conversion, and it’s very helpful when looking at a script or calculation formula to be able to compare it with the original. One nice thing about hard copies, of course, is that you can annotate them as you go. You might, for instance, check off buttons on screenshots of layouts as you test them, noting whether everything worked as planned or needs post-conversion attention. The printouts become both your testing plan and your post-conversion audit trail.
- An access privilege matrix— This is simply an overview of the privilege settings in your current files. Create it in a database, spreadsheet, or text document—it really doesn’t matter.
If you use FileMaker Pro Advanced, you might want to create a database design report (DDR) of your old solution as part of your documentation process.
![]() For more information on third-party documentation tools, see “Document Your Solution,” p. 586.
For more information on third-party documentation tools, see “Document Your Solution,” p. 586.
Fix File References and External Data Sources
Whenever you link one FileMaker file with another, FileMaker uses a file reference stored in File A to locate File B. Beginning in FileMaker 9, file references are just one example of external data sources. The operations that might require file references include defining relationships, performing external scripts, creating value lists based on the contents of fields in another file, performing an Open script step, and scripting an import from another file.
Absolute Paths
To understand how that hornets’ nest was created and why it can be difficult to untangle, you must understand how FileMaker managed file references in previous versions of the product. Prior to FileMaker Pro 5.5, all file references were stored as absolute paths: When you define a link from File A to File B, FileMaker remembers the full path to File B. On Mac OS X, that might look like /Macintosh HD/Documents/myDatabases/File B. On Windows, the full path could be something like C:/myDatabases/File B. If the link were to a hosted file, the link might include the IP address of the hosted file, as in 192.168.100.87/File B. If the hosted file were on the same subnet as the person defining the link, the IP address wouldn’t be stored; an asterisk would appear in the file reference instead.
The main problem with absolute references is that they tend to cause problems when you move files from one machine to another or rename files or folders. In those cases, FileMaker would pop up a message to the user saying, in effect, “I can’t find File B...where is it?” You would re-establish the reference by pointing to the moved or renamed file. But rather than replace the previous reference, FileMaker would store the new path as an additional search path for the given link. If you have a file that was developed over the course of many years and/or on many different machines, you might have dozens of absolute paths stored in it. If you ever had problems in previous versions where FileMaker would seemingly irrationally open the wrong copy of a given file, it was likely because there was an obsolete file reference higher up in the search order.
Another problem with file references in previous versions of FileMaker is that different linking operations might produce entirely new references. For instance, say that you create a relationship from File A to File B while both files are open on your local computer. A file reference containing the path to File B would be stored. Then you move the files to a server where FileMaker Server hosts them, and from your desktop you create a script in File A that calls a subscript in File B. An entirely new file reference is created for the external script call.
Relative Paths
FileMaker Pro 5.5 introduced the option to store only a relative path when creating links between files. This went a long way to solve the problems caused by renaming or moving files. Rather than locate File B with a full path reference, a relative reference simply indicates the path to get to File B from File A. For example, the relative path might be ../File B, which indicates that FileMaker should look for File B in File A’s parent directory.
Conversion of File References
So what happens to all the obsolete and redundant file references during conversion? The conversion routine tries to do some consolidating and eliminating of file references that are no longer needed, but in many cases, you’ll still end up with a bit of a mess.
There are several potential problems that you may experience using a converted solution with file reference problems. The first is speed: FileMaker looks for files in the locations specified by the file references, in the order in which they appear. A complex solution with obsolete file references could take many times longer to open than one with clean file references. (The extra time is taken up as FileMaker scans fruitlessly through the obsolete references trying to find the file.)
After conversion, you can, of course, manually change all the obsolete paths to updated, relative paths. In a complex solution, this might require manually editing hundreds of references. After you finish, you’ll have solved the problem of obsolete references but not that of redundant references.
The problem with redundant references is maintenance. If you have five file references that all point to the same file, every time you set up a link to a file, you have to choose which of those five references to use. If you ever need to update the reference, you need to update it in five places. That might be an acceptable short-term solution, but eventually, you’ll want to eliminate the redundant file references.
Simply deleting redundant file references can have potentially disastrous consequences. Every link that uses the reference, be it an external table occurrence, a value list, or an external script call, will be broken and will need manual repair. The proper way to remove redundant file references is as follows:
- Pick one of the set that is to survive the consolidation.
- Rename all the other file references in the set so that they include an easily identifiable text phrase. DELETE ME works well.
- Run a DDR using FileMaker Pro 9 Advanced.
- Open the DDR in a text editor or word processor and search for your text phrase to find all the objects that use a redundant file reference.
- In your converted files, manually change the file reference used by these objects to the canonical reference for that set.
- Run a new DDR report to make sure that you haven’t missed any references.
- Delete the file references that are no longer needed.
Be sure to make a backup of your system before you start playing with file references; a small mistake, such as deleting the wrong one, can have far-reaching consequences.
Do Some Housekeeping
In addition to file references, you can avoid other potential post-conversion problems if you do a bit of preconversion work. You can actually identify much preconversion work by examining the alpha conversion files. You might, for instance, discover that you have objects with illegal names, which are placed in between curly brackets during conversion. These can be changed in the original system so that by the time you’re ready to do your beta conversion, they’re no longer an issue. By doing as much work as possible in the pre-beta conversion stage, you reduce the amount of time and work required to get your converted files ready for production.
If there are scripts, layouts, relationships, passwords, value lists, or fields that you know are no longer used or needed, try to eliminate these before conversion. If there has been case inconsistency in the entry of passwords in your current system, take the time to standardize them. These efforts will be rewarded by shorter conversion time and having less to test after conversion. Any other housekeeping in the original files can only be beneficial, including organizing scripts, editing object names, and archiving old data.
Post-Conversion Tasks
As discussed in the previous sections, you can avoid many potential post-conversion problems by doing some preconversion work on your old system. However, a number of tasks can be done only post-conversion.
The actual tasks vary from system to system; many of the tasks listed here might not be applicable to your particular solution.
You should begin a list of post-conversion tasks during your exploration of the alpha files. You’ll spot problems and potential areas of improvement. Anything that can’t easily be fixed through preconversion work should go on your post-conversion task list. Keep in mind that you’ll end up destroying the alpha files, so don’t spend too much time or effort fixing problems. Some fixes are necessary just so that you can continue your exploration; you might opt to do other fixes just so that you can test the results.
To know what tasks you have to do after conversion, you must understand what actually happens to your files during conversion. The following sections look at five different aspects of your files: security, relationships, scripts, fields, and data. For each, we discuss what happens during conversion and what potential post-conversion tasks you need to perform.
One vital post-conversion task that goes almost without saying is testing. Before deploying a converted solution, it’s vital that you do sufficient testing to identify any problems.
If your databases don’t open correctly immediately after conversion, see “Disabling Startup Scripts” in the “Troubleshooting” section at the end of this chapter.
Security
Depending on whether and how passwords and groups were set up in your solution, you might have some post-conversion work to do involving security. During conversion, passwords in your previous system turn into accounts, and groups turn into privilege sets. Accounts in FileMaker 9, of course, have both an account name and a password. For each account in a converted system, both the account name and password will be the same as the old password. So, a password of test123 in your old system turns into an account named test123 with a password of test123.
Post-conversion, you should change all the account names to something other than their default conversion value. Account names are visible on screen during login, so if you don’t do this it will be very easy for people to discover their co-workers’ passwords. Be sure that you distribute the new account information prior to deployment.
The conversion of groups into privilege sets is more complex than the conversion of passwords into accounts. The number of privilege sets might be greater or fewer than the number of groups in the old system. The following list explains the rules for determining how groups relate to privilege sets:
- If there are multiple groups with identical settings, only the first group is converted. FileMaker discards the others.
- If there are passwords not assigned to any groups, FileMaker creates new privilege sets based on the properties of the passwords. The first one is named Privilege Set, the second Privilege Set 2, and so on. Any passwords with the same properties are assigned to the same privilege set.
- Any groups not assigned to any passwords (other than master passwords) are not converted into privilege sets.
- If a password is assigned to multiple groups that have different access privileges, a new privilege set is created that has the privileges of both groups. The name of the privilege set is a combination of the names of the groups used for its formation. For instance, if a password foo was associated with groups bar and baz, each of which had different access rights, the new account named foo would be associated with a privilege set named bar/baz.
- Master passwords are associated with the [Full Access] privilege set.
Calls to the Status(CurrentGroups) function are turned into calls to the Get (PrivilegeSetName) function during conversion. However, if the older function call tests for the presence of literal text strings, you might have to change the strings to the new privilege set names; they aren’t modified at all during conversion. For instance, if you used PatternCount (Status (CurrentGroups), ("masterGroup")) in a script or calculation formula, after conversion you have to manually edit this to be Get (PrivilegeSetName) = "[Full Access]". Because accounts can be associated with only one privilege set, whereas passwords can be associated with multiple groups, the PatternCount function is no longer needed.
Default Passwords
If you specified a default password in the document preferences in your old file, the converted solution has a default account specified in the File Options. As in previous versions of FileMaker Pro, you can force the account/password dialog to display by holding down the (Option) [Shift] key as the file opens.
(no password)
Older versions of FileMaker allowed you to specify a blank password as a valid way of gaining access to a file. The password list represents this as (no password). During conversion, a file with a blank password has the Guest account activated. It is associated with whatever privilege set is appropriate. When the Guest account is active, in the login dialog, users have the option of selecting the Guest Account radio button. It is grayed out if that account isn’t active.
Files with No Password
If you convert a file that has absolutely no passwords in it, the converted file has an account named Admin with a blank password. It is assigned the [Full Access] privilege set and is set as the default login under File, File Options. A guest account is created as well, but it is inactive. This is the default behavior when you create a new database in FileMaker Pro 9.
Extended Privileges
If a file had the Multi-User or Multi-User (Hidden) option set prior to conversion, all the privilege sets will have the fmapp extended privilege enabled when it is converted to. This is required for accounts to be able to open files hosted by FileMaker Server or shared peer-to-peer. You can certainly enable or disable this extended privilege after conversion as fits your deployment needs.
Relationships
During conversion, relationships turn into table occurrences. For instance, if you have a relationship from File A to File B called “File B by someKey,” when you convert these files, the Relationships Graph for File A will have an external table occurrence called “File B by someKey.” The number of table occurrences in the converted file equals the number of relationships in the old file. The converted solution retains settings from the relationship, such as cascading delete and the capability to add records through the relationship.
The Relationships Graph in a converted solution is always in a hub-and-spoke configuration. The hub is a table occurrence associated with the file’s base table; it has the same name as the table (and the file itself). All the other table occurrences connect to the hub as spokes connect to a wheel. All the layouts in the file are associated with the hub table occurrence, which means that it is always the context for all scripts, calculations, imports, and exports.
Remember that each file in a relational solution turns into a file in FileMaker 9 during conversion. Each has its own hub-and-spoke Relationships Graph.
If you plan to do any future development in your converted system, you’ll likely want to spend some time organizing the Relationships Graphs. This might simply mean repositioning and resizing table occurrences to make particular relationships easier to locate. You might also consider using color as a means of organizing the graphs, or using the new Notes feature in FileMaker 9 to add descriptive notes to the Graph. Finally, depending on what sort of conventions you used to name your relationships, you might want to change the names of the table occurrences to better reflect their purposes.
Down the road, consider making some more significant changes to the converted Relationships Graph. Many relationships from previous versions of FileMaker either could be implemented differently or are not required in FileMaker 9. For instance, many developers used relationships based on constants as a means for setting and retrieving global field values from other files. In FileMaker 9, fields with global storage can be accessed from any table occurrence, even ones disconnected from the current context. Likewise, relationships built with multiline and/or concatenated keys can be built in FileMaker 9 with join types other than equi-joins and/or multiple match criteria. These aren’t changes you must make prior to deployment, but they make the converted solution easier to maintain and extend in the long run.
Scripts
Many script steps in FileMaker 9 have slightly different parameters or behavior than in previous versions and, consequently, you have to be vigilant in regard to a few potential post-conversion issues. In some cases, the conversion routine actually adds steps to your scripts as a way to compensate for functional changes. Some of the changes, and the issues that arise from them, include the following:
- The Go To Layout script step no longer has an option to Refresh Window. If you had checked this option, a Refresh Window script step is inserted during a conversion, directly after the Go To Layout step.
- The Refresh Window script step no longer has an option to Bring to Front. A Select Window [Current Window] step is added to scripts that had this option specified. This can cause some extra screen flashing in some instances, so you may need to remove Select Window steps to achieve the behavior you want.
- The Perform Script step no longer has the option not to perform subscripts. This feature was infrequently used, so chances are that you won’t miss it. In FileMaker 8, subscripts are always run. The conversion routine does nothing to account for this, nor does anything in the conversion log alert you of any Perform Script steps where the subscripts button was unchecked. If this was a feature you relied on in your solution, you might have to rework some of your scripts during post-conversion testing.
- In versions of FileMaker prior to 7, when an external script was called as the last step of a script, the external file’s window would become active, having the effect of leaving the user in the other file. The same holds true of Go to Related Record steps. That’s no longer the case. To accommodate this change, the conversion routine inserts a Select Window step following certain Perform Script and Go to Related Records steps. If a script ends with a call to an external subscript or with a Go to Related Records step, the conversion routine adds Select Window [Name: “NameOfOtherFile”]. When these steps are not found at the end of a script, Select Window [CurrentWindow] is added. The selection of another file’s window, however, can be a bit fragile because the name of the window is hard-coded as the filename itself. If no window by that name exists, control does not pass properly to the external file. You might have to edit the Select Window steps—or perhaps even delete some of them—for your script to function as it did previously. Having the wrong window in the foreground is probably the most frequent (and happily, most conspicuous) problem you’ll face.
- There is no Show Message script step in FileMaker 9. During conversion, it changes into a Show Custom Dialog step. The default title of the dialog is simply Message, and the message itself is the text of your old script. You need to make no post-conversion changes to these; simply be aware of the change that occurs.
- The settings stored on the Windows operating system for Print and Print Setup script steps might not convert properly. Be sure to test and, if necessary, respecify these print settings after conversion. It might help to go back to your previous solution and take screen shots of the settings stored for particular scripts so that you can easily restore them post-conversion.
- The Open File script step in FileMaker 9 always activates the file being opened. In earlier versions, the Open script step would do this only if it were the last step in the script. Any additional steps after the Open step would cause the calling file to remain active. For example, assume that you have a script in File A that has two steps: Open [“File B”] and Exit Record/Requests. When performed in a pre–FileMaker 7 Pro version of FileMaker Pro, File A remains the active file throughout the script. To retain this behavior, you have to add a Select Window [Current Window] after the Open File script step.
- FileMaker now requires much greater attention to the opening and committing (saving) of records than previous versions did. Consequently, some of your scripts might require some post-conversion tweaking so that they behave as desired. For instance, if a script ends with a step that modifies a record, such as a Set Field, the record isn’t committed when the script ends. This might cause users not to see refreshed data until they manually commit the record. If the script in question is called as a subscript, there might be other unintended behaviors because the edited record is still locked. The fix for this is to add a Commit Record/Request step at the end of any script that modifies data.
Because Exit Record/Request converts into Commit Record/Request, you can also fix many of these problems as pre-conversion tasks.
- In older versions of FileMaker, the Go to Field step generated an error if the record was locked, so it was common to use this step as a test in scripts that has to be able to modify records. In FileMaker 9, simply entering a field no longer attempts to place a lock on a record, so it doesn’t generate errors that you can rely on. You should therefore find and change any Go to Field step that serves this need into an Open Record/Request step (which does explicitly try to lock the record).
- FileMaker 9 handles summary field sorting differently than older versions of FileMaker did. Instead of being able to specify only a single summary field as one of your sort criteria, in FileMaker 9 you can re-sort any number of sort criteria based on summary fields. During conversion, FileMaker 9 alters scripts that store sorts that include summary fields so that the summary field is attached to the last nonsummary field in the sort criteria. For instance, assume that you have a summary report of customers and invoices where you sort by CustomerName, and then by InvoiceDate, and finally by TotalInvoiced (a summary field). Your report would not list customers alphabetically but rather from lowest to highest, based on the total you invoiced. After conversion, your script’s sort would have two criteria: CustomerName and InvoiceDate. The latter would be reordered by TotalInvoiced. For your report to display the way it did previously, you would have to manually adjust the sort criteria so that the TotalInvoiced summary is applied to the CustomerName field rather than to InvoiceDate.
- In older versions of FileMaker Pro, after sorting a set of records, the active record was always the first one in the sorted set. In FileMaker 9, the active record remains whatever it was prior to sorting. Because this could have adverse impact on scripts that expect to be on the first record after a sort, a Go To Record/Request/Page[First] step is automatically added after every Sort script step during conversion.
- If you’ve specified scripts to execute when a file opens or closes, these preferences are retained in the converted file. Be aware, however, that they might trigger at slightly different times in FileMaker 8. Startup scripts execute the first time that a window for a particular file becomes visible. For instance, if File A has relationships to File B, when File A opens, File B appears in the list of hidden files in parentheses, meaning that there are no windows for that file, hidden or active. If you were to select that file from the list, the startup script for that file would run. Shutdown scripts run when the last window for a given file is closed. The Close File script step closes any windows for that particular file, thereby triggering the shutdown script. In both cases, however, if files that have relationships to the file you just closed are still open, the filename still appears in the list of hidden windows in parentheses. Therefore, a file is not truly closed until all files that reference it are closed as well.
Fields and Formulas
There are some subtle (and some not so subtle) differences regarding fields and formulas in FileMaker 9. As with scripts, you’ll find that the conversion routine does a good job at heading off many problems by modifying your code a bit. Still, a few things can go awry in a converted solution that you’ll have to deal with during post-conversion testing.
- For the most part, conversion to FileMaker Pro 9 behaves the same as conversion to FileMaker Pro 7, although at least one bug in conversion was fixed after the release of FileMaker 7. By now, so many people have converted so many files that you don’t have to worry about this.
- Beginning with FileMaker 7, there are new reserved words that didn’t have the same significance in previous versions. For instance, Bold and Italic are potential parameters in the new
TextStyleAddandTextStyleRemovefunctions; you would be warned in FileMaker 9 that these are illegal filenames. If you used any reserved words or illegal names in your old system, anytime they were used in calculation formulas they are enclosed, on conversion, with the symbols ${ } to avoid confusion with the reserved words. A field named Bold in your previous solution would appear as ${Bold} in formulas in FileMaker 9. The conversion log also lists this as a poor field name. - FileMaker now uses a new shortcut evaluation method to speed up the processing of calculation formulas. This can cause problems in a converted system if you were relying on every portion of a formula being evaluated. As an example, assume that you have the formula If (Length(myField) > 10 and Left (myField, 1) = “X”, 1, 2). When FileMaker evaluates the first part of the test, Length(myField) > 10, if that does not return True, FileMaker doesn’t bother evaluating the other half of the test. It immediately knows that the False result must be returned. In older versions of FileMaker, external function calls to plug-ins were often placed in innocuous places in functions; it’s possible they might not be invoked after conversion. For instance, in the formula If ( 1 or External (“myPlugin”, “someParameter”), 1, 2), the plug-in would never be invoked because the first part of the test is sufficient to establish which value should be returned.
- The
Todayfunction is no longer supported. During conversion, references toTodayin scripts and validation checks are converted intoGet (CurrentDate). If it’s used in stored calculation fields, a new date field called Today is added to your database; it is set to auto-enter the creation date. Additionally, a new script called Update Today Field is added to the file. This script is set as the file’s startup script, or, if it already has a startup script, that script is modified so that it calls the Update Today Field script as its first step. - The results returned by
DatabaseNamesandStatus(CurrentFileName)included file extensions in previous versions of FileMaker Pro. Now,DatabaseNamesandGet (FileName)do not return file extensions. You might have to edit scripts and fields that presume the presence of a file extension. For instance, you might have checked to see whether a file foo.fp5 was open by using the formula PatternCount (DatabaseNames, “foo.fp5”). Now this formula always returns 0. Be aware also that no existing data is affected during conversion. If you have a field that auto-enters the results ofStatus(CurrentFileName)into the field (or even a stored calculation with the same formula), after conversion all your data will still contain a file extension, but any new data you create won’t. This sort of inconsistency should be avoided; it might have adverse consequences down the road. - The indexing rules have changed slightly. For instance, nonalphanumeric characters weren’t indexed in previous versions but are in FileMaker Pro 7 and later. One of the consequences of the new indexing rules is that hyphens are considered word breaks for the first time. For instance, WordCount (“testA-testB”) returns
2in FileMaker 9 but only 1 in versions 6 and earlier. Some text parsing routines might have to be changed to account for this. - Alphabetic characters, spaces, colons, and plus signs are not acceptable separators in date fields in FileMaker 9. If your older files use any of these as separators, your converted dates will be invalid. You can test for invalid dates after conversion by doing a find for ? in date fields. You can clean up invalid dates using a calculated Replace that uses the Substitute function. Similarly, if you have fields involved in relationships and the field data contain trailing spaces, the relationships might no longer resolve correctly. For example, a record in Table A that contained the value
"123"used to find"123 "as a related record, but it won’t in FileMaker 9 until the trailing space is removed. - Versions of FileMaker prior to 7 interpret text strings placed in a number field one of three ways. If the text string begins with the letters Y or T (representing Yes and True), it is considered to have a value of 1. Text strings beginning with an N or F (representing No and False) are considered to have a value of 0. With any other starting character, the value is considered blank. In FileMaker 9, all text strings are regarded as having no numeric value. Frequently, developers captured Yes/No radio button responses in number fields, knowing they could perform math as if these were 1 and 0. In a converted solution, any formula that relies on this behavior returns incorrect values. You can either edit these formulas so that they explicitly regard Y and T as 1 and N and F as 0, or you can perform a Find/Replace action to modify your legacy data.
- With the exception noted in the previous bullet, older versions of FileMaker Pro ignored text placed in number fields. If, for instance, a Number field called myNum contains a value of
23 skidoo, Length (myNum) returns 2. In FileMaker 9, text functions recognize text characters found in number fields, so this function would return 9. To correct for this, all number fields used as parameters in text functions are wrapped with a GetAsNumber function, which strips out any nonnumeric characters. Don’t be surprised if you see GetAsNumber sprinkled throughout your field definitions after conversion. It might not be needed, but it’s a case of “better safe than sorry.” - The contents of container fields are preserved during conversion, but depending on what platform you do the conversion, you might have to do some post-conversion work before they can be displayed properly cross-platform. In older versions of FileMaker Pro, when the Store Compatible Graphics option was selected in a file’s document preferences, both Windows Metafile and PICT images were stored in a single container field. The Windows Metafile data is not immediately accessible if you use a Mac for the conversion. You can restore it by opening the files on a PC and viewing each record with a container field. If, on the other hand, you use a PC for the conversion, be sure that QuickTime is installed or else the PICT data is not preserved.
If you think you might have issues with container fields, be sure that you test your alpha conversion files on both platforms. If it’s convenient, perform the final conversion on a PC with QuickTime to avoid this issue altogether.
- Review globals with an eye to converting them to variables and script parameters.
- Review conditional formatting in calculations: This can often be handled with the new conditional formatting available in layouts.
- The
Modfunction handles negative numbers differently than older versions did. For example, in older versions,Mod (–10, 3)would return–1, but it returns2in FileMaker 9.
Layouts
Significant changes in layouts for FileMaker 9 make it possible to remove code and improve usability in converted solutions.
- Convert pre-tab layouts to true tab layouts. This will frequently remove large chunks of code and layout design objects.
- Use the new object name attribute and Go To Object script step to explicitly control behavior. Older versions made some assumptions about the objects you were using—the first portal on a layout, for example, was the default.
- Use buttons and scripts to add records to portals; this technique works in all cases. The blank-record-at-bottom method of adding records works only for simple relationships. As a result, you can quickly wind up with two types of interfaces, the distinction between them being a database issue that is not obvious to the user.
Troubleshooting
Disabling Startup Scripts
I’ve converted a solution, but it won’t open properly.
Because of the changes that take place during conversion, there are many reasons your files might not open properly after conversion. The typical cause for this is a startup script that attempts to validate for conditions that no longer are true. For instance, a startup script might check that a certain plug-in is available. If you haven’t installed the plug-in in FileMaker 9, or if the interface to it has changed, your script might not be able to get by the validation check.
Another typical problem in startup scripts is checking to see that some set of related files is open. The DatabaseNames function used to return file extensions of open files but doesn’t do so any more. Validating that foo.fp5 is open, for instance, might cause a startup script to deny entry into the system.
If you experience problems opening a converted solution, try disabling the startup scripts in the preconverted files and try again.
Repointing Table Occurrence References
After conversion, I’ve attempted to consolidate tables from multiple files into a single file, but all the relationships, scripts, and portals get pointed to the wrong fields when I repoint the table occurrence references.
One of the more difficult post-conversion tasks you can attempt is to consolidate tables from multiple files into a single file. In FileMaker 7, you would typically have begun by manually creating a new table in one of your files. The new table would be defined with fields named the same as those in one of your other files, the intention being to consolidate the second file into the first. Among other tasks, you would have to repoint relationships to table occurrences based on the new, consolidated table. On the Relationships Graph, when you repoint table occurrences from the external table to the new internal table, the match fields involved in the relationship might change even if you’ve taken great care to keep all the field names the same.
This happens because the match fields don’t resolve by name, but rather by field ID. Therefore, if you create the fields in a different order, or have ever deleted fields, thereby leaving “holes” in your field IDs, the relationships won’t match up correctly. This also affects portals and scripts that reference fields through the changed table occurrences.
Beginning with FileMaker 8, this type of consolidation is a great deal easier. You can move tables between files in two ways: either by using the Import feature in the Define Database dialog, Tables tab or by copying and pasting tables between files (you’ll need FileMaker Pro 9 Advanced for this). Both of these methods preserve the field IDs from the original file, and all relationships and references continue to work as expected.
After consolidating tables into a single file, be aware that you still have to move all your layouts, scripts, value lists, privilege settings, and data into the new file. None of these is a trivial activity. If consolidation of tables into a single file is one of the goals you hope to achieve from migrating to FileMaker 9, you might be better off rewriting your system.
FileMaker Extra: Converting Web-Enabled Databases
If your existing solutions are web-enabled, you have a few additional concerns when migrating to FileMaker 9. The web capabilities of FileMaker 8 are considerably different from previous versions; your migration plan depends mainly on the technology you used to web-enable your solution.
Instant Web Publishing
No Instant Web Publishing (IWP) configuration options are retained during conversion of a solution from FileMaker 6 or older to FileMaker Pro 7, 8, or 9. IWP is so greatly improved that the older configuration options are irrelevant and unnecessary. Where you were limited to a handful of layouts and themes before, IWP now has a status area that is very similar to that of FileMaker Pro itself, and it allows a user to potentially access any layout in a file. More than 70 script steps are IWP compatible (compared to about a dozen before), making IWP a very powerful and flexible web technology. Even though no IWP settings are preserved during conversion, if you used IWP in your previous solution, you’ll be up and running again within a matter of minutes.
Security in IWP is now handled just as it is for FileMaker users—via accounts and privilege sets—so you can easily create special accounts for web users and restrict them to web-friendly layouts.
![]() See Chapter 25, “Instant Web Publishing,” p. 689, for more information on how to use IWP to web-enable a database.
See Chapter 25, “Instant Web Publishing,” p. 689, for more information on how to use IWP to web-enable a database.
Custom Web Publishing with CDML
CDML (Claris Dynamic Markup Language) is no longer supported. FileMaker has instead focused its CWP efforts on XML/XSLT (Extensible Markup Language/XSL Transformations) and PHP (Hypertext Preprocessor). FileMaker Server 8 Advanced had a CDML-to-XML/XSLT conversion application. Because CDML has not been supported since FileMaker Pro 6, and because PHP has joined XML/XSLT as a second Custom Web Publishing technology, the CDML converter is no longer supported.