
Chapter 9. Getting Started with Scripting
In this chapter
Working with Buttons on Layouts
FileMaker Extra: Creating a Script Library
Scripts in FileMaker Pro
Scripts are sets of stored instructions that specify a series of actions FileMaker should perform when they’re initiated; they’re programs that run within FileMaker Pro solutions. They can be just one command attached to a button, or they can be hundreds of commands long.
Scripts do two important things in FileMaker Pro: They automate internal processes, and they add interactivity to custom user interfaces. Internal processes might consist of such things as creating a batch of monthly invoices, setting the status of sales leads, or exporting data for an aggregated report. By adding interactivity, we refer to the capability to create interface elements (such as buttons or icons) that will do something in response to user actions. Scripts help with both of these needs.
Scripts are written in FileMaker Pro’s ScriptMaker, a point-and-click interface. Scripts can perform tasks ranging from simple things (such as simply entering Find mode) to complex automated import/export processes, multitable reporting, data reconciliation, and anything that can be expressed as a programmed series of FileMaker steps.
ScriptMaker is one of the areas of FileMaker Pro 9 that has seen significant changes to its interface.
It’s a bit of an oversimplification, but you can think of scripts as automating a process that a human using your database solution might perform by hand. After some user action or external trigger (we’ll cover how scripts get initiated later in the chapter) initiates a script, it usually runs in sequence from its first step to the last, exiting or ending after it is complete. Here’s a simple example:

As you can see from this short example, FileMaker Pro scripts are easy to read and comprehend. This script resets the found set of the current layout/window to consist of all the records in a given table, and then takes the user to the first record in that set, beeps, and shows a dialog with an OK button. Each step of the script executes in order: Show All Records is completed, and then Go to Record/Request/Page is dealt with.
It’s possible to create branching scripts by using logical If statements and it’s also possible to construct scripts that execute other scripts (hereafter referred to as subscripts). We’ll get into both such techniques later in the chapter.
We have found over the years that the best way to learn scripts is to be presented with examples. We will endeavor in this chapter to review what we consider important and widely applicable topics for scripts and to provide as many examples as these pages allow.
![]() Script writing is one of the areas in which FileMaker Pro Advanced differs from FileMaker Pro. Some of these features are the script debugger, data viewer, the Database Design Report, tools to optimize databases and to create standalone solutions, as well as the ability to copy and paste scripts. Note that it is the writing of scripts that is expanded; scripts written using the authoring features in FileMaker Pro Advanced run perfectly well in FileMaker Pro. For more information on FileMaker Pro Advanced, see Chapter 16, “Advanced Scripting Techniques,” p. 477. That chapter also provides information about the more programmer-like features of FileMaker scripting such as parameters, variables, and the like.
Script writing is one of the areas in which FileMaker Pro Advanced differs from FileMaker Pro. Some of these features are the script debugger, data viewer, the Database Design Report, tools to optimize databases and to create standalone solutions, as well as the ability to copy and paste scripts. Note that it is the writing of scripts that is expanded; scripts written using the authoring features in FileMaker Pro Advanced run perfectly well in FileMaker Pro. For more information on FileMaker Pro Advanced, see Chapter 16, “Advanced Scripting Techniques,” p. 477. That chapter also provides information about the more programmer-like features of FileMaker scripting such as parameters, variables, and the like.
Creating Scripts
Creating and editing scripts in FileMaker is straightforward. Simply choose Scripts, ScriptMaker and the Manage Scripts dialog opens as shown in Figure 9.1. You can also use the keyboard shortcut of (![]() -S) [Ctrl+S]. Keep in mind you’ll need to have signed in with an account that allows script access (the default Admin account for databases allows this access).
-S) [Ctrl+S]. Keep in mind you’ll need to have signed in with an account that allows script access (the default Admin account for databases allows this access).
Figure 9.1. The Manage Scripts dialog box allows you to create, edit, and organize your scripts, and decide which ones to display in FileMaker’s Script menu.
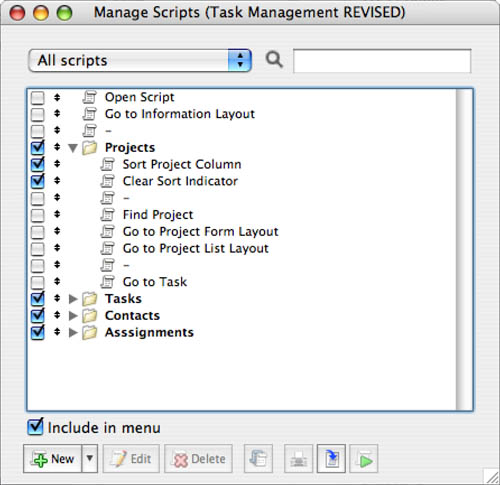
If you have used FileMaker Pro before, you will notice that the Manage Scripts dialog has a number of new features in FileMaker 9.
After you’re in ScriptMaker, you’ll see a list of existing scripts and can manage all the scripts in your file (you can delete, reorder, and so on). From there you can delve into a single script and edit its individual script steps.
Writing an actual script requires first that you have a goal in mind: What purpose is the script intended to accomplish? A script steps through a series of instructions, one at a time, until the script either reaches its last instruction or reaches some exit condition. Exit conditions can vary, and this chapter covers many of their implementations.
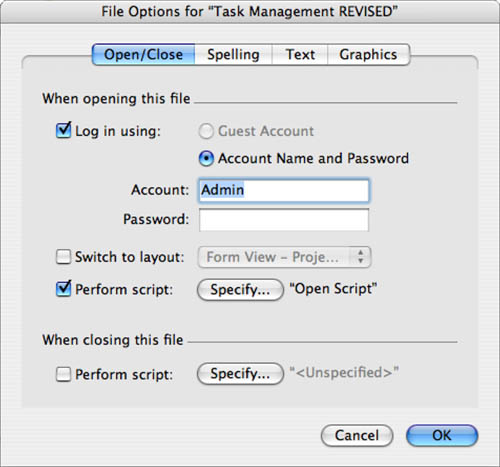
Here’s an example of the logical outline of a script you might use to take users to a Main Menu layout after they log in. Presumably this script would be set to run when an individual user first opens a file. You can set a script to run automatically when a file opens by selecting it in the File->File Options dialog as shown in Figure 9.2.
Figure 9.2. You can set a script to run automatically when a file opens.
After valid login, carry out these steps:
- Go to an internally used layout to set the login information.
- Set a global to the name of the account that has been used to log in (we use “Kim” as an example here).
- In a table of users, set the LastLoginDate field in Kim’s record to today’s date.
- Set the gUserNameDisplay field to
"Kim". - Set the gUserMessage field to
"Welcome back, Kim". - Perform Go to Layout:
Main_Menu.
This simple six-step process takes care of some background tasks first, and then from a user’s standpoint navigates to the main menu on which, presumably, a welcome message sits. All the user would see is that the system landed Kim on the Main Menu layout.
To implement a script like this, a developer would open ScriptMaker, create a new script, give it a name, and then use the Edit Script dialog to insert various steps into the script. The actual script that would manage the preceding logic could look like this:
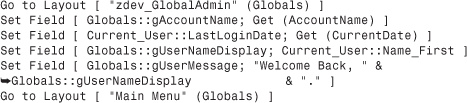
In forthcoming pages, we’ll detail a number of ideas contained in the preceding example. The important thing in this case is to become more familiar with reading a script and following its logic.
This script first goes to a layout called zdev_GlobalAdmin. It then posts information into four fields. One of these steps draws data from a related field in a Current_User table occurrence and another sets information in that related record. The script then last navigates again to a Main Menu layout. This conforms to the flow we mapped out previously; you might think of the original six pseudocode steps as an outline for the finished script. (Working from a basic goal for a script and then into pseudocode and finally into actually code is a good programming technique.)
The ScriptMaker Interface
The Manage Scripts dialog shown previously in Figure 9.1 allows you to manage all the scripts in your current file. As you can see in Figure 9.1, the Manage Scripts dialog lets you organize scripts into groups and to separate them with separators. This is one of the new features in FileMaker Pro 9. As you will see later in this chapter, it was possible to do this in previous versions, but the process was cumbersome.
As you move separators or scripts into groups, they automatically indent. You can create groups within groups to provide further organization of the scripts. To reorder scripts, groups, or separators, simply drag the individual items up or down the list.
Use (![]() -up/down arrow) [Ctrl+up/down arrow] to move scripts via your keyboard.
-up/down arrow) [Ctrl+up/down arrow] to move scripts via your keyboard.
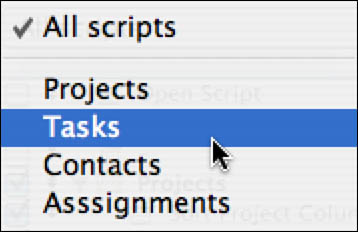
You can use the pop-up menu at the top of the dialog to select whether you want to see all scripts or only the scripts in a given group as shown in Figure 9.3.
Figure 9.3. You can choose to see only the scripts in a given group.
Buttons at the bottom of the Manage Scripts dialog let you perform a number of tasks. From the left to right, as shown in Figure 9.4, these buttons let you perform the following functions:
- You can create new scripts, groups, or separators with the plus button at the left.
- If you select a script in the list, you can edit it with the Edit button. If you select a group, the Edit button lets you change its name just as you can change the name of a script.
- If you select a script, Delete lets you delete it. You receive a warning before the deletion occurs in case you change your mind or clicked the button by accident.
- If you select a script, the Duplicate button makes a copy of it with the word Copy appended to the name. You might want to make one or more standard scripts and then copy and customize them as needed. As part of the editing of a script, you can change its name.
- You can use the Print button to print a script. Printing a script is a good way to create documentation—especially in combination with Adobe Acrobat’s capability to create PDFs—and to spot problems more easily.
- You can import scripts from one file to another. This feature works similarly to copying scripts. For FileMaker Pro 9 users (not Advanced), this is your only option for moving scripts from file to file.
- By selecting a script and clicking Perform, you can execute scripts directly from this dialog.
Figure 9.4. Buttons at the bottom of the Manage Scripts dialog let you work on scripts.
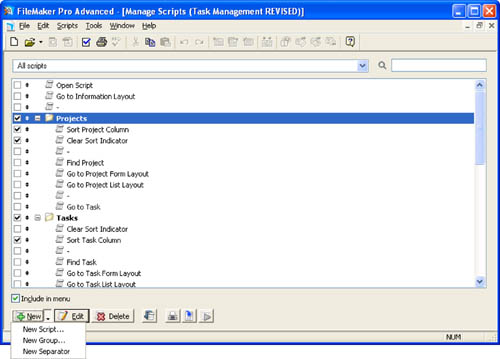
Notice that by using (![]() -click) [Ctrl+click] you can select multiple, noncontiguous scripts and then delete, duplicate, or print as you need. Shift-click selects multiple contiguous scripts.
-click) [Ctrl+click] you can select multiple, noncontiguous scripts and then delete, duplicate, or print as you need. Shift-click selects multiple contiguous scripts.
Script Naming Practices
Keeping your scripts well organized and following good script-naming practices is important, particularly as your FileMaker solutions grow in size. Versions of FileMaker Pro prior to 7 generally involved more individual files than today, and hence scripts tended to be naturally distributed throughout a given system. In a system in which one file can contain many tables, all your scripts might very well live in a single file.
FileMaker 9’s capability to store many tables in one file has many implications, but in particular with scripts, you won’t be constantly closing and reopening ScriptMaker in different files as you would have with FileMaker 6 or earlier. Fewer scripts are also required in many cases: Many operations that would have required executing a series of external subscripts across several files can now be accomplished by a single script in FileMaker 9. As noted previously, you might have a user interface file with interface scripts and separate files containing data with behind-the-scenes scripts.
Script naming and organizing practices vary quite widely from developer to developer. It’s less important that you follow any particular naming convention than that you use a logical and consistent system. We do, nonetheless, recommend you consider some of the following ideas:
- Use the new groups and separators features to organize your scripts.
- When using subscripts that are exclusively subordinate to another “main” script, you might consider indenting the names of the subscripts with underscores or using a prefix naming style to indicate that a set of scripts is to be used as a unit. Alternatively, create a group that consists of the main script and a subgroup within it for the subscripts. That way, ScriptMaker will take care of the organizing and indenting. More important, if you move the script’s group, the subscripts will move with it.
- Scripts are often intended to operate on a specific table occurrence. For example, if you’re using a script to control the creation of a new customer record, you want to make sure that a new record is created in the Customer table, not the Product table. It’s a good idea to use short table prefixes or suffixes when a script applies to only a given table, and “all” when it doesn’t—for example,
New_Record_contact_to,Report_invoices_to, orResize_Window_all. - If you plan to use Custom Web Publishing, we encourage you to avoid spaces and special characters in your script names. They’re a pain to parse if you plan to call these scripts from the Web. (Clearly those scripts you allow to display in the Scripts menu must follow user-friendly naming conventions.)
Script Editing
After you create a new script in ScriptMaker, or edit an existing script, the Edit Script window opens (see Figure 9.5). Here you construct the actual script by inserting script commands from the list on the left into the window on the right. Nearly every script step has additional options you need to specify, such as the name of a layout to go to, or the name of a file from which to import. These options appear under your script when you highlight a given step in it.
Figure 9.5. The Edit Script window presents you with additional dialogs as needed to configure settings for specific steps in your script.
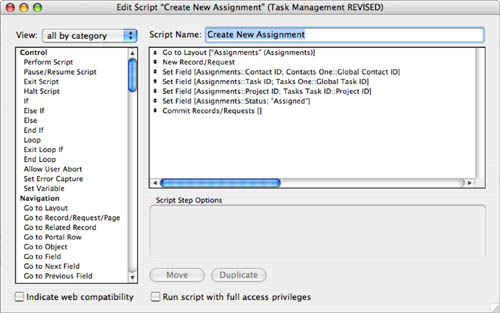
You can (![]() -click) [Ctrl+click] multiple script steps at once and insert the batch into a script in one move.
-click) [Ctrl+click] multiple script steps at once and insert the batch into a script in one move.
As an example, Go to Layout is a common step you’ll use quite often. Notice that when you insert it into a script, a menu appears in the Script Step Options area at the lower right, from which you can choose an existing layout, the layout on which the script began, or one determined by calculation.
To reorder script steps, simply drag them by the two-headed arrow icon located to the left of the step.
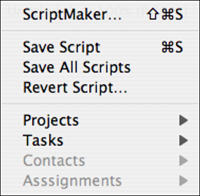
Beginning with FileMaker Pro 9, you can open as many script editing windows as you want at the same time: Just select the script(s) you want to edit and click Edit in the Manage Scripts dialog. Because you can have multiple script windows open and do not have to close one to work on another, the former Save buttons in the lower right have been moved. Now, if you try to close a script window with unsaved changes, you receive a prompt with a dialog to save the changes. In addition, when you are working with scripts, the Scripts menu contains commands to let you save or revert the script in an editing window or to save all scripts. Figure 9.6 shows the Scripts menu commands.
Figure 9.6. Three extra commands appear in the Scripts menu when the Manage Scripts dialog is open.
If you enable Indicate Web Compatibility, any script steps incompatible with web publishing display in gray.
Full Access Privileges
Notice the Run Script with Full Access Privileges check box at the bottom of the Edit Script dialog. Designating that a script run with full access privileges simply means that for the duration of that script, FileMaker overrides all security restrictions. When this option is not enabled, scripts run subordinate to whatever privilege set the currently signed-in user has. For instance, if a script makes a call to delete a record and the user running that script cannot do so based on his current security privileges, the script usually presents an alert message to the user and ignores that step of the script. The rest of the script is still performed.
Note that when this option is checked, the security privilege set for the current user actually does change for the duration of the script: If you use the calculation function Get ( PrivilegeSetName ), it returns [Full Access] as long as the script is running. If your script contains logic in which you need to check a user’s assigned privilege set, you’ll need to capture the user’s privilege set information elsewhere before running the script and refer to it however you’ve stored or captured the information.
![]() Error management in scripts is an important element in all scripting. For more detail, see “
Error management in scripts is an important element in all scripting. For more detail, see “Set Error Capture,” p. 298.
![]() To understand FileMaker security and privilege sets, see Chapter 12, “Implementing Security,” p. 371.
To understand FileMaker security and privilege sets, see Chapter 12, “Implementing Security,” p. 371.
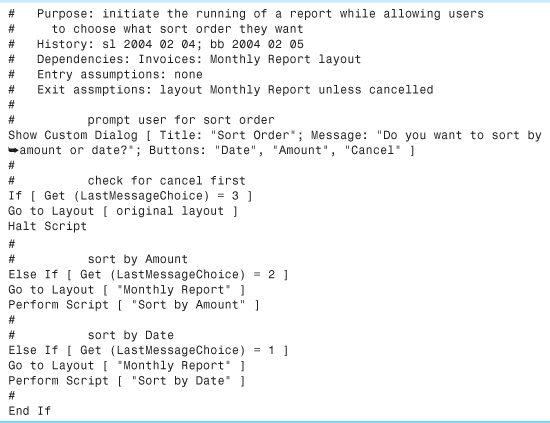
Commenting Scripts
Keeping track of what scripts do is a difficult task. What seemed perfectly intuitive at the time you wrote a given script might become hopelessly obscure a few weeks—or sometimes even hours—later. Although developers vary in how they use comments, nearly all developers recognize the value of commenting their work.
Remember that you’re not coding in a vacuum. We can virtually guarantee that although you might never intend that a given database be seen by someone else’s eyes, if it stands the tests of time and proves useful, at some point you’ll crack it open with the infamous words, “Let me show you how I did this....” Likewise, professional-grade systems are nearly all collaborative efforts. Comments exist to help your peers understand what your caffeine-sodden brain was thinking at the time you wrote a particular routine.
In addition to describing the purpose of the script, it is particularly helpful to note if the script changes from one layout to another. Entry assumptions (such as the layout from which it is called) and exit assumptions (such as the layout that it leaves open) are important to people who are calling scripts. In this case, as well as many others, documenting the script in a standard way can force you to consider important issues such as these.
Listing 9.1 shows a simple example of a commented script. Notice that the # symbol prefixes comments in FileMaker Pro.
Listing 9.1. Script with Comments
Exiting a Script
You can exit a script with an explicit call to Exit Script; you can also exit the script just by executing the last line of code. If you are passing back a result value from the script, you must use the call. Also, if you are leaving the script at any location other than the last line (perhaps as a result of an error you have encountered), you must use Exit Script.
The Exit Script step is a script step like any other. That means that if you are stepping through a script with the debugger, you will pause just before the script step is executed—that is, just before you exit the script. During that pause, you can inspect the values of the variables in the script.
Because Exit Script is required in some cases and is helpful in debugging, it is a good idea to always use it in writing your scripts.
![]() For more on script results, see Chapter 16, “Advanced Scripting Techniques,” p. 477.
For more on script results, see Chapter 16, “Advanced Scripting Techniques,” p. 477.
![]() For more on script debugging, see Chapter 19, “Debugging and Troubleshooting,” p. 551.
For more on script debugging, see Chapter 19, “Debugging and Troubleshooting,” p. 551.
Using a Script Template
It is often helpful to create a template script that you can duplicate when you need to create a new script. In our templates, we include several comment lines at the top where we record information about the purpose and revision history of the script. A template script looks something like this:

Although it is simple, this template does save time and promote good code. If you don’t need a particular piece of it, it’s easy enough to delete.
![]() Parameters and result values are discussed in Chapter 16, “Advanced Scripting Techniques,” p. 477.
Parameters and result values are discussed in Chapter 16, “Advanced Scripting Techniques,” p. 477.
Adding the Go to Layout step to your template can help ensure that the script begins on the correct layout and thus is associated with the proper base table attached to that layout. Including this step in the template prompts developers to make a conscious decision and reminds you that context needs management.
Using Subscripts
One of the most useful things in ScriptMaker is the Perform Script step itself. One FileMaker script can call another script, which is then commonly known as a subscript. This allows you to divide scripts into smaller logical blocks and to break out discrete scripts for anything you are likely to want to use again. This degree of abstraction in your system is one that we very much recommend. Abstraction makes scripts easier to read, easier to debug, and modular in that a subscript can be generic and used in a variety of scripts. Here’s an example:
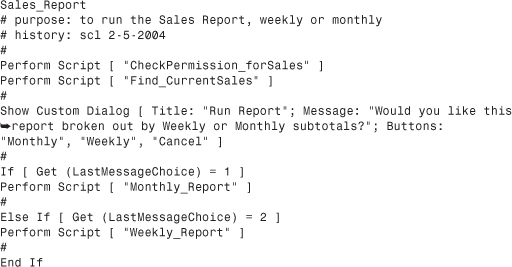
Notice that the script actually doesn’t do much on its own. It first runs a permission check script, and then runs another script to establish a found set. It then prompts the user to make a choice and runs one of two report subscripts based on what choice the user makes. This approach is quite common and demonstrates a flexible approach to programming. The Find_CurrentSales subscript could have other uses elsewhere in the database. Creating separate routines for weekly and monthly reports makes the script more readable; imagine seeing all the logic for those two reports embedded here as well.
As another example of script abstraction, imagine sorting a contacts database by last_name and then by first_name for a given report. If you write a script to produce that report, sorting is a step in the process. However, odds are that you’ll want to be able to sort by last_name, first_name again—perhaps for a different report, perhaps as a function that lives on a list view or in a menu, or perhaps before running an export script (or perhaps all the above). Whenever reasonable, we recommend looking for ways to abstract your code and foster reuse. It saves time and complexity if your client (or boss) suddenly comes to you and says now you have to present everything by first name. If that logic lives in one place, it’s a one-minute change. If you have to hunt for it, the change could take days and require extensive debugging.
Even if you’re not planning to reuse blocks of code, it’s still a good idea to break scripts into subscripts. They’re easier to read, they’re easier to enable and disable during testing, and they allow you to name them in logical ways that are comprehensible even at the Define Scripts dialog level.
Some other good candidates for subscripts are sort and find routines; these are often reusable by a wide range of scripts or by users as standalone functions. Other uses of subscripts might be for the contents of a loop or If function. Sometimes it’s easier to separate logic into separate paths by dividing logical groups into separate scripts, as in the example we gave a little earlier. When you have a branching script (covered later in the chapter), it’s helpful to encapsulate a single branch in a subscript. This allows you to see the flow of logic in the parent script and cover each branch in its own respective subscript.
Finally, consider separating scripts by whether or not they have user interactions. Often a script interacts with the user, collecting options and values it passes on to a subscript that does not interact with the user.
Importing Scripts
You can import scripts from another database file by clicking the Import button at the bottom of the Manage Scripts window. This lets you select a file; after you have done so, the Import Scripts dialog shown in Figure 9.7 opens.
Figure 9.7. You can import scripts from another file.
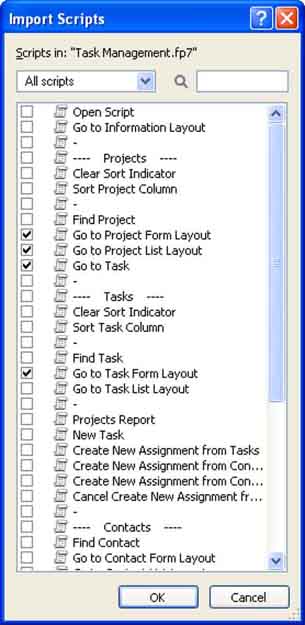
Use the check boxes to select as many scripts as you want to import. After the import completes, you receive a warning about any conflicts or errors encountered.
Figure 9.7 shows the scripts in the Task Management starter solution. The examples in this chapter are from a revised version of that database (downloadable from the author’s website). The original Task Management starter solution used dummy scripts to organize the file, as shown in Figure 9.7, because groups and separators did not exist.
Managing Scripts
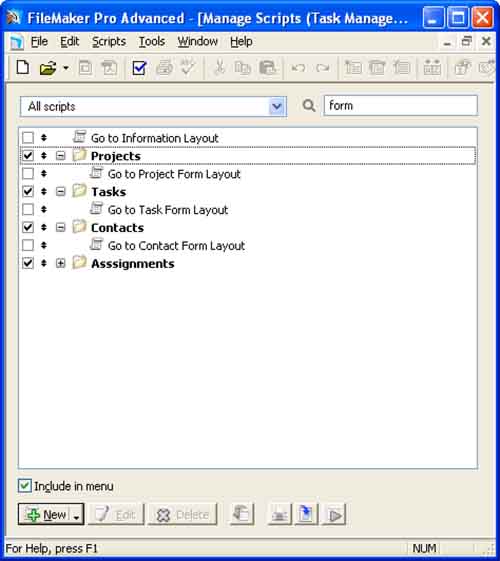
In addition to using groups to manage scripts in the Mange Scripts dialog, you can use the field at the upper right of that dialog or the Import Scripts dialog to find scripts with certain text in their names. For example, Figure 9.8 shows scripts and groups with “form” in their names.
Figure 9.8. Search for scripts by name.
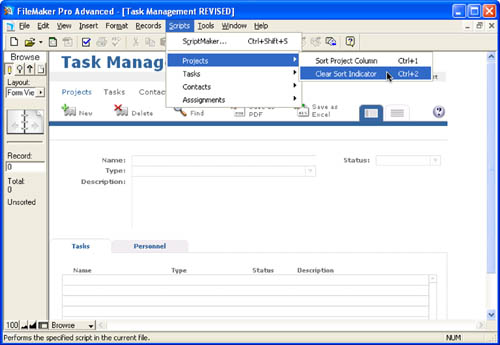
Managing the Scripts Menu
The Scripts menu in Browse mode shows the available scripts organized into the groups that you have created. The check box column to the left of a script, group, or separator controls whether it appears in FileMaker’s standard Scripts menu. If you hide a script by unchecking its check box, you need to provide the user with another means of performing, or executing, the script. Typically this entails either associating the script with one or more button objects that appear on various layouts or tying the script to a custom menu item. And, of course, subscripts often should not appear in the Scripts menu because only other scripts call them.
Figure 9.9 shows the Script menu with the groups and scripts visible as indicated previously in Figure 9.1. If a script is visible but its group is not, it appears on its own in the menu as if it were not part of a group.
Figure 9.9. You can control visibility of the Scripts menu items.
In addition to controlling whether the Scripts menu shows scripts, note that FileMaker Pro 9 Advanced allows developers to create custom menu sets. Quite often you might want to have a menu item run a certain script. You might want to use custom menus to hide the regular Scripts menu altogether and attach your scripts to other menu items throughout other menus.
![]() To learn about how to implement custom menus in a solution, see Chapter 14, “Advanced Interface Techniques,” p. 415.
To learn about how to implement custom menus in a solution, see Chapter 14, “Advanced Interface Techniques,” p. 415.
Common Scripting Topics
We will now delve into some useful and common scripting techniques and discuss topics that are germane to a wide range of scripts. This is not meant to be a comprehensive list—the function of the Beep script step should be fairly obvious to you—but rather these are the important areas to understand. They will help you establish a solid foundation in scripting.
Error Management
Error management is an important part of the scripting process. Frequently scripts make assumptions about the presence of certain data or the existence of certain objects, or depend on a layout to establish context. If any one of a given script’s assumptions is not met, the script either might not work or might produce unintended results. Error management involves identifying these assumptions and creating ways of dealing with them. You can bank on users finding odd, unpredictable ways to break your system. Applying some thought to how to manage such situations will serve you well in the long run.
Note that FileMaker Pro 9 Advanced has the capability to enable and disable individual script steps. This facilitates testing significantly: You can turn off sections of your script that aren’t finished and run discrete sections of your logic.
![]() For further discussion of error handling, see “Handling Errors in Scripts,” p. 557.
For further discussion of error handling, see “Handling Errors in Scripts,” p. 557.
![]() For more ideas on error management, see Chapter 19, “Debugging and Troubleshooting,” p. 551.
For more ideas on error management, see Chapter 19, “Debugging and Troubleshooting,” p. 551.
Allow User Abort
Allow User Abort enables and disables a user’s ability to press (![]() -period) [Esc] to cancel a script in midstream. Generally speaking, it’s the rare script that’s designed for graceful cancellation at any time in its process. There’s really no reason to turn
-period) [Esc] to cancel a script in midstream. Generally speaking, it’s the rare script that’s designed for graceful cancellation at any time in its process. There’s really no reason to turn Allow User Abort on unless you’re testing a loop script or some other long-running process. Any script that doesn’t have Allow User Abort disabled allows users to cancel a script in progress, with consequences you might not intend. Note that this is true for scripts users run, but the opposite is true for developers: If you’re in the midst of writing a script and need to test a loop, for example, you should leave this setting turned on to halt your script if need be.
The other thing Allow User Abort does is take away the Cancel button when a script pauses, giving users only the option to continue. There are many cases in which canceling a script would leave the user stuck on a report layout or stranded midstream in some extended process.
 To learn more about how to deal with incomplete script completion (atomicity in database lingo), see “Unfinished Scripts” in the “Troubleshooting” section at the end of this chapter.
Set Error Capture
The Set Error Capture script step either prevents or allows the display of FileMaker’s default error messages to the user. When error capturing is off, FileMaker displays its own alert dialogs to the user if, for example, a record fails validation or a user runs a search without any find criteria. When error capture is on, the script in question captures errors and doesn’t present them to the user. This allows you, the developer, to present your own, customized error messages but imposes a greater burden in terms of checking for and managing errors yourself.
![]() Handling errors well in scripts is a black art because it’s difficult to anticipate what errors will crop up. For more information on using the
Handling errors well in scripts is a black art because it’s difficult to anticipate what errors will crop up. For more information on using the Set Error Capture script step, see Chapter 19, “Debugging and Troubleshooting,” p. 551.
When doing your own error checking and managing, you’ll want to use the Get ( LastError ) calculation function to programmatically deal with errors within your script. Use the If function to test Get ( LastError ) and present dialogs to the user as appropriate. Refer to FileMaker Pro’s online help system for a list of error codes.
Be careful with the Set Error Capture script step. It certainly doesn’t prevent errors from happening; it simply doesn’t show the user a message about one that did. An error might happen, but FileMaker won’t interrupt the user’s experience to deal with it. This allows you to control how you manage errors within your script itself. You should not turn error capture on unless you also add steps to identify and handle any errors that arise.
To explore problems with error messages you think are being wrongly suppressed in scripts, refer to “Lost Error Messages in Scripts” in the “Troubleshooting” section at the end of this chapter.
Here’s an example of a script segment that tests for an error—in this case a find request that results in zero found records:
Setting and Controlling Data
Some of the primary uses of scripts lie in manipulating, moving, and creating data. The Fields category contains most of the script steps for manipulating field data.
Essentially, these field category steps allow you to insert data into a given field programmatically, just as a user otherwise would. This could mean setting the field contents to the result of a calculation, copying the contents of one field into another, or simply inserting into a field whatever is on the user’s clipboard.
As an example, imagine that you wanted to give users a button that inserts their name, the current date, and the current time into a comments field, and then places the cursor in the proper place for completing their comment:
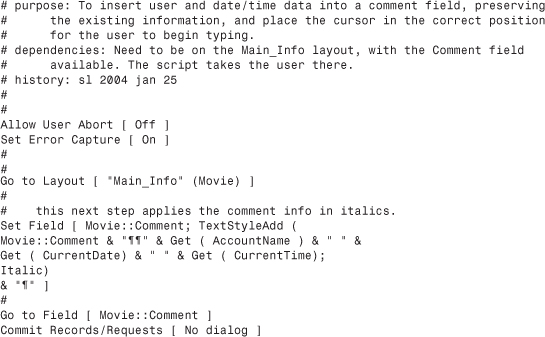
This script includes the full commenting approach described in this chapter and the two Allow User Abort and Set Error Capture steps. From here on out, we’ll forego those details in the interest of brevity.
When using a Go to Field step, FileMaker Pro places the cursor at the end of whatever content already exists in the field unless the Select/Perform option is enabled, in which case FileMaker Pro selects the entire field. If you wanted, you could use the Set Selection script step to place the cursor somewhere within the body of text.
Notice that the comment info is nested within a TextStyleAdd() function so that it displays in italics.
![]() For more information on calculation functions, including text formatting, see Chapters 8, “Getting Started with Calculations,” p. 249, and 15, “Advanced Calculation Techniques,” p. 433.
For more information on calculation functions, including text formatting, see Chapters 8, “Getting Started with Calculations,” p. 249, and 15, “Advanced Calculation Techniques,” p. 433.
Set Field is by far the most used of the field category steps. Nearly all the other functions in this category depend on the field in question being on the layout that performs the script. You should get into the habit of using the Set Field command whenever possible, in preference over the others. It doesn’t depend on a field being on a specific layout—or any layout, for that matter—and it can usually accomplish what you’re trying to do with one of the other steps.
You’ll generally need the Insert script steps only when you expect user input. For example, you might place a button next to a field on a given layout called “index” that then calls up the index for a given field and waits until the user selects from its contents. That script could often be a single step: Insert from Index (table::fieldname). As always, you’d use your template for clarity, but this script would open the index for a given field and wait for the user to select a value. Again, you should tend to think of scripts as evolutionary. Consider writing a script even for a one-step process because you might want to attach that script to multiple buttons or extend its operation in the future.
To manage cases in which your script seems to be affecting the wrong portal row or related record, refer to “Editing the Correct Related Records” in the “Troubleshooting” section at the end of this chapter.
![]() For more discussion on indexes, see “Storage and Indexing,” p. 110.
For more discussion on indexes, see “Storage and Indexing,” p. 110.
You might also discover the Copy, Cut, and Paste script steps. These work as you would expect. Copy and Cut place data onto the user’s clipboard and Paste inserts from it. Cut and Copy overwrite anything already on the user’s clipboard. Furthermore, Copy, Cut, and Paste depend on having access to the specified fields and are therefore layout dependent. If, for some reason, you remove those fields from the specific layout in the future, your script will stop working. You should almost never use Copy and Paste for these reasons and should defer instead to Set Field.
![]() For further discussion of layout dependencies, as well as other types of dependencies that can get your scripts into trouble, see “Context Dependencies,” p. 566.
For further discussion of layout dependencies, as well as other types of dependencies that can get your scripts into trouble, see “Context Dependencies,” p. 566.
Another example of using the Set Field script step concerns totaling child record data calculations and saving the results in a new record (presumably to track the growth of some quantity over time). Often a simple calculation field with a Sum ( related field ) function works, but consider that with a large related data set, the performance of such calculations can become a problem. Furthermore, you cannot index that sort of a calculation field—which might prove problematic for users performing find requests or for your needs as a developer. Consider instead creating a script to calculate and store your totals and calling that script only on demand:
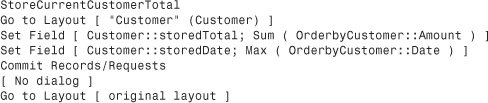
The preceding script is a typical example of drawing data from related records, of moving from layout to layout to establish proper context, and finally of using SetField to populate data.
Providing User Navigation
You might have noticed a section of the script steps list devoted to navigation in FileMaker’s Edit Script dialog. One of the most common uses of scripts is to provide a navigation scheme to users whereby they can navigate from layout to layout, record to record, or window to window by using buttons or some other intuitive means.
There’s not too much magic here: By using the Go to Layout script step, you’ll get the fundamentals. Consider placing buttons along the top of each layout to offer a means of navigating to all user-facing layouts in your solution with a Go to Layout script attached.
By building complete navigation scripts, you can control the entire user experience of your solutions and can opt to close the Status Area if you want. Armed with find routines, sort buttons, reporting scripts, and a navigation interface, it is possible to build a complete application with a look and feel all its own.
Script Context and Internal Navigation
Consider that FileMaker uses layouts to determine script context: For any script step that depends on a specific table, you need to use Go to Layout steps to provide that context. Review the script we introduced at the beginning of the chapter:
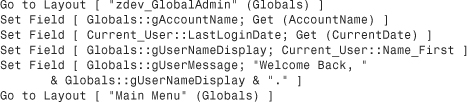
This script takes itself to a zdev_GlobalAdmin layout, executes some steps (in this case sets data into fields), and then brings the user to a Main Menu layout. All the users see (presumably when they log in) is that they’ve landed on a Main Menu layout. They’ll never see, or interact with, the zdev_GlobalAdmin layout, but the system will have done so. Had we written the script without the initial Go to Layout step, the routine would have had quite unexpected results.
Notice that the script makes use of a Current_User table occurrence. As related data, that information would likely be very different depending on the perspective from which a user views it. The purpose of navigating internally to a specific layout is to control this context precisely.
The point here is that you’ll need to bring a script to a specific layout to establish a different context. The table occurrence associated with a given layout determines context. The user might never see this internal navigation going on, but if you were to walk through the script step by step (for example, using the Script Debugger, covered in Chapter 17), you’d see the system go to the zdev_GlobalAdmin layout and then to the Main Menu layout.
![]() Using object names on layouts provides greater control of navigation. For more information, see Chapter 14, “Advanced Interface Techniques,” p. 415.
Using object names on layouts provides greater control of navigation. For more information, see Chapter 14, “Advanced Interface Techniques,” p. 415.
Saved Script Options
Scripts tend to mirror the actions a user could perform manually but, obviously, do so without human intervention. It is possible in FileMaker to save find, sort, export, and other actions in a script (hard-coding them, if you will), or to prompt the user for some input to help perform these steps.
The advantages of hard-coding requests should be obvious. If, for example, you need to prepare a report on active real estate listings, it makes sense to have one of your script steps be a Perform Find that returns all the records with a status of “active.” The requirements of your report will rarely change, so you’ll save users time (and possible errors) if you hard-code the find request.
On the other hand, allowing the user to provide input is a great way to make scripts more flexible. Continuing the example, you might create a real estate listings report and in your script prompt the user for some search criteria. This can be done by either using a dialog that gives the user one or two choices (we’ll cover that later in the chapter, in the “Working with Custom Dialogs” section), or simply allowing the report to act on the current found set and sort.
You will often find it helpful to build hard-coded find and sort routines. For example, you might want a script for finding overdue invoices, or easy-access buttons for sorting by first name, last name, or company. FileMaker allows you to save complex find, sort, export, and import requests as necessary, and allows you to edit these requests within ScriptMaker.
Find Script Steps
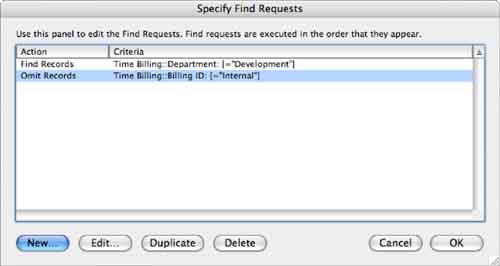
FileMaker allows you to assemble and store complex requests within scripts using find requests. You create and edit them by double-clicking Perform Find in the script editing window. In Figure 9.10, the script finds all records from the Development department and omits those with internal billing; the result replaces the found set.
Figure 9.10. Assemble as many find requests as necessary.
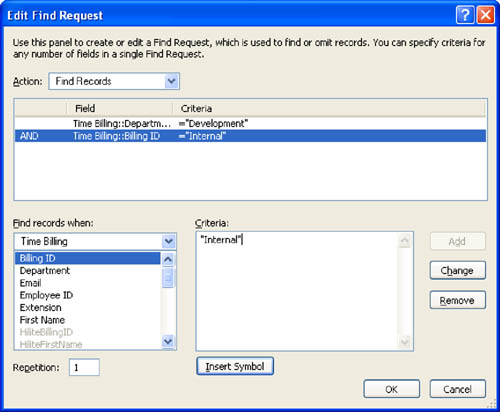
You can assemble a single find request via the Edit Find Request dialog (see Figure 9.11).
Figure 9.11. By adding multiple criteria to a single find request, you are performing an And search.
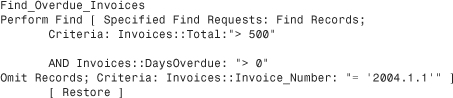
Note in Figure 9.11, however, that we have opted to omit records that match the second request. Setting a request to omit records simply means that FileMaker finds those records that match the overall request and takes out or ignores those that meet the omit criteria. If you create a find request that does nothing but omit records, it replaces your existing found set with all records that don’t match your request. (How’s that for a double negative?) The following example shows a script that combines a find request with an omit request:
Other search-related script steps include Constrain Found Set and Extend Found Set. Just as though a user had chosen each command from FileMaker’s menu-driven interface, Constrain reduces the current found set, eliminating any records that don’t match the search criteria, and Extend adds those records from outside the set that match its criteria to the current found set.
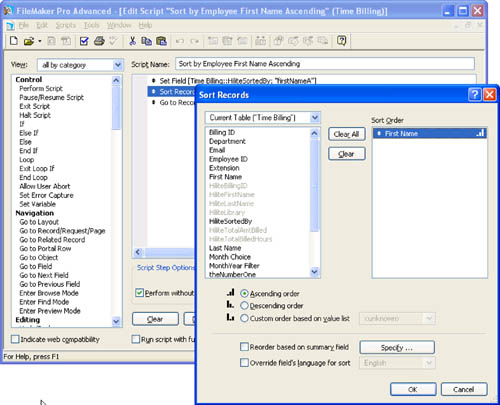
Sort Script Step
Establishing saved sort orders in the Sort dialog works, happily, just as it does for users performing a manual sort (see Figure 9.12).
Figure 9.12. It’s generally quite helpful to create sorting scripts for users. Sorting needs are usually predictable and always needed more than once.
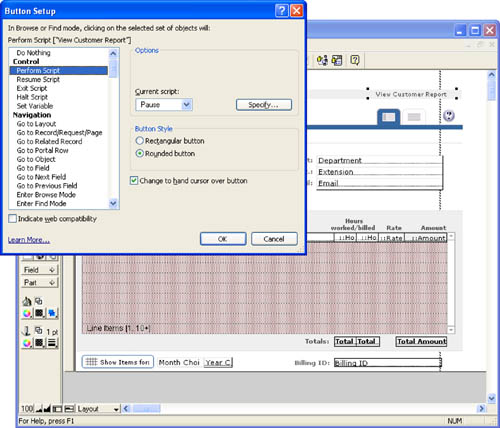
One of the most common applications of sort scripts is in building column header buttons. Simply create a series of sort scripts and apply them to the buttons along the top of a list view. You can make any buttons or text into a button by choosing Format, Button Setup in Layout mode (see Figure 9.13).
Figure 9.13. Scripting is often employed in creating more intuitive user interfaces for users.
Keep in mind that many of your reports depend on sorting, especially as you get into reporting by summary data. It’s a good idea to create sort scripts for your reports and call them as subscripts, rather than hard-coding sort criteria into your report scripts themselves.
You might well create reports that behave differently depending on different sort orders—by setting up different, multiple subsummary parts on one report layout, for example—so you’ll want to factor the sorting logic into its own script or subscripts. A report with both a week-of-year subsummary part and a month subsummary part will display by week, by month, or by week and month, depending on the sort options your script establishes. This is a handy technique for reducing the number of layouts you need in a system—with a little bit of scripting, you can use a single layout for three different reports.
![]() For more on summary reporting, see Chapter 10, “Getting Started with Reporting,” p. 315.
For more on summary reporting, see Chapter 10, “Getting Started with Reporting,” p. 315.
Using Conditional Logic
Another important element of scripting is the capability to branch scripts based on various conditions. To manage logically branching scripts, you use the If, Else, Else If, and End If script steps. These conditional script steps work by performing a logical test, expressed as a calculation. If that calculation formula resolves to a true statement, FileMaker executes all the script steps subordinate to (that is, nested within) an If or Else If statement.
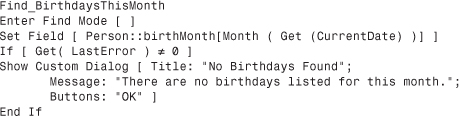
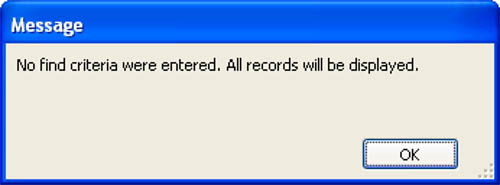
One of the most common applications of conditional logic in FileMaker revolves around Perform Find script steps. Because we as developers can never guarantee the state of a given table’s data—in other words, how many records it contains—we have to test for their existence in scripts that perform find requests and then branch accordingly if no records are found. Here’s an example:
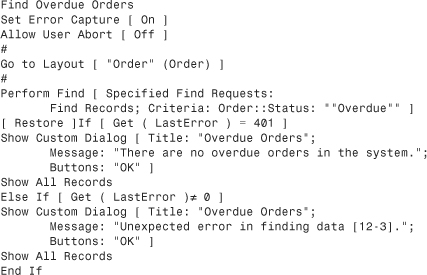
In this simple script two outcomes are possible: Users see either a set of order records whose statuses have been set to Overdue, or a dialog informing them that no overdue orders exist and ending with a full set of all orders.
The entire idea behind conditional logic is to allow the computer to determine which of multiple possible paths to take. Computers aren’t terribly smart, so they make these decisions based entirely on Boolean (true/false) tests. At the end of every script step, FileMaker records an internal error that you can retrieve using the Get ( Last Error ) function. In the preceding script, if that function is storing a value of 401, the first set of nested steps within the If clause will be performed; if the value is not zero (no error) and not 401, the second set of nested steps will be performed, providing a true error message. If you turn on error capture, it is your job to capture errors; typically you either capture all of them, or, in cases such as this, you handle some “errors” as normal conditions, passing along other, unexpected errors.
To learn how to bake error checking into your conditional tests, refer to “Conditional Error Defaults” in the “Troubleshooting” section at the end of this chapter.
There’s no practical limit to the number of branches that a script might take. For scripts of particular complexity, we recommend breaking them into subscripts and, when necessary, creating a flowchart of the process before writing the script.
Using Loops
Another key scripting technique is looping. Looping allows you to execute a series of script steps repeatedly until some exit condition is met. This is very much the same as an If/Else If construct. But this time, instead of performing a new branch of logic, you simply tell the script to perform the same actions over again until a controlling conditional test returns a true value; for example, if the end of a found set is reached or the results of a calculation come to a specific number.
A simple example of this might be stepping through each record in an invoice table’s found set and generating a new invoice for any invoice that remains unpaid or should be sent out again for some reason. The logic, without worrying about syntax, might look like this:
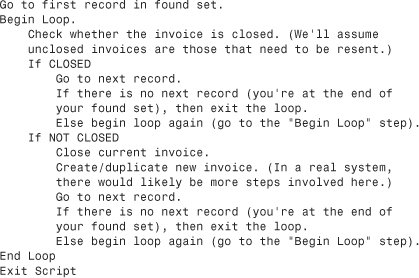
Notice that an exit condition is established. The system tests in both If branches whether you’re at the end of a found set and exits the script regardless of whether the last record in the set closes. Imagine you’re a user doing this manually. You’d start at the top of a found set, use the book icon to page through each record one at a time, and then stop the process when you reach the end of your record set.
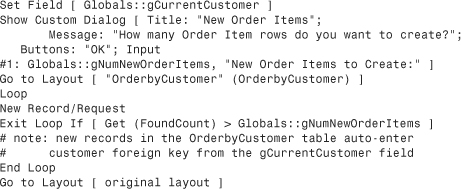
Here’s another example, this time in FileMaker’s scripting syntax. It creates a series of new order records based on a request from the user (posted in a global field):
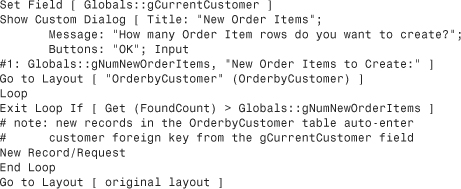
This simple example demonstrates all the essential logic for working with loops. First, some condition by which the script exits the loop must be established. In this case, a number provided by the user is used to exit the script. Note that if this were a real-world script, we’d recommend some error-checking to make sure that the user inputs a positive integer.
A loop exit condition is almost always useful if something changes during the course of a script. It’s possible you might be sitting in a loop, waiting for something elsewhere to change and checking periodically, but this kind of polling activity is not commonly needed in FileMaker Pro.
Notice where the commands are placed. The exit condition tests for a greater-than condition. This ensures that the script does, in fact, run the number of times a user requests. If the New Record/Request script step were placed above the Exit Loop If step, this script would still be perfectly valid, but it would generate one fewer new orders than the user requested. If you’re a perfectionist, it’s possible to write the script like so:
In this scenario, you save one iteration through the loop by testing conditions immediately after the creation of a new record. It’s unlikely that this makes much of a difference in this particular example, but when you write particularly large scripts, especially those that involve looping, we recommend you look for ways to make them perform as efficiently as possible. Speed and system performance should always be considerations when writing scripts.
Loops become more interesting when combined with conditional logic more complex than checking for an incremented counter. The first example for closed invoices did just this. It is possible to build a loop that tests for certain conditions within your system and exits only when those conditions are met—for example, a loop that processes all unclosed invoices, checking at the end of each cycle whether it has reached the end of a found set.
Loops can be exited in various ways. The simple conditional in the script example shown earlier is quite common. Another common technique is to use the Go to Record/Request/Page [Next, Exit After Last] script step. It enables you to step through a found set and exit a loop after reaching the last record.
Another way to exit a loop is to exit or halt the script altogether. You have two processes running: the script itself, which you can terminate, and the internal loop.
To cope with endless loop problems, refer to “Testing Loops” in the “Troubleshooting” section at the end of this chapter.
Working with Custom Dialogs
One of the most common user interactions necessary for a system is to capture a response to a question. “Are you sure you want to delete all records?” “Do you want to report on all records, or just your found set?” “Would you like fries with that?”
The Show Custom Dialog script step is a great, built-in way to capture this sort of interaction. (There are ways to create layouts that act and behave like dialog boxes, but they’re a good bit more work.) Custom dialogs allow you to present some descriptive text or a question to a user and capture a response (see Figure 9.14).
Figure 9.14. Here’s an example of a custom dialog.
![]() To learn how to create pop-up layouts that behave as modal dialogs, see “Multiwindow Interfaces,” p. 525.
To learn how to create pop-up layouts that behave as modal dialogs, see “Multiwindow Interfaces,” p. 525.
Naturally, after you create a custom dialog, you need to deal with the results. FileMaker Pro stores the user’s button choice until the end of the current script or until you present another custom dialog. Think of these dialogs as existing solely within the space of a given script.
To identify which response the user chose to your dialog, use the Get ( LastMessageChoice ) function. This function returns a 1, 2, or 3 based on which button the user clicked, from right to left. The rightmost button is identified as 1. The label you assigned to the button is inconsequential.
Conditional scripting similar to what you saw earlier also allows you to test the choices a user made and respond accordingly. Here’s an example:

Custom dialogs are flexible, but they do have limitations. The most obvious limitation is that you cannot alter their appearance or size. In a FileMaker layout, you can apply images, background color fills, and other graphical attributes of the screen. Not so in a custom dialog. You are limited to a system-style dialog.
Second, and more important, if you provide input fields data entered is posted to your database only if the user clicks the first, rightmost button in the dialog. You do not have programmatic control of the input field behaviors. This then means that your users will have “post to database” as their default. Not optimal, but there you have it.
The third limitation of the dialog lies in scope: You’re limited to three input fields and three buttons. If you need anything more complex, you have to use a standard FileMaker layout to build a custom pop-up layout.
Dialogs of all sorts were quite popular in the early days of personal computers. Today, dialogs are used less and less frequently because they bring processing to a halt until the user deals with them (which is the point). Allowing users to continue with other operations, as you can do by using multiple windows, increases user control and productivity. If you have used versions of FileMaker Pro before FileMaker Pro 9, compare the modal, dialog-based ScriptMaker interface with the new FileMaker Pro 9 window-based interface.
Triggering Scripts
There are eight ways to initiate, or perform, scripts:
- By selecting a script via the Scripts menu
- By establishing a custom menu item tied to a script
- By opening the Scripts dialog, selecting a script, and clicking Perform
- By calling a script from another FileMaker script (within the same file or externally)
- By calling a script from an external web source
- By attaching a script to a layout element, which a user then clicks (and thus it becomes a button)
- By calling it from AppleScript or VBScript
- By attaching a script to the startup or shutdown routines in the file options dialog
FileMaker lacks most procedural triggers—functions that fire automatically when certain events occur, such as creating or editing a record. (An exception is that you can configure a file to run a specific script when a file opens or closes.) To perform a script, the user generally has to actively click something. You can attach scripts to layout objects so that a user clicking on the object triggers them, or they can be activated directly from the Scripts menu, if you choose to make particular scripts visible there. You can also use FileMaker Pro 8 Advanced to create custom menus that run scripts. There are other ways to call scripts externally through web publishing as well.
![]() To tie a script to a custom menu item, see Chapter 13, p. 421.
To tie a script to a custom menu item, see Chapter 13, p. 421.
![]() To call scripts externally through Instant Web Publishing, see Chapter 25, “Instant Web Publishing,” p. 689.
To call scripts externally through Instant Web Publishing, see Chapter 25, “Instant Web Publishing,” p. 689.
Some plug-ins on the market offer event trigger functionality. Events from Waves in Motion is one such plug-in. We encourage you to visit FileMaker’s website to see the latest offerings.
Working with Buttons on Layouts
More often than not, clickable layout objects are graphical buttons, but it is possible to attach a script to anything you can place on a layout: a field, a graphic, even a portal. These layout objects then become button-like so that when a user clicks such an object, the script associated with the object runs.
Creating buttons on FileMaker layouts is straightforward. You can opt to use the Button tool to draw a 3D-esque button, or you can attach a button behavior to any object on a layout (including fields, merge fields, text, images, and even binary files pasted onto layouts).
Apply button behaviors to an object either by right-clicking and choosing Specify Button, or, with a layout object selected, by navigating to the format menu and choosing Button.
We’ve talked about buttons as a tool for triggering scripts. This is actually a little inaccurate. A button, when clicked, can perform any single script step: Go To Layout, for example, or Hide Window. Of course, one of the available script steps you can attach to a button is Perform Script. Choose that option, and your button can perform a script of any length or complexity.
Given that fact, when adding interactivity to a button, why use any of the other single script steps other than Perform Script itself? Well, we’re going to argue that you shouldn’t. If you use single script steps, you’re out of luck if you ever want a button to do two things. You’re out of luck again if you create a bunch of buttons that perform the same step (such as Go to Layout) and you need to change them all—it’s insufficient abstraction to not allow the same button behavior to be reused elsewhere. Because it’s likely that you will want to add steps, or duplicate a button and edit its behavior globally, you should ignore every button behavior other than Perform Script. Even if a script is one step long and is likely never to be reused, take the few extra seconds to create a script. If the button performs a script, you can easily add steps whenever you need them, and you can change at once all the buttons that need to go to, say, the Invoice layout. After you select the script in question, you can opt to modify the behavior of the script that might or might not be currently running.
![]() For more details on controlling script flow via button attributes, see “Script Parameters,” p. 479.
For more details on controlling script flow via button attributes, see “Script Parameters,” p. 479.
Troubleshooting
Lost Error Messages in Scripts
My script is not working properly, but I’m not getting any error messages. Where do I start?
Be sure that you properly account for potential errors if you turn error capture on. What if a find request returns zero records? What if a user doesn’t have access to a given layout needed for a script? To manage debugging, turn error capture off while you’re testing. Some developers write scripts that toggle error capture for all scripts in a system. This is a convenient way to turn on and off a debugging mode.
Unfinished Scripts
I need a script to run to completion without fail. I set Allow User Abort [off], but it appears that a user aborted the script at some point. How can I make sure that users can’t muck with my scripts?
Remember that turning off Allow User Abort doesn’t always save you from errors in the script itself, power outages, the user closing FileMaker Pro, or other random acts of unpredicted computer wonkiness. You can never absolutely depend on a script completing in FileMaker Pro. If need be, write a “check conditions” script in your system and run it when appropriate. Another way to deal with this problem is to write a script log that saves a record when a script starts and another when it ends. You can check for incomplete pairs.
Editing the Correct Related Records
My Set Field script step is continually changing the first record in a portal instead of the one I want. How do I get the script to act on the proper row?
Be careful when setting fields through relationships. It’s possible to think that you’re pointing to a single record when you’re really pointing to the first of many. In that case, FileMaker blithely applies your script steps to the first related record it finds. Either put a button directly in a portal, in which case the script will apply to that row, or use a Go To Related Record script step to explicitly control both the context and the record against which a script operates.
Conditional Error Defaults
My If/Else statement isn’t returning the proper result. How can I test what’s going on?
Be sure to account for all variations of logic in your conditional scripts. We strongly recommend that you build If routines that end with an option you think will never occur. Here’s a quick example:
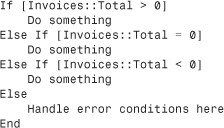
This function should never return the default error, but you cannot perfectly predict all such behaviors. For example, what if a calculation for Total is wrong and returns a null or empty value? Or if a calculation you expect to be numeric returns text in some cases?
Testing Loops
My loop seems to be stuck endlessly looping. How do I debug the problem?
Rare is the developer who gets everything right the first time, and if you don’t, you might find yourself in the middle of an endless loop. A handy trick is to always create an exit condition that tests whether the Shift key is held down by using the Get( CurrentModifierKey ) function. It’s a backdoor out of your loop that’s quite handy if you have an error in logic. A much easier way to go if you own FileMaker Pro 8 Advanced is simply to turn on the script debugger the first time you test a new loop.
FileMaker Extra: Creating a Script Library
You might consider having a utility file sitting around your hard drive with all the basic scripts each of your solutions will need. You can then import these scripts into your own solution files as needed. We always have the following in our databases:
StartUp— Here’s a script we use to open all the files of a given solution at once, to set default values for globals, to set a login history record if need be, and so on.ShutDown— The partner forStartUp, theShutDownscript can close out your user session by setting any tracking info and can close all the files in a solution so that FileMaker Pro need not be quit.ToggleAllStatusAreas— This is another critical script for developers working in multiple files or windows. Very often we’ll close and lock the Status Area to maintain control and keep users from accessing records or layouts we have carefully scripted around. This handy script reopens the Status Area for development.ToggleMultiUser— A script that simply turns on or off peer-to-peer sharing. It is useful to use theSet Multi-User [on/off]script step when you need to isolate your system during testing.InitializeGlobals— Often a subscript ofStartUp, but best abstracted as it is here, this script sets all the initial values of globals and global variables in your system, ensuring that they all start out user sessions in a predictable state. You need to add explicit steps for each global you add to your system as you work, but you’ll find it invaluable to have a “global” global initializer.ScriptTEMPLATE— This is the template we duplicate for new scripts. It has initial comment headers and default script steps as needed.PrintSetUp_landscapeandPrintSetUp_portrait— Every printer-bound output of your system needs page properties established. Write them once.
If you find yourself writing certain scripts time and time again, add them to your library. Using the capability to copy and paste scripts in FileMaker Pro 9 Advanced enables you to leverage prior work more easily.