
Chapter 26. Custom Web Publishing with XML/XSLT
In this chapter
Custom Web Publishing Versus Instant Web Publishing
Custom Web Publishing Versus XML Export
Preparing for Custom Web Publishing
Publishing FileMaker Data as XML
Other Custom Web Publishing Commands and Parameters
About the FileMaker XSLT Extensions
About Custom Web Publishing
Custom Web Publishing (CWP) is one of two technologies you can use to dynamically publish your FileMaker data on the World Wide Web. The other is Instant Web Publishing, which you can read about in Chapter 25, “Instant Web Publishing.” CWP in FileMaker 7 replaced the technology known as CDML (Claris Dynamic Markup Language) in earlier versions of FileMaker Pro. It is no longer supported.
With FileMaker 9, CWP now is available in two technologies: XML/XSLT (Extensible Markup Language/XSL Transformations; XSL is Extensible Stylesheet Language), which was introduced in FileMaker 7 and is described in this chapter, and PHP (PHP: Hypertext Preprocessor), which is released in FileMaker 9 and is described in Chapter 27, “Custom Web Publishing with PHP.”
Beginning with the FileMaker 7 lines, the web publishing technologies are built directly into the Server products and run as true standalone server-side processes. This is a change from previous implementations.
In FileMaker 9, it’s still possible to use Instant Web Publishing (IWP) to publish data from a client copy of FileMaker Pro. IWP can also be used in the server-only mode as well, though, and can support many more users in a server configuration.
As you can read in more detail in Chapter 29, “FileMaker Server and Server Advanced,” the FileMaker Server product line has two different flavors: FileMaker Server and FileMaker Server Advanced. FileMaker Server provides the web publishing capabilities for CWP. For ODBC/JDBC (Open Database Connectivity/Java Database Connectivity) or Instant Web Publishing beyond a single computer, you need FileMaker Server Advanced.
FileMaker Server need not have web publishing enabled, but if it is not, you will not be able to use Instant Web Publishing or Custom Web Publishing with PHP, XML, or XSLT. Without web publishing, the only access to your databases will be directly through the FileMaker Database server using FileMaker Pro clients. If you have FileMaker Server Advanced, you will be able to enable ODBC/JDBC, which will allow access to your databases from ODBC/JDBC clients other than FileMaker.
Most installations do enable web publishing if only because they allow so many deployment options, and because FileMaker Server supports web publishing except for Instant Web Publishing and ODBC/JDBC, which require FileMaker Server Advanced. When you install FileMaker Server or FileMaker Server Advanced, you deploy it over one, two, or three computers. Figure 26.1 shows the Admin Console used to deploy FileMaker Server Advanced on two computers.
Figure 26.1. Deploy FileMaker web publishing on one, two, or three computers.
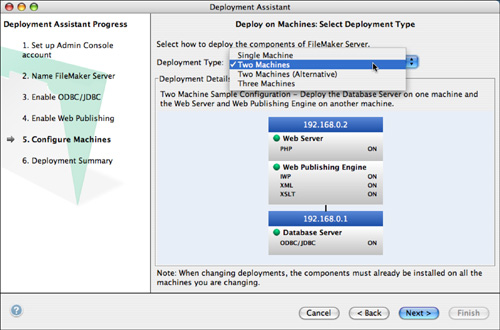
Regardless of the number of computers you use, you need to know about these three parts of FileMaker web publishing:
- Web server— This is Apache (Mac OS X) or IIS (Windows). During installation, the Web Server Module is installed into the web server. In addition, the FileMaker PHP application programming interface may be installed on the web server.
- Web Publishing Engine (WPE)— This is the code that handles web publishing. It includes the Web Publishing Core that routes requests from the Web Server Module inside the web server to the FileMaker Database Server. It also includes the Custom Web Publishing Engine (CWPE) that routes return information to the web server.
- FileMaker Database Server— This is the basic server to which you connect from FileMaker Pro clients.
What is critically important is that the users use web browsers to access the web server just as they normally would to access any web page. The Web Server Module installed by FileMaker routes the requests to the WPE and the FileMaker Database Server.
Requests to the CWP engine can return either raw XML—meaning that it’s presented in one of FileMaker’s built-in XML grammars—or they can return the results of an XSLT transformation applied to the XML. This leads to the possibility of transforming the XML into HTML, PDF, or any other text-based format before returning the data to the client. Returning raw XML is XML publishing; returning transformed XML is referred to either as XSLT or XML/XSLT publishing.
![]() You can read about FileMaker’s XML grammars in “FileMaker’s XML Grammars,” p. 664, and you’ll learn more about them in the course of this chapter as well.
You can read about FileMaker’s XML grammars in “FileMaker’s XML Grammars,” p. 664, and you’ll learn more about them in the course of this chapter as well.
Custom Web Publishing Versus Instant Web Publishing
If you’ve read about Instant Web Publishing already (in Chapter 25), you’ll be aware that the IWP capabilities of FileMaker 9 are quite extensive—so extensive, in fact, that you might wonder whether IWP would suffice for all your web publishing needs. It certainly seems simpler than working with a lot of XML and XSL data files. But CWP has a number of important advantages over IWP. Here are some of the most significant ones:
- IWP works very hard to replicate the look and feel of your FileMaker layouts, so it is guaranteed to work with only a few browsers (recent versions of Internet Explorer, Firefox, and Safari). By contrast, if you are publishing XML data as HTML, you can create HTML that is compatible with as wide (or narrow) a range of browsers as you choose—even a smart phone or iPhone.
- With CWP, it’s straightforward to integrate FileMaker data with other websites or provide FileMaker data to others in the form of a web service. CWP makes a strong distinction between the raw data (which is returned as XML) and the final presentational form (which can result from applying an optional XSLT stylesheet). By contrast, in IWP, data and presentation combine in a way that makes it all but impossible to use the data itself in other contexts.
- CWP is best for sites that need to conform to the conventions of the World Wide Web. IWP presents data in a FileMaker-driven way: It’s easy, using IWP, to reproduce a complex FileMaker layout on the Web. But it would be quite difficult to, for example, display a set of search results in a two-column list, or break a large set of search results up into multiple results pages—both of which are common presentation styles on the Web.
- IWP has a number of built-in limitations. For instance, it cannot reproduce FileMaker’s Preview mode, so it can’t display subsummary reports on the Web. In addition, the IWP list and table views are limited to displaying 5 and 20 records at a time, respectively. CWP can overcome these limits.
In general, IWP is best for making some portion of the functionality of an existing FileMaker database accessible to remote users. IWP’s chief strength is in bringing the FileMaker experience into a web browser. The most likely targets for this technology are remote users of a FileMaker system who might not be able to be in the same building or same site as the server, but require ready access. This is likely to cater to a relatively small group of users—hundreds, say, rather than the thousands and tens of thousands that a public website can reach.
CWP, on the other hand, is best when you want to present FileMaker data in a non-FileMaker style, either as familiar-looking web pages or in some other text-based form. It enables you to make FileMaker data available over the Web as raw XML, to integrate FileMaker data into an existing website, or to build a new website around FileMaker data while preserving all the conventions of web presentation.
Custom Web Publishing Versus XML Export
At first view, CWP might sound a lot like the XML Export capability we discussed in Chapter 24, “Sharing Data with XML.” There are some similarities, but there are also many significant differences. The main ones are these:
- XML export is a “push” technology rather than a “pull” technology. New data becomes available to potential clients only when you decide to publish the data by performing a new export, possibly manually, possibly via an automated script. CWP is a server-side technology that can be made available on demand, enabling clients to pull new data at any time by accessing a specific URL that you provide.
- XML import and export are desktop-based; they use FileMaker Pro or FileMaker Pro Advanced, not FileMaker Server.
- CWP is a server-side technology, which means you don’t need a copy of the FileMaker client to take advantage of CWP. All necessary programming occurs on the server side. On the other hand, exporting XML can take place only from a client application.
To sum up: Use XML export for occasional exports of FileMaker data as raw or transformed XML that you trigger through a client copy of FileMaker Pro. Use CWP when you want to provide live, on-demand access to FileMaker data via a web interface.
Preparing for Custom Web Publishing
CWP requires that you have FileMaker Server or FileMaker Server Advanced installed alongside a web server. Beyond that, you need to prepare each database that will use CWP, and you need to enable the appropriate CWP technologies on FileMaker Server.
![]() For more information on FileMaker Server and FileMaker Server Advanced, see Chapter 29, p. 785.
For more information on FileMaker Server and FileMaker Server Advanced, see Chapter 29, p. 785.
Getting Your Databases Ready for CWP
To get your FileMaker databases ready for CWP, you need to do a few specific things with access privileges in each file you want to share via CWP. If you’re familiar with previous versions of FileMaker Pro, you’ll recall that the various publishing options for a database (web sharing, local ODBC, remote ODBC) were all accessed via a file’s sharing options. Enabling or disabling a sharing method was simply a matter of checking or unchecking a sharing option.
Access to a FileMaker database via either XML or XSLT is handled via the security and privilege system. You can allow or deny XML or XSLT access to a file based on whether a user has the appropriate privilege, as well as control that user’s rights and privileges down to the record or field level.
Unfortunately, with this flexibility comes some additional work. To enable CWP in a file, you must enable the correct extended privileges for each type of CWP access you want to allow. To allow access to data from the file as raw XML, enable the extended privilege with the keyword fmxml. To allow access via XSLT, enable the extended privilege with the keyword fmxslt. Figure 26.2 illustrates the use of these extended privileges.
Figure 26.2. You’ll need to enable certain extended privileges to enable Custom Web Publishing with XML and XSLT.
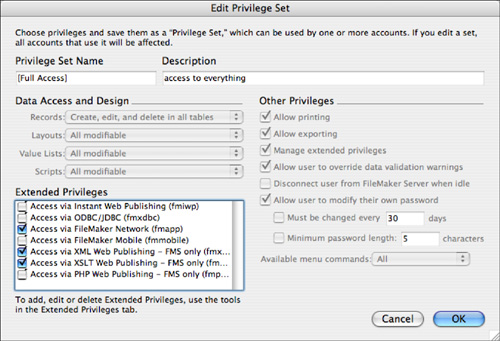
In FileMaker 7, it was necessary to create these extended privileges by hand. Since then, the set of default extended privileges expanded to include these two privileges. They’re off by default, but it’s no longer necessary to create them by hand.
In versions of FileMaker Pro before version 7, web sharing in any of its forms could not be enabled or disabled while a database was being served by FileMaker Server. In FileMaker 7 and later, the extended privileges for CWP can be enabled or disabled on the fly.
To recap, each database that you want to share via CWP must have the appropriate extended privileges created and added to one or more privilege sets.
In Figure 26.2, you see that extended privileges for both XML and XSLT are enabled. If you are only using one of the technologies, you do not need to enable both of them. What is important is that FileMaker network access is enabled. If so, you can use the Open Remote command in FileMaker Pro to access the database being shared by FileMaker Server. This is an important safety valve for you because it enables you to log on and make changes to things such as accounts and privileges. In general, providing yourself with at least one account that has network access to each shared database is a good idea.
 If you expect to see a database served via CWP and it doesn’t appear, check to make sure that the appropriate extended privileges are enabled. See the “Getting the Right Privileges” section in the “Troubleshooting” section at the end of this chapter.
Getting FileMaker Server Ready for Custom Web Publishing
You also have to configure FileMaker Server for the CWP technologies you will be using. This is done in the Web Publishing Engine configuration tab of Admin Console. The section for each CWP technology will show you what the settings are.
Publishing FileMaker Data as XML
This chapter covers two categories of CWP: CWP with XML and CWP with XSLT. The former technique allows you to publish FileMaker data as raw XML over the Web. The latter technique is XML-based as well, but involves applying additional transformations to the XML to turn it into other data formats such as HTML. Because XML publishing is the basis for both of these flavors of CWP, we begin with a thorough discussion of FileMaker data publishing with XML.
![]() Custom Web Publishing with PHP is described in Chapter 27, p. 749.
Custom Web Publishing with PHP is described in Chapter 27, p. 749.
Preparing for XML Publishing
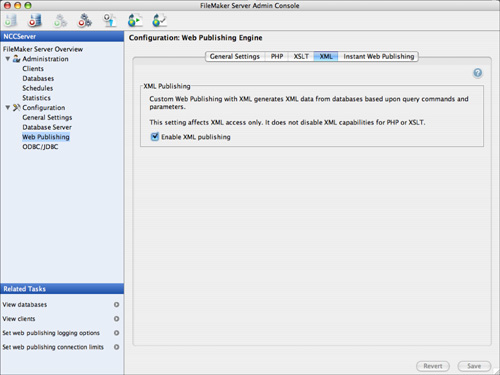
To publish FileMaker data as XML via the Web Publishing Engine, you must configure your databases for XML publishing as described in the previous section. You also need to enable XML publishing in the Configuration tab of Admin Console as shown in Figure 26.3.
Figure 26.3. Enable XML publishing in Admin Console.
Introduction to XML Publishing
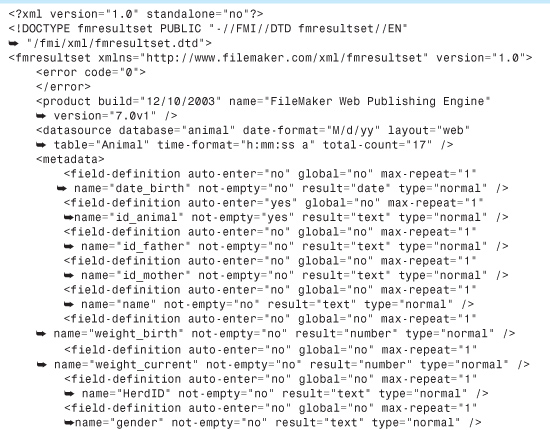
After you have enabled XML publishing in the database and in Admin Console, you can draw XML data from a served database by opening a web browser and entering a URL like the following:
http://192.168.100.101/fmi/xml/fmresultset.xml?-db=Animal&-lay=web&-findall
This URL, 192.168.100.101, is the address of the web server that we’ve configured to work with the Web Publishing Engine. The path to fmresultset.xml indicates that we want the results returned in the fmresultset grammar. The URL also instructs the WPE to access a database called Animal, via a layout called Web, and then to find all records and return them in the select fmresultset grammar.
Note that it’s not necessary to include the filename suffix (.fp7) when referencing the database name in the URL.
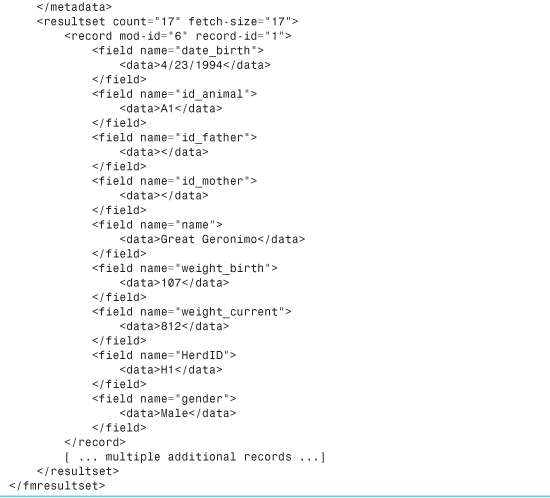
If you had a database called Animal open under FileMaker Server, and if it had privilege sets with the extended privilege for XML enabled, and it had a layout called Web, the Web Publishing Engine would return an XML document to your browser. If you’re using a browser capable of displaying XML (which includes Firefox, Safari, and Internet Explorer), you’d see something like the code in Listing 26.1.
Listing 26.1. XML Formatted with the fmresultset Grammar
In general, when you want to access XML data from an appropriately configured FileMaker file, you do so by entering a URL in the following format:
<protocol>//<server-ip>[:<port>]/fmi/xml/<grammar>.xml?[<query-string>]
Protocol indicates a web protocol, either HTTP or HTTPS.
Server-IP is the IP address of the web server that serves as the point of entry to the Web Publishing Engine. Note that if the Web Publishing Engine is installed on a different machine from the web server, you must specify the IP address of the web server machine here—providing the address of the Web Publishing Engine does not work.
Port is an optional part of the URL. In general, your web server will be running on the default HTTP port of 80 or the default HTTPS port of 443. If for any reason you’ve configured your web server to run on a different port than the protocol default, you need to specify that port number here. This port has nothing to do with any of the WPE-specific ports (in the 16000 range) or the FileMaker Server port (5003) that you might have encountered in the Web fmresultset Publishing Engine documentation; it refers strictly to the port on which your web server accepts incoming requests.
Grammar refers to one of two FileMaker xml grammars: FMPXMLRESULT or FMPXMLLAYOUT.
Note that only the first of these grammars is available via XML export—the second is available only via Custom Web Publishing.
Query-string refers to a series of one or more specific pieces of information you pass to the Web Publishing Engine to form the substance of your request. Among the pieces of information you would pass in the query string are the name of the database to access, the name of the layout you want to work with, and the name of a database action (such as “find all records,” expressed in the sample URL by the -findall command).
In general, then, you’ll use specially formatted URLs to access FileMaker data as XML via Custom Web Publishing. These URLs can be manually entered in a web browser, or they can be linked from a web page, or they can be used by other processes or applications that want to consume FileMaker data as XML.
Understanding Query Strings
A lot of the action in a Custom Web Publishing URL occurs inside the query string—that odd-looking set of commands at the end of the URL. Here again is the sample URL from the previous section:
http://192.168.100.101/fmi/xml/fmresultset.xml?-db=Animal&-lay=web&-findall
The query string is the portion of the URL that comes after the question mark. A query string consists of multiple name-value pairs, with each name-value pair taking the form name=value. If there are multiple name-value pairs in a URL, an ampersand character (&) separates additional pairs from the first one.
Query strings are not peculiar to FileMaker or to Custom Web Publishing—they’re an HTTP standard for passing information to a server-side program via a URL.
The sample URL passes three name-value pairs. Table 26.1 shows the names and their corresponding values.
Table 26.1. Name-Value Pairs in a Sample CWP URL

In general, any Custom Web Publishing URL has to specify at least a database name, a layout name, and a database action to perform. In fact, you can omit the database name and layout name in the case of a few specialized database actions. But, at a minimum, you will usually provide a -db value, a -lay value, and the name of some database action.
A few more notes on query string syntax: The order of the name-value pairs within the query string doesn’t matter, as long as all the required pairs are present. The initial dash (-) in the various names is significant, however, and can’t be omitted. You’ll notice that the database action consists of a name without a value (which is perfectly legitimate in an HTTP URL query string); database actions always consist of a name with no value attached.
If you have spaces in your field, layout, or database names, this might cause trouble. See “Dealing with Spaces” in the “Troubleshooting” section at the end of this chapter.
Performing Specific Searches with CWP URLs
The CWP URLs we’ve looked at so far are simply querying a FileMaker database table, finding all records, and returning the results as raw XML according to the selected XML grammar. But what if you want to query different tables within the chosen database, or select only certain records rather than all records, or apply a sort order to the results? All these things are possible with CWP.
Specifying the Table
One of the reasons it’s so important to supply a layout name with your CWP URLs (via the -lay parameter) is that the active table is determined by the active layout, via that layout’s table context. You might recall that there’s a Show Records From option in the Layout Setup dialog for each layout. This enables you to select a table occurrence that will provide the layout’s table context. When you specify a layout in a CWP URL, you are implicitly setting the active table as well. All commands in the query string are considered to be applied to whatever table underlies the chosen layout.
Finding Specific Records
The Custom Web Publishing URL can also be used to search for specific records. To do this, use -find as the database action, instead of -findall. You also need to specify one or more search criteria, which are also supplied as name-value pairs.
For example, if you’re working with a database of animals, and there’s a name field for the animal’s name, you can use the following URL to search for any animals named Hector:
http://192.168.100.101/fmi/xml/fmresultset.xml?-db=animal&-lay=web &name=Hector&-find
The database in question has only a single table, also called Animal, and that table is the table context for the web layout.
This code snippet specifies a database action of -find, and adds one more parameter to the query string. We say name=Hector to cause the Web Publishing Engine to search for only records where the name is Hector. If there are any such records, they’ll be returned in the chosen XML grammar. If there are no matching records, we get back a response that looks a bit like Listing 26.2.
Listing 26.2. Sample Error Response
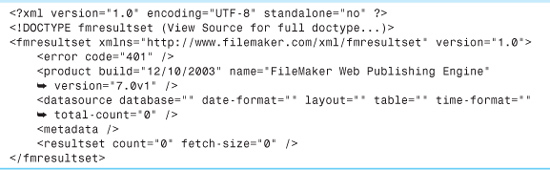
You can see that in the case where no records are found, the XML returned by the Web Publishing Engine contains an error code appropriate to the situation. In this case, the code is a standard “no records found” error. Note that the exact format of the error response varies depending on which XML grammar you specified in the URL.
Specifying an Exact Match When Searching
In the previous example, the search appeared to be for all animals named Hector. This is not exactly true. The previous URL will have exactly the same effect as entering Find mode in the regular FileMaker client, typing Hector into the name field, and performing the search. FileMaker, when searching text fields, searches on a “starts with” basis, so this search actually finds animals named Hector, Hector II, Hectorax, and so on. To specify that you want an exact match, rather than a “starts with” match, you need a bit more precision. In FileMaker’s regular Find mode, you’d type =Hector in the search field, with the equal sign indicating an exact match. In a CWP URL, you’d write:
http://192.168.100.101/fmi/xml/fmresultset.xml?-db=animal&-lay=web&name=Hector![]() &name.op=eq&-find
&name.op=eq&-find
Another parameter has been added to the query string here. The new parameter specifies what kind of operator we want to apply to one of the search fields. The syntax for this new parameter is
<field-name>.op=<operator>
Here, field-name is the field to which you want to apply the operator, and operator is a short character string indicating one of nine different possible operators. Here, the operator we’ve chosen is eq for an exact match. Other possible operators are cn for contains, bw for begins with (the default), and ew for ends with. So, if you wanted to find all animals with a name ending in tor, you could use this URL:
http://192.168.100.101/fmi/xml/fmresultset.xml?-db=animal&-lay=web&name=tor![]() &name.op=ew&-find
&name.op=ew&-find
This query string instructs the Web Publishing Engine to treat the search on the name field as an “ends with” search.
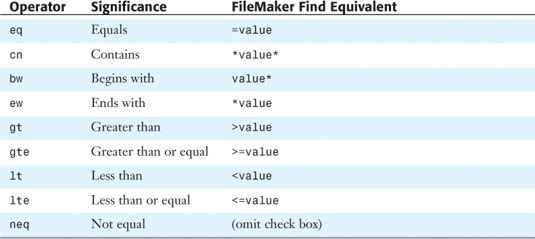
The operators available to you in Custom Web Publishing are similar to, but not identical to, the list you would find in the FileMaker client if you entered Find mode and clicked the symbol list in the status area. Both FileMaker Find mode and the Custom Web Publishing find syntax contain operators unavailable in the other. Table 26.2 lists all the operators available in Custom Web Publishing.
Table 26.2. Comparison Operators for the -find Command
Performing a Numerical Comparison Search
Consider a database that contains some numerical fields. The Animal database used as an example so far contains a field called weight_birth for an animal’s birth weight. Suppose that you want to find all animals with a birth weight less than 100 pounds. The following URL would do it:
http://127.0.0.1/fmi/xml/fmresultset.xml?-db=animal&-lay=web&weight_birth=100![]() &weight_birth.op=lt&-find
&weight_birth.op=lt&-find
Here, 100 is specified for the weight_birth search field, but we go on to say that the operator for that search field is the less-than operator, symbolized by the code lt.
Searching on Multiple Criteria
Suppose that you want to construct a more narrowly tailored search. You want to find all male animals with a birth weight less than 100. This is the equivalent of filling in two fields in FileMaker’s Find mode, instead of just one. You’d use a URL like the following:
http://127.0.0.1/fmi/xml/fmresultset.xml?-db=animal&-lay=![]() web&weight_birth=100&gender=Male&weight_birth.op=lt&-find
web&weight_birth=100&gender=Male&weight_birth.op=lt&-find
Here we’ve simply added one more search field: gender=Male. This constitutes a further limit on the search you saw in the previous example. This search finds only records for male animals with a birth weight less than 100.
Creating Multiple Find Requests
The preceding example showed how to use multiple criteria to narrow a search. But what if you want to use multiple criteria to broaden a search? We’ve searched for animals with birth weight less than 100. What if you also want to find, in the same search, any animals that have a current weight less than 500? You might recognize this as the equivalent of creating additional Find requests in the regular FileMaker Pro software.
To explain this kind of search, we need to introduce the concept of a logical operator. In the search demonstrated previously, for a record to be included in the search, all the search criteria in the query string had to be true. That is, an animal would not be included in the search results unless it was both male and had a birth weight less than 100. This kind of search is thus often referred to as an and search or an all-true search.
On the other hand, when you think about also finding animals with current weight less than 500, you have a situation where an animal will be included in the search results if any of the search criteria are true. In other words, a record will be found if the animal had a birth weight of less than 100 or it has a current weight of less than 500. This type of search is thus often called an or search or an any-true search.
By default, the Web Publishing Engine treats all searches as and searches. To perform an or search, you use a URL like this one:
http://127.0.0.1/fmi/xml/fmresultset.xml?-db=animal&-lay=web![]() &weight_birth=100&weight_current=500e&weight_birth.op=lt&weight_current.op=lt
&weight_birth=100&weight_current=500e&weight_birth.op=lt&weight_current.op=lt![]() &-lop=or&-find
&-lop=or&-find
Here you supply two search criteria. You also have to supply the field-level operator for each search field. In both cases, you’re performing a less-than search, so you need to specify an operator of lt for each field. The new element in the query string is the -lop parameter, which stands for logical operator. -lop can have a value of and (the default) or or (the one used here). The -lop parameter here instructs the Web Publishing Engine to treat the search as an or search.
In FileMaker proper, you can construct a search that’s a complex mixture of and and or searches by entering multiple Find requests, each with more than one field filled in. Such searches can’t readily be reproduced with Custom Web Publishing: The -lop command can be applied only to all the search fields taken together. There is also no way to invoke the additional FileMaker search options of Constrain or Extend Found Set.
Specifying a Sort Order for Search Results
When you make a request to the Web Publishing Engine, you can specify how the results should be sorted. You can specify one or more fields to sort on, as you can in the regular FileMaker application, and you can specify whether each sort field should be sorted in ascending or descending order. Consider a URL that will find all records in the Animal table, and ask that the records be sorted by name:
http://192.168.101.100/fmi/xml/fmresultset.xml?-db=Animal&-lay=web![]() &-sortfield.1=name&-findall
&-sortfield.1=name&-findall
The new query string command here is called -sortfield. You’ll notice we also added the suffix .1 to this parameter. This indicates the sort field’s precedence. The concept of precedence is meaningful only if you have more than one sort field, as you’ll see in a moment. Despite this fact, you can’t omit the sort precedence, even for a one-item sort, or the records won’t be sorted at all.
Suppose that you wanted to sort the records by gender, and to sort within each gender by current weight from highest to lowest. You’d do that like this:
http://127.0.0.1/fmi/xml/fmresultset.xml?-db=Animal&-lay=web![]() &-sortfield.1=gender&-sortfield.2=weight_current&-sortorder.2=
&-sortfield.1=gender&-sortfield.2=weight_current&-sortorder.2=![]() descend&-findall
descend&-findall
Here two sort fields are specified. The first sort is by gender, the second by weight_current. There’s also a new parameter, called -sortorder. Like -sortfield,-sortorder also takes a numeric suffix. Here, it’s used to indicate which sort field is being referred to. By default, each field will be sorted in ascending order. If you supply a value of descend for the second sort field, you ensure that the animals will be sorted, within each gender group, from heaviest to lightest.
Applications of Custom Web Publishing with XML
The current section shows how to use the Web Publishing Engine to query a database and publish the results as raw XML in one of several XML grammars. But what use is this capability, exactly?
Well, the most obvious significant use is to allow FileMaker to act as a web service provider. In Chapter 24, we covered how to use FileMaker to pull data from other web services on the Internet. But FileMaker can also act as a web service. If you provide a web service client with an appropriate URL, remote services and programs can query your FileMaker database via the Web Publishing Engine and extract whatever information you choose to let them see. Additionally, the URL query syntax discussed in this section is also at the heart of the more sophisticated form of Custom Web Publishing made possible by the application of XSLT stylesheets, which is the topic of the next sections.
The previous section discussed how to use FileMaker to produce plain XML, distributed over HTTP. This section builds on the previous one and demonstrates how to use XSL transformations (XSLT) to manipulate that raw XML further.
About Server-Side XSLT
The previous section demonstrates how to query a FileMaker database via the Web Publishing Engine and return the results as some form of raw XML. But, as you’ll know if you’ve worked with XSLT before, or if you’ve already read Chapter 22, “Importing Data into FileMaker Pro,” of this book, XML becomes even more interesting when you begin to transform it with XSLT stylesheets.
![]() For an overview of XML and XSLT basics, see “FileMaker and XML,” p. 663 and “Transforming XML,” p. 667.
For an overview of XML and XSLT basics, see “FileMaker and XML,” p. 663 and “Transforming XML,” p. 667.
If you’ve already read Chapter 24, you’re familiar with the distinction between client-side and server-side XSL transformations. When using FileMaker’s XML export capability, it’s the client copy of FileMaker that performs any XSL transformations you specify; hence the term client-side transformation. On the other hand, with Custom Web Publishing, the transformation is performed by the Web Publishing Engine (server side), and only the transformation result is sent back to the client (in this case, a web browser).
In the world of Custom Web Publishing, all XSLT transformations are server-side transformations. Stylesheets are placed in one or more predetermined locations within the Web Publishing Engine install hierarchy and accessed by the Web Publishing Engine as necessary.
Where to Put Your Stylesheets
When using Custom Web Publishing with XSLT, your stylesheets live on the same machine as the Web Publishing Engine. All the stylesheets you write have to be located at or beneath a certain point in the Web Publishing Engine directory hierarchy. On Mac OS X, the root directory is /Library/FileMaker Server/Web Publishing/xslt-template-files. On Windows, the root directory is located by default at c:Program FilesFileMakerFileMaker ServerWeb Publishingxslt-template-files, but you have the option to change the install directory on Windows, so be aware of where you installed your Web Publishing Engine and plan accordingly.
Preparing for XSLT Publishing
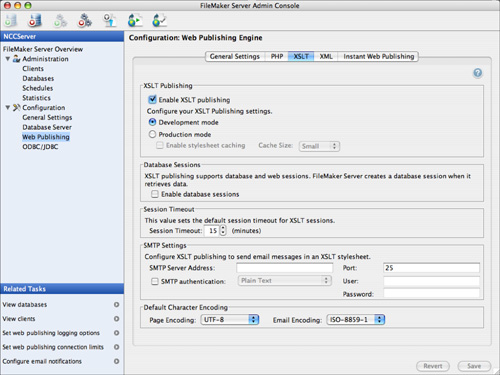
You have to enable the XSLT extended privilege in each database you want to use. You also have to use Admin Console to enable XSLT publishing as shown in Figure 26.4. The other options in this window are described later in this chapter.
Figure 26.4. Enable XML publishing in Admin Console.
Using the XSLT Site Assistant
When you have set up FileMaker Server and your databases for XML/XSLT publishing, you can use the XSLT Site Assistant to build a site. It is highly recommended that you start here. You can take the site that is built and modify the graphics to provide your own look and feel. You can also modify the pages to show more or less data. Starting from a functioning site is a big step forward. In fact, many programmers and web developers never start from a blank page: they begin with an existing site and modify it for the task at hand.
Build the Site with the Site Assistant
This section walks you through the process of using the XSLT Site Assistant to build a site for the Task Management Starter Solution. The files that are generated by the XSLT Site Assistant are downloadable from the author’s website at http://www.northcountryconsulting.com or the publisher’s website at http://www.informit.com/title/078973723X. In the section that follows, you will see how to write your own site files and how to modify these.
You can launch the XSLT Site Assistant in several ways:
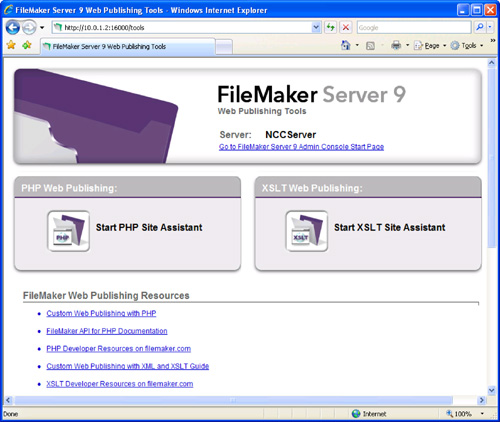
- There is a link to it at the bottom of the page you can access to connect to Admin Console. The URL is http://10.0.1.2:16000 (replace 10.0.1.2 with the address of your FileMaker Server computer; if you are running on the same computer, you can use 127.0.0.1 or localhost). The link takes you to the page shown in Figure 26.5.
- You can go to the tools page at http://10.0.1.2:16000/tools to open the window shown in Figure 26.5. Click the XSLT Site Assistant button.
- If you have downloaded the XSLT Site Assistant, you might have a shortcut on your computer you can double-click.
Figure 26.5. Start the XSLT Site Assistant.
In the first step, shown in Figure 26.6, type in an IP address (local or over the network) for the FileMaker Server computer. Click Connect. It might take a little while for the XSLT Site Assistant to connect to the remote computer. You should see a list of the available databases as shown in the figure.
Figure 26.6. Connect to FileMaker Server.
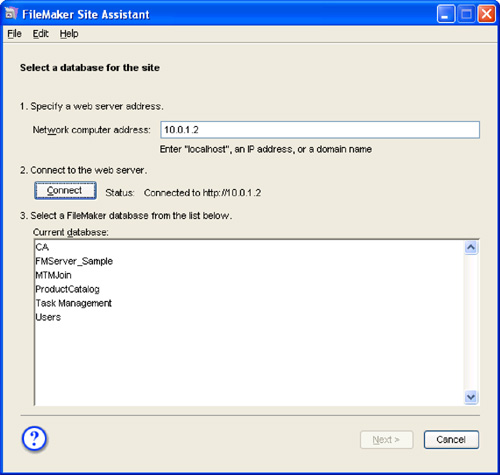
If you do not see the database you expect to see (or do not see any databases), try using the Open Remote command in FileMaker Pro or FileMaker Pro Advanced to connect to the same server. If you do not see the databases, the use Admin Console to check that they are open in FileMaker Server.
If you see them in FileMaker Pro with the Open Remote command, check the XSLT extended preference for the databases (use FileMaker Pro and the Open Remote command to do this). Databases without the XSLT extended preference set will not show up in this list.
When you select the database you want, you might be prompted to log in. If you have not set up your own accounts and privileges, the database probably will retain its default settings: user (Admin) and password (blank).
The next screen, shown in Figure 26.7, lets you select the layouts you want to use and the features you want to implement.
Figure 26.7. Select the site features.
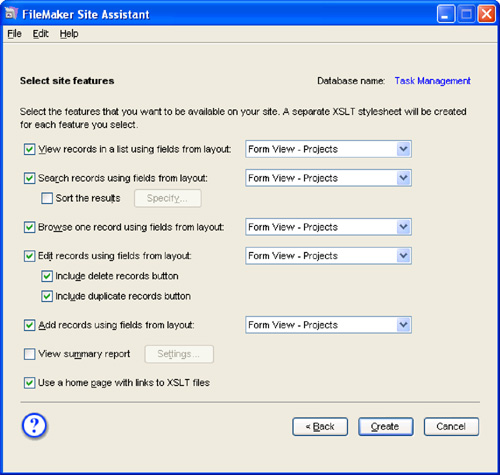
You might want to create new layouts specifically for CWP/XSLT. Those layouts may bring together a variety of fields from various tables. Whatever fields are in the layout you choose for any feature will be shown on the generated page.
Although you can customize the look of your web pages as you see fit, you can do only a few things with database-driven web pages, and they are the features listed in Figure 26.7. As you will see when the completed site is demonstrated, there are links back and forth from one page to another: If you display records in a list, you can click an individual record to show it in its own page (that is, the third feature, Browse One Record). Editing a record using a very similar display to that of browsing a record, but it allows input; likewise, adding a record is similar to editing a record, except that it starts with empty data values.
Navigation from one page of the site to another uses URLs as is the case with all websites. If you choose the last feature—a home page with links to XSLT files—you will have a page that uses no special elements in the URL and that can be easily linked to. It is a good idea to use this feature to provide a home or start page.
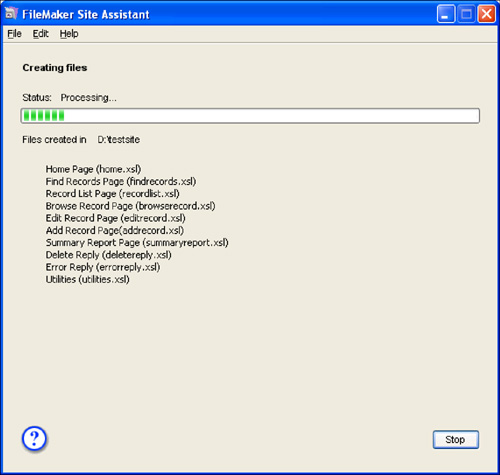
When you have made your choices, click Create and you will be prompted to choose a location for the files as shown in Figure 26.8. It is a good idea to generate the files in a directory of your own and then manually move them into the xslt-template-files folder. In addition, in selecting the location for the files, you will probably choose to create a new folder so that they are all together. Then you can move the entire folder into xslt-template-files.
Explore the Generated Site
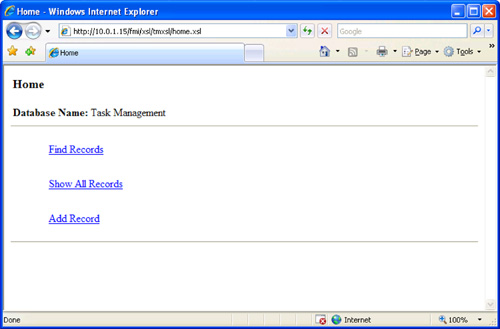
You can move the contents of the generated site into xslt-template-files to test it. In this case, a folder called TMXSL was created in xslt-template-files. The generated files were placed there. You can then use a browser to access them. The home page in this scenario is located at http://10.0.1.2/fmi/xsl/TMXSL/home.xsl. You would change the address for the address of your web server, and you would change TMXSL to the name of whatever folder you create. The name of the home page (if you chose the final feature, as recommended previously) is always home.xsl.
As you can see in Figure 26.9, this is a bare-bones site in terms of graphics. But it is fully featured from the FileMaker database point of view.
Figure 26.9. Launch the home page.
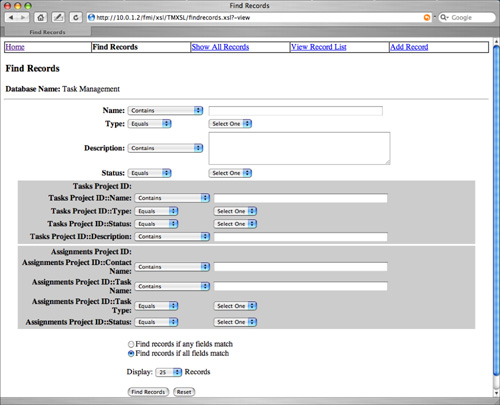
From the home page, you can click the Find Records link to display the automatically generated page shown in Figure 26.10.
Figure 26.10. A Find Records page is automatically generated.
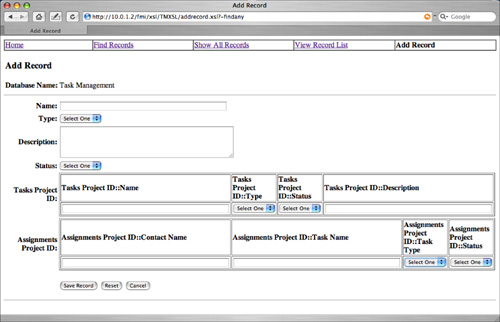
Likewise, the XSLT Site Assistant has created an Add Record page if you chose that feature. Figure 26.11 shows the Add Record page.
Figure 26.11. The XSLT Site Assistant also generates the Add Record page.
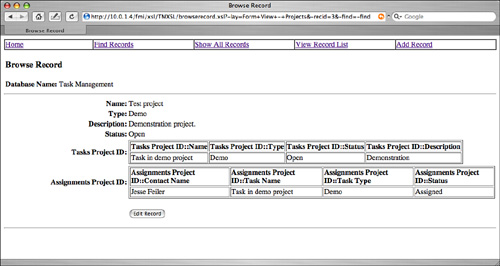
Another basic page simply displays a single record as shown in Figure 26.12.
Figure 26.12. The Browse Record page shows a single record.
Basic Cleanups
If you are familiar with HTML, you can modify the generated code. The most frequent change that you might want to make is to eliminate some of the fields and to change their names which, by default, are the names of the fields.
Both Figures 26.10 and 26.11 present their information inside an HTML table. The rows correspond to field names and input fields. The fastest way to customize the generated files is to provide new labels for the fields. Because a table is used to present the data, each row is inside a table row (tr) element. In most cases, the row consists of two or three table data (td) elements. For a simple field with a label, there are two td elements; for the find table, there is a pop-up menu with the find choices such as contains, equal, and so forth.
Thus, to change the label of the Tasks Project ID::Description field, simply find the row that contains that td element. Here is the code from findrecords.xsl:
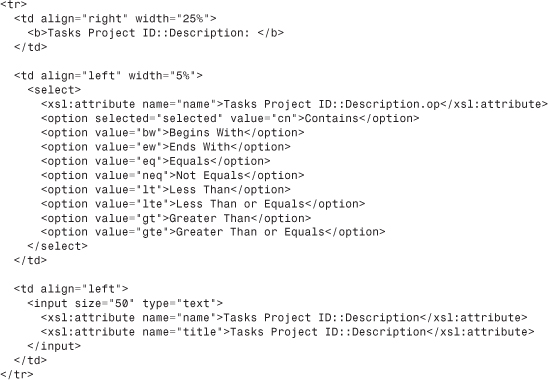
The first element is the name, followed by the selector for the type of relationship, and then the comparison value. You will see XSL code in the second two td elements, but the first one simply consists of the label. You can change that without causing problems. But, of course, you should test it after you change it. This same process can be used to remove fields from the generated pages: Just make certain you delete an entire tr element.
Because the XSL code is clearly identified, you can see where it is. For now, do not touch it. The next section takes you inside the XSLT files either to write your own or to further modify the code that has been generated.
Writing Your Own XSLT Code
The mechanics of the stylesheet are straightforward enough. It declares a namespace called fmrs to match up with the fmresultset namespace. It does an initial template match on the fmresultset element, where it outputs all the initial HTML elements, including a small CSS stylesheet. After that, it uses <xsl:for-each> to loop over all the <fmrs:record> elements, and outputs two formatted HTML table rows for each record: one containing the name, the other containing the other three fields of interest. You’ll notice that the fmresultset grammar is easier to work with than the FMPXMLRESULT grammar because you can reference field names directly, instead of having to refer to them by their position within the <METADATA> element.
Format of the XSLT URL
The previous section demonstrated a simple server-side stylesheet, but it didn’t explain exactly how the stylesheet would be applied to XML coming out of FileMaker Server. Just as with XML Custom Web Publishing, you invoke the stylesheet from a web browser, via a specially formatted URL. For the previous section’s stylesheet, a sample URL might be
http://192.168.101.100/fmi/xsl/animal/animal-fmresult.xsl?-lay=web![]() &-db=Animal&-grammar=fmresultset&-findall
&-db=Animal&-grammar=fmresultset&-findall
The general format of an XSLT URL is somewhat similar to that for XML. It looks like this:
<protocol>//<server-ip>[:<port>]/fmi/xsl/[<path>/]<stylesheet.xsl>![]() [?<query string>]
[?<query string>]
Many of these elements have the same significance as in the plain XML URL. Rather than reference the /fmi/xml path on the server, though, we reference /fmi/xsl. We follow this immediately with the name of the stylesheet, but note that this assumes that the stylesheet is immediately inside the root XSL directory in your Web Publishing Engine installation directory. You have the option of creating additional subdirectories inside that root directory, and if you do this, you have to reference those intermediate folders in the path as well. In the URL shown previously, we created a subdirectory inside the XSLT root directory, called animal, and inside that directory is the stylesheet, called animal-fmresult.xsl. So, you have to include the intermediate /animal folder in the path in the URL.
After the name of the stylesheet, a query string is supplied that’s very similar to the XML query string because you can request the identical actions and search options. One difference, though, is that you have to pass a parameter called -grammar and set it to be equal to the name of the grammar you intend to use. The earlier stylesheet was written with the fmresultset grammar in mind, so this must be specified in the URL. It’s an error to omit the -grammar parameter. And, of course, if you specify a grammar different from the one the stylesheet expects, you’ll get unexpected results.
It’s actually possible to omit the entire query string when using XSLT with Custom Web Publishing! The reason is that XSLT-CWP has a special command for embedding the query parameters inside the stylesheet itself. You’ll see more on this in the following section.
Embedding Query Parameters in a Stylesheet
One of the difficulties with allowing your FileMaker data to be accessed via a URL is that a canny user can easily experiment with the URL elements to try to create effects other than those you intended—for example, displaying forbidden records, or even sending a command to delete a record. Custom Web Publishing has a method for embedding query parameters in the body of a stylesheet.
To do this, you use a special XML construct called a processing instruction. A processing instruction is a command to a specific XML processor. If you pass a processing instruction that your processor doesn’t understand, it ignores that instruction. To embed query parameters in a stylesheet, you could add a line like the following to a stylesheet:
<?xslt-cwp-query params="-grammar=fmresultset&-db=Animal&-lay=web&-findall"?>
What this processing instruction means is that the values supplied in this processing instruction override any values for -grammar, -db, -lay, or the database action passed via the URL. So, no one can ever point the page to a different database or demand a different database action (such as record deletion!).
You should be aware that this query string in the processing instruction does not simply replace the query string that might be present in a URL. It overrides it, one parameter at a time. What this means is that if the URL contains a parameter, such as a search field or sort order, that isn’t mentioned in the processing instruction, that parameter will still be in force. If you want to block any possibility that a user could supply a rogue query parameter, you have to specify that parameter explicitly in your static processing instruction.
It’s a good idea to use this technique wherever you can to increase the security of your databases and your web application. In addition, embedding at least the expected grammar in the stylesheet prevents you from ever having a mismatch between the grammar you choose in a URL and the one for which the stylesheet is written.
Using Tokens to Share Data Between Stylesheets
You can use tokens to pass information between your stylesheets. There are two parts to the process: sending token information to a page and retrieving it.
Creating a Token in a URL
You create a token as part of a URL by using the syntax
-token.myTokenName=<a URL-encoded string>
You can name the token whatever you want (after the dot); the data that is associated with it is URL encoded, which means that it cannot contain unescaped spaces.
Because URLs might be visible in browsers and on the network, do not use tokens for passing data that you want to remain confidential.
The token created in the URL will be passed to the invoked stylesheet.
Retrieving a Token in a Stylesheet
You can retrieve tokens, or other parameters from the URL invoking the page, by using a request-query parameter at the top of your stylesheet. First, declare the required namespace:
fmq="http://www.filemaker.com/xml/query"
Next, include the <xsl:param name="request-query"> statement before the templates in your stylesheet.
You can then access URL query parameters with syntax such as the following:
$request-query/fmq:query/fmq:parameter]@name = '-token.myTokenName']
This syntax lets you access any of the following URL parameters by simply specifying these values in the quoted string for name:
-db-lay-grammar-findall
Other values that you can retrieve include
client-ipclient-user-nameclient-passwordxml-base-uriauthenticated-xml-base-uri
Other Custom Web Publishing Commands and Parameters
XSLT-CWP has a lengthy list of other commands and parameters that you can pass as part of the query string. This section lists and explains them briefly.
Other Query Commands
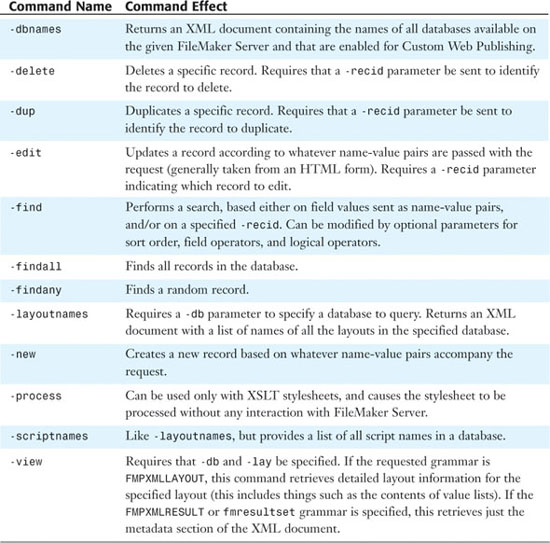
As you know, each Custom Web Publishing URL contains a query string, and that query string can supply at most one database command. Commands covered so far include -find, -findall, -delete, -new, and -edit. Commands are supplied as a single name with no associated value. Table 26.3 contains the full list.
Table 26.3. Custom Web Publishing Database Action Commands
Other Query Parameters
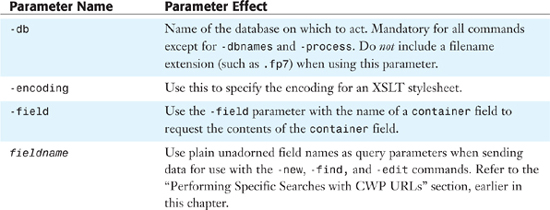
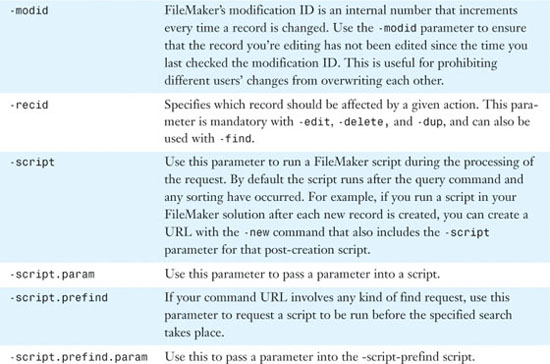
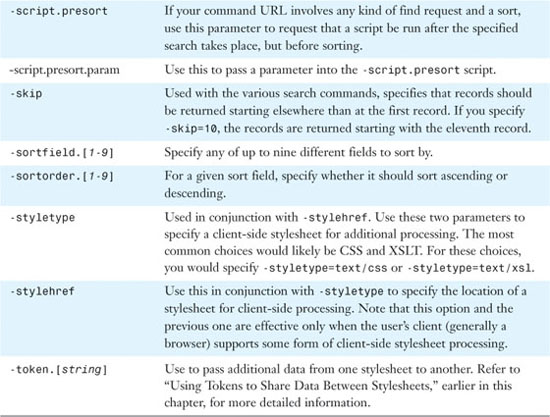
In addition to a single database command, Custom Web Publishing URLs can contain other parameters. Some are mandatory, such as -db, and (generally) -lay and -grammar. Others, such as -lop and -sortfield, are particular to specific commands. Table 26.4 shows a list of the most important ones.
Table 26.4. Other Custom Web Publishing URL Parameters

About the FileMaker XSLT Extensions
All XSL transformations have to be performed by an XSL processor of some kind. An XSL processor should conform to some standard flavor of XSL (currently 1.0). But XSL processors are also free to add their own extensions. Like proprietary extensions to web browsers, this practice stands to increase the range of actions you can perform with a given XSL stylesheet, but risks the creation of stylesheets that work well with only one XSL processor. Stylesheets for CWP work well in only a FileMaker environment anyway, so this is not a serious concern.
The Web Publishing Engine’s XSLT processor obviously adds some extensions because it’s capable of triggering FileMaker database actions. But it also has a host of other extended capabilities. Some of these you’ve seen already, such as the capability to access all the parameters of the HTTP request that invoked the stylesheet. With similar syntax, you can get access to the user’s IP address, username, and password, as well as the address of the server from which the stylesheet is being served.
FileMaker also provides XSL extensions to handle a host of other common web programming tasks. There’s a rich library of string-manipulation functions, as well as a set of functions to send email, a set of functions to create and maintain user sessions, and functions to deal with HTTP headers and cookies. Unfortunately, a full treatment of all these areas is beyond the scope of this book, but the documentation that accompanies FileMaker Server Advanced describes these functions fairly thoroughly.
The point to be aware of here is that FileMaker’s XSL implementation is actually a full-featured web programming language as well, and has many of the features of powerful modern web programming languages such as Perl, PHP, and JSP. After you’re familiar with the basics of combining XSL stylesheets with FileMaker database actions, you can delve further into the other rich features of the CWP XSL implementation.
About Sessions
If you’ve read Chapter 25, you’ve already read some discussion of the concept of sessions. To recap briefly: The connection between a web browser and the Web Publishing Engine is very much unlike the connection between a client copy of FileMaker and the FileMaker Server. FileMaker Server can at any time reach out and push data to any connected client. It knows at all times what its connected clients are, where they are in the system, and at what network address they can be found. A web server, by contrast, retains no memory of a client from one connection to the next.
This is not a good thing for database work! I need my website to remember the contents of my shopping cart as I shop around the site. This is possible only with session management. Session management is generally a middleware feature. Web programming languages such as PHP and JSP offer the programmer different means of managing sessions. In general, under session management, each incoming web request is associated with a key of some kind. The key can be passed in the URL (if you’ve ever seen a long ugly string such as ?jsession=A9238Ajasdj9mAEd in a web URL, odds are you were looking at a session key), or it can be passed behind the scenes in an HTTP cookie. FileMaker’s Custom Web Publishing session implementation lets you choose between these two methods. Whatever the means, the middleware on the web server has a way of associating that key to other information about the client. In the shopping cart example, the key might hook up to a database record that stores the actual contents of your cart as you navigate around the site.
FileMaker’s Custom Web Publishing, like other middleware solutions, enables you to manage sessions for your users behind the scenes. You would use this capability anytime you wanted to store important information about the user that would be carried from screen to screen. An experienced HTML programmer could get away with passing a lot of data from page to page via the URL or via an HTML form. But there are limits to the amount of data than can be passed by URL, and there are limits to the type of data that can be passed by either method—generally just plain text strings.
FileMaker’s session implementation is quite elegant because it allows you to pass around XML fragments behind the scenes. This allows for much richer data structures than you could pass with regular HTML.
In addition to passing around XML information by means of sessions, FileMaker’s session implementation allows you to keep track of the state of the FileMaker client session as well. The XSLT configuration screen shown previously in Figure 26.4 allows you to enable or disable database sessions. Database sessions are an additional capability on top of regular session management. In addition to “sessionizing” user information of your choice, they enable you to keep track of FileMaker-specific information such as global fields or the current script state.
So, for example, if your stylesheets modify a global field and you have database sessions enabled, the global field retains its new value for the specific current user as that user navigates from page to page. Or, if you use a script to change some aspect of the user’s state (for example, by using the Relogin script step to change the user’s privileges), this state is maintained across sequential requests.
Session management is a large topic and we don’t have space to do it justice. The FileMaker documentation helps you get a better grip on the specific functions and commands that Custom Web Publishing uses for session management. As for the issue of whether to configure the Custom Web Publishing to use database sessions, your decision will depend on how you construct your XSLT-CWP solution. If you intend to make heavy use of global fields or call scripts from your stylesheets that would change the state of a user’s privileges, you should configure the Web Publishing Engine to enable database sessions.
Troubleshooting
Getting the Right Privileges
I can connect to my Web Publishing Engine and FileMaker Server via the Administration Console, but I don’t see the databases I expect to see.
Make sure that for every database you want to make available via XML-CWP or XSLT-CWP, you have attached the appropriate extended privilege (fmxml or fmxslt) to at least one privilege set.
Dealing with Firewalls
My web requests mysteriously time out, as though something were blocking them.
If you can get to the Administration Console, but your Custom Web Publishing URL requests appear to get no response, you might have a firewall in your way. If you suspect a firewall might be involved, consult your network administrator to explore this question. If it turns out that your machines are set up such that your web server is on one side of a firewall and your Web Publishing Engine machine or FileMaker Server machine is on the other, you need to open certain ports in the firewall. The rules are these:
- When the web server and Administration Console are on one machine and the Web Publishing Engine on another, traffic must be able to flow between the two machines on ports 16016 and 16018.
- When the Web Publishing Engine is on a different machine from FileMaker Server, traffic must be able to flow between the two machines on port 5003.
Dealing with Spaces
The Web Publishing Engine doesn’t seem to see my entire URL. I enter a long URL and the web server appears to truncate it and reports that the shorter URL can’t be found.
If, despite the cautionary notes in this chapter, you have left any of your databases, fields, or layouts with spaces or any other nonalphanumeric characters in their names, your Custom Web Publishing URLs might very well break. If a web server or browser encounters a space in a URL, it might assume that the URL ends there. Other nonalphanumerics have different but equally irritating effects.
If you must work with URLs with spaces in them, you can get by with replacing all spaces with the string %20 whenever you need to write out a URL. Your stylesheet then might generate an HTML page with the following link:
<a href="http://192.168.101.100/fmi/xsl/process-this.xsl?![]() -db=Too%20Many%20Spaces&-lay=Spaces%20Here%too&-findall
-db=Too%20Many%20Spaces&-lay=Spaces%20Here%too&-findall
If at all possible, we strongly encourage you to use only alphanumeric characters for database, layout, and field names and to avoid the use of whitespace. Extend this caution to script names if you are planning to call scripts from the Web.