
Chapter 22. Importing Data into FileMaker Pro
In this chapter
Importing From a Microsoft Excel File
Importing Multiple Files from a Folder
Importing Photos from a Digital Camera
FileMaker Extra: Exploiting the FileMaker-to-FileMaker Import
Working with External Data
FileMaker Pro can work with data from a variety of other sources. It’s possible to bring data directly into FileMaker from a number of different flat-file formats, as well as from remote databases and XML-based data sources. In many cases, you can open data files from other applications simply by dropping them onto the FileMaker Pro application as though they were native FileMaker files. FileMaker can also import data that resides on other computers (such as data from a remote database or a web-based XML data source) and even from devices such as a digital camera.
![]() Additional information bearing on the topic of FileMaker data exchange can be found in Chapter 23, “Exporting Data from FileMaker,” p. 649, and Chapter 24, “Sharing Data with XML,” p. 661.
Additional information bearing on the topic of FileMaker data exchange can be found in Chapter 23, “Exporting Data from FileMaker,” p. 649, and Chapter 24, “Sharing Data with XML,” p. 661.
Flat-File Data Sources
Flat file is a generic term that refers to a file containing data in row-and-column format. If you think of a spreadsheet that holds data about personal contacts, the spreadsheet will have some number of columns, for attributes such as first name, last name, address, and so forth, and some number of rows, each one representing a single contact.
The formats of flat files vary. Some might separate one column from the next by tabs and one row from the next by carriage returns (a tab-delimited file). Another might use commas to separate column values. Some might include a first row that gives a name for each column. Some might be in a plain text format that you could read with any text editor, whereas others might be in specialized file formats (such as FileMaker Pro or Microsoft Excel). In general, though, all flat-file data sources represent some variation of the idea of row-and-column data.
Choosing the Target Table
As you can tell from the previous description, a flat data file maps well onto the concept of a database table. And indeed, in FileMaker Pro, we do import data into only one table at a time. FileMaker chooses this target table for you automatically, based on the prevailing table context.
![]() For a full discussion of table context, see Chapter 18, “Advanced FileMaker Solution Architecture,” p. 517.
For a full discussion of table context, see Chapter 18, “Advanced FileMaker Solution Architecture,” p. 517.
Initiating the Import
We give the example of importing tab-separated data because it’s a good example of a typical text-based flat-file format. Many of the other text-based formats vary from tab-separated text only in small details. We’ll note those differences further on. Here we’ll walk through the process of importing from a tab-separated text file. Like other types of data, you can import a tab-separated data file in one of three ways:
- Choose File, Import Records, and then navigate to the file and select it.
- Choose File, Open, and then navigate to the file and select it.
- Drag and drop the file directly onto the FileMaker Pro application.
Importing and opening non-FileMaker files are very similar actions in FileMaker Pro. The main difference is that the “open” action creates a new FileMaker file (complete with data from the originating document), whereas the “import” action is used to bring data into an existing file. You can also use the importing technique to bring in images from a digital camera and data from multiple files in a folder—neither of these is possible if you use either variation of the Open command.
The Import Field Mapping Dialog
When you’re importing data, after you choose your source file, FileMaker Pro presents you with the Import Field Mapping dialog box shown in Figure 22.1. This dialog lets you choose how the records in your source file will be imported and in what order.
Figure 22.1. FileMaker’s Import Field Mapping dialog. All importing processes pass through this dialog at some point.

The top of the Field Mapping dialog lists two filenames: Source and Target. Source is the file from which you’re importing, and Target is the current table in the current file—in other words, the one that’s receiving the imported data.
Choosing an Import Action
One of the things you have to choose in the Import Field Mapping dialog is the Import Action. It’s visible in the lower left of the dialog box. This choice tells FileMaker whether to try to add new records in the target table (one record per row of source data), or to try to update the existing FileMaker records with the source data. Updating on import is a topic in its own right, one that we deal with later in this chapter. For now, we’ll cover what happens when we want to create new FileMaker records based on the source data.
Aligning Source and Target Fields
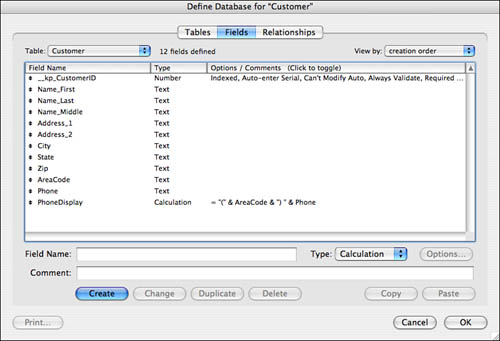
You also have to decide which fields in the target are to receive data and from which source columns they’ll receive it. Figure 22.2 shows the field structure for a FileMaker table designed to hold customer information. It consists mostly of text fields, with the exception of the PhoneDisplay field, which creates a formatted display from the AreaCode and Phone fields.
Figure 22.2. The field structure for a basic table of customer information.
Assume that you want to import some data into this customer table. The source file is a tab-separated file containing first name, middle name, last name, address1, address2, city, state, and ZIP. (Notice that the order is a little different from the field order on the FileMaker side.) To do this, you choose File, Import Records, File. From the Show menu, choose Tab-Separated Text, and then navigate to your file and select it. Figure 22.3 shows the result.
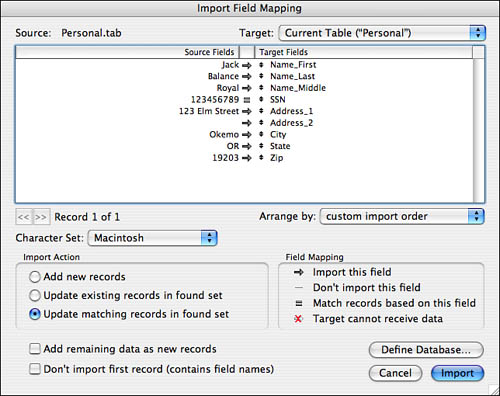
Figure 22.3. Another look at the Import Field Mapping dialog. Note that the source and target fields don’t quite line up correctly. Jack R. Balance is about to enter the system as Jack B. Royal.
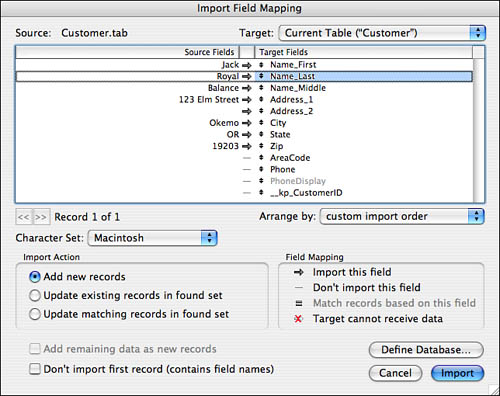
If we look at the way the source fields line up with the target fields, something isn’t right. We have a record for someone named Jack Royal Balance. FileMaker will import this record into the system as Jack Balance Royal if nothing changes in the import order. In the FileMaker creation order, middle name comes after last name, but in the source file, it comes before. It’s not possible to manipulate the ordering of the fields on the left (the source fields), but you can use the black up-down arrows next to each target field to change the target ordering manually. In this case, you just drag the Name_Middle field up one line to make it change places with Name_Last.
When you change the target field ordering by dragging a field manually, the field you drag changes places with the field you drop it on. Often you might want to drop the field you’re moving between two others in the import ordering so that it pushes all the fields underneath it down a step, but this is not how the manual ordering works.
Deciding Where the Data Goes
After all the target fields correctly align with the source fields, you need to make sure that they’re all set to receive data. Between the columns of source and target fields is a column of field mapping indicators. The possible indicators are shown in the Import Field Mapping dialog, in the section at the lower right called Field Mapping, as shown in Figure 22.4.
Figure 22.4. FileMaker’s Import Field Mapping indicators.
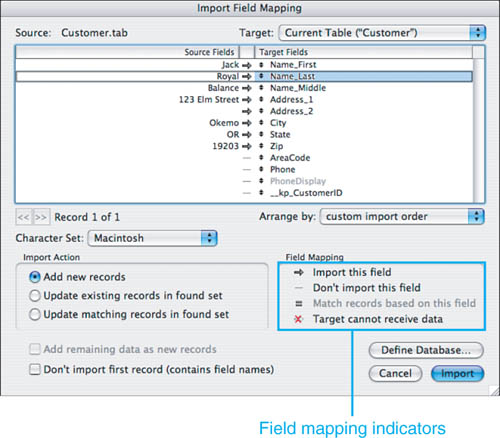
The meaning of the different indicators is as follows:
- Arrow— Data from the source field will be imported into the target field.
- Straight line— Data from the source field will not be imported into the target field.
- Equal sign— The source and target fields are being used as part of a match criterion. This choice is available only if you’ve chosen one of the update import actions. We discuss the update options fully in the following section (see “Updating Records with Imported Data“).
- Red x— This indicates that the target field cannot receive data. Typical causes are that the target field is a calculation or summary field.
To sum up, make sure that all your target fields align with the correct source fields and that the mapping indicators are set to allow data to flow into the fields you intend to receive it.
Ways of Auto-Aligning Source and Target Fields
In the Import Field Mapping dialog, you might have noticed a menu at the middle right called Arrange By. This menu simply governs the ordering of the target fields in the column on the right. It might be that you can line up the target fields with the source fields by putting the target fields in creation order, for example, or in alphabetical order by name. If you choose one of these options, FileMaker rearranges the target fields in the order you chose, and then does its best to set the mapping indicators accordingly. Most likely you’ll have to do some manual adjustment of the result, but these choices can often eliminate a lot of tedious hand labor.
One very useful choice in this menu is the first one: Matching Field Names. This choice is available only when the source file has some kind of data in it that attaches names to each of the source fields. Examples of such files are actual FileMaker files (of course) or flat data files with field names in the first row. If your source file contains field names that correspond to the names of target fields, you can choose this arrangement option and all the fields with identical names will simply line up, no matter what position they have in their respective files.
This doesn’t guarantee that the target fields will be able to accept data. If a source field has the same name as a field in the target table but the target field is defined as a calculation, the two will line up, but it will still be impossible to import any data into the target field (you cannot import into calculation fields).
Scanning the Data Before Importing
When the Import Field Mapping dialog first opens, the Source column shows data from the first record in the source file. You might find that the first record’s data is not enough to remind you of the appropriate field mapping, or you might want to scan through the source data for other reasons.
Directly under the source column, you’ll notice forward arrow and back arrow buttons, and a display that shows the total number of inbound records as well as the record you’re currently viewing. You can use the forward and back arrow buttons to scan through the inbound data, either to verify that you have the correct mapping of source to target or to examine it for other reasons.
Performing the Import
After you verify all your field mappings and make your choice of import action (so far we’ve looked only at adding records), pressing the Import button starts the import proper. When the import completes, FileMaker displays a dialog box telling you how many records were imported and whether there were any errors in the import process.
 Depending on how you set up your field validation, the inbound data might or might not be acceptable. Under certain circumstances, FileMaker might reject imported records for this reason. See “Imports and Validation” in the “Troubleshooting” section at the end of this chapter for more information.
Assuming that there were no serious errors and at least some records were imported, the newly imported records are isolated in their own found set after the import is complete. This is an important point because if there’s something seriously amiss with the imported data, you have an opportunity to delete the whole set and start over. Or, more optimistically, the records are all there in one set if you need to perform any other operations on them as a group, such as a batch Replace operation.
Updating Records with Imported Data
When you import data into a table, you have a choice as to whether FileMaker Pro should use the source data to create new records or add it into records that already exist. You can also choose to import the data into an entirely new table. We discuss this feature in more detail later.
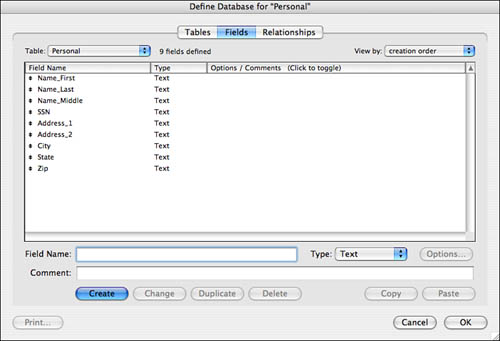
As an example, suppose that you have a FileMaker file with a table of records about people. This table contains a name, address, Social Security number, and other information about each person. Let’s say that you periodically want to import the most current address for each person from some other source outside of FileMaker, and apply the most current address to each of your FileMaker records, without changing anything else about the record. Assume that your table of personal data looks something like the data shown in Figure 22.5.
Figure 22.5. Data structure for a table containing personal information.
Then assume that you can get a data file from some other source, possibly governmental, that contains (among other things) a field for Social Security number and a few fields of address information. You’d like to match up the records in the source file with the records in your FileMaker table. FileMaker considers two records to match if they have the same Social Security number. If a record on the FileMaker side doesn’t have a match in the source file, you’d expect it to be left alone. If there’s a record in the source file that doesn’t have a matching FileMaker record, you’d want to ignore the source record altogether.
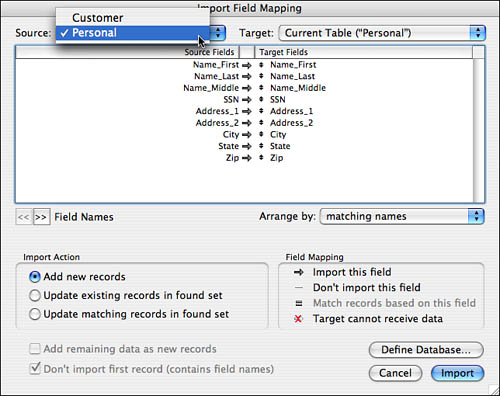
All these goals are easily accomplished with FileMaker’s import options. Figure 22.6 shows the necessary settings in the Import Field Mapping dialog.
Figure 22.6. The Import Field Mapping dialog, preparing to import address data for records with matching Social Security numbers in the source.
Here the action Update Matching Records In Found Set has been selected. This tells FileMaker that you’re going to specify at least one pair of fields as matching fields. This pair of fields acts a lot like a match field in a FileMaker relationship: Each row (or record) in the source is matched with any corresponding records in the target.
FileMaker’s Update Matching Records feature can be tricky. For an overview of some of the potential pitfalls, see “Matching Imports” in the “Troubleshooting” section at the end of the chapter.
In addition to choosing the Update Matching Records setting, the option to bring in just the address fields is also chosen. So, these particular settings update just the address information, leaving all the other fields untouched.
As a final note on update importing, you should be aware that the update affects only records in the current found set on the target side. If a record on the target matches a record in the source, but the target record is outside the current found set, the import does not affect it.
Updating Records Without Using Match Fields
You’ve probably noticed that another update option is available in the Import Action section. It’s Update Existing Records in Found Set, and it’s simpler than the Update Matching Records choice. When this action is selected, rather than matching records based on a match field or fields, FileMaker matches records based purely on their position: The first record in the source updates the first record in the current found set on the target side, the second source record updates the second found target record, and so on.
If the number of records in the source doesn’t exactly equal the number of records in the target found set, FileMaker takes account of this. If there are more source records than target records, FileMaker skips the extra source records. If there are more target records than source records, the extra target records are left untouched. In either case, FileMaker provides an extra message to tell you what happened.
The only exception occurs if you check the box labeled Add Remaining Data as New Records. In that case, if there are extra records on the source side, FileMaker imports them into the target as brand new records.
Importing from Another FileMaker Pro File
As you might expect, it’s possible to import from other FileMaker Pro files. If you choose FileMaker Pro as your source format, you also have to specify a table in the source file from which you want to draw data. This choice is available in the Import Field Mapping dialog, as shown in Figure 22.7.
Figure 22.7. When importing from a FileMaker database with multiple tables, it’s necessary to pick the source table from which you want to draw data.
Importing from a FileMaker file can be particularly convenient in that it allows you to use the Matching Field Names option for lining up the source and target fields. Developers will often choose to open a source file within FileMaker, create a new FileMaker file based on the originating document, and then use that new FileMaker file for importing, data cleanup, and so on.
![]() For some other uses of the FileMaker-to-FileMaker import feature, see the “FileMaker Extra: Exploiting the FileMaker-to-FileMaker Import” section at the end of this chapter, p. 646.
For some other uses of the FileMaker-to-FileMaker import feature, see the “FileMaker Extra: Exploiting the FileMaker-to-FileMaker Import” section at the end of this chapter, p. 646.
Importing from a Microsoft Excel File
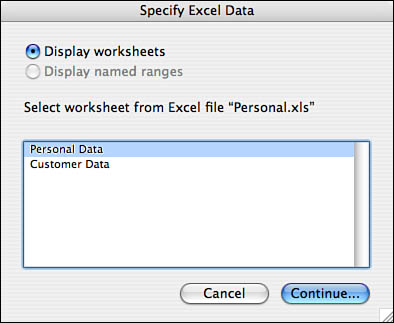
FileMaker Pro has some special capabilities for importing data from Microsoft Excel documents. FileMaker is aware of multiple worksheets within an Excel document and of any named ranges (groups of cells that have been given specific names). When you select an Excel file for import, if it contains multiple worksheets or named ranges, FileMaker prompts you to select either a worksheet or a named range as the source for the data, as shown in Figure 22.8.
Figure 22.8. When you import data into FileMaker from an Excel document, you can import from a specific tab or a named Excel range.
After you choose the specific part of the Excel document you want to import, the rest of the import proceeds. If you’re bringing Excel data into FileMaker by choosing File, Open, and selecting an Excel file to open, FileMaker creates a new FileMaker file, as it does when opening other importable file types. In this situation, FileMaker can apply a little extra intelligence to creating the new FileMaker file. If a column in the Excel file contains only one type of data (numbers, text, dates), FileMaker assigns a suitable field type to the resulting FileMaker field. If the data in the column are somehow mixed—that is, the column contains some data that looks like numbers, and other data that looks like dates, for example—then the resulting FileMaker field will be a Text field.
When importing from an Excel file, FileMaker brings in only the raw data it finds in the file. FileMaker does not import Excel formulas, only their results. FileMaker imports neither graphics nor charts, nor does it import notes. Programming logic, such as Visual Basic macros, is also not imported by FileMaker.
Using an Import to Create a New Table
Beginning in FileMaker 8, you can instead choose to create an entirely new table at the time of import and have the imported data flow into the new table. Figure 22.9 illustrates the new feature.
Figure 22.9. FileMaker 9 enables you to create a new table from imported data.
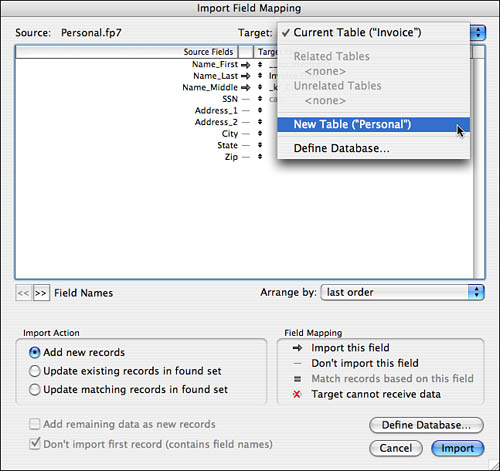
The new table will behave in many ways like a table created by choosing File, Open and opening the data source directly; see the discussion of this behavior earlier in this chapter. This feature is particular useful, though, when importing from another FileMaker table. In this case, the entire schema of the table, including things such as calculation and summary fields, is re-created. (Note that information such as value lists, custom functions, relationships, and security privileges will not be imported because they are attached at the file level rather than at the table level.) The newly created table will be an exact copy of the old one, including things such as field IDs, which is important if you’re re-creating this table as a way of consolidating two formerly separate FileMaker files.
![]() For a full discussion of consolidating multiple tables, see “Repointing Table Occurrence References,” in the Troubleshooting section at the end of Chapter 20, “Converting Systems from Previous Versions of FileMaker Pro,” p. 598.
For a full discussion of consolidating multiple tables, see “Repointing Table Occurrence References,” in the Troubleshooting section at the end of Chapter 20, “Converting Systems from Previous Versions of FileMaker Pro,” p. 598.
This capability, which is available in regular FileMaker Pro 9, is similar, although not identical, to the Import Table feature available only in FileMaker Pro 8 Advanced. The Import Table feature is limited to importing tables from other FileMaker files, but it can import many tables at once. Furthermore, the Import Tables function imports just the schema but no data, whereas with the Import As New Table feature, it’s necessary to bring the data along—there’s no way to copy just the schema of a table using this feature.
Importing Multiple Files from a Folder
FileMaker can import data from several files at once. In this batch mode, FileMaker takes the data from a file and imports it into one or more fields in a FileMaker table. FileMaker can also bring in information about each file’s name and directory path.
FileMaker can work with two types of data when performing a folder import: image files and text files. In the case of image files, FileMaker can bring the image data from each file into a container field so that each image can be viewed inside FileMaker. In the case of text files, FileMaker brings the entire contents of the file into a specified text field.
FileMaker can store a maximum of 2GB of data in a single field. This might seem like a lot, and it is a lot compared to the limit of 64KB that was in force in previous versions of FileMaker! But it follows from this that you shouldn’t import text or image files into FileMaker if any single imported file will be larger than 2GB.
Importing Text Files
Assume that you have a folder with a number of plain text files in it. Assume also that you have a FileMaker database that has a table in it with fields called TextContent, FileName, and FilePath. If you select File, Import Records, Folder, you’ll see FileMaker’s Folder of Files Import Options dialog box, shown in Figure 22.10.
Figure 22.10. FileMaker kicks off the Import from Folder process with a special initial dialog box.
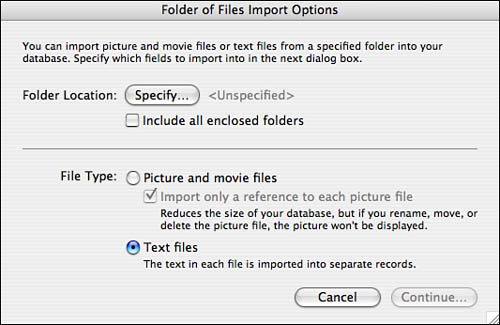
In the upper area, you can choose the folder from which to import data. You can also choose whether to confine the import to files at the first level inside the folder or whether to drill into all the subfolders that might be below the top level.
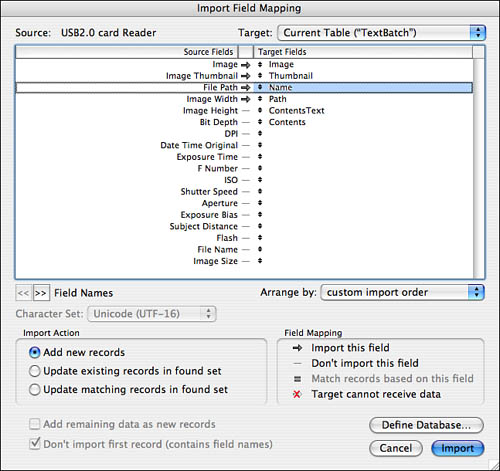
After you choose a folder from which to import, choose the file type. To import from text files, choose the Text Files option and click Continue. You’ll then see a folder import dialog box that is similar but not identical to the regular Import Field Mapping dialog box, as shown in Figure 22.11.
Figure 22.11. When importing from a folder of files, the source fields have a special name and meaning.
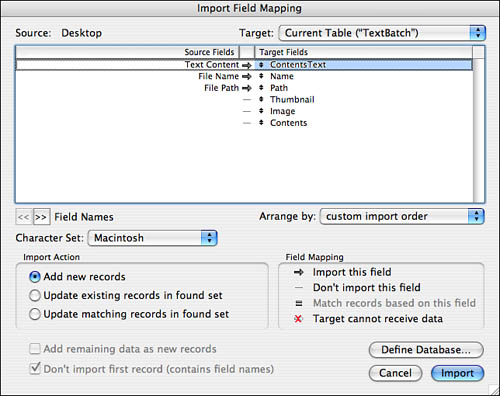
When you’re doing a folder import, the names and contents of the source fields on the left are fixed: They depend on the type of file from which you’re importing. When you’re importing from text files, the source fields are called Text Content, File Name, and File Path. These fields contain, respectively, the actual text content of the field, the name of the individual file from which the data is coming, and the full name of the path to the file. As with any other data source, you can choose to import some or all of these fields, and you can choose how to map them to fields in the FileMaker table that’s the target of the import.
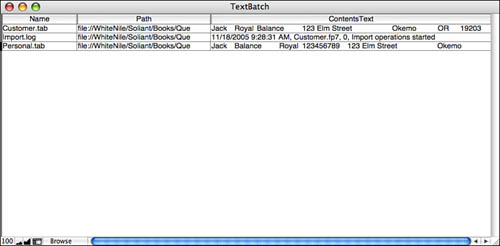
Unlike imports from other kinds of flat-file data sources, FileMaker’s batch text import brings the entire contents of each text file into a single FileMaker field. After importing, you might have a data set that looks like the data seen in Figure 22.12.
Figure 22.12. This is a sample data set resulting from a batch import of three text files from a folder.
Importing Image Files
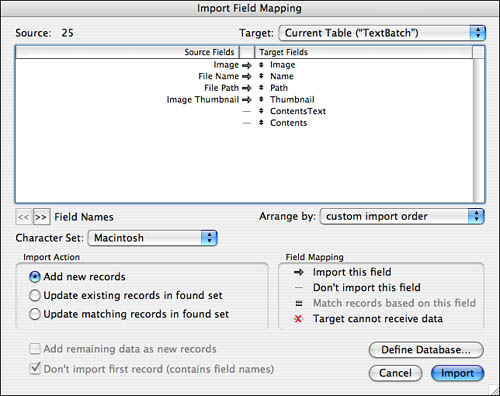
Importing image files from a folder is quite similar to importing text files. See Figure 22.13 for a look at the folder-import options that apply to images. As with text files, you need to choose a source folder and decide whether to drill down into any subfolders as well.
Figure 22.13. These are the special Import Field Mapping options for importing from a folder of images.
In the past, FileMaker’s usefulness as a tool for storing entire files (sometimes referred to as asset management) was somewhat limited by the 2GB maximum size of an individual FileMaker file. With FileMaker 7, the file size limit is reckoned in terabytes, so it’s tempting to try to use FileMaker as a tool for managing large amounts of non-FileMaker data such as image files.
Images or References?
Still, image data can take up a great deal of storage space, and it might not make sense to try to store thousands of high-resolution images inside a FileMaker file. Accordingly, FileMaker offers you the option (when importing images from a folder), to import only a reference to each file, rather than the entire contents of the image. If you choose to import a reference, FileMaker remembers where the image is stored on disk and refers to it when necessary in a fashion similar to the way in which Mac OS and Windows work with shortcuts and aliases.
![]() There are some additional considerations when using container fields in conjunction with FileMaker’s Instant Web Publishing: see “Container Fields,” p. 707.
There are some additional considerations when using container fields in conjunction with FileMaker’s Instant Web Publishing: see “Container Fields,” p. 707.
The benefit of storing references is, of course, that they take up much less space in the database. The disadvantage is that if you move or rename the original files in any way, FileMaker will no longer be able to find them and the images will not display in FileMaker nor be otherwise usable.
This is especially problematic if the file containing the images is hosted for multiuser access. Each user of the system has to see the image directory via the same network path. Because Windows and Macintosh handle server paths differently, creating a unified server structure to work in both environments could be challenging.
In the end, the decision as to whether to import whole image files or just references is up to you, keeping in mind the trade-off between the flexibility of having all images stored directly in the database, versus the increased capacity that comes from working with the file references alone.
Images Versus Thumbnails
When you import data from text files, you can bring in up to three pieces of data: the filename, the full path to the file, and the text contents of the file. With image files, it is possible to bring in four pieces of data. As with text files, you can bring in the filename and file path. You can bring in the full contents of the image file (into a container field, presumably), and if you choose, you can bring in a smaller version of the image, called a thumbnail. See Figure 22.12, shown previously, for a possible import configuration for a batch import of images.
Naturally, a full-sized image can take a lot of space, so FileMaker gives you the option of bringing in only a smaller thumbnail instead. You can bring in the thumbnail in addition to the larger image or instead of it. (Of course, you could choose to import just the filename and path if that suits your purpose.)
FileMaker doesn’t give you any control over how it creates thumbnails during the image import process. You might find that although you do want to store only a smaller copy of the image in the database, FileMaker’s thumbnail process doesn’t give you what you want. You might want the thumbnails a little smaller or larger or with some kind of color adjustment. If so, you will want to experiment with creating your own thumbnails first and import them instead.
Importing Photos from a Digital Camera
In Mac OS X, FileMaker is able to import photos from a digital camera or a similar device such as a memory card reader. The manual covers this procedure, so we’ll be content with a brief overview.
If you choose File, Import Records, Digital Camera on Mac OS X, with a compatible digital device connected to the computer and powered on, you’ll see the dialog box shown in Figure 22.14. Here you’ll have the opportunity to specify which photos you want to import from the camera or device, as well as the choice whether to import entire images or just image references. See the earlier section titled “Images or References?” for details.
Figure 22.14. FileMaker has a variety of options for importing from a digital camera.
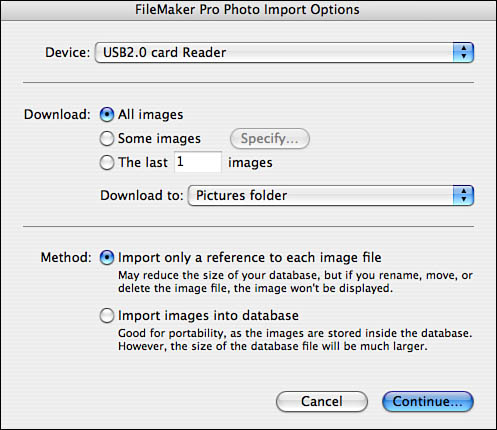
If you choose the option to Specify Images in this dialog box, not only will you be able to select individual images for import, but you’ll also be able to specify whether imported thumbnails should be small, medium, or large—an option that’s not available when importing many images from a folder.
After you decide on which photos to import, and whether to import them as images or full references, you’ll proceed to the standard Import Field Mappings dialog. Just about everything here is as you expect it, but there’s one possible difference, as you can see in Figure 22.15.
Figure 22.15. FileMaker can read and import EXIF data from a digital camera in addition to the regular filename and path and image fields.
If the images you’re importing contain EXIF (Exchangeable Image File) data, FileMaker can read and import that data as well. This data can include information such as the time of day, shutter speed, aperture, and film speed for the images, as well as many other pieces of data. The photos being imported in Figure 22.15 do contain EXIF data, as the long list of source fields shows; any of or all these fields are available for import. Many digital cameras capture EXIF data with each image.
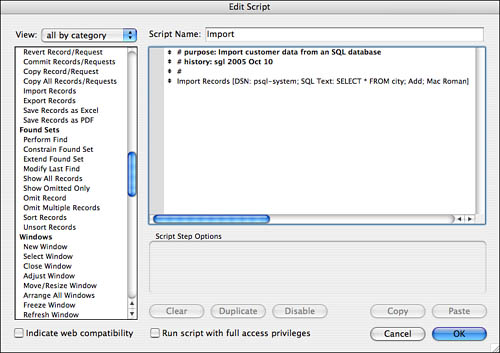
Using a Script to Import Data
Like most other actions in FileMaker Pro, a script can trigger a data import operation. It’s possible to save your import settings in a script for later reuse as well.
A scripted import has a few steps and options that are slightly different from the regular File, Import Records method. To import records from within a script, choose the Import Records script step and add it to your script. ScriptMaker gives you several choices, as shown in Figure 22.16.
Figure 22.16. FileMaker enables you to save a number of options when you import records from within a script.
When the Import Records script step is selected, a Specify Data Source menu at the lower right gives you access to a set of options identical to those you see when you choose File, Import Records. Using this selection, you can save all the important information about your data source. For files, this means mainly the filename. For folders, it includes the file type, and the choice of whether to save references. For ODBC data sources, it includes the DSN information, password, and other data such as a SQL query.
When an Import Records script step is selected, a Specify Import Order button at the lower right gives you access to the Import Field Mapping dialog, where you can set any of or all the relevant import mapping features. Finally, as with other script steps in FileMaker, you have the choice of performing the import with or without dialogs. If you choose to run the import with dialogs, the user can respecify any aspect of the data source or import order on the fly. If you choose to run it without dialogs, the import is a canned process that uses all the saved options you specified.
When performing a complex import, you might want to save drafts of the import into a script as you go. That way if you make a mistake or need to change things, you don’t run the risk of FileMaker forgetting the import specification you worked so hard on.
Note that a scripted import can go awry if your database structure changes after you configure the script. Adding fields should be no problem, but deleting any fields, especially those involved in the import, disrupts your field mappings and data will no longer flow into the correct fields.
Troubleshooting
Matching Imports
I can’t get an import to work using the Update Matching Records option. The outcome is never what I expect.
When you choose the Update Matching Records option when importing data into a FileMaker table, FileMaker tries to match records in the source to records in the target, based on the specified match field or match fields. We’ve been assuming that there will be at most one source record and one target record that share the same match criteria. But what happens if there are multiple matches on either or both sides?
Assume that you’re doing a matching import based on a Social Security number. If several records in the source data have the same Social Security number, FileMaker uses the data from the last of these records to update matching records in the target (assuming that there are any).
On the other hand, if there are multiple records with the same Social Security number on the target side, FileMaker updates them all with whatever turns out to be the matching data from the source side. So, FileMaker updates all target records with the same value in their match field(s) with the same data from the source, whether that means updating two target records or two thousand.
If you put both scenarios together, and multiple records in both the source and target share the same Social Security number, the outcome is as follows: Data from the last such record in the source is used to update all the matching records in the target. If 4 matching records were in the source, and 19 in the target, data from the fourth matching source record would be used to update all 19 matching target records.
Imports and Validation
I imported data, but some of it turned out to be invalid. I have field validation rules set up, but it seems as though FileMaker is ignoring them.
In previous versions of FileMaker, field validation and data imports didn’t mix well. FileMaker simply didn’t perform any field validation at all on data that was imported. Even if you marked a field as having to be not empty, for example, it was perfectly possible to import records that had no value in that field. This could be an annoying backdoor around your carefully constructed validation rules.
The situation is better in FileMaker 9 (and in FileMaker 8 as well), but there are still pitfalls. Everything depends on your field validation settings. When you apply validation to a field in FileMaker 9, you can choose to validate the data only during data entry, or always. If you select the Only During Data Entry option, the behavior is similar to previous versions of FileMaker: Imported data is not checked for validity, and it’s up to you to handle the consequences. On the other hand, if you choose Always for the data validation on a field, imported records are checked. If this is the case, any record that does not pass a validation check is rejected, and the dialog box that appears at the end of the import tells you how many records were rejected (although not which ones, unfortunately).
FileMaker Extra: Exploiting the FileMaker-to-FileMaker Import
You saw earlier that it’s possible to import data into one FileMaker table from another. Those tables can be in the same FileMaker file or different ones. This capability has a number of useful and interesting applications.
Duplicating a Found Set
Occasionally, you’ll encounter situations where you want to duplicate a found set of records. Of course, as with most things in FileMaker, there are several approaches. You could write a script that starts at the beginning of the found set and loops through it, duplicating as it goes. But you’d quickly find you had some tricky record-position issues to deal with. (Duplicating records can change which record is the current one, so it can be hard to keep your place when looping through a found set.)
One general rule for speeding up FileMaker operations goes something like this: Where possible, replace scripts, especially looping scripts, with built-in FileMaker operations. FileMaker’s Replace command is much quicker than a script that loops over a group of records and performs a Set Field step on each record. FileMaker’s Delete Found Records command is quicker than a script that loops over a set of records and deletes each one. And so on.
Another choice is to export these records to a separate table and then import them into the original table again. A single script can control both the export and the import, and the logic is much easier to read and understand.
Duplicating Between Tables
Suppose that you have a simple order tracking database. The database has tables for customers, orders, order lines, and products. Each order, of course, has one order line per product on the order.
Suppose also that users have said that they want to create new orders by checking off a number of products from a list and then having a new order be created with one line for each selected product. So, a user would check off Screwdrivers, Milk, and Roofing Tar in a product list, click a button that says Make Order, and see a new order with lines for the three selected products.
Again, you can do a number of things with scripts, but one elegant solution is to gather the selected products into a found set and then simply import that found set (well, the relevant fields from it, anyway) into the Order Lines table, thus creating one new order line per selected product.
Moving, Consolidating, and Re-creating Tables
With the added capability to create a new table when importing data into FileMaker 9, it has also become possible to use the FileMaker-to-FileMaker import to perform some important migration tasks. If you’re converting files from FileMaker 6 or earlier to FileMaker 9 and you intend as part of your conversion to consolidate several older files into one new file with several tables, this feature can help. Creating a new table via import preserves all aspects of the table schema. Still, if you’re performing consolidation as part of a conversion, we recommend you invest in FileMaker Pro Advanced and its more heavy-duty features for copying and pasting schema elements.
![]() For a full discussion of consolidating multiple tables, see “Repointing Table Occurrence References,” in the Troubleshooting section at the end of Chapter 20, “Converting Systems from Previous Versions of FileMaker Pro,” p. 598.
For a full discussion of consolidating multiple tables, see “Repointing Table Occurrence References,” in the Troubleshooting section at the end of Chapter 20, “Converting Systems from Previous Versions of FileMaker Pro,” p. 598.