
The jQuery tagline is “write less, do more,” and the tagline is a perfect description of the jQuery experience. The API is terse, yet powerful. The library itself is flexible, yet lightweight. Best of all, jQuery supports all the modern browsers (including Internet Explorer, Firefox, Safari, Opera, and Chrome), and hides the inconsistencies (and bugs) you might experience if you wrote code directly against the API each browser provides. When you use jQuery, you'll not only be writing less code and finishing jobs in less time, you'll keep the hair on your head, too.
jQuery is one of the most popular JavaScript libraries in existence, and remains an open source project. You can find the latest downloads, documentation, and plugins on the jquery.com website. You can also find jQuery in your ASP.NET MVC application. Microsoft supports jQuery, and the project template for ASP.NET MVC will place all the files you need to use jQuery into a Scripts folder when you create a new MVC project.
As you'll see in this chapter, the MVC framework builds on top of jQuery to provide features like client-side validation and asynchronous postbacks. Before drilling into these ASP.NET MVC features, let's take a quick tour of the underlying jQuery features.
jQuery Features
jQuery excels at finding, traversing, and manipulating HTML elements inside an HTML document. Once you've found an element, jQuery also makes it easy to wire up event handlers on the element, animate the element, and build AJAX interactions around the element. This section begins looking at these capabilities by discussing the gateway to jQuery functionality: the jQuery function.
The jQuery Function
The jQuery function object is the object you'll use to gain access to jQuery features. The function has a tendency to perplex developers when they first start using jQuery. Part of the confusion occurs because the function (named jQuery) is aliased to the $ sign (because $ requires less typing and is a legal function name in JavaScript). Even more confusing is how you can pass nearly any type of argument into the $ function, and the function will deduce what you intend to achieve. The following code demonstrates some typical uses of the jQuery function:
$(function () {
    $("#album-list img").mouseover(function () {
        $(this).animate({ height: ‘+=25’, width: ‘+=25’ })
               .animate({ height: ‘-=25’, width: ‘-=25’ });
    });
});
The first line of code is invoking the jQuery function ($), and passing an anonymous JavaScript function as the first parameter.
$(function () {
    $("#album-list img").mouseover(function () {
        $(this).animate({ height: ‘+=25’, width: ‘+=25’ })
               .animate({ height: ‘-=25’, width: ‘-=25’ });
    });
});
When you pass a function as the first parameter, jQuery assumes you are providing a function to execute as soon as the browser is finished building a document object model (DOM) from HTML supplied by the server. This is the point in time when you can safely begin executing script against the DOM.
The second line of code passes the string “#album-list img” to the jQuery function:
$(function () {
    $("#album-list img").mouseover(function () {
        $(this).animate({ height: ‘+=25’, width: ‘+=25’ })
               .animate({ height: ‘-=25’, width: ‘-=25’ });
    });
});
jQuery will interpret this string as a selector. A selector tells jQuery what elements you are searching for in the DOM. You can find elements by their attribute values, their class names, their relative position, and more. The selector in the second line of code tells jQuery to find all the images inside the element with an id value of album-list.
When the selector executes, it returns a wrapped set of zero or more matching elements. Any additional jQuery methods you invoke will operate against all the elements in the wrapped set. For example, the mouseover method hooks an event handler to the onmouseover event of each image element that matched the selector.
jQuery exploits the functional programming capabilities of JavaScript. You'll often find yourself creating and passing functions as parameters into jQuery methods. The mouseover method, for example, knows how to wire up an event handler for onmouseover regardless of the browser in use, but it doesn't know what you want to do when the event fires. To express what you want to happen when the event fires, you pass in a function with the event handling code:
$(function () {
    $("#album-list img").mouseover(function () {
        $(this).animate({ height: ‘+=25’, width: ‘+=25’ })
               .animate({ height: ‘-=25’, width: ‘-=25’ });
    });
});
In the preceding example, the code animates an element during the mouseover event. The element the code animates is referenced by the this keyword (this points to the element where the event occurred). Notice how the code first passes the element to the jQuery function ($(this)). jQuery sees the argument as a reference to an element and returns a wrapped set with the element inside.
Once you have the element wrapped inside of jQuery goodness, you can invoke jQuery methods like animate to manipulate the element. The code in the example makes the image grow a bit (increase the width and height by 25 pixels), and then shrink a bit (decrease the width and height by 25 pixels).
The result of the code is as follows: When users move their mouse over an album image, they see a subtle emphasizing effect when the image expands then contracts. Is this behavior required to use the application? No! However, the effect is easy and gives the appearance of polish. Your users will love it.
As you progress through this chapter, you'll see more substantive features. First let's take a closer look at the jQuery features you'll need.
jQuery Selectors
Selectors are the strings you pass to the jQuery function to select elements in the DOM. In the previous section, you used “#album-list img” as a selector to find image tags. If you think the string looks like something you might use in a cascading style sheet (CSS), you would be right. The jQuery selector syntax derives from CSS 3.0 selectors, with some additions. Table 8.1 lists some of the selectors you'll see in everyday jQuery code.
Table 8.1: Common Selectors
| Example | Meaning |
| $(“header”) | Find the element with an id of “header” |
| $(“.editor-label”) | Find all elements with a class name of “.editor-label” |
| $(“div”) | Find all <div> elements |
| $(“#header div”) | Find all <div> elements that are descendants of the element with an id of “header” |
| $(“#header > div”) | Find all <div> elements that are children of the element with an id of “header” |
| $(“a:even”) | Find evenly numbered anchor tags |
The last line in the table demonstrates how jQuery supports the same pseudo-classes you might be familiar with from CSS. Using a pseudo-class allows you to select even or odd numbered elements, visited links, and more. For a full list of available CSS selectors, visit http://www.w3.org/TR/css3-selectors/.
jQuery Events
Another one of jQuery's strengths is the API it provides for subscribing to events in the DOM. Although you can use a generic bind function to capture any event using an event name specified as a string, jQuery also provides dedicated methods for common events, such as click, blur, and submit. As demonstrated earlier, you tell jQuery what to do when the event occurs by passing in a function. The function can be anonymous, like in the example you saw in the section “The jQuery Function” earlier in the chapter, or you can also pass a named function as an event handler, as in the following code:
$("#album-list img").mouseover(function () {
    animateElement($(this));
});

function animateElement(element) {
    element.animate({ height: ‘+=25’, width: ‘+=25’ })
           .animate({ height: ‘-=25’, width: ‘-=25’ });
}
Once you have some DOM elements selected, or are inside an event handler, jQuery makes it easy to manipulate elements on a page. You can read the values of their attributes, set the values of their attributes, add or remove CSS classes to the element, and more. The following code adds or removes the highlight class from anchor tags on a page as the user's mouse moves through the element. The anchor tags should appear differently when users move their mouse over the tag (assuming you have a highlight style set up appropriately).
$("a").mouseover(function () {
    $(this).addClass("highlight");
}).mouseout(function () {
    $(this).removeClass("highlight");
});
A couple interesting notes about the preceding code:
- All the jQuery methods you use against a wrapped set, like the mouseover method, return the same jQuery wrapped set. This means you can continue invoking jQuery methods on elements you've selected without reselecting those elements. We call this method chaining.
- Shortcuts are available in jQuery for nearly every common operation you can think of. Setting up effects for mouseover and mouseout is a common operation, and so is toggling the presence of a style class. You could rewrite the last snippet using some jQuery shortcuts and the code would morph into the following:
$("a").hover(function () {
    $(this).toggleClass("highlight");
});
Lots of power in three lines of code—that's why jQuery is awesome.
jQuery and AJAX
jQuery includes everything you need to send asynchronous requests back to your web server. You can generate POST requests or GET requests and jQuery notifies you when the request is complete (or if there is an error). With jQuery, you can send and receive XML data (the X in AJAX stands for XML, after all), but as you'll see in this chapter, it's trivial to consume data in HTML, text, or JavaScript Object Notation (JSON) format. jQuery makes AJAX easy.
In fact, jQuery makes so many things easy it has changed the way web developers write script code.
Unobtrusive JavaScript
In the early days of the Web (before jQuery came along), it was fashionable to intermingle JavaScript code and HTML inside the same file. It was even normal to put JavaScript code inside an HTML element as the value of an attribute. You've probably seen an onclick handler like the following:
<div onclick="javascript:alert(‘click’);">Testing, testing</div>
You might have written markup with embedded JavaScript in those days because there was no easier approach to catching click events. Although embedded JavaScript works, the code is messy. jQuery changes the scenario because you now have a clearly superior approach to finding elements and catching click events. You can now remove JavaScript code from inside HTML attributes. In fact, you can remove JavaScript code from HTML entirely.
Unobtrusive JavaScript is the practice of keeping JavaScript code separate from markup. You package all the script code you need into .js files. If you look at the source code for a view, you don't see any JavaScript intruding into the markup. Even when you look at the HTML rendered by a view, you still don't see any JavaScript inside. The only sign of script you'll see is one or more <script> tags referencing the JavaScript files.
You might find unobtrusive JavaScript appealing because it follows the same separation of concerns that the MVC design pattern promotes. Keep the markup that is responsible for the display separate from the JavaScript that is responsible for behavior. Unobtrusive JavaScript has additional advantages, too. Keeping all of your script in separately downloadable files can give your site a performance boost because the browser can cache the script file locally.
Unobtrusive, JavaScript also allows you to use a strategy known as progressive enhancement for your site. Progressive enhancement is a focus on delivering content. Only if the device or browser viewing the content supports features like scripts and style sheets will your page start doing more advanced things, like animating images. Wikipedia has a good overview of progressive enhancement here: http://en.wikipedia.org/wiki/Progressive_enhancement.
ASP.NET MVC 3 takes an unobtrusive approach to JavaScript. Instead of emitting JavaScript code into a view to enable features like client-side validation, the framework sprinkles metadata into HTML attributes. Using jQuery, the framework can find and interpret the metadata, and then attach behaviors to elements, all using external script files. Thanks to unobtrusive JavaScript, the AJAX features of ASP.NET MVC support progressive enhancement. If the user's browser doesn't support scripting, your site will still work (they just won't have the “nice to have” features like client validation).
To see unobtrusive JavaScript in action, let's start by taking a look at how to use jQuery in an MVC application.
Using jQuery
The Visual Studio project templates for ASP.NET MVC give you everything you need to use jQuery when you create a new project. Each new project contains a Scripts folder with a number of .js files inside it, as shown in Figure 8.1.
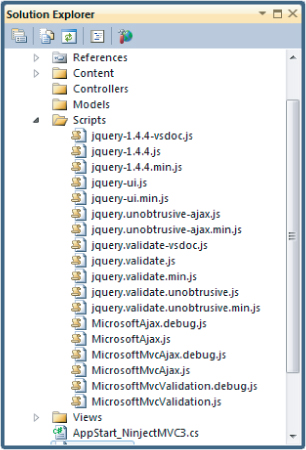
The core jQuery library is the file named jquery-<version>.js, where version is 1.4.4 at the time of writing. If you open this file, you'll find a readable, commented version of the jQuery source code inside.
Notice there is also a jquery-<version>.min.js file. Minified JavaScript files have “.min” in their name and are smaller than their un-minified counterparts (typically less than one half the size). They contain no unnecessary whitespace characters, no comments, and all the local variable names are one character long. If you open a minified file, you'll find an unreadable pile of JavaScript code. You might give a minified JavaScript file to a job interviewee who thinks he is an expert JavaScript programmer. Ask him what he thinks the code will do.
Minified files behave the same in the client and implement the same functionality as un-minified files. However, because minified files are smaller, you typically send minified files to the client whenever possible (because it's fewer bytes to download, and also faster to load and run). The default layout view (_Layout.cshtml) in an MVC application will already reference the minified version of jQuery with the following script tag:
<script src="@Url.Content("∼/Scripts/jquery-1.4.4.min.js")" type="text/javascript">
</script>
Having the preceding script tag placed into your markup by the layout view is all you need to start using jQuery.
Custom Scripts
When you write your own custom JavaScript code, you can add your code into new files in the scripts directory (unless you want to write intrusive JavaScript, then go ahead and embed script code directly in your view, but you lose 25 karma points when you do this). For example, you can take the code from the beginning of this chapter and place it into a MusicScripts.js file in the scripts directory. MusicScripts.js would look like the following:
/// <reference path="jquery-1.4.4.js" />
$(function () {
    $("#album-list img").mouseover(function () {
        $(this).animate({ height: ‘+=25’, width: ‘+=25’ })
               .animate({ height: ‘-=25’, width: ‘-=25’ });

    });
});
The commented reference line at the top of this file has no impact on the runtime behavior of the script. The only purpose of the reference is to let Visual Studio know you are using jQuery, and Visual Studio can provide IntelliSense for the jQuery API.
To add MusicScripts.js to the application you'll need another script tag. The script tag must appear later in the rendered document than the script tag for jQuery because MusicScripts.js requires jQuery and the browser loads scripts in the order they appear in the document. If the script contains functionality the entire application will use, you can place the script tag in the _Layout view, after the script tag for jQuery. In this example, you need to use the script only on the front page of the application, so you can add it anywhere inside the Index view of the HomeController (because the view engine places the contents of the rendered view in the body of the page and after the jQuery script tag).
<div id="promotion">
</div>

<script src="@Url.Content("∼/Scripts/MoviesScripts.js")" type="text/javascript">
</script>
<h3><em>Fresh</em> off the grill</h3>
Placing Scripts in Sections
Another option for injecting scripts into the output is to define Razor sections where scripts should appear. In the layout view, for example, you can render a section named “scripts” and make the section optional:
<head>
    <title>@ViewBag.Title</title>
    <link href="@Url.Content("∼/Content/Site.css")" rel="stylesheet"
          type="text/css" />
    <script src="@Url.Content("∼/Scripts/jquery-1.4.4.min.js")"
            type="text/javascript"></script>
    @RenderSection("scripts", required:false);
</head>
Inside of any content view, you can now add a scripts section to inject view-specific scripts into the header:
@section scripts{
    <script src="@Url.Content("∼/Scripts/MusicScripts.js")"
            type="text/javascript"></script>
}
The section approach allows you to have precise placement of script tags and ensure required scripts are included in the proper order.
And Now for the Rest of the Scripts
What are all these other .js files in the Scripts folder?
In addition to the core jQuery library, the Scripts folder contains two jQuery plugins—jQuery UI and jQuery Validation. These extensions add additional capabilities to the core jQuery library, and you'll use both plugins in this chapter. Notice that minified versions of both plugins exist.
You'll also find files containing vsdoc in the name. These files are specially annotated to help Visual Studio provide better IntelliSense. You never have to reference these files directly, or send them to the client. Visual Studio will find these files automatically when you use reference scripts from your own custom scripts files.
The files with “unobtrusive” in the name are files written by Microsoft. The unobtrusive scripts integrate with jQuery and the MVC framework to provide the unobtrusive JavaScript features mentioned earlier. You'll need to use these files if you want to use AJAX features of the ASP.NET MVC framework, and you'll also see how to use these scripts in this chapter.
The files starting with the word Microsoft (like MicrosoftAjax.js) contain, or build upon, the Microsoft AJAX libraries. Because ASP.NET MVC 3 applications rely on jQuery by default, you don't need these files and can safely remove them from an application. These files are here primarily for backward compatibility.
Now that you know what jQuery is, and how to reference the script in your application, take a look at AJAX features directly supported by the MVC framework, found in the following section.