
Chapter 7
Recording MIDI
In This Chapter
![]() Setting up Logic Pro to record MIDI
Setting up Logic Pro to record MIDI
![]() Recording external instrument and software instrument tracks
Recording external instrument and software instrument tracks
![]() Using musical typing and onscreen keyboards to record MIDI
Using musical typing and onscreen keyboards to record MIDI
![]() Overdubbing and recording multiple MIDI tracks
Overdubbing and recording multiple MIDI tracks
Logic Pro was created as a powerful MIDI sequencer. MIDI is the ultimate flexible recording medium, enabling you to change what you record until it’s perfect. It does have limitations, but it’s unlikely that you’ll notice them.
In this chapter, you find out how to record MIDI, filter MIDI events, multitrack MIDI recording, use musical typing, and much more.
Preparing to Record MIDI
MIDI is just data. Audio is not included in a MIDI region or a MIDI message. What you hear when a MIDI track plays is either the software instrument connected to the track or the audio output from your external instruments. To begin recording MIDI, you’ll need to create either an external MIDI track or a software instrument track. Each type of track is explained in this section.
 Show Advanced Tools must be selected in the Advanced Preferences pane. Choose Logic Pro X⇒Preferences⇒Advanced and then select Show Advanced Tools.
Recording external MIDI instruments
If you have an external MIDI instrument such as a keyboard workstation, you need to route the audio from the instrument into an audio track in your project. To create an audio track, choose Track⇒New Audio Track (Option-![]() -A). You should also turn on input monitoring, as explained in Chapter 6, so you can hear the input of your MIDI instrument.
-A). You should also turn on input monitoring, as explained in Chapter 6, so you can hear the input of your MIDI instrument.
After you’ve verified that the audio is coming out of your instrument and into the audio track, you create and set up an external MIDI track as follows:
- Choose Track⇒New External MIDI Track (or press Option-
 -X).
-X).
A new external MIDI track is added to the track list and automatically selected.
- Open the inspector by pressing I or by choosing View⇒Show Inspector.
The inspector shows you an external MIDI track channel strip, as shown in Figure 7-1. Note that the controls are different than those available with other types of tracks, and you can’t add effects or control the audio in your project. You can, however, control various MIDI functions on the external instrument.
- Display the track inspector by clicking the disclosure triangle above the channel strip, as shown in Figure 7-2.
The track inspector area opens allowing you to adjust the external MIDI track settings.
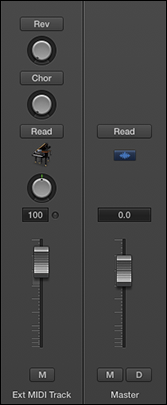
Figure 7-1: External MIDI track channel strip.
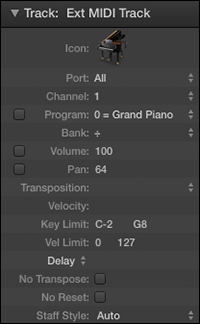
Figure 7-2: External MIDI track inspector.
- Select the correct MIDI port and channel in the track inspector.
If you have multiple external MIDI instruments connected to a third-party interface, you can choose different MIDI ports to control the instrument independently. Each MIDI port or MIDI instrument can transmit and receive up to 16 different channels. This allows you to control 16 different sounds on each MIDI instrument.
You need two tracks for external MIDI instruments: an audio track to monitor the instrument and the external MIDI track to record the MIDI. For this reason, I record external MIDI instruments to audio as soon as possible. For starters, leaving tracks as MIDI invites indecision. You can tweak until the end of time, but if you want to be productive, you need to make decisions quickly. Also, because external gear and multiple tracks only complicate your project, recording your external MIDI instruments as audio simplifies the project and guarantees that you’ll have the performance captured if a piece of gear changes or breaks later.
 Most keyboard workstations have a local off function. You should turn on Local Off on your external MIDI instrument; otherwise, you’ll get doubled audio when both your hands and the MIDI data are playing the sounds on your keyboard.
Recording software instruments
To record a software instrument, you’ll need to create a new software instrument track. Follow these steps:
- Choose Track⇒New Software Instrument Track (or press Option--S).
A new software instrument track is added to the track list and automatically selected.
- Open the inspector by pressing I or by choosing View⇒Show Inspector.
The inspector displays a software instrument track channel strip, as shown in Figure 7-3.
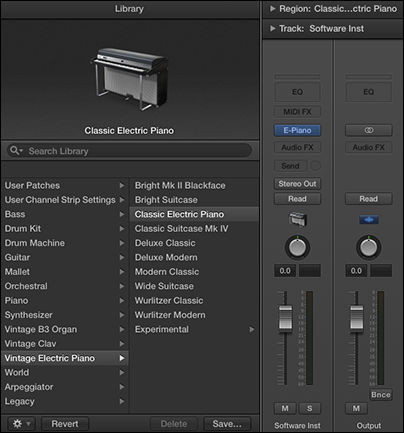
Figure 7-3: The library menu and the software instrument track.
- Open the library by pressing Y or by choosing View⇒Show Library.
The library menu opens to the left of the inspector.
- On the library menu, select the patch you want to use.
You can audition patches by selecting a patch and playing your MIDI controller.
- Display the track inspector by clicking the disclosure triangle above the channel strip (refer to Figure 7-3).
The track inspector area opens allowing you to adjust the software instrument track settings.
- Set the correct MIDI channel in the track inspector.
The default MIDI channel is set to All, which means your MIDI controller can be set to any MIDI channel and the software instrument track will receive the signal. If you want to set the track to receive from only a single MIDI channel, you need to set it to the correct MIDI channel in the track inspector. Using different MIDI channels is useful if you have more than one MIDI controller and you want them to control specific software instrument tracks.
Recording with musical typing
What if you don’t have a keyboard controller handy? No problem. You can use musical typing to play your computer keyboard like a musical keyboard. Simply do the following:
- Choose Window⇒Show Musical Typing or press -K.
The Musical Typing keyboard appears, as shown in Figure 7-4.
- Play the notes on the keyboard by pressing the corresponding keys.
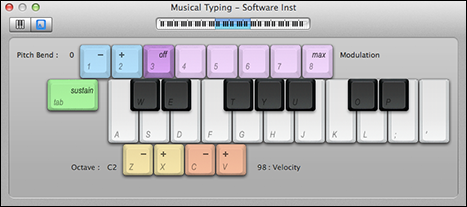
Figure 7-4: The musical typing keyboard.
You can do a lot with the musical typing keyboard. Here’s a description of the keys and what they do:
- You have access to almost an octave and a half by using the middle and top rows of alphabet keys.
- Sustain the notes you play by holding down the Tab key.
- Pitch bend down and up by using the 1 and 2 keys.
- Modulate the software instrument by pressing the 4 through 8 keys. Turn off modulation by pressing 3. The parameter that gets modulated will depend on the selected software instrument.
- Shift the keyboard octave down or up by pressing Z or X, respectively. To change the octave, drag the blue area in the keyboard at the top of the window (as shown in Figure 7-5).
- Adjust the velocity of the keyboard down or up by pressing C or V, respectively.
- Switch between the musical typing keyboard and the onscreen keyboard (shown in Figure 7-5) by clicking the keyboard icon in the upper-left corner of the interface.

Figure 7-5: The onscreen keyboard.
Recording with the step input keyboard
The step input keyboard allows you to enter notes one at a time. It’s great for non-keyboard players or keyboard players who need a little help inputting technical passages or those impossible to play with only two hands. The step input keyboard is also great for inputting scores from sheet music without having to learn how to play the part.
A MIDI region must be open in a MIDI editor to input notes with the step input keyboard. To use the step input keyboard, follow these steps:
- Double-click the MIDI region you want to edit.
The piano roll editor opens at the bottom of the tracks area.
- Choose Window⇒Show Step Input Keyboard (or press Option--K).
The step input keyboard appears, as shown in Figure 7-6.
- Place the playhead where you want to begin inputting notes.
- Click the note length and note velocity icons, and then click the key you want to input.
A MIDI note event is added to the piano roll editor at the playhead position.
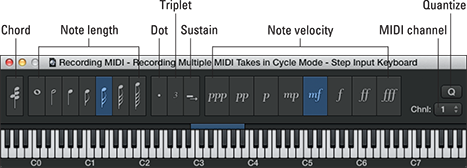
Figure 7-6: The step input keyboard.
The step input keyboard has the following advanced features:
- To input notes sequentially on the same beat, select the chord icon on the left side of the step input keyboard.
- To make the first note you click a length and a half of the currently selected note length, select the dot icon. The second note you click will be half the length of the currently selected note length.
- To make the next three notes you play part of a triplet, select the triplet icon.
- Select the sustain icon to lengthen the selected note in the editor by the length selected in the Step Input Keyboard.
- To snap the next note you input to the nearest division on the grid, select the quantize icon.
- To define the MIDI channel of the next selected note, choose a value in the MIDI channel drop-down menu.
The step input keyboard uses traditional notation for velocity values: ppp (16) pp (32), p (48), mp (64), mf (80), f (96), ff (112), and fff (127).
Recording Your First MIDI Take
Recording a MIDI take is similar to recording an audio take. Just do the following:
- Select the track, and then record-enable it by clicking the record enable icon on the track header or by pressing Control-R.
The record enable icon will blink red to let you know that the track is enabled for recording.
- Place the playhead where you want to begin recording.
- Press R or click the record icon on the transport in the control bar.
Refer to Chapter 3 for control bar and transport details.
- Wait for the count-in and then start playing.
- When you’re finished, press the spacebar or click the stop icon on the transport.
A new MIDI region will fill the area where you began and stopped recording, as shown in Figure 7-7.

Figure 7-7: A recorded MIDI region.
You can adjust the recording count-in by choosing File⇒Project Settings⇒Recording⇒Count-In.
As you record a MIDI track, your controller could be sending a lot more data than note on and note off messages. You could be sending aftertouch data, system exclusive data, or other control changes. If you don’t need these types of MIDI data in your project, you can filter them. Choose File⇒Project Settings⇒MIDI, click the Input Filter tab, and then select the MIDI data you want to filter (see Figure 7-8). Recording all MIDI data isn’t a big deal, but if you need to do MIDI editing in the list editor (described in Chapter 15), having less data makes it easier.
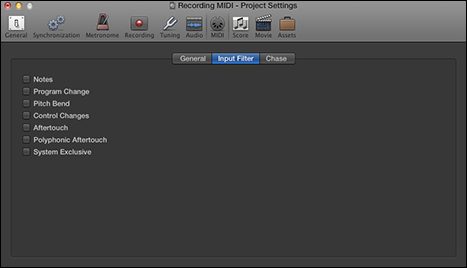
Figure 7-8: Project settings for the MIDI input filter.
Recording Multiple MIDI Takes in Cycle Mode
As with audio takes, you can record multiple MIDI takes to build a perfect take. Building a final composite take from multiple takes is called comping. To create a take folder when recording in cycle mode, you must first choose Record⇒MIDI Recording Options⇒Create Take Folders. The MIDI recording options will set how your project behaves when you create overlapping MIDI regions.
You can get to the MIDI recording options also by choosing File⇒Project Settings⇒Recording. Then select how your project handles overlapping MIDI regions on the drop-down menu, as shown in Figure 7-9. For a detailed look at all overlapping recording options, see the video guide I provided for you at http://logicstudiotraining.com/lpxfordummies.
To record MIDI takes in cycle mode, follow these steps:
- In the cycle ruler at the top of the tracks area, drag from left to right to set the cycle locators.
Cycle mode is automatically turned on and represented by a yellow strip in the ruler.
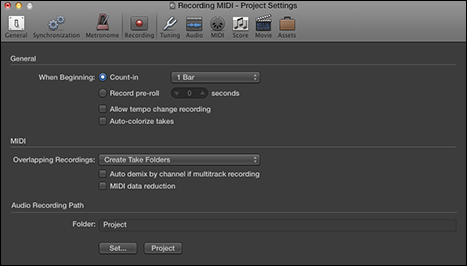
Figure 7-9: Project settings for MIDI recording options.
- Press R to begin recording.
After the second take is recorded, a take folder is created, as shown in Figure 7-10, and new lanes are added with each pass through the cycle. All previous takes are muted so you hear only the current take.
- Press the spacebar to end recording.
- Click the disclosure triangle in the upper-left corner of the take folder.
The take folder will open and display all the takes, as shown to the right in Figure 7-10. You can open the take folder also by double-clicking it or by selecting it and pressing Control-F.
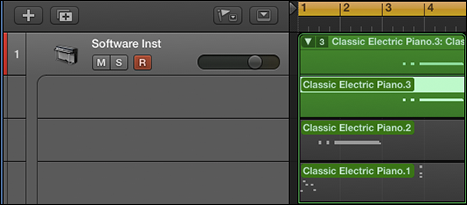
Figure 7-10: A MIDI take folder.
Creating Tracks in Cycle Mode
You might want to record a beat or groove and build it one take at a time. Recording this way makes it easier to focus on a single element rather than playing a full part. Logic Pro gives you several options when you record in cycle mode:
- Record⇒MIDI Recording Options⇒Create Tracks when Cycling creates a new take track with each pass. A take track uses the same channel strip as the original track, so it doesn’t use up more resources. For example, if you’re recording MIDI drums and want each drum sound on a different track, you can create new tracks in cycle mode until you have a complete beat. You can use the same technique with a multi-instrument (a single software instrument with more than one sound) and create an entire groove from the ground up. Recording this way is like using a looper, with each loop building on the first, except it continues to add layers until you stop recording.
- Record⇒MIDI Recording Options⇒Create Tracks and Mute When Cycling mutes the previous track after each pass. Use this if you don’t want to build on the previous take but do want to create take alternatives. This method is similar to take recording, but it creates new take tracks instead of creating a take folder. Logic Pro lets you accomplish similar goals in several ways. In many cases, there’s no right way to do something — just the way that lets you get the job done.
Overdubbing MIDI
You may need to add a part to an existing region. Building drum grooves is a perfect example. You might want to join the new recording to the already existing region. In this case, choose Record⇒MIDI Recording Options⇒Join with Selected Regions. Everything you record on top of a current region will be joined with it, as long as it’s selected before you begin recording.
If you want a similar recording behavior while recording in cycle mode, choose Record⇒MIDI Recording Options⇒Join When Cycling. Now all regions will be joined after each pass.
Recording Multiple MIDI Inputs
You can record more than one MIDI track at a time. Record-enable each track that you want to record and then record as usual. Anything you play will be recorded on all record-enabled tracks.
If you want to use two or more controllers to perform different parts on different software instruments, you’ll need to set the tracks and controllers to separate MIDI channels in the track inspector, as described previously in the “Preparing to Record MIDI” section.
I’ve saved the best tip for last. Imagine that you’re playing your project and it’s sounding good. You’re feeling the vibe, so you reach over to your keyboard and improvise a sick riff. “Oh, that was nice! I wish I had recorded that,” you think to yourself as you gaze beyond the cold heartless computer, disappointed. Stop feeling blue. I have great news: You were recording the entire time! You can capture that recording retroactively:
- Press Shift-R to capture the most recent MIDI performance. Depending on your current MIDI recording options, your most recent performance is captured as a region, take, or take track on the selected track.
- You can add the capture recording icon to the control bar. For details on customizing the control bar, see Chapter 3.
- Capture recording works only on MIDI tracks. You can’t retroactively capture audio recordings.
As you can see, your creative power is limited only by your imagination. And your imagination is fueled by the possibilities Logic Pro gives you. You have a professional recording studio that can handle any project you can envision.