
Chapter 11
Sound Design with Synths and Samplers
In This Chapter
![]() Playing the Logic Pro synths
Playing the Logic Pro synths
![]() Understanding synthesis fundamentals
Understanding synthesis fundamentals
![]() Getting classic synth sounds
Getting classic synth sounds
![]() Modeling acoustic instruments
Modeling acoustic instruments
Synthesizers are crucial to popular music, and Logic Pro gives you enough synth power to consider selling every keyboard you own. If you don’t own any keyboards, you might have just saved thousands of dollars by buying Logic Pro. You now own several instruments modeled after classic synths as well as some innovative sound design tools that will enable you to create sounds you’ve never even imagined. And some of the fun things you’ll discover about playing with synthesizers are all the happy accidents you encounter along the way.
In this chapter, you discover how to emulate classic synths, create sampler instruments, and model acoustic sounds as well as sounds that would be hard to create in the analog world. You’ll also learn basic synthesis fundamentals to help you navigate these synths and design your own sounds.
Exploring the Logic Pro Synths
With Logic Pro X, you get a whole bunch of instruments that could easily replace every synth and keyboard you own. They’re powerful and flexible — and they sound amazing. Also, they can seem daunting to program when you look at all the controls and parameters that you can adjust. In this section, you get a tour of the instrument interfaces and parameters. For a more detailed video demonstration of what these synths can do, visit http://logicstudiotraining.com/lpxfordummies, where I show you how synthesizers work and how to use these synths in your music.
 To play the Logic Pro synths, you must create a software instrument track and select the instrument from the channel strip instrument slot as follows:
- Choose Track⇒New Software Instrument Track (or press Option-
 -S).
-S).
A new software instrument track is added to the track list.
- Choose View⇒Show Inspector (or press I).
The inspector opens to the left of the track list.
- Click the right side of the instrument slot, and choose the instrument you want.
The software instrument interface opens.
Before you begin the tour of Logic Pro’s fabulous synth collection, it’s important to understand some basic synthesis terms:
- Oscillator: A synthesizer oscillator produces a continuous signal that forms the basis for your sound. Oscillators are capable of producing several different waveform shapes that have different tonal qualities. Oscillators are the most important part of the synthesizer because they create the sound that the other synth parameters will shape.
- Modulation: A static synth sound gains interest when it’s varied in some way. Modulation is the process of varying synthesizer parameters. Vibrato is a common example of modulation.
- Filter: Synth sounds are shaped through the use of filters. Filters remove parts of the frequency spectrum, allowing you to contour the sound.
- Envelope: A synth envelope shapes the beginning, middle, and end of your sound. The most common envelope adjusts the attack, decay, sustain, and release (ADSR). For example, a piano has a fast attack, fast decay, medium sustain, and fast release.
- LFO: A low frequency oscillator (LFO) is a signal, usually below the audible frequency spectrum, that modulates a signal. LFOs are used to alter the original signal in some way. A common use of an LFO is to create vibrato.
The EFM1 FM synth
The EFM1 FM synth, shown in Figure 11-1, gets sounds like the 80s classic Yamaha DX7, one of the most popular digital synthesizers of all time. The EFM1 uses FM (frequency modulation) synthesis to get digital sounds such as electric pianos, bells, organs, basses, and other cool and complex sounds. The EFM1 is capable of playing 16 simultaneous voices and, unlike the DX7, is easy to program.

Figure 11-1: The EFM1 FM synth.
To design sounds with FM synthesis, you set the modulator and carrier parameters, and then alter the FM intensity. The tuning ratios between the modulator and carrier set the harmonic overtones. The FM intensity sets the level of the overtones. Here’s a description of the EFM1 parameters:
- Modulator parameters: The modulator parameters are on the left side of the EFM1 interface. Rotate the Harmonic knob to set the modulator signal’s tuning ratio. Rotate the Fine tune knob to adjust the harmonics. Turn the Wave knob all the way to the left to set the modulator waveform to the traditional FM sine wave or anywhere to the right for additional waveforms. Rotate the large center FM knob to adjust the FM intensity.
- Carrier parameters: The carrier parameters are on the right side of the EFM1 interface. Rotate the Harmonic knob to set the carrier signal’s tuning ratio. Rotate the Fine tune knob to adjust the harmonics. Click the Fixed Carrier button to avoid having the carrier modulated by the keyboard, pitch bend, or LFO.
- Global parameters: In the top section of the EFM1, you can set global parameters. Click the Transpose field and Tune field to change the pitch of the EFM1. Click the Voices field to choose how many notes can be played simultaneously. Click the Glide field to set the time it takes to slide from one pitch to another, also known as portamento. Click the Unison button to layer voices and make the sound richer, which also reduces by half the number of voices that can be played simultaneously.
- Modulation parameters: In the center of the EFM1 are modulation envelope sliders that set the attack, decay, sustain, and release (ADSR) of the sound. Rotate the Modulator Pitch knob to set how the modulation envelope affects the pitch. Rotate the FM Depth knob to set how the modulation envelope affects the FM intensity. Rotate the LFO knob to set how much the LFO modulates the FM intensity or the pitch. Rotate the Rate knob to set the speed of the LFO.
- Output parameters: The bottom half of the EFM1 is dedicated to output parameters. Rotate the Sub Osc Level knob to increase the bass response. Rotate the Stereo Detune knob to add a chorus effect to the sound. Rotate the Velocity knob to set the velocity sensitivity in response to your MIDI controller. Rotate the Main Level knob to adjust the overall volume. Adjust the Volume Envelope sliders to set the ADSR of the sound.
 Click the Randomize button at the bottom right of the EFM1 interface to create random sounds. Adjust the amount of randomization by clicking the Randomize field and setting the percent of randomization. If you like crazy digital sounds, 100 percent randomization is your best friend.
The ES1 subtractive synth
The ES1 synthesizer, shown in Figure 11-2, creates sounds by using subtractive synthesis, in which you start with an oscillator and a suboscillator and then subtract parts of the sound to shape it. The ES1 is modeled after classic analog synths and is great at creating basses, leads, pads, and even percussion sounds.
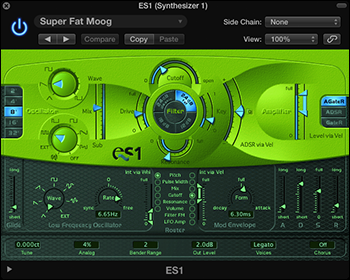
Figure 11-2: The ES1 subtractive synth.
A description of the ES1 parameters follows:
- Oscillator parameters: The left half of the ES1 interface gives you the oscillator parameters that define your basic sound. Click the buttons on the left to choose the octave. Rotate the Wave knob to set the oscillator waveform. Rotate the Sub knob to set the suboscillator waveform. Adjust the Mix slider to set the mix between the two oscillators.
- Filter parameters: The center section of the ES1 filters the two oscillator waveforms. Adjust the Cutoff slider to set the cutoff frequency of the low-pass filter. Adjust the Resonance slider to set the quality of the frequencies around the cutoff frequency. Click one of the four Slope buttons to choose how extreme the low-pass filter affects the signal. Adjust the Drive slider to affect the resonance setting and to overdrive the filter. Adjust the Key slider to set how the pitch adjusts the filter. Adjust the ADSR via Velocity slider to set how the filter is affected by note velocity.
- Amplifier parameters: The right sections of the ES1 adjust the volume level and performance. Adjust the Level via Velocity slider to set how the volume is affected by note velocity. Click the Amplifier Envelope buttons to set how the ADSR envelope affects the volume.
- Modulation parameters: The largest section of the dark-green area of the ES1 adjusts how the sound is modulated. The Glide parameter sets the speed of the portamento. Rotate the Wave and Rate knobs to set how the Low Frequency Oscillator (LFO) stimulates the sound over time. The Modulation Envelope sets how the modulation fades in or out. The Router parameters set the targets of the LFO and Modulation Envelope.
- Envelope parameters: The far right section of the dark-green area adjusts the ADSR envelope. Use the sliders to set the time of the attack, decay, sustain, and release.
- Global parameters: The bottom row of parameters controls the ES1 global parameters. Click the Tune field to adjust the overall tuning. Click the Analog field to introduce random changes to the tuning and cutoff frequency, similar to an analog circuit that changes due to heat and age. Click the Bender Range to adjust the amount of pitch bend. Click the Out Level to adjust the overall volume. Click the Voices field to set the number of voices the ES1 can play simultaneously. Click the Chorus field to choose the type of built-in chorus effect that will thicken the sound.
The ES1 is a great instrument to use for getting the feel of analog synthesis. Many of the synths that follow have similar parameters. Getting the hang of setting oscillator waveforms, filters, envelopes, and modulators will help you take command of the synths and design your own sounds.
You don’t have to be a programming genius to get great sounds out of Logic Pro’s synthesizers. Every synth comes with a menu of presets at the top of the interface. Load a sound you like, twist some knobs, and have some fun.
The ES2 hybrid synth
The ES2, shown in Figure 11-3, is like a combined EFM1 and ES1 synth plus another type of synthesis called wavetable synthesis. A wavetable is made up of many different waveforms that evolve from one to another or blend at once, creating complex digital sounds. Although the ES2 can produce sounds similar to the EFM1 and ES1, it shines at creating pads, sonic textures, and synthetic sounds that evolve over time.
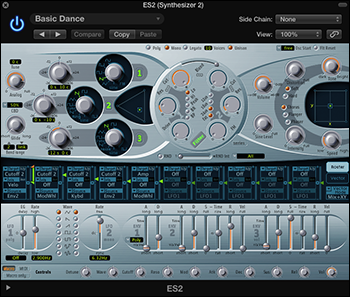
Figure 11-3: The ES2 hybrid synth.
I skip many of the parameters that are similar to the ES1 and EFM1 and focus on the unique features of the ES2:
- Oscillator parameters: The three numbered oscillators on the upper-left side of the ES2 interface choose the basic sound. The triangle-shaped area to the right of the three oscillators blends them together.
- Filter parameters: The round section in the center of the ES2 adjusts the filters that shape your synth sound.
- Amplifier parameters: The top-right section contains the ES2 volume level. You can add a sine wave to the output section using the Sine Level knob.
- Effects parameters: To the right of the ES2 parameters are several built-in effects, including distortion and chorus, as well as a flanger and a phaser.
- Planar pad: The X/Y pad to the right of the amplifier parameters can control two parameters simultaneously. The planar pad parameters are chosen in the modulation router or vector envelope.
- Modulation router and vector envelope parameters: The dark-blue strip of the ES2 controls the modulation sources and targets as well as the vector envelope generator. You can toggle between the modulation router and vector envelope using the Router and Vector buttons on the right.
- Modulation parameters: Below the modulation router and vector envelope parameters are the modulation parameters. Adjust the two LFOs and three envelopes to modulate the ES2 modulation targets. You set the modulation sources and targets in the modulation router.
- Macro controls and controller assignment parameters: The bottom strip of buttons and knobs are where you set the macro controls and MIDI controller assignments. Click the Macro or MIDI button to toggle between the two types of controls. Click the Macro Only button to hide all ES2 parameters except the preprogrammed macro controls, which are useful when you went to adjust the ES2 sounds globally. The MIDI controller assignments allow you to map controls on your MIDI controller to parameters of the ES2.
- Global parameters: Found above the filter parameters and to the left of the oscillator parameters are the ES2 global parameters. You can tune the instrument, set the number of voices, adjust the portamento speed, and more.
The ES2 hybrid synth can be used in surround mode to pan your sound throughout the surround spectrum if you're monitoring your project in surround sound. Working in surround sound is beyond the scope of this book, but I thought you would want to know that the Logic Pro designers have seemingly thought of everything. To get to the surround parameters, click the disclosure triangle at the bottom of the ES2 interface to display the advanced parameters.
The ES E ensemble synth
The ES E synth, shown in Figure 11-4, is a lightweight, eight-voice subtractive synth. The E in its name stands for ensemble, and the ES E is great for warm pads such as analog brass and strings. Best of all, it’s much easier to program than the ES1 or ES2.
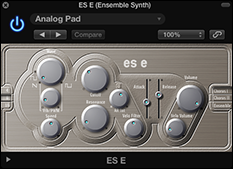
Figure 11-4: The ES E ensemble synth.
Here’s a description of the ES E parameters:
- Oscillator parameters: The left side of the ES E interface adjusts the oscillator parameters. Click the buttons on the far left to choose the octave of your sound. Rotate the Wave knob all the way to the left to generate a sawtooth wave, which is bright with strong odd and even harmonics and excels at generating rich pads. The rest of the wave range generates pulse waves, which are hollow sounding with strong odd harmonics and can create excellent reedy sounds such as woodwinds.
- LFO parameters: The knobs below the wave parameter adjust the LFO settings. The LFO modulates the oscillator waveform. Rotate the Vibrato/PWM (pulse wave modulation) knob to set the modulation intensity. Rotate the Speed knob to set the LFO speed.
- Filter parameters: To the right of the oscillator and LFO parameters are the low-pass filter parameters. A low-pass filter allows low frequencies to pass through while reducing the higher frequencies. Rotate the Cutoff knob to set the cutoff frequency, and rotate the Resonance knob to raise or lower the frequencies around the cutoff frequency. Rotate the Attack/Release Intensity knob to adjust how the envelope generator affects the filter. Rotate the Velocity Filter knob to adjust how velocity affects the filter.
- Envelope parameters: To the right of the filter parameters are the envelope parameters. Adjust the Attack and Release sliders to set the level of your sound over time. A high attack setting will result in a more immediate sound, and a lower setting will result in a slow fade up to the final volume. A high release setting will cause the sound to slowly fade when you release the key, and a lower setting will cause the sound to fade quickly.
- Output parameters: To the right of the envelope parameters are the output parameters. Rotate the Volume knob to adjust the overall ESE volume. Rotate the Velocity Volume knob to adjust the velocity sensitivity.
- Effects parameters: To the right of the envelope parameters, you can choose a built-in effect. Choose between Chorus I, Chorus II, and Ensemble to thicken your sound.
The ES M mono synth
The ES M, shown in Figure 11-5, is another lightweight subtractive synth. The M stands for mono, which means the ES M can play only one note at a time. Monophonic synths such as the ES M are perfect for bass and lead sounds. Like the ES E, the ES M is simple to program and features a stripped-down set of controls. Both the ES E and ES M are great instruments for learning the basics of synthesis.
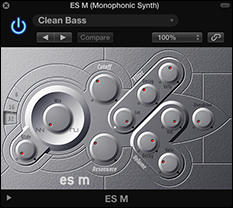
Figure 11-5: The ES M monophonic synth.
A description of the ES M parameters follows:
- Oscillator parameters: The left side of the ES M adjusts the oscillator parameters. Click the numbered buttons on the far left to choose the octave. Rotate the Mix knob all the way to the left to select a sawtooth wave and all the way to the right to select a rectangular wave. Rotate the Mix knob between the two positions to mix the sawtooth and rectangular waves. Rectangular waves, like pulse waves, are reedy and nasal and great for synth bass sounds. Rotate the Glide knob to adjust the speed of the portamento.
- Filter parameters: To the right of the oscillator parameters are the filter parameters. Rotate the Cutoff knob to adjust the cutoff frequency of the low-pass filter. Rotate the Resonance knob to boost or cut the frequencies around the cutoff frequency. Rotate the Filter Intensity knob to adjust how the envelope generator modulates the cutoff frequency. Rotate the Filter Decay knob to adjust the filter envelope decay time. Rotate the Filter Velocity knob to adjust how velocity affects the filter.
- Volume parameters: To the lower right of the filter parameters are the output parameters. Rotate the Volume knob to adjust the overall volume. Rotate the Volume Decay knob to adjust how the sound decays over time. Rotate the Volume Velocity knob to adjust how volume responds to velocity. Rotate the Overdrive knob to add distortion to your sound.
Click the disclosure triangle at the bottom of the interface to view the extended parameters. You can adjust the pitch bend amount and fine-tuning in this area.
The ES P poly synth
The ES P, shown in Figure 11-6, is another lightweight subtractive synth. The P stands for polyphonic; you can play eight voices at once. The ES P is modeled after classic 80s synths and does a great job of creating analog pads, bass, and brass sounds.
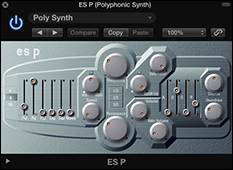
Figure 11-6: The ES P polyphonic synth.
Here’s a description of the ES P parameters:
- Oscillator parameters: The left side of the ES P adjusts the oscillator parameters. Click the numbered buttons to choose the octave. The Oscillator sliders are used to mix the six oscillators. From left to right, you can set the level of a triangle wave, sawtooth wave, rectangle wave, suboscillator -1 (one octave below), suboscillator -2 (two octaves below), and noise generator.
- LFO parameters: To the right of the oscillator parameters are the LFO parameters. Rotate the Vibrato/Wah knob to adjust the amount of vibrato or wah-wah effect. Rotate the Speed knob to adjust the speed of the vibrato or wah.
- Filter parameters: To the right of the LFO parameters are the filter parameters. Rotate the Frequency knob to set the cutoff frequency of the low-pass filter. Rotate the Resonance knob to boost or cut the frequencies around the cutoff frequency. Click the 1/3, 2/3, or 3/3 buttons to adjust how the pitch affects the cutoff frequency modulation. Rotate the ADSR Intensity knob to adjust how the envelope generator affects the cutoff frequency modulation. Rotate the Velocity Filter knob to set how velocity affects the filter.
- Volume parameters: To the lower right of the filter parameters are the volume parameters. Rotate the Volume knob to adjust the overall volume. Rotate the Velocity Volume knob to adjust how the velocity affects the volume. Lower levels mimic classic synthesizers without velocity-sensitive keyboards; higher levels make notes louder if the key is struck harder.
- Envelope parameters: To the right of the volume parameters are the envelope parameters. Adjust the attack, decay, sustain, and release parameters (ADSR) to adjust the ES P envelope.
- Effects parameters: To the right of the envelope parameters are the effects parameters. Rotate the Chorus knob to the right to add chorus and thicken your sound. Rotate the Overdrive knob to the right to add distortion.
The EVOC 20 poly synth vocoder
The EVOC 20 poly synth, shown in Figure 11-7, is a vocoder and a 20-voice synthesizer. A vocoder (voice encoder) takes an incoming audio signal, typically a voice, and applies this signal to the synthesizer, creating a hybrid vocal synthesizer. However, a voice isn’t the only thing you can use as an input. You could input a drum loop or an instrument into the synthesizer or run the synth without any input as a stand-alone synthesizer.
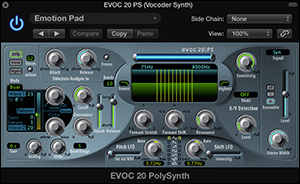
Figure 11-7: The EVOC 20 vocoder synth.
To use the EVOC 20 PS as a classic vocoder, do the following:
- On the Side Chain menu in the EVOC 20 PS plug-in header, choose the input source.
The source can be a live input, an audio track, or a bus. The classic vocoder effect uses a live input or prerecorded vocal track.
- Mute the input source so you hear only the output from the EVOC 20 PS.
- Play your MIDI controller simultaneously with the input source.
The EVOC 20 PS synthesizes your input source.
Here’s a brief description of a couple important EVOC 20 PS parameters:
- Side-chain analysis parameters: The upper-left area of the EVOC 20 PS adjusts the side-chain parameters. Rotate the Attack knob to set how fast or slow the synth reacts to the beginning of the input signal. Rotate the Release knob to adjust how fast or slow the synth reacts to the end of the input signal. Click the Freeze button to hold the current input signal indefinitely.
- U/V detection parameters: The right side of the EVOC 20 PS adjusts the U/V (unvoiced/voiced) detection parameters. The human voice is made up of voiced sounds such as vowels and unvoiced sounds such as plosives, fricatives, and nasals. Rotate the Sensitivity knob to adjust how sensitive the EVOC 20 PS is to voiced and unvoiced input signals. Click the Mode field to choose how unvoiced sounds are synthesized. Rotate the Level knob to adjust the volume of the unvoiced content.
You’ll get great results if your input source is a constant volume with lots of high-frequency content. Be sure that your input source’s volume doesn’t vary too much. You can also EQ the input source to boost the high-frequency content. You learn how to EQ signals in Chapter 16.
Sampling with the EXS24 Sampler
The EXS24 sampler, shown in Figure 11-8, plays audio files known as samples. Samplers are useful for re-creating acoustic instruments because you’re playing back recorded audio files. But you can also sample synthetic sounds or mangle acoustic samples until they’re no longer recognizable to create unique sounds.
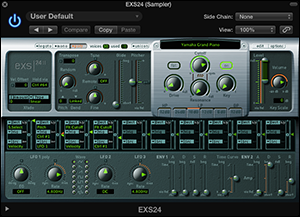
Figure 11-8: The EXS24 sampler.
In this section, you learn how to use the EXS24, import third-party sample libraries, create your own sampler instruments, and much more.
Importing sample libraries
The EXS24 comes with an enormous library of sampler instruments, but you can also import third-party sample libraries. The EXS24 has a large user base, so finding sample providers online isn’t difficult. In addition to the native EXS24 sampler instrument format, you can import SoundFont2, DLS, and Gigasampler files.
To import a third-party sample library, follow these steps:
- Copy the sample files to a subfolder of your choosing in any of the following locations:
Macintosh HD/Users/<USERNAME>/Music/Audio Music Apps/Sampler Instruments/
Macintosh HD/Users/<USERNAME>/Library/Application Support/Logic/Sampler Instruments/
Macintosh HD/Library/Application Support/Logic/Sampler Instruments/ - At the top of the EXS24 interface, click the Sampler Instruments menu and choose Refresh Menu.
Your imported sampler instrument appears on the menu, so that you can select and open it.
Converting regions to sampler instruments
You can create your own sampler instrument from any audio region in your project. For example, you can take a drum loop or an instrument riff and slice it into several pieces that you can play with your MIDI controller. You can also trigger the entire region as a loop or a one-shot sample, which means it plays just once instead of repeating. To convert audio regions to sampler instruments, do the following:
- Select an audio region in your project.
- Control-click the region and choose Convert⇒Convert Regions to New Sampler Track (or press Control-E).
The Convert Regions to New Sampler Track dialog opens.
- Select Create Zones from Regions or Create Zones from Transient Markers.
Select Regions to create a loop or one-shot sample. Select Transient Markers to slice the region into several different samples that you can trigger with your MIDI controller.
- Name the instrument and select the note trigger range.
The note trigger range defines the MIDI notes that will trigger the samples.
- Click OK.
A new software instrument track is added to the track list loaded with the EXS24. A MIDI region containing the trigger notes is also added to the tracks area.
If you convert a drumbeat to a sampler instrument, you can play the beat chromatically with your MIDI controller. A cool trick is to rearrange parts of the beat to create new beats or drum fills. If you converted an instrument part to a sampler instrument, you can rearrange the part and come up with new instrument parts. You could also sample your boss saying, “No one leave until the work is done” and rearrange it to say, “The work is done. Leave.”
Controlling sample parameters
Just like the other Logic Pro synthesizers, EXS24 sounds can be shaped by filters and modulation. Here’s a brief description of some EXS24 parameters:
- Global parameters: The top-left green section and top row of parameters are where you set the EXS24 global parameters. Click the Legato, Mono, or Poly button to change the keyboard mode. Double-click the Voices field to set the maximum number of notes that the EXS24 can play at a time. Click the Unison button to play many slightly detuned voices at once to emulate a thick and classic synth sound. Double-click the Velocity Offset field to increase or decrease the incoming velocity signals from your MIDI controller. Click the Hold Via field to change the default MIDI controller used to trigger the sustain pedal.
- Pitch parameters: To the right of the global parameters are the EXS24 pitch parameters. In this section, you can transpose and fine-tune the instrument. You can adjust the amount of pitch bend and introduce random pitch changes to emulate analog synthesizers or live string players. Adjust the Glide slider to set the speed of the portamento effect.
- Filter parameters: Below the sampler instrument menu are the EXS24 filter parameters. Click the buttons at the bottom of the filter section to choose the type of filter. Rotate the Cutoff and Resonance knobs to set the filter parameters.
- Output parameters: To the right of the filter parameters are the EXS24 output parameters. Rotate the Volume knob to set the overall volume. Adjust the Level Via Velocity slider to set how velocity affects the volume. Double-click the Key Scale field to set how volume is affected by pitch. Positive values increase the level of higher notes, emulating acoustic instruments.
- Modulation router: The center dark-blue strip of controls is where you set the EXS24 modulation sources and targets.
- LFO parameters: The bottom-left section of the EXS24 is where you set the parameters of the three LFOs.
- Envelope parameters: To the right of the LFO parameters are the envelope parameters. Envelope 1 controls the filter while Envelope 2 controls the volume level.
- EXS24 preferences: Click the Options button on the upper-right corner of the EXS24 to open the Options menu. Choose Preferences on the Options menu to open the Sampler Preferences window, shown in Figure 11-9. In this window, you can choose to search samples on your local hard drive, external hard drives, or all hard drives connected to your computer.
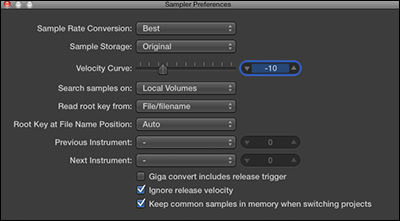
Figure 11-9: The EXS24 Preferences window.
Editing sampled instruments
There may come a time when you want to create your own sampler instruments or edit the current instrument. A sampler instrument is made up of zones and groups. A zone is the location of a single sample, whereas a group can contain many zones. You can edit all the zones in the group simultaneously.
To visualize how zones and groups fit together, consider a piano sampler instrument. Each piano key is sampled at multiple velocity levels. These sampled notes (zones) are grouped according to their velocity level for organization and so the group can be edited as a whole. You can have a group that contains loud samples and a group that contains quiet samples, for example, and edit each group and all the zones in it.
To open the instrument editor, which is shown in Figure 11-10, click the Edit button at the top right of the EXS24 interface. The instrument editor has two views, zones and groups, which can be accessed by clicking the buttons at the top left of the Instrument Editor window. On the Instrument drop-down menu at the top of the interface, you can save, rename, and create new instruments. You can also create zones and groups, as well as show and hide parameters on the View menu. Double-clicking the audio file names will open the samples in the Logic Pro audio file editor. (For more on the audio file editor, see Chapter 14).
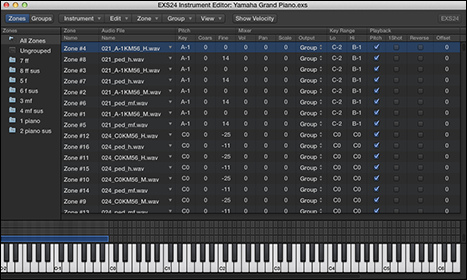
Figure 11-10: The EXS24 instrument editor.
Modeling Sounds Using Sculpture
Sculpture, shown in Figure 11-11, is a component-modeling synthesizer, which creates virtual models of the components of acoustic instruments, such as the necks and bodies of string instruments as well as the strings themselves. Sculpture can also model the location of these components, so you can put them indoors, outdoors, or in synthetic locations. Sculpture can also synthesize sounds much like the other Logic Pro synths described in this chapter.
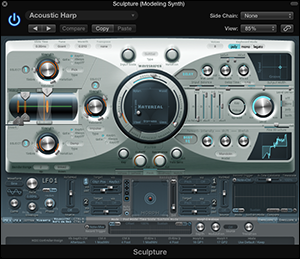
Figure 11-11: The Sculpture modeling synth.
In this section, you learn how to model instruments and synthesize sounds with Sculpture.
Understanding sound modeling
Sound modeling uses math to simulate the stimulation of physical objects. To create a complete sound model, the math has to take into consideration the object being stimulated as well as the object doing the stimulating. The object being stimulated can have many components, such as a guitar string, a guitar neck, and a guitar body.
Sculpture gives you the following parameters for detailed sound modeling.
- String: In Sculpture, the stimulated component is called a string. The string parameters are adjusted in the round Material pad in the center of the interface. You can move the puck in the Material pad to change the string parameters to nylon, wood, steel, or gloss. The left/right axis adjusts the stiffness of the material. The up/down access adjusts inner loss (dampening caused by the string material). You also have sliders to adjust the resolution, tension modulation, and media loss (string dampening due to the surrounding environment). Click the buttons at the bottom of the Material pad to show or hide the Keyscale and Release parameters. Keyscale changes how the string reacts depending on the pitch, and Release affects how the string behaves when released.
- Objects: The components that stimulate the string are called objects in Sculpture. Objects are adjusted in the left side of the interface, and three objects are available. Click the numbered object buttons to turn an object on or off. One object must be selected for the string to sound when played. Click the object Type buttons to choose different materials and methods of stimulating the string. Each object includes a knob to adjust the object's strength and sliders to adjust the timbre, velocity sensitivity, and variation. Click the Gate mode buttons to set the object to stimulate the string at Key On, Always, or Key Off.
- Pickups: Sculpture uses two pickups to take the sound generated by the objects and string and input that signal into the rest of Sculpture’s signal processing. Pickups are analogous to a guitar’s pickups. Adjust the pickup properties in the cylindrical area in the Object section. Drag the pickup A and B sliders at the top and bottom of the cylinder to adjust the pickup position. Drag the numbered object sliders to adjust the position of the objects in relation to the pickups.
- Body: Change the body type Sculpture uses to shape the sound in the lower-right area of the interface. Click the Model button to choose the body type. Click the Body EQ button to turn the entire body parameter on or off. Adjust the intensity, shift, and stretch of the body using the knobs.
Exploring the Sculpture interface
In addition to component-modeling parameters, Sculpture can filter and modulate your sound. Plus, you can add built-in effects. Here’s a brief description of some Sculpture parameters:
- Global parameters: The buttons and input fields across the top of the Sculpture interface are global parameters. Click the Glide Time field to adjust the portamento speed. Click the Tune field to fine-tune the instrument. Click the Warmth field to slightly detune the voices and thicken the tone. Click the Transpose field to transpose the instrument in octaves. To the right side of the global parameters are the Voices field and Keyboard Mode buttons. The Voices field sets the number of voices that can be played simultaneously. Click the Keyboard Mode buttons to select Polyphonic, Monophonic, or Legato. In monophonic mode, the attack is always retriggered. In legato mode, notes aren’t retriggered unless you release the key before playing the next key.
- Waveshaper parameters: Directly above the string material parameters are the waveshaper parameters. The waveshaper adds nonlinear curves to your sound and can add rich saturation or raw distortion. Click the Type pop-up menu to choose the waveshaper curve. Rotate the Input Scale knob to raise or lower the input signal. Rotate the Variation knob to alter the shape.
- Filter parameters: Directly below the string material parameters are the filter parameters. Click the filter type buttons to select the filter mode. Rotate the Cutoff and Frequency knob to adjust the filter. Rotate the Key Tracking knob to adjust how the filters respond to the key that’s played. Acoustic sounds generally have mellower low notes and brighter high notes, and key tracking allows the filter to respond to the pitch. Rotate the Velocity Sensitivity knob to adjust how velocity affects the filter. A harder velocity will usually make an acoustic sound brighter, and a higher value will give you more velocity sensitivity.
- Modulation parameters: At the bottom-left section of the interface are the modulation parameters. In addition to common LFO, vibrato, and envelope modulation sources, Sculpture provides some unique ways to modulate your sound and create constantly evolving textures to make your sound more expressive. Click the modulation type buttons at the bottom to open the parameters for that modulation type. The two Jitter modulators provide continuous and random alterations of your sound. The Velocity/Note On Random parameters can give your sound acoustic realism by emulating the subtle changes a musician would make while playing.
- Output parameters: To the far right of the string material parameters are the output parameters. The Level knob adjusts the overall volume. Click the Level Limiter mode buttons to process the volume level depending on the mode. Mono mode limits all the voices; Poly mode limits each voice separately.
- Morph parameters: Directly below the filter parameters are the morph parameters. Morphable parameters can be stored in a point in the Morph pad, allowing you to smoothly change the sound over time. All morphable parameters are indicated by orange values, rather than blue or turquoise values. The morph parameters are beyond the scope of this book, but you can get a free Sculpture tutorial by visiting http://logicstudiotraining.com/lpxfordummies.
- Delay parameters: The upper-right section of the Sculpture interface is dedicated to the delay parameters. The delay effect copies the sound and repeats it based on the parameters you choose. Click the Delay button to turn on the delay effect. Drag the Delay Time slider to choose when the sound will repeat. Rotate the Wet Level knob to adjust the volume of the delay. Rotate the Feedback knob to adjust how many times the delay will repeat.
- MIDI controller parameters: At the very bottom of the Sculpture interface are the MIDI controller parameters. Click the MIDI controller name pop-up menu to choose the MIDI controller, or select Learn to listen for the next MIDI controller that you touch.
Many of the presets on the Logic Pro instruments have their overall volume set to zero, which means it neither boosts nor cuts the signal. Consequently, the software instruments can be very loud when you first load them. It’s a good idea to find the overall volume of these instruments and turn it down so you aren’t in danger of clipping the signal. Also, you will get a better balance between the other tracks in your project if the instruments aren’t too loud.
With all these software instruments to play with, you can have an endless amount of fun. One of the joys of playing synths is how they can surprise and delight you with their unique personalities. Just like getting to know a good friend, listen to your synth and let it tell you its story. In time, you and your synths will become close musical partners.