
Chapter 14
Editing Audio Tracks
In This Chapter
![]() Getting to know the audio editors
Getting to know the audio editors
![]() Creating composite takes
Creating composite takes
![]() Fixing pitch and audio timing
Fixing pitch and audio timing
![]() Repairing audio glitches
Repairing audio glitches
Imagine you’re back in the time before personal computers and you want to edit audio. You would have to use a razor blade on tape — with no undo command. The process wouldn’t be creative or quick, and you wouldn’t edit analog audio just to experiment.
Fast-forward to the present. Music is in high demand in this high-speed world. You don’t have the luxury of taking months to finish a project — your Internet fans want it yesterday. Logic Pro X makes editing audio so simple and powerful that you can meet the demands of your fans and clients without breaking a sweat — or cutting your fingers on a razor blade.
In this chapter, you discover how to create the perfect take with Logic Pro’s quick swipe comping. You find out how to get the timing of your parts just right and tune up the pitch. And you learn how to get the best sound out of your audio and even create sounds that you didn’t record in the first place.
Knowing Your Audio Editors
Logic Pro X provides you with several ways to edit audio. You can do some audio editing right from the tracks area, as you learn in Chapter 13. In this section, you discover the specialized Logic Pro X audio editors.
The audio track editor
The audio track editor, shown in Figure 14-1, is the default Logic Pro audio editor. It works well for most audio editing needs. You can open the audio track editor in any of the following ways:
- Double-click an audio region.
- Choose View⇒Show Editor with an audio region selected.
- Press E with an audio region selected.
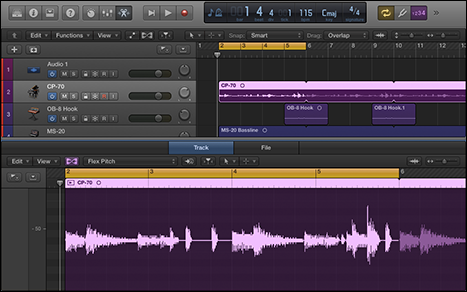
Figure 14-1: The audio track editor.
The audio file editor
The audio file editor, shown in Figure 14-2, is used for sample-level audio editing. It works well at audio repair, such as removing pops and clicks. You can open the audio file editor in the following ways:
- Double-click an audio region, and then click the File tab at the top of the audio editor.
- Choose View⇒Show Editor with an audio region selected, and then click the File tab at the top of the audio editor.
- Choose Window⇒Open Audio File Editor to open the editor in a new window.
- Press Option and double-click an audio region in the project audio browser.
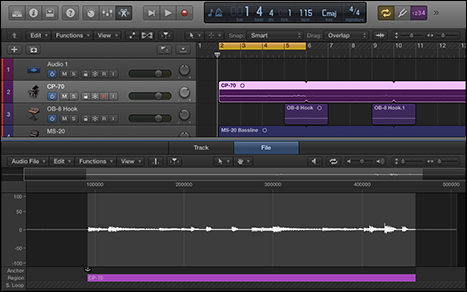
Figure 14-2: The audio file editor.
 The audio file editor is considered a destructive editor because the original audio file on your hard drive is modified. You can still undo your edits, but it’s always safer to work with copies of your audio files.
Creating the Perfect Take with Quick Swipe Comping
Creating the perfect take used to be time consuming. But since Logic Pro automatically records take folders, creating a composite take (a comp take) is almost too easy. You can quickly create a comp take by swiping on takes in a take folder, as you learn in this section. Quick swipe comping is another example of how Logic Pro X does the heavy lifting, allowing you to focus on creating.
 Show Advanced Tools must be selected in the Advanced Preferences pane to get access to the additional audio editors. Choose Logic Pro X⇒Preferences⇒Advanced Tools and select Show Advanced Tools.
Comping takes
A comp take is studio-speak for a composite take, a single recording made from many recordings. Comping used to require a lot of copying and pasting — as well as razor blades and tape before digital audio came along. As you learn in Chapter 6, Logic Pro puts your recorded takes on multiple lanes of a single track, as shown in Figure 14-3. Each lane enables you to drag through the region to hide or display audio from the take and build a final composite take. For example, with a vocal performance, you can take one word or even just part of a word from a single take and improve your singer’s performance. (Just don’t tell the singer or you might bruise his or her ego.)
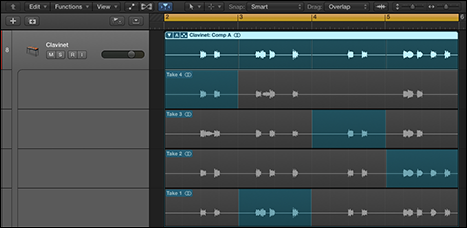
Figure 14-3: A take folder.
To create a single take from multiple takes, do the following:
- In the upper-left corner of the take folder, click the disclosure triangle to see the individual take lanes.
- Preview an individual take by clicking it and playing your project.
If you have many takes, it’s a good idea to take notes with a pen and paper or with the Logic Pro notepad (Option-
 -P). Pay attention to what sounds good and what doesn’t.
 - Use the pointer or the pencil tool to drag over the areas of the take you want in your comp.
Dragging over one take automatically deselects the same area of the other takes and updates the current comp.
In addition to dragging selections within takes, you can edit the comp in more advanced ways:
- Shorten a take section without extending the selection of other takes by Shift-dragging the take section. Shortening a take section leaves silence in between the two adjacent sections in the comp.
- Move the selection left or right by placing your cursor in the center of the section and dragging when the cursor becomes a two-headed arrow.
- Alternate sections between takes by clicking an empty section of a take. The take you click will become active, and the formerly active take will become inactive. Use this method to audition sections of takes quickly.
- Remove a section from the comp by Shift-clicking the section. To remove the entire take from the comp, Shift-click the take header.
Creating alternate comps
When you create a comp that you like, it’s a good idea to duplicate the comp for safekeeping. You might also want to try out different ideas. Follow these steps to create alternative comps:
- To the right of the take folder disclosure triangle, click the current comp indicator.
A pop-up menu appears that lets you select takes and gives you commands for your comps and take folder.
- In the pop-up menu, choose Create New Comp or Duplicate Comp.
Your new or duplicate comp appears in the menu list, where you can select and edit it. The Create New Comp command is available only if you haven’t created a comp. After you’ve created a comp, the Duplicate Comp command is available.
After you’ve duplicated your comp, you can use the pop-up menu to select between the two comps as well as rename the comp. You can also delete the comp or delete all other comps except the current comp.
Editing take regions
![]() You might want to edit take regions directly but not edit your comp. For example, you can change the start and end points of a take region or split the region in two. You can turn quick swipe comping on and off by clicking the take folder’s quick swipe comping icon (shown in the margin). When quick swipe comping is on, you can create and edit comps by dragging in the take regions, as described previously.
You might want to edit take regions directly but not edit your comp. For example, you can change the start and end points of a take region or split the region in two. You can turn quick swipe comping on and off by clicking the take folder’s quick swipe comping icon (shown in the margin). When quick swipe comping is on, you can create and edit comps by dragging in the take regions, as described previously.
When quick swipe comping is off, the icon shows a pair of scissors, and you can edit the regions directly. You can also do the following to your take regions when quick swipe comping mode is off:
- Select an individual take by clicking it.
- Change start and end points by dragging the lower edges of the take region.
- Slice a take at a comp section borders by Control-clicking and choosing Slice at Comp Section Borders in the pop-up menu.
- Trim takes at active comp section borders by Control-clicking and choosing Trim to Active Comp Section Borders in the pop-up menu.
- Move a take within its lane by dragging left or right.
- Move a take to a different lane by dragging the take to the new lane.
Packing and unpacking take folders
It’s not necessary to record multiple takes on a single track to use a take folder. You can create a take folder from any audio you have in your project. You can also remove takes from a take folder so that they play independently as regions on their own track.
To pack audio regions into a take folder, follow these steps:
- Select the regions you want to pack into a take folder.
- Control-click a selected region, and choose Folder⇒Pack Take Folder (Control--F) in the pop-up menu.
The regions are placed into a take folder on the topmost track.
You can do either of the following to unpack a take folder:
- Control-click the take folder header, and then choose Folder⇒Unpack Take Folder to Existing Tracks (Control--U) or Folder⇒Unpack Take Folder to New Tracks (Shift-Control--U).
- Click the current comp indicator to the right of the take folder disclosure triangle, and then choose Unpack or Unpack to New Tracks.
In addition to packing and unpacking take folders, you can do the following in the take folder menu:
- Flatten: The current active comp replaces the take folder. Each take section is its own region with crossfades added to the regions for smooth transitions between the regions.
- Flatten and merge: The current active comp replaces the take folder. Each take section is merged into a single audio file with only one region.
- Export the active comp to a new track: The current active comp is exported to a new track, leaving the original take folder unchanged. Each take section on the new track is in its own region with crossfades added to the regions.
- Move the active comp to a new track: The current active comp is exported to a new track, but the original take sections are removed from the take folder.
 You can create a vocal double effect, a common music production technique, by creating different comps and exporting them to new tracks. If you have several usable takes in a take folder, creating multiple comps and exporting them makes vocal doubling easy. And if the exported comps aren’t perfectly in tune or the timing is off, you can adjust them by using flex pitch and flex time, as you’re about to learn.
Time Traveling with Flex Time
When flex time was added to Logic Pro in 2009, it was one of those gasp-at-the-possibilities moments. If you’ve ever been on a deadline and the recording wasn’t going well, you probably wished you had something like flex time. You’ve come to Logic Pro at the right time, as you’re about to find out.
Flex time allows you to adjust the timing and groove of performances. You can fix mistakes, experiment, perfect important downbeats, and so much more. To enable flex time on a track in the tracks area, do the following:
- Choose Edit⇒Show Flex Pitch/Time (-F).
Flex icons appear on the track headers, as shown in Figure 14-4.
- Click the flex icon on the audio track you want to edit.
The flex menu appears on the track header.
You can enable flex time also from the audio track editor:
- Open the audio track editor by double-clicking an audio file or by selecting an audio file and choosing View⇒Show Editor (E).
The audio track editor opens in the main window.
- Click the flex icon on the audio track editor menu bar.
The flex menu appears on the menu bar to the right of the flex icon.
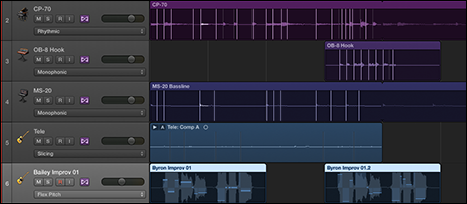
Figure 14-4: Tracks with flex mode enabled.
Choosing flex time algorithms
After you’ve turned on flex mode, you can select an algorithm in the flex mode menu, which appears in the following places, to determine how your audio will be altered:
- Track inspector (see Figure 14-5)
- Track header
- Audio track editor
You can also have Logic Pro analyze your audio and automatically choose the best algorithm for the audio material.
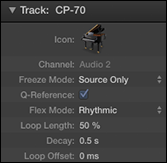
Figure 14-5: The track inspector flex parameters.
Depending on the flex algorithm you choose, different parameters will be available in the track inspector. You can choose between the following flex algorithms and parameters:
- Automatic: Logic Pro analyzes your audio and selects between monophonic, slicing, and rhythmic algorithms.
- Monophonic: Used for monophonic audio such as bass lines, lead sounds, and vocals. Click the Percussive check box if the audio is a percussive monophonic sound, such as a guitar or pitched percussion.
- Slicing: Used for percussive audio such as drums and percussion. Audio isn’t expanded or compressed with this algorithm, so moving audio can create gaps. Set the Decay time to compensate for gaps in the audio. Click the Fill Gaps check box to disable the decay time and remove any gaps. Set the Slice Length to shorten each slice by a percentage and adjust the gaps between slices.
- Rhythmic: Used for rhythmic audio such as guitars and keyboards. Set the Loop Length to adjust the length of the loop used at the end of the slice to fill the gap. Set the Decay value to adjust the decay of the loop. Set the Loop Offset to move the loop forward in time, preserving the attack of the transients that follow.
- Polyphonic: Used for polyphonic audio such as chords and full mixes. The polyphonic algorithm is the most processor intensive of all the algorithms. Click the Complex check box to add more internal transients to the flex time processing.
- Speed (FX): Used for special effects, especially percussive material. This algorithm has no additional parameters.
- Tempophone (FX): Used for special effects based on granular synthesis techniques. Adjust the Grain Size used to compress and expand the audio. Adjust the Crossfade length to set the quality of the effect. Higher values produce softer effects, and lower values produce hard effects.
Using flex markers
You adjust the timing of your audio with flex markers. After you enable flex time editing, your audio is analyzed using the chosen algorithm and transient markers are added to your audio, as shown in Figure 14-6. You can use these markers to help you see where you need to adjust the timing.
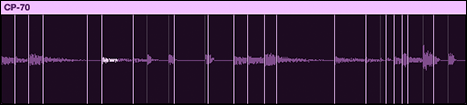
Figure 14-6: Transient markers.
Flex time editing can be done in the tracks area and in the audio track editor. Follow these steps to adjust the timing of your audio tracks with flex time:
- In the track header, click the flex icon to enable flex time editing.
Your audio is analyzed and transient markers are added to the region.
- Choose a flex time algorithm.
- Click the spot you want to adjust.
A flex marker is added to the track. You can use the transient markers to guide your editing, but you can also add flex markers to points without transient markers.
If you click the lower half of the region, multiple flex markers are added. In addition to the place you click, a marker is added to the left and right transients, making the flex editing more precise.
- Drag the marker to the left or right to adjust the timing.
The audio is compressed or expanded to fit the edit.
You can connect a flex marker to a transient in a region on an adjacent track, allowing you to tighten the timing between two separate tracks. Drag a flex marker up or down to a transient on another region until the line between the two regions turns yellow, and then release. Your track will be adjusted to the transient.
Using the flex tool
The tool menus in the tracks area and the audio track editor contain a flex tool to use on regions when flex editing isn’t shown. To use the flex tool on an audio region, do the following:
- Open the tool menu (T) and choose the Flex Tool.
- Drag the audio waveform to adjust the timing.
Remember the marquee tool in Chapter 13? It’s a great tool for flex editing. Create a selection with the marquee tool, and then drag the selection with the flex tool to adjust the timing. You can also click the selection with the pointer tool to create flex time markers from the selection and the closest transients. If you click in the upper half of the region, flex markers are added to the four positions: the edges of the selection and the nearest transients outside the selection. If you click in the lower half of the region, flex markers are added to three positions: the selection edges and the place you clicked.
Tuning with Flex Pitch
Flex pitch is a new feature in Logic Pro X. It’s a good thing we were given seven years to come down from the glee of flex time before Logic Pro announced flex pitch. We needed to catch our breath.
Editing pitch isn’t anything new and a few companies have done a pretty good job implementing it. But flex pitch makes editing pitch simple thanks to its intuitive workflow and the fact that it’s built into Logic Pro X. To enable flex pitch on a track in the tracks area, follow these steps:
- In the tracks area menu bar, click the flex icon to enable flex editing.
Flex icons appear on the track headers.
- In the track header, click the flex icon.
Flex editing is now enabled on the track.
- On the Flex Mode menu in the track header or the track inspector, choose Flex Pitch.
The regions on the track display the flex pitch editing bars, as shown in Figure 14-7.

Figure 14-7: Flex pitch in the tracks area.
Editing pitch in the tracks area
After you enable flex pitch on a track, the region in the tracks area displays horizontal bars above or below each note. These bars show you how close or far away the pitch is from the center pitch, indicated by the horizontal center of the region. If a bar is above the center, the pitch is sharp. If a bar is below the center, the pitch is flat. To edit the pitch, drag the bars closer to the center.
You can speed up the editing process by Control-clicking the audio region and choosing Set All to Perfect Pitch on the menu. If you don’t like your edits, you can start fresh by choosing Set All to Original Pitch.
You can adjust two flex pitch parameters from the track inspector:
- Formant Track: Formants are bands of frequencies that determine the sound quality of vowels. Drag up on the Formant Track field to increase the tracking interval.
- Formant Shift: This parameter adjusts how formants are affected by changes in pitch. You can get some cool vocal effects by setting the Formant Shift value to extremes. Positive values give you squeaky Mickey Mouse effects, and negative values give you deep-voiced Barry White effects. The formant shift parameter is fun to play with, and it helps you get more natural sounding flex pitch edits.
Editing pitch in the audio track editor
You can edit pitch also in the audio track editor, which provides a different flex pitch interface. The flex pitch presentation in the audio track editor is similar to the pitch presentation in the MIDI piano roll editor, and you have more control over the edited sound. To use flex pitch in the audio track editor, do the following:
- Double-click an audio region to open the audio track editor, or select the region and press E.
The audio track editor opens at the bottom of the main window.
- On the audio track editor menu bar, click the flex icon.
Flex editing is enabled on the track.
- On the Flex Mode menu on the audio track editor menu bar, choose Flex Pitch.
Flex pitch data is added to each note, as shown in Figure 14-8.
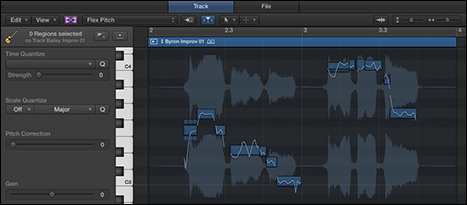
Figure 14-8: Flex pitch in the audio track editor.
Editing pitch event hot spots
In the audio track editor, flex pitch creates a blue rectangle for each note. The notes correspond to the piano keys to the left of the editor. Drag the rec-tangle left, right, up, or down to adjust both time and pitch. You can also split the note with the scissors tool to create two notes or merge notes by using the glue tool. You can reset the pitch by Control-clicking the note and choosing Set to Original Pitch.
As you hover your cursor over each rectangle, six hot spots become available so you can edit the following flex pitch parameters:
- Pitch Drift: The left and right hot spots at the top of the rectangle control the pitch drift at the beginning and end of the note. Use these parameters to allow the pitch to drift into or out of the note. These parameters are useful for keeping a natural feel to the pitch because singers often scoop into notes and fall out of notes.
- Fine Pitch: Use the top center hot spot to fine-tune the pitch.
- Gain: The bottom left hot spot controls the volume of the note.
- Vibrato: The bottom middle hot spot controls the pitch vibrato.
- Formant Shift: The bottom-right hot spot controls how formants are affected by the pitch shift.
Have you ever wished you could sing a melody and have it turned into MIDI or notation? Flex pitch lets you do that. After you’ve finished flex pitch editing, choose Edit⇒Create MIDI Track from Flex Pitch Data on the audio track editor menu. A new software instrument track is created and the flex pitch data is added to a MIDI region as MIDI notes.
Quantizing the pitch and scale of a region
With flex pitch enabled in the audio track editor, you can have Logic Pro automatically quantize the pitch, scale, and time of a region. Choose View⇒Show Local Inspector to view the quantization parameters. At the top of the inspector are the Time Quantize parameters, which enable you to choose the note value and strength of quantization. The Scale Quantization parameters enable you to choose the root note of the scale and the type of scale. All common scale modes are available along with other popular scale types and some more esoteric scales.
Flex pitch can do more than just fix pitch mistakes or inconsistencies. You can use it also to create new parts, such as vocal harmonies. In many cases, the parts you come up with will be perfectly useable. Sometimes, however, moving a pitch too far can sound unnatural, so adjust the formant parameters for better results. But even if you don’t keep the part, you can experiment and find out what will make your song sound stronger.
Editing Audio in the Audio File Editor
The audio file editor is new to Logic Pro X and replaces the sample editor from earlier versions of Logic Pro. You probably won’t need to use the audio file editor often because the audio track editor will usually be your first choice for editing audio. The audio file editor is reserved for more precise and permanent edits to audio files. You can open the audio file editor, shown in Figure 14-9, in the following ways:
- Choose View⇒Show Editor or double-click an audio file and then click the File tab in the audio editor window.
- Choose Window⇒Open Audio File Editor (-6) to open the audio file editor in a new window.
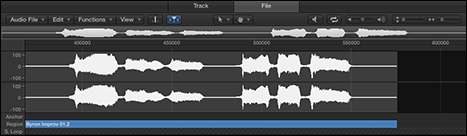
Figure 14-9: The audio file editor.
It’s worth repeating that the audio file editor is a destructive editor, meaning it changes your audio permanently. Making copies and backups of files you intend to edit is good practice. You can
- Choose Audio File⇒Create Backup (Control-B). A duplicate of the audio file is stored in the same location as the original file and given a .dup file extension.
- Choose Audio File⇒Save A Copy As. A dialog opens where you can adjust the settings and location of the file before you click the Save button.
Navigating and playing audio
Playback in the audio file editor is independent from the project audio. That means the transport controls in the control bar don’t control the playback of files in the audio file editor. The audio editor is monitored through the prelisten channel strip in the mixer, shown in Figure 14-10. The prelisten channel strip adjusts the audio settings of files played in the audio file editor and project audio browser.
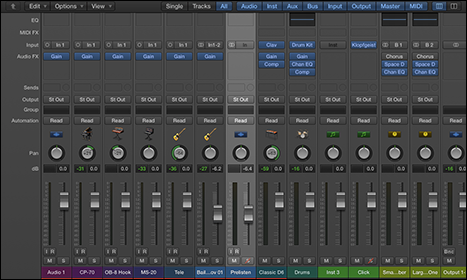
Figure 14-10: The prelisten channel strip.
Follow these steps to view the prelisten channel strip:
- Open the mixer in the tracks area (X) or in its own window (-2).
You can open the mixer also by choosing View⇒Show Mixer or Window⇒Open Mixer.
- On the mixer menu bar, click the All button to display all channel strips.
The Prelisten channel strip is located to the right of the last audio channel strip.
![]() You can play audio files in the editor by clicking the prelisten icon (shown in the margin). Control-click the prelisten icon to choose to play audio through the prelisten channel strip or the track channel strip. In addition to the prelisten icon, you can play audio in the editor in the following ways:
You can play audio files in the editor by clicking the prelisten icon (shown in the margin). Control-click the prelisten icon to choose to play audio through the prelisten channel strip or the track channel strip. In addition to the prelisten icon, you can play audio in the editor in the following ways:
- Press Control-Option--spacebar to play and stop the entire audio file.
- Press Shift-Control-Option-spacebar to play and stop the audio contained in the region.
- Press Control-Option-spacebar to play and stop the region from the anchor position. The anchor position is used to determine the absolute start point of the audio file.
- Double-click the ruler to play and stop the audio file.
- Click-hold the waveform overview to start playback at the click location.
- Drag your cursor in the ruler to scrub the audio.
- Click the cycle icon to continuously repeat the selected audio.
The audio file editor allows you to navigate to precise points in your audio file. Because the audio file editor is used for detailed editing, it’s important to have the capability to navigate around your audio file at the smallest level. To navigate your audio file, do one of the following:
- Click the waveform display to navigate to specific locations in the audio file.
- Choose Edit⇒Go To and select the audio file location you want.
- Choose Functions⇒Search Peak to find the loudest point in the audio file.
- Choose Functions⇒Search Silence to find the first silent point in the audio file.
- Use the vertical and horizontal zoom sliders to adjust how much of your audio file you see in the editor window.
Selecting audio
To edit audio in the audio file editor, you need to select the audio in the editing window. The audio file editor gives you precise ways of selecting audio, down to the individual samples. You can select portions of your audio file in the following ways:
- Drag your cursor over the area you want to select.
- Choose Edit⇒Select All (-A).
- Choose Edit⇒Select All Previous (Shift-Control-Option-left arrow).
- Choose Edit⇒Select All Following (Shift-Control-Option-right arrow).
- Choose Edit⇒Region -> Selection to select only the audio that is used in the region.
In addition to these basic ways of selecting parts of your audio file, you can use transient markers to make selections. Transient markers can make selecting and editing audio much faster. To select audio using transients:
 On the menu bar, click the transient editing mode icon (see the margin).
The audio is analyzed for transients, and markers are added.
- Double-click between two markers or use one of the commands on the Edit⇒Set menu.
The start and end points of your selection are shown in the info display on the menu. You change the format of the information by selecting one of the following modes from the View menu:
- Samples
- Min:Sec:Ms
- SMPTE Time
- Bars/Beats
Editing audio
In the audio file editor, you can do basic editing, such as copying and pasting, or more advanced editing, such as fading in and out and removing pops and clicks. Use the audio file editor, as opposed to the audio track editor, to accomplish more detailed, permanent edits.
From the Edit menu, you can copy, cut, paste, and delete. Copied audio is put on the clipboard for pasting to a new location. Cutting audio pulls all the audio after the cut forward and places the selection on the clipboard. Pasting audio occurs at the clicked location and makes room for the paste by pushing back all the audio that follows. Deleting audio is similar to cutting except the selected contents aren’t copied to the clipboard.
After you have selected some audio, you can choose several editing commands on the Functions menu. Here are some common editing functions:
- Silence: Remove all sound. Be careful when you silence audio because too much silence can make an audio recording sound unnatural. In many cases, it’s better to lower the gain by using the Change Gain function. Silencing audio is better at the beginning or ending of audio files or when you need to remove an unwanted artifact.
- Reverse: Make the sound play backwards. If you’ve ever wanted to create a reverse cymbal crash sound to swell into a section, you’ll love this command. It’s also useful for making clean versions of explicit vocal parts.
- Remove DC Offset: Center the waveform and remove potential cracks and pops that DC (direct current) offset can produce. Use this function if your audio hardware introduces DC offset into your audio. DC offset is clearly visible on your audio waveforms by a vertical shift in the waveform display.
- Trim: Remove everything except your selected audio.
The pencil tool is probably the most useful tool for removing pops and clicks from your audio. To use the pencil tool, you’ll need to zoom in closely on the area you want to edit. If you’re not zoomed in enough, clicking the waveform with the pencil will automatically change it to the zoom tool, a nice hint that you’re not zoomed in enough. After you’re zoomed in enough, drag from left to right to draw in the new waveform.
You can set Logic Pro to edit your audio in external editor:
- Choose Logic Pro X⇒Preferences⇒Audio.
The Audio Preferences window opens.
- Click the Audio File Editor tab, as shown in Figure 14-11.
- Click the External Sample Editor field.
A browser window opens where you can navigate to your external sample editor.
- Select your external sample editor in the browser, and then click Choose.
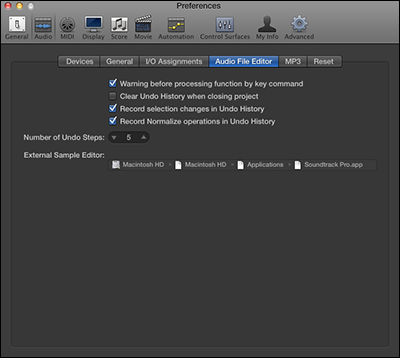
Figure 14-11: The Audio Preferences window.
After you’ve set up your external audio editor, select an audio file and choose Edit⇒Open in (Shift-W) on the tracks area menu bar. Your audio will open in the external audio editor, ready to be manipulated to your ear’s content.
We’ve come a long way since the days of tape and razor blades. You can take control of your audio quickly and easily. Your creative process can stretch into the realm of audio manipulation or consist of simply shaping things until you and your clients are happy.
With the capability to create perfect takes and massage the timing and tuning of your parts, you can deliver the best music your imagination has to offer. Your fans want more music. Go give it to them.