
Chapter 13
Arranging Your Music
In This Chapter
![]() Arranging tracks and regions in the tracks area
Arranging tracks and regions in the tracks area
![]() Making global changes to your arrangement
Making global changes to your arrangement
![]() Arranging techniques to create interest
Arranging techniques to create interest
![]() Creating groove templates to enhance timing
Creating groove templates to enhance timing
When you arrange music, you’re organizing instruments and parts until they sound and feel good and capture your listener’s attention. Logic Pro gives you a structured and flexible environment to make your arranging skills develop and blossom. You get instant feedback on your changes and tools to make improvements quickly. With Logic Pro as your arranging partner, you’ll find that it does most of the work, leaving you to enjoy the results.
In this chapter, you discover how to make your grooves feel better and tighter. You learn how to systematically build an arrangement that will keep your listeners interested. And you find efficient ways to enhance your arrangement and create parts that stick.
Working in the Tracks Area
After all your tracks are recorded, it’s time to arrange them. You’ll do most of your arranging work with regions in the tracks area, deciding which regions to play, and when and where to play them.
Recording much more material than you need to build a well-organized arrangement is a common practice. Expert arrangers will tell you that a big part of arranging is deciding what not to play. With Logic Pro’s visual tracks area, you should have no challenges organizing your regions into pleasing patterns that stimulate and entertain.
 You must select Show Advanced Tools in the Advanced Preferences pane to get the most out of Logic Pro X and the information in this chapter. Choose Logic Pro X⇒Preferences⇒Advanced Tools and then select Show Advanced Tools.
Using the ruler
The ruler is the place your eyes look when you need to know where you are in the project. The ruler shows you the position of the playhead and regions in the tracks area, and it quickly lets you know how much of the project you’re seeing in the main window. You use the ruler also to guide you as you move regions in your arrangement.
In Chapter 2, you find out how to set the ruler to display bars and beats or clock time from the General pane of Project Settings (Option-P). But you can have the best of both worlds and view bars and beats as well as clock time by displaying the secondary ruler. To show the secondary ruler, choose View⇒Secondary Ruler (Control-Option-![]() -R) on the tracks area menu bar. A second ruler will appear showing either bars and beats or clock time, depending on your current selection in the project preferences.
-R) on the tracks area menu bar. A second ruler will appear showing either bars and beats or clock time, depending on your current selection in the project preferences.
A third ruler that’s useful to have available is the marquee ruler. Choose View⇒Marquee Ruler on the tracks area menu bar. A small band of empty space, called the marquee strip, will appear below the main ruler. The marquee ruler shows the location of the currently selected regions. You can drag the marquee selection forward or backward in your project or adjust the edges of your selection.
By default, the marquee tool is set as your ![]() -click tool. This means you can quickly make selections using the marquee tool by
-click tool. This means you can quickly make selections using the marquee tool by ![]() -dragging across the regions you want to select. The marquee tool is also great for setting the playback position because playback always begins from the left side of your marquee selection. If your cursor is at the bottom of the main window, it can be faster to make a quick marquee selection to set the playback position instead of moving your cursor to the top of the tracks area and clicking in the ruler to set the playback position.
-dragging across the regions you want to select. The marquee tool is also great for setting the playback position because playback always begins from the left side of your marquee selection. If your cursor is at the bottom of the main window, it can be faster to make a quick marquee selection to set the playback position instead of moving your cursor to the top of the tracks area and clicking in the ruler to set the playback position.
 An advanced and precise way to navigate your project is to use the Go to Position dialog, shown in Figure 13-1. Press / or choose Navigate⇒Go To⇒Position. When the dialog opens, type the bar number and click OK or press Return. This method is my preferred way of navigating Logic Pro because the key commands are so much faster than using a trackpad or mouse.
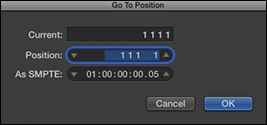
Figure 13-1: The Go to Position dialog.
Scrubbing the arrangement
![]() You can drag your cursor along the ruler to audition your project, a process known as scrubbing. Scrubbing is useful when you need to find a precise spot for an edit. In the transport, click the pause icon (shown in the margin). If the pause icon isn’t visible, customize the control bar as described in Chapter 3, and select Pause on the transport menu. Drag your cursor along the bottom part of the ruler, forward or backward, and the playhead will scrub the audio and MIDI at the speed of your cursor.
You can drag your cursor along the ruler to audition your project, a process known as scrubbing. Scrubbing is useful when you need to find a precise spot for an edit. In the transport, click the pause icon (shown in the margin). If the pause icon isn’t visible, customize the control bar as described in Chapter 3, and select Pause on the transport menu. Drag your cursor along the bottom part of the ruler, forward or backward, and the playhead will scrub the audio and MIDI at the speed of your cursor.
Sometimes, you might not want your MIDI regions to scrub with your audio. To scrub only audio in the tracks area, choose File⇒Project Settings⇒MIDI, click the General tab, and deselect the Scrubbing with Audio in Tracks Area check box. If an audio region is selected in the tracks area, only the selected audio will be scrubbed.
Although not enabled by default, you can set up key commands to Scrub Rewind and Scrub Forward in your project. You find out how to create key commands in Chapter 3.
Investigating the region inspector
The inspector has a lot of arranging power. And because a lot of arranging is done with regions, the region inspector area is a great arranging tool. Display the inspector (I) and click the disclosure triangle to display the region inspector area, which is shown in Figure 13-2. When you select a region or multiple regions in the tracks area, the region inspector is updated based on the selection. If you want to select all the regions and edit them simultaneously using the region inspector, click the track header, and all the regions on the track will be selected. Then you can edit them as a group from the inspector.
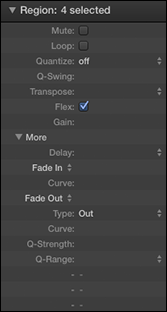
Figure 13-2: The region inspector.
The parameters available in the region inspector depend on the type of selected track. All region inspectors have an additional disclosure triangle to hide and show more parameters. The benefit of editing the regions in the inspector is that the edits are nondestructive. You can always go back to the region’s original state by undoing the inspector changes.
Here’s a description of some of the available parameters:
- Mute: Mute the selected regions.
- Loop: Loop the selected regions indefinitely or until they reach the next region on the track.
- Quantize: Correct the timing of notes. Choose the quantize value on the pop-up menu and all your notes will snap to the nearest division.
- Q-Swing: Determine the amount of shuffle feel to add to your quantize value. A setting between 50% and 75% will give you a natural swing feel.
- Transpose: Change the value in the Transpose field to transpose MIDI regions and Apple loops.
- Gain: Raise or lower the volume of audio regions and Apple loops. The main downside of using the Gain field to lower the volume of regions is that the audio waveform gets smaller in the tracks area and audio editors. It’s better to use this Gain parameter to raise the level of tracks that are recorded too low.
- Delay: Adjust the timing of your regions. A great use for the Delay field is with orchestral choir patches. Because choir patches have a slow attack time, delaying the region by a negative value pulls the region forward in the project. You can get a natural timing of the choir with the rest of the tracks by adjusting the delay to compensate for the slow attack. If you want a region to have a laid-back feel, the Delay setting is perfect for this kind of experimentation.
- Fade In/Out: Fade in and out audio regions. By using the region inspector, you can quickly fade multiple tracks, such as drums, simultaneously. You often need to fade into the beginning of audio regions to minimize room noise that’s present before the part begins. For example, you may need to remove room noise from live drums. With the region inspector, you can select an entire group of drum tracks and fade them in and out.
Investigating the track inspector
Below the region inspector is the track inspector, as shown in Figure 13-3. You use the track inspector to edit the currently selected track. To edit multiple tracks simultaneously, first select them by Shift-clicking the track headers.
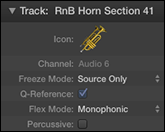
Figure 13-3: The track inspector.
You can select a region without selecting the track that the region is on, so make sure that you select the track and not just a region on the track.
Similar to the region inspector, the track inspector shows you different parameters depending on the type of track selected. Here’s a description of some of the parameters available:
- Icon: Control-click the track icon to choose an icon on the pop-up menu, as shown in Figure 13-4.
- Channel: Display the channel strip type and number. The channel parameter is for reference only and isn’t editable.
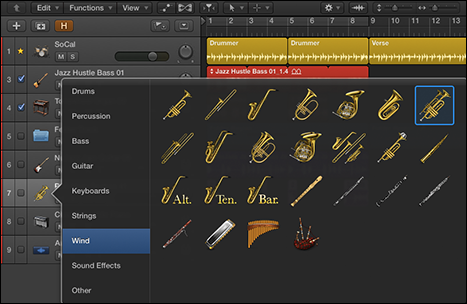
Figure 13-4: The track icon menu.
- Freeze mode: Freeze a track to reduce processing power on the track by temporarily turning the track and all its audio effects into an audio file. (In Chapter 3, you find out how to freeze tracks in the track header.) Freeze mode parameter can be set to Source Only, in which the track is frozen without effects plug-ins, or to Pre Fader, in which the track is frozen with all effects plug-ins.
- Q-reference: On audio tracks, use the track’s transients (peaks in volume) as reference points during the quantization of an edit group. For more on editing audio, see Chapter 14.
- Flex mode: Define how the audio will be processed while flex editing. You can discover more about flex editing in Chapter 14.
- MIDI channel: On MIDI tracks, choose the MIDI channel for the track’s output.
Showing Your Global Tracks
In Chapter 4, you find out about global tracks, which affect all your project’s tracks. Global tracks are useful when you’re arranging because they help you create markers for quick navigation and for important sections of your project.
To view the global tracks, choose Track⇒Global Tracks⇒Show Global Tracks (G). The global tracks appear at the top of the tracks area, as shown in Figure 13-5. If you don’t see a global track you’re looking for, choose Track⇒Global Tracks⇒Configure Global Tracks (Option-G) and select the global tracks you want to view.

Figure 13-5: The global tracks.
Creating and naming markers
Markers are excellent arrangement tools. They allow you to quickly navigate your project and select regions. You can also rename markers to help you identify sections in your project. You can view and edit markers in several ways:
- Choose Track⇒Global Tracks⇒Show Marker Track or press Shift-
 -K to display the marker track.
 - Choose View⇒Show List Editors (D) and then click the Marker tab to view the marker list editor, as shown in Figure 13-6.
- Choose Navigate⇒Open Marker List to view the marker list in a new window.
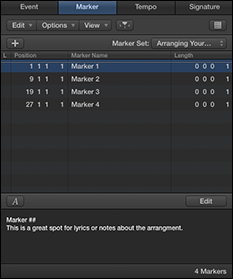
Figure 13-6: The marker list editor.
To create and edit markers, do one of the following:
- Click the plus sign icon in any of the marker editors to add a new marker at the current playhead position.
- In the global marker track, use the pencil tool and click the location where you want to create a new marker.
- In the marker list editor or Marker List window, choose Options⇒Create.
- At any time, press Option-apostrophe (‘) to create a new marker at the current playhead position.
When you create a new marker, the default behavior is to round the marker to the nearest beat. If you want to create a marker without rounding, choose Navigate⇒Other⇒Create without Rounding or choose Options⇒Create without Rounding from the marker lists.
Moving, renaming, and deleting markers is a straightforward process:
- In the global marker track, drag the edges of the marker to change its start and end points. Double-click the marker or use the text tool to rename it. You can delete selected markers by pressing Delete. Control-click the marker to access a pop-up menu with more marker commands.
- In the marker list editors, you can cut, copy, paste, and delete markers on the Edit menu. You can adjust the position and length of markers by typing in the marker list. Double-clicking a marker will open the Edit Marker Text area at the bottom of the editor window. Use this area to rename markers and add text notes to your marker. This spot is great for lyrics or notes about the arrangement.
You can also store alternate marker sets. If you need to create markers at a few places in your project to make edits later, but you don’t want to mess up your current arrangement of markers, you can create a new marker set and even give it a descriptive name. From the marker list editor, choose New Set on the Marker Set drop-down menu. To create a new marker set from the global tracks, click the Marker title in the track header and choose Marker Sets⇒New Set on the pop-up menu. You can also rename sets from these menus.
If you have an extended keyboard with an extra number pad, press the number keys to instantly move the playhead to the corresponding marker number. You can also navigate markers by using the Next Marker and Previous Marker key commands: ![]() -period (.) and
-period (.) and ![]() -comma (,). Whenever you find yourself wishing you could go to the same places in your project over and over again, create a new marker set and create a few markers. Then you can zip to the stored locations quickly.
-comma (,). Whenever you find yourself wishing you could go to the same places in your project over and over again, create a new marker set and create a few markers. Then you can zip to the stored locations quickly.
Here are a some more uses and tips for markers:
- Use the Go to Marker Number key command (Option-/) to open a dialog where you can type the marker number and press Enter to instantly take the playhead to the marker.
- Markers make it fast and easy to set locators. Use the Set Locators by Marker and Enable Cycle key command (Control-Option-C). You can explore other key commands by opening the Key Commands window (Option-K) and typing marker in the search field.
- You can color your markers by choosing View⇒View Colors (Option-C). Click a color in the palette and the selected marker will be colored.
- The marker track can be resized to view all the text in your markers. Put your cursor over the bottom edge of the marker track in the track header and pull down when your cursor becomes the resize tool.
Creating key signature and time signature changes
The signature global track does double duty, handling the key signature and the time signature. Choose Track⇒Global Tracks⇒Show Signature Track. The top half of the track shows the time signature, and the bottom half shows the key signature. You can also view and edit the signature track from the signature list editor. Choose View⇒Show List Editors (D) and then click the Signature tab to view the signature list editor, shown in Figure 13-7.
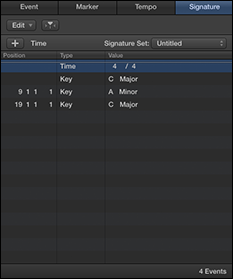
Figure 13-7: The signature list editor.
You use the pencil tool to create signature changes in global tracks. Click the top half of the signature track to create a time signature change. The Time Signature window opens, as shown in Figure 13-8, and you can choose the number of beats per bar and the note value that equals one beat. You can also define how you want the beat divided. For example, a 7/4 time signature that’s divided as 2+2+3 can be entered as 223 in the Beat Grouping field. The beat grouping feature affects the display of notation in the score editor.
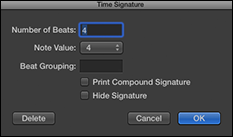
Figure 13-8: The Time Signature window.
You create key signature changes by clicking the bottom half of the signature track. The Key Signature window opens, as shown in Figure 13-9. Choose the Key, Major or Minor, and whether to disable double flats (bb) or double sharps (x) in the score editor.
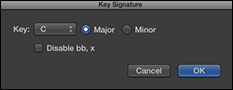
Figure 13-9: The Key Signature window.
To edit signature changes, double-click the signature change in the signature track. You can edit your signature changes also in the signature list editor. Just like with the marker track, you can create signature sets. Click the Signature name in the track header and choose Signature Sets⇒New Set on the drop-down menu. Or use the signature list editor to create, delete, and rename signature sets on the Signature Set drop-down menu.
Key signature changes don’t change the pitch of the audio or MIDI regions you’ve recorded. They change only the display of the regions in the score editor.
Creating tempo changes
Most projects have a single tempo. But when projects need tempo changes, it’s nice to know that Logic Pro makes the job simple and effective. Choose Track⇒Global Tracks⇒Show Tempo Track (Shift-![]() -T). The tempo track behaves similarly to the other global tracks. But unlike the other tracks, the tempo track can handle more edit points and create smooth curves for natural feeling tempo changes.
-T). The tempo track behaves similarly to the other global tracks. But unlike the other tracks, the tempo track can handle more edit points and create smooth curves for natural feeling tempo changes.
Use the pencil tool to create a tempo change in the tempo track. A solid tempo control point will appear on the tempo line along with a hollow tempo curve automation point that you can drag left and right or up and down to create tempo curves between two points, as shown in Figure 13-10.

Figure 13-10: The tempo track.
Change the tempo resolution, change the quantization, and create tempo sets by clicking the Tempo name in the tempo track header and making a choice on the pop-up menu. Another way to adjust your tempo is with the tempo list editor, as shown in Figure 13-11. Press D to open the list editor and then click the Tempo tab.
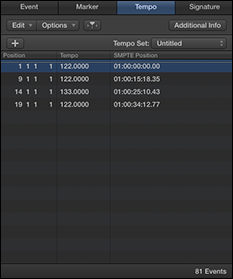
Figure 13-11: The tempo list editor.
In the tempo list editor, click the Additional Info button to see all tempo points used to create your tempo curves. Because a curve can contain hundreds of tempo changes, it’s useful to hide that information when you’re viewing your tempo changes. Choose Options⇒Tempo Operations to open the Tempo Operations window, as shown in Figure 13-12.

Figure 13-12: The Tempo Operations window.
The Tempo Operations window is capable of creating complex tempo curves or scaling existing tempo changes. Explore the Operation menu to see the other tempo operations available. Because the Tempo Operations window has an Undo button, it’s a great place to try out your tempo changes until you get it just right.
If you’ve imported audio into your project and you’re unsure of the tempo, you can use beat detection to create tempo changes. Select a region in the tracks area and choose Edit⇒Tempo⇒Adjust Tempo using Beat Detection (Option-![]() -T). The Beat Detection window opens, as shown in Figure 13-13. The Beat Detection window displays the tempo of the region and enables you to create tempo changes.
-T). The Beat Detection window opens, as shown in Figure 13-13. The Beat Detection window displays the tempo of the region and enables you to create tempo changes.
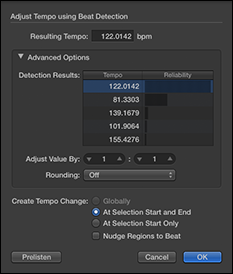
Figure 13-13: The Beat Detection window.
Creating arrangement markers
Arrangement markers are new to Logic Pro X. They are similar to regular markers but can be used to rearrange your project globally. To view the arrangement track, choose Track⇒Global Tracks⇒Show Arrangement Track (Shift-![]() -A). You create arrangement markers with the pencil tool. By default, arrangement markers are eight bars long, but you can drag the edges of the markers to resize them. Click the name of the marker to choose a different preset name on the pop-up menu, or choose Rename to create your own marker name.
-A). You create arrangement markers with the pencil tool. By default, arrangement markers are eight bars long, but you can drag the edges of the markers to resize them. Click the name of the marker to choose a different preset name on the pop-up menu, or choose Rename to create your own marker name.
You can select arrangement markers and drag them to new positions on the arrangement track. All regions within the arrangement markers will be moved to the new position. You can select multiple arrangement markers by Shift-clicking them, and you can copy arrangement markers, including the regions within them, by Option-dragging the marker to a new location. All arrangement markers and their content will be shifted to the right to make room for the new arrangement. You can replace markers by ![]() -dragging an arrangement marker on top of another one.
-dragging an arrangement marker on top of another one.
 Deleting markers removes all the regions within the marker. There’s no way to delete an arrangement marker without deleting the regions within it.
Creating transposition points
The transposition track transposes the key of your Apple loops and MIDI regions globally. Audio regions, drum loops, and Apple loops with undefined keys are unaffected by the transposition track. If you don’t want a software instrument or MIDI track to be transposed, select No Transpose in the track inspector.
To open the transposition track, choose Track⇒Global Tracks⇒Show Transposition Track (Shift-![]() -X). You create transposition control points with the pencil tool. Drag the control points up or down with the pointer tool to adjust the level of transposition. Delete selected control points by pressing Delete.
-X). You create transposition control points with the pencil tool. Drag the control points up or down with the pointer tool to adjust the level of transposition. Delete selected control points by pressing Delete.
Decide quickly if you’re going to transpose individual regions or transpose the track globally. If you change the transposition of a single region and then decide to transpose the entire project from the transposition track, you may end up transposing that region more than you intend.
If you want the ultimate control, it’s best to transpose individual regions from the region inspector, but that process can be time consuming. If you’re just trying something out and want to temporarily transpose your project, the transposition track is the right tool for the job. It works great for trying out harmonic modulations in songs or when you’re finding the right key for a singer at the beginning of your project.
Beat Mapping Your Arrangement
If you didn’t record to a metronome or you’re importing audio that was recorded in a different session or in other software, you’ll need to align your ruler to the imported tracks. For that task, you should use the beat mapping track. Beat mapping makes the project tempo follow the audio or MIDI regions in your project. After you beat map your project, you can do things such as overdub with the metronome, quantize regions, loop regions, and view MIDI in the score editor.
To show the beat mapping track, shown in Figure 13-14, choose Tracks⇒Global Tracks⇒Show Beat Mapping Track (Shift-![]() -B).
-B).

Figure 13-14: The beat mapping track.
Beat mapping MIDI regions
Not every project requires a metronome. Sometimes, you want to play freely, known as tempo rubato. But when the recording is completed, you can use beat mapping to adjust the ruler to fit the performance. Beat mapping makes editing easier and makes it possible to view your MIDI recordings in the score editor. Here’s how you beat map MIDI regions:
- Select the MIDI regions.
The beat mapping track displays the contents of the selected regions.
- Click the position in the beat mapping ruler that you want to map to a note.
A vertical line appears in the beat mapping track.
- Drag the vertical line to the note.
The tempo adjusts, and the ruler position and note are aligned.
- Repeat Steps 2 and 3 with other ruler positions and notes.
You might want to beat map the ruler to a place in a region that doesn’t have a note. To do this, Control-drag the vertical line to the place on the region you want to map.
Beat mapping audio regions
The process for beat mapping audio regions is similar to the one for MIDI regions except you have to analyze the audio beforehand. To analyze the audio for beat detection, follow these steps:
- Select the audio regions to be analyzed.
- Click the Beat Mapping title in the global tracks header, and then choose Analyze Transients on the pop-up menu.
The audio is analyzed for peaks in volume, known as transients. Transients appear as blue lines in the beat mapping track.
- Click the position in the beat mapping ruler that you want to map to a transient.
- Drag the vertical line to the transient.
The tempo adjusts to the audio region.
Automatically beat-mapping regions
As mentioned at the beginning of this chapter, Logic Pro does a lot of arranging work for you. It’s good to know how to beat map audio and MIDI regions, but you can also let Logic Pro automatically beat map your regions. Simply do the following:
- Select the regions to beat map.
- Click the Beat Mapping title in the global tracks header, and then choose Beats from Region on the pop-up menu.
The Set Beats by Guide Region(s) window opens, as shown in Figure 13-15.
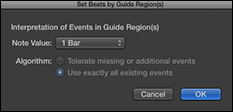
Figure 13-15: Set Beats by Guide Regions window.
- Choose the Note Value.
The note value sets the beat map resolution.
- If an audio region is selected, select the algorithm.
Select the Tolerating Missing or Additional Events check box to map only the most important transients. Select the Use Exactly All Events check box to map every transient.
- Click OK.
Transients appear as blue lines in the beat mapping track, and the tempo is adjusted to the region.
Arranging Regions in the Tracks Area
Arranging in Logic Pro consists mostly of organizing your regions so they make sense to your ear. You can also apply arranging techniques to a single region in terms of harmony, such as string or horn arranging. But the tracks area is the broad stroke palette for you to use to paint your sonic masterpiece. Here are some tips to help you begin arranging:
- Create contrast: Creating contrast in your arrangement adds energy, forward motion, and interest. If you want your arrangement to sound big, make it small first. Create contrast through the use of different combinations of instruments in your song sections. Moving from dense to sparse, intense to relaxed, and unstable to stable will keep your listener’s attention. Look for ways to provide refreshing contrast in your song form, rhythm, harmony, and melody.
- Arrange your song form: Your song form can be arranged and rearranged. At the least, your song will probably have two different sections. Use your song form as an arrangement tool. For example, change the order of your sections using the arrangement markers to see if they sound better.
- Add and release tension: You can simplify the job of all harmony to tension and release. Every time you play the root chord, you release the tension. (In the key of C, for example, the root chord is C.) Every time you move away from the root chord, you build tension. Pay close attention to where you place the root chord in your song and find ways to build tension and release it. In terms of contrast, you can adjust the length of your chord progression, add or subtract chords from sections, and start each section on different chords.
- Provide consistency and contrast: The big driver of pop music is rhythm. (I use the term pop music loosely, as in the opposite of unpopular music.) Listeners want consistency and variation, in other words, contrast. Give the listener consistency by keeping the rhythms similar in the A sections, and give the listener contrast by doing something different in your B sections. In songwriting, for example, keep the rhythms of your verses consistent but contrast the chorus rhythm from your verse. Note that the term rhythm includes the rhythm of your harmony and melody in addition to the rhythm of the drums and other rhythmic instruments.
- Rearrange sounds: Your instrument choices can complement and contrast each other. You learn how to create an orchestral template in Chapter 12, and the different orchestral sections are a great example of compliment and contrast. Brass is metallic and bright, woodwinds are nasal and soft, strings are warm and lush, and percussion is sharp and punchy. All those sounds can be rearranged in many wonderful combinations to create interest for your listener.
Selecting regions
The bulk of arranging work is done on regions, so you’ll do a lot of selecting in the tracks area with the pointer tool. You open the tool menu by pressing T. Note that each tool has a key command associated with it, as shown in Figure 13-16. After you open the tool menu by pressing T, you can press the key command for the tool you want. Pressing T twice selects the pointer tool. These shortcuts make selecting regions quick and easy.
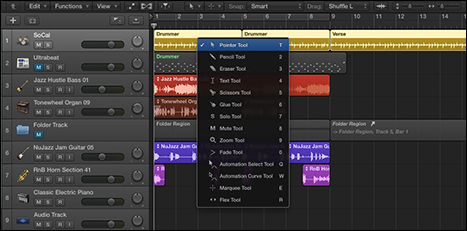
Figure 13-16: The tool menu.
You can select more than one region by Shift-clicking regions one by one or by dragging your cursor around the regions you want to select. You can select all the regions on a track by clicking the track header.
You can select regions in more ways by using the Edit menu. To select all the regions in your project, choose Edit⇒Select All. If you Control-click an empty spot in the tracks area, you have more selection choices, such as Select Overlapped Regions/Events, which is useful if you need to select regions that are underneath other regions. If you Control-click a region, another menu of selection commands appears in a pop-up window, such as Select⇒Invert Selection. You can also navigate and select regions by using the arrow keys.
Selecting parts of regions with the marquee tool
Sometimes, you’ll want to select only parts of regions. For example, a live drum performance could contain a dozen tracks, each with a single region the length of the entire song. When you want to select only a portion of those regions, you use the marquee tool.
To select a portion of a region or group of regions, select the marquee tool on the tool menu (T) and drag your cursor around the area you want to select. The selection is outlined and brighter in color, as shown in Figure 13-17. In addition to selecting regions, your marquee selection is used for playback. As long as the selection is in place, playback begins at the left of the selected regions.
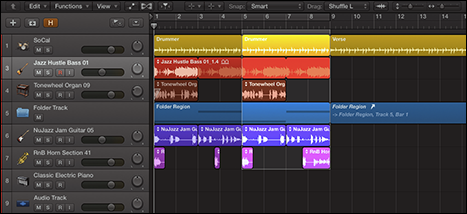
Figure 13-17: A marquee tool selection.
You can remove a region from the selection by Shift-clicking the region. You can adjust the edges of a selection by Shift-clicking an edge and dragging. If the marquee ruler is displayed, you can move the selection left or right by dragging in the ruler. To display the marquee ruler, choose View⇒Marquee Ruler on the tracks area menu bar.
Marquee selections have many uses. You can apply edits to your selection, and you can also navigate by using your selection. For example, pressing Z will zoom to fit your selection. You can set your locators by the marquee selection (for use in cycle mode) by pressing ![]() -U.
-U.
Logic Pro doesn’t take selecting objects for granted. If you take the time to practice some alternate methods of selecting regions, besides simply clicking regions individually with the pencil tool, you’ll be rewarded with a fast and productive workflow, which means less time clicking and more time creating.
Here’s a good reason to colorize your tracks. If you color groups of tracks the same color, you can choose File⇒Select⇒Equal Colored Regions (Shift-C) and select them all in an instant.
Moving regions
After you select regions, you can drag them anywhere in the tracks area. Keep in mind that you can drag a region to a different track type, but the region will play only if it’s moved to the same track type.
You copy regions by Option-dragging them to a new location. Change the length of a region by dragging its bottom corner to the new length. You loop a region by dragging its top corner to the right as far as you want it to loop.
A great key command to memorize is the nudge command. Press Option-right arrow to nudge the selected region to the right by the nudge value. Press Option-left arrow to nudge the region to the left. Set the nudge value by Control-clicking a region and choosing Move⇒Set Nudge Value To on the pop-up menu. You can set the nudge value to a variety of lengths, such as bars and beats, milliseconds and samples, or video frames. Press the semicolon key (;) to move the selected region to the playhead position.
Copying and pasting works the same as in many other Mac applications. You make a selection and copy it by pressing ![]() -C or choosing Edit⇒Copy. You paste your selection on the selected track at the playhead position by pressing
-C or choosing Edit⇒Copy. You paste your selection on the selected track at the playhead position by pressing ![]() -V or choosing Edit⇒Paste.
-V or choosing Edit⇒Paste.
Don’t forget to deselect your regions when you’re finished making changes. Deselecting your regions is a safety measure against accidentally editing or deleting regions and not realizing it. The key command to deselect all is Shift-Option-D. You can also deselect regions by clicking an empty spot in the tracks area or choosing Edit⇒Select⇒Deselect All.
Soloing and muting regions
Soloing regions is less of an arrangement tool and more of a mixing or editing tool. You solo regions or tracks to listen to the details of the recording. Sometimes, editing or mixing in solo mode is useful for silencing all distractions and hearing minute details. To play regions in solo mode, select the solo tool on the tool menu (T) and click-hold the region to play it without any other tracks.
The mute tool is much more useful in an arranging workflow. You want the capability to silence regions without committing to deleting them. Expert arrangers know that it’s as important to leave things out as it is to put things in. It’s common to record more than you need and then mute what you don’t need. Muting is a huge part of arranging.
Select the mute tool on the tool menu (T) and click the regions you want to mute. Muted regions appear dark gray in the tracks area. To unmute a region, click the region again using the mute tool.
You can also mute regions in the region inspector. Press I to open the inspector and then click the disclosure triangle to open the region inspector, as shown in Figure 13-18. Select the Mute check box to silence the region. Notice how the mute tool updates the mute check box in the region inspector and vice versa.
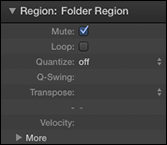
Figure 13-18: The region inspector.
Two useful key commands to remember are Control-M to mute regions and Shift-M to select muted regions. For example, if you have a few regions muted but not selected, press Shift-M to select the muted regions and then press Control-M to unmute the regions.
Time-stretching regions
If you import a MIDI or audio file that doesn’t fit your project tempo perfectly, you can stretch or shrink the region so it fits the tempo. To time stretch a region, Option-drag the lower-right or lower-left edge of the region. The region will be compressed or expanded. If you’re time stretching an audio region, you can choose Edit⇒Time Stretch⇒Time Stretching Algorithm and select one of the following options:
- Universal: The default algorithm and a good option for most time stretching
- Complex: A good option for full mixes and complex sounds
- Percussive: A good option for drums and percussive sounds
Demixing MIDI regions
Standard MIDI files contain more information than just note values. These files contain tempo changes, marker names and positions, and individual track names, as well as the MIDI events such as notes, time positions, and MIDI channels. The two MIDI file formats are 0 and 1. Format 0 contains all the data in a single track, and format 1 contains multiple tracks. Depending on the type of MIDI file you import, you could be importing multiple MIDI channels on a single track. In situations like this, you can demix the MIDI events in a region by MIDI channel:
- Select the MIDI region.
- Choose Edit⇒Separate MIDI Events⇒By Event Channel.
A new track is added to the tracks area, and a MIDI region is created for each channel containing data.
A similar situation is called for when you have a MIDI region containing a drum pattern and you want each drum on its own track for individual control. Choose Edit⇒Separate MIDI Events⇒By Note Pitch. Each note that contains data will be added to a new track and region. You can also separate MIDI events by Control-clicking the region and choosing MIDI⇒Separate by Note Pitch or Separate by MIDI Channel on the pop-up menu.
Fading and crossfading audio regions
When you organize audio regions in the tracks area, sometimes you need to smoothly crossfade between two regions. A crossfade makes the transition between two audio files sound more natural. And sometimes you need to fade in and out of audio regions to get rid of noise. Guitar players who love distortion know what I mean.
Select the fade tool on the tool menu (T), and drag over the beginning of an audio region to fade in or drag over the end to fade out. A fade is created on the region, as shown in Figure 13-19. To crossfade between two regions, drag over the end of one region and the beginning of another. With the fade tool selected, you can adjust the fade length by dragging it in the region.

Figure 13-19: Audio region crossfade.
Stripping silence from audio regions
Sometimes you’ll record a take the entire length of a song but record audio only some of the time, for example, when recording background vocal tracks. You might be recording only a few notes every fourth bar, but you leave record on for the entire length of the song. You can quickly strip the silence from the long region to create many smaller regions. Control-click the region and choose Split⇒Strip Silence (Control-X) on the pop-up menu. The Strip Silence window opens, as shown in Figure 13-20, and you can adjust the settings that determine the number of regions. Click OK and your big region becomes many regions.
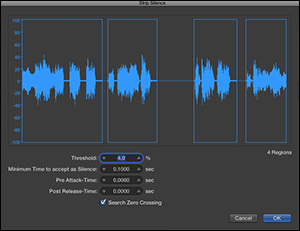
Figure 13-20: The Strip Silence window.
Creating Folder Tracks
Logic Pro can help you organize your arrangement and experiment with different arrangements by using folders. A folder is a container. It looks just like a region but it can contain other regions. You can also have folders within folders. You might use folders to
- Organize tracks and song sections
- Nest parts of an arrangement
- Nest alternate versions of a part
If you want to organize your tracks, another option is a folder track stack. You find out how to create track stacks in Chapter 4. Track stacks make it easy to open and close folders of tracks, which simplifies your workspace.
Packing and unpacking folders
You can select as many regions as you want and put them into a folder. If the selected regions are on the same track, the folder is added to the same track as the regions. But if the selected regions are on different tracks, a new folder track is created. To create a folder, do the following:
- Select the regions you want to include in the folder.
- On the tracks area menu bar, choose Functions⇒Folder⇒Pack Folder.
A folder track is created containing the regions, as shown in Figure 13-21, and the regions are removed from the tracks area.

Figure 13-21: A folder track.
![]() A folder looks like a region in the tracks area. A folder doesn’t have a channel strip, so a folder track does not have audio controls. Double-click the folder to open the folder contents and display the tracks area of the folder. To leave the folder, click the leave folder icon (shown in the margin) on the tracks area menu bar or double-click an empty spot in the tracks area.
A folder looks like a region in the tracks area. A folder doesn’t have a channel strip, so a folder track does not have audio controls. Double-click the folder to open the folder contents and display the tracks area of the folder. To leave the folder, click the leave folder icon (shown in the margin) on the tracks area menu bar or double-click an empty spot in the tracks area.
You can drag a folder region to an audio or MIDI track type and the corresponding contents of the region will play through the track’s channel strip. So if you drag a folder that contains MIDI to a MIDI track type, the MIDI regions play through the track’s channel strip. Likewise, a folder containing audio regions can be played on an audio track.
To unpack the contents of a folder, do the following:
- Select the folder region.
- Choose Functions⇒Folder⇒Unpack Folder to Existing Tracks or Unpack Folder to New Tracks.
The regions contained in the folder are added to the tracks area.
Adding and removing regions
To add regions to an existing folder, drag them onto the folder at the location you want them to play. The region is moved into the folder along with its track. To remove regions from the folder track, open a second main window and drag the regions from the folder to the main tracks area:
- Press -1 or choose Window⇒Open Main Window.
A second main window opens in a new window.
- Double-click the folder region to view its contents.
The tracks area displays all the regions contained in the folder.
- Drag the regions from the folder to the tracks area in the first main window where you want them to play.
Your region is moved to the main tracks area and is no longer contained in the folder.
Creating alias folders and regions
Region aliases and clones are references not to science-fiction movies but to regions in the tracks area. You can create a region that references an original region, allowing you to edit the original and have the alias change too. These regions are referred to as aliases if they’re MIDI regions or clones if they’re audio regions. You can also create folder aliases. Aliases are great for parts that repeat because you have to edit only the original region, and all the aliases will be updated with the new edit.
To create an alias of a region, press Shift-Option while dragging the region to a new location. If you make an alias of a MIDI region or folder region, the alias region looks different than the original, as shown in Figure 13-22. The name is in italics and the region has an alias icon. Cloned audio regions look the same as the original, which makes them less desirable than MIDI or folder regions.

Figure 13-22: A region alias.
Audio clones have limited cloning capability because only the start and end points of the original region are cloned. You can get around this limitation by packing the audio regions into a folder and then making an alias of the folder. Then all the edits you make to the regions in the original folder will be cloned in the folder alias.
Using Groove Templates
Another important part of arranging is creating parts that feel good together. Logic Pro gives you two amazing ways to make audio, and MIDI tracks follow the same groove:
- Groove track: You can set one track in your project as the groove track and select other tracks to follow the timing of the groove track. Control-click anywhere on the track list and choose Track Header Components⇒Show Groove Track. Click the track number of the track that defines the groove. A second column of check boxes appears in the track header, as shown in Figure 13-23. Select the check box to follow the groove track.
- Groove template: You can create custom quantized grids based on an audio or MIDI region. You apply the grid to other regions so they get the same feel.
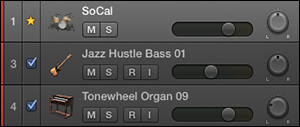
Figure 13-23: The groove track.
You can make groove templates as long as you like, but it’s usually best to create short ones, between two and four bars. Because you can create multiple groove templates in a project, you can model the groove from several different instruments and musical parts and use it throughout your project to enhance the timing and feel.
Creating a groove template
If you have a drummer track in your project, selecting a drummer region for your groove template is a great choice. But if you have a region that you think defines the groove better, select it. Better yet, create groove templates from both regions. Nothing is holding you back from creating groove templates from every region in your project. To create a groove template:
- Select the region you want to model for the groove template.
- On the Flex Mode pop-up menu in the track inspector (I), select a flex time mode, as shown in Figure 13-24.
Because the transients in the audio region are used to quantize the region, either Slicing or Rhythmic flex time mode is a good choice.
- On the Quantize pop-up menu in the region inspector, select Make Groove Template.
The groove template is added to the quantize menu, named after the region.
- Select the regions you want to quantize with the groove template.
- On the Quantize pop-up menu in the region inspector, select the new groove template.
The timing of the region matches the groove template.
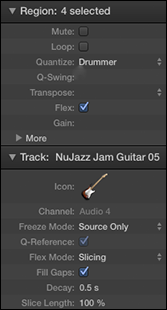
Figure 13-24: The track and region inspector.
If you delete the region on which a groove template is based, the groove template is deleted too. After a groove template quantizes a region, you can create a second groove template from the quantized region. This safeguards your groove template from being lost if the original region is deleted. You can also manually remove groove templates by using the region inspector Quantize menu.
Importing groove templates from other projects
Because groove templates are based on regions in your project, any media you import can be used as a groove template. You can collect regions with good grooves and save them in a project template, as you learn in Chapter 2. Start your next project with this template and all your grooves will be ready to load.
Groove track and groove templates can be used together. You can create groove templates from the tracks that follow your groove tracks. You can now delete the original groove track because the tracks that were following the groove track are now following a groove template.
Importing third-party groove templates
You can import third-party groove templates by choosing File⇒Import⇒Other and navigating to the file. Logic Pro supports standard MIDI files and DNA Groove Template files. Because groove templates are basically MIDI events that are used to set quantize values, any imported MIDI file can become a groove template. Also, because you can quantize audio using flex time, as you learn in Chapter 14, even your imported audio can become a groove template. Groove templates are unbeatable at getting the right feel in your arrangement.
Now that you can build an arrangement in the tracks area, you can listen to how your favorite artists arrange their music and duplicate what they do in Logic Pro. You can import audio you love and make templates to tighten up your groove. Your command of folders and global tracks will make you more productive.
If you put Logic Pro to work for you, your arrangements will feel great and sound solid. Even the greatest musicians can benefit from Logic Pro’s timing enhancements and workflow shortcuts. Don’t feel odd or embarrassed if you find yourself saying, “Logic Pro, I couldn’t have done it without you.” I’m almost certain Logic Pro thinks the same about you.